Notice: Home Assistant has released a new integration called Z-Wave JS. You should be using that integration vs the older Z-Wave integration that this article covers. I will be updating this guide soon.
A few years back I had a SmartThings Hub and for the most part it worked great. It was simple to setup, can be accessed anywhere, and for the most part automatically updated itself. Unfortunately, with the acquisition of it by Samsung, it seems to have turned into bloatware with poor responsiveness, the mobile application’s UI is horrific, and they have a less than desirable security/privacy policy.
Luckily, the open source community has thrown together Home Assistant, an open source home automation project backed by hundreds/thousands of individuals. Over the years, they have now brought native support for mobile devices, at time of writing this there are 1500+ integrations for dang near any device, and the software puts you in control of who has access to and where your data is accessible.
The one trade-off though is while Home Assistant works well and is very extensible, the documentation and usability of the application can be overwhelming to understand for someone new to home automation, unfamiliar with Linux/Open Source technologies, or new to debugging/command line interfaces.
In this case, I’ve tried to document a crash course in getting Home Assistant up and running as quickly as possible for those that want to get started with Z-Wave devices and Home Assistant.
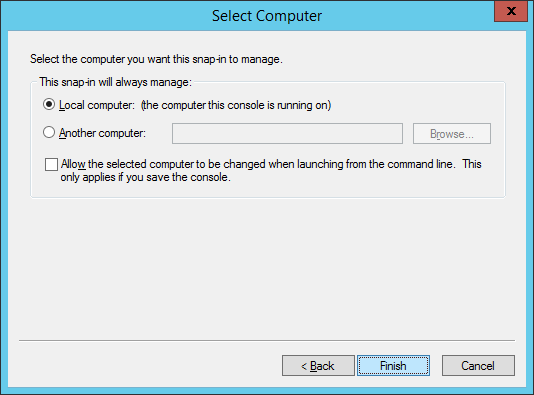
Home Assistant will run on any version of Raspberry Pi, but it is recommended to use version 3 or 4 for best performance. In this guide, I use a Raspberry Pi 4 for reference. Below is a link to the Raspberry Pi kit, which contains everything you need to get started.
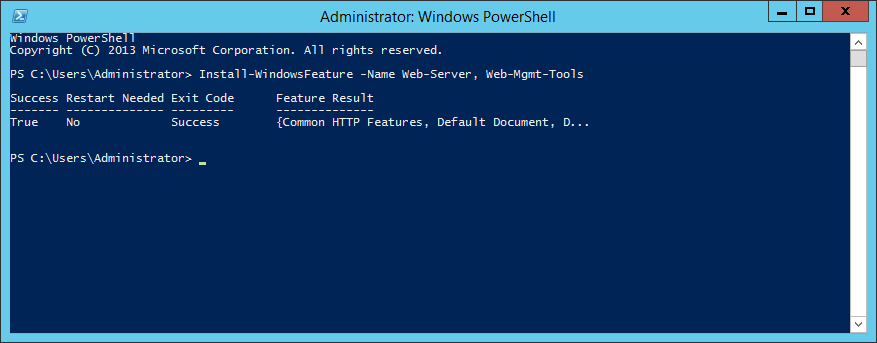
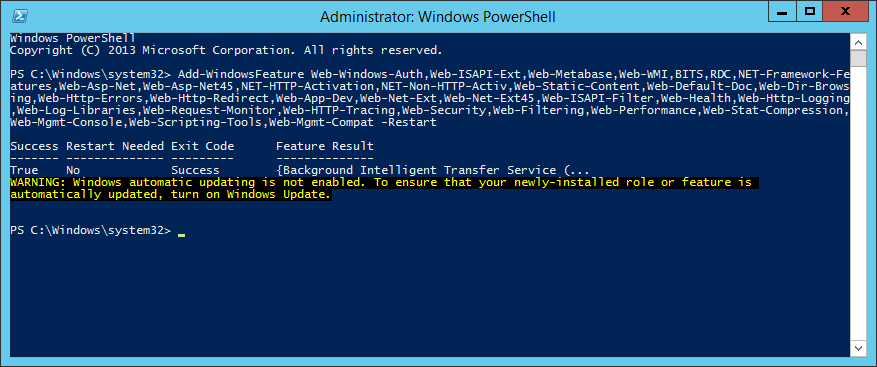
First things first, update your Raspberry Pi with the latest updates. Open up Terminal or SSH to your Raspberry Pi and execute the following command:
sudo apt-get update && sudo apt-get upgrade
Prepare your Z-Wave USB Stick
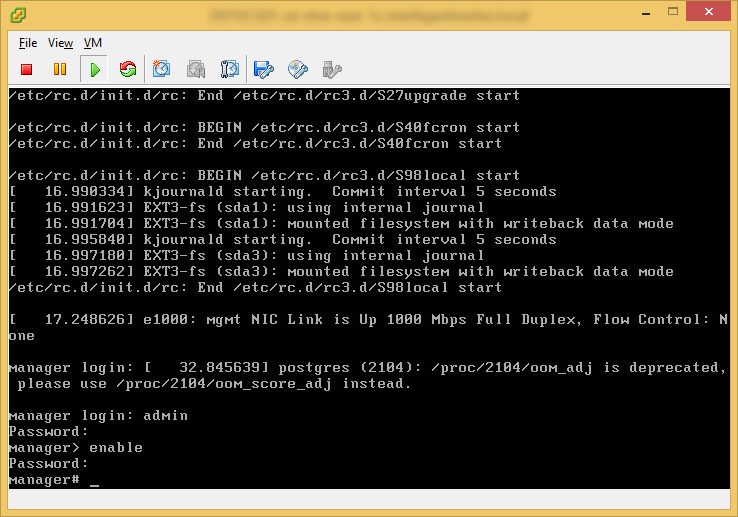
Plug in your Z-Wave USB stick. Once plugged in, we need to find the device path so that we can reference it for Home Assistant. Execute the lsusb command to find your device ID. In this case, you can see my device ID begins with 0658.
root@raspberrypi:/dev# lsusb
Bus 002 Device 001: ID 1d6b:0003 Linux Foundation 3.0 root hub
Bus 001 Device 003: ID 0658:0200 Sigma Designs, Inc. Aeotec Z-Stick Gen5 (ZW090) - UZB
Bus 001 Device 002: ID 2109:3431 VIA Labs, Inc. Hub
Bus 001 Device 001: ID 1d6b:0002 Linux Foundation 2.0 root hub
Next, let’s find what the device path is for the USB stick. You can do this by executing the following command: dmesg | egrep ‘0658|acm’ Please note, if you purchased a difference device, 0658 may be a different number. In this case, you can see my device is presented on ttyACM0.
root@raspberrypi:/dev# dmesg | egrep '0658|acm'
[    1.405327] usb 1-1.2: New USB device found, idVendor=0658, idProduct=0200, bcdDevice= 0.00
[    3.468875] cdc_acm 1-1.2:1.0: ttyACM0: USB ACM device
[    3.471348] usbcore: registered new interface driver cdc_acm
[    3.471359] cdc_acm: USB Abstract Control Model driver for USB modems and ISDN adapters
Install Docker
Home Assistant doesn’t require Docker, but by leveraging Docker you can easily copy/backup your configuration and simply redeploy the container if something goes wrong. As updates are made, you can simply remove your container and redeploy. To install Docker, execute the following command:
curl -sSL https://get.docker.com | sh
Deploy Home Assistant Docker Container
Once Docker is installed, you can deploy the container from Docker Hub. Docker Hub is a public repository that has tons of different prebuilt containers to deploy. Here you can find the official homeassistant containers: https://hub.docker.com/u/homeassistant
To deploy the container, execute the following line, replacing the following variables with your desired configuration:
This allows the container to leverage the Z-Wave USB device. Make sure you specify the path to your device found in the previous step
-v /home/docker/home-assistant:/config
This is the path that the home assistant configuration files should be stored to. You can specify a fileshare or other path to place your configuration files.
The first half of this is the container you wish to deploy and the second half is the version. You can find all of Home Assistant’s official containers here: https://hub.docker.com/u/homeassistant
Note: In newer versions of the docker container –init should not be specified in the docker run command. Specifying –init will result with the following error: “s6-overlay-suexec: fatal: can only run as pid 1”. This was mentioned as a breaking change in: 2022-06-01 update: 2022.6: Gaining new insights! – Home Assistant (home-assistant.io)
Setup Home Assistant
Give the container a few minutes to deploy and configure itself for the first time. After a few minutes, try opening your web browser and navigating to the IP address assigned to your machine, using port number 8123: http://192.168.1.2:8123/
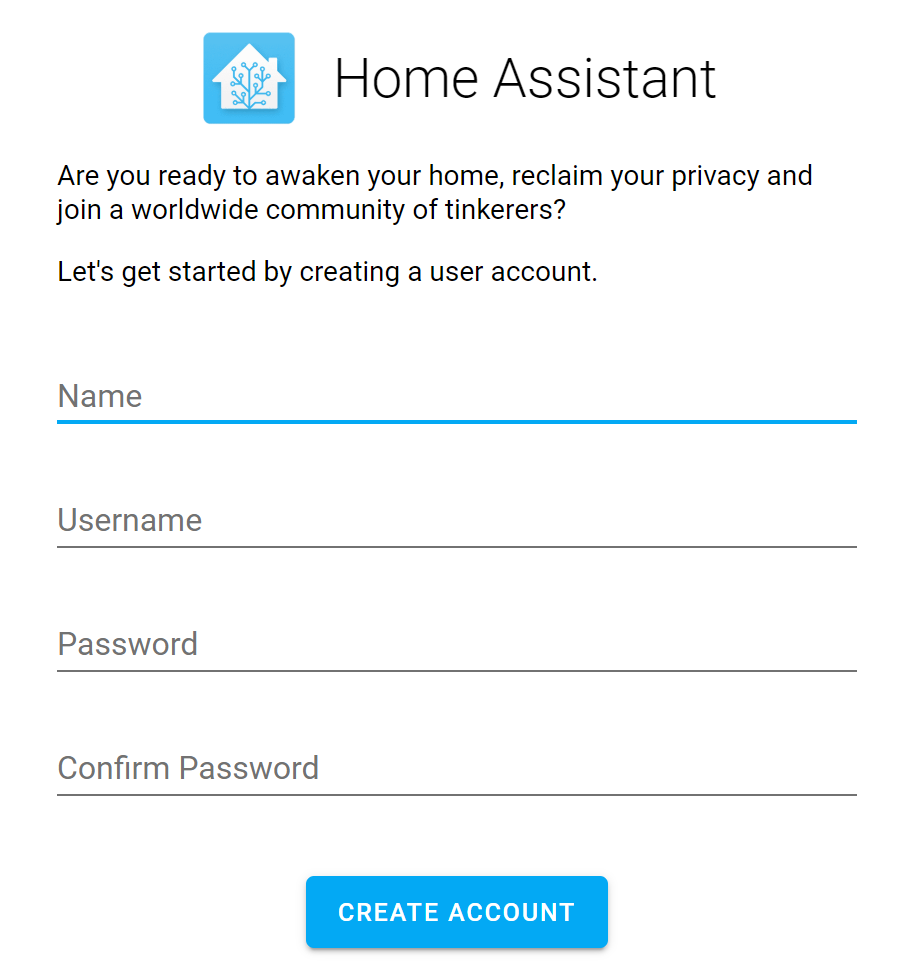
When the page loads, it should first ask for your Name, Username, and Password. This is the username and password you will use to login to Home Assistant.
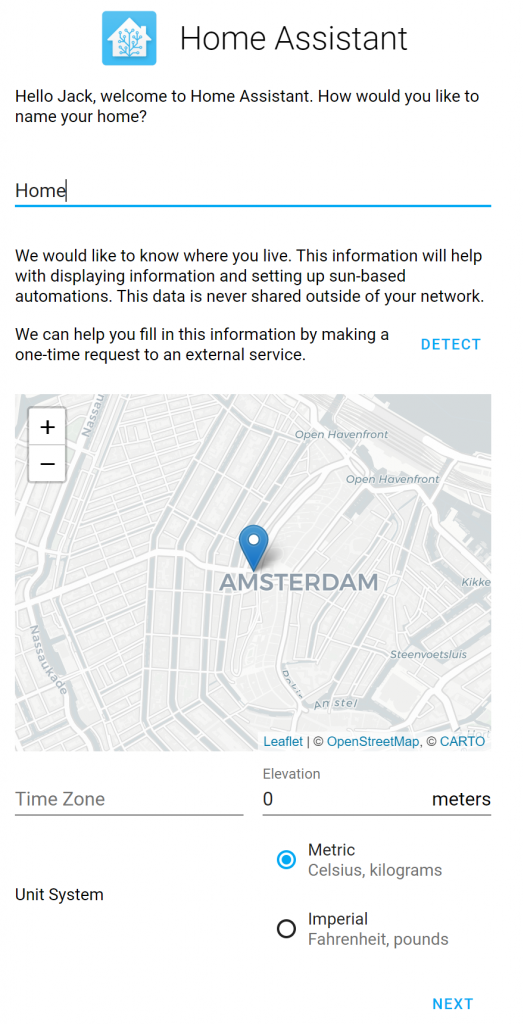
Next, specify the location of where your Home Assistant deployment is located. Oddly enough, you cannot type in a location, but you can place the pin near your location by dragging the map around and clicking once to set the pin.
Once you click Next, Home Assistant may have already found a few devices connected to your network. You can add them now or skip and add them later.
Tell Home Assistant to use your Z-Wave USB Stick
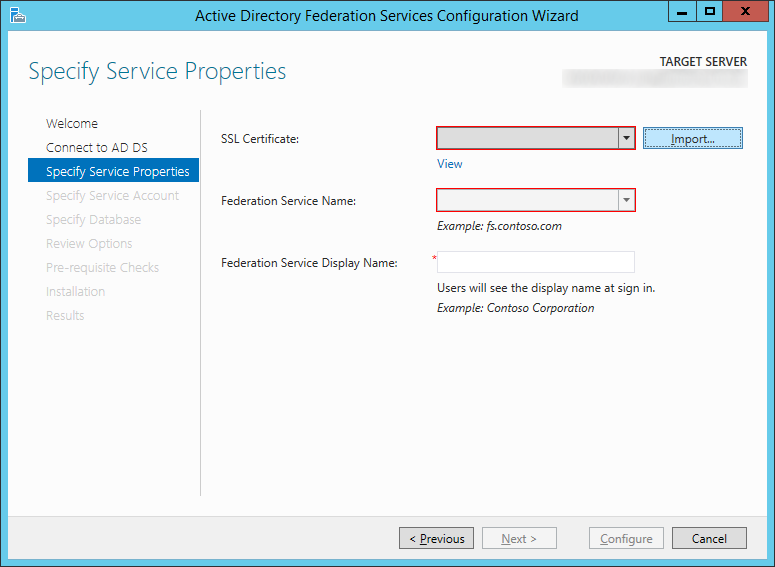
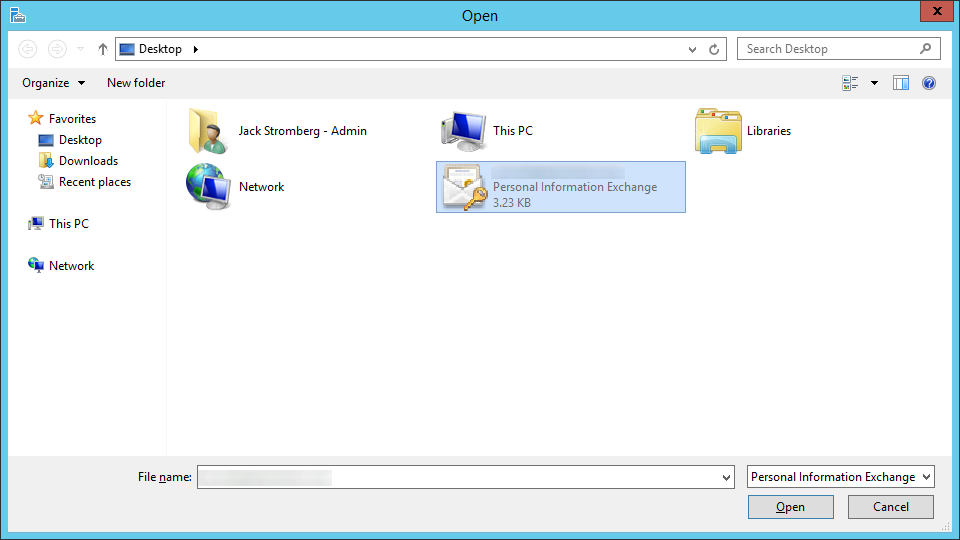
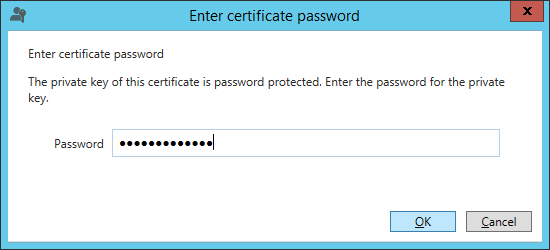
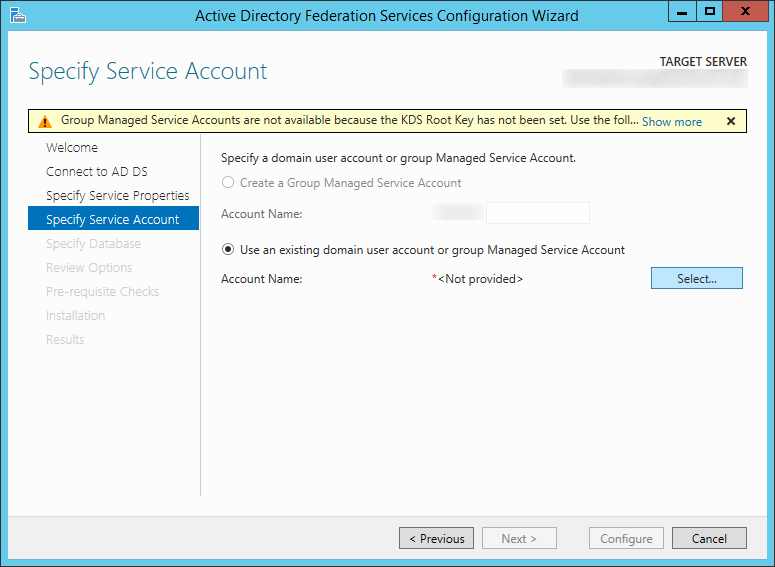
Although we granted access to the container to use the Z-Wave USB Stick, you need to tell Home Assistant how to leverage the device. To do so, you will need to open up Terminal or SSH to your machine and edit the configuration.yaml file to point to the device. Before we get into modifying the configuration.yaml file, first execute the following command to generate a Z-Wave Security Key. This key may be required by Z-Wave security devices (Door Locks, Keypads, etc), as an extra layer of security. More information on this can be found here: https://www.home-assistant.io/docs/z-wave/adding#network-key
Execute the following command via Terminal or SSH:
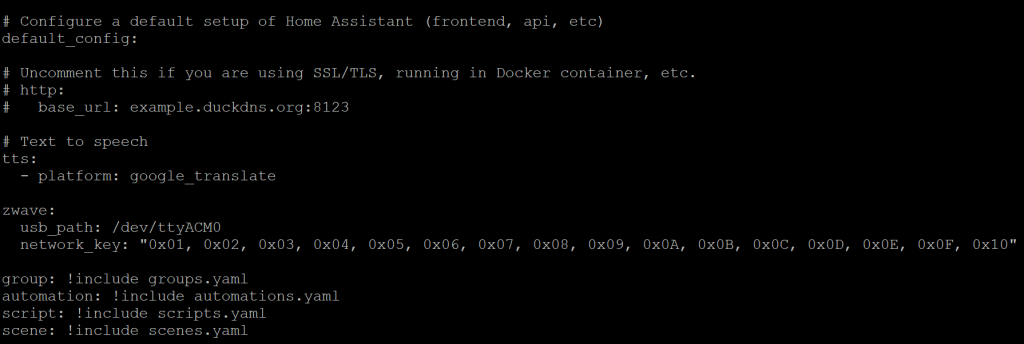
Next, we need to edit the configuration.yaml file, which can be found in the path specified when the Docker container was deployed (using the -v parameter). For the purpose of this article, /home/docker/home-assistant/configuration.yaml is where the file is located. Using your favorite text editor, add the following lines of code:
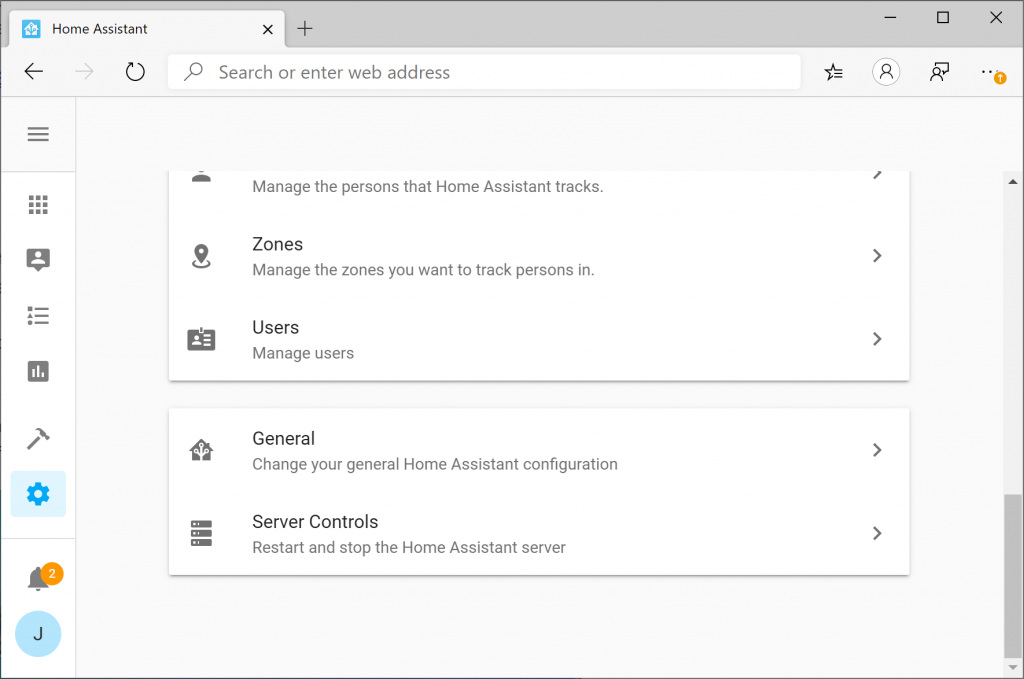
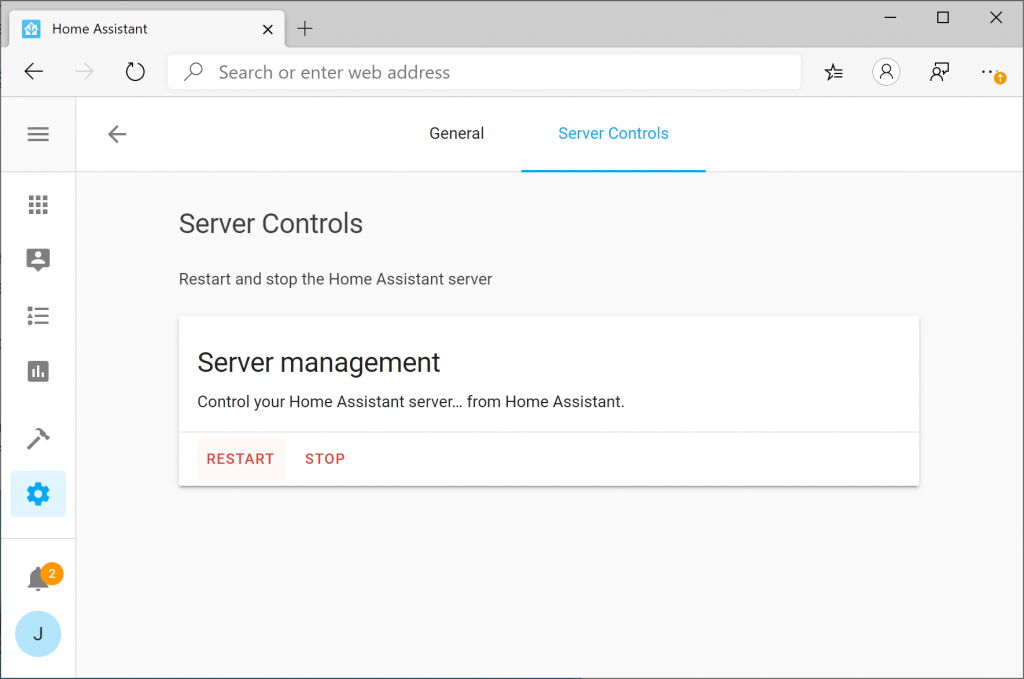
Once saved, go back to Home Assistant and click the Gear icon and then select Server Controls
Select the Restart button to restart Home Assistant. Any time you make a change to the configuration.yaml file, you will need to restart Home Assistant to pickup the configuration changes.
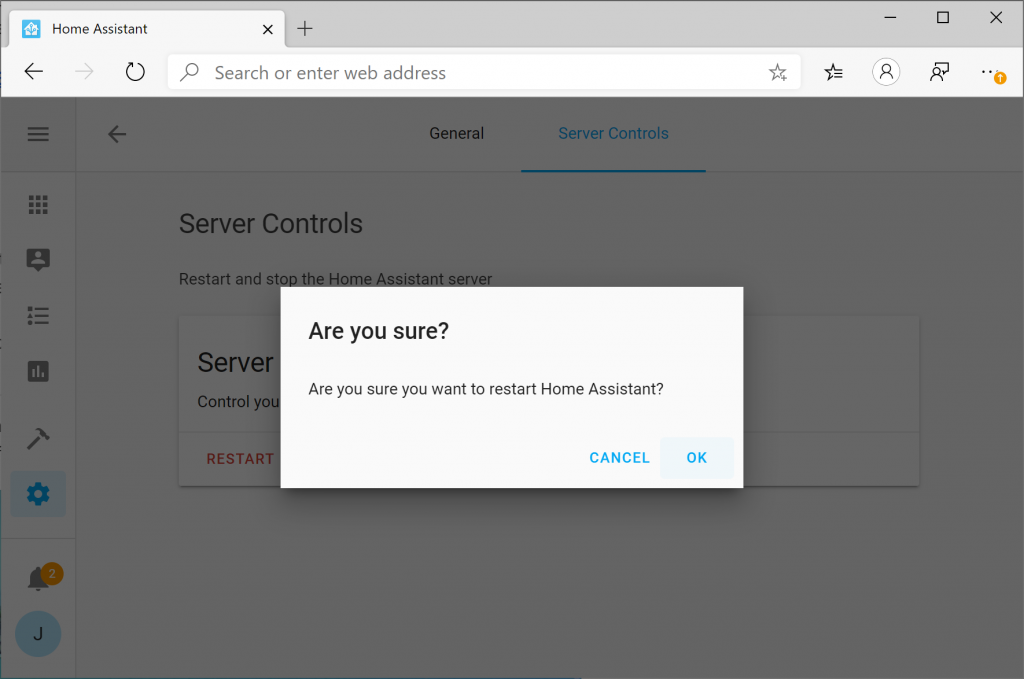
Click OK to Restart
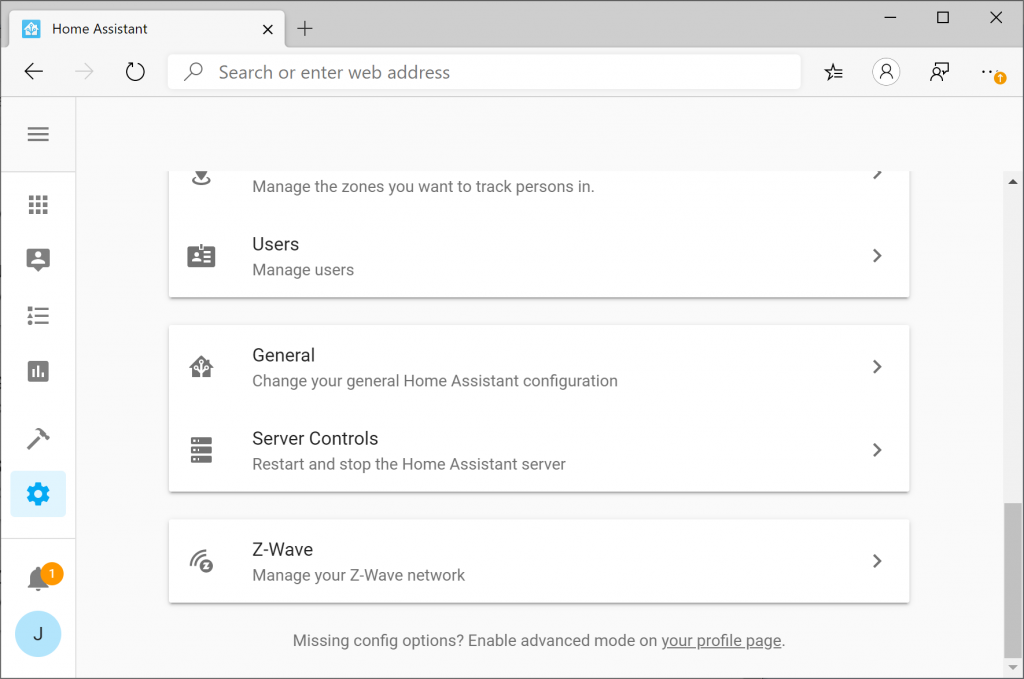
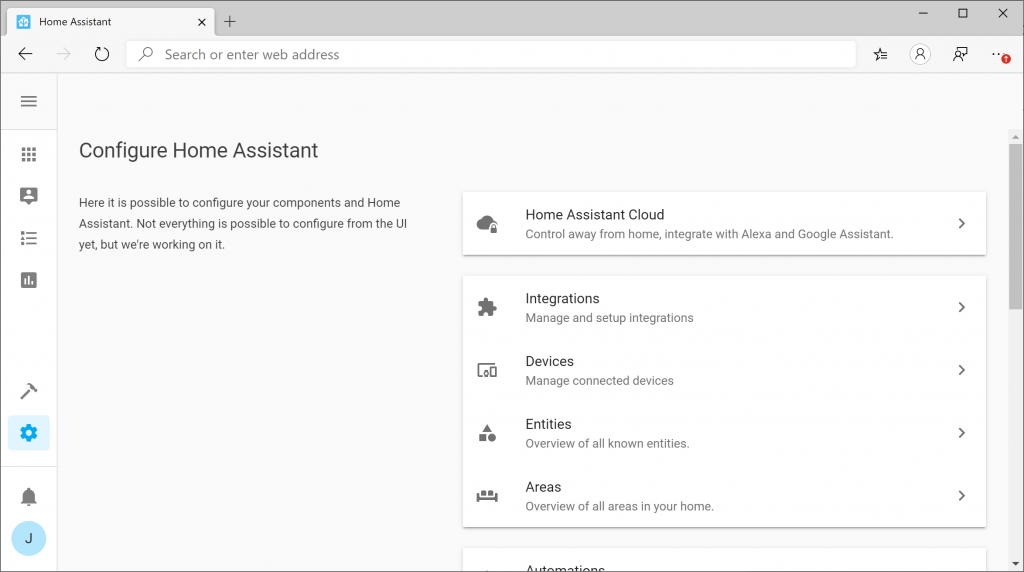
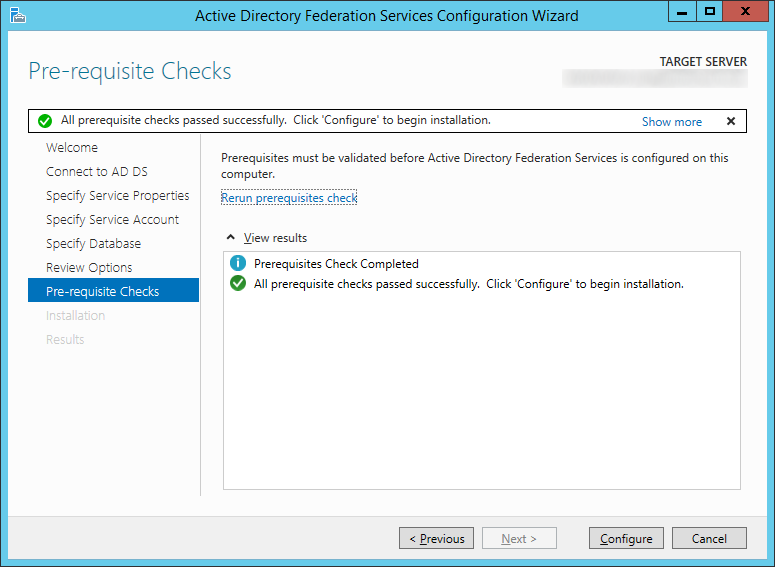
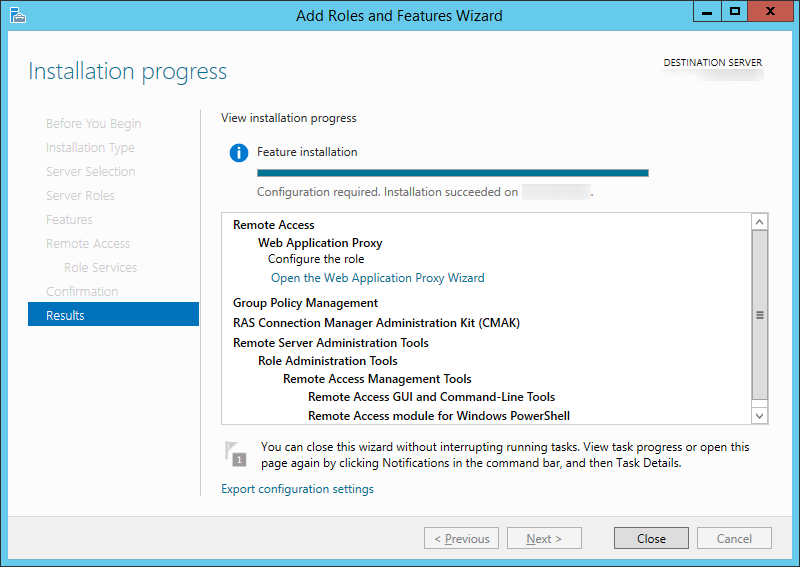
Upon restart, navigate back to the Gear icon and you should see a new entry in the Config portal for Z-Wave. If you do not see the “Z-Wave” section, scroll down to the troubleshooting step at the end of this article.
Add a Z-Wave device
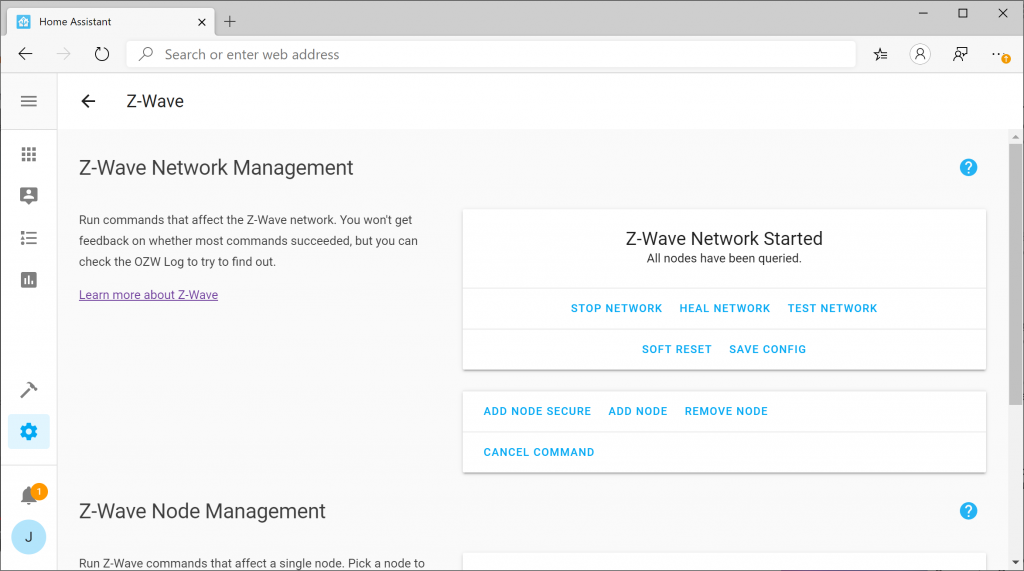
Once you see that your Z-Wave network has started, adding a device is a piece of cake. First click the Add Node button. When you click the button, nothing will happen, but go ahead and put your device in inclusion mode. Once the device is in inclusion mode, Home Assistant should automatically add the device.
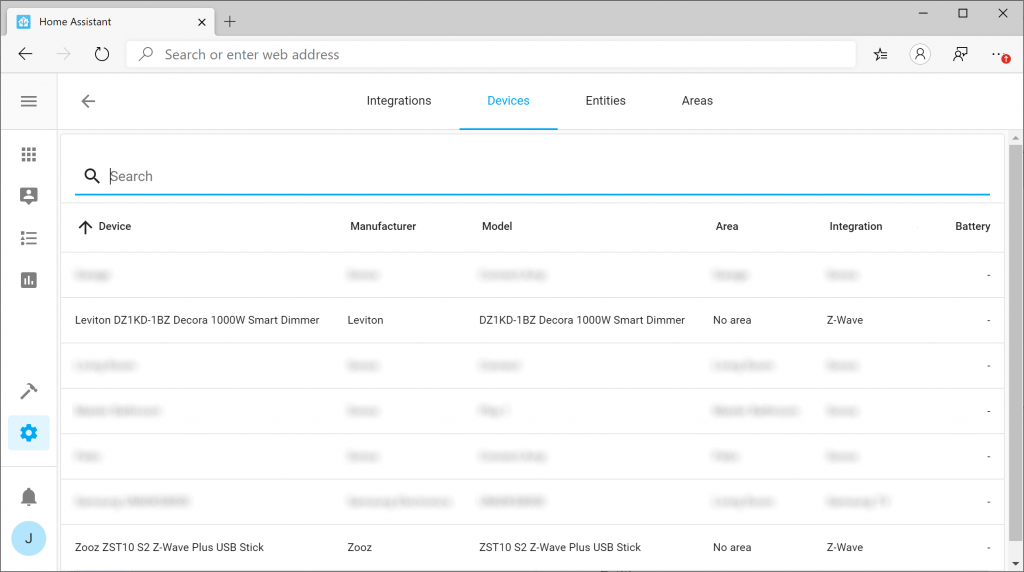
At this point, if you navigate back to Configuration (Gear icon) and select Devices
You should see your newly added Z-Wave device!
At this point, you can select the Device to give it a friendly name or start to work on building your own home automation actions.
Hope this helped! If you have any comments or suggestions on how to improve this guide, please drop it below.
Troubleshooting Missing Z-Wave Configuration
The first time I ran through this, I noticed I was missing the Z-Wave configuration tile after making changes to the configuration.yaml file. It turned out I specified the wrong device path in the configuration file. To verify, you can check the logs from your Docker container by executing the following command in your Terminal or via SSH. (Replace home-assistant with the name of your container if you specified something else)
sudo docker logs home-assistant
In my case, I had the following error:
2020-02-16 21:08:01 INFO (MainThread) [homeassistant.components.scene] Setting up scene.homeassistant
2020-02-16 21:08:02 INFO (MainThread) [homeassistant.components.zwave] Z-Wave USB path is /dev/ttyACM01
2020-02-16 21:08:02 ERROR (MainThread) [homeassistant.config_entries] Error setting up entry Z-Wave (import from configuration.yaml) for zwave
Traceback (most recent call last):
  File "/usr/local/lib/python3.7/site-packages/openzwave/option.py", line 78, in __init__
    raise ZWaveException(u"Can't find device %s : %s" % (device, traceback.format_exception(*sys.exc_info())))
openzwave.object.ZWaveException: "Zwave Generic Exception : Can't find device /dev/ttyACM01 : ['NoneType: None\\n']"

During handling of the above exception, another exception occurred:

Traceback (most recent call last):
  File "/usr/src/homeassistant/homeassistant/config_entries.py", line 215, in async_setup
    hass, self
  File "/usr/src/homeassistant/homeassistant/components/zwave/__init__.py", line 369, in async_setup_entry
    config_path=config.get(CONF_CONFIG_PATH),
  File "/usr/local/lib/python3.7/site-packages/openzwave/option.py", line 81, in __init__
    raise ZWaveException(u"Error when retrieving device %s : %s" % (device, traceback.format_exception(*sys.exc_info())))
openzwave.object.ZWaveException: 'Zwave Generic Exception : Error when retrieving device /dev/ttyACM01 : [\'Traceback (most recent call last):\\n\', \'  File "/usr/local/lib/python3.7/site-packages/openzwave/option.py", line 78, in __init__\\n    raise ZWaveException(u"Can\\\'t find device %s : %s" % (device, traceback.format_exception(*sys.exc_info())))\\n\', \'openzwave.object.ZWaveException: "Zwave Generic Exception : Can\\\'t find device /dev/ttyACM01 : [\\\'NoneType: None\\\\\\\\n\\\']"\\n\']'
Here you can see I accidentally specified /dev/ttyACM01 vs /dev/ttyACM0. Simply updating the configuration.yaml file with the correct device path solved the issue.
Edit in 2025: This guide was originally published in 2020 and works with Dovecot 2.3. Dovecot 2.4 introduces many new changes that prevent this guide from working as-is. While the premise is the same, the configuration file for Dovecot will need to be updated.
There’s a few things in this journey that you should be aware of when running your own mailserver before we begin.
Invest in a static public IP
Don’t open mail relay
Leverage proper DNS records to help mitigate your email from being marked spam
In my career in doing IT, handling email is one of the most tedious tasks to setup/maintain due to so many moving pieces; many of which may be out of your control. Dealing with spam, blacklisting, having emails non-deliverable for several reasons, handling dns records, certificates, etc…. it’s sometimes worth paying a few extra bucks to have someone else host your email and have peace of mind the message will be delivered. That being said, if you have the extra time on your hands and like the challenge of solving problems, here’s a quick way to get started.
Preamble
This guide took me several hours to compile through trial and error. If you have any thoughts, notice any errors/typos, or have ideas on how to further secure/optimize, please leave feedback below to further improve this guide. Thank you and good luck on the deployment of your mail server!
You are running Ubuntu or Debian as per the above guide (you can still follow this guide, you may have to slightly change which commands you use for your distribution — configuration should remain the same though)
DNS
Let’s first start at getting your DNS records configured properly. This guide will talk about configuring MX, SPF, and PTR records. We won’t be covering Domain Keys in this article, maybe in a separate article if someone donates to my paypal on the right side of the website 😉
MX Record
Via your nameservers, add a new mx record for your domain name. Here’s a list of tutorials for some of the major domain registrars:
Contrary to many websites that say you need to create a “SPF” record type, the SPF record type was never ratified by RFC standards. In this case, the proper way to create a SPF record is via a TXT record with the SPF value (as per RFC 7208).
You can leverage my SPF generator to create a new TXT record in the root of your domain.
PTR Record
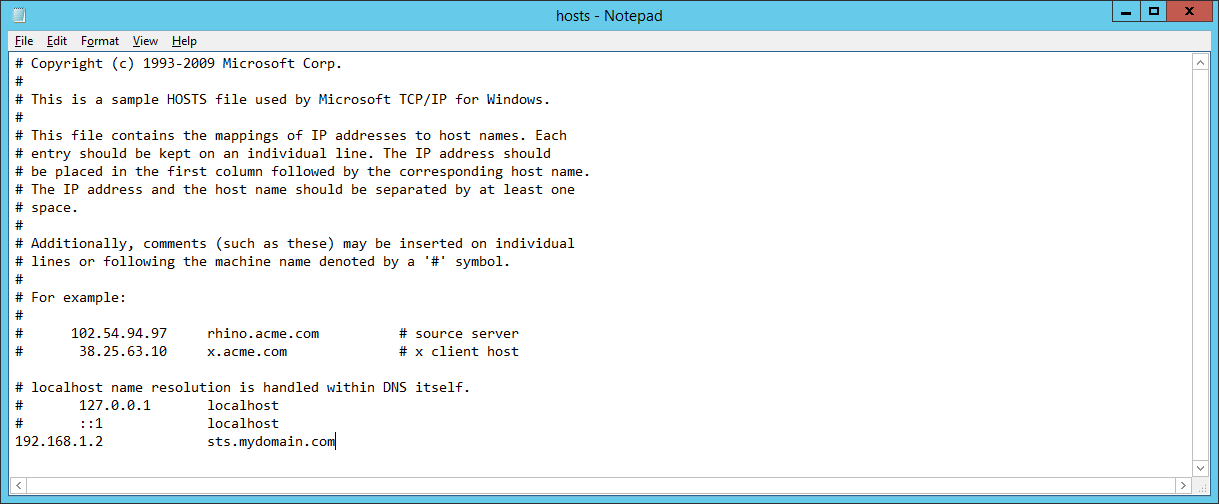
To help decrease the odds of your emails being labeled as spam, I’d recommend creating a PTR record that will resolve your IP address to a DNS name (we call this a reverse lookup). For example, if my mail server’s domain name was mail.mydomain.com and it resolved to 123.123.123.123, I would create a PTR record for 123.123.123.123 that points to mail.mydomain.com.
In many cases, you will need to either work with your ISP (Internet Service Provider) or domain registrar if you own your own IP block to make changes to the record for your IP address block.
When you are ready, you can leverage the nslookup command on Windows to validate the name from the IP address.
nslookup 123.123.123.123
Or on linux you can leverage the host command to verify the reverse lookup as well:
host 123.123.123.123
Get the OS ready
Download the latest packages and actually perform any updates.
sudo sh -c 'apt update && apt upgrade'
Prepare MariaDB for virtual users/aliases
One of the primary reasons we need to configure a database is it is what will contain the information about all of our users and their corresponding email addresses (aliases). To do so, we need to create 3 new tables inside of a new database.
Login to the database
sudo mariadb -u root -p
Create the database, database user, and tables
Create a new database for our users (in this case, I’m calling the database mailserver). Note: This command must be run in the context of mariadb, this is not a bash command.
create database mailserver;
Create a new user called mailuser, grant them access to the entire database, require the user to only create connections from 127.0.0.1 (localhost), and specify a password for the user.
GRANT SELECT ON mailserver.* TO 'mailuser'@'127.0.0.1' IDENTIFIED BY 'mysupersecretpassword';
Execute the following command to apply the changes
FLUSH PRIVILEGES;
Create a table for each of the domain names we will leverage for our email addresses.
CREATE TABLE `mailserver`.`virtual_domains` (
  `id` int(11) NOT NULL auto_increment,
  `name` varchar(50) NOT NULL,
  PRIMARY KEY (`id`)
) ENGINE=InnoDB DEFAULT CHARSET=utf8;
Create a table that will hold each of the users that will need mailboxes.
CREATE TABLE `mailserver`.`virtual_users` (
  `id` int(11) NOT NULL auto_increment,
  `domain_id` int(11) NOT NULL,
  `password` varchar(106) NOT NULL,
  `email` varchar(100) NOT NULL,
  PRIMARY KEY (`id`),
  UNIQUE KEY `email` (`email`),
  FOREIGN KEY (domain_id) REFERENCES virtual_domains(id) ON DELETE CASCADE
) ENGINE=InnoDB DEFAULT CHARSET=utf8;
Create a table that will hold aliases (additional email addresses) for a particular user.
CREATE TABLE `mailserver`.`virtual_aliases` (
  `id` int(11) NOT NULL auto_increment,
  `domain_id` int(11) NOT NULL,
  `source` varchar(100) NOT NULL,
  `destination` varchar(100) NOT NULL,
  PRIMARY KEY (`id`),
  FOREIGN KEY (domain_id) REFERENCES virtual_domains(id) ON DELETE CASCADE
) ENGINE=InnoDB DEFAULT CHARSET=utf8;
Insert a new user into the database
First, we need to add our first domain name into the domains table
INSERT INTO `mailserver`.`virtual_domains`
  (`name`)
VALUES
  ('mydomain.com');
Second, we need to create the user. Replace mysupersecretpassword with your password.
Type exit once you are done to leave the context of MariaDB.
Install Packages for Postfix and Dovecot
Postfix is what we call a Mail Transport Agent (MTA) and is responsible for actually sending/receive the messages from the internet. Later, we will talk about Dovecot which will be our MDA (Mail Delivery Agent) (what actually interacts with the mailbox).
The following command will install postfix, dovecot, and pull the packages to interact with MySQL. Although these are labeled MySQL, they should interact fine with MariaDB.
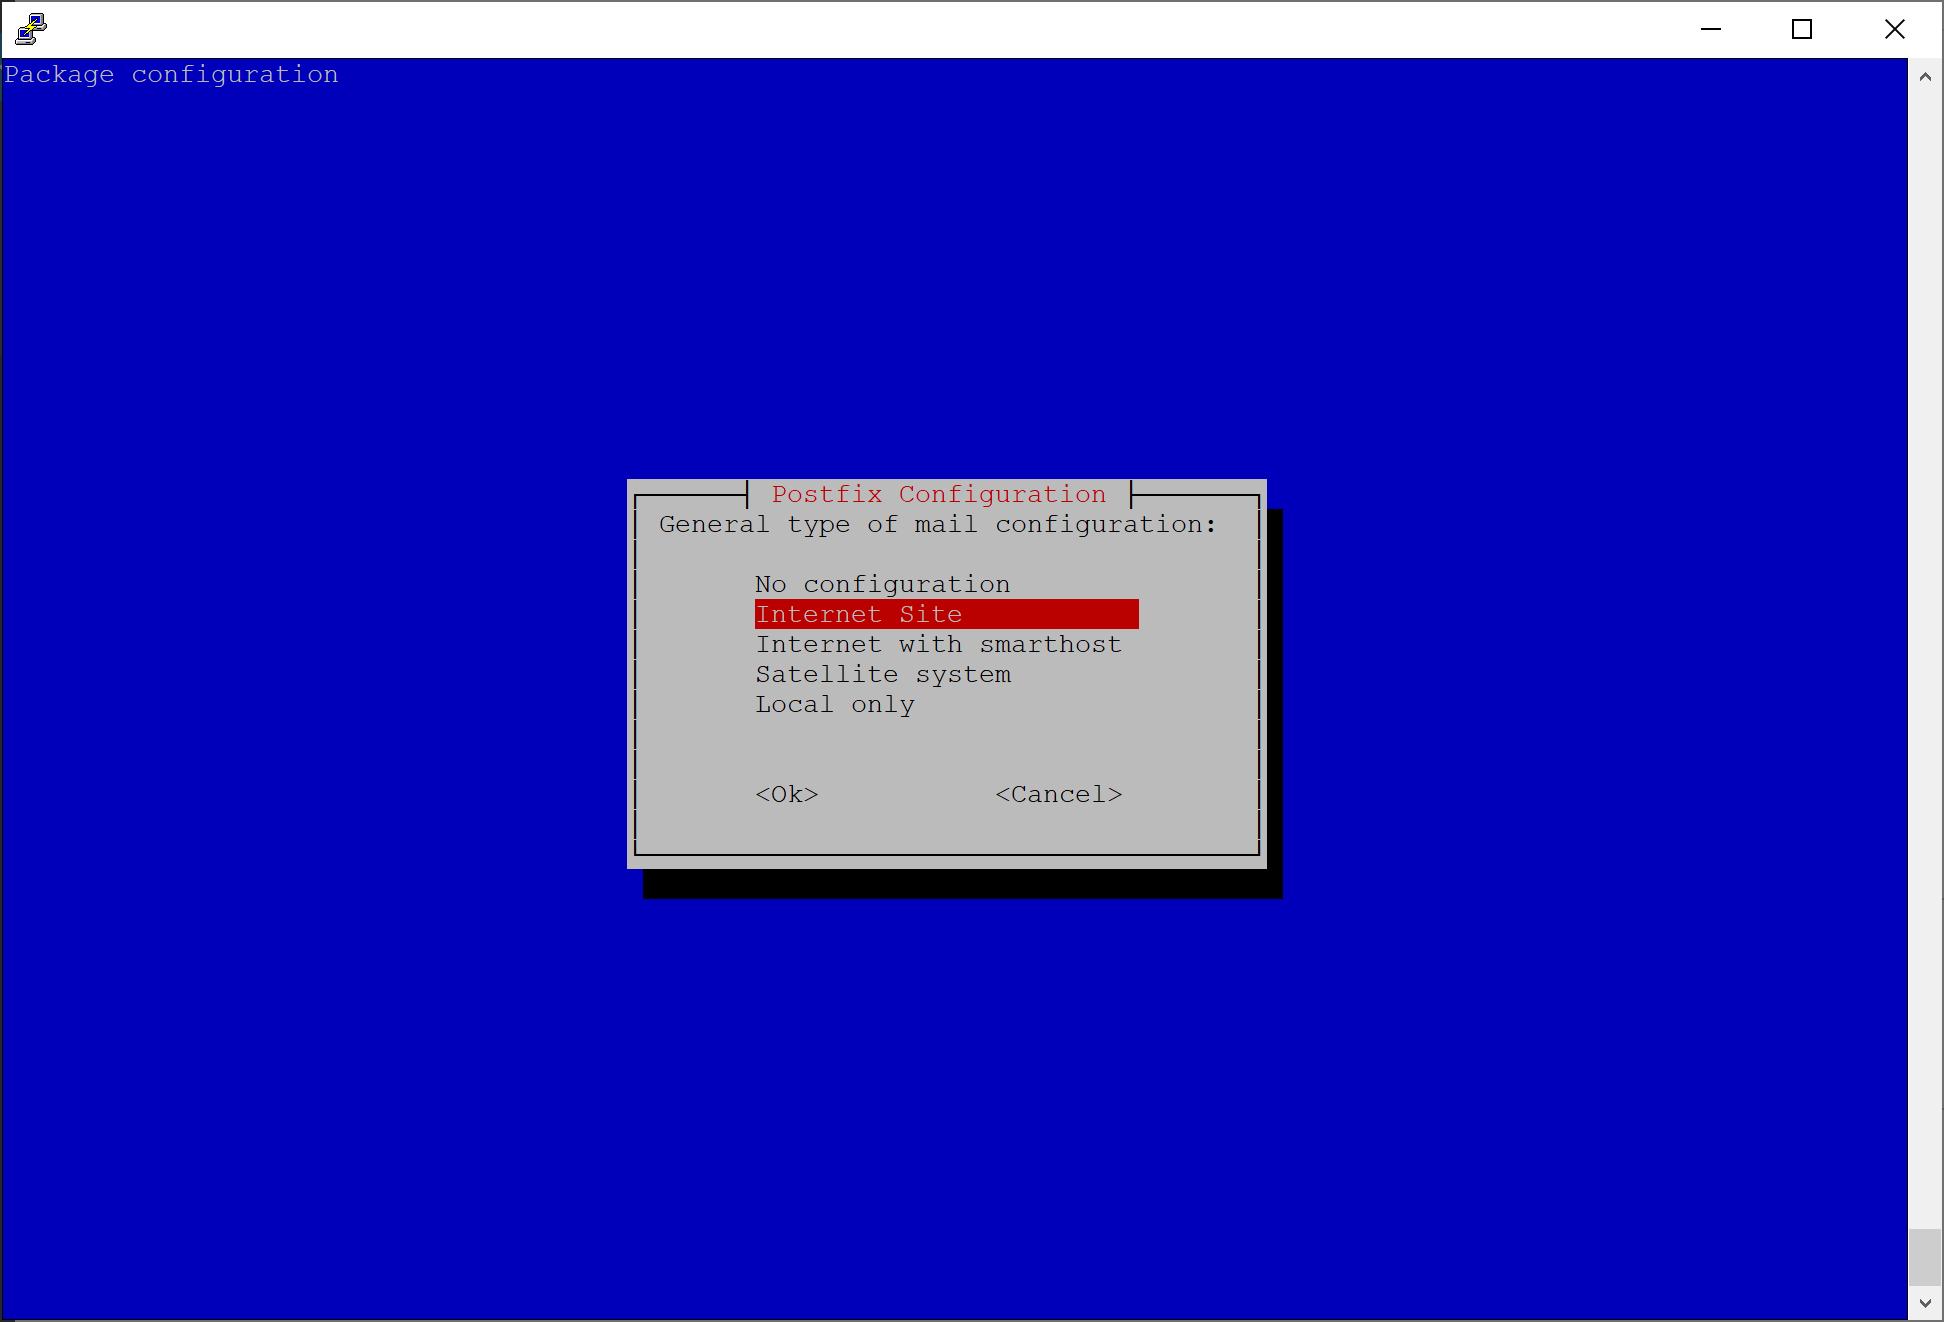
During the installation of Postfix, you will be prompted to configure the connection type to the mail server. In this case, select Internet Site for the mail configuration.
On the second installation prompt, it will ask for the domain name used in receiving email. In this prompt, specify one of the domain names you will be using for your users. For example, if your email addresses are going to be [email protected] you would specify mydomain.com for this prompt. Don’t worry if you have multiple email addresses, we will cover that later on.
Configure Postfix to leverage MariaDB
First, let’s create a backup of the Postfix configuration, so we have a baseline to refer back to.
Copy the following configuration and replace the domain name example.com with yours. Credit to linode for sharing their configuration as it not only defines integration into a database, but also hardens the Postfix deployment.
# See /usr/share/postfix/main.cf.dist for a commented, more complete version

# Debian specific:  Specifying a file name will cause the first
# line of that file to be used as the name.  The Debian default
# is /etc/mailname.
#myorigin = /etc/mailname

smtpd_banner = $myhostname ESMTP $mail_name
biff = no

# appending .domain is the MUA's job.
append_dot_mydomain = no

# Uncomment the next line to generate "delayed mail" warnings
#delay_warning_time = 4h

readme_directory = no

# TLS parameters
smtpd_tls_cert_file=/etc/letsencrypt/live/mydomain.com/fullchain.pem
smtpd_tls_key_file=/etc/letsencrypt/live/mydomain.com/privkey.pem
smtpd_use_tls=yes
smtpd_tls_auth_only = yes
smtp_tls_security_level = may
smtpd_tls_security_level = may
smtpd_sasl_security_options = noanonymous, noplaintext
smtpd_sasl_tls_security_options = noanonymous

# Authentication
smtpd_sasl_type = dovecot
smtpd_sasl_path = private/auth
smtpd_sasl_auth_enable = yes

# See /usr/share/doc/postfix/TLS_README.gz in the postfix-doc package for
# information on enabling SSL in the smtp client.

# Restrictions
smtpd_helo_restrictions =
        permit_mynetworks,
        permit_sasl_authenticated,
        reject_invalid_helo_hostname,
        reject_non_fqdn_helo_hostname
smtpd_recipient_restrictions =
        permit_mynetworks,
        permit_sasl_authenticated,
        reject_non_fqdn_recipient,
        reject_unknown_recipient_domain,
        reject_unlisted_recipient,
        reject_unauth_destination
smtpd_sender_restrictions =
        permit_mynetworks,
        permit_sasl_authenticated,
        reject_non_fqdn_sender,
        reject_unknown_sender_domain
smtpd_relay_restrictions =
        permit_mynetworks,
        permit_sasl_authenticated,
        defer_unauth_destination

# See /usr/share/doc/postfix/TLS_README.gz in the postfix-doc package for
# information on enabling SSL in the smtp client.

myhostname = example.com
alias_maps = hash:/etc/aliases
alias_database = hash:/etc/aliases
mydomain = mydomain.com
myorigin = $mydomain
mydestination = localhost
relayhost =
mynetworks = 127.0.0.0/8 [::ffff:127.0.0.0]/104 [::1]/128
mailbox_size_limit = 0
recipient_delimiter = +
inet_interfaces = all
inet_protocols = all

# Handing off local delivery to Dovecot's LMTP, and telling it where to store mail
virtual_transport = lmtp:unix:private/dovecot-lmtp

# Virtual domains, users, and aliases
virtual_mailbox_domains = mysql:/etc/postfix/mysql-virtual-mailbox-domains.cf
virtual_mailbox_maps = mysql:/etc/postfix/mysql-virtual-mailbox-users.cf
virtual_alias_maps = mysql:/etc/postfix/mysql-virtual-mailbox-aliases.cf,
        mysql:/etc/postfix/mysql-virtual-mailbox-users.cf

# Even more Restrictions and MTA params
disable_vrfy_command = yes
strict_rfc821_envelopes = yes
#smtpd_etrn_restrictions = reject
#smtpd_reject_unlisted_sender = yes
#smtpd_reject_unlisted_recipient = yes
smtpd_delay_reject = yes
smtpd_helo_required = yes
smtp_always_send_ehlo = yes
#smtpd_hard_error_limit = 1
smtpd_timeout = 30s
smtp_helo_timeout = 15s
smtp_rcpt_timeout = 15s
smtpd_recipient_limit = 40
minimal_backoff_time = 180s
maximal_backoff_time = 3h

# Reply Rejection Codes
invalid_hostname_reject_code = 550
non_fqdn_reject_code = 550
unknown_address_reject_code = 550
unknown_client_reject_code = 550
unknown_hostname_reject_code = 550
unverified_recipient_reject_code = 550
unverified_sender_reject_code = 550
Next, we need to create the mappings of domain names, users, and aliases. In the same directory as the main.cf (/etc/postfix) we need to first create a file that will tell postfix how to lookup what domain names exist. You can open the documents with your favorite text editor; I use vi since it’s universally installed.
sudo vi /etc/postfix/mysql-virtual-mailbox-domains.cf
Press i to get vi into insert mode and paste the following, replacing the password with the mailuser we specified earlier in this tutorial.
user = mailuser
password = mysupersecretpassword
hosts = 127.0.0.1
dbname = mailserver
query = SELECT 1 FROM virtual_domains WHERE name='%s'
Press : and then type wq and press enter to write the changes to the file and quit in vi.
Next, we will create another file that is used to lookup each user’s mailbox.
sudo vi /etc/postfix/mysql-virtual-mailbox-users.cf
Press i to get vi into insert mode and paste the following, replacing the password with the mailuser we specified earlier in this tutorial.
user = mailuser
password = mysupersecretpassword
hosts = 127.0.0.1
dbname = mailserver
query = SELECT email FROM virtual_users WHERE email='%s'
Press : and then type wq and press enter to write the changes to the file and quit in vi.
Last, we will create another file that is used to map an alias to a user’s mailbox.
sudo vi /etc/postfix/mysql-virtual-mailbox-aliases.cf
Press i to get vi into insert mode and paste the following, replacing the password with the mailuser we specified earlier in this tutorial.
user = mailuser
password = mysupersecretpassword
hosts = 127.0.0.1
dbname = mailserver
query = SELECT destination FROM virtual_aliases WHERE source='%s'
Press : and then type wq and press enter to write the changes to the file and quit in vi.
Restart the Postfix service for the changes to take effect
sudo service postfix restart
Next, to enable port 587 and 465 to connect securely with email clients, we need to modify /etc/postfix/master.cf. First, let’s create a backup of the master.cf file.
Press : and then type wq and press enter to write the changes to the file and quit in vi.
Note: If you’d like to allow open relay locally, you can prefix permit_mynetworks to the smtpd_relay_restrictions list as well.
Restart the Postfix service for the changes to take effect
sudo service postfix restart
Configure Dovecot
Now that we have our MTA configured, we now need to configure our MDA. You can think of Postfix as a shipping center and Dovecot as the courier, who interfaces directly with your mailbox. Roundcube will be our MUA (mail user agent) that interfaces with Dovecot to display your mail. The goal for this section is to ensure Dovecot requires SSL.
First, we’ll create backups of each of the Dovecot configuration files
Next we need to edit the user authentication file (/etc/dovecot/conf.d/10-auth.conf) to tell Dovecat to leverage MariaDB for our users. Execute the following commands:
sudo sed -i 's/^#disable_plaintext_auth = yes/disable_plaintext_auth = yes/g' /etc/dovecot/conf.d/10-auth.conf
sudo sed -i 's/^#auth_mechanisms = plain login/auth_mechanisms = plain login/g' /etc/dovecot/conf.d/10-auth.conf
sudo sed -i 's/^!include auth-system.conf.ext/#!include auth-system.conf.ext/g' /etc/dovecot/conf.d/10-auth.conf
sudo sed -i 's/^#!include auth-sql.conf.ext/!include auth-sql.conf.ext/g' /etc/dovecot/conf.d/10-auth.conf
Once we have the authentication file configured, we need to update the sql driver (/etc/dovecot/conf.d/auth-sql.conf.ext) to point to our mailboxes. You will need to uncomment the passdb section and uncomment the userdb driver that is static.
sudo vi /etc/dovecot/conf.d/auth-sql.conf.ext
Press i to get vi into insert mode and paste the following configuration
# Authentication for SQL users. Included from 10-auth.conf.
#
# <doc/wiki/AuthDatabase.SQL.txt>

passdb {
  driver = sql

  # Path for SQL configuration file, see example-config/dovecot-sql.conf.ext
  args = /etc/dovecot/dovecot-sql.conf.ext
}

# "prefetch" user database means that the passdb already provided the
# needed information and there's no need to do a separate userdb lookup.
# <doc/wiki/UserDatabase.Prefetch.txt>
#userdb {
#  driver = prefetch
#}

#userdb {
#  driver = sql
#  args = /etc/dovecot/dovecot-sql.conf.ext
#}

# If you don't have any user-specific settings, you can avoid the user_query
# by using userdb static instead of userdb sql, for example:
# <doc/wiki/UserDatabase.Static.txt>
userdb {
  driver = static
  args = uid=vmail gid=vmail home=/var/mail/vhosts/%d/%n
}
Press : and then type wq and press enter to write the changes to the file and quit in vi.
The final Dovecot file we need to modify will set our database settings (/etc/dovecot/dovecot-sql.conf.ext). Execute the following commands to uncomment the correct settings. Note: be sure to replace the password with the database password we configured earlier.
sudo sed -i 's/^#driver = /driver = mysql/g' /etc/dovecot/dovecot-sql.conf.ext
sudo sed -i 's/^#connect =/connect = host=127.0.0.1 dbname=mailserver user=mailuser password=mysupersecretpassword/g' /etc/dovecot/dovecot-sql.conf.ext
sudo sed -i 's/^#default_pass_scheme = MD5/default_pass_scheme = SHA512-CRYPT/g' /etc/dovecot/dovecot-sql.conf.ext
sudo sed -i '/^#password_query = \\/i password_query = SELECT email as user, password FROM virtual_users WHERE email=\x27%u\x27;' /etc/dovecot/dovecot-sql.conf.ext
After making the changes to the dovecot-sql.conf.ext file, next we need to change the owner and the group of the dovecot folder to the vmail user:
Next, we need to disable the unencrypted versions of IMAP and SMTP.
sudo vi /etc/dovecot/conf.d/10-master.conf
We need to edit the /etc/dovecot/conf.d/10-master.conf file and set ports to 0 to disable non-encrypted imap/pop3. Find service imap-login { and make it look like the following.
service imap-login {
  inet_listener imap {
    port = 0
  }
  inet_listener imaps {
    port = 993
    ssl = yes
  }

  # Number of connections to handle before starting a new process. Typically
  # the only useful values are 0 (unlimited) or 1. 1 is more secure, but 0
  # is faster. <doc/wiki/LoginProcess.txt>
  #service_count = 1

  # Number of processes to always keep waiting for more connections.
  #process_min_avail = 0

  # If you set service_count=0, you probably need to grow this.
  #vsz_limit = $default_vsz_limit
}

service pop3-login {
  inet_listener pop3 {
    port = 0
  }
  inet_listener pop3s {
    port = 995
    ssl = yes
  }
}
In the same file, find service lmtp { and replace the whole block down to the third } with the following:
service lmtp {
  unix_listener /var/spool/postfix/private/dovecot-lmtp {
    mode = 0600
    user = postfix
    group = postfix
  }

  # Create inet listener only if you can't use the above UNIX socket
  #inet_listener lmtp {
    # Avoid making LMTP visible for the entire internet
    #address =
    #port =
  #}
}
In the same file, find service auth { and replace the whole block down to the third } with the following:
service auth {
  # auth_socket_path points to this userdb socket by default. It's typically
  # used by dovecot-lda, doveadm, possibly imap process, etc. Users that have
  # full permissions to this socket are able to get a list of all usernames and
  # get the results of everyone's userdb lookups.
  #
  # The default 0666 mode allows anyone to connect to the socket, but the
  # userdb lookups will succeed only if the userdb returns an "uid" field that
  # matches the caller process's UID. Also if caller's uid or gid matches the
  # socket's uid or gid the lookup succeeds. Anything else causes a failure.
  #
  # To give the caller full permissions to lookup all users, set the mode to
  # something else than 0666 and Dovecot lets the kernel enforce the
  # permissions (e.g. 0777 allows everyone full permissions).
  unix_listener auth-userdb {
    mode = 0600
    user = vmail
    #group =
  }

  # Postfix smtp-auth
  unix_listener /var/spool/postfix/private/auth {
    mode = 0600
    user = postfix
    group = postfix
  }

  # Auth process is run as this user.
  user = dovecot
}
In the same file, find service auth-worker { and replace the whole block down to the } with the following:
service auth-worker {
  # Auth worker process is run as root by default, so that it can access
  # /etc/shadow. If this isn't necessary, the user should be changed to
  # $default_internal_user.
  user = vmail
}
Press : and then type wq and press enter to write the changes to the file and quit in vi.
Last, we need to tell dovecot where our SSL certificate is for encryption. We will modify the /etc/dovecot/conf.d/10-ssl.conf file. Make sure to update the directory with the correct path for your certificates.
Execute the following commands, replacing
sudo sed -i 's/^ssl = yes/ssl = required/g' /etc/dovecot/conf.d/10-ssl.conf
sudo sed -i 's/^ssl_cert = .*/ssl_cert = <\/etc\/letsencrypt\/live\/mydomain.com\/fullchain.pem/g' /etc/dovecot/conf.d/10-ssl.conf
sudo sed -i 's/^ssl_key = .*/ssl_key = <\/etc\/letsencrypt\/live\/mydomain.com\/privkey.pem/g' /etc/dovecot/conf.d/10-ssl.conf
Last, restart devocot to enable all of our changes.
sudo service dovecot restart
Configure Roundcube
Install dependencies for Roundcube
Roundcube requires several PHP PEAR modules. To install the bare minimum featureset, execute the following command:
First, we need to create a new database and user for Roundcube. We can do this by logging into MariaDB and executing the create and grant commands.
sudo mariadb -u myusername -p
CREATE DATABASE roundcubemail CHARACTER SET utf8 COLLATE utf8_general_ci;
GRANT ALL PRIVILEGES ON roundcubemail.* TO roundcube@localhost IDENTIFIED BY 'myreallyreallysecretpassword';
FLUSH PRIVILEGES;
exit
Request SSL Certificates for Roundcube
We will want to ensure all traffic to and from the client is encrypted in transit when trying to access Roundcube. To do this, I leverage Let’s Encrypt, which will allow you to request a free SSL certificate. If you have your own SSL certificate, go ahead and copy it to a location on the server so we can reference it later.
We will need to create a directory that will hold Roundcube’s files to serve to the web. Let’s create a new directory to serve these files and limit permissions to www-data.
We will need to grab the latest copy of Roundcube’s code to run the website. Note: please ensure you substitute the correct version for Roundcube when executing the commands below as the version listed in the guide will likely be out of date as time goes on:
cd /tmp
wget https://github.com/roundcube/roundcubemail/releases/download/1.4.1/roundcubemail-1.4.1.tar.gz
tar -xf roundcubemail-1.4.1.tar.gz
mv roundcubemail-1.4.1 /var/www/webmail.mydomain.com
Populate the SQL Database
You will need to execute the following SQL command to populate your Roundcube database with the tables needed to run Roundcube. To do so, execute the following commands.
Roundcube doesn’t ship with several javascript dependencies. To ensure the Roundcube pages load properly, you will need to execute the following command to pull down the javascript dependencies.
Let’s configure NGINX to point to our web directory for the website. When doing so, it is very important you protect your installation by preventing access to some sensitive files from the web.
First, create a virtual-host file within the nginx sites-available folder:
sudo vi /etc/nginx/sites-available/webmail.mydomain.com
Press i to get vi into insert mode and paste the following. Note: Please replace the values with the path to your SSL Certificate we generated earlier.
##
# You should look at the following URL's in order to grasp a solid understanding
# of Nginx configuration files in order to fully unleash the power of Nginx.
# https://www.nginx.com/resources/wiki/start/
# https://www.nginx.com/resources/wiki/start/topics/tutorials/config_pitfalls/
# https://wiki.debian.org/Nginx/DirectoryStructure
#
# In most cases, administrators will remove this file from sites-enabled/ and
# leave it as reference inside of sites-available where it will continue to be
# updated by the nginx packaging team.
#
# This file will automatically load configuration files provided by other
# applications, such as Drupal or WordPress. These applications will be made
# available underneath a path with that package name, such as /drupal8.
#
# Please see /usr/share/doc/nginx-doc/examples/ for more detailed examples.
##

# Default server configuration
#

server {
        listen 443 ssl;
        listen [::]:443 ssl;
        server_name webmail.mydomain.com;

ssl_certificate /etc/letsencrypt/live/webmail.mydomain.com/fullchain.pem;
  ssl_certificate_key /etc/letsencrypt/live/webmail.mydomain.com/privkey.pem;
  ssl_session_timeout 1d;
  ssl_session_cache shared:SSL:50m;
  ssl_session_tickets off;
  ssl_protocols TLSv1.1 TLSv1.2;
  ssl_ciphers 'ECDHE-RSA-AES128-GCM-SHA256:ECDHE-ECDSA-AES128-GCM-SHA256:ECDHE-RSA-AES256-GCM-SHA384:ECDHE-ECDSA-AES256-GCM-SHA384:DHE-RSA-AES128-GCM-SHA256:DHE-DSS-AES128-GCM-SHA256:kEDH+AESGCM:ECDHE-RSA-AES128-SHA256:ECDHE-ECDSA-AES128-SHA256:ECDHE-RSA-AES128-SHA:ECDHE-ECDSA-AES128-SHA:ECDHE-RSA-AES256-SHA384:ECDHE-ECDSA-AES256-SHA384:ECDHE-RSA-AES256-SHA:ECDHE-ECDSA-AES256-SHA:DHE-RSA-AES128-SHA256:DHE-RSA-AES128-SHA:DHE-DSS-AES128-SHA256:DHE-RSA-AES256-SHA256:DHE-DSS-AES256-SHA:DHE-RSA-AES256-SHA:!aNULL:!eNULL:!EXPORT:!DES:!RC4:!3DES:!MD5:!PSK';
  ssl_prefer_server_ciphers on;
  ssl_stapling on;
  ssl_stapling_verify on;
  ssl_trusted_certificate /etc/letsencrypt/live/webmail.mydomain.com/chain.pem;


        # SSL configuration
        #
        # listen 443 ssl default_server;
        # listen [::]:443 ssl default_server;
        #
        # Note: You should disable gzip for SSL traffic.
        # See: https://bugs.debian.org/773332
        #
        # Read up on ssl_ciphers to ensure a secure configuration.
        # See: https://bugs.debian.org/765782
        #
        # Self signed certs generated by the ssl-cert package
        # Don't use them in a production server!
        #
        # include snippets/snakeoil.conf;

        root /var/www/webmail.mydomain.com;

        # Add index.php to the list if you are using PHP
        index index.php index.html index.htm;

       # Revoke access to sensitive files and directories
       location ~ ^/(README|INSTALL|LICENSE|CHANGELOG|UPGRADING)$ {
                deny all;
       }
       location ~ ^/(config|temp|bin|SQL|logs)/ {
                deny all;
       }

        # pass PHP scripts to FastCGI server
        #
        location ~ \.php$ {
                include snippets/fastcgi-php.conf;
        #
        #       # With php-fpm (or other unix sockets):
                fastcgi_pass unix:/run/php/php7.3-fpm.sock;
        #       # With php-cgi (or other tcp sockets):
        #       fastcgi_pass 127.0.0.1:9000;
        }

        # deny access to .htaccess files, if Apache's document root
        # concurs with nginx's one
        #
        location ~ /\. {
                deny all;
                access_log off;
                log_not_found off;
       }
}
Press : and then type wq and press enter to write the changes to the file and quit in vi.
Last, we need to create a link of the virtual host file to /etc/nginx/sites-enabled. You will need to execute the following commands to create the link as well as restart nginx to apply the changes.
sudo ln -s /etc/nginx/sites-available/webmail.mydomain.com /etc/nginx/sites-enabled/webmail.mydomain.com
sudo service nginx restart
Run the Roundcube installer
At this point, if you navigate to https://webmail.mydomain.com/installer, you should see the Roundcube Webmail Installer page. You should see a series of items show OK, NOT AVAILABLE, or NOT OK. You will need to remediate any items that show NOT OK for Roundcube to successfully run.
In this installer, I primarily focused on Step 1 (Checking the environment) and Step 2 (Checking the database). Once both show OK (don’t worry about if email is successful or fails (likely it is failing still), move the installer directory to your home drive to secure the environment (IT IS VERY DANGEROUS TO LEAVE THIS PAGE!!! DON’T SKIP THIS STEP).
sudo mv /var/www/webmail.mydomain.com/installer ~
Update Roundcube configuration
I couldn’t get Roundcube to actually work during the installation with this setup until I manually specified a few items via the Roundcube configuration file. Within the /var/www/webmail.mydomain.com/config/config.inc.php file, ensure you have the following code snippets to allow Roundcube to properly authenticate to your mailserver.
sudo vi /var/www/webmail.mydomain.com/config/config.inc.php
Ensure you have the following code snippets (typically there is a section under // IMAP that has the config we can start with). To do so, press i to get vi into insert mode and paste the following.
Press : and then type wq and press enter to write the changes to the file and quit in vi.
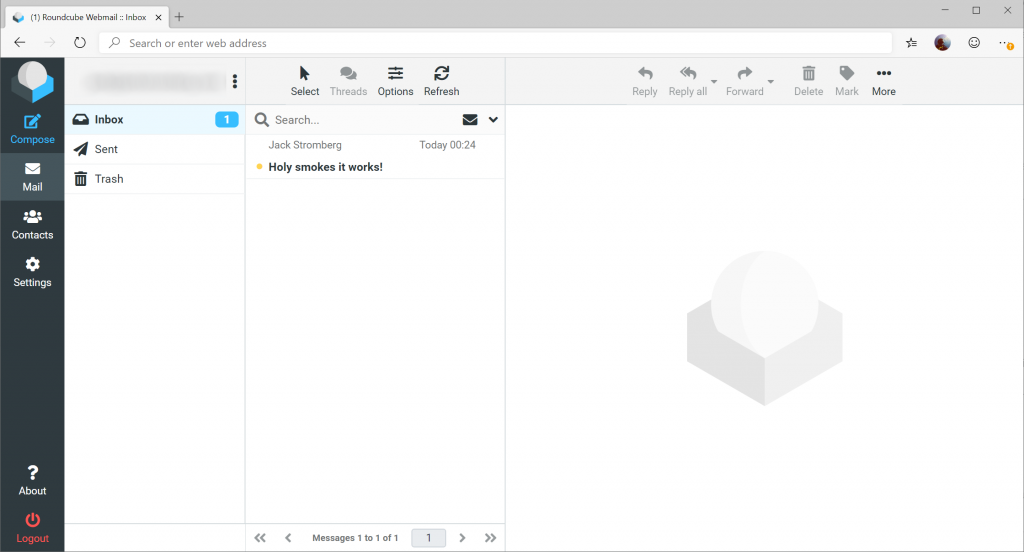
Verify
At this point, you should be able to login to https://webmail.mydomain.com and send/receive email!
As with all technology, ensure you keep up-to-date with all the latest security patches to keep your environment stable and secure.
If you made it to this point, were able to successfully send/receive mail via Roundcube, pat yourself on the back and grab a fine beverage!
Troubleshooting
Here are some useful commands to help troubleshoot your deployment.
sudo postqueue -p can be used to check if any pending emails are queued.
sudo postmap -q mydomain.com mysql:/etc/postfix/mysql-virtual-mailbox-domains.cf can be used to validate what domain names are accepted. You should receive the value of 1 if it exists.
sudo postmap -q [email protected] mysql:/etc/postfix/mysql-virtual-mailbox-users.cf will validate if a user account exists with the specified email address. You should receive the value of the email address of the user if it exists.
sudo postmap -q [email protected] mysql:/etc/postfix/mysql-virtual-mailbox-aliases.cf can be used to validate the alias of an email address. You should receive the email address of the user account if it does map back to another user.
tail -f /var/log/mail.log can be useful watching how emails are handled by postfix/dovecot to troubleshoot how messages are being handled
One of the hidden gems of Azure is HCM (Hybrid Connection Manager), which addresses the issue of Azure’s App Services (Web App, API App, Functions) having the ability to connect to resources hosted in other Azure environments, clouds, or on-premises. In many cases, VPN or ExpressRoute connectivity may be overkill or not a possibility in establishing connectivity to the requested service. The great thing is Hybrid Connections is all the traffic will be egress TCP 443 traffic to Azure via TLS 1.2, which can easily attest to the needs of many secured environments and not require ports to be opened inbound into the environment.
There are two ways to leverage Hybrid Connections for App Services in Azure:
For the purposes of this article, we are going to cover how to connect to a web service “on-premises” via the HCM Agent. While we are using a Web App as an example, keep in mind that this concept can be applied to all App Services such as Web Apps, API Apps, Logic Apps, and Azure Functions. In addition, this article will make a call to a web service on-premises, however keep in mind that HCM is able to connect to any TCP service such as MSSQL, MySQL, Oracle, Web Services, custom TCP service, mainframes, etc.
Tutorial
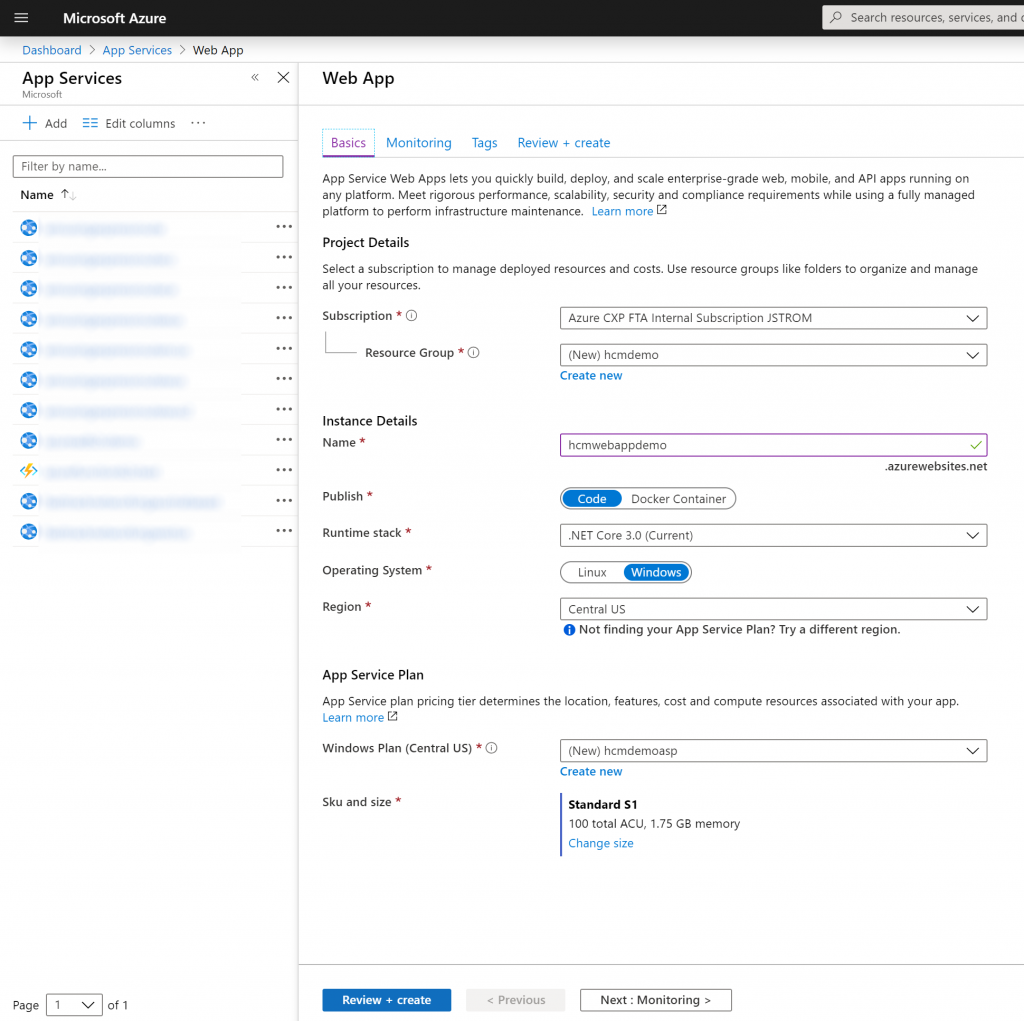
To begin, we will first deploy a Web App from the Azure Portal to give us access to the Hybrid Connection Manager blade. Note: You can leverage any App Service to create the hybrid connection manager instance, but you must be on a paid tier (Free tier will not work).
Select All services -> App Services -> click + Add
Fill out the required information, ensuring you are on a plan greater than Free. Select Review + create and Create
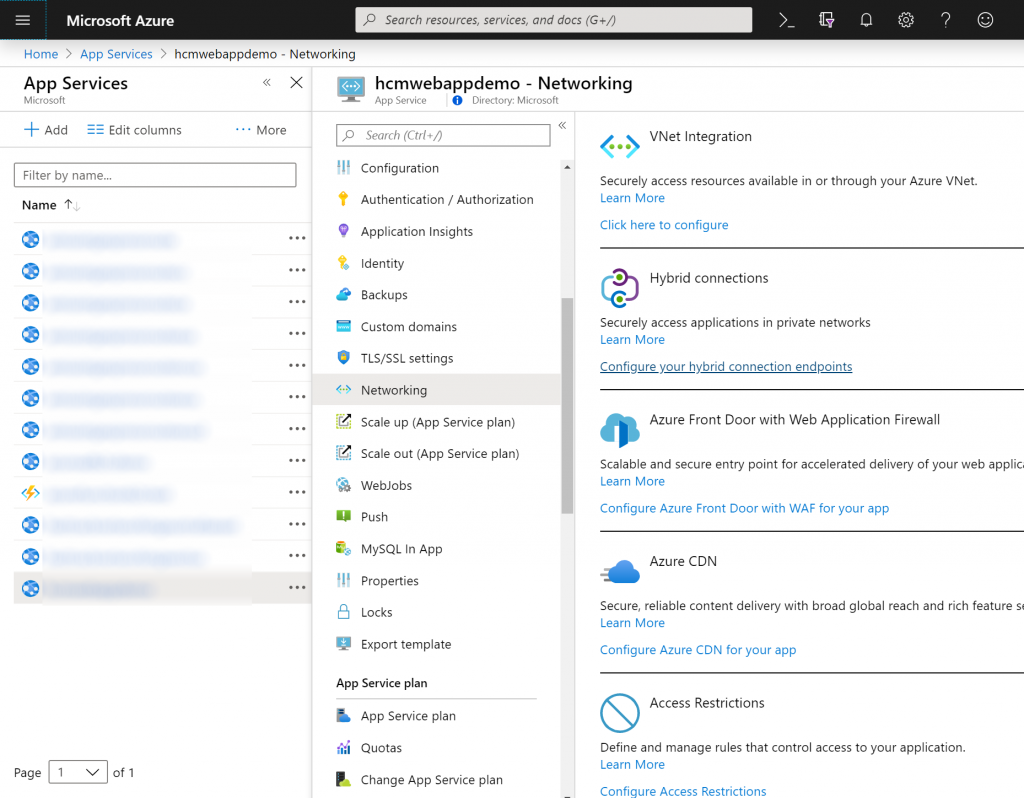
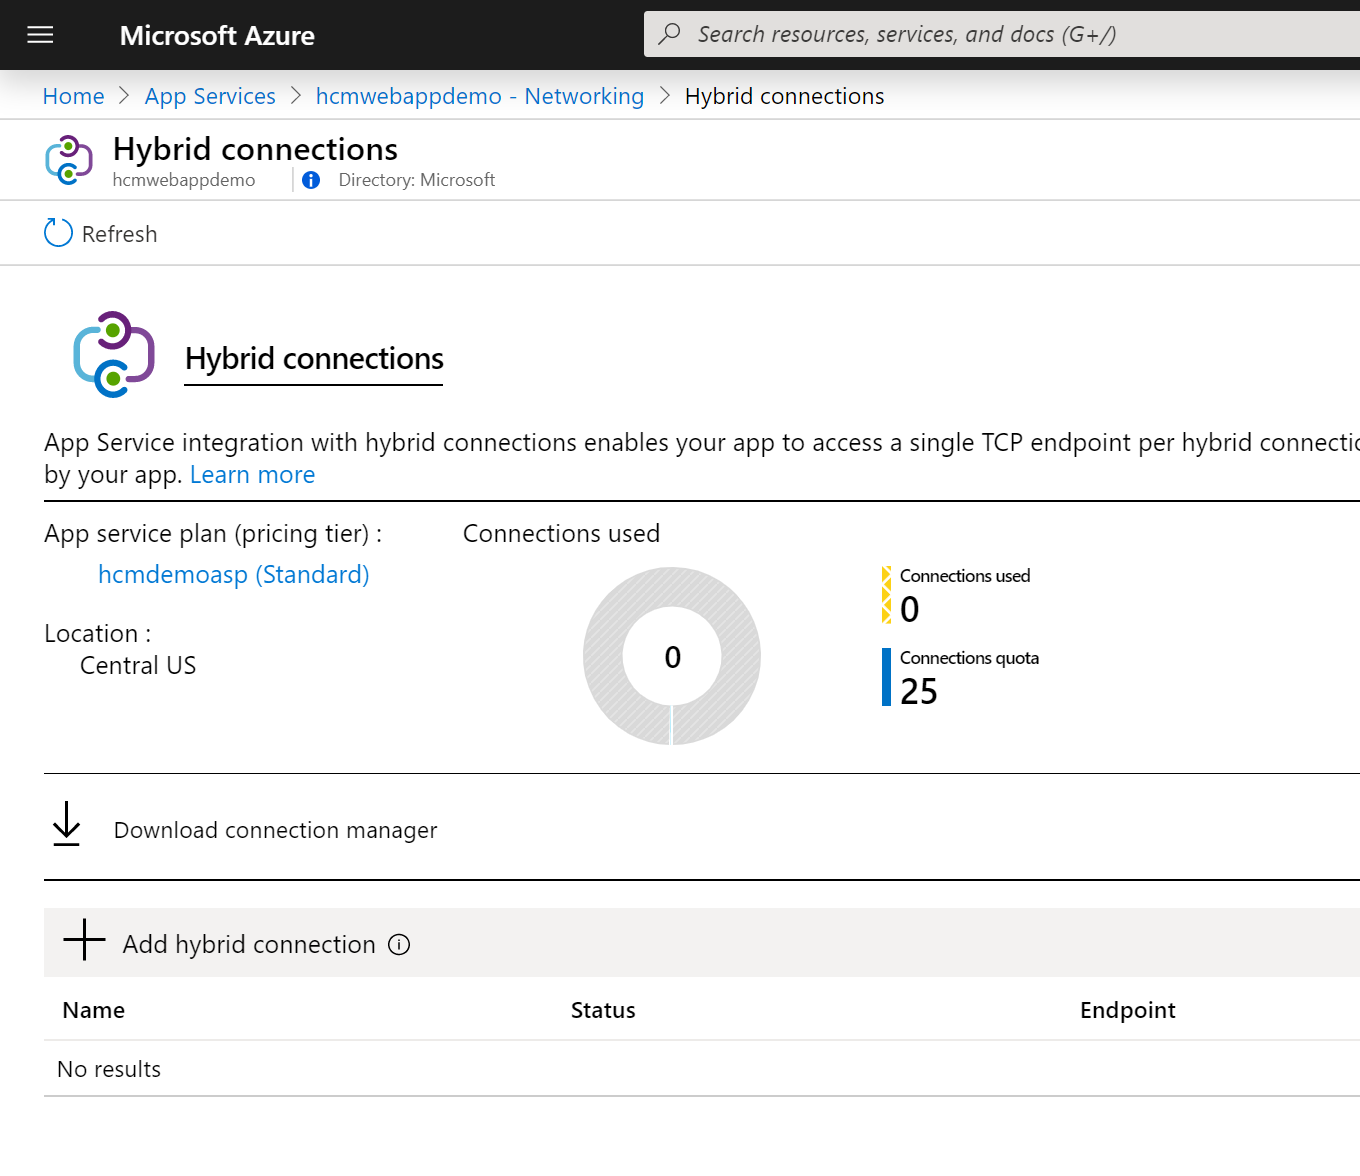
Once deployed, navigate to your Web App, select Networking, and click on Configure your hybrid connection endpoints
On the Hybrid connections screen, click on Download connection manager.
Note: This is the agent you will need to install in the environment that contains the service you are trying to access. The agent itself can be deployed on any machine as long as the machine can access the service you are trying to reach.
Installation of the agent is very straightforward. Complete the steps below.
Select HybridConnectionManager.msi
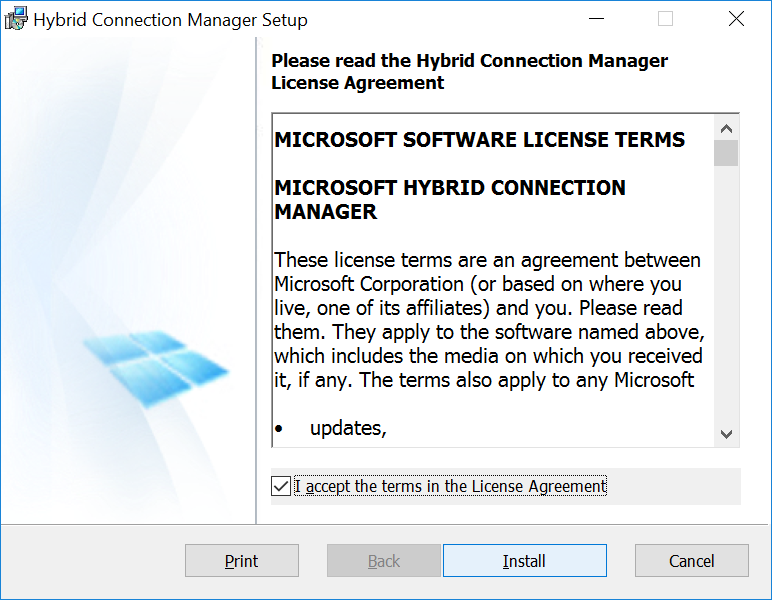
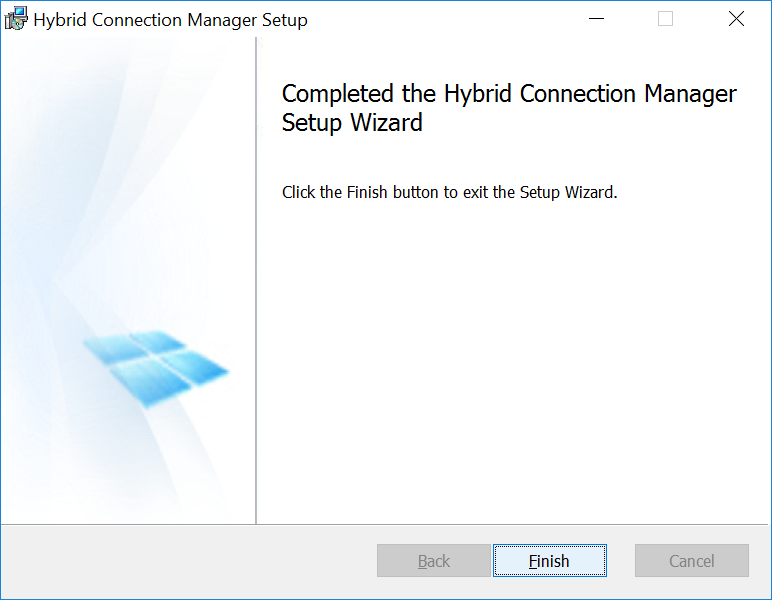
Read the EULA, select I accept the terms in the License Agreement, and click Install
Click Finish
Once installed, navigate back to the Azure Portal (portal.azure.com), click All services -> App Services -> Select your webapp, click Networking, select Configure your hybrid connection endpoints, and click Add hybrid connection.
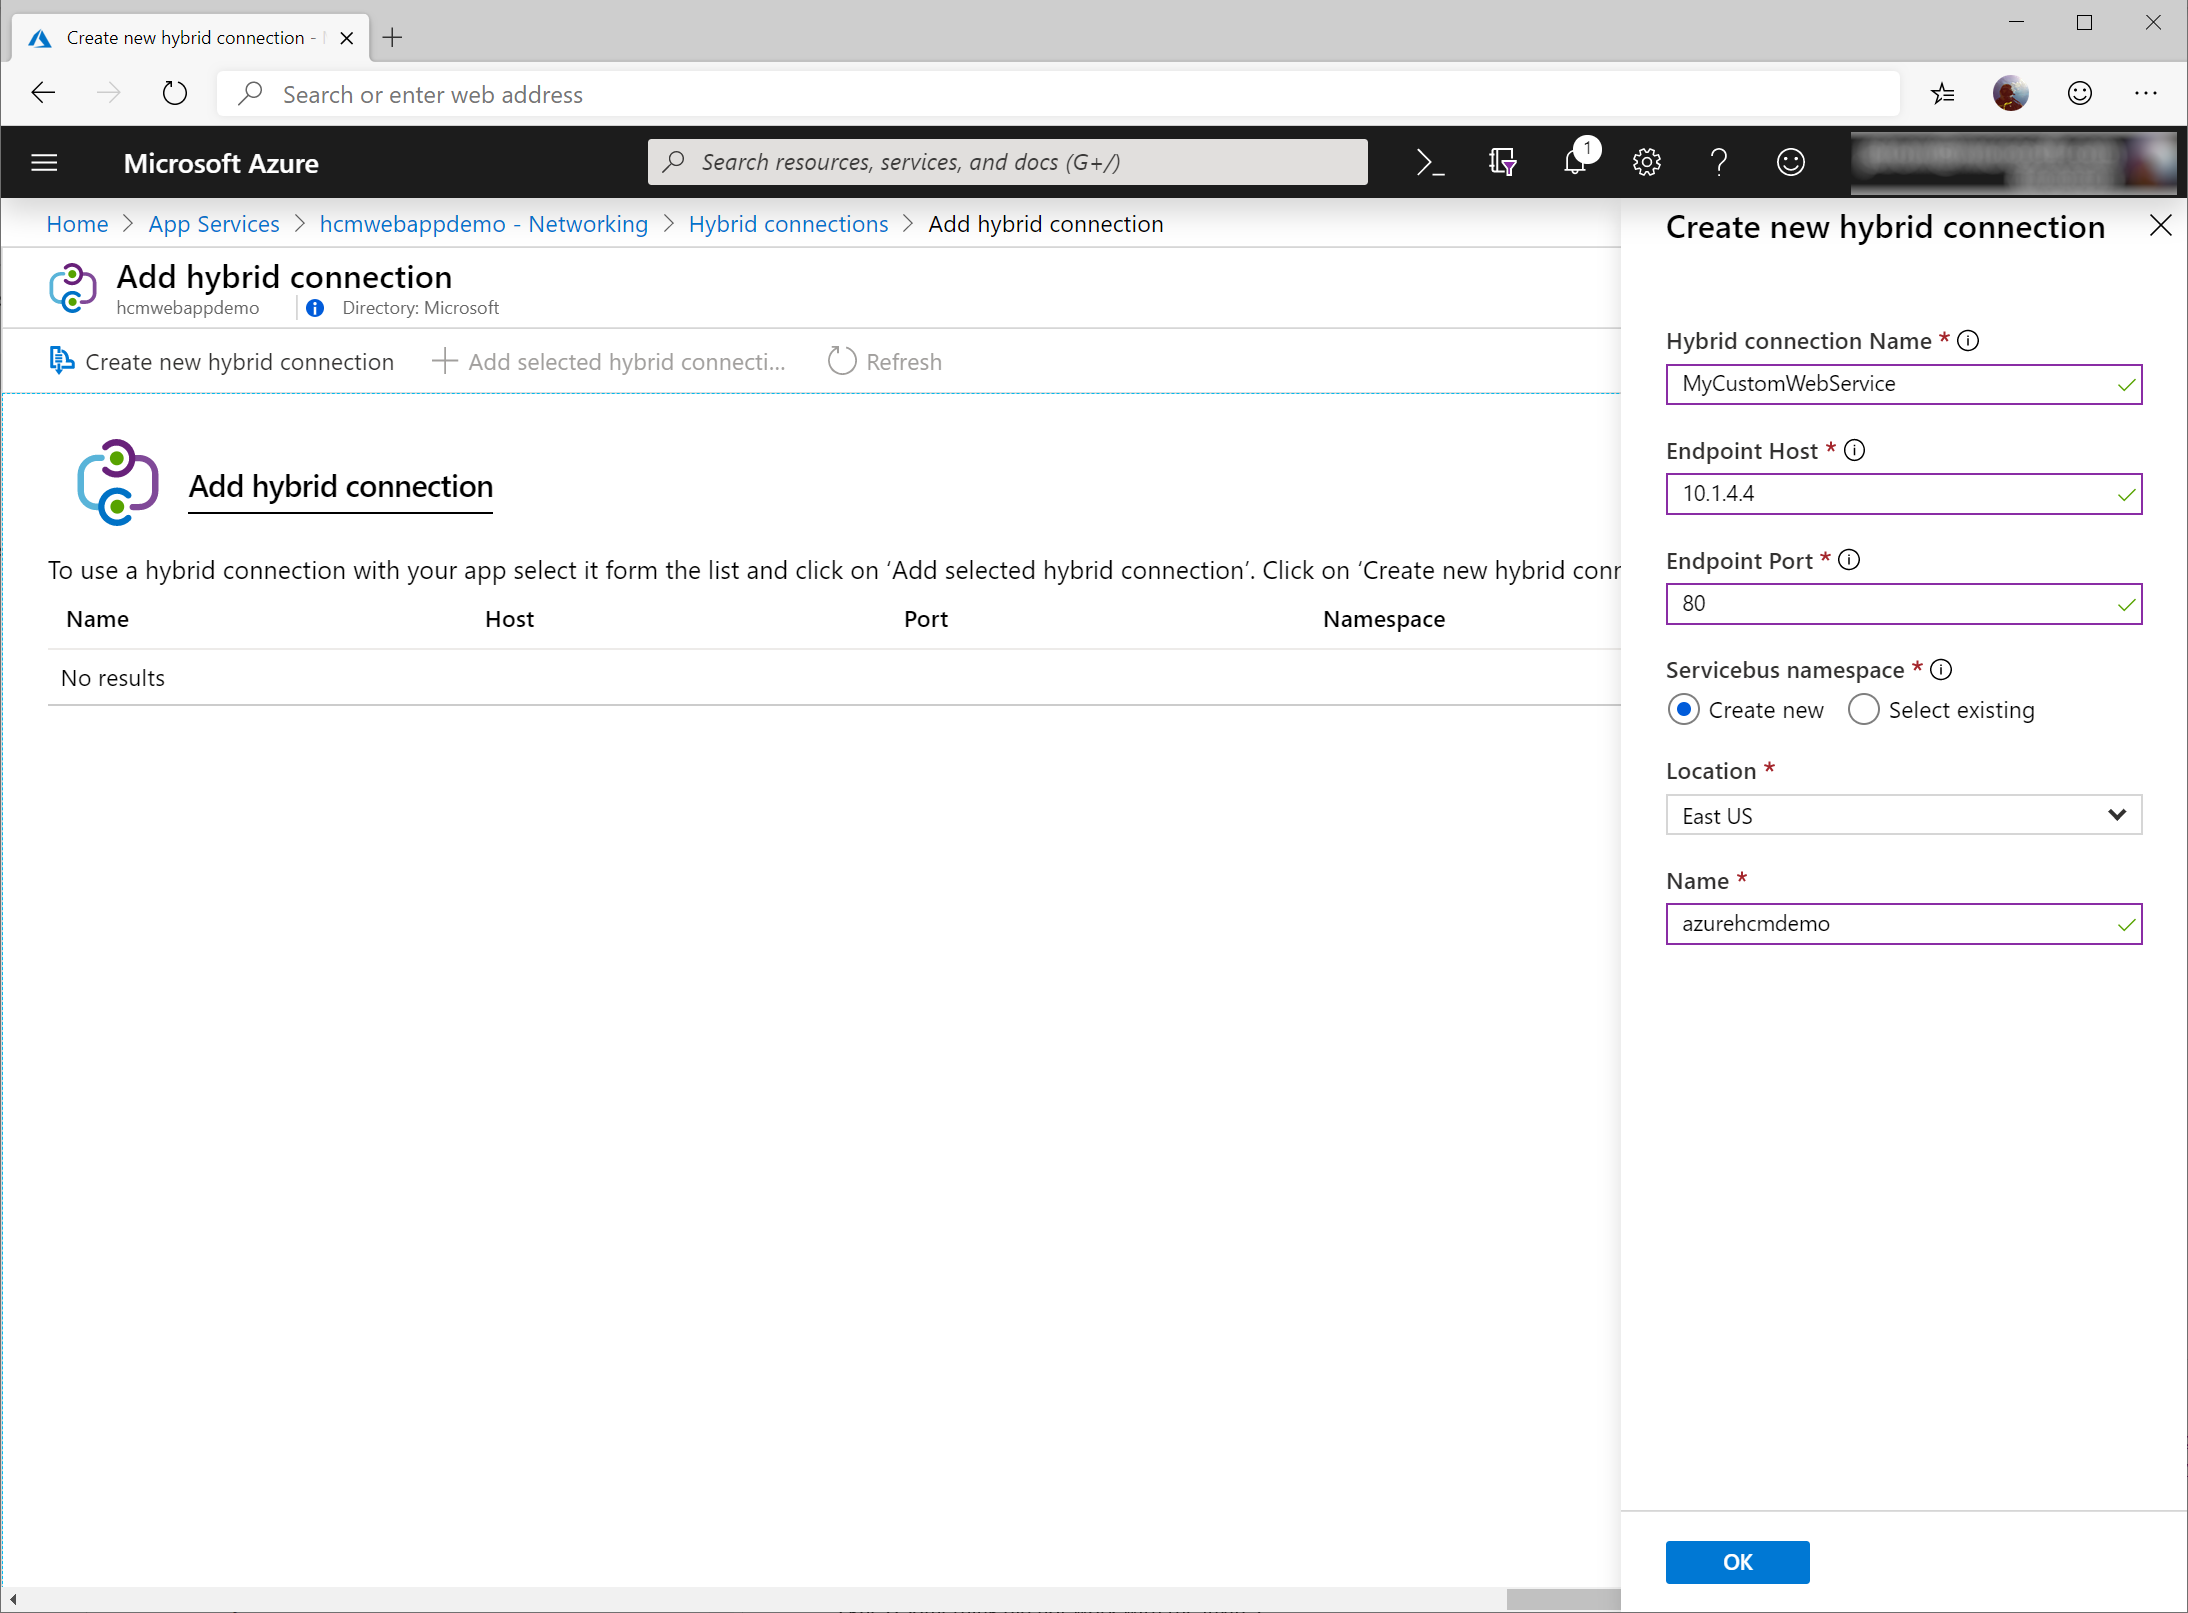
Click Create new hybrid connection and enter the following:
Hybrid connection Name
MyService
Endpoint Host
IPAddress or DNSNameOfTheService
Endpoint Port
PortNumberofYourService
Servicebus namepsace
Create new
Location
Pick the location of the Azure region you want to go to
Name
Enter a unique name for the service bus resource that will be created. This is a globally unique name accross all of Azure and must only consist of lowercase letters, numbers, and hyphens.
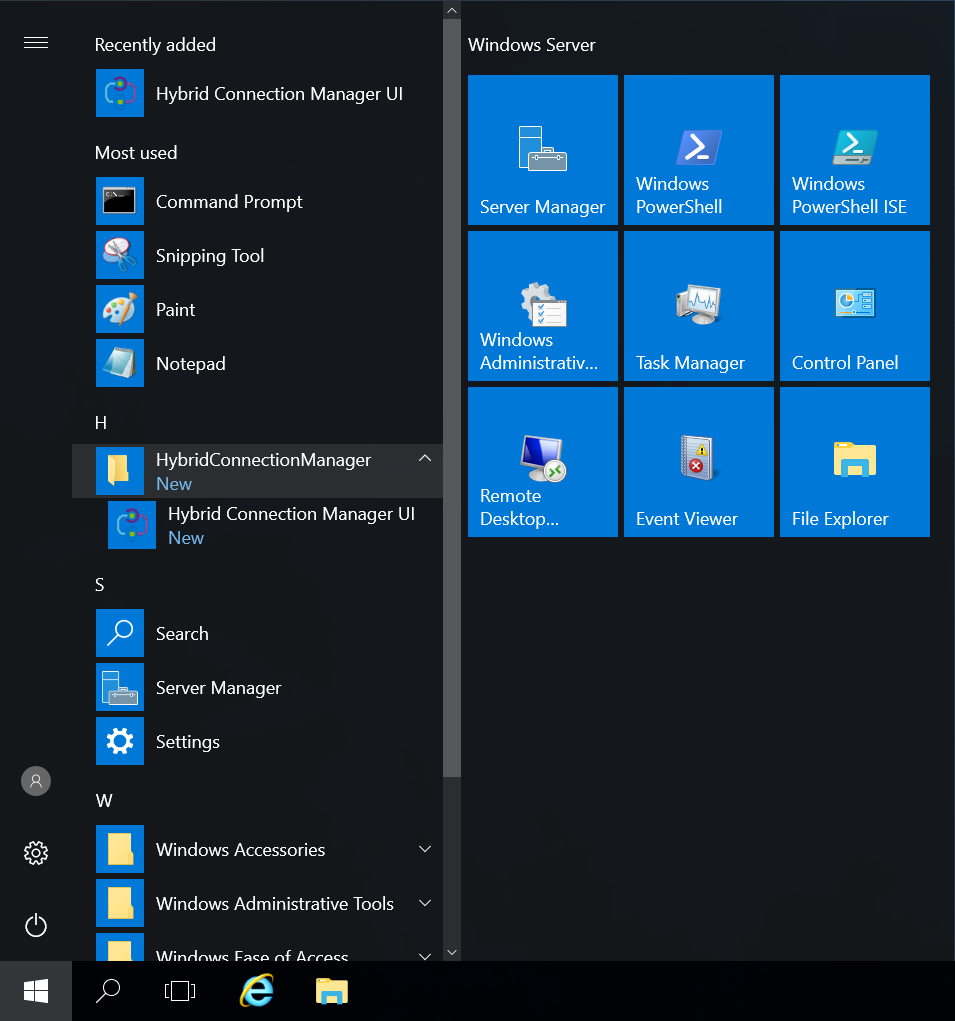
Click OK once you have filled out the information above. Once Azure has created the connection, navigate back to the machine you installed the agent on. On the machine, click Start, HybridConnectionManager, and select Hybrid Connection Manager UI.
Once the agent has launched, select Add a new Hybrid Connection.
This will prompt you to enter your Azure credentials. Enter your credentials in the prompt.
Note: if the machine is locked down and cannot leverage javascript, you can close out of the sign-in window and select Enter Manually on the previous step. Back in the Azure Portal, you can select your connection and copy the “Gateway Connection String” to connect this agent to Azure.
Once you have authenticated click the Subscription dropdown to select your Azure Subscription, select the connection you created via the portal, and click Save.
Once Saved, you should see the connection we created via the Azure Portal with the Azure Status of “Connected”. If you don’t see “Connected”, double check you don’t have a proxy blocking outbound TCP 443 requests to the Service Bus instance we created earlier (azurehcmdemo.servicebus.windows.net).
Note: To help with resiliency, you can deploy multiple agents on different machines to ensure resiliency/availability/scalability. When you select the same connection endpoint, HCM will automatically begin to load balance traffic between the agents.
Once you see the agent connected on-premises, you can validate from the Azure Portal we see the agent is connected as well. Via All services -> App Services -> your app service -> Networking -> Configure your hybrid connection endpoints, you should see “Connected” via the Status column on your Hybrid connections blade.
At this point, within your application, you should be able to reference the contents of the on-premises machine via the same connection string you may have used before. Below I’ve added an example showing an on-premises IIS server that displays the text “Moo” when you browse to the web page. Via my Web App in Azure, I created a quick PHP script that will request the on-premises server, in which HCM on the App Service will place the request on a Service Bus queue, the HCM agent on-premises will pull down the request, forward the request to the Web App on-premises, place the response back on the queue, and the web app will display the result “Moo”.
Hope this helps! If you have any questions or comments feel free to reach out below.
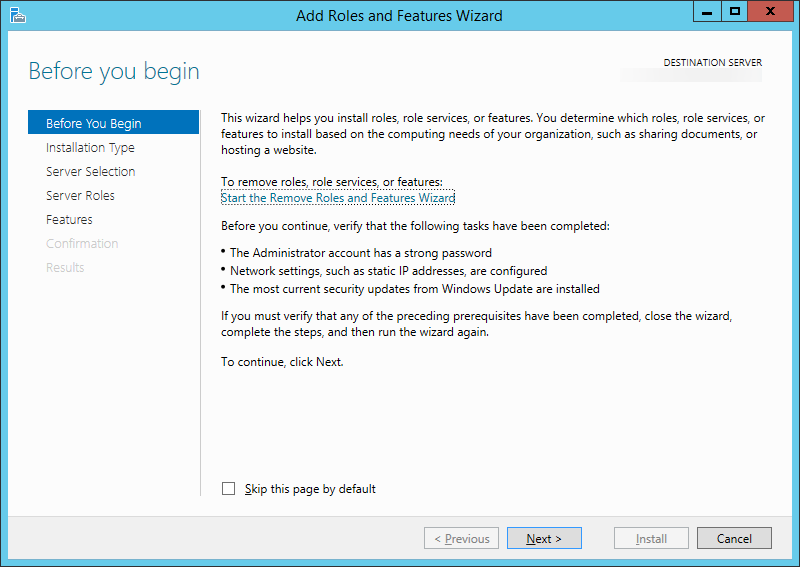
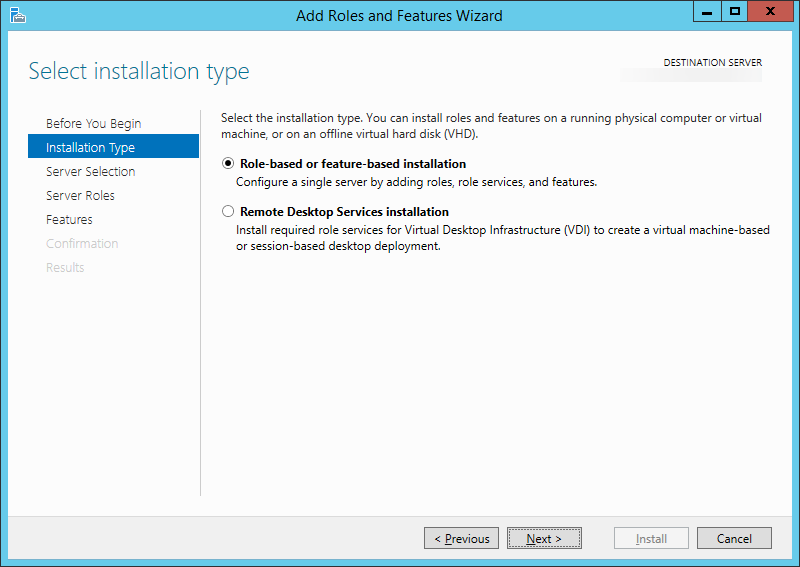
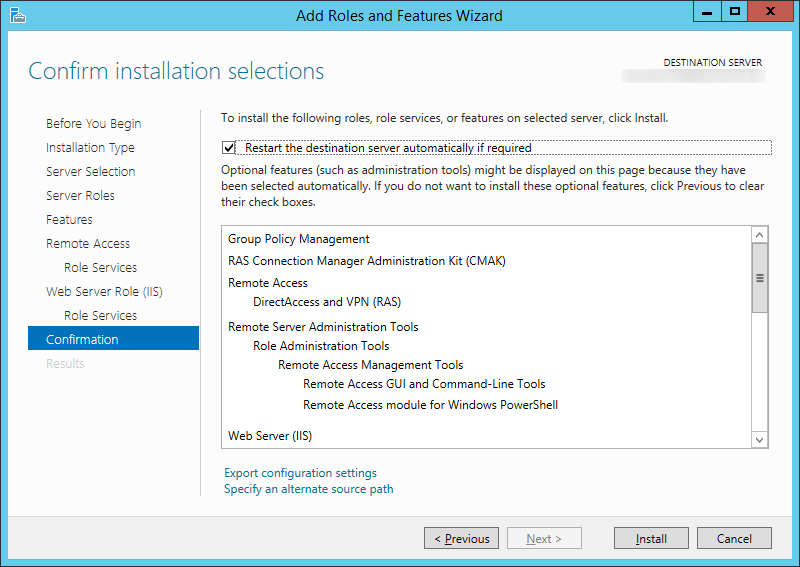
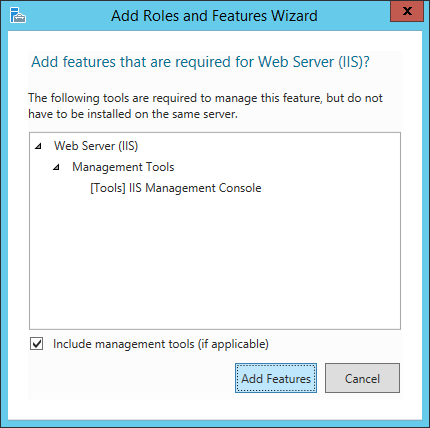
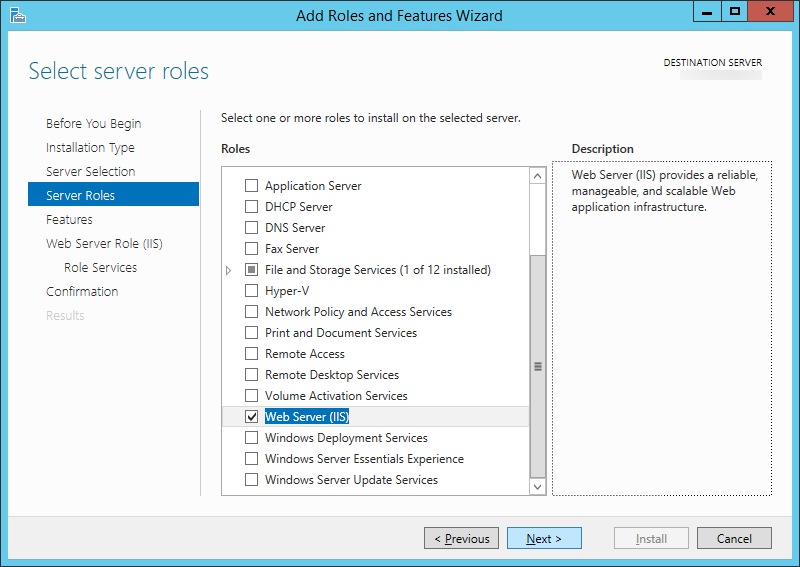
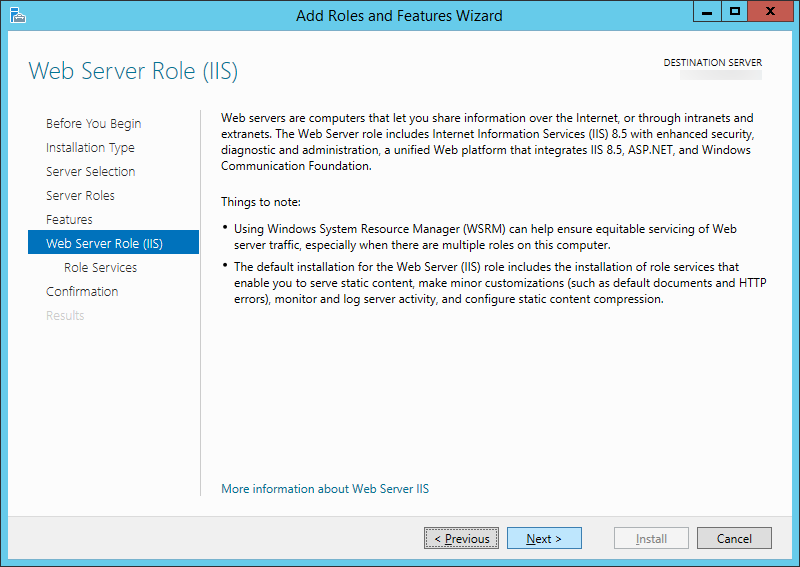
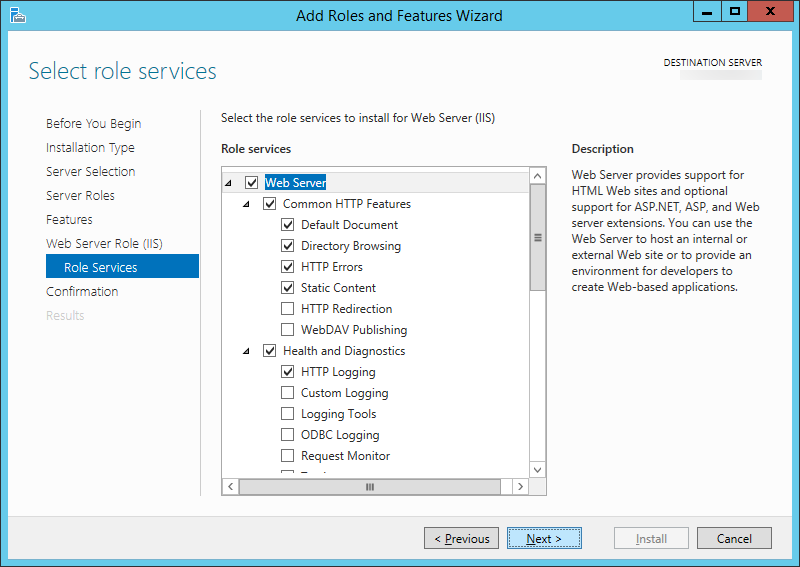
Here is a tutorial on how to install IIS on Server 2012 and Server 2012 R2. The installation process for this is very straight forward and does not differ much from Server 2008 R2. This guide will only go over the basic install, additional configuration of IIS is outside the scope of this tutorial. Before beginning, you can choose to install IIS via PowerShell or the GUI. Either option will result with the exact same configuration.
Per the following Technet article (http://technet.microsoft.com/en-us/library/hh508781.aspx) Endpoint Protection in System Center 2012 Configuration Manager provides security, antimalware, and Windows Firewall management for computers in your enterprise.
When you use Endpoint Protection with Configuration Manager, you have the following benefits:
You can configure antimalware policies and Windows Firewall settings to selected groups of computers, by using custom antimalware policies and client settings.
You can use Configuration Manager software updates to download the latest antimalware definition files to keep client computers up-to-date.
You can send email notifications, use in-console monitoring, and view reports to keep administrative users informed when malware is detected on client computers.
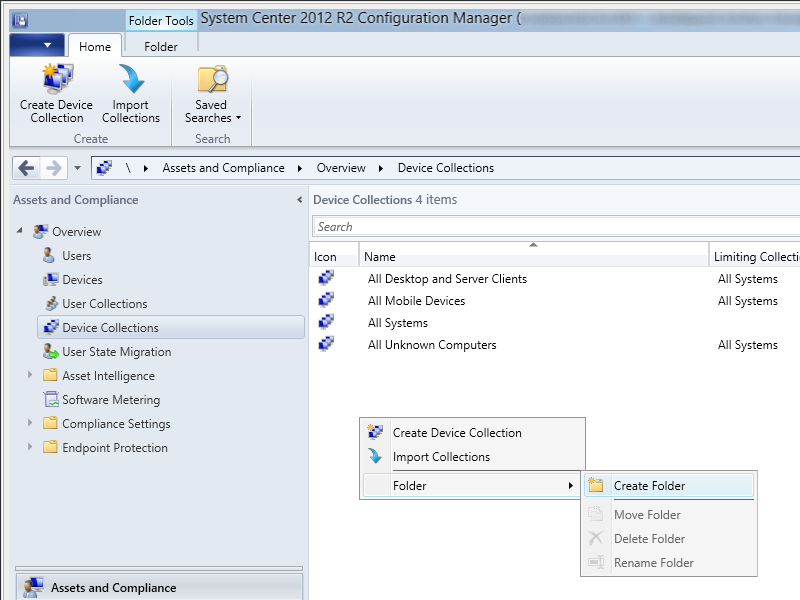
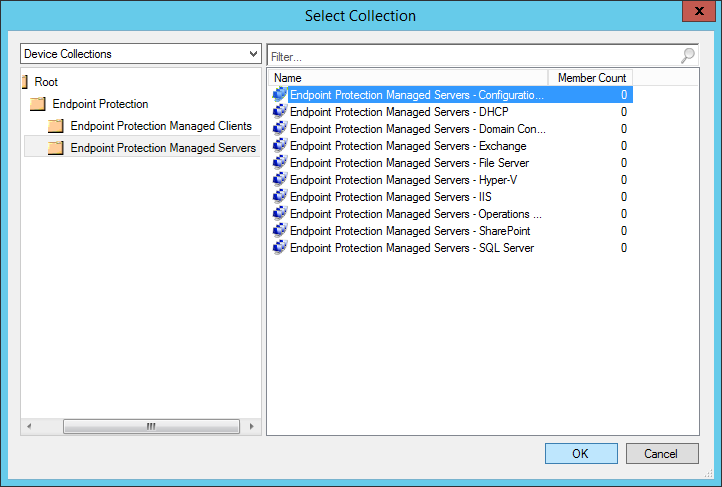
Creating Endpoint Protection Hierarchy via Folders
Launch the System Center 2012 R2 Configuration Manager console
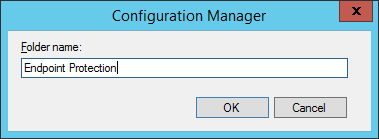
On the Assets and Compliance pane, select Device Collections, and then right click and select Create Folder
Enter Endpoint Protection for the folder name and click OK
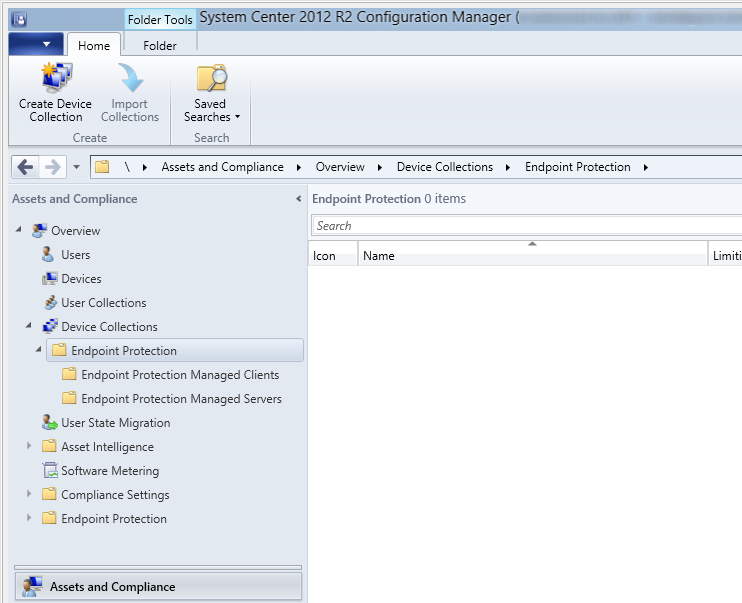
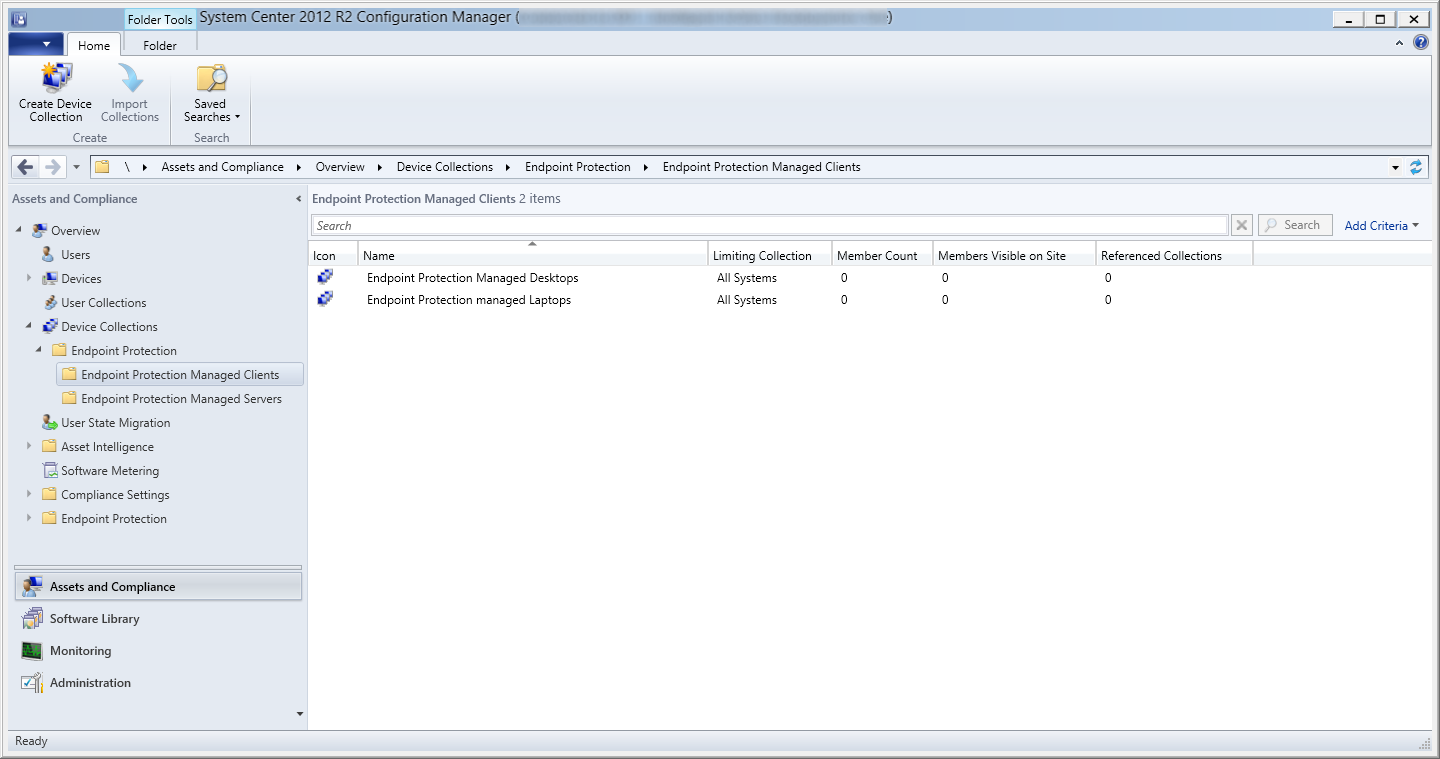
Select your Endpoint Protection folder under Device Collections and create two more folders called Endpoint Protection Managed Clients and Endpoint Protection Managed Servers
Create Device Collections to categorize devices managed by SCCM
Launch the System Center 2012 R2 Configuration Manager console
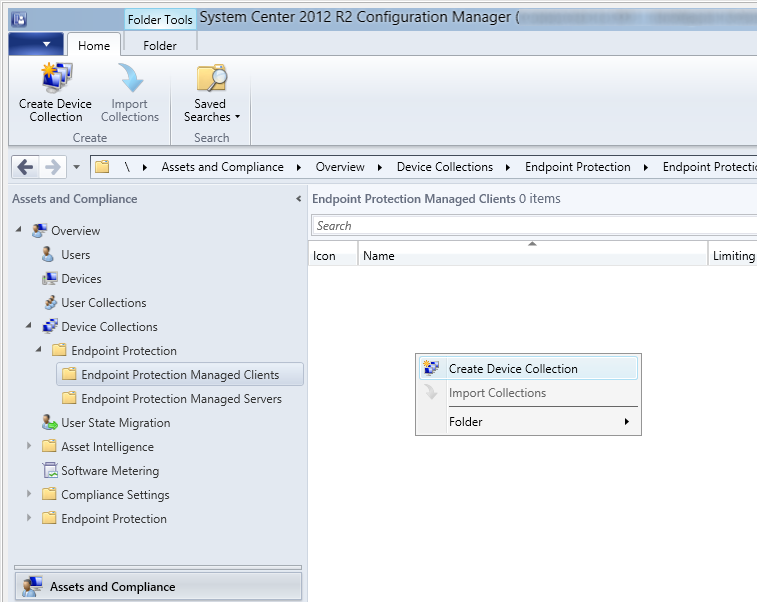
On the Assets and Compliance pane, select Device Collections, Endpoint Protection Managed Clients, and right click select Create Device Collection
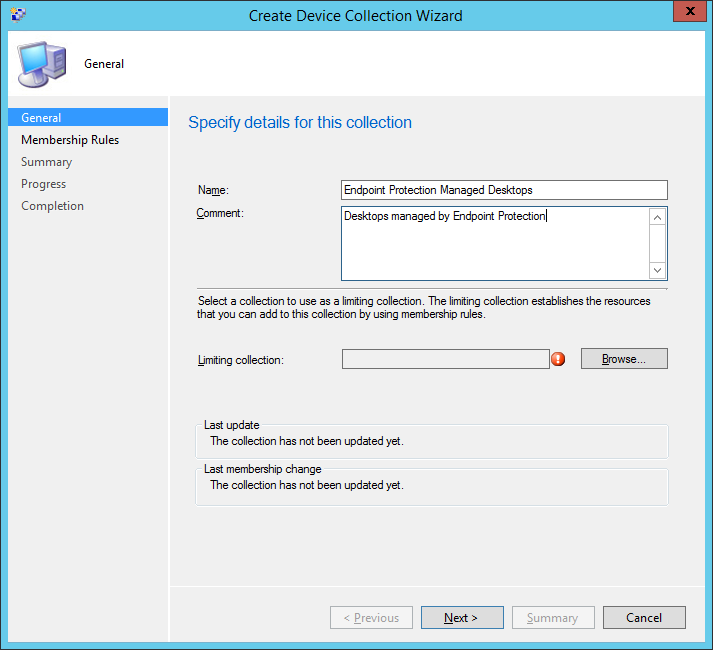
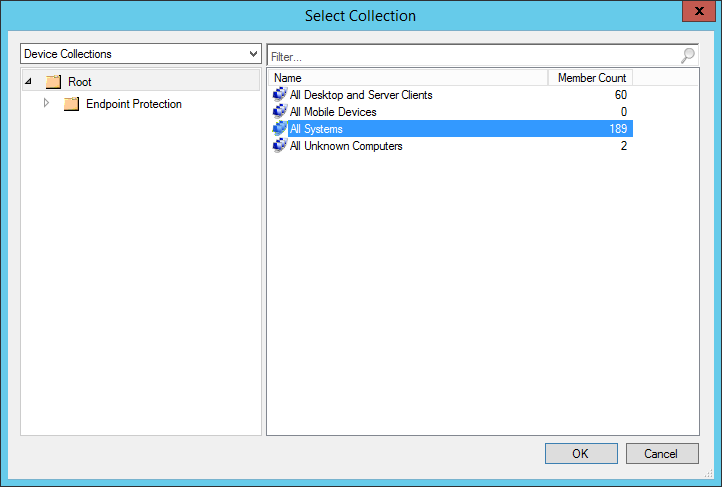
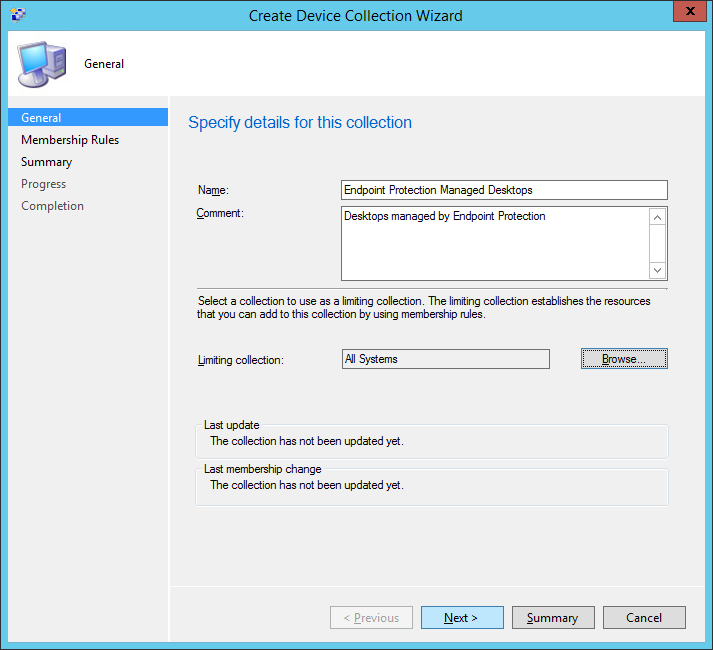
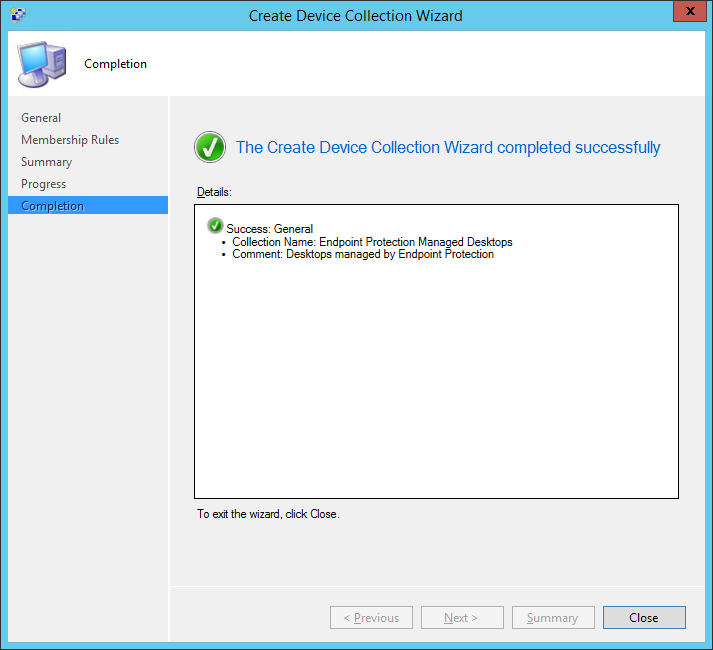
Enter Endpoint Protection Managed Desktops for the name and then a comment describing what the group will hold (Desktops in this example), and then click Browse…
Select All Systems and click OK
Click Next >
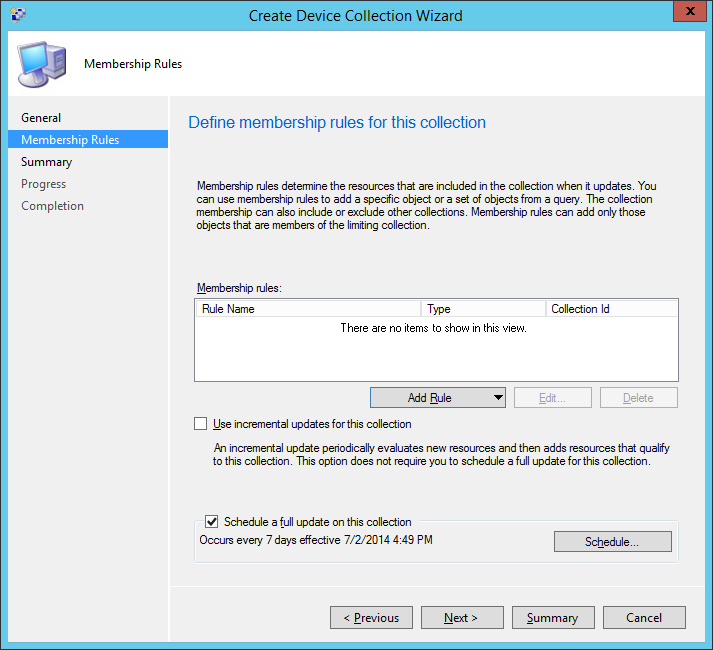
Click Next >
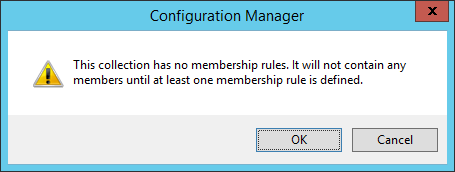
Click OK on the dialog box explaining we have set no rules
Click Next >
Click Close
Repeat steps 2-9 to create another group for Laptops
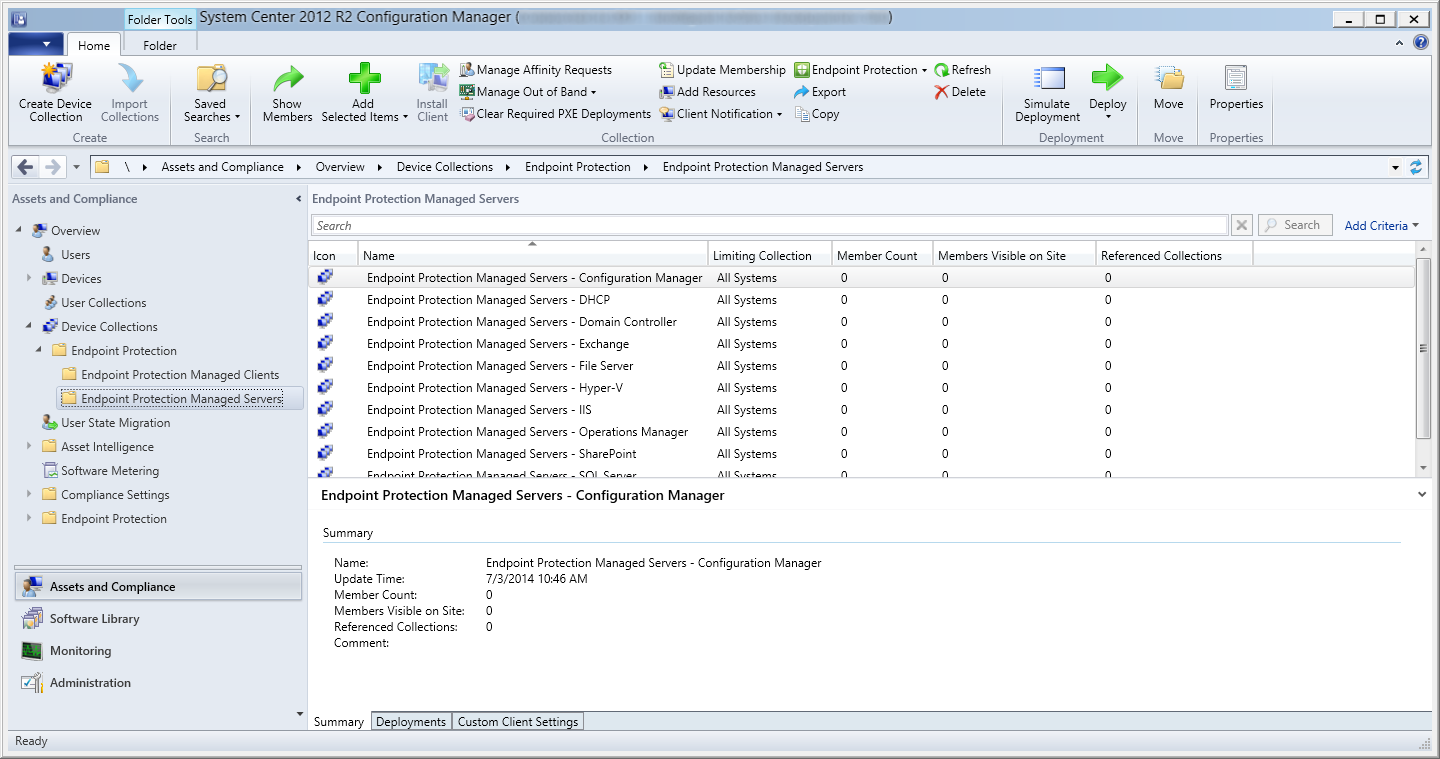
Select Endpoint Protection Managed Servers and repeat steps 2-9 to create the following groups
Note: This step is optional, this i more for organization. If you don’t have all of these services/servers deployed in your environment, you don’t have to create these Collections.
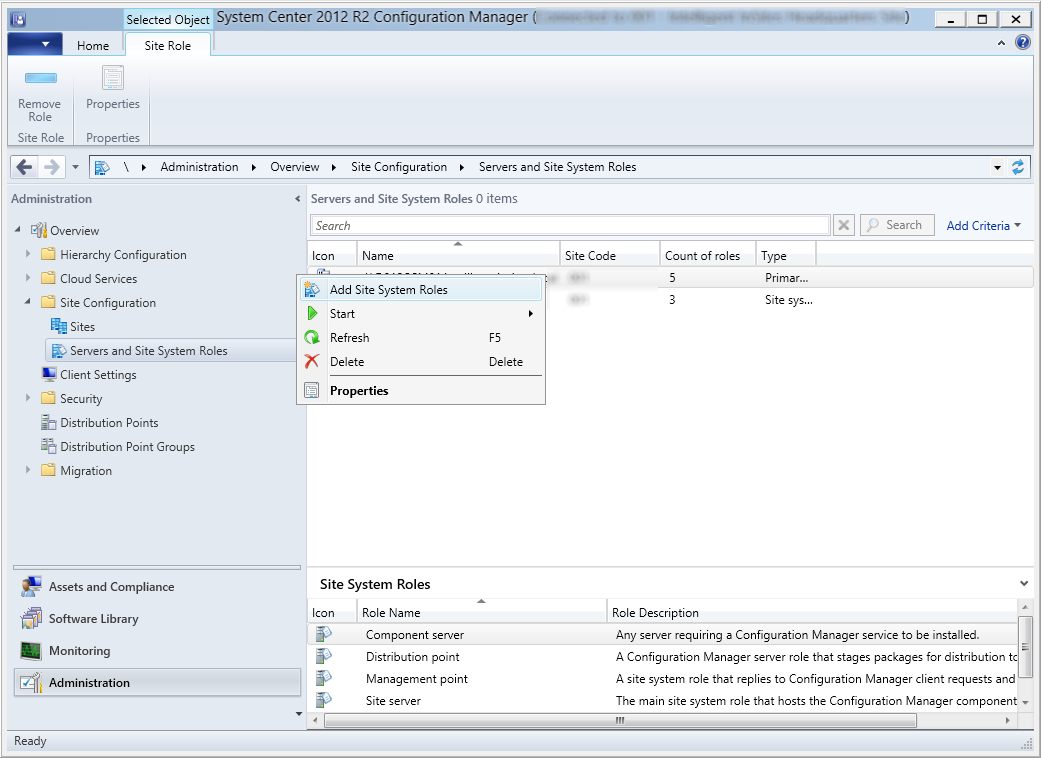
Launch the System Center 2012 R2 Configuration Manager console
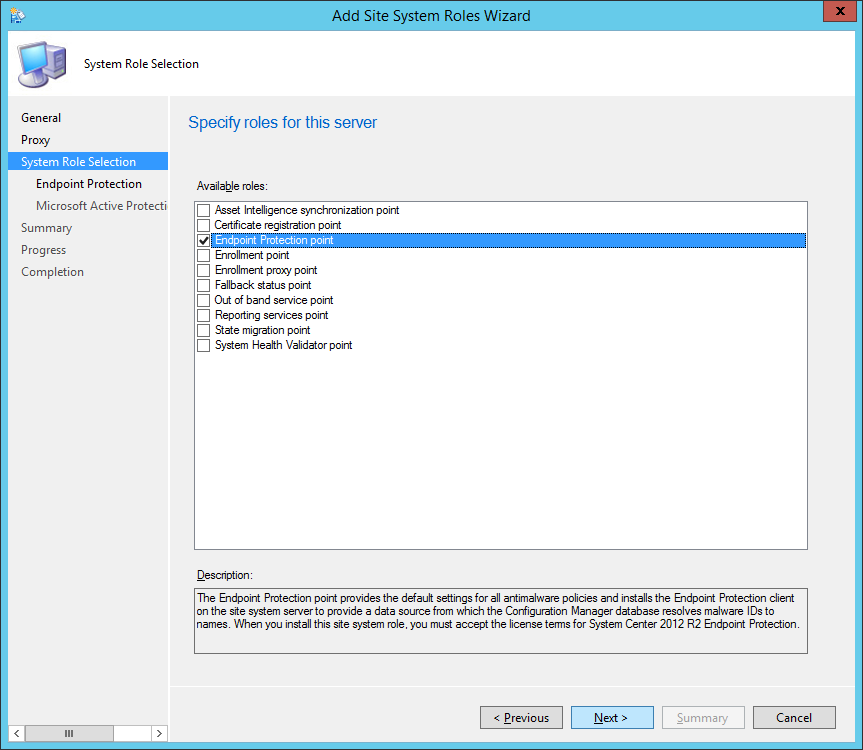
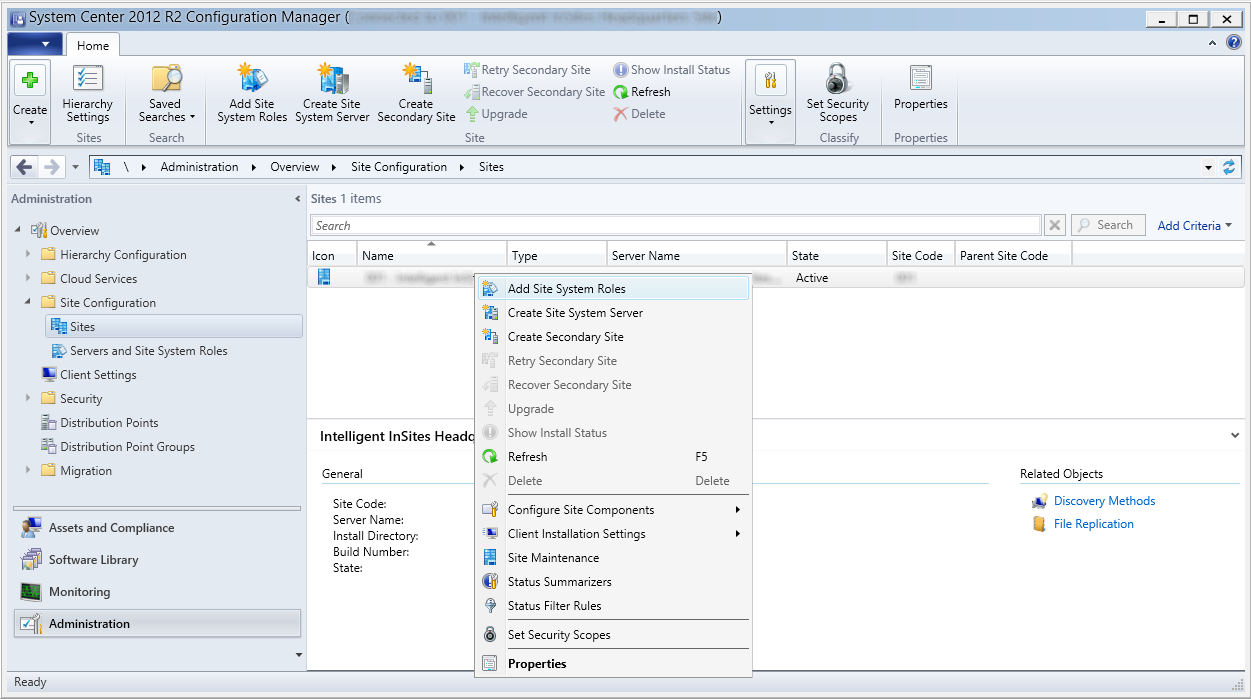
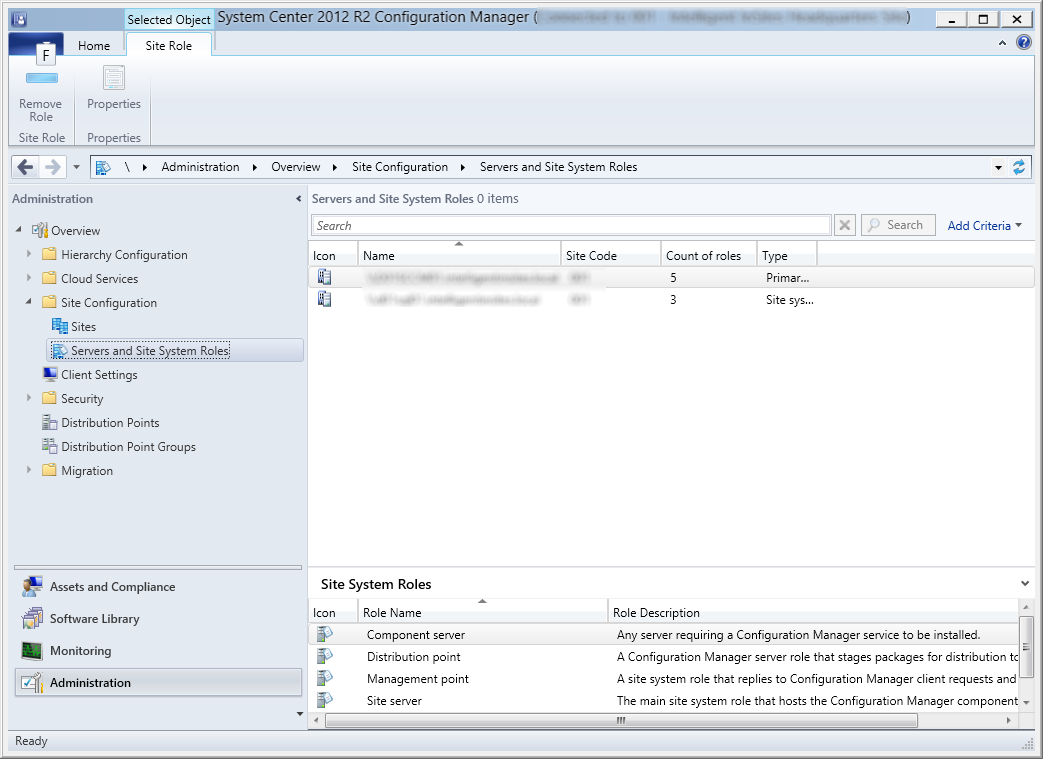
Select Administration, Site Configuration, Servers and Site System Roles, and right click on your Primary site and select Add Site System Roles
Click Next >
Click Next >
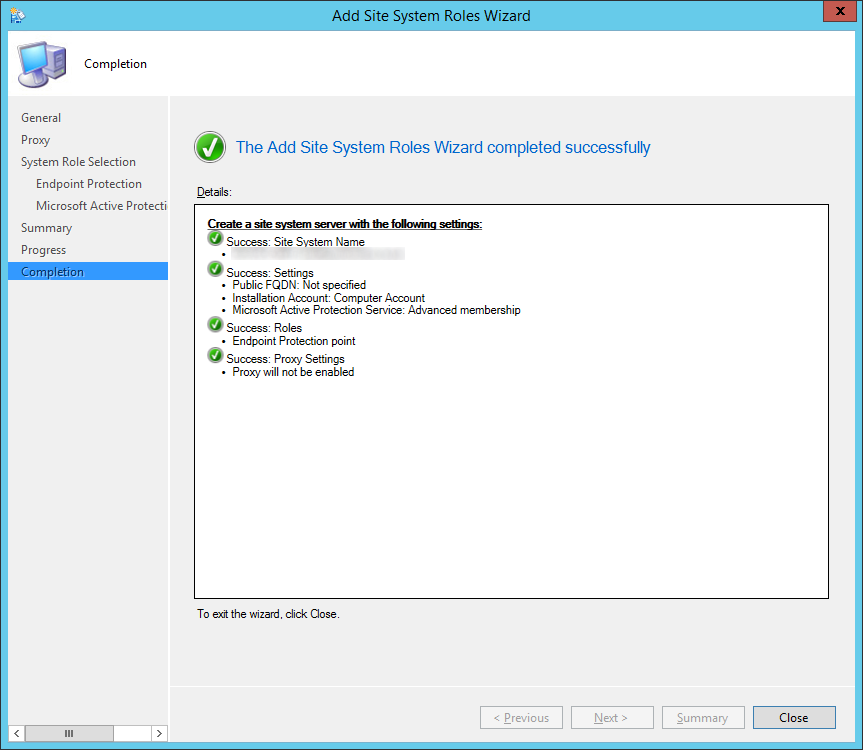
Check Endpoint Protection point
Click OK on the Configuration Manager dialog
Click Next >
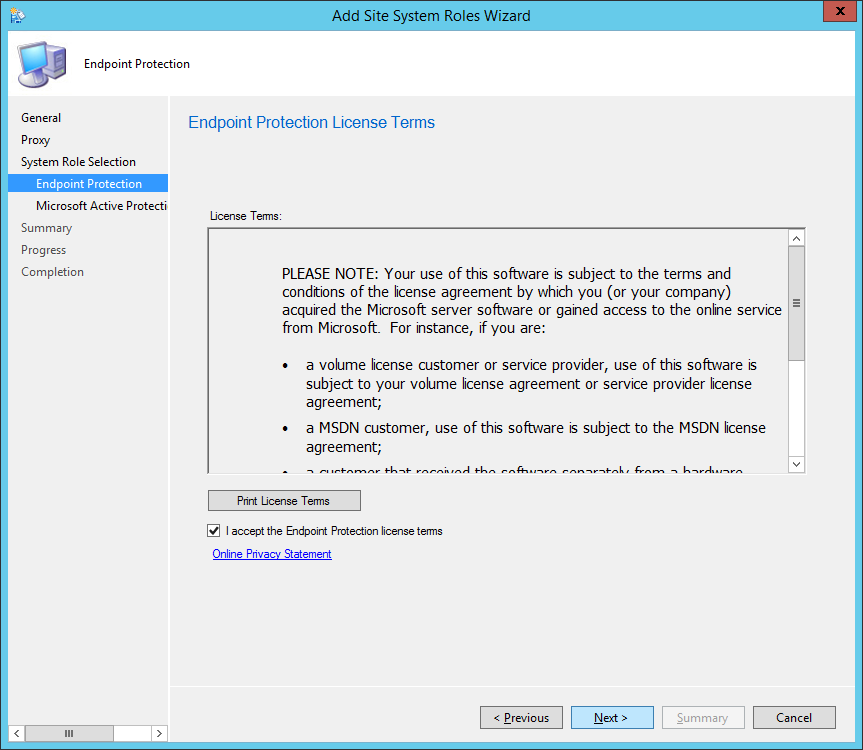
Check I accept the Endpoint Protection license terms and click Next >
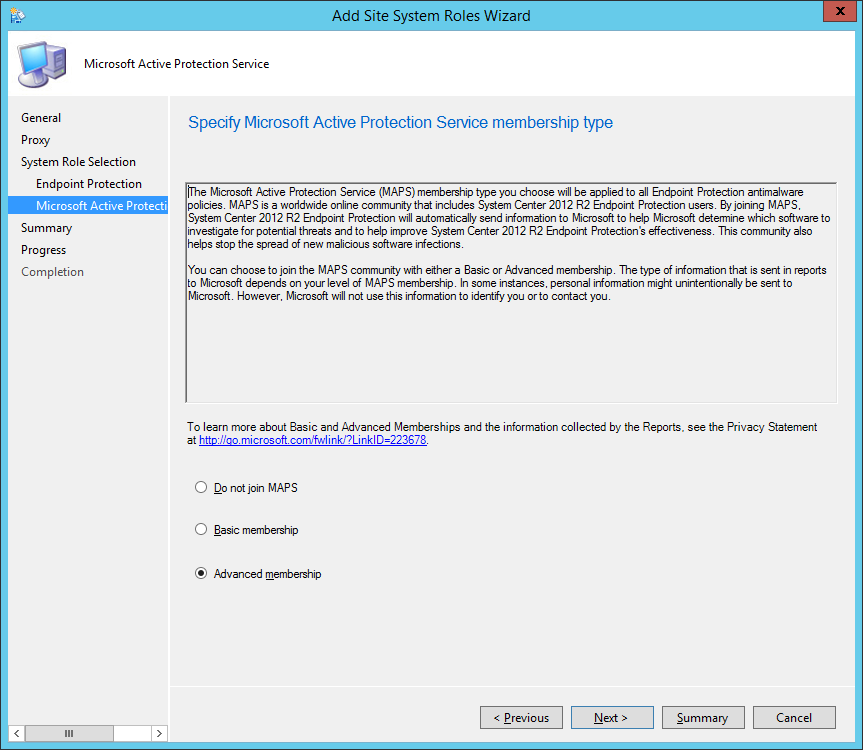
Check Advanced membership and click Next >
Note: MAPS can be joined with a basic or an advanced membership. Basic member reports contain the information described above. Advanced member reports are more comprehensive and may include additional details about the software Endpoint Protection detects, including the location of such software, file names, how the software operates, and how it has impacted your computer. These reports, along with reports from other Endpoint Protection users who are participating in MAPS, help Microsoft researchers discover new threats more rapidly. Malware definitions are then created for programs that meet the analysis criteria, and the updated definitions are made available to all users through Microsoft Update. See http://technet.microsoft.com/library/hh508835.aspx for full details.
My thoughts on this are to go with Advanced. If you are using the AV product, may as well help contribute towards making the product detect anomalies more accurately (I’ll turn my Microsoft fan-boyness off now :))
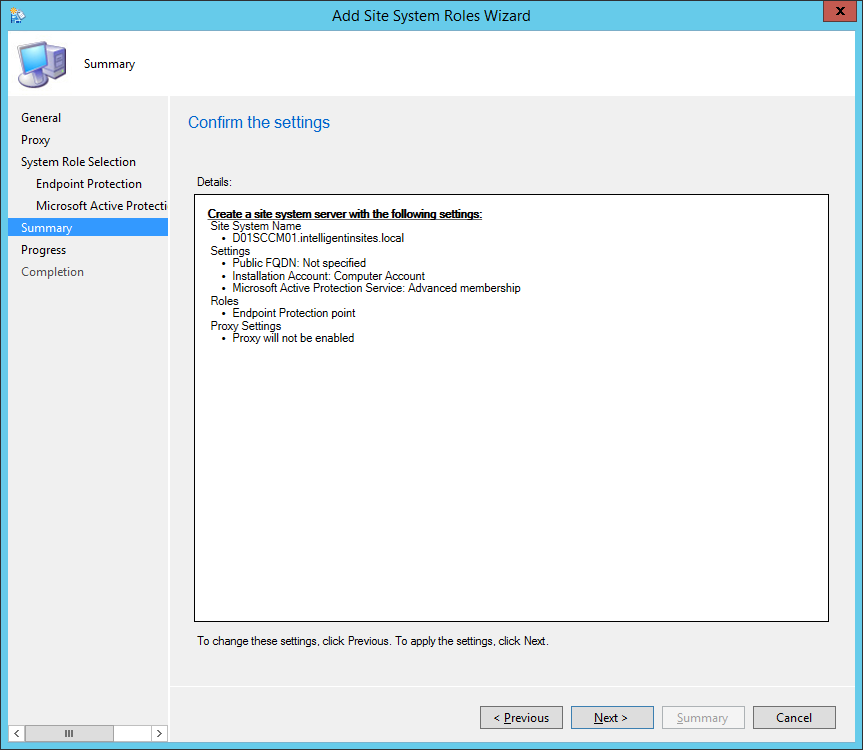
Click Next >
Click Close
Configuring Endpoint Protection Alerting
Email Alerting
Device Collection Alerting
Configure SUP for Endpoint Protection
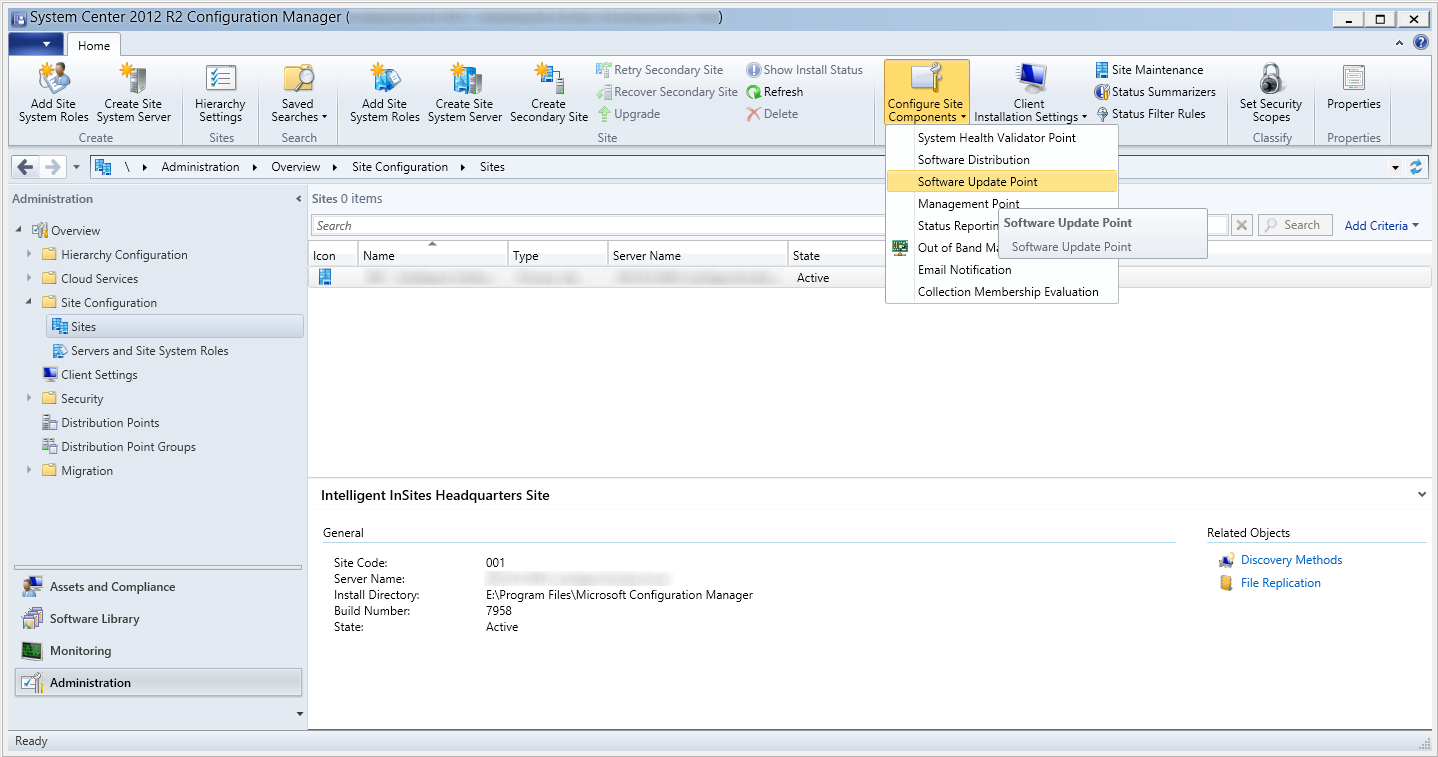
Launch the System Center 2012 R2 Configuration Manager console
Select Administration, Overview, Site Configurion, Sites and select Settings, Configure Site Components, Software Update Point
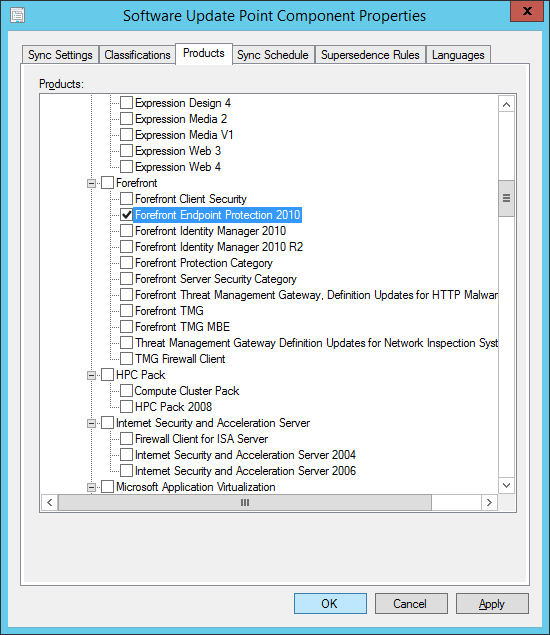
Select the Products tab and then check Forefront Endpoint Protection 2010 and click OK
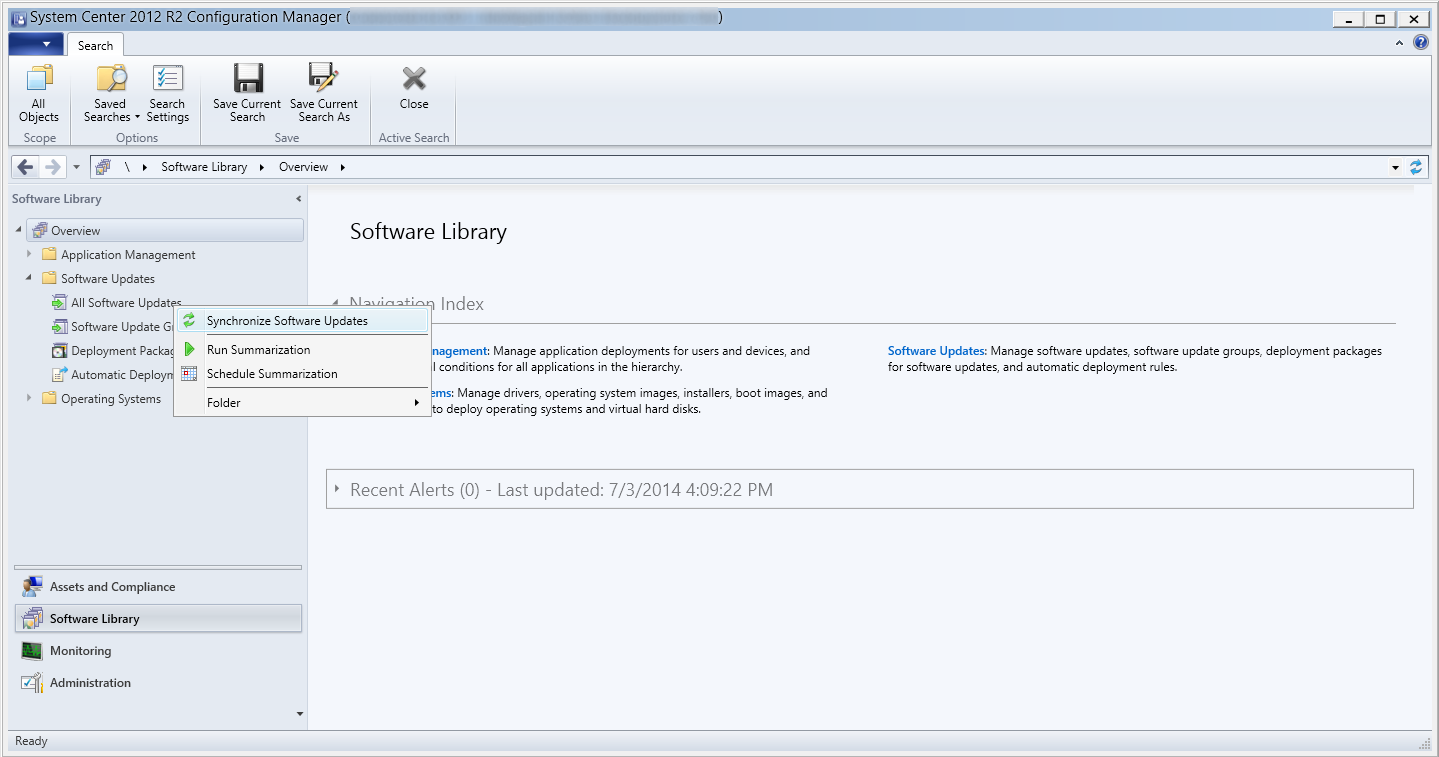
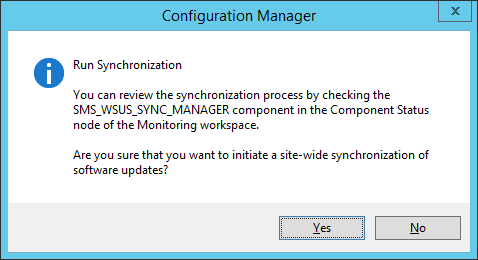
Select Software Library, expand Software Updates and right click on All Software Updates and select Synchronize Software Updates
Click Yes on the Run Synchronization dialog box
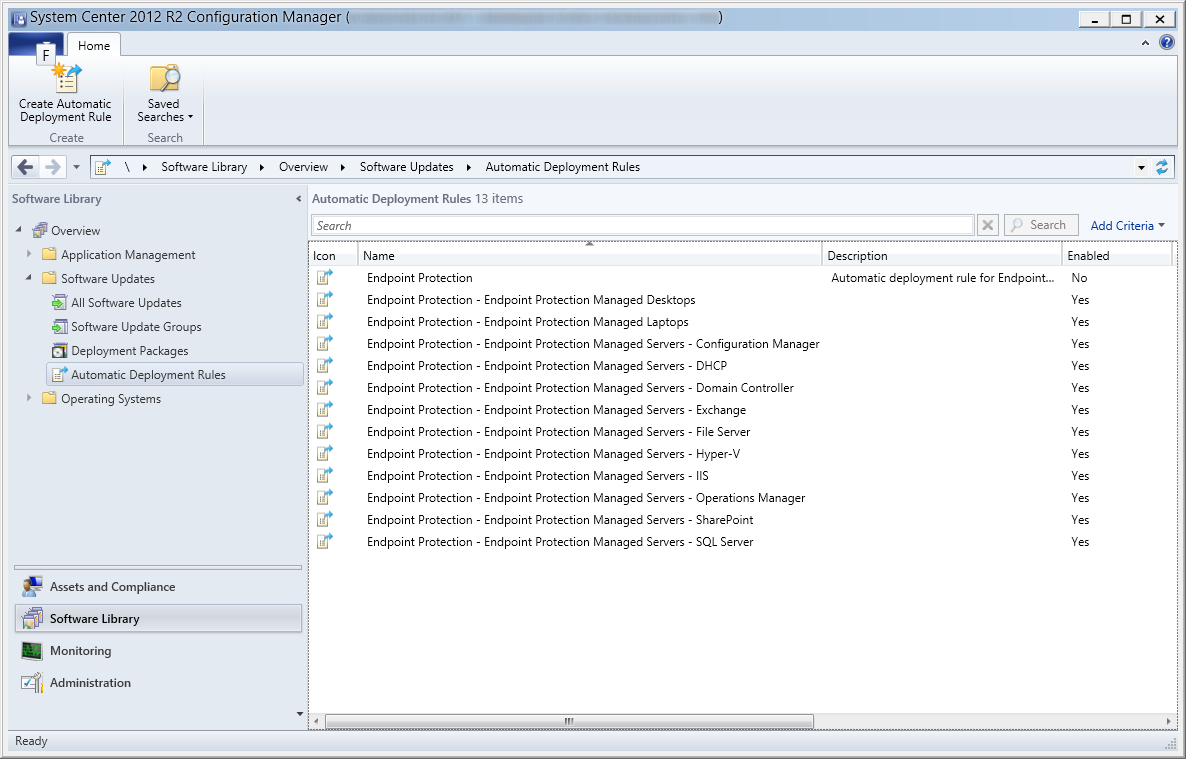
Configure SUP to deliver Definition Updates using an Automatic Deployment Rule
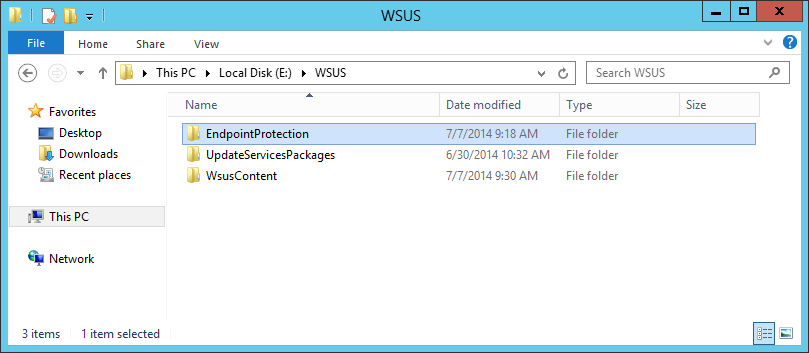
Create a new shared folder called EndpointProtection in your WSUS directory
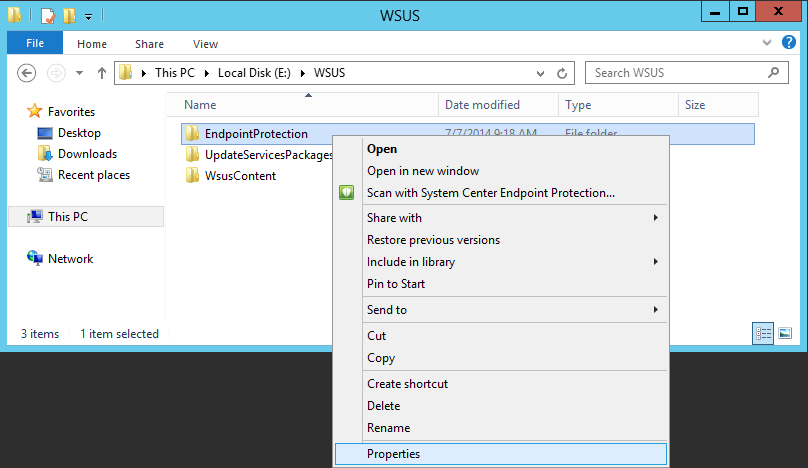
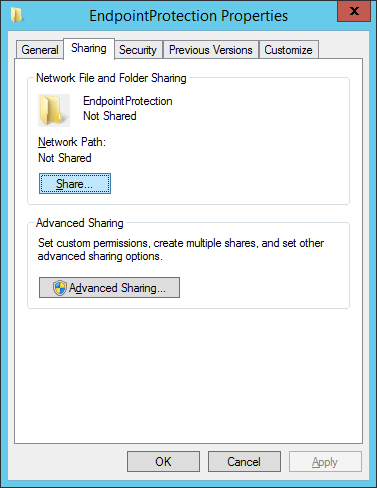
Share the folder with the Everyone group
Right click on the folder and select Properties
Select the Sharing tab and then click the Share… button
Type Everyone and then click Add. Ensure the Permission level is Read and then click Share
Launch the System Center 2012 R2 Configuration Manager console
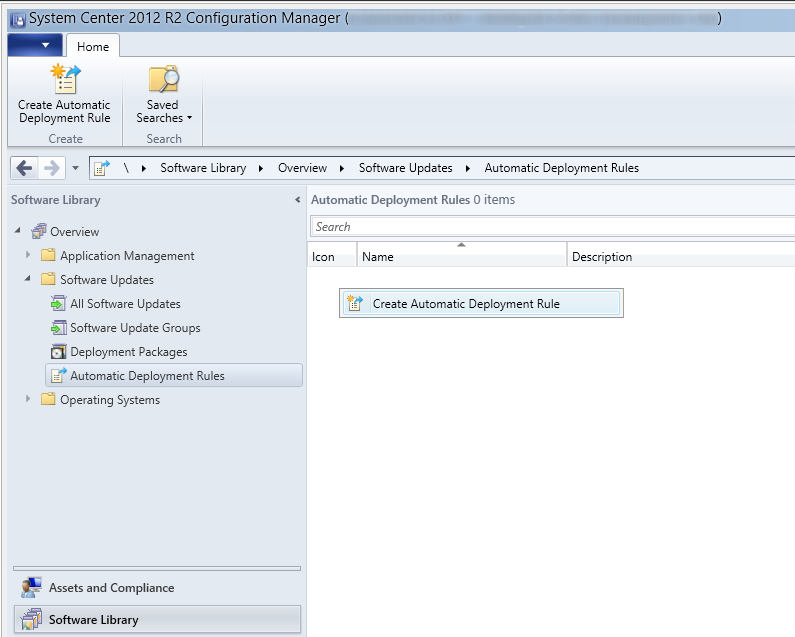
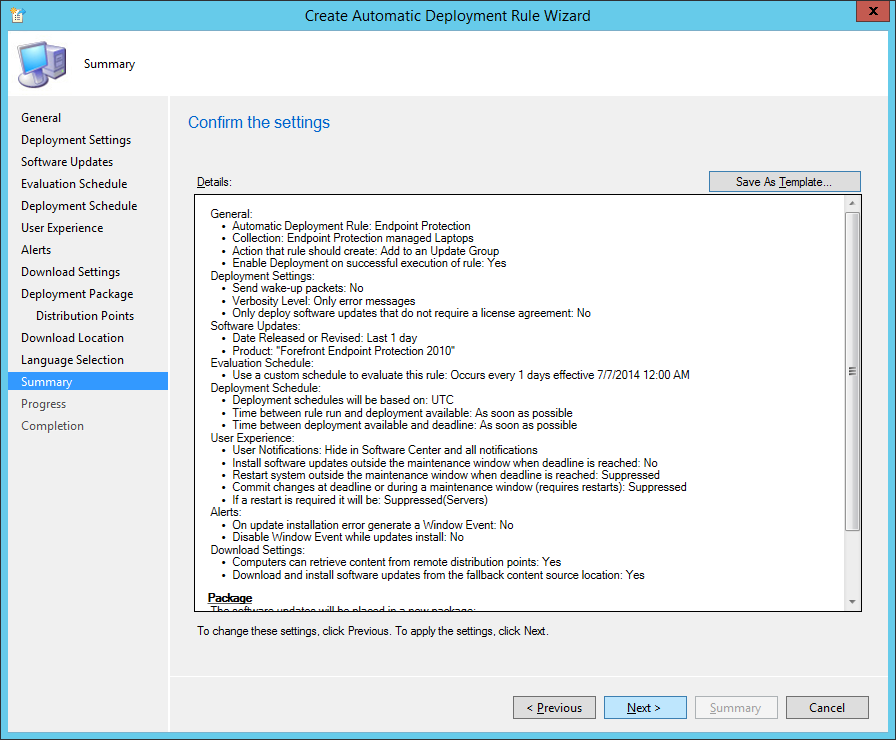
Select Software Library, Expand Overview, Software Updates, and select Automatic Deployment Rules. Right click and select Create Automatic Deployment Rule
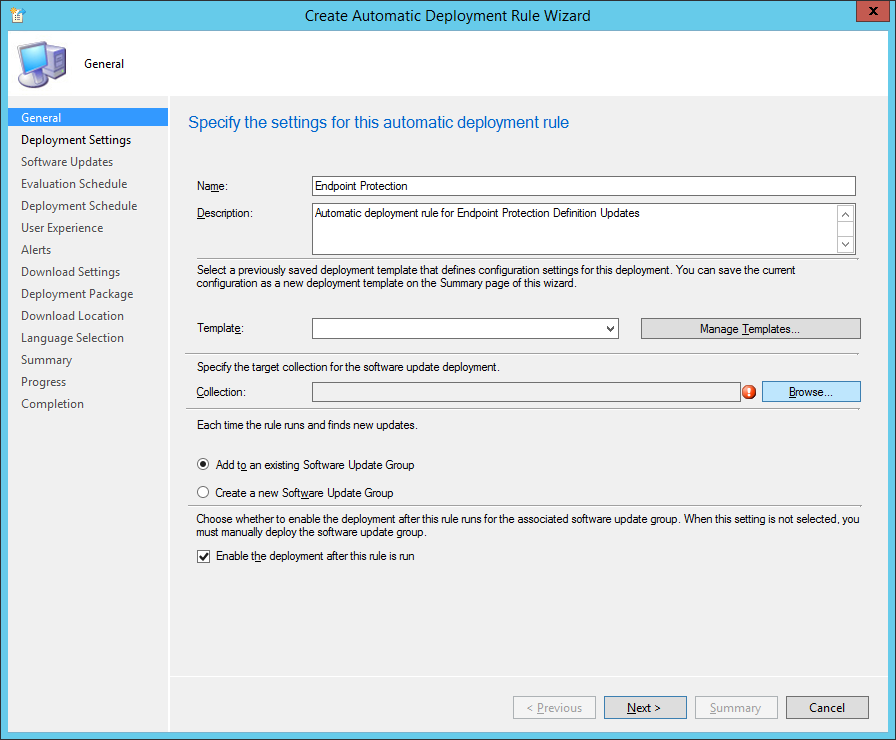
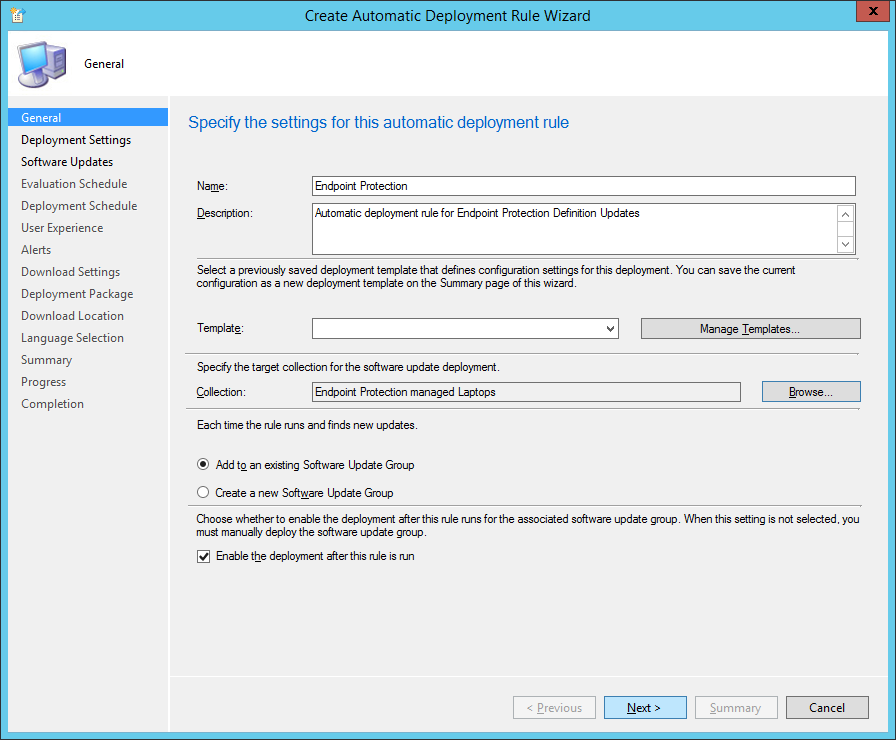
Enter in a Name and Description for your Automatic Deployment Rule and then click on the Browse… button
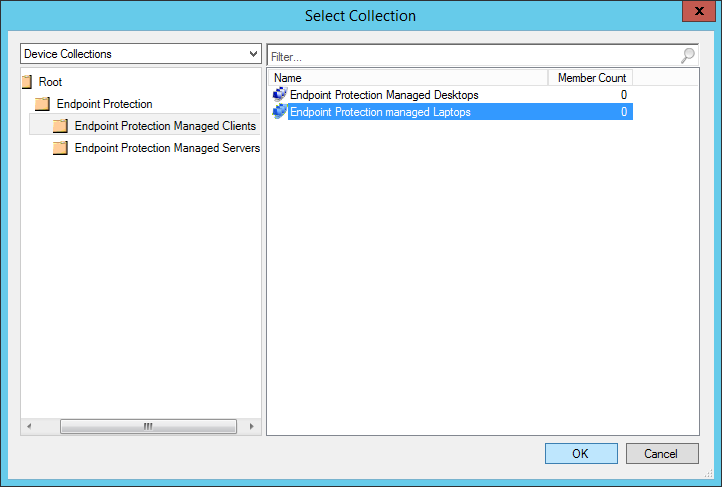
Select one of the Device Collections we made prior back and then click OK
Click Next >
Click Next >
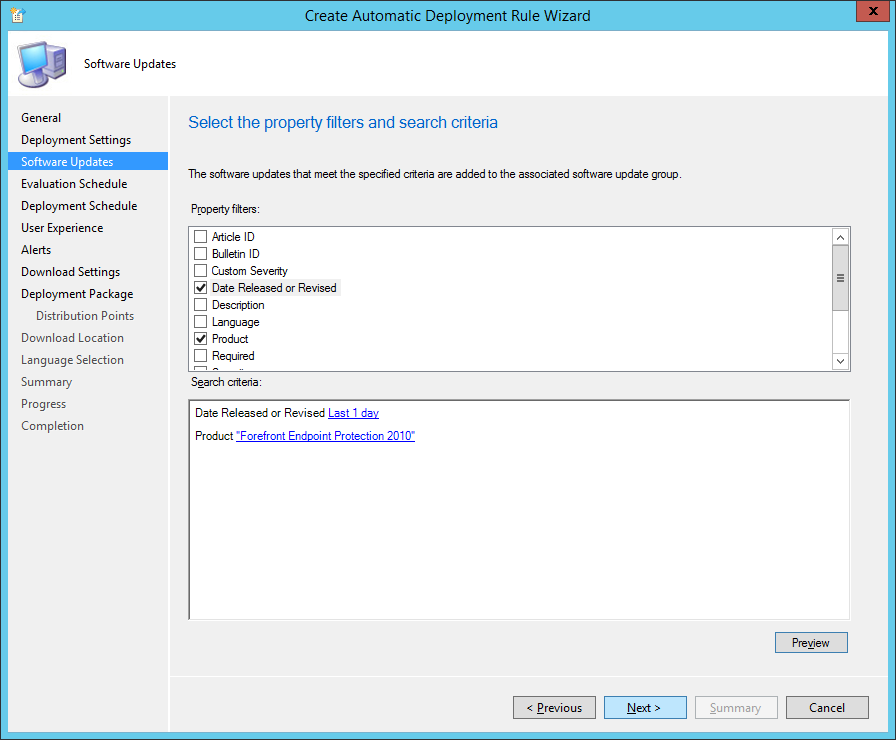
Check Date Released or Revised and and Product, set Date Released or Revised to Last 1 day and Product to Forefront Endpoint Protection 2010 and click Next >
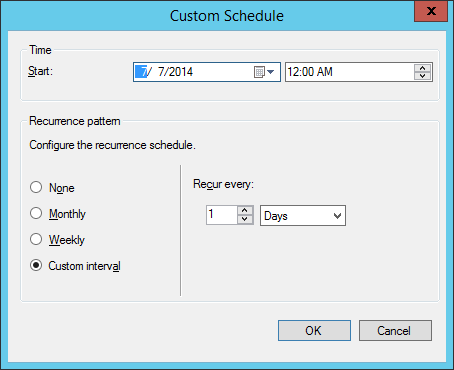
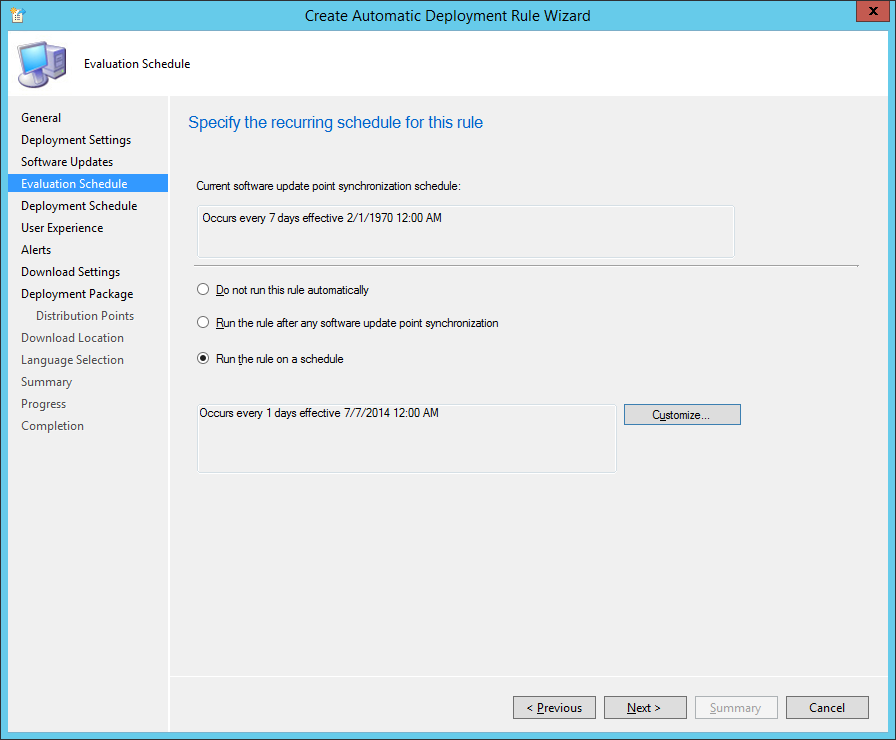
Check Run the rule on a schedule, click the Customize… button, and then select 1 days at 12:00AM, and click Next >
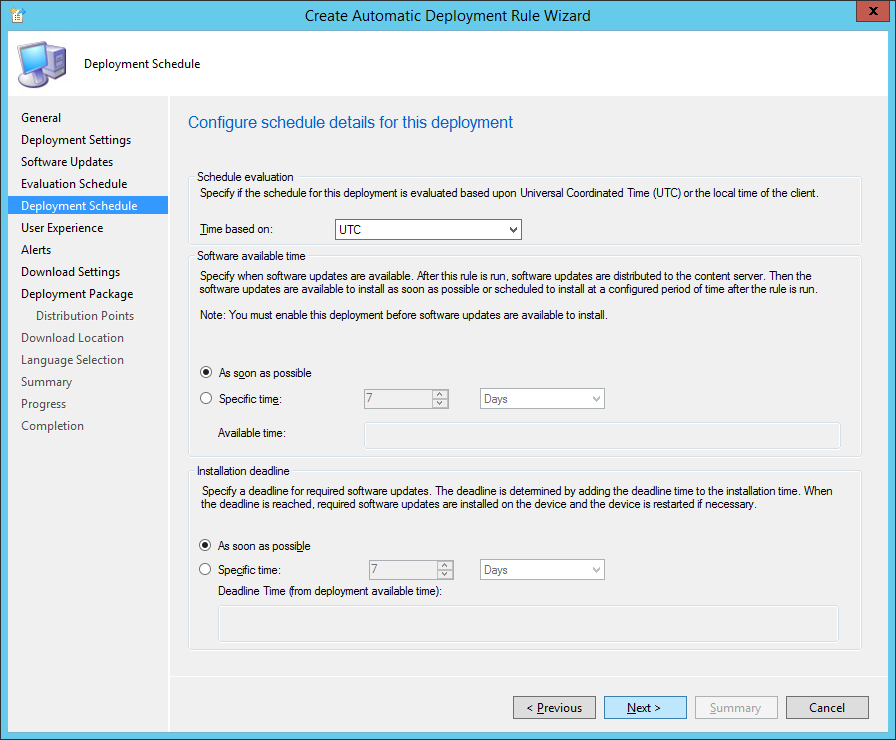
Set Time based onUTC and set Installation deadlineAs soon as possible and click Next >
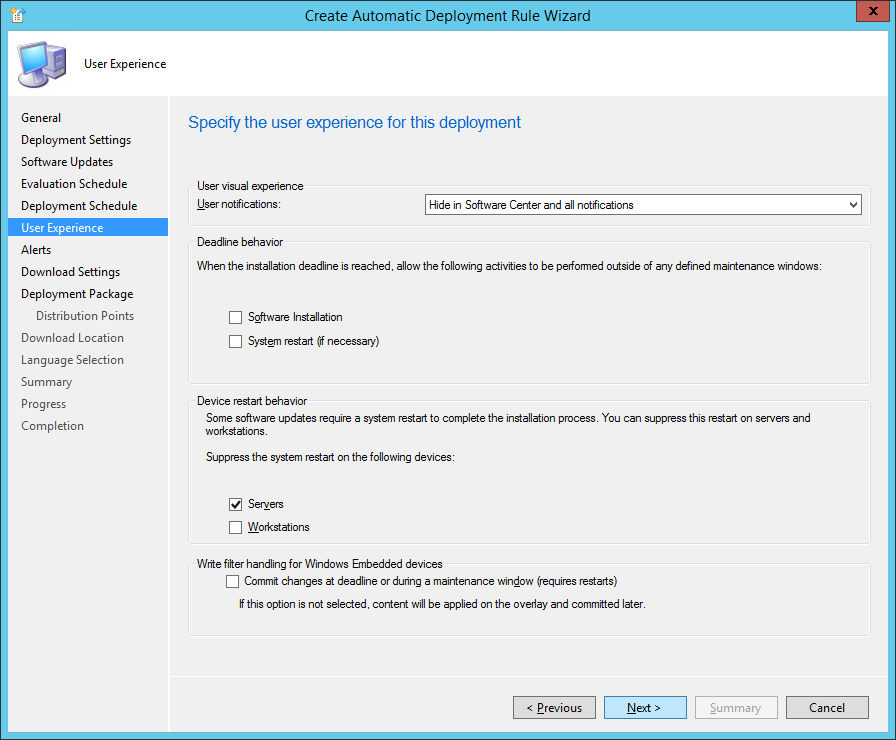
Check Servers on Device restart behavior (this will prevent a server from restarting from an update), and click Next >
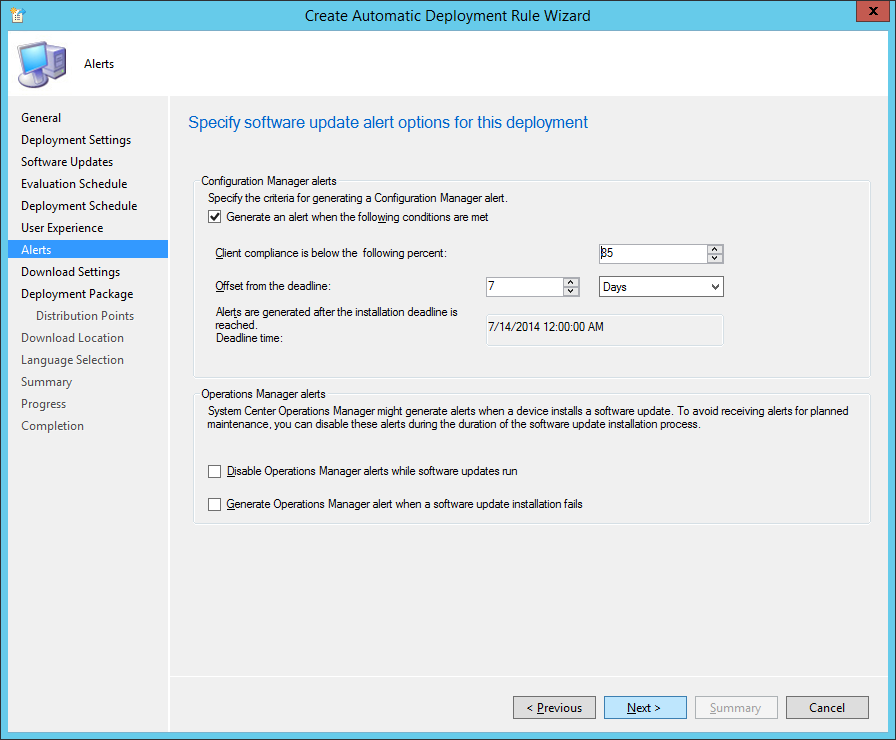
Check Generate an alert when the following conditions are met and click Next >
NOTE: This is an optional step. If you would like to set an alert to be triggered when X% of your clients do not have the latest virus definitions, use this option. If you do not wish to be alerted leave the box unchecked and click Next > In this particular example, after 15% of the clients have virus definitions out of date will receive an alert.
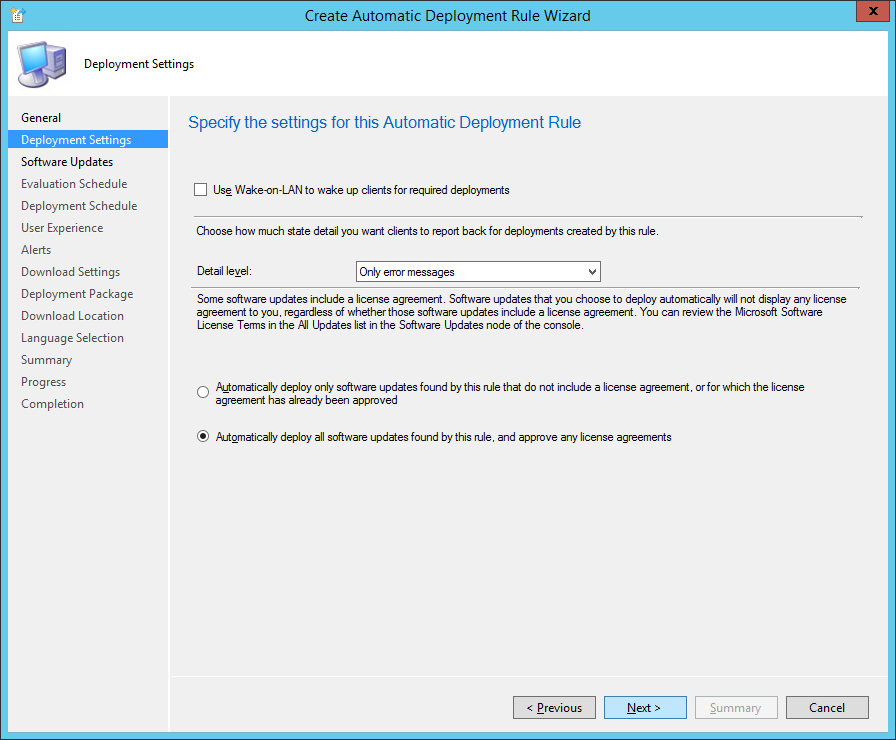
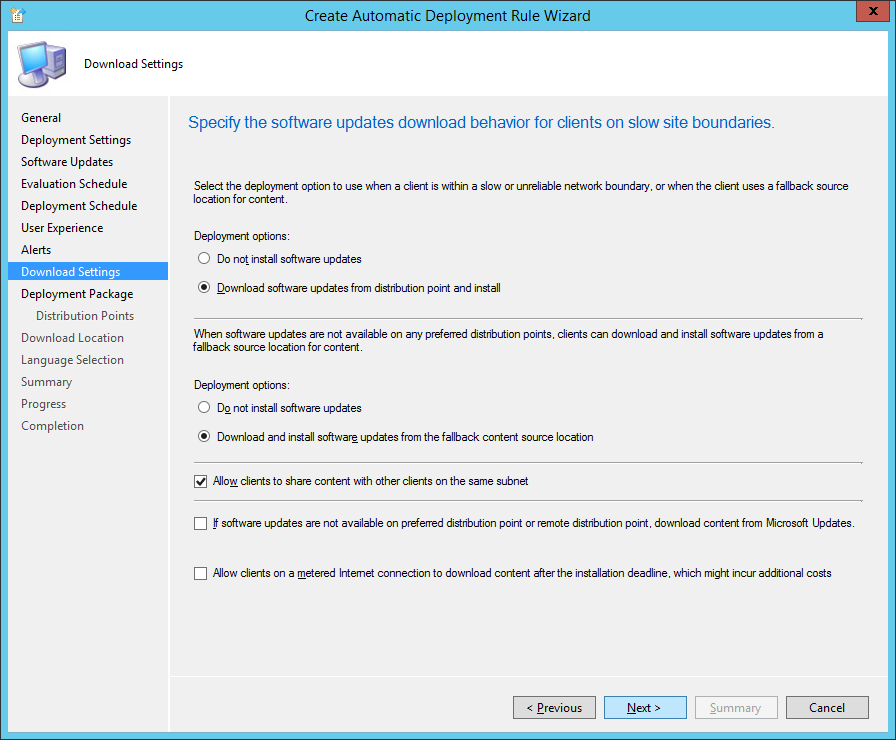
Check Download software updates from distribution point and install, check Download and install software updates from the fallback content source location, and click Next >
Optionally, you can check If software updates are not available on preferred sitribution point or remote distirbution point, download content from Microsoft Update, to always ensure your client has a source to download the latest virus defitions.
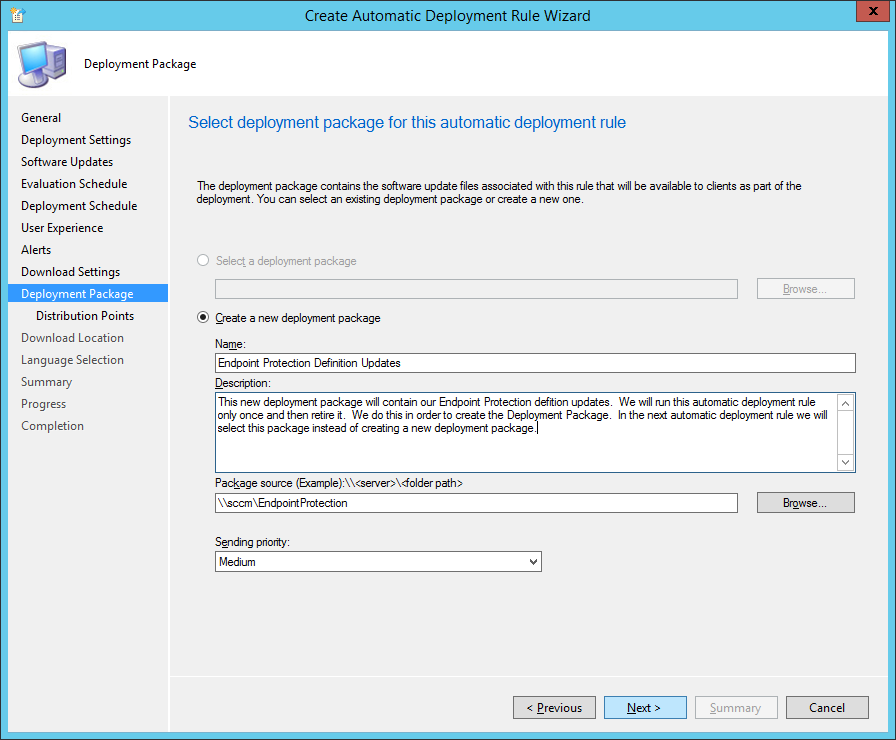
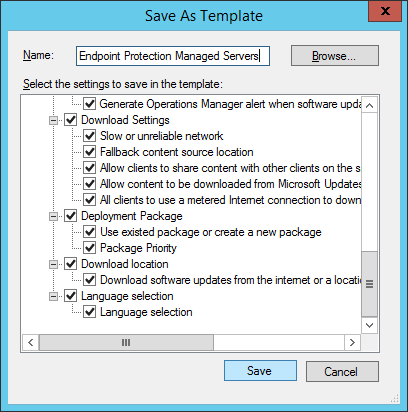
Enter Endpoint Protection Definition Updates for the Name, the following Description: This new deployment package will contain our Endpoint Protection defition updates. We will run this automatic deployment rule only once and then retire it. We do this in order to create the Deployment Package. In the next automatic deployment rule we will select this package instead of creating a new deployment package., and type in the share path to your sccm folder (\\sccm\EndpointProtection). Click Next >
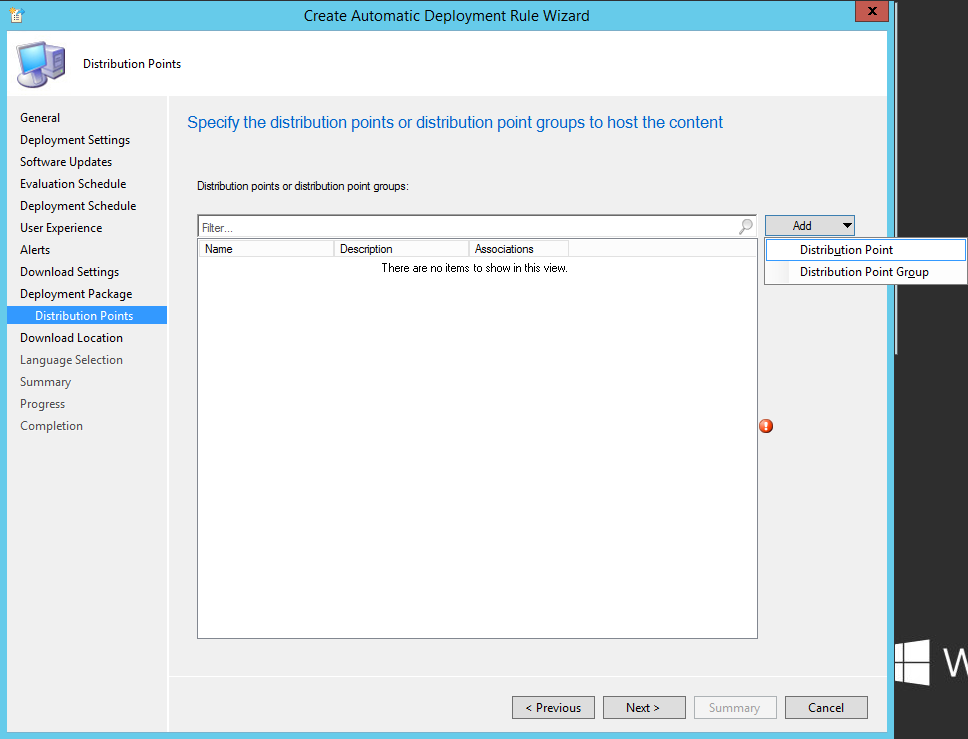
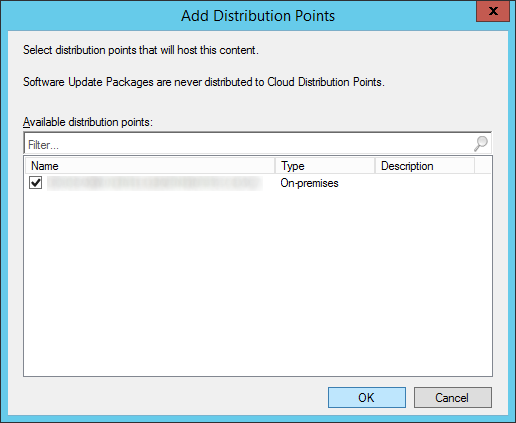
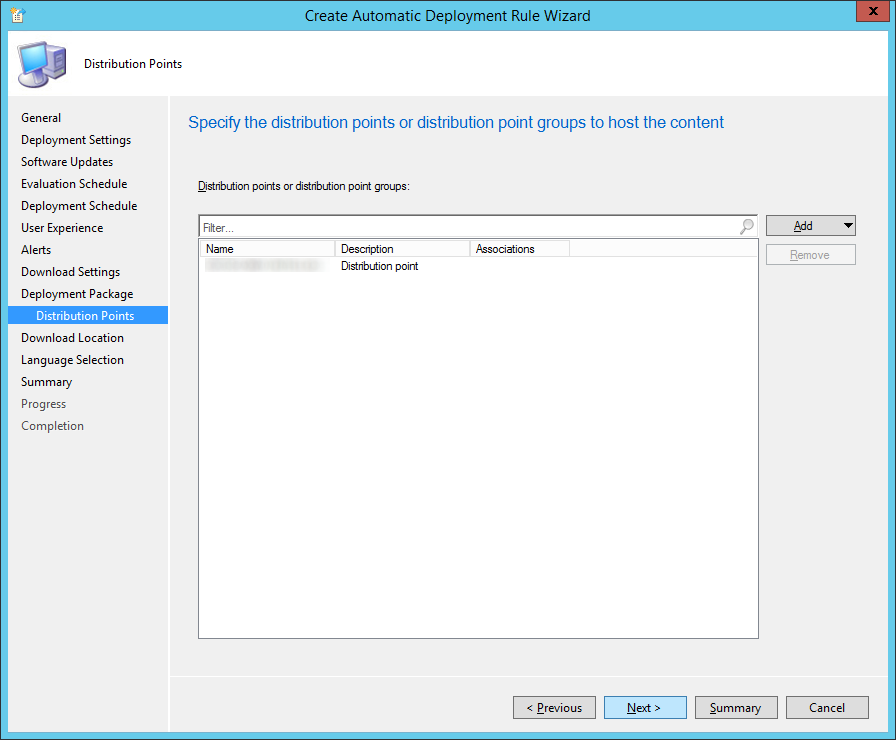
Click Add, Distribution Point
Check your site and click OK
Click Next >
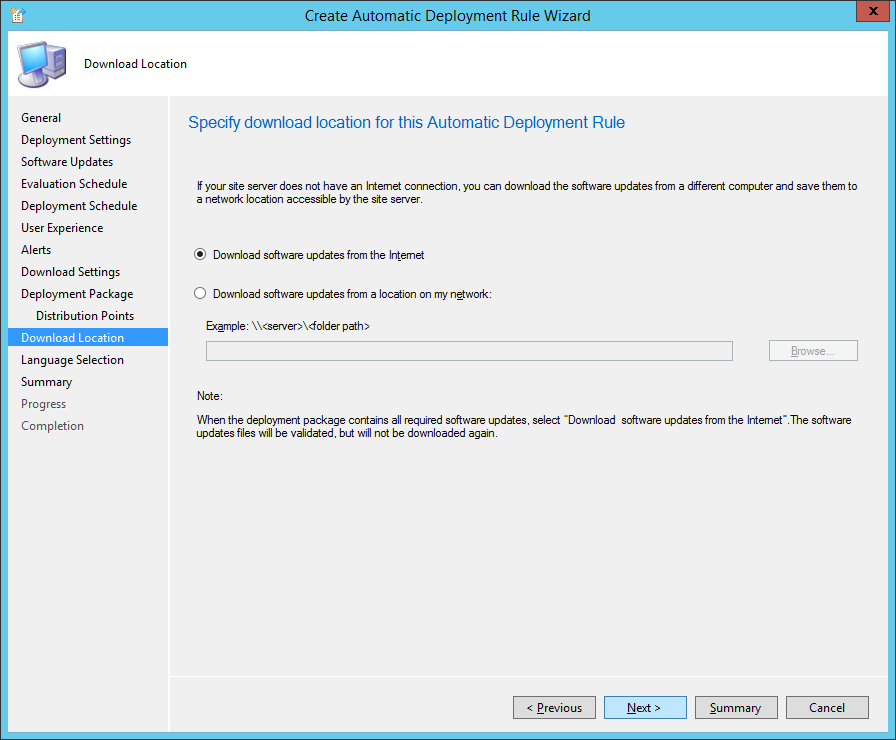
Ensure Download software updates from the Internet is checked and click Next >
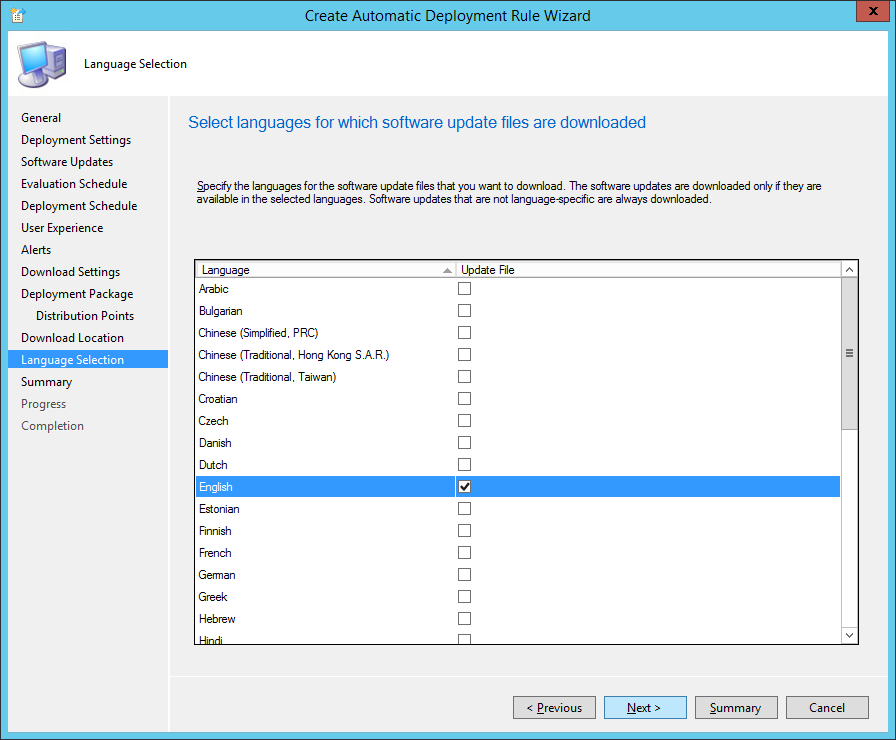
Check the languages you want to support and then click Next >
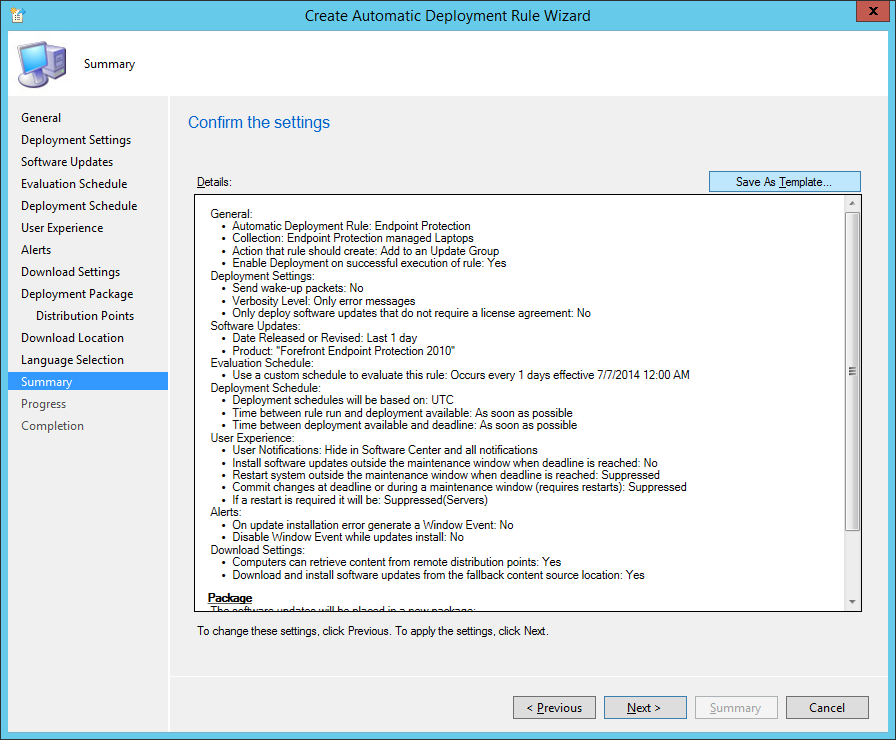
Click Save As Template…, click Browse… and enter Endpoint Protection Managed Servers and click Save
Click Next >
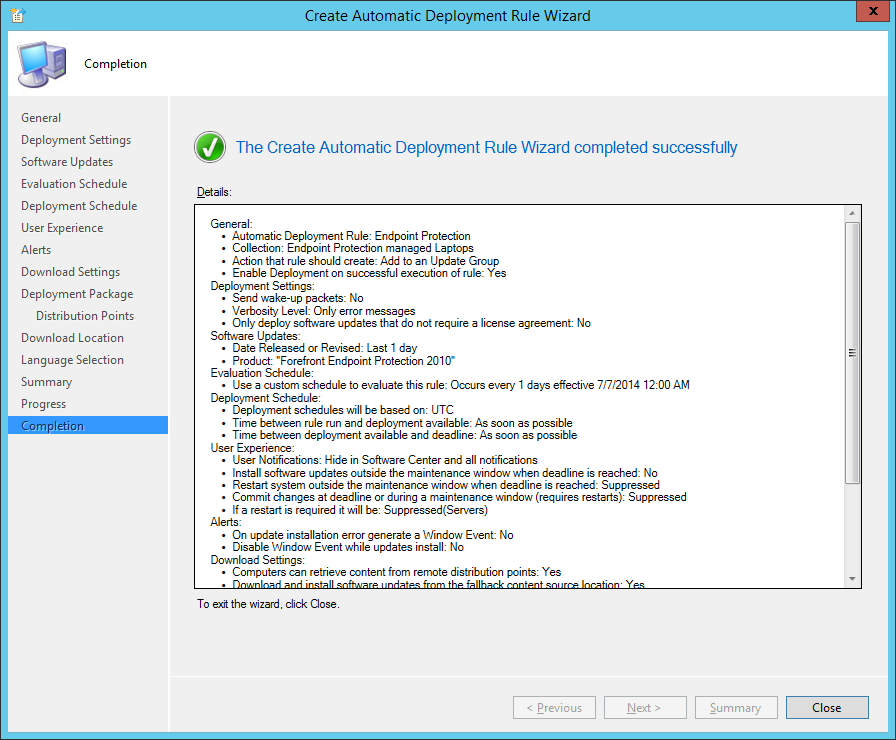
Click Close
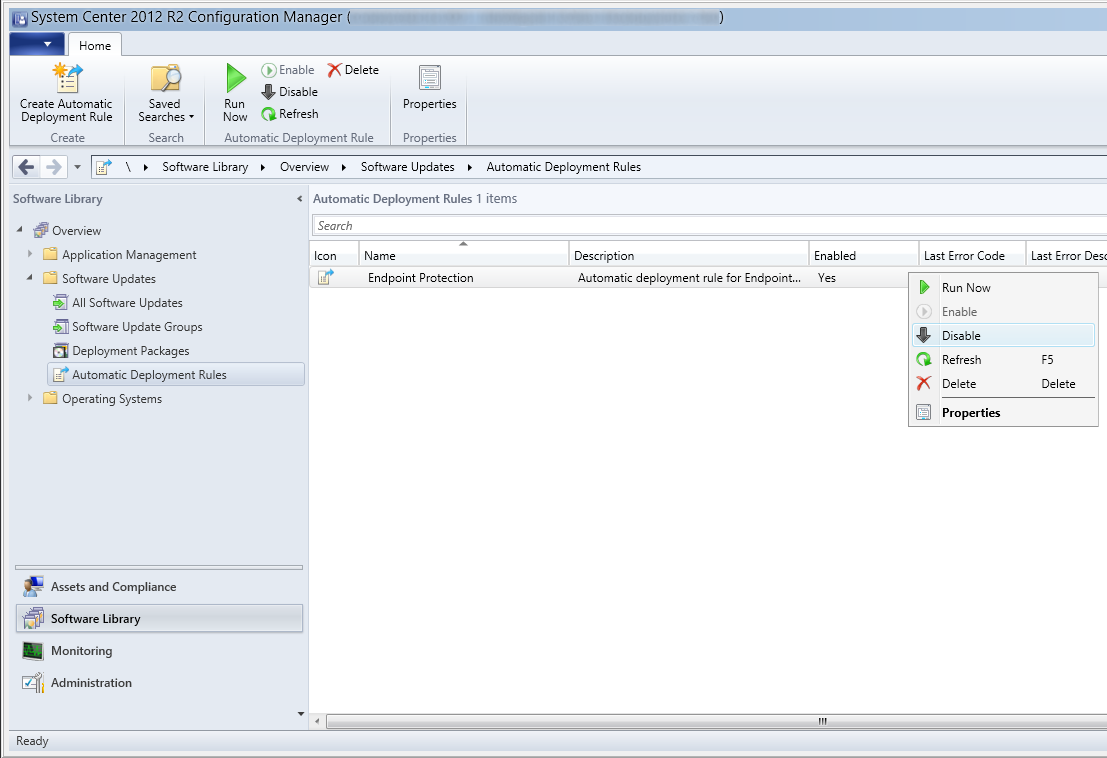
Right click on your Endpoint Protection rule and select Disable
Repeat steps 3-23, using Endpoint Protection Managed Servers as a template in Step 4 for each of the Device Collection groups we created.
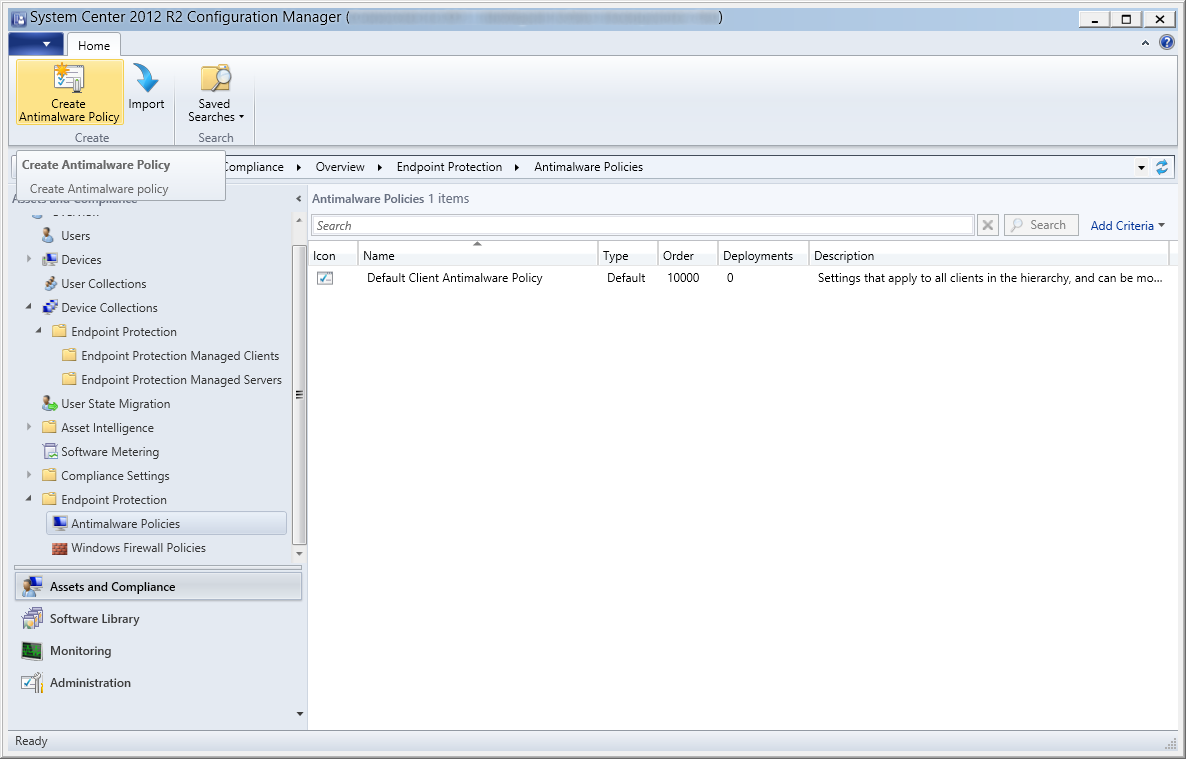
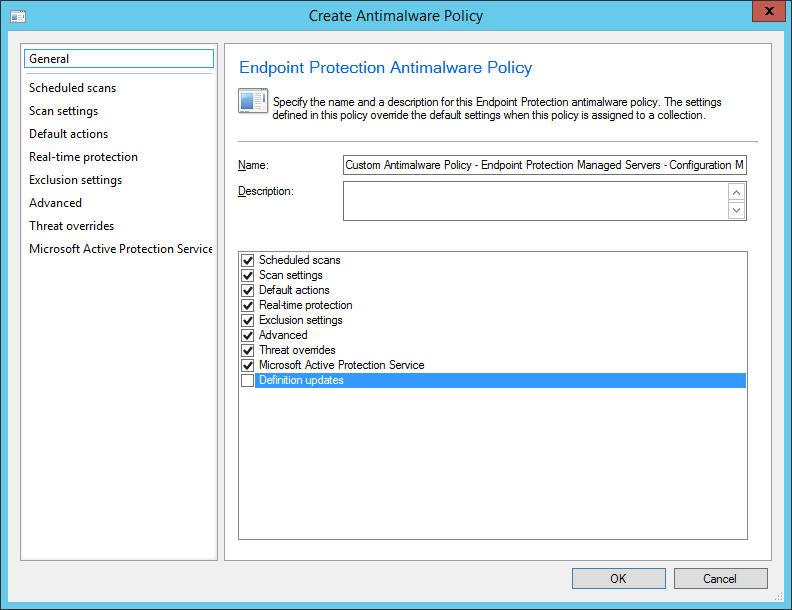
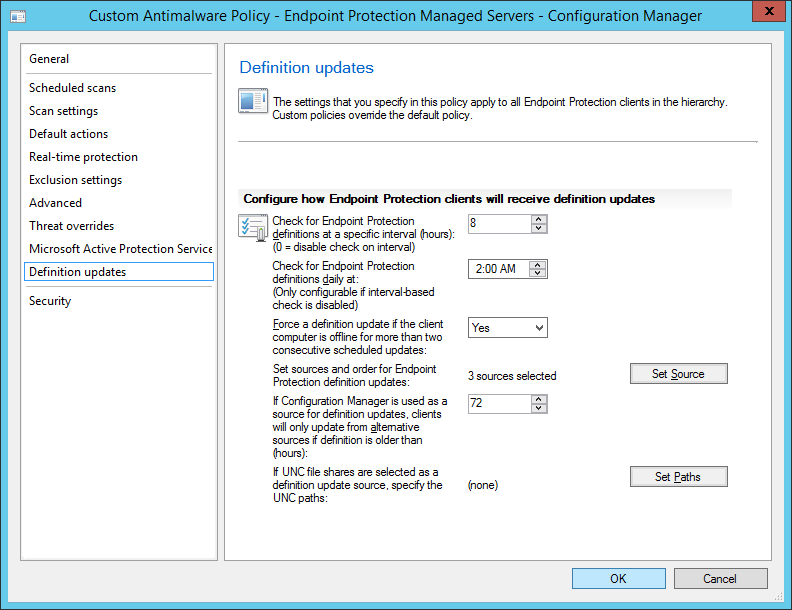
Configure custom antimalware policies
In this section we will configure how Endpoint Protection will function on the client machines.
Launch the System Center 2012 R2 Configuration Manager console
Select Assets and Compliances, Endpoint Protection, and then click the Create Antimalware Policy button
Set a Name and Description for your Endpoint Protection Antimalware Policy, and then check each of the boxes for the options you wish to configure. Go through each of the tabs and customize how you wish the agent to run. Then click OK
Right click on your custom policy and click Deploy
Select the group you wish to target (in this case, configuration manager), and click OK
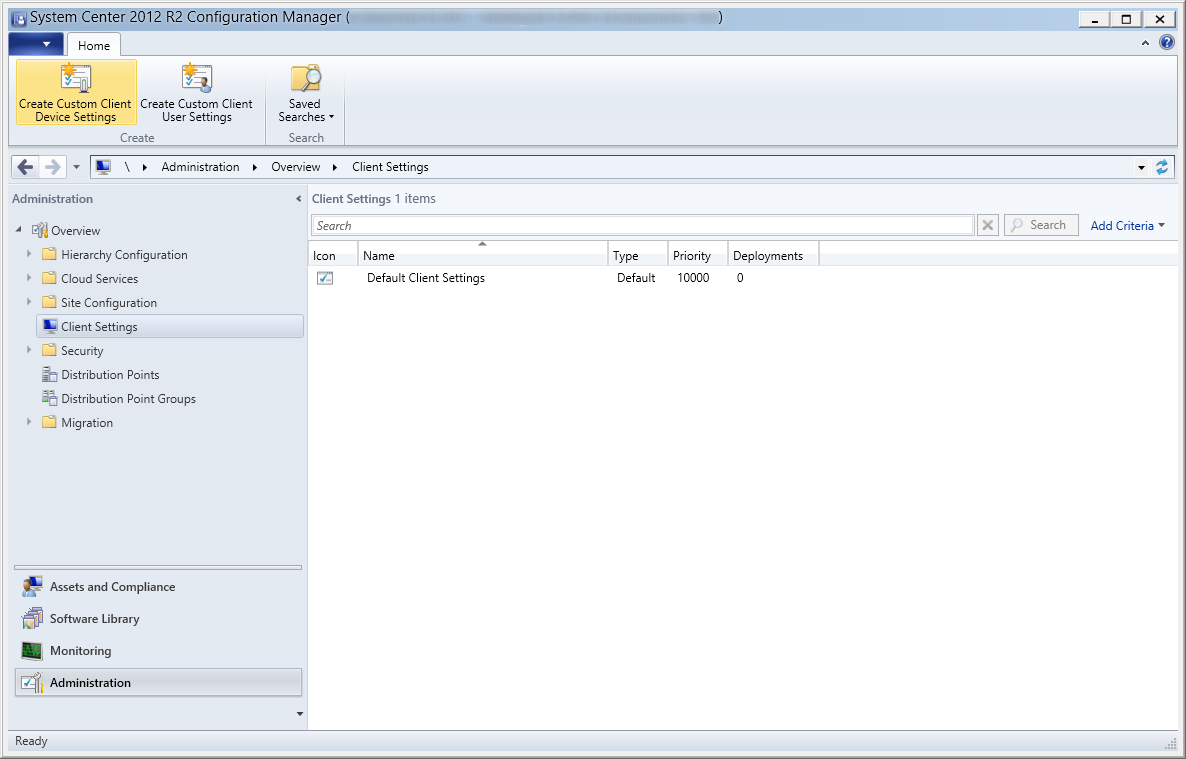
Configure Custom Device Settings
In this section we will configure the client policy to tell the machine it is managed by Endpoint Protection.
Launch the System Center 2012 R2 Configuration Manager console
Select Administration, Client Settings, and then click on Create Custom Client Device Settings
Enter in a Name (Custom Client Device Settings – Endpoint Protection Managed Servers – Configuration Manager), Description (Custom client device settings for servers related to configuration manager), and check Endpoint Protection
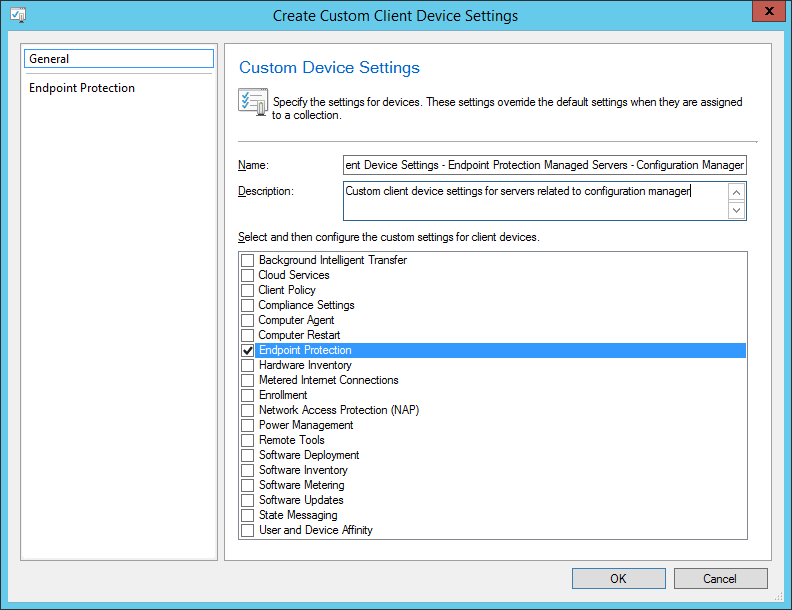
On the Endpoint Protection tab use the following settings and then click OK
Manage Endpoint Protection client on client computeres: Yes
Allow Endpoint Protection client installation and restarts outside maintenance windows. Maintenance windows must be at least 30 minutes long for client installation: Yes
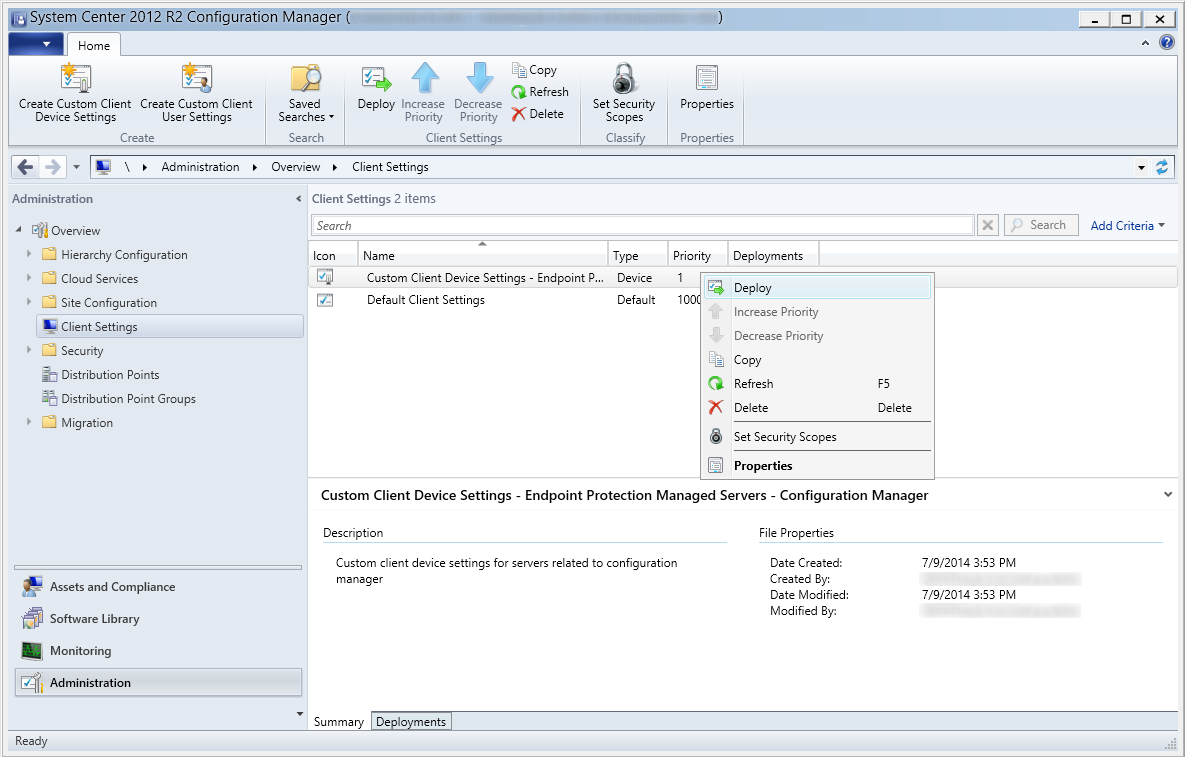
Right click on your new Custom Client Device Settings policy and select Deploy
Select the group of machines you want to deploy the agents to and select OK
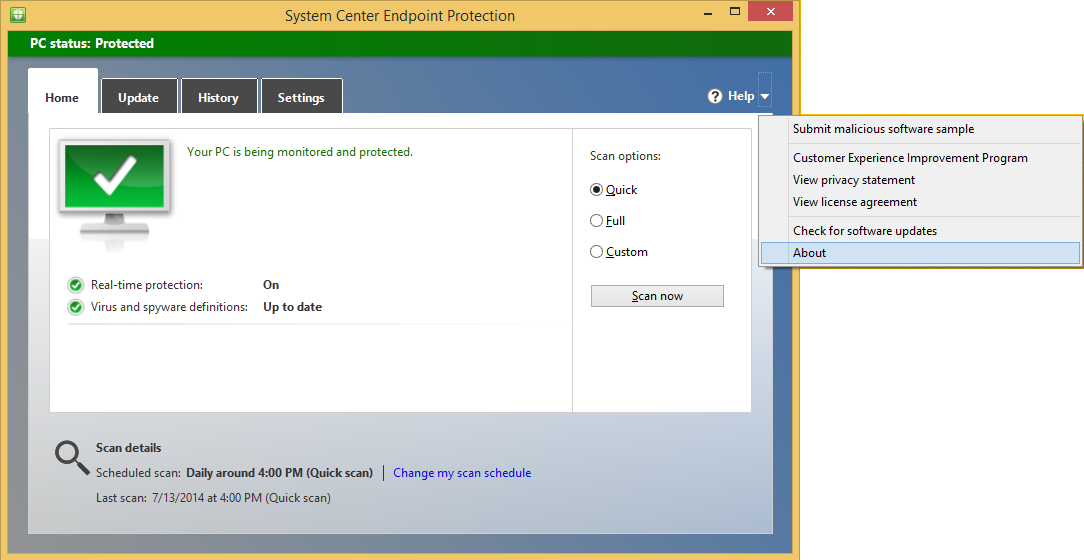
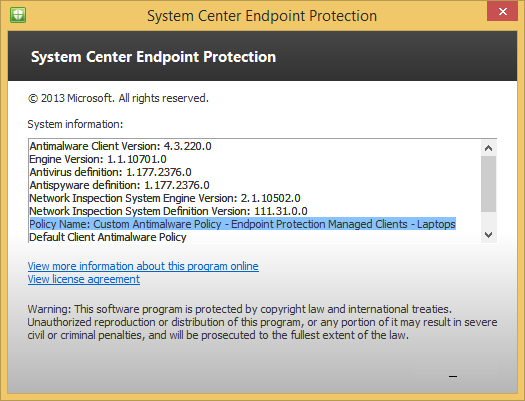
Verify the client shows the policy
Open the Endpoint Protection agent and select About
This guide is in continuation to my guide on deploying system center 2012 r2 configuration manager, as found here.
This guide will go over installing the Application Catalog to allow users to choose software they may wish to download and install (that you have already approved), configuring the SCCM client options, deploying the client, and verifying the client has been installed.
Configuring Application Catalog
Launch the System Center 2012 R2 Configuration Manager console
Click on Administration in the bottom left corner
Expand Site Configuration and select Sites and right click on your site and select Add Site System Roles
Click Next >
Click Next >
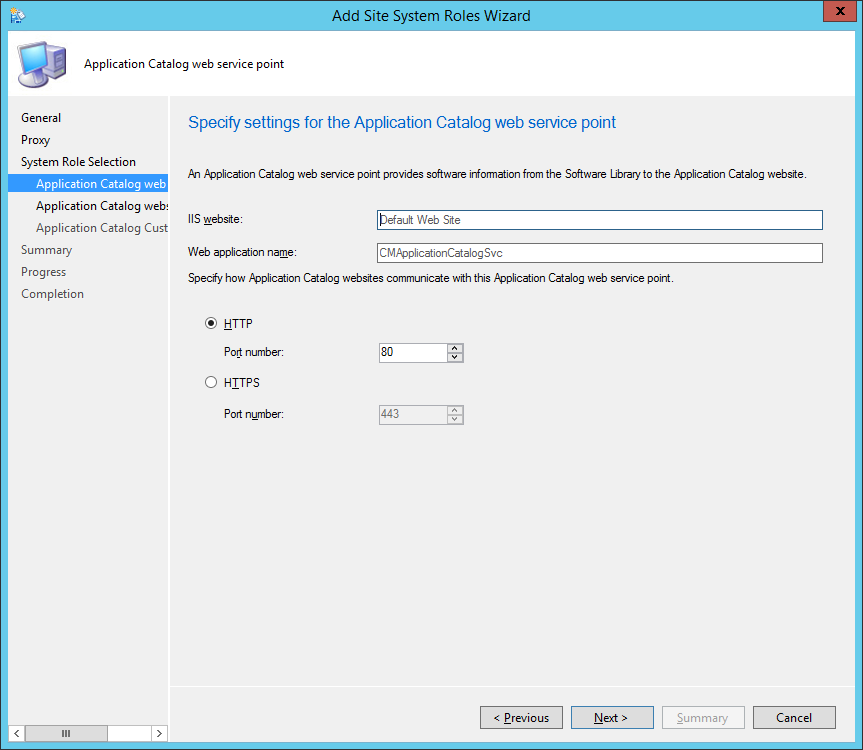
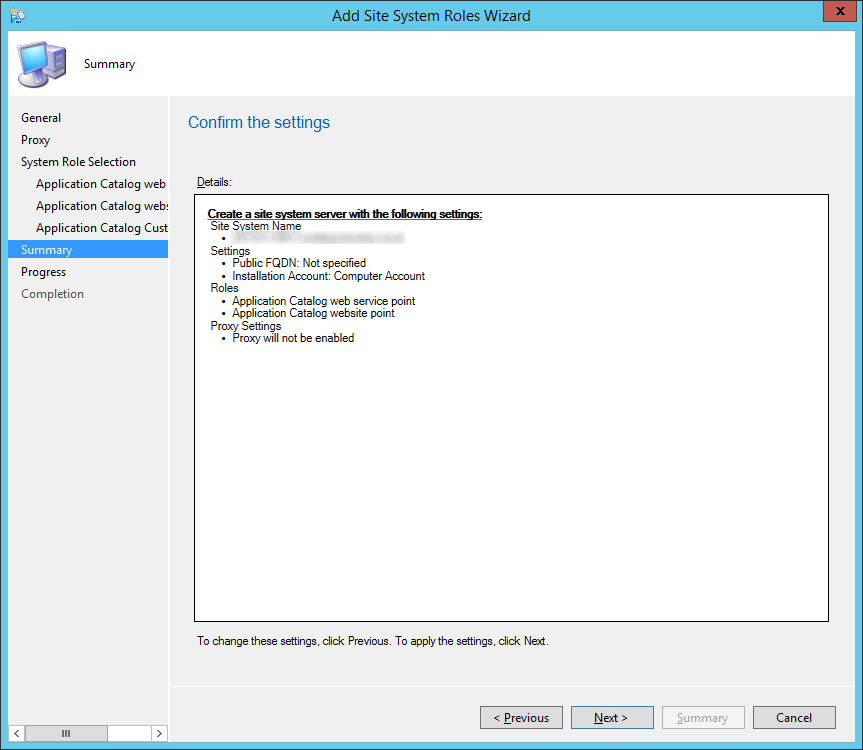
Check Application Catalog Web Service Point, Application Catalog Website Point, and click Next >
Click Next >
NOTE: If you have a PKI environment, go ahead and check HTTPS and hit Next > to encrypt your network traffic
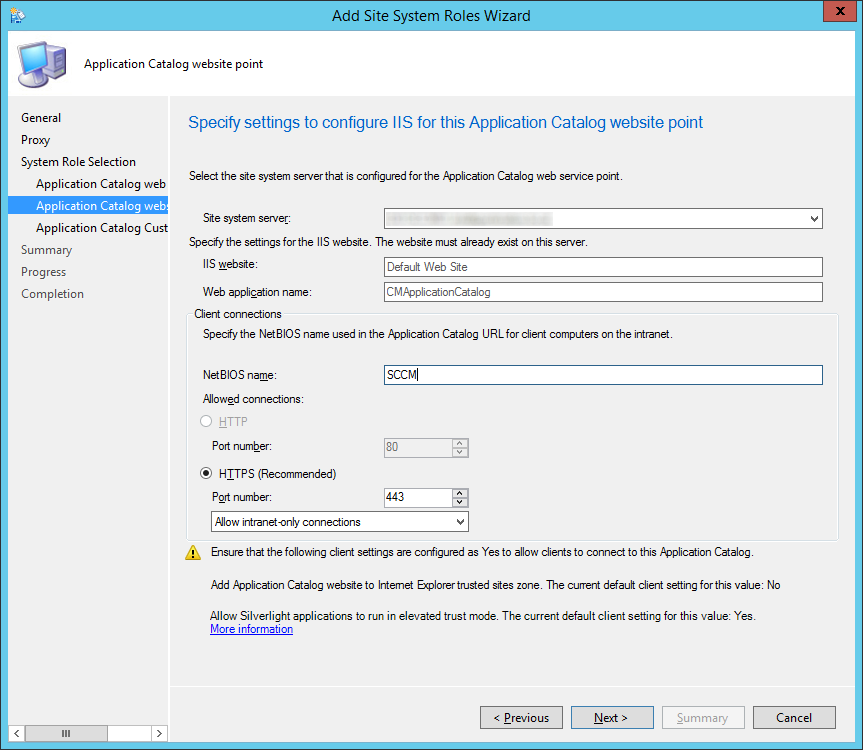
Click Next >
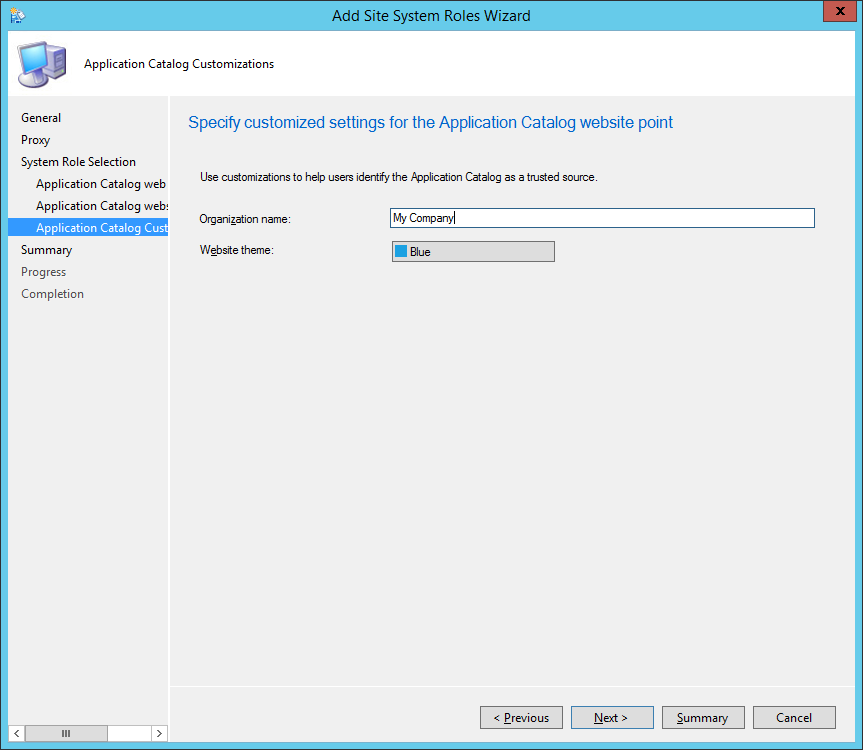
Enter your Organization name, select a Website theme, and click Next >
Click Next >
Click Close
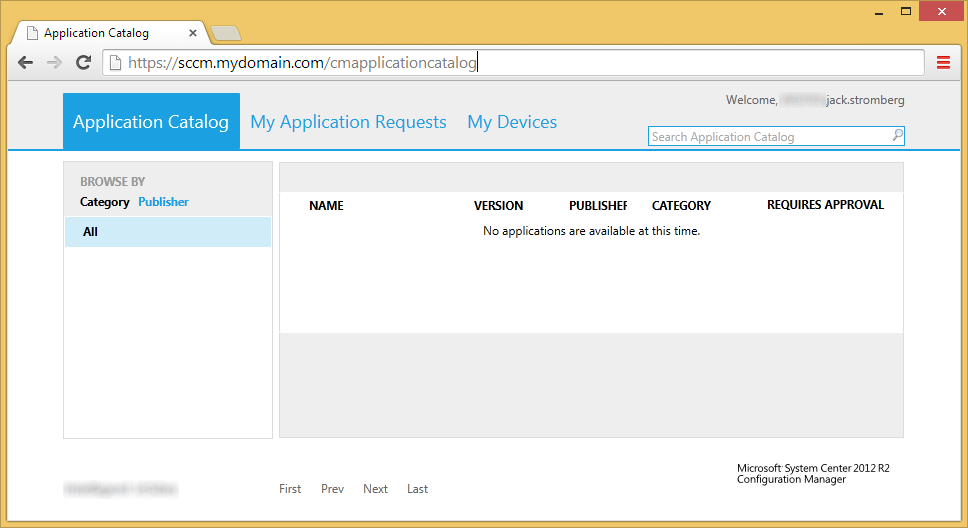
Verify you can access the website from a remote machine (you will need Silverlight in order to browse the page)
https://sccm.mydomain.com/cmapplicationcatalog
Configuring SCCM Agent Settings
Launch the System Center 2012 R2 Configuration Manager console
Click on Administration in the bottom left corner
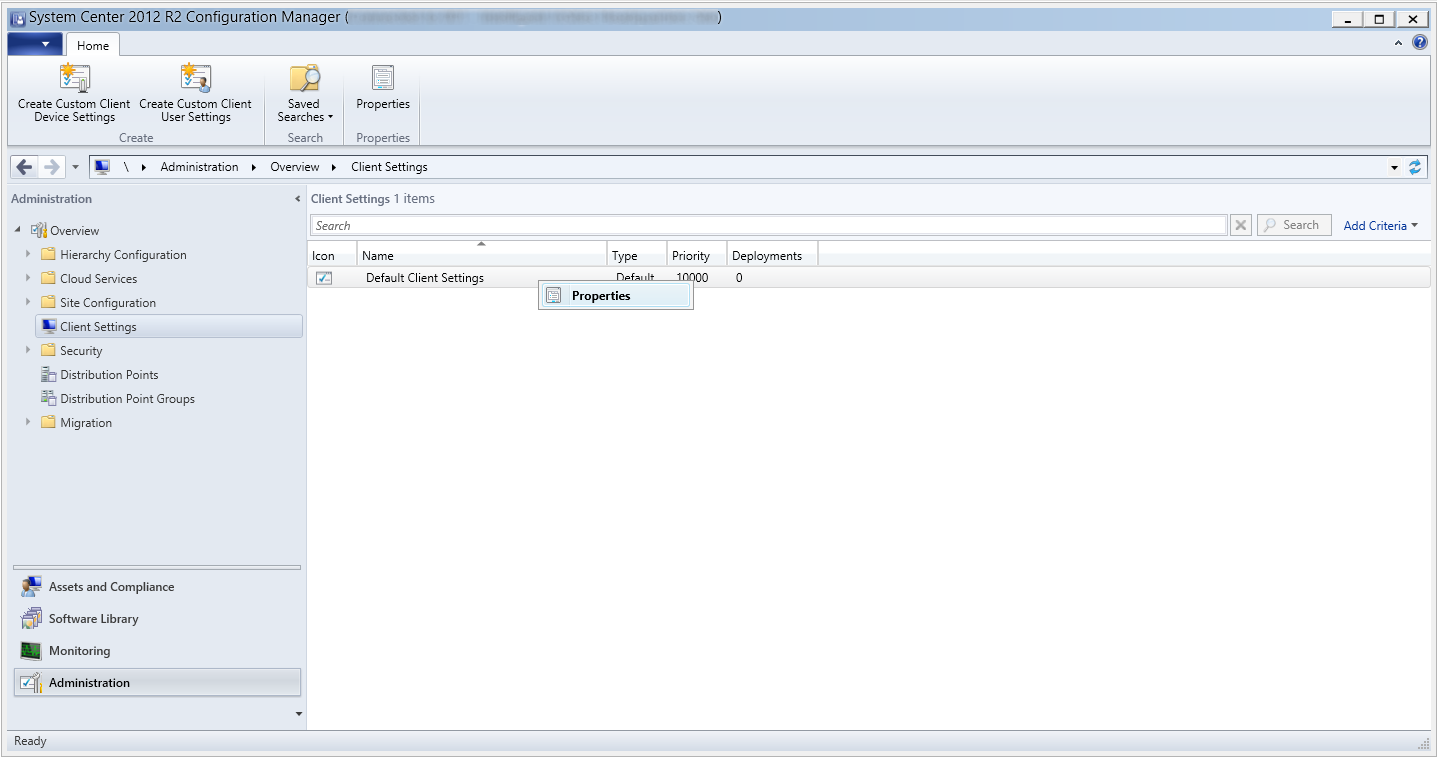
Click Client Settings, right click on Default Client Settings, select Properties
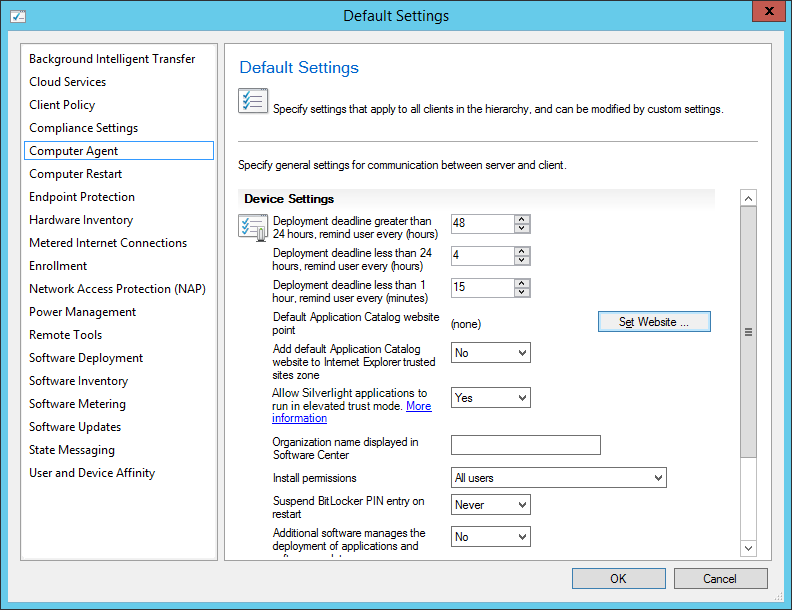
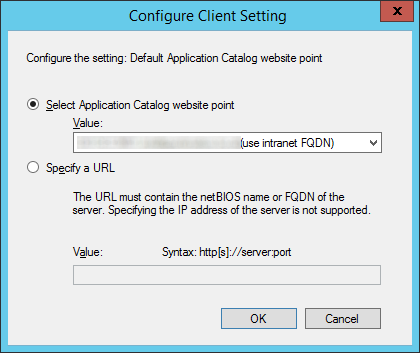
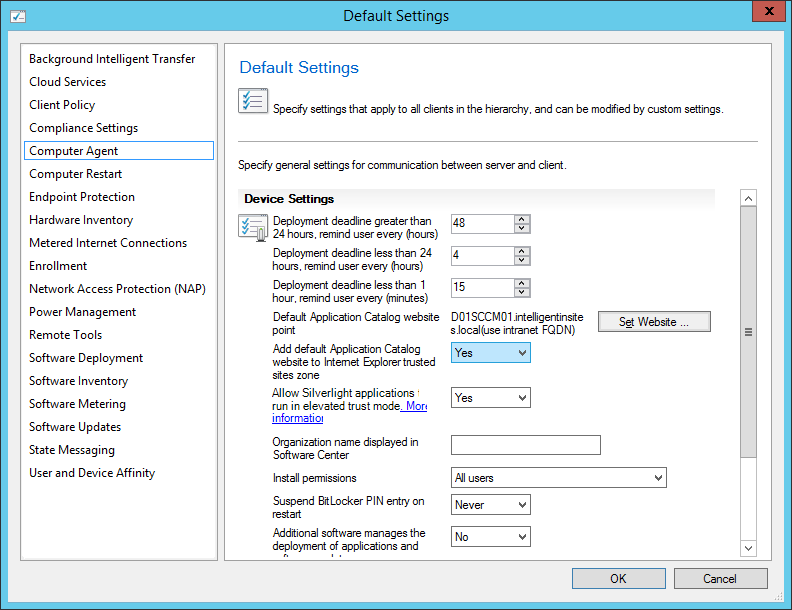
Select Computer Agent and then click on the Set Website… button near Default Application Catalog website point
Select the value that matches your intranet FQDN and click OK
Select Yes under Add default Application Catalog website to Internet Explorer trusted site zone
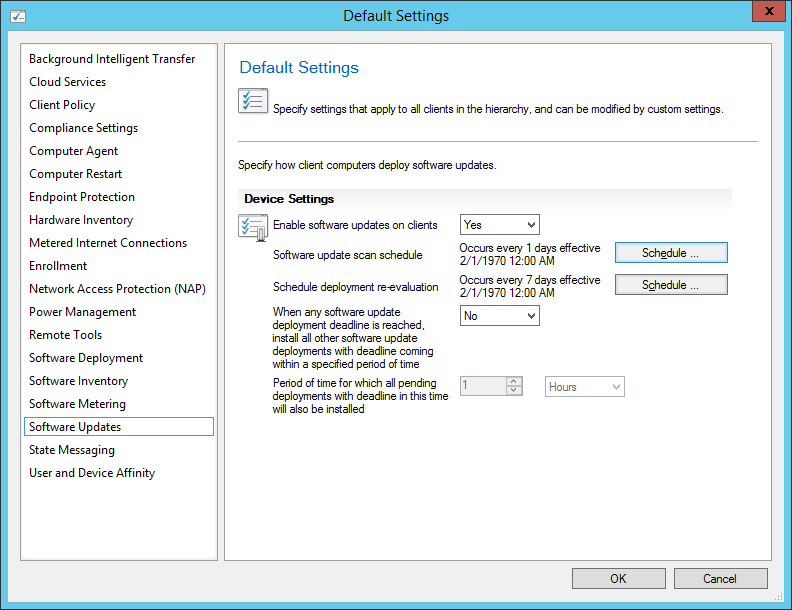
Click on Software Updates and schedule software updates to happen every 1 days
NOTE: We want software updates to scan every day to deploy Endpoint Protection (antivirus) defitions to all of our clients. If you will not be using Endpoint Protection, you may want to leave this at 7 days or however frequently you wish to push updates.
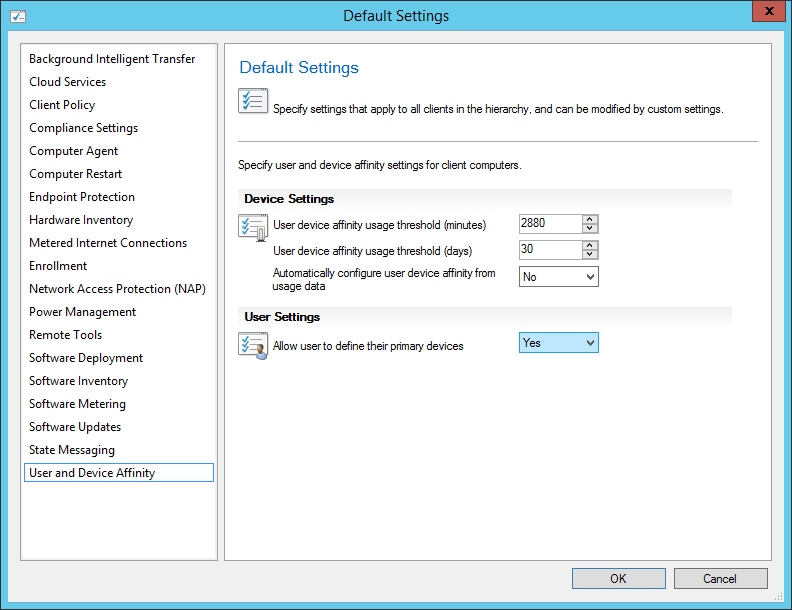
Click on User and Device Affinity and set Allow user to define their primary devices to Yes
NOTE: What is User Device Affinity? User device affinity in Microsoft System Center 2012 Configuration Manager is a method of associating a user with one or more specified devices. User device affinity can eliminate the need to know the names of a user’s devices in order to deploy an application to that user. Instead of deploying the application to all of the user’s devices, you deploy the application to the user. Then, user device affinity automatically ensures that the application install on all devices that are associated with that user. More info can be found here: http://technet.microsoft.com/en-us/library/gg699365.aspx
Click OK
Preparing deployment credentials to install SCCM Agent to clients
Launch the System Center 2012 R2 Configuration Manager console
Click on Administration in the bottom left corner
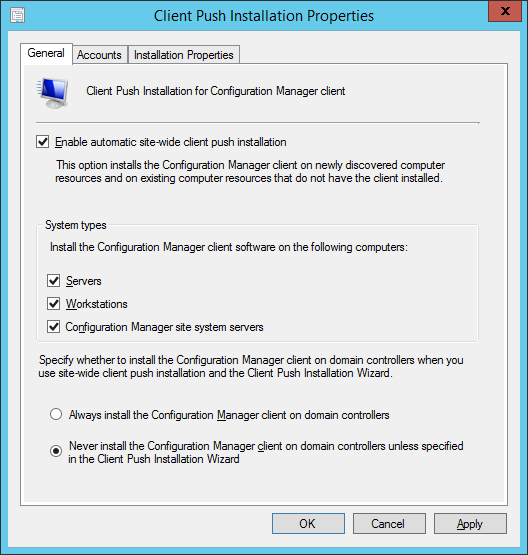
Select Site Configuration, Sites, and then click Settings->Client Installation Settings->Client Push Installation
Check Enable automatic site-wide client push installation and check all options to under System types to cover all machines in your environment
NOTE: This step is optional. If you wish to manually deploy the SCCM client every time you add a machine to your environment, leave this option unchecked.
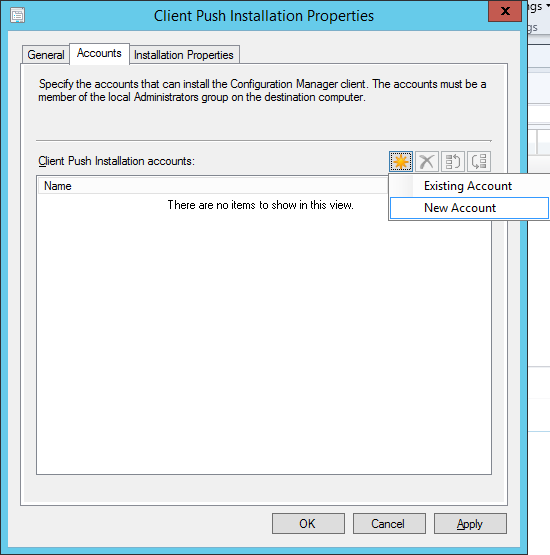
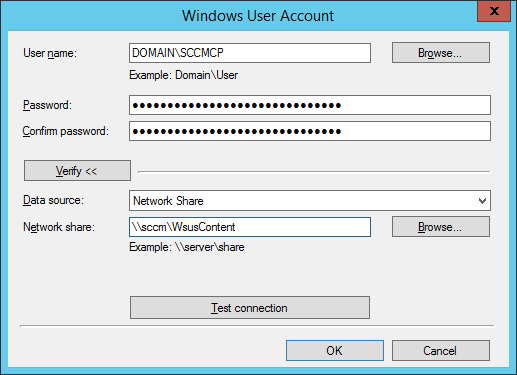
Select the Accounts tab and then click the yellow star and select New Account
Enter in the SCCMCP user credentials (that have local admin privileges on the remote machines), click the Verify button, and type in the path to one of the shared folders on your machine.
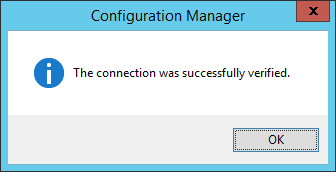
Click Test Connection and hit OK on the Configuration Manager dialog
NOTE: If this step failed, ensure your folders are being shared properly. The sharing properties on this folder should have been configured automatically when WSUS was being installed.
Click OK
Deploy the SCCM Agent to clients
Launch the System Center 2012 R2 Configuration Manager console
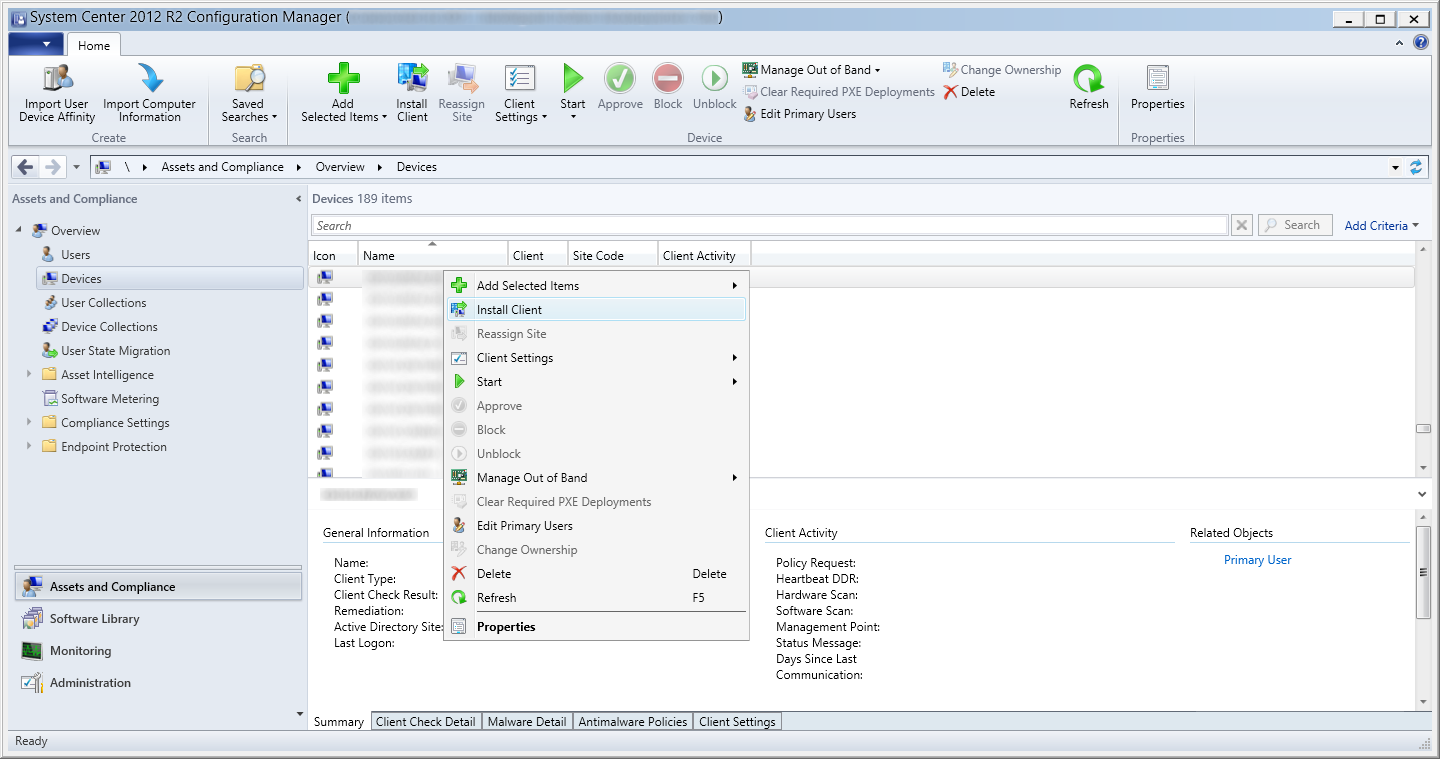
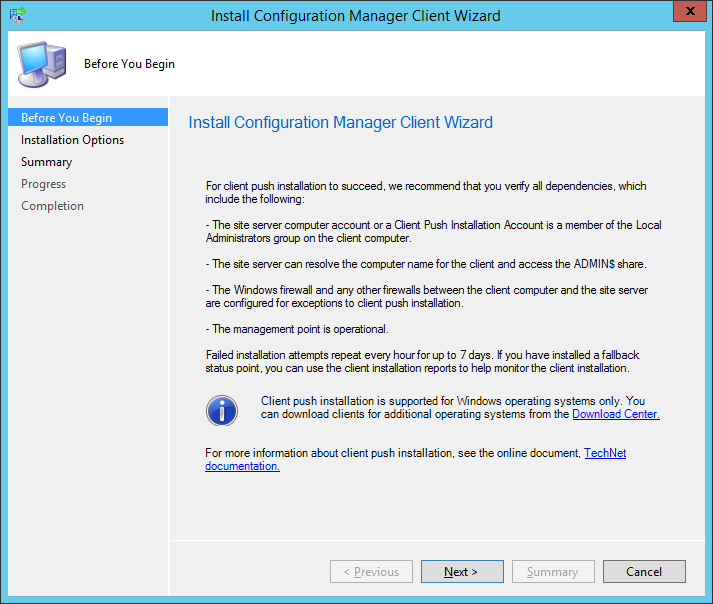
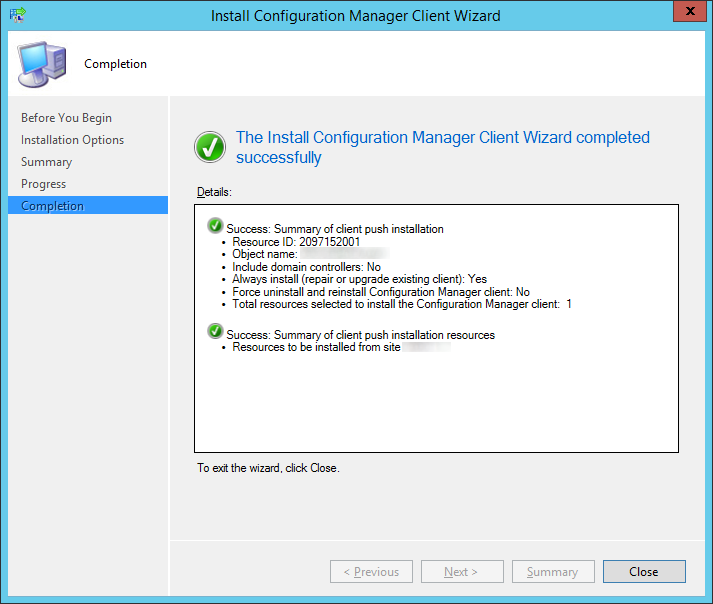
Select Devices, right click on the client you wish to deploy the agent to and select Install Client
Click Next >
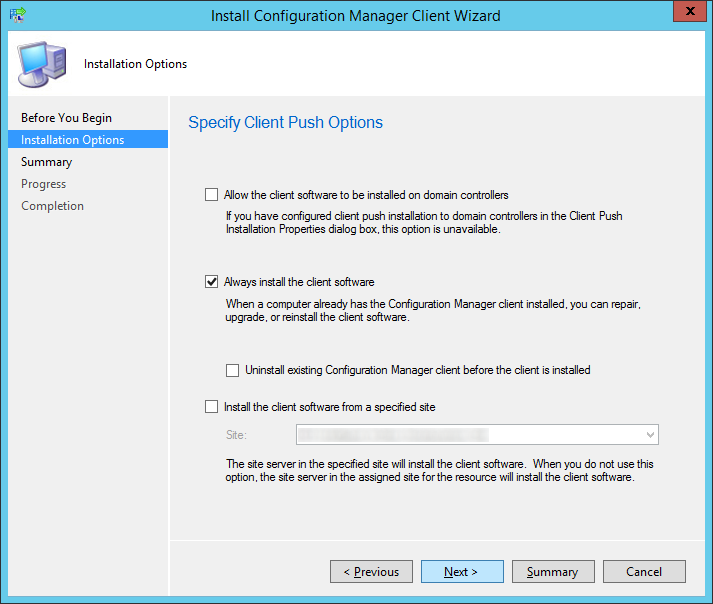
Check Always install the client software optionally check the others and click Next >
Note: Since we only have one site, the Install the client software from a specific site option will default to your only site and in this case, since we aren’t installing the agent on a domain controller, the first checkbox won’t be applicable during installation.
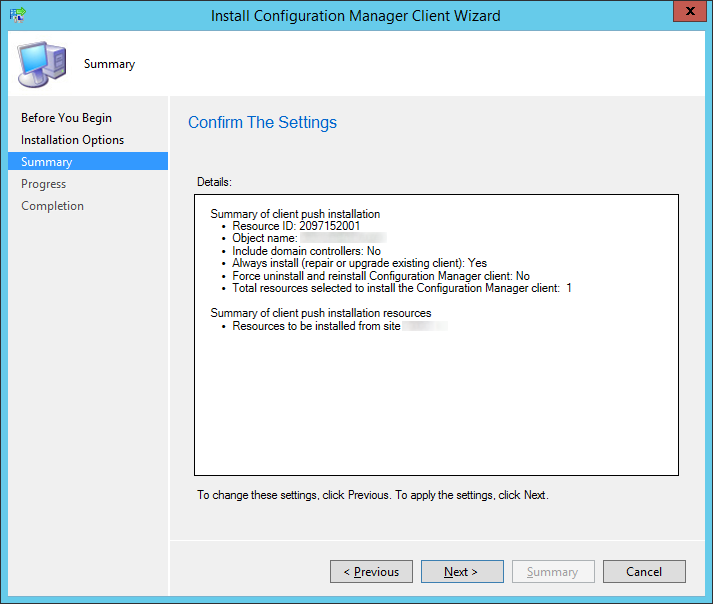
Click Next >
Click Close
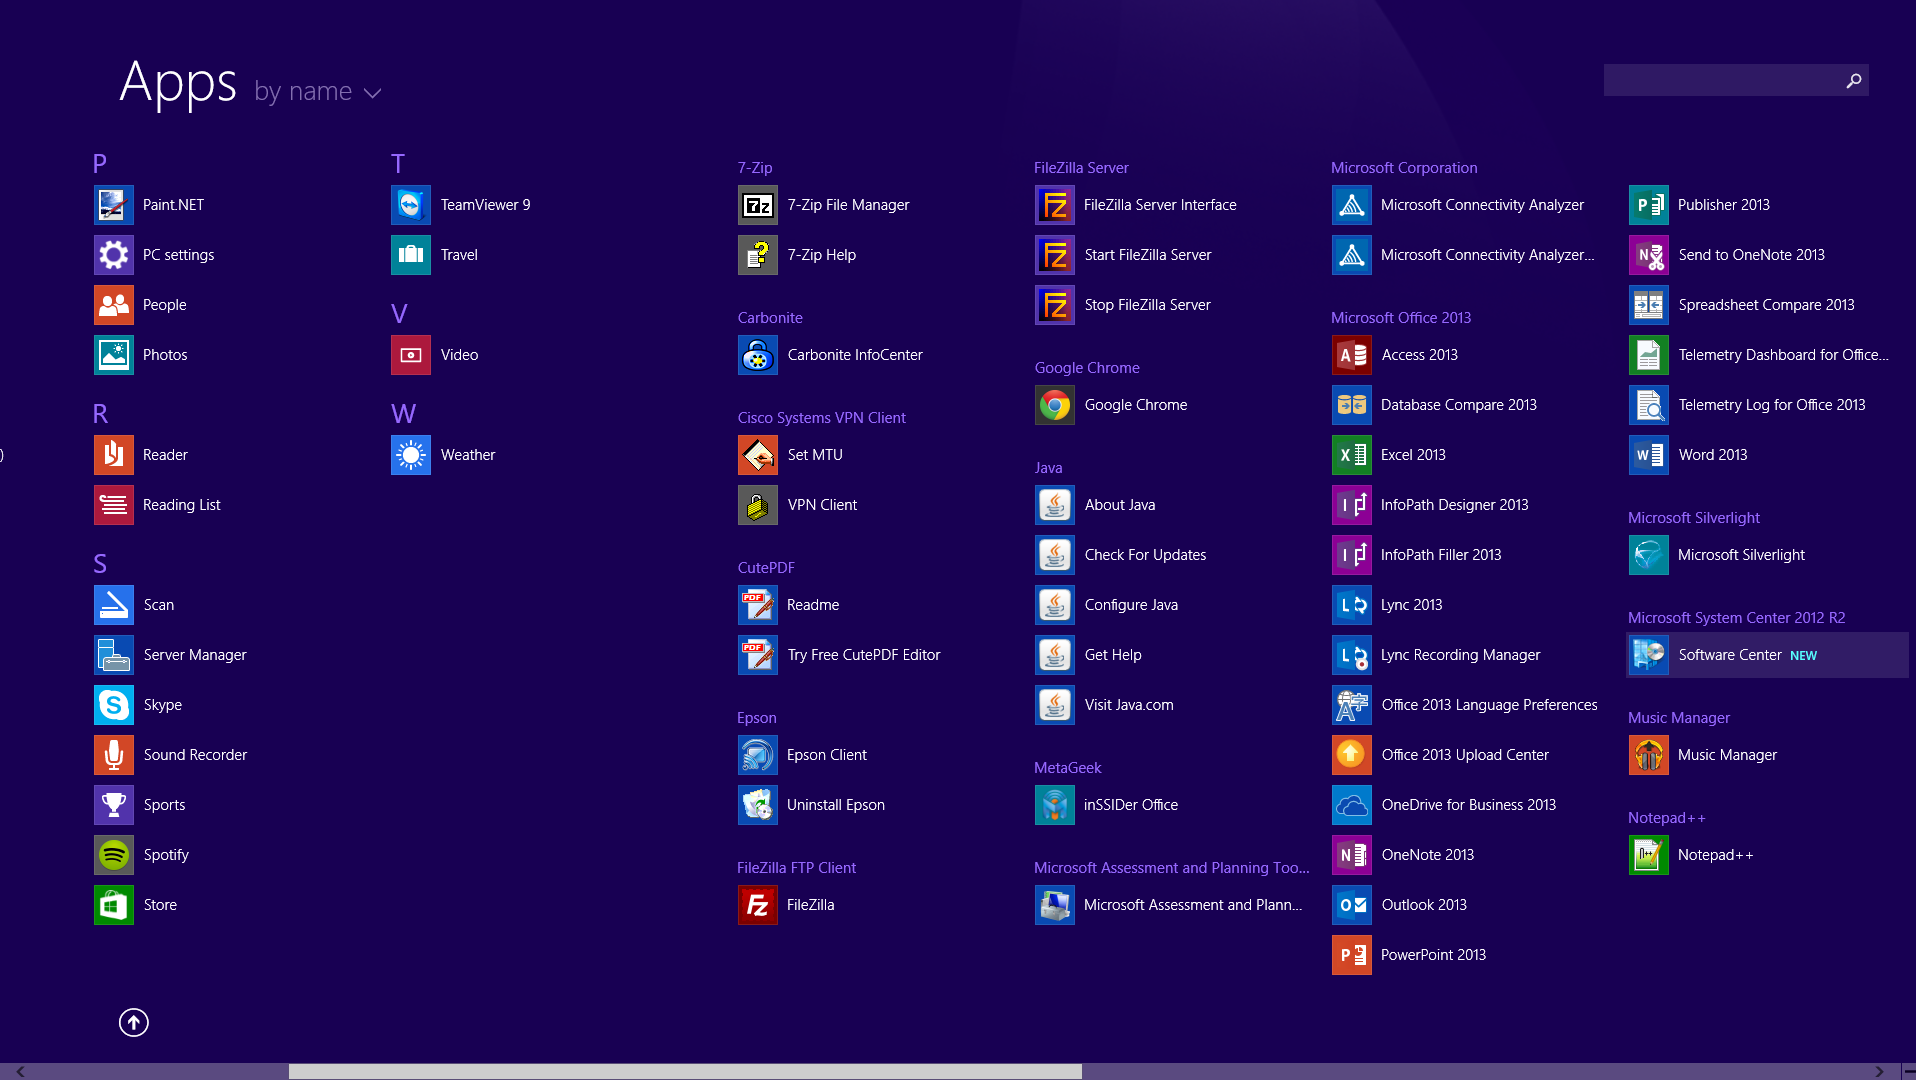
After about 5 minutes or so, you should see an entry in your start menu called Software Center. If you see this, you have successfully deployed the SCCM client! 🙂
This guide is in continuation to my guide on deploying system center 2012 r2 configuration manager, as found here.
Definition SUP (Software Update Point) – The software update point interacts with the WSUS services to configure update settings, to request synchronization to the upstream update source, and on the central site, to synchronize software updates from the WSUS database to the site server database. More details on this can be found from the following technet article: http://technet.microsoft.com/en-us/library/bb632674.aspx
WDS (Windows Deployment Services) – Will be used for Operating System deployment.
Launch the System Center 2012 R2 Configuration Manager console
Click on Administration in the bottom left corner
Expand Site Configuration and select Servers and Site System Roles
Right click on your SCCM server and select Add Site System Role
Click Next > on the General section of the wizard
Click Next > on the Proxy section of the wizard
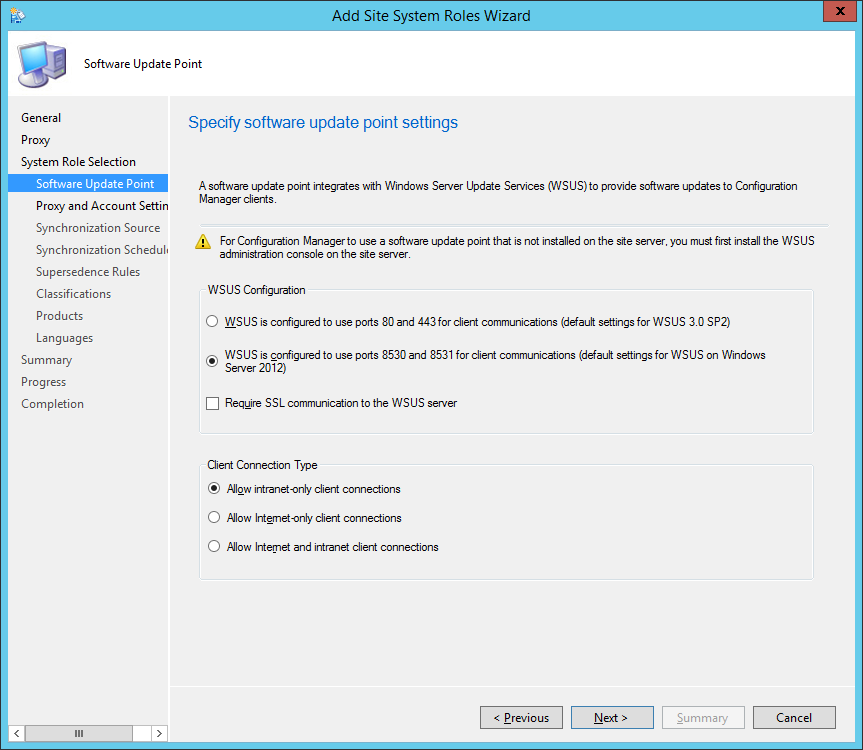
Check Software update point and click Next > on the System Role Selection section of the wizard
Check WSUS is configured to use ports 8530 and 8531 for client communications and click Next > on the Software Update Point screen
NOTE: If you have a PKI environment and want everything to be encapsulated by SSL, you can go ahead and check Require SSL communication to the WSUS server to ensure all traffic is encryptioned.
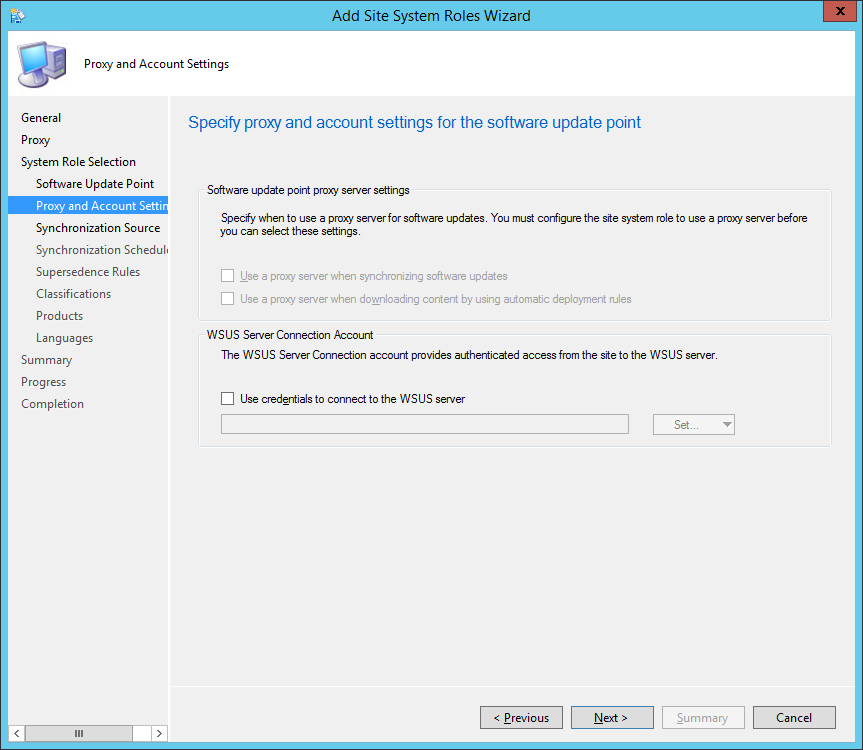
Click Next > on the Proxy and Account Settings screen
Click Next > on the Synchronization Source screen
Check Enable Synchronization on a schedule to set how often the check should run. Click Next > on the Synchronization Schedule screen
Optionally, check Alert when synchronization fails on any site in the hierarchy to be notified if a synchronization with Microsoft fails.
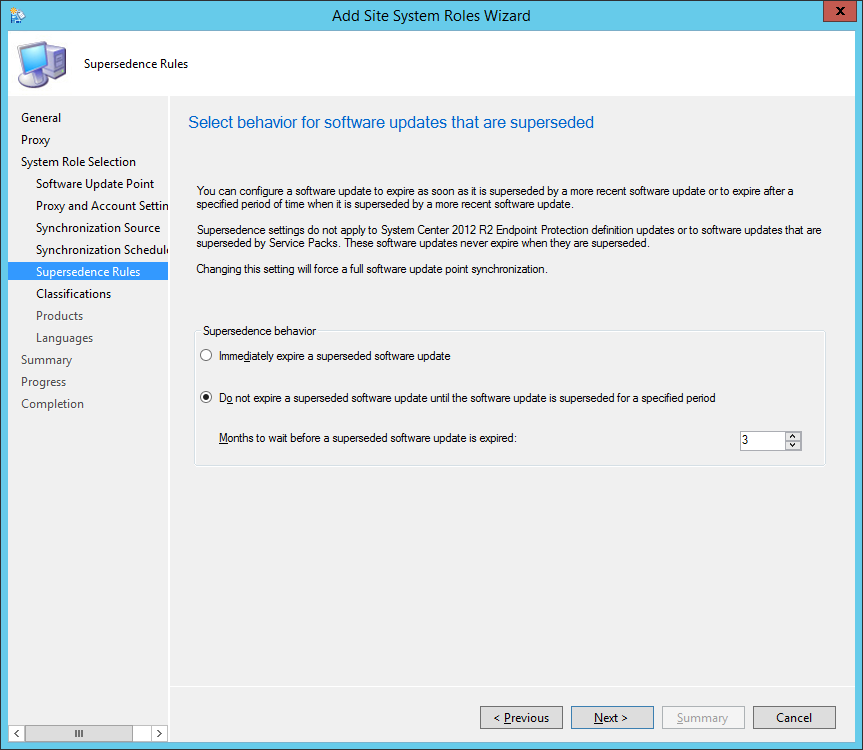
Click Next > on the Supersedence Rules screen
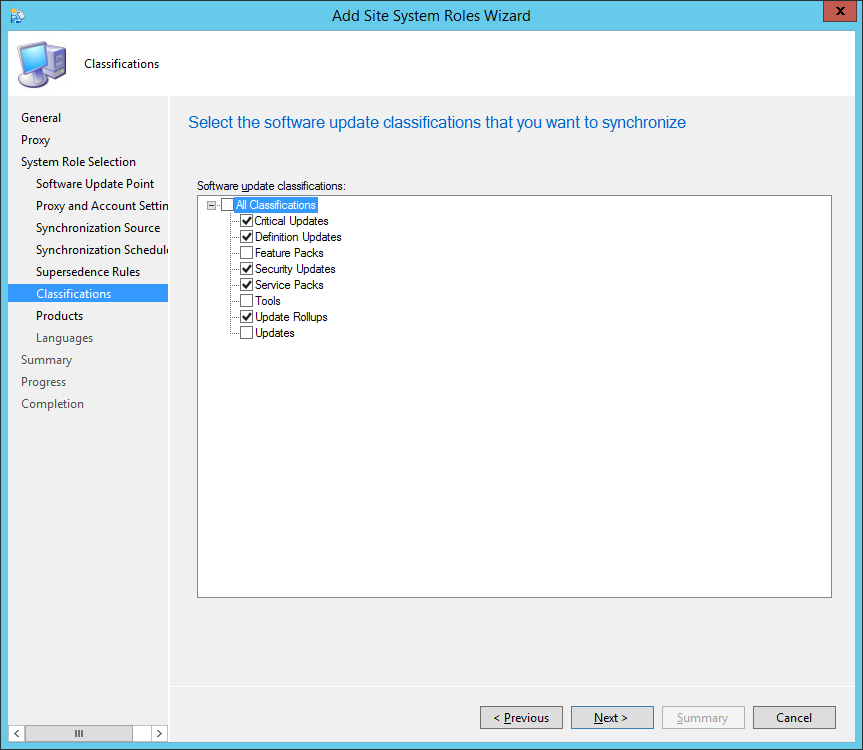
If you will be deploying System Center Endpoint Protection (SCEP) (Microsoft’s Antivirus Solution), check Definition Updates for WSUS to download those. If you wish to have more frequent updates, check Critical Updates to have those pulled down from Microsoft as well. Click Next >
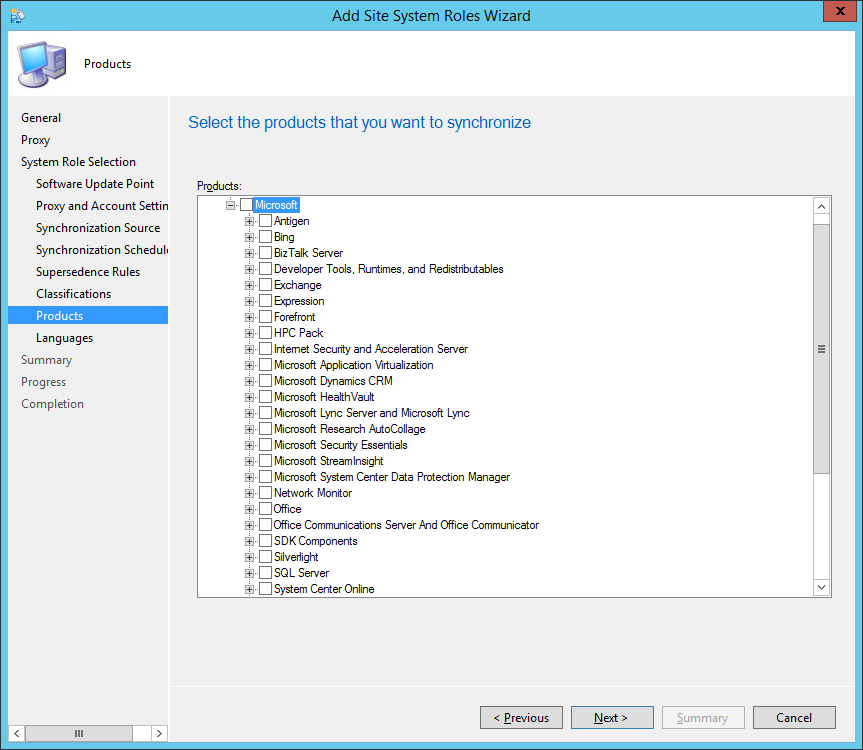
Expand All Products, Microsoft, on the Products page and check the products you wish to download updates for. Click Next > once done.
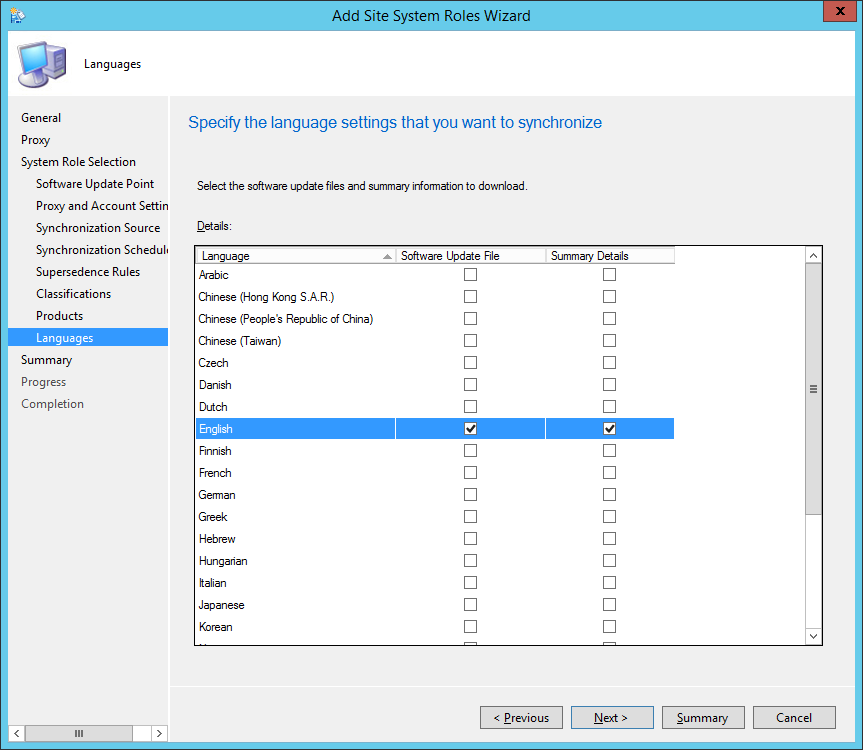
On the languages page, select which languages you want to sync and then click Next >
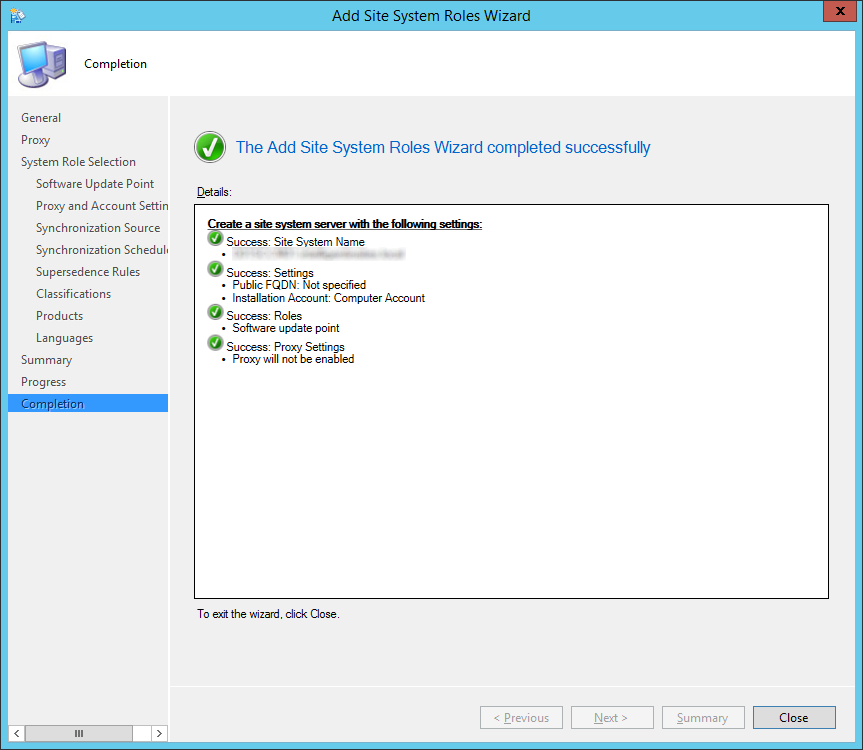
Click Next > on the Summary page if everything looks correct
Click Close if the settings have successfully applied
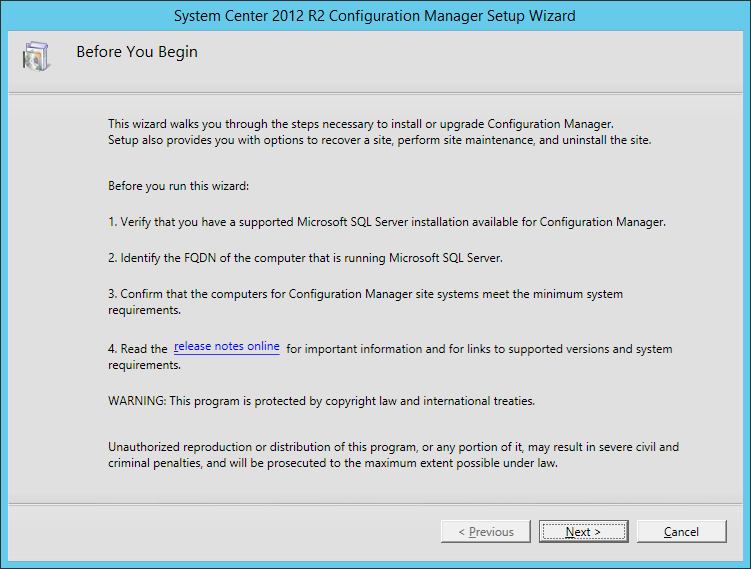
Recently, I had to install System Center 2012 Configuration Manager R2. I have had no prior experience using this product up to this point, so I thought I would document my notes and findings while giving the installation a whirl.
Manually create the System Management Container in Active Directory Domain Services
From the following technet article: http://technet.microsoft.com/en-us/library/bb632591.aspx Configuration Manager does not automatically create the System Management container in Active Directory Domain Services when the schema is extended. The container must be created one time for each domain that includes a Configuration Manager primary site server or secondary site server that publishes site information to Active Directory Domain Services.
Log on to one of your domain controllers
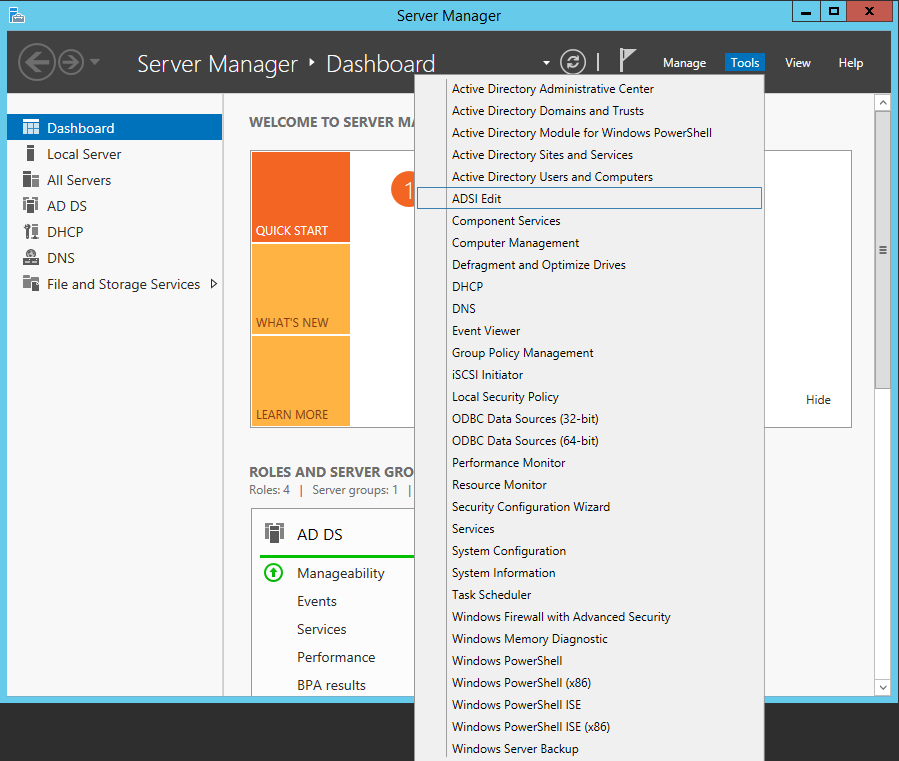
From Server Manager, select Tools -> ADSI Edit
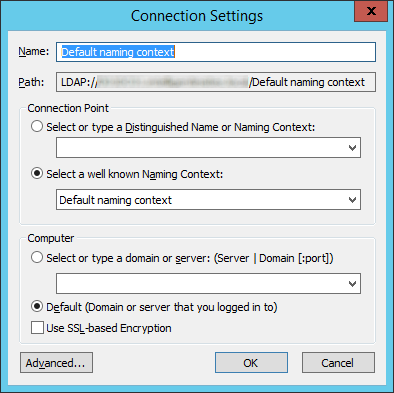
Right click ADSI Edit and select Connect to…
Ensure the Connection Point is set as Default naming Context and click OK
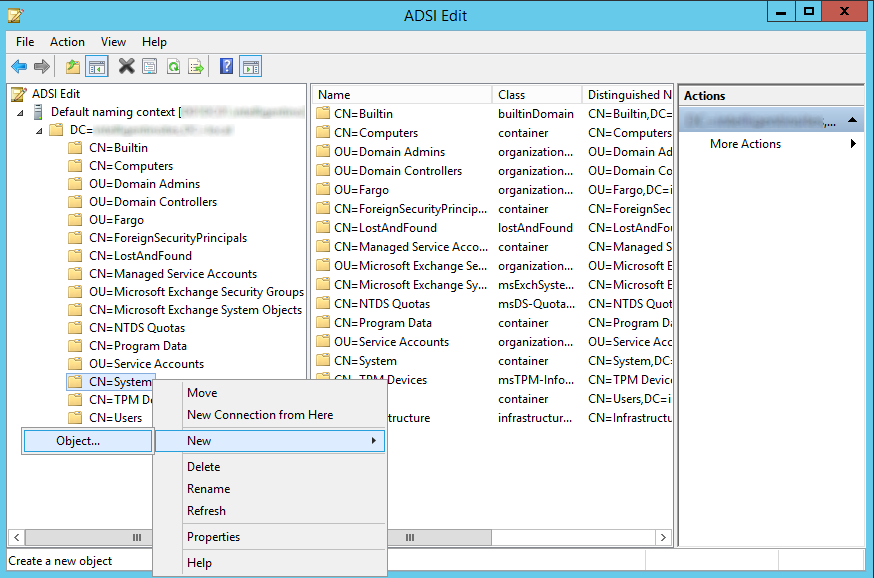
Expand Default naming context <FQDN>, expand <distinguished name>, right-click CN=System, click New, and then click Object
In the Create Object dialog box, select Container, and then click Next
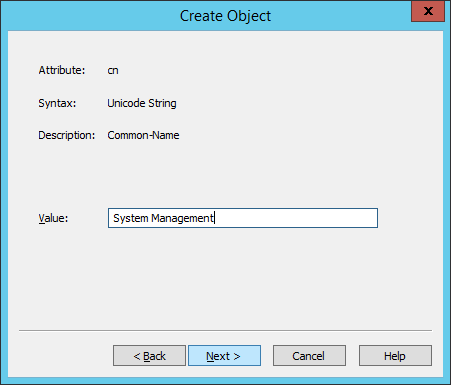
In the Value box, type System Management, and then click Next
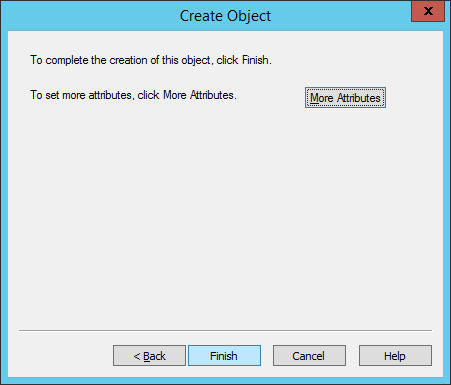
Click Finish
Add Permission to the System Management Container
From the following technet article: http://technet.microsoft.com/en-us/library/bb633169.aspx
After you have created the System Management container in Active Directory Domain Services, you must grant the site server’s computer account the permissions that are required to publish site information to the container.
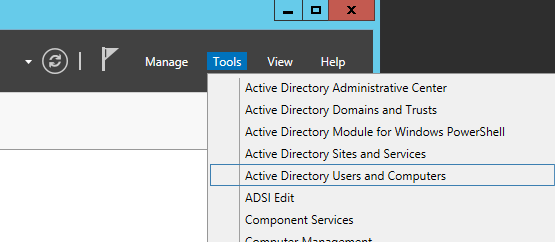
On your domain controller navigate to Server Manager -> Tools -> Active Directory Users and Computers
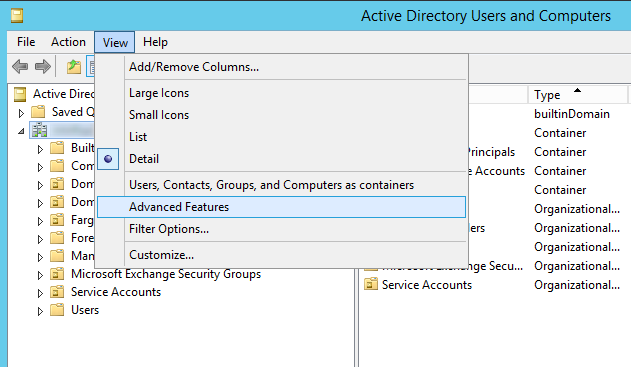
Click View and select Advanced Features
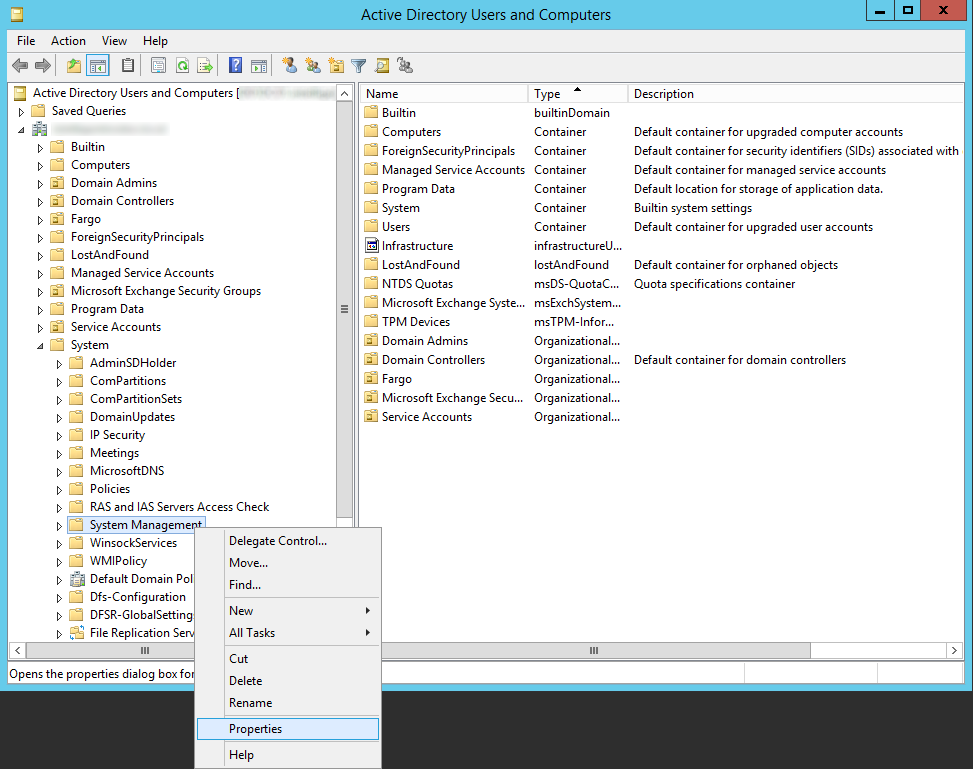
Expand your site, System, System Management and select Properties
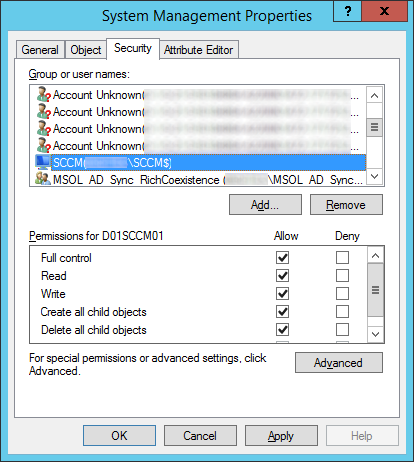
On the System Management Properties dialog box select the Security Tab
Click Add.. on the Security Tab
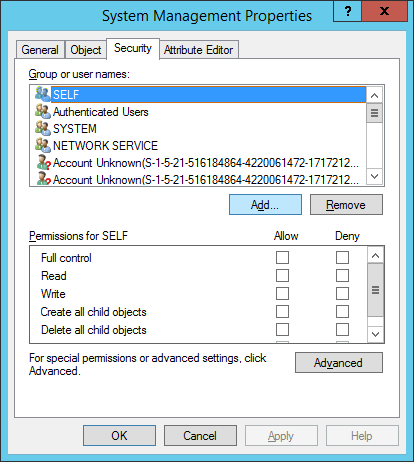
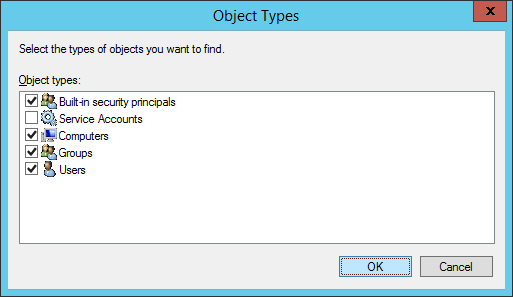
Click the Object Types… button, check Computers, and click OK
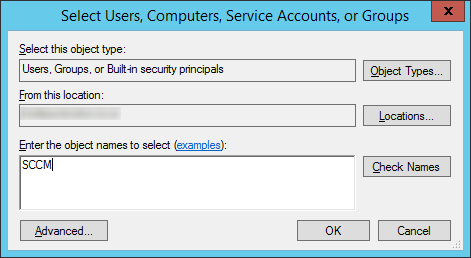
Type in the computer’s name and click OK
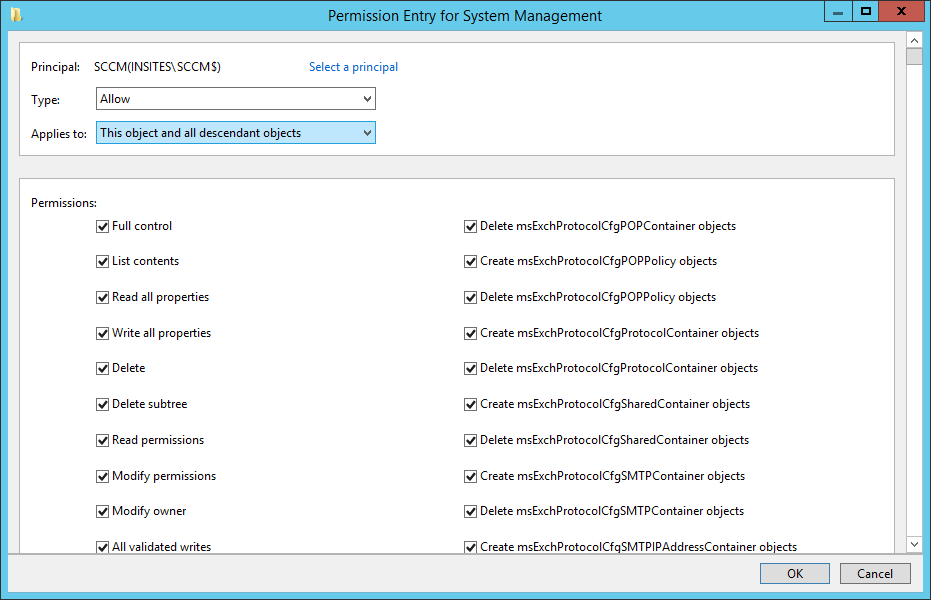
Check Full Control on the Security Permissions for your SCCM machine
Click the Advanced button, select the computer account, and click Edit
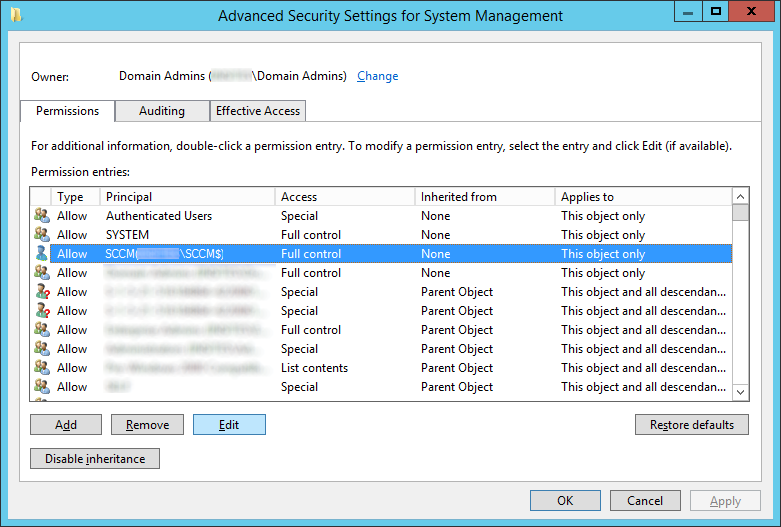
Select This object and all descendant objects in the Applies to section and click OK
Create Service Accounts for System Center in Active Directory
SCCMDJ
This service account is actually defined as the Task Sequence Editor Domain Joining Account. The account is used in a task sequence to join a newly imaged computer to a domain. This account is required if you add the step Join Domain or Workgroup to a task sequence, and then select Join a domain. This account can also be configured if you add the step Apply Network Settings to a task sequence, but it is not required.
SCCMCP
The Client Push Installation Account is used to connect to computers and install the Configuration Manager client software if you deploy clients by using client push installation. If this account is not specified, the site server account is used to try to install the client software. This account will need to be a local administrator on the machine we want to push software to.
SCCMNA
The Network Access Account is used by client computers when they cannot use their local computer account to access content on distribution points. For example, this applies to workgroup clients and computers from untrusted domains. This account might also be used during operating system deployment when the computer installing the operating system does not yet have a computer account on the domain.
SCCMRA
The Reporting Services Point Account is used by SQL Server Reporting Services to retrieve the data for Configuration Manager reports from the site database. The Windows user account and password that you specify are encrypted and stored in the SQL Server Reporting Services database.
NOTE: There are other service accounts that can be created for SCCM other than these as well. You can see a full listing from the following technet article (additional note, descriptions for the service accounts above were copied from this same article): http://technet.microsoft.com/en-us/library/hh427337
Download a copy of Microsoft System Center 2012 R2 Configuration Manager and Endpoint Protection from the Volume Licensing Center or the Technet Evaluation Center
This is called System Center 2012 R2 Config Mgr Client Mgmt License in the Volume Licensing Center
NOTE: In this tutorial, I will be using the ISO distributed from the volume licensing center
Extend the Active Directory schema for Configuration Manager
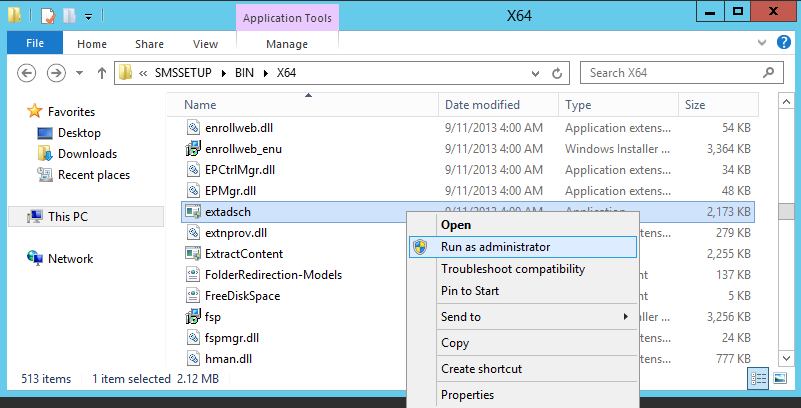
Mount/extract the System Center 2012 R2 Configuration Manager media to your SCCM machine
Navigate to D:\SMSSETUP\BIN\X64 (or where ever your installation media is). Right click on a file called extadsch.exe and right click, Run as Administrator
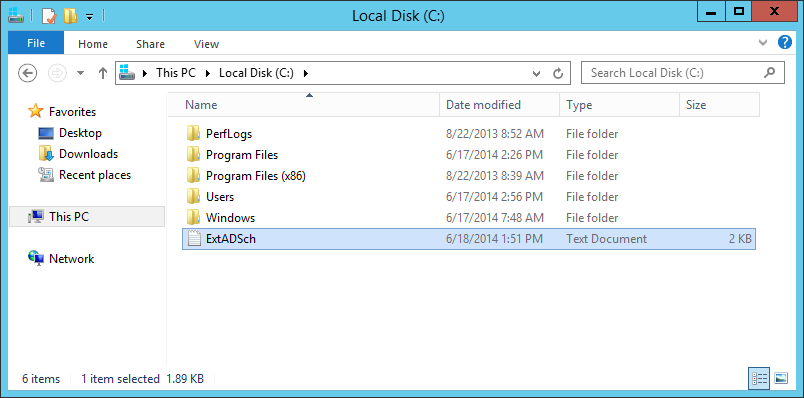
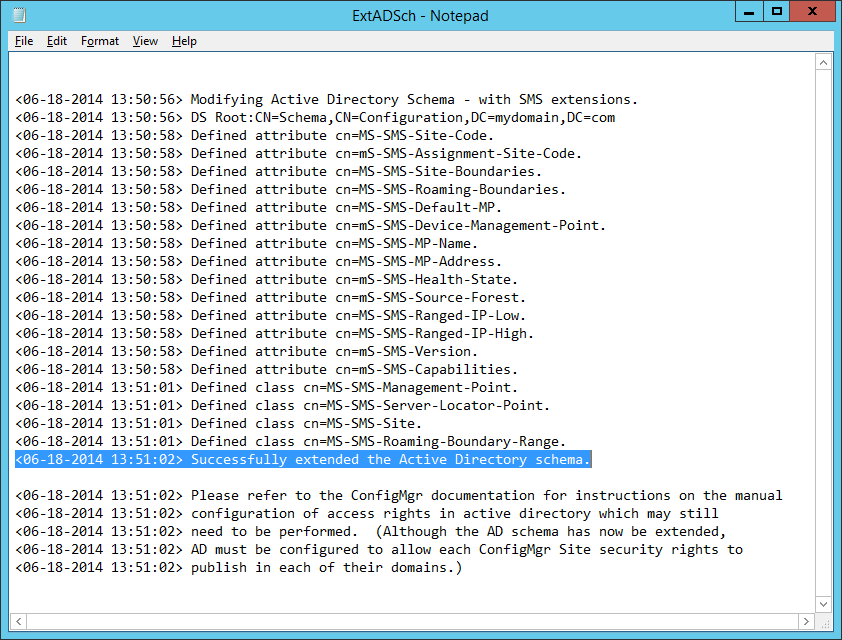
You will notice a black command prompt popup and then dissappear. Once it has dissappeared, open the following text document: c:\ExtADSch.txt
Verify the schema has been successfully extended
Install Pre-requisits to System Center Configuration Manager 2012 R2
NOTE: Apparently there was/is? a bug in the .NET framework which causes an error later on. Although optional, I would run this just be sure the .NET framework works properly with two different versions installed. You can read more about this command here: http://msdn.microsoft.com/en-US/library/k6h9cz8h(v=vs.80).ASPX
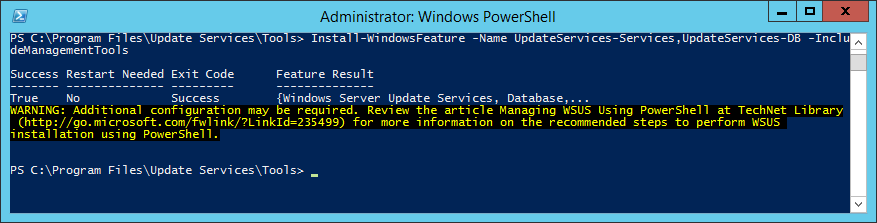
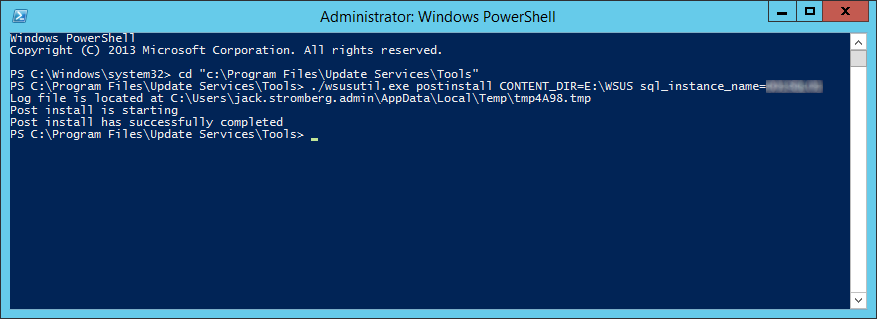
Install Windows Server Update Services
Execute the following commands (ensure you change the values to where you want the WSUS definitions and SQL server locations reside)
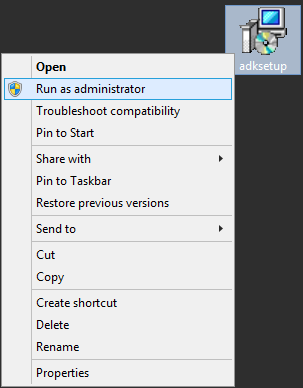
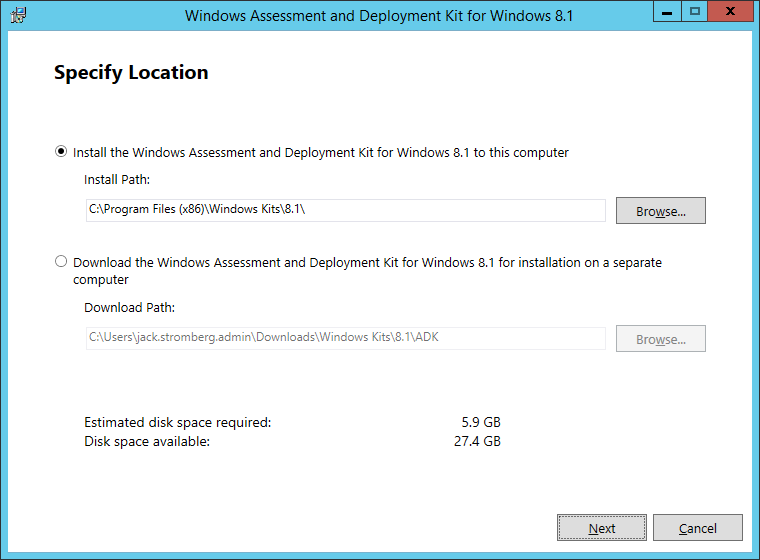
Right click and run adksetup.exe as an administrator (Click Yes if prompted by UAC)
Click Next on the Specify Location screen
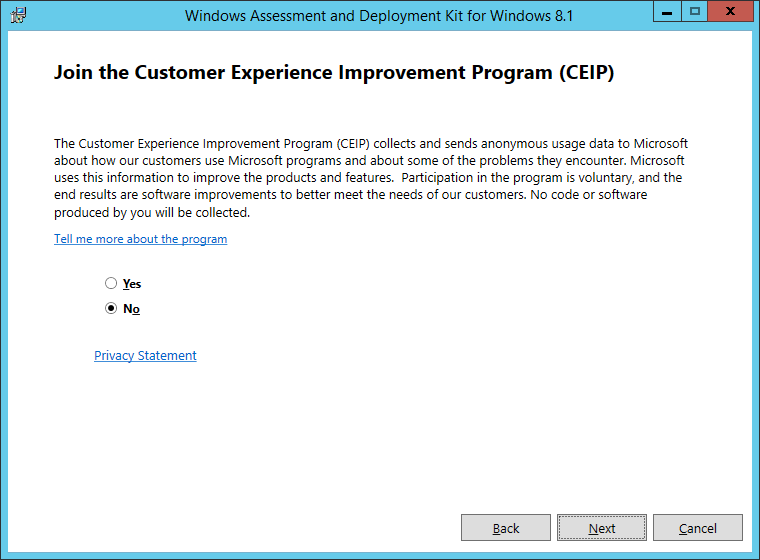
Click Next on the Join the Customer Experience Imporovement Program (CEIP) screen
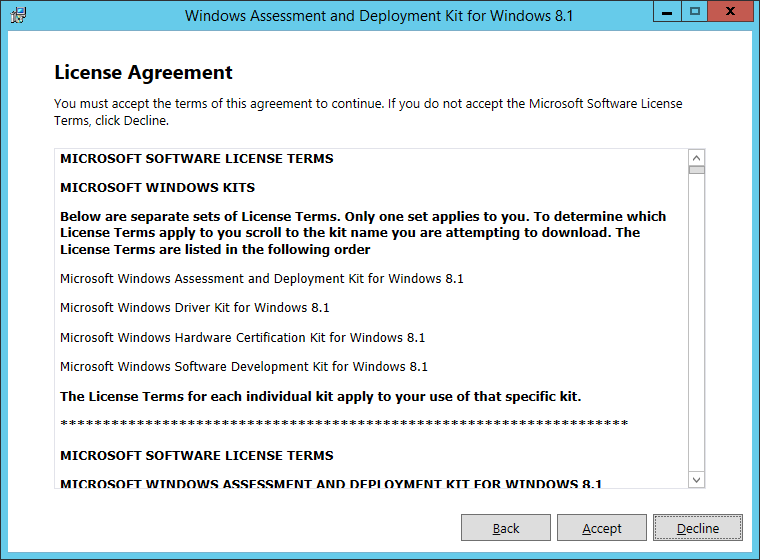
Click Accept on the License Agreenment screen
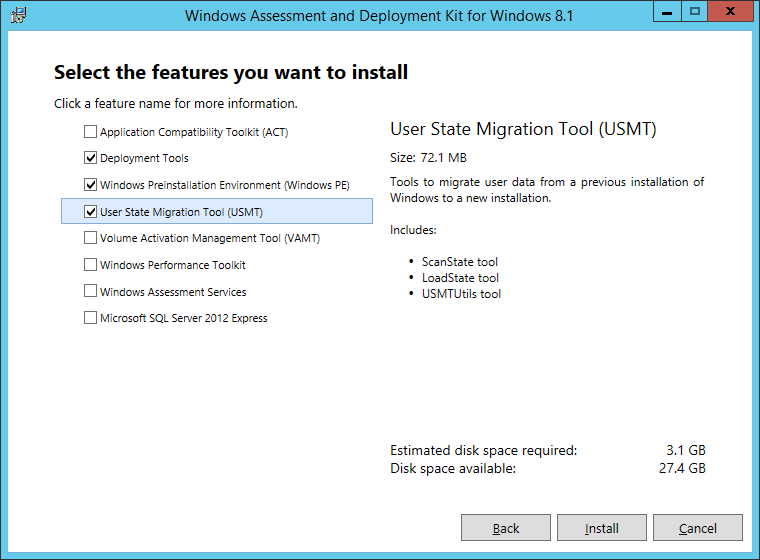
Check Deployment Tools, Windows Preinstallation Environment (Windows PE), and User State Migration Tool (USMT), and then click Install
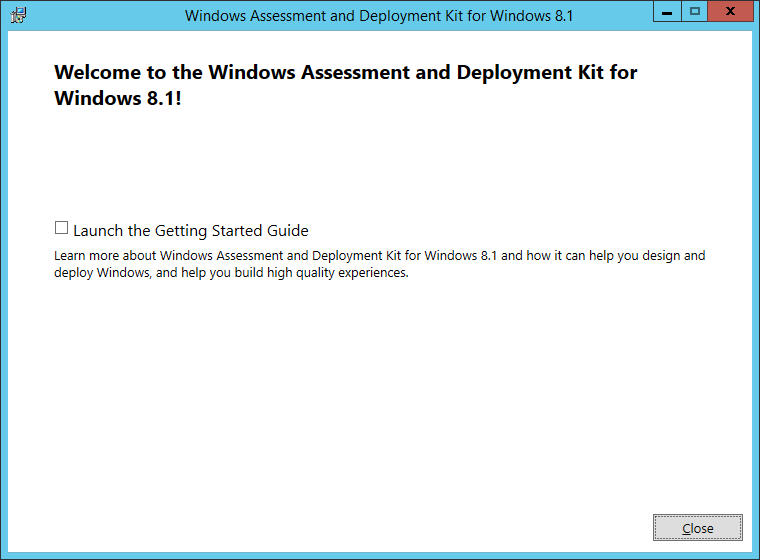
Click Close on the Welcome to Windows Assessment and Deployment Kit for Windows 8.1
Run Windows Updates to ensure you are fully patched
Install and Configure SQL Server
Install SQL Server
This step can vary on how you want to deploy SQL server. In this particular environment, a SQL cluster had already been deployed in the organization, so I will take advantage of that. However, in smaller environments, you can install the SQL Service on the same machine. You can find a compatibility matrix and which versions of SQL Server can be installed: http://technet.microsoft.com/en-us/library/gg682077.aspx#BKMK_SupConfigSQLDBconfig
Install System Center 2012 Configuration Manager R2
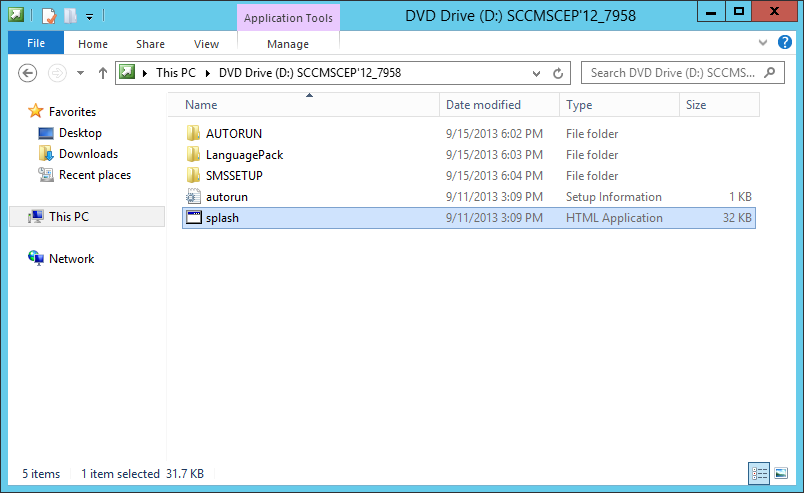
Navigate to your installation media and double click on splash.hta to launch the installer
NOTE: If you are doing an offline install (no internet), run the setupdl.exe installer from your installation media (example: D:\SMSSETUP\BIN\X64\setupdl.exe)
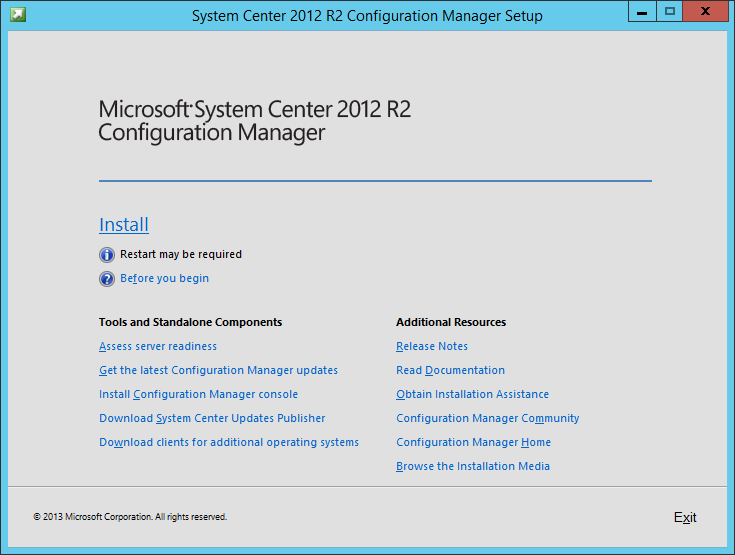
Click on Install (Click Yes if prompted by UAC)
Click Next >
Ensure Install a Configuration Manager primary site is checked and click Next >
Enter your license key or hit Install the evaluation edition of this product and click Next >
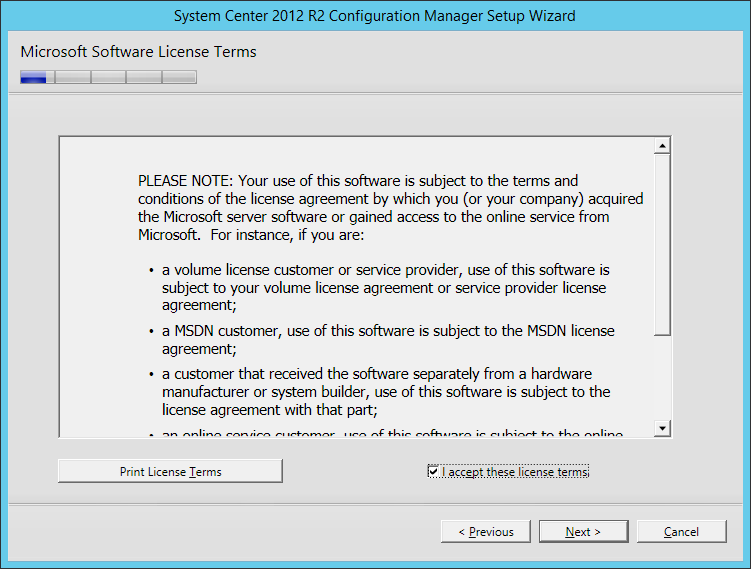
Accept the license agreemt for the Microsoft Software License Terms
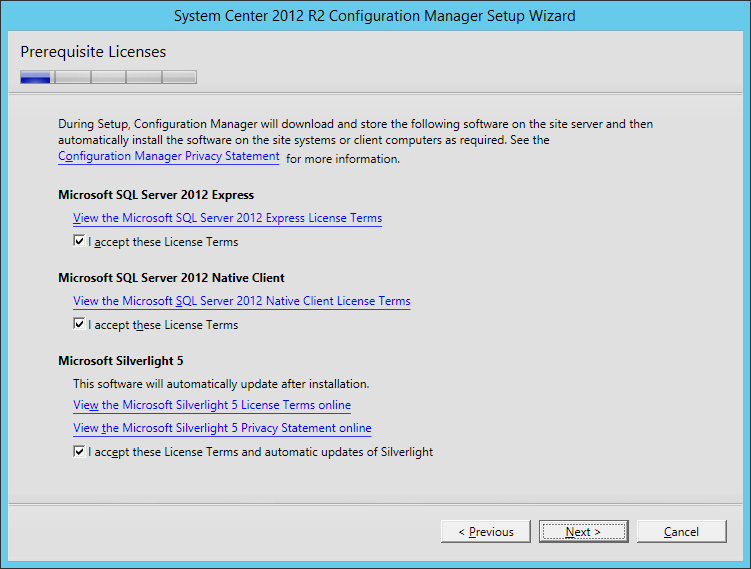
Accept the license agreements for SQL Server 2012 Express, SQL Server 2012 Native Client, and Silverlight, then click Next >
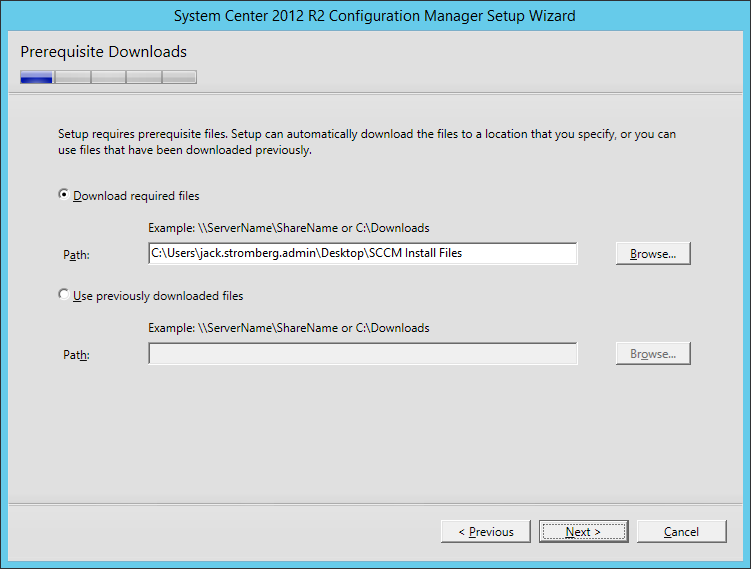
Check Download required files and put them on your desktop
This will grab the latest copy of SCCM. If you need to do an offline installation, you can manually run the offline installer from your installation media (in my case: D:\SMSSETUP\BIN\X64\setupdl.exe).
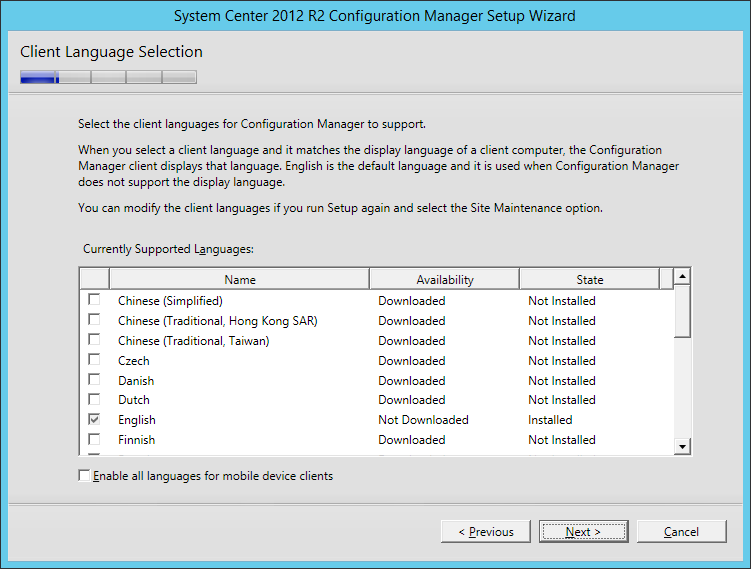
Select your language to run System Center server in and then click Next >
Select your languages to support on your client devices and click Next >
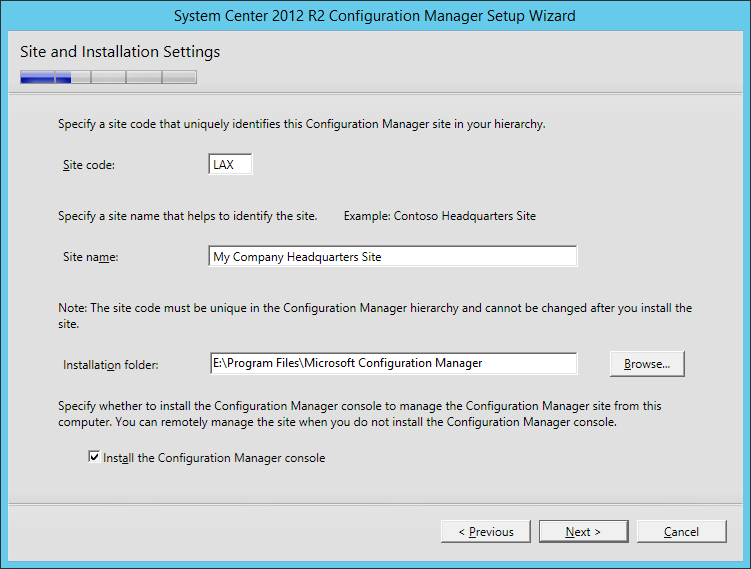
Set a site code (I would use an airport code if you only have one office in each office location), enter your site name, and then change the installation folder to use your second partition. Once done, click Next >
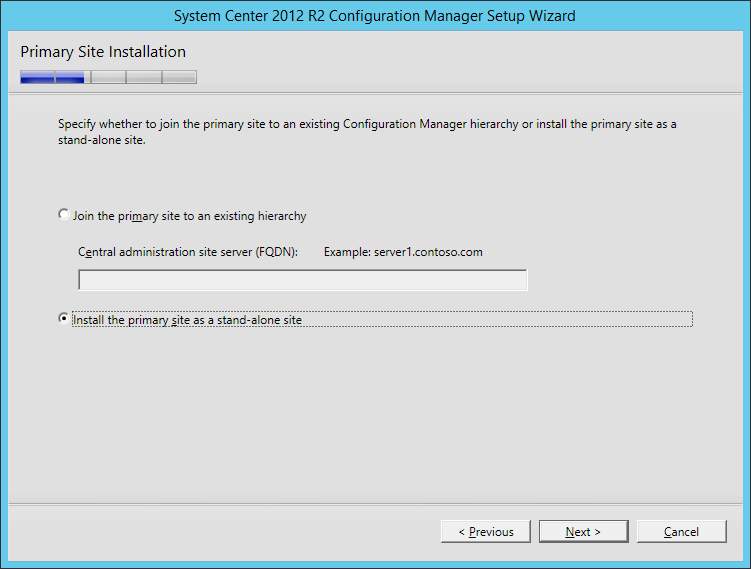
Check Install the primary site as a stand-alone site and click Next >
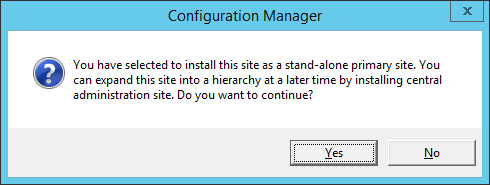
Click Yes on the Configuration Manager dialog box that explains you can configure SCCM to be in a heirrachy to scale at a later time
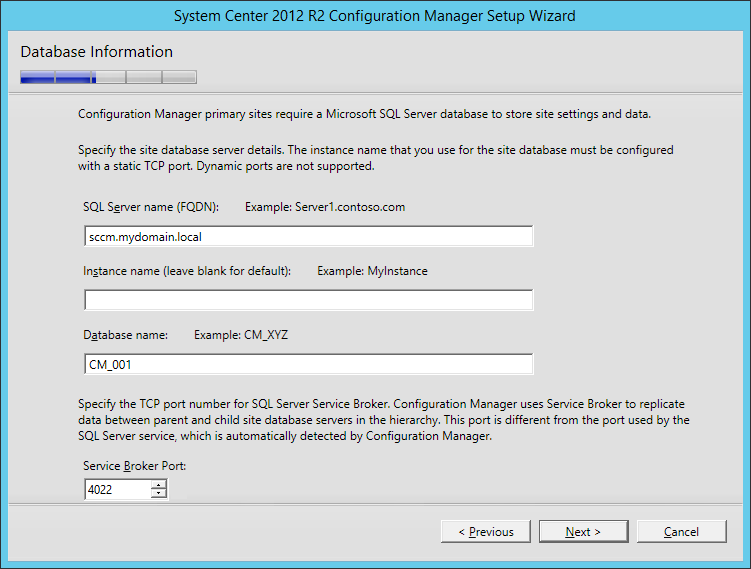
Enter in the SQL Server Name (FQDN) to your database server and click Next >
If you installed the SQL Server service on this same machine, it should be the FQDN to your SCCM machine. If you have a SQL Server you would like to point to, enter in the FQDN of that server.
Click Next > on the Database Information screen
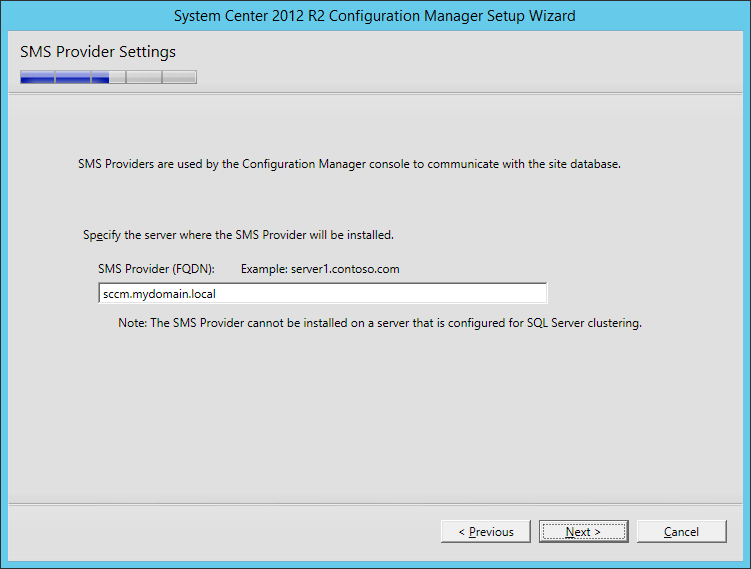
Click Next > on the SMS Provider Settings
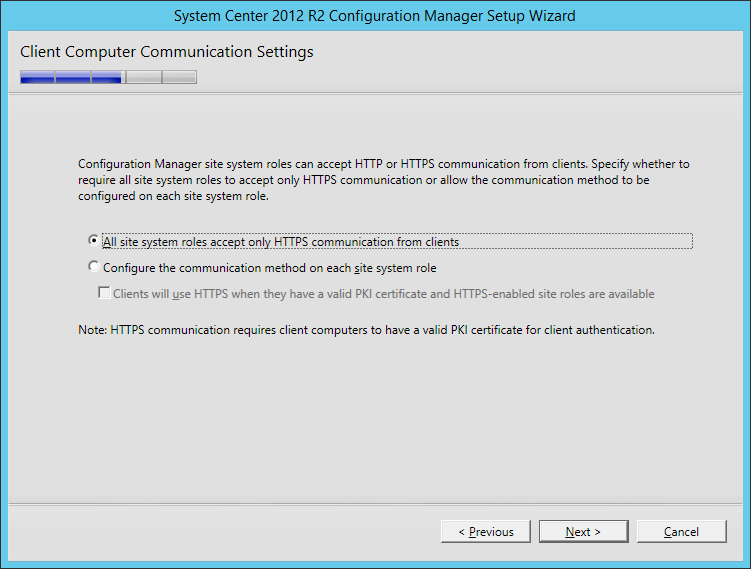
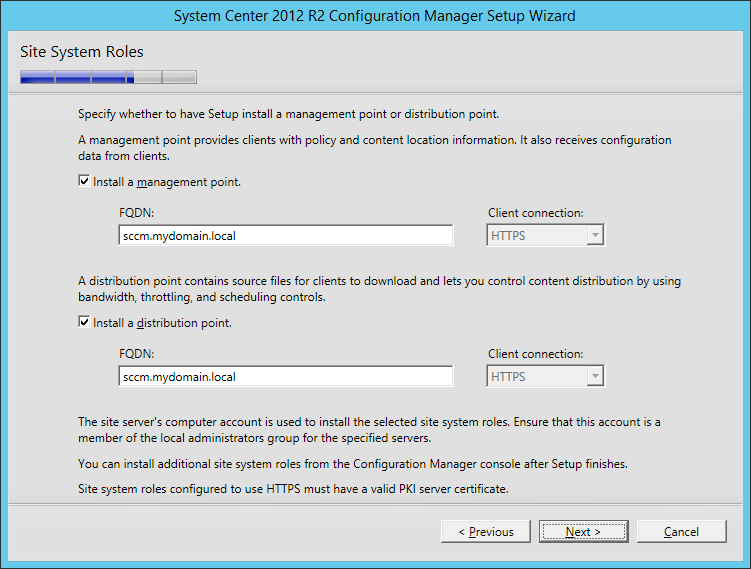
Check Configure the communication method on each site system role and then click Next > if you do not have PKI setup. If you have a PKI implemented in your environment, you may go ahead and choose All site system roles accept only HTTPS communication from clients.
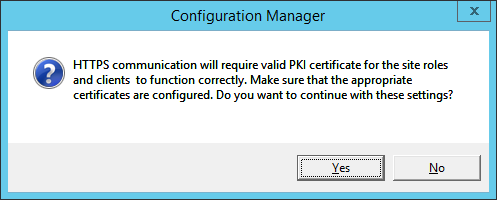
Click Yes to continue if you selected All site system roles accept only HTTPS communication from clients
Ensure Install a management point and Install a distribution point are checked and click Next >
Click Next > on the Customer Experience Improvement Program
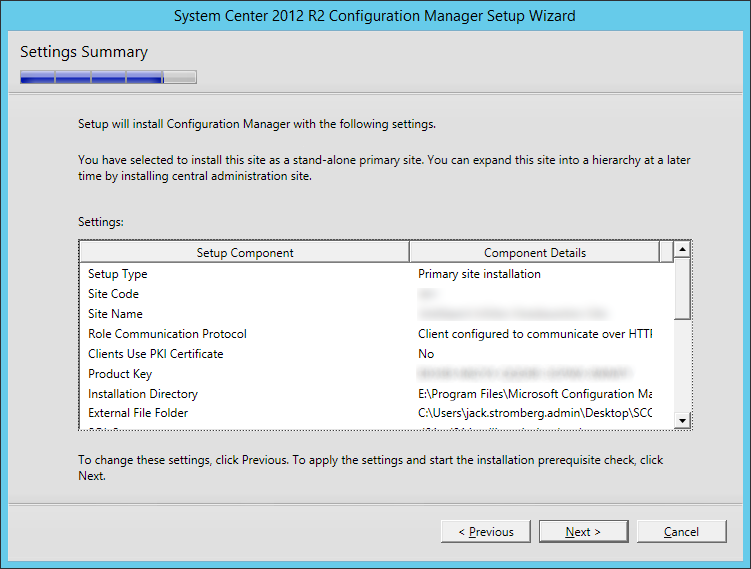
Verify the settings you chose on the Settings Summary and then click Next >
Click Begin Install on the Prerequisite Check once you have passed all of the potential issues. In this case, I have a few that are false possitives, so I am going to go ahead with the install.
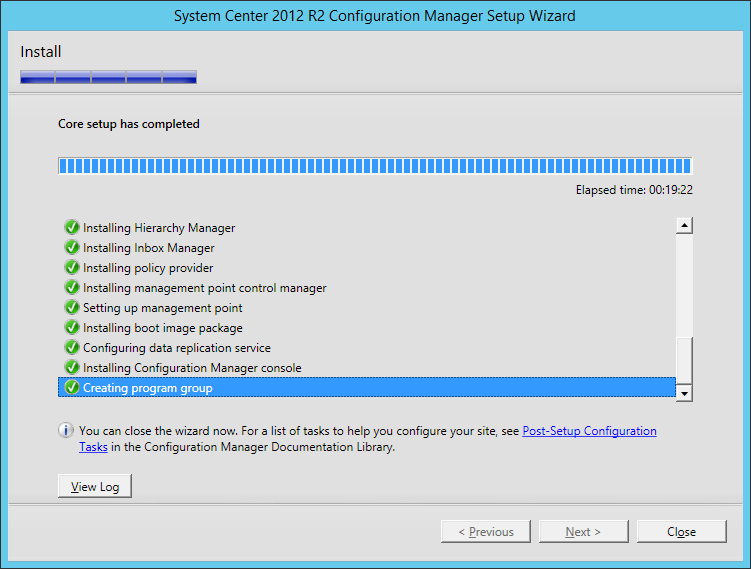
Once done installing, hit Close
Try opening up the System Center 2012 R2 Configuration manager console. If it opens, congrats on your newly deployed System Center! 🙂
Here is a tutorial on deploying VMware vCloud Networking and Security 5.5 (formerlly called vShield). Unlike other VMware products, this product must be installed as an appliance. VMware provides you an OVA file that contains the entire virtual appliance, so minimal configuration is needed. Here is a good overview of the product and how it works: http://vmwarelearning.com/vcloud_net_sec/
Installing VMware vCloud Networking and Security 5.5 Appliance
Download the VMware vCloud Networking and Security 5.5 OVA file from myvmware.com
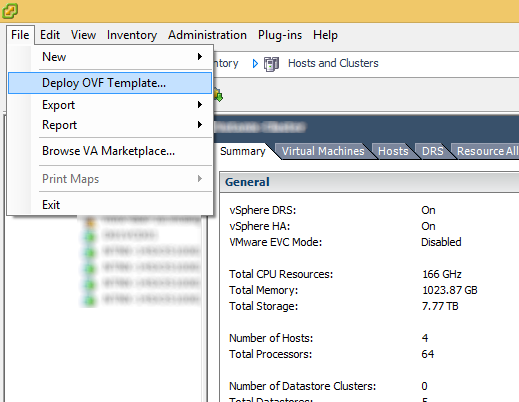
Login to vCenter
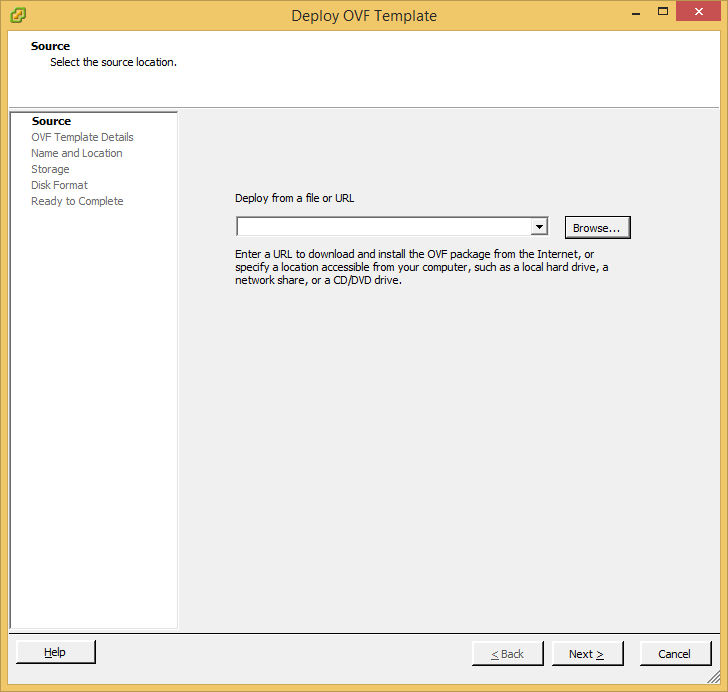
Select File->Deploy OVF Template…
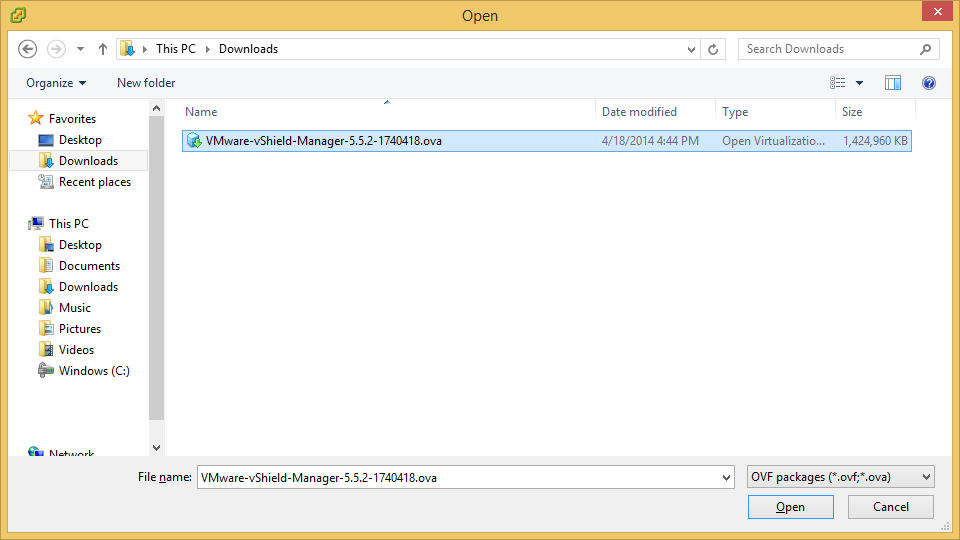
Click Browse…
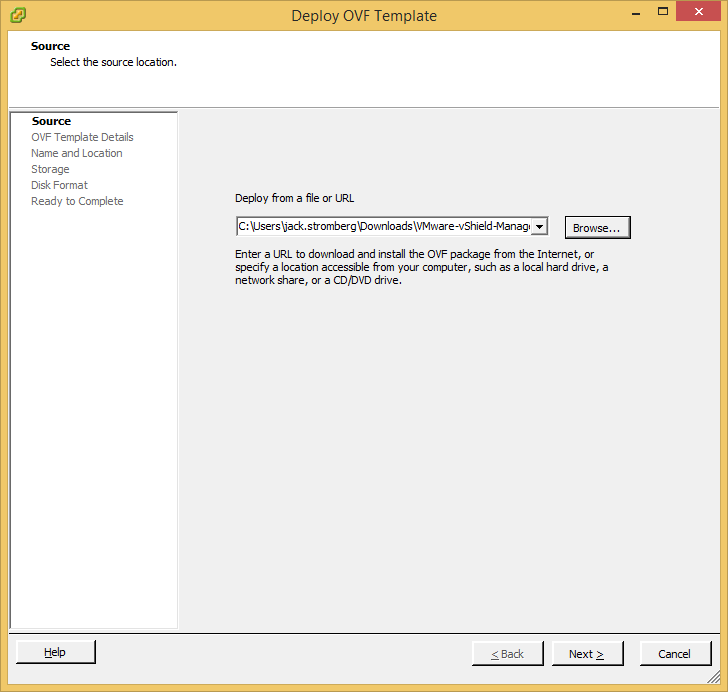
Select the VMware-vShield-Manager-5.5.x-xxxxxxx.ova file you downloaded and click OK
Select Next >
Select Next >
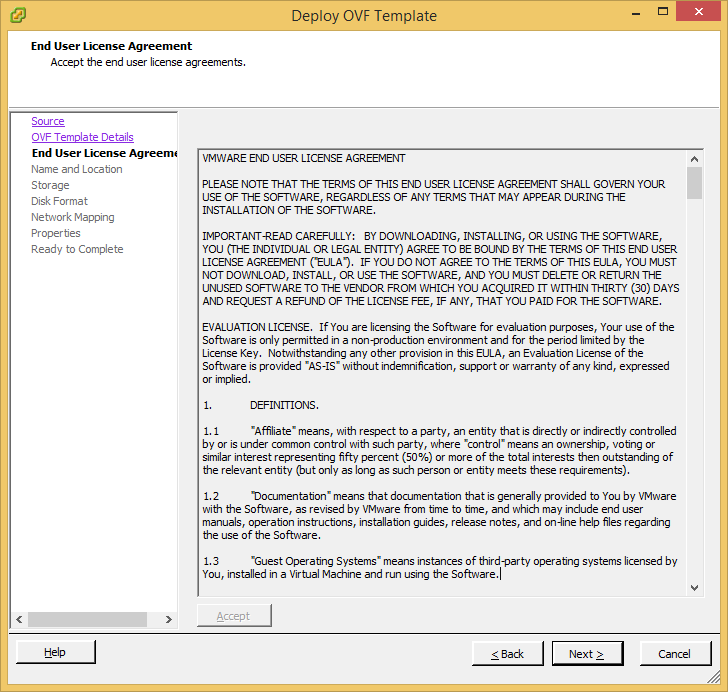
Select Accept and then click Next >
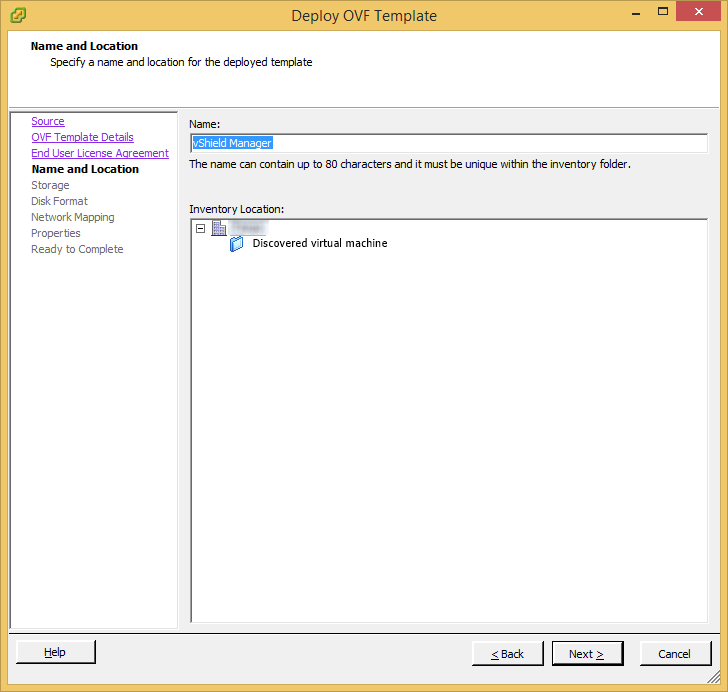
Enter a name for the VM and click Next >
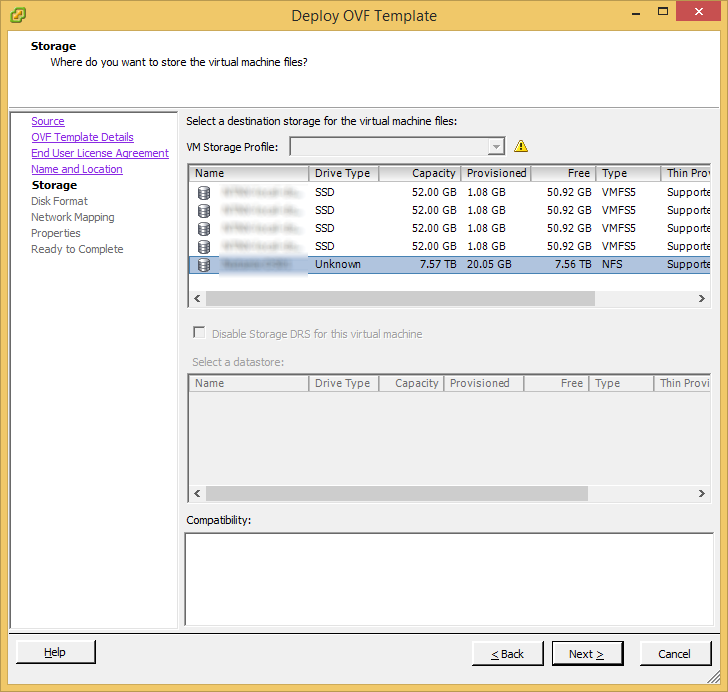
Select a datastore to place the VM on storage and click Next >
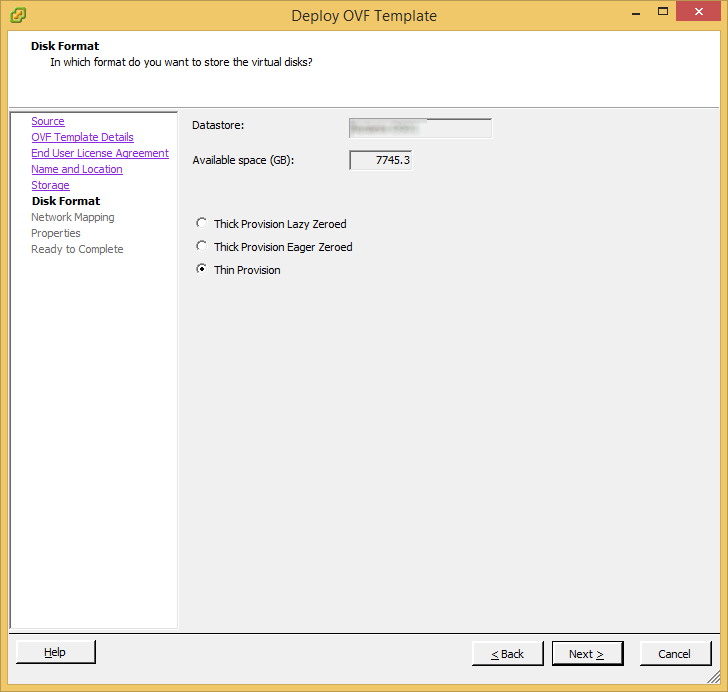
Select how you want to provision the VM and click Next >
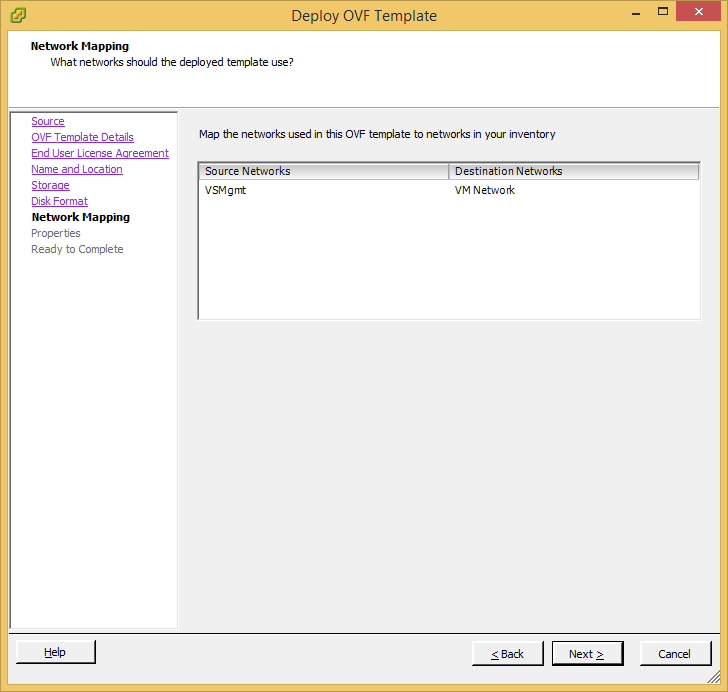
Select the destination network and click Next >
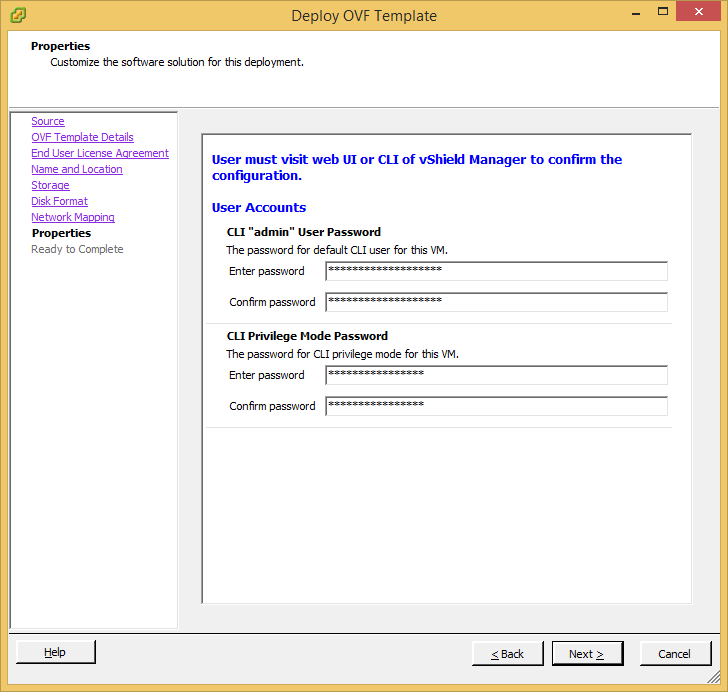
Enter in a password for the default admin user and for privileged CLI access and click Next >
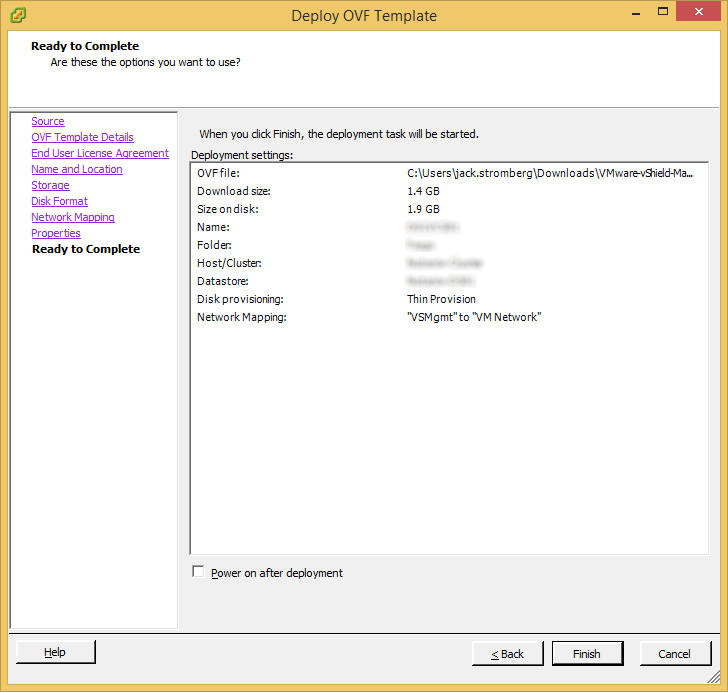
Click Finish
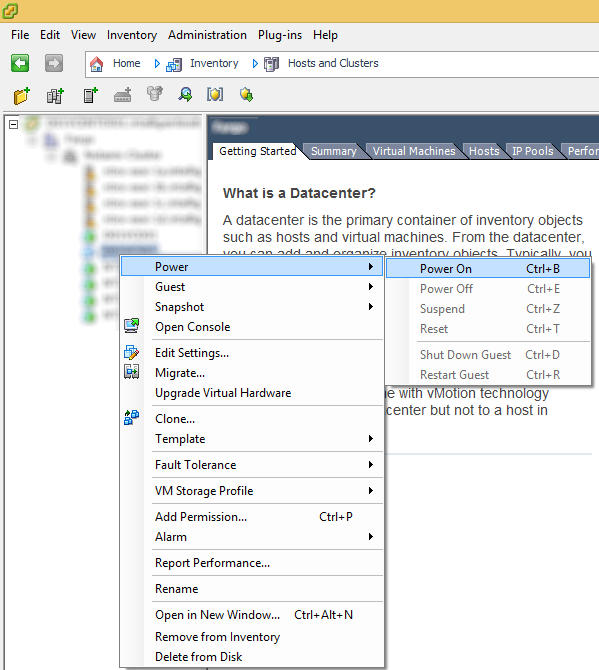
Power on the VM
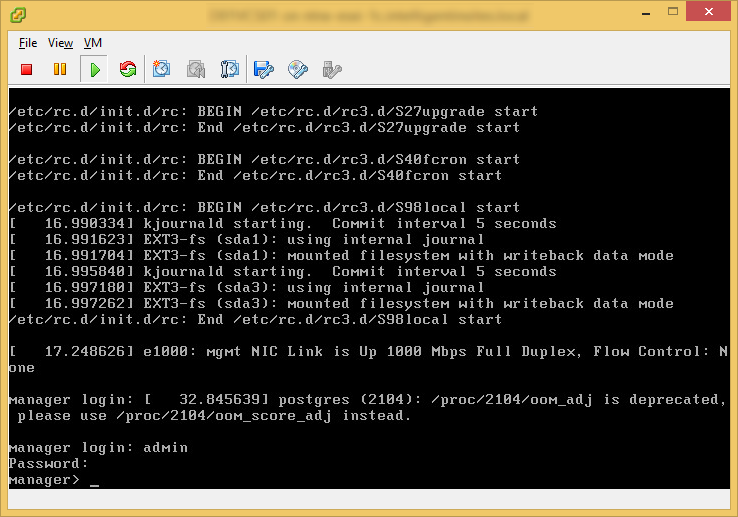
Open up a console the VM
Login to the VM using the username admin and the “user password” you specified in step 13.
Type enable and hit enter (use the “privileged user password” you specified in step 13).
Type setup and hit enter to launch the network configuration wizard
Enter in the static IP Address you wish to assign to the appliance and hit enter
Enter in the Subnet Mask for your network and hit enter
Enter in the Default gateway for your network and hit enter
Enter in your Primary DNS server’s IP address and hit enter
Enter in your Secondary DNS server’s IP addres and hit enter
Enter in your domain search list (DNS Suffix if you host your own internal DNS) and hit enter
Type y to confirm your changes and hit enter
Press control+alt+insert to send the control+alt+delete command to the VM to restart the guest. Note: Logging out like the wizard tells you didn’t work for me. Had to do the reboot.
Open up your webbrowser and head over to the static IP address you gave your appliance
Enter in the username admin and the password default to login
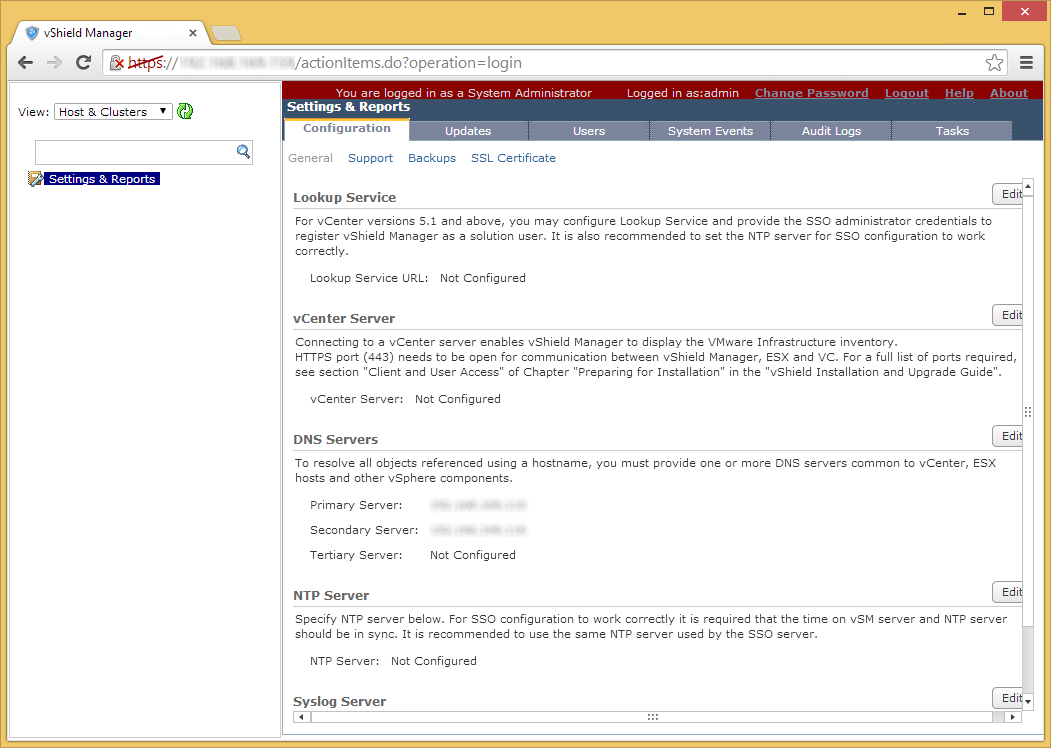
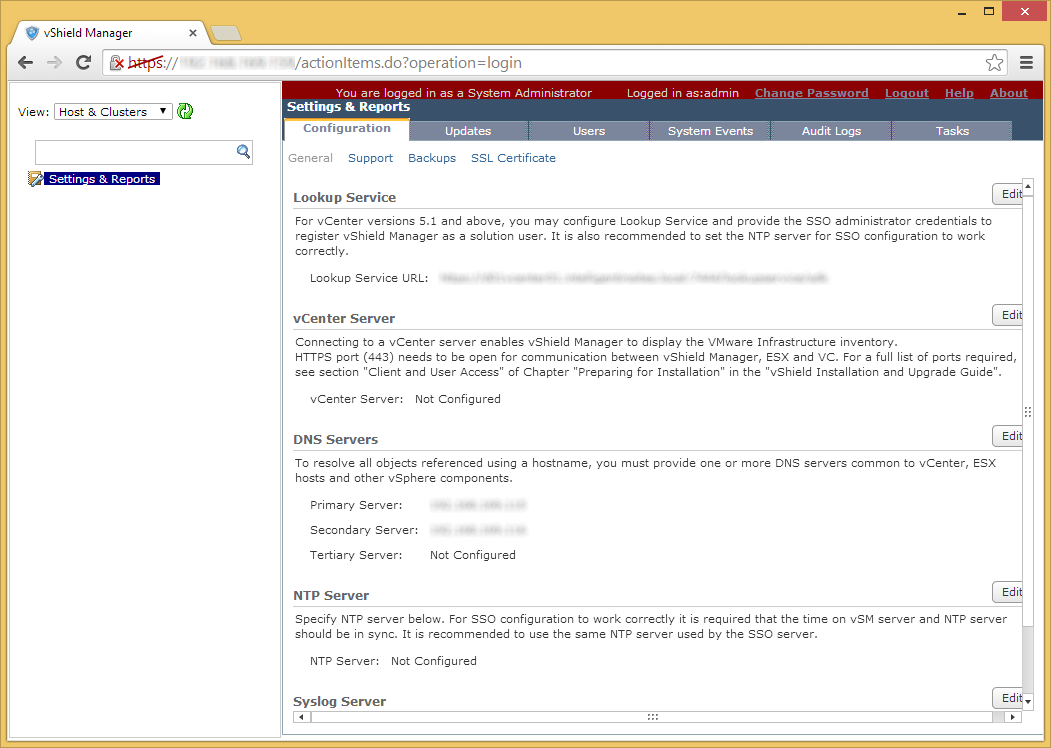
Configuring VMware vCloud Networking and Security 5.5 for vCenter
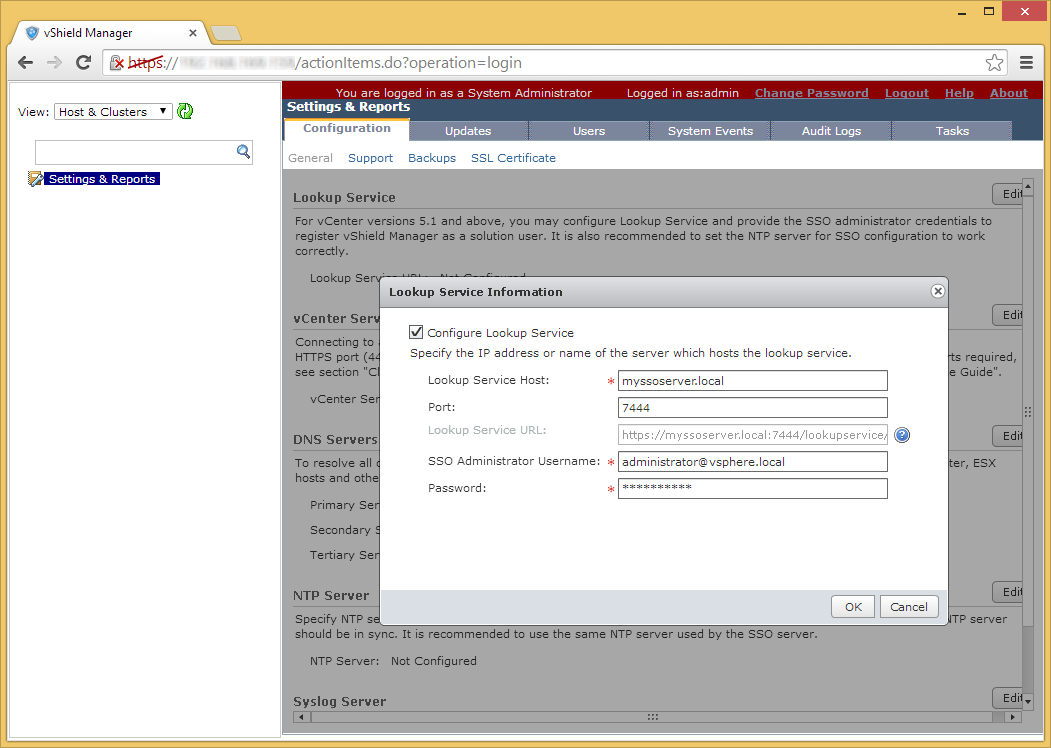
Click on the Edit button next to Lookup Service
Check Configure Lookup Service and enter in the information to your vCenter’s Lookup Service instance:
Lookup Service Host
Lookup Service Port
SSO Administrator Username (should be admin@System-Domain or [email protected] if you used the default installation options)
SSO Administrator Password.
Click OK once configured.
Click Yes to trust the server’s SSL certificate
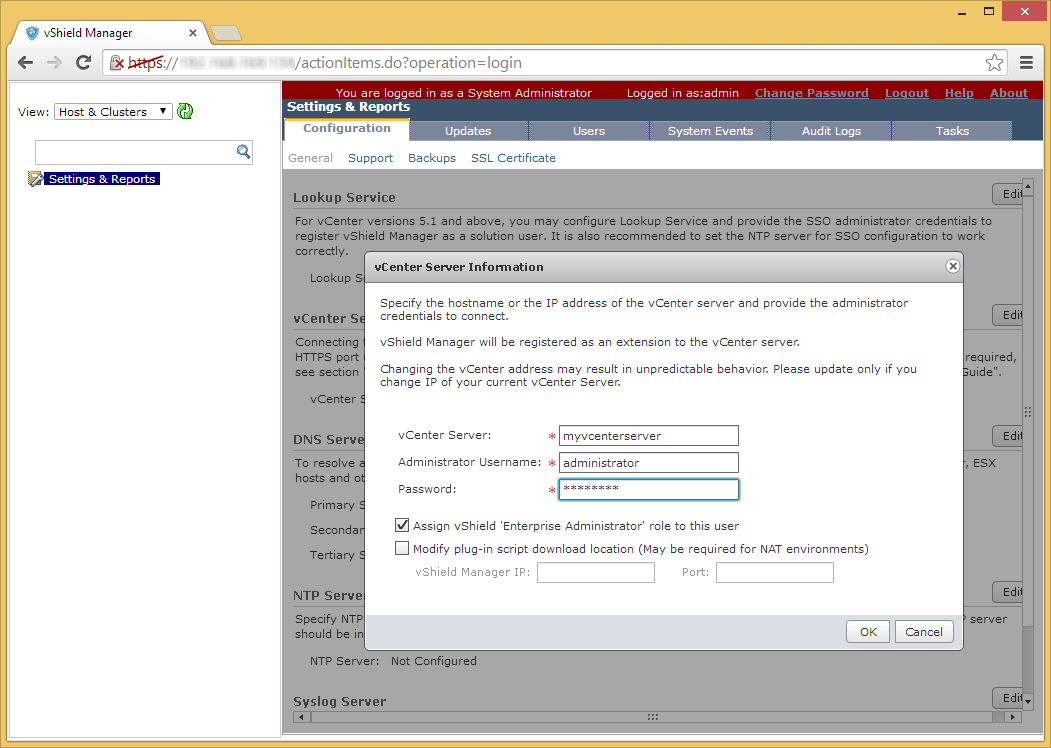
Click Edit next to vCenter Server
Enter in your vCenter info and click OK
vCenter Server
Administrator Username
Administrator Password
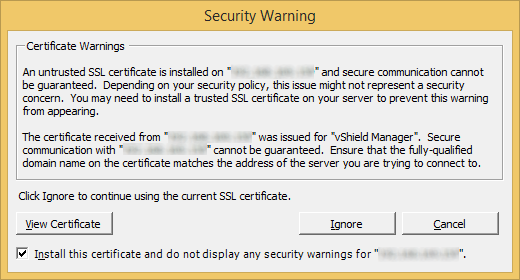
Select Yes to trust the vCenter SSL certificate
Check Install this certificate and do not display any security warnings and then click the Ignore button when prompted
Click the Edit button next to NTP Server
Specify the IP address of the NTP server you wish to sync to and click OK
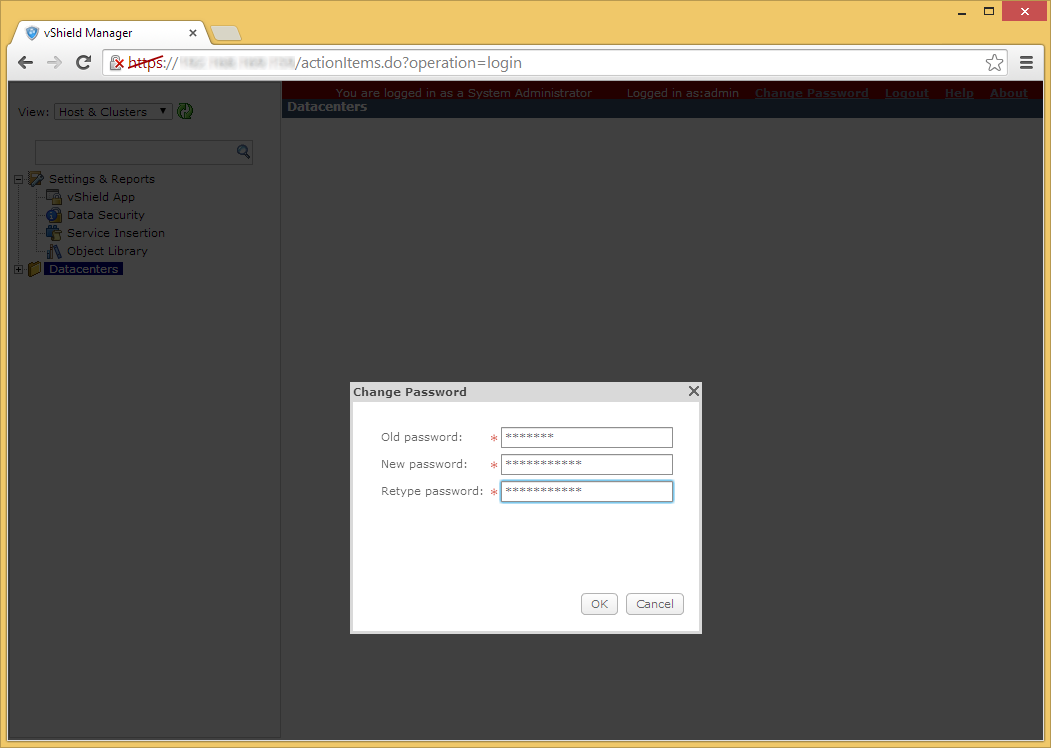
Click the Change Password link at the top to change the default admin password. Click OK when you are done.
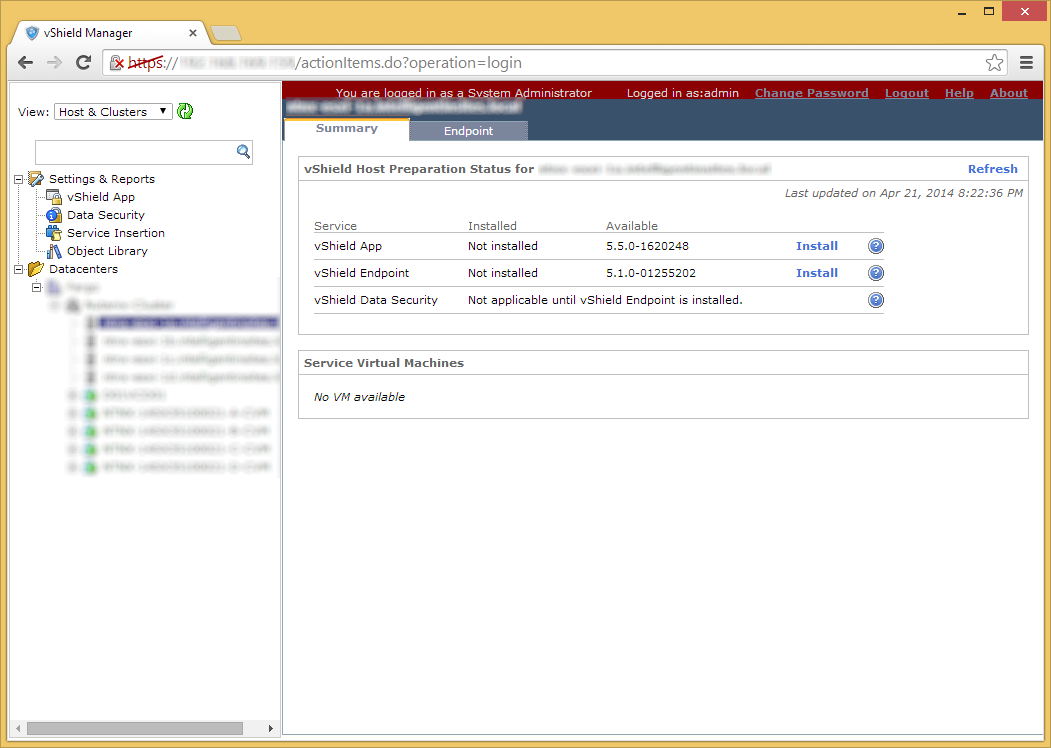
At this point, you can begin to install the vShield App, vShield Endpoint, and vShield Data Security services by selecting one of your hosts and clicking the Install links. However, configuration of these options is outside the scope of this tutorial.
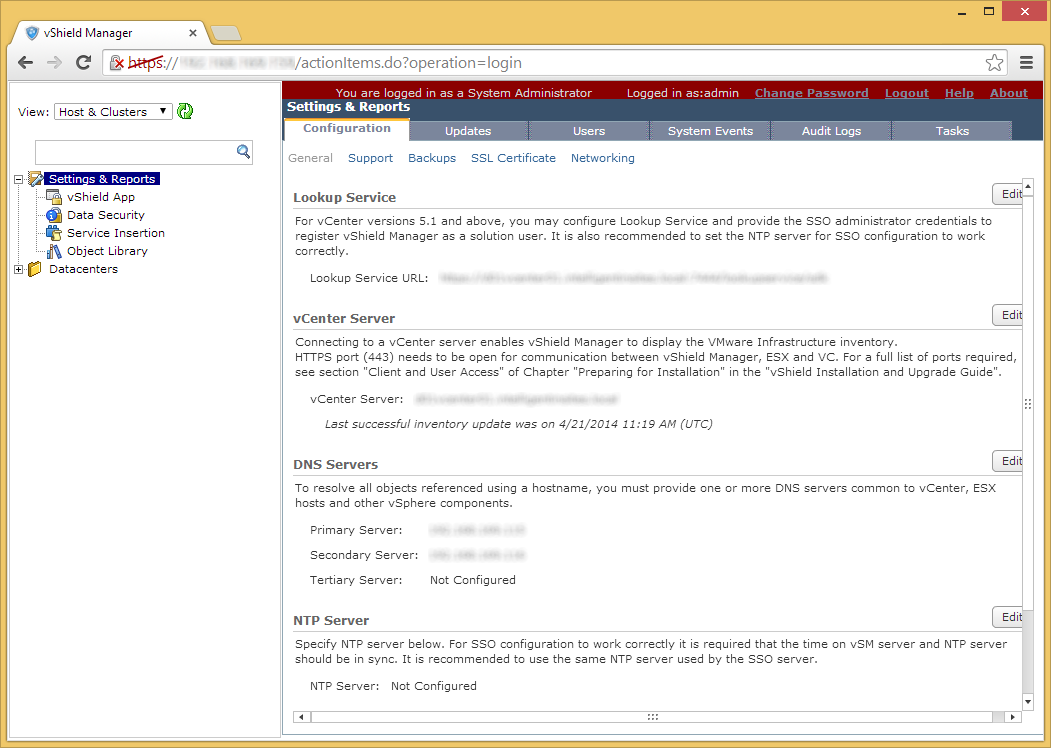
Note: One thing that I did notice that is different from vShield 5.1 is that once vShield Manager 5.5 is synchronized with vCenter, the management plugin will automatically be registered to vCenter and you can access vShield Manager from the vSphere Client.
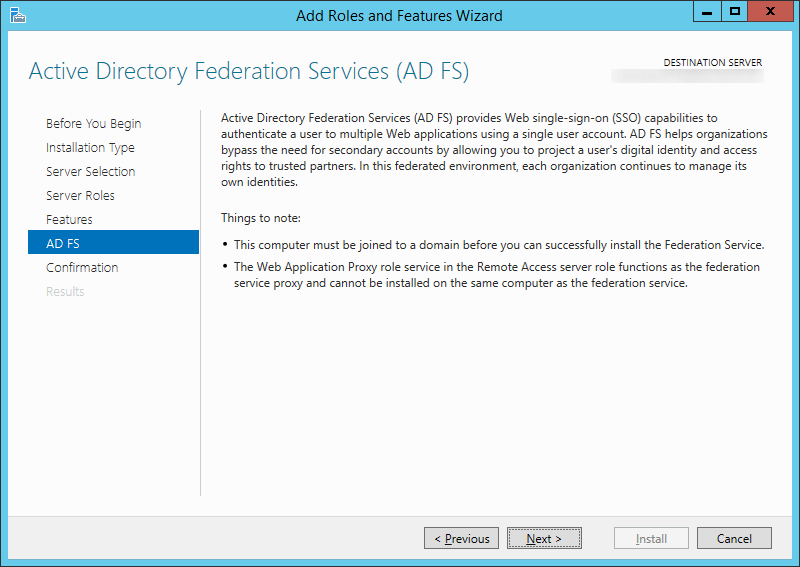
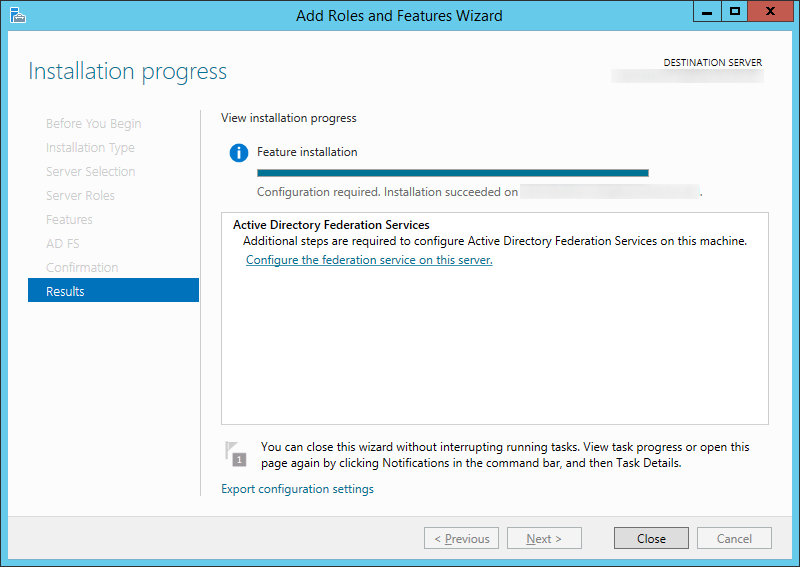
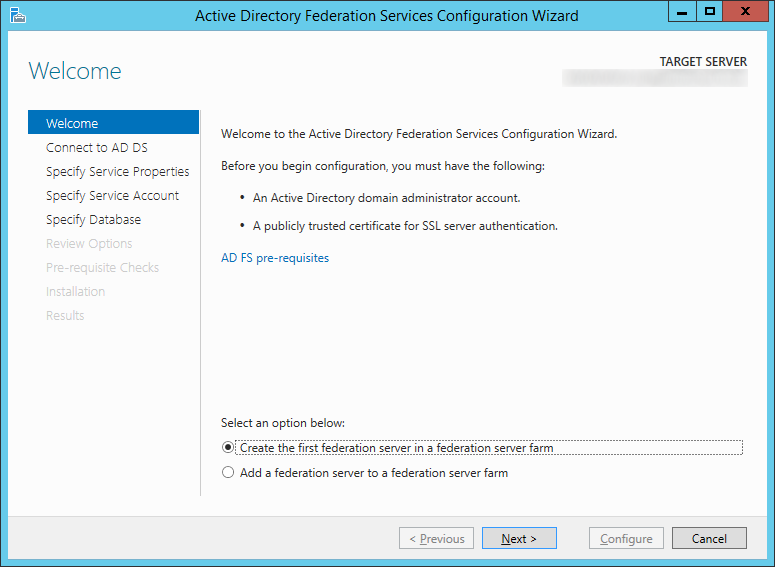
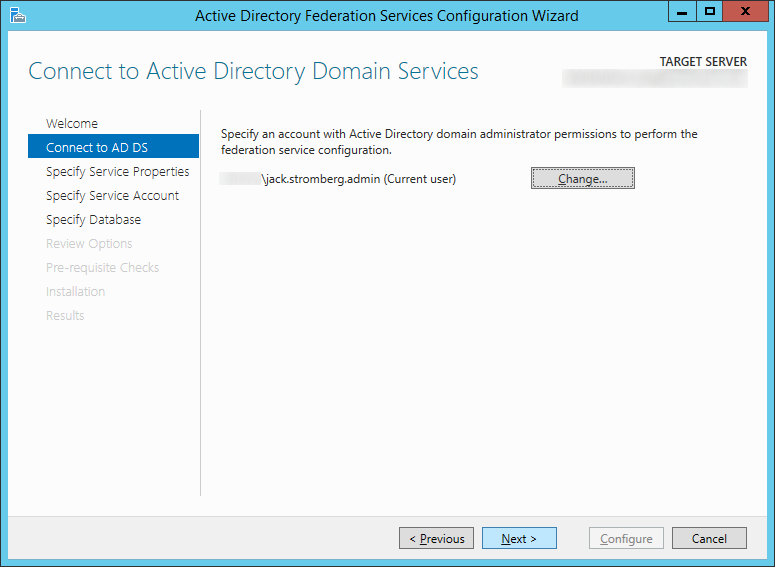
Scenario: You want to upgrade your ADFS 2.0 or 2.1 farm using WID (Windows Internal Database) from Server 2008 R2 to Server 2012 R2. In this scenario, I have 2 ADFS servers (one as the primary and a second for failover purposes), and 2 ADFS Proxy servers (for load balancing/failover purposes).
NOTE: Prior to writing this article I had only found limited documentation provided by Microsoft on a proper upgrade path for this. Since then, it apperas that tools had been included with the Server 2012 installation media which will greatly cutdown on the number of steps needed as well as provide as little downtime as possible. I would highly recommend giving this article a read before proceeding with my article: http://blogs.technet.com/b/askpfeplat/archive/2014/03/31/how-to-build-your-adfs-lab-part4-upgrading-to-server-2012-r2.aspx
My article should still work, but it is definitely not the most efficient way to do an upgrade as pointed out in the technet article above. My guide essentially goes over cutting over to a completely new ADFS deployment “an upgrade”, side-by-side to your production environment. As pointed out below, you cannot add a Server 2012 R2 machine to a Server 2008 R2 ADFS farm as documented in their earlier help articles.
Tutorial
Login to one of your slave ADFS nodes (secondary server) running Server 2008 R2
Remove the node from your load balancer
Stop the AD FS 2.0 Windows Service
Click Start -> Administrative Tools -> Internet Information Services (IIS) Manager
Select your server and double click on Server Certificates
Right click on your certificate and select Export…
Export the certificate to your desktop, type in a password to protect the exported certificate/private key, and select OK
Copy the pfx (exported certificate/private key) to your local machine; we will import this on our new server later.
Disjoin the ADFS machine from the domain
Turn the ADFS machine off and retire it
Create a new Server 2012 R2 machine with the same name and IP as your Server 2008 R2 ADFS machine
While the new ADFS machine is being created, login to one of your ADFS proxy servers
Remove the proxy from your load balancer
Stop the AD FS 2.0 Windows Service
Turn the machine off and retire it
Create a new Server 2012 R2 machine with the same name and IP as your Server 2008 R2 ADFS Proxy machine
While the new ADFS proxy machine is being created, login to your new ADFS Server 2012 R2 machine.
Open up Server Manage and select Manage -> Add Roles and Features
On the Before You Begin screen, click Next >
Select Role-based or feature-based installation and click Next >
Select your server and click Next >
Check Active Directory Federation Services and click Next >
Click Next > on Features
Click Next > on AD FS
Click Install
Click on the Configure the federation service on this server. link once the installation has completed successfully.
Check Create the first federation server in a federation server farm on the Welcome screen for the Active Directory Federation Services Configuration Wizard and then click Next >
Please see my notes below on why we did not check Create the first federation server in a federation server farm.
Click Next > on the Connect to AD DS step
Copy the .pfx file we exported from the ADFS server earlier to the new ADFS server
On the Specify Service Properties screen, click on the Import… button
Select your certificate and click Open
Type in the password to the exported certificate and click OK
Type in a Federation Service Display Name that will be shown to your users when they login to the ADFS service (this can be anything), and click Next >
On the Specify Service Account screen, click the Select… button
Type in the name of your service account you wish to use for ADFS, click the Check Names button to verify you don’t have any typos, and click OK
Type in the password for the ADFS service account and click Next >
Click Next > on the Specify Configuration Database
Note: I choose to continue to use WID, you can switch to SQL if you would like now, however that is outside of the scope of this document.
Click Next > on the Review Options screen
Click the Configure button once all the prerequsite checks have passed successfully
Click Close once the server has successfully been configured
Open up Internet Explorer on the new ADFS machine and navigate to https://localhost/adfs/ls/IdpInitiatedSignon.aspx to ensure the service is properly running
Note: you should receive an invalid ssl certificate error; that is OK, we will switch the DNS records over once we are ready to transition from our old farm to the new one.
Next, login to your Server 2008 R2 primary ADFS server and recreate the federation trusts on the new Server 2012 R2 primary ADFS server
Start -> Administrative Tools -> AD FS 2.0 Management; select Trust Relationships -> Relying Party Trusts
Recreate all the rules/trusts from your original ADFS server on your new Server 2012 R2 ADFS machine
Note: If you are recreating rules for Office 365, you will need to wait until you switch over our new Server 2012 R2 environment to production. The reason is when you setup the new ADFS instance, some of the certificates will change causing a certificate mismatch/preventing your users from logging in. You will need to make sure you follow the following steps when resetting up the Office 365 trust to ensure your users don’t receive “Error 80041317”: http://support.microsoft.com/kb/2647020/en-us
Login to your new ADFS Proxy server
Import your SSL cerficate from your old ADFS server (from step 8) onto the server’s Local Machine certificate store
Right click on Start and select Run
Type MMC and click OK
Click File -> Add/Remove Snap-in…
Select Certificates and click Add >
Select Computer account and click Next >
Select Finish
Click OK on the Add or Remove Snap-ins screen
Expand Certificates (Local Computer), select Personal, and right click, select All Tasks -> Import…
Click Next on the Certificate Import Wizard
Click the Browse… button
Select your certificate and click Open
Note: You may need to click on the dropdown box in the bottom right and select All Files for your pfx file to show up.
Click Next on the File to Import screen
Type in the password to the pfx file, check Mark this key as exportable, and click Next
Ensure Place all certificates in the following store shows Personal and click Next
Click Finish
Click OK on the Certificate Import Wizard successful dialog box
Edit the hosts file to point your DNS record to your new ADFS server
Open Notepad as an Administrator
Open the following file: C:\Windows\System32\drivers\etc\hosts
Add in your DNS entry and point to your new ADFS server
Save the file
Note: We will come back to this later and update it to point to our load balancer once we switch over everything. For now, this lets us test our new deployment while switching things over.
Open up Server Manager
Click Manage -> Add Roles and Features
Click Next > on the Before you begin screen
Select Role-based or feature based installation and click Next >
Select your server and click Next >
Check Remote Access on the Server Roles screen
Click Next > on the Features screen
Click Next > on the Remote Access screen
Check Web Application Proxy
ClickAdd Features on the Add Roles and Features Wizard dialog box
Click Next > on the Roles Services screen
Click Install on the Confirmation screen
Click on the Open the Web Application Proxy Wizard link once the installation succeeds
Click Next > on the Welcome screen
Type in the FQDN to your ADFS server, the credentials of an account with local admin privileges, and then click Next >
Select your certificate on the AD FS Proxy Certificate screen and click Next >
Click Configure on the Confirmation screen
Click Close once the Web Application Proxy has been successfully configured.
After you click close a new window should open. On the Remote Access Management Console, select Publish
Note: This step only needs to be done once. It will replicate to all other proxy servers when you set those up at a later time.
Click Next > on the Welcome screen
Select Pass-through and click Next >
Enter in a name, external URL, and internal URL for your federated server (mine were both the same since I use split-dns). Click Next >
Click Close
Add the new Server 2012 R2 ADFS machine to your load balancer and remove your Server 2008 R2 machine.
Add the new Server 2012 R2 ADFS Proxy machine to your load balancer and remove your Server 2008 R2 proxy machine.
Update the hosts file on your Server 2012 R2 proxy machine to point to your load balanced Server 2012 R2 ADFS environment
Retire your Server 2008 R2 ADFS environment
Disjoin the ADFS proxy server from the domain and recycle the machine
Disjoin the ADFS machine from the domain and recycle the machine
Add a new Server 2012 R2 machine and WAP machine to your new ADFS environment for redudnancy (same steps as above, except in Step 27, you will select Add a federation server to federation server farm
Why did I not check Add a federation server to a federation server farm on the Welcome screen for the Active Directory Federation Services Configuration Wizard?
The reason behind not checking this is I believe Microsoft has a bug in their discovery tool in adding another machine to a farm running ADFS 3.0. When adding a Server 2012 R2 machine to a farm with only Server 2008 R2 machines running ADFS 2.0, you will receive the following error:
The primary federation server was contacted successfully, but the configuration data was not valid. Ensure that the primary federation server is running Windows Server 2012 R2 or later. Unable to retrieve configuration from the primary server. The primary federation server was contacted successfully, but the configuration data was not valid. Ensure that the primary federation server is running Windows Server 2012 R2 or later. Prerequisites Check Completed One or more prerequisites failed. Please fix these issues and click “Rerun prerequisites check”
Symptom: You receive the following error while setting up the WAP (proxy) server:
An error occurred when attempting to establish a trust relationship with the federation service. Error: Not Found
Resolution: Make sure you update the DNS records of your ADFS deployment to point to your new ADFS server. Both the ADFS proxy and ADFS server must be running the same OS version (in this case, Server 2012 R2).