Tag Archives: error

Cisco AnyConnect - Windows 8 - The VPN client driver encountered an error. Please restart your computer or device, then try again error

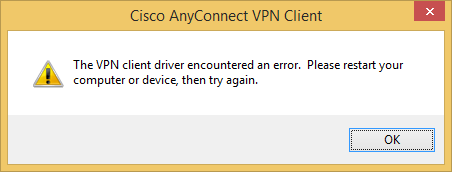
Symptom: You receive the following error when trying to establish a connection with the Cisco AnyConnect client on Windows 8 x64.

Cisco AnyConnect VPN Client - The VPN client driver encountered an error.  Please restart your computer or device then try again error

Solution:

Option 1: PowerShell Method

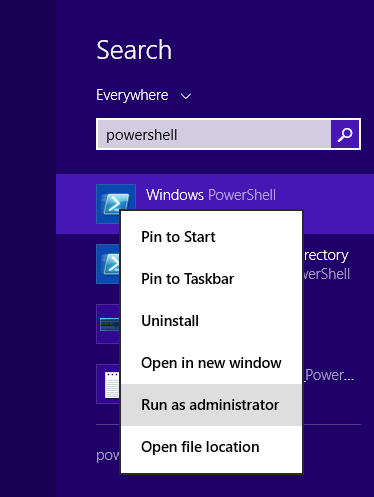
  1. Go to the Windows 8 Start screen, search for PowerShell, Run as an Administrator
    Windows 8 - Search - powershell - run as administrator
  2. Execute the following powershell command
    1. Set-ItemProperty -Path HKLM:\SYSTEM\CurrentControlSet\Services\vpnva -Name DisplayName -Value ‘Cisco AnyConnect VPN Virtual Miniport Adapter for Windows x64‘
      PowerShell-Set-vpnva-DisplayName-Cisco-AnyConnect-VPN
  3. Exit and reopen the Cisco AnyConnect Program

Option 2: Registry Editor GUI Method

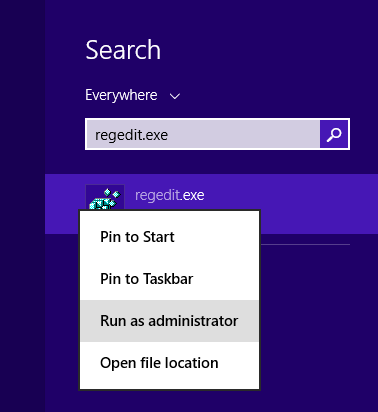
  1. Go to the Windows 8 Start screen, search for regedit, right click Run as administrator
    Windows 8 - Search - regedit - Run as administrator
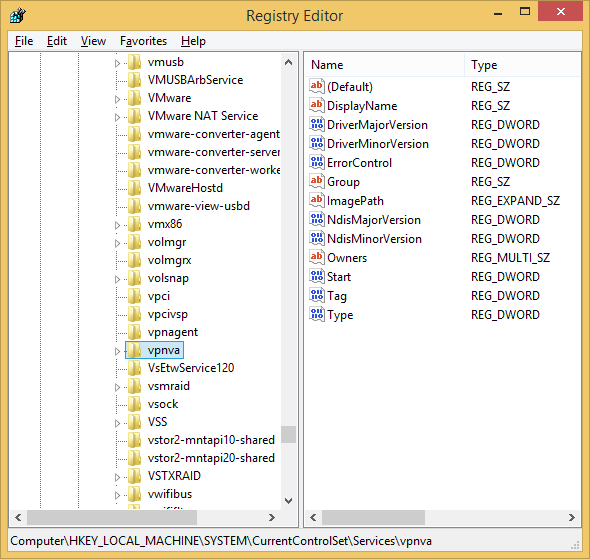
  2. Navigate to the following registry key
    HKEY_LOCAL_MACHINE\SYSTEM\CurrentControlSet\Services\vpnva
    HKEY_LOCAL_MACHINE-System-CurrentControlSet-Services-vpnva
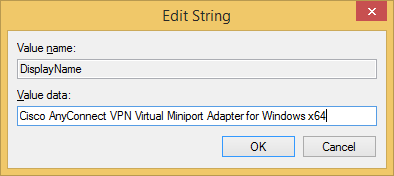
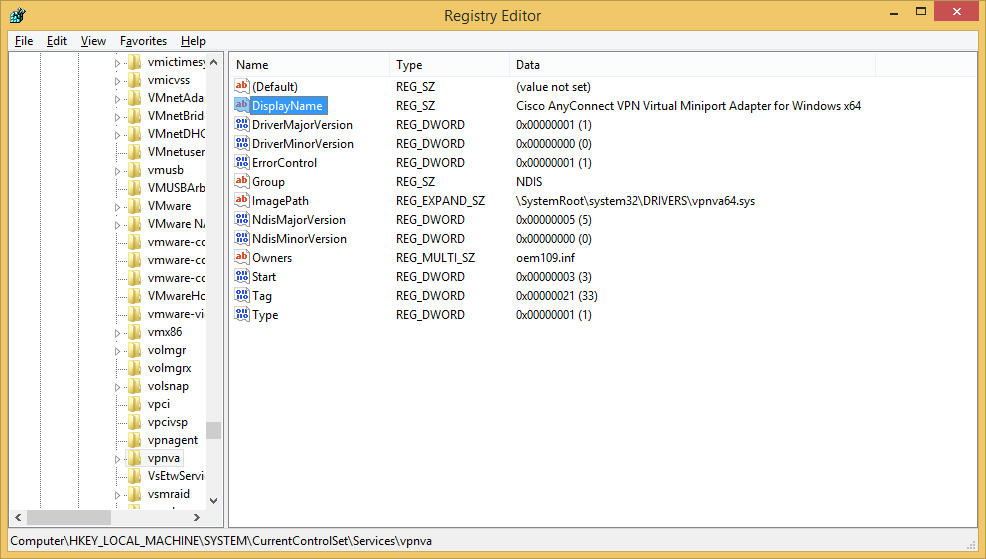
  3. Double cick on the DisplayName value and replace the value with Cisco AnyConnect VPN Virtual Miniport Adapter for Windows x64
    HKEY_LOCAL_MACHINE-System-CurrentControlSet-Services-vpnva - DisplayName - Cisco AnyConnect VPN Virtual Miniport Adapter for Windows x64
    HKEY_LOCAL_MACHINE-System-CurrentControlSet-Services-vpnva - DisplayName - Cisco AnyConnect VPN Virtual Miniport Adapter for Windows x64 - regedit
  4. Exit and reopen the Cisco AnyConnect VPN client

System Center 2012 R2 Configuration Manager - Configuration Manager console cannot connect to the Configuration Manager site database (SQL Server)

Symptom: When opening up the System Center 2012 R2 Configuration Manager, you receive the following error message.

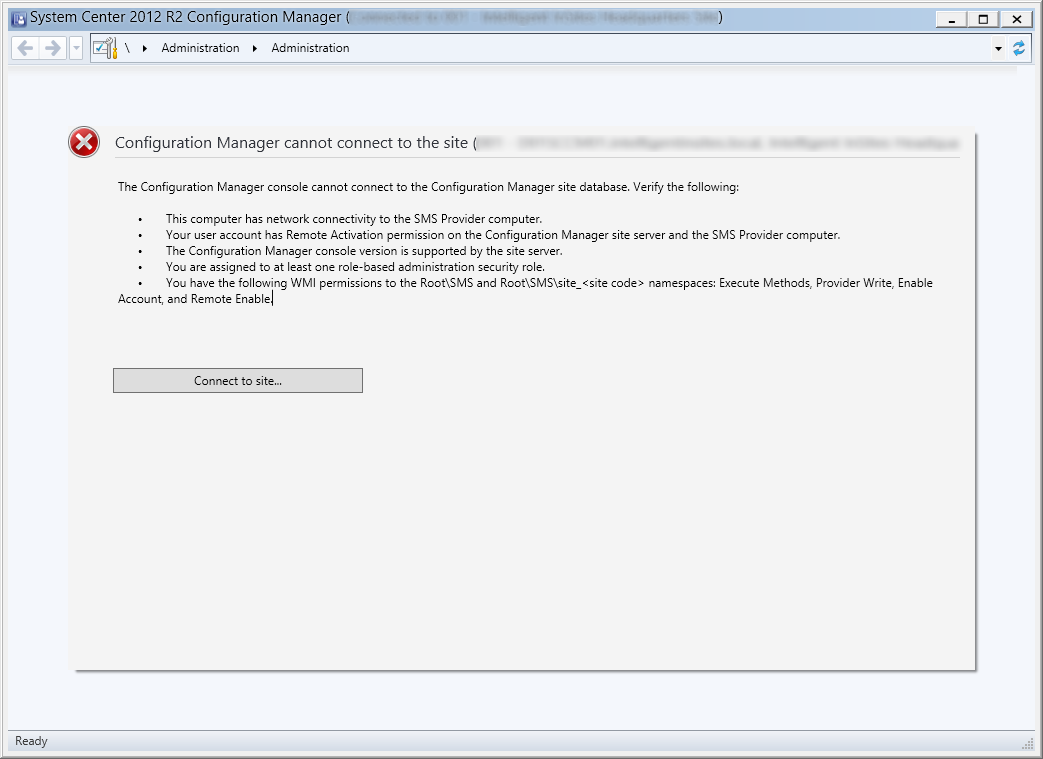
Configuration Manager cannot connect ot the site (CODE - FQDN)

The Configuration Manager console cannot connect to the Configuration Manager site database. Verify the following:

• This computer has network connectivity to the SMS Provider computer.
• Your user account has Remote Activation permission on the Configuration Manager site server and the SMS Provider computer.
• The Configuration Manager console version is supported by the site server.
• You are assigned to at least one role-based administration security role.
• You have the following WMI permissions to the Root\SMS and Root\SMS\site_<site code> namespaces: Execute Methods, Provider Write, Enable Account, and Remote Enable.

System Center 2012 R2 Configuration Manager cannot connect to the site

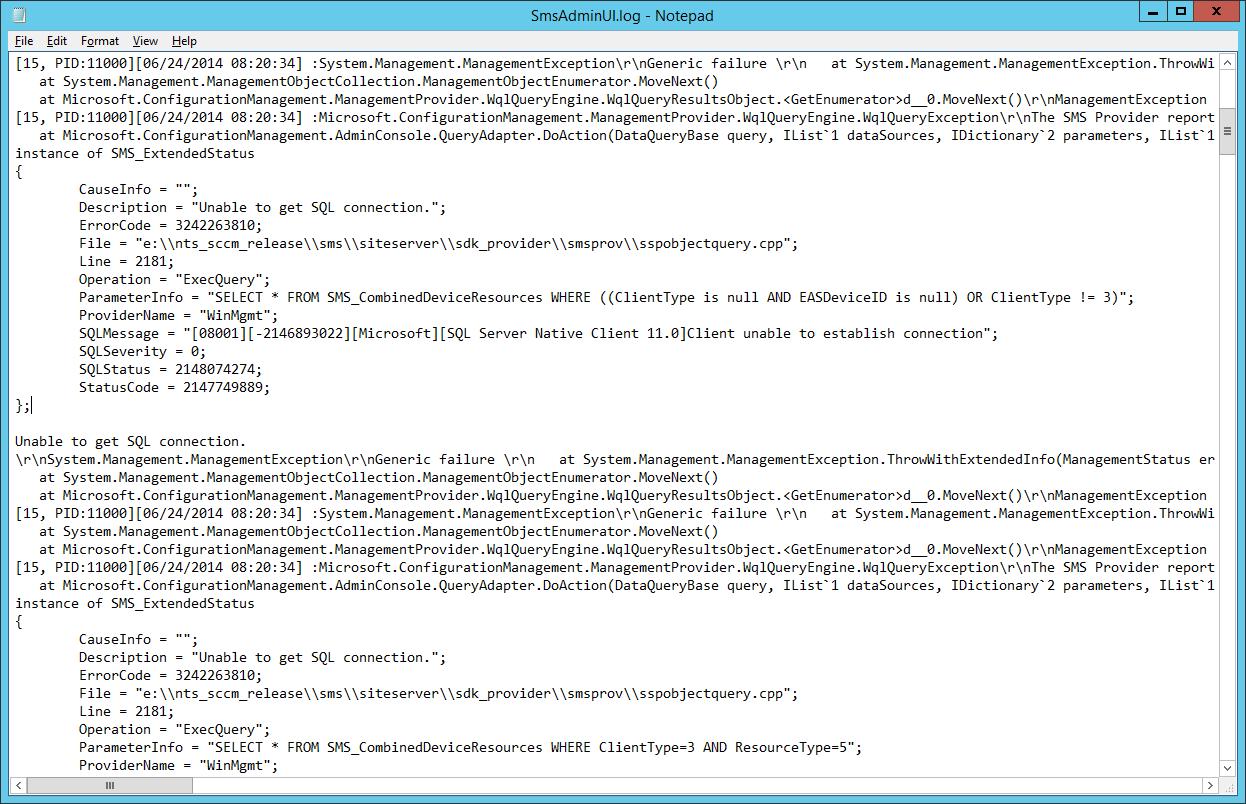
Additionally, when you browse to INSTALLEDDRIVE:\Program Files\Microsoft Configuration Manager\AdminConsole\AdminUILog\SmsAdminUI.log, you see the following error:

[15, PID:11000][06/24/2014 08:20:34] :System.Management.ManagementException\r\nGeneric failure \r\n at System.Management.ManagementException.ThrowWithExtendedInfo(ManagementStatus errorCode)
at System.Management.ManagementObjectCollection.ManagementObjectEnumerator.MoveNext()
at Microsoft.ConfigurationManagement.ManagementProvider.WqlQueryEngine.WqlQueryResultsObject.<GetEnumerator>d__0.MoveNext()\r\nManagementException details:
instance of SMS_ExtendedStatus
{
CauseInfo = "";
Description = "Unable to get SQL connection.";
ErrorCode = 3242263810;
File = "e:\\nts_sccm_release\\sms\\siteserver\\sdk_provider\\smsprov\\sspobjectquery.cpp";
Line = 2181;
Operation = "ExecQuery";
ParameterInfo = "SELECT * FROM SMS_CombinedDeviceResources WHERE ((ClientType is null AND EASDeviceID is null) OR ClientType != 3)";
ProviderName = "WinMgmt";
SQLMessage = "[08001][-2146893022][Microsoft][SQL Server Native Client 11.0]Client unable to establish connection";
SQLSeverity = 0;
SQLStatus = 2148074274;
StatusCode = 2147749889;
};
\r\n
[15, PID:11000][06/24/2014 08:20:34] :Microsoft.ConfigurationManagement.ManagementProvider.WqlQueryEngine.WqlQueryException\r\nThe SMS Provider reported an error connecting to the ConfigMgr site database server. Verify that the SQL Server is online and that ConfigMgr site server computer account is an administrator on the ConfigMgr site database server.\r\n at Microsoft.ConfigurationManagement.ManagementProvider.WqlQueryEngine.WqlQueryResultsObject.<GetEnumerator>d__0.MoveNext()
at Microsoft.ConfigurationManagement.AdminConsole.QueryAdapter.DoAction(DataQueryBase query, IList`1 dataSources, IDictionary`2 parameters, IList`1 inputs, String outputCollectionName)\r\nConfigMgr Error Object:
instance of SMS_ExtendedStatus
{
CauseInfo = "";
Description = "Unable to get SQL connection.";
ErrorCode = 3242263810;
File = "e:\\nts_sccm_release\\sms\\siteserver\\sdk_provider\\smsprov\\sspobjectquery.cpp";
Line = 2181;
Operation = "ExecQuery";
ParameterInfo = "SELECT * FROM SMS_CombinedDeviceResources WHERE ((ClientType is null AND EASDeviceID is null) OR ClientType != 3)";
ProviderName = "WinMgmt";
SQLMessage = "[08001][-2146893022][Microsoft][SQL Server Native Client 11.0]Client unable to establish connection";
SQLSeverity = 0;
SQLStatus = 2148074274;
StatusCode = 2147749889;
};

Unable to get SQL connection.

SmsAdminUI_log - Unable to get SQL connection

Solution: During your installation you may have tried to change the default SSL certificate on the database.  Based on what documentation I could find, by design, System Center requires you use the default SSL certificate that gets autogenerated during the installation process.  In this case, you need to ensure you have a seperate SQL Server instance dedicated solely to the System Center installation and can use the dedicated system center SSL certificate.

Notes: If you receive errors like  like [SQL Server Native Client 10.0] SSL provider: The target principle is incorrect or  [SQL Server Native Client 10.0] Client unable to establish connection. you might need to install the Server 2008 Native SQL Client (which can be obtained from here).

Windows 7 - Windows created a temporary paging file on your computer because of a problem that occured with your paging file configuration when you started your computer.

Symptom: Every time you boot your Windows 7 machine or access system settings, you receive the following error:

Windows created a temporary paging file on your computer beause of a problem that occurred with your paging file configuration when you started your computer.  The total paging file size for all disk drives may be somewhat larger than the size you specified.

Windows 7 Error - a problem occured with your paging file configuration

Solution: In this case, the page file had grown too large and corrupted itself.  I was able to resolve the issue by deleting the pagefile.sys file and having Windows recreate it from scratch.  Here are the steps on how to complete this task.

  1. Click Start, right-click Computer, and select Properties
  2. In the left pane, select Advanced system settings
  3. On the Advanced tab, click the Settings button under Performance
  4. On the Advanced tab, click the Change button under Virtual memory
  5. Clear the Automatically manage paging file size for all drives check box and check No paging file
  6. Click Set button next to No paging file
  7. Click OK on all open windows and restart your machine
  8. Open up Windows Explorer
  9. Navigate to the root of your system drive (C:\)
  10. Enable the showing of System Files
    1. On the View menu, click Options
    2. On the View tab, click Show All Files, and then click OK
  11. Delete the pagefile.sys file
  12. Click Start, right-click Computer, and select Properties
  13. In the left pane, select Advanced system settings
  14. On the Advanced tab, click the Settings button under Performance
  15. On the Advanced tab, click the Change button under Virtual memory
  16. Check the Automatically manage paging file size for all drives checkbox and click OK
  17. Restart your machine

[Error] Enable-CsUser : Specified SIP domain is not vaild. Specify a valid SIP domain and then try again.

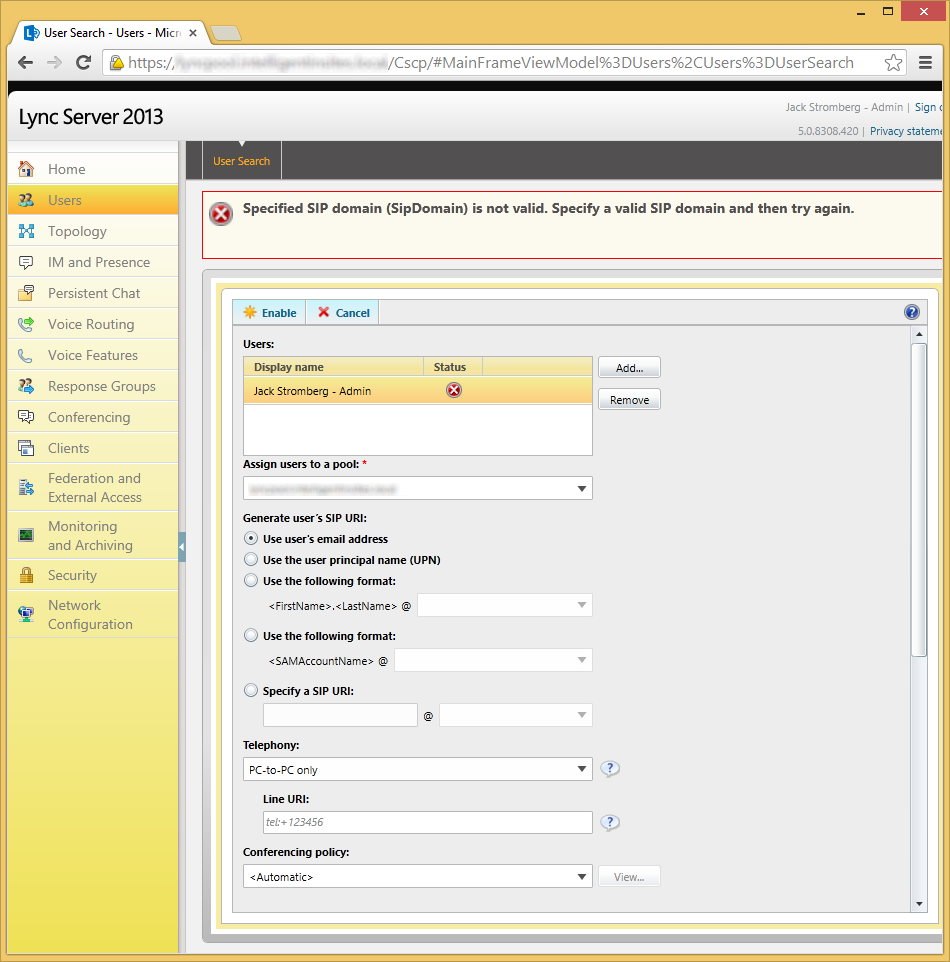
Issue: When trying to enable a new user for Lync, you receive the following error; both within PowerShell and the Web GUI.

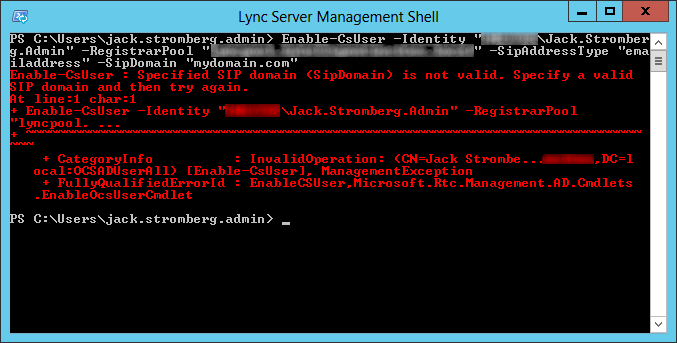
Enable-CsUser : Specified SIP domain is not vaild. Specify a valid SIP domain and then try again.
Specified SIP domain is not valid - cscp

When executing: Enable-CsUser -Identity "DOMAIN\Jack.Stromberg.Admin" -RegistrarPool "lyncpool.mydomain.local" -SipAddressType "emailaddress" -SipDomain "mydomain.com"
Specified SIP domain is not valid - lync server management shell

Solution: Most of the time this turns out to be a typo in the -SipDomain parameter or the user's email address set inside of Active Directory.  Once you verify that you do not have any typos in the user's email address/SipDomain parameter, the user should be able to be added successfully.  If neither work, you can specify the SipAddressType to be the user's SamAccountName rather than email address.

Lync Persistent Chat Error - User is not sip-enabled

Symptom: When you try to create a new chatroom from the Lync 2010/2013 client, you are redirected to a webpage that shows the following error:

User is not sip-enabled.

User is not sip-enabled


Solution: Turns out this is an issue with cross-compatibility between Single-sign on and 3rd party browsers.  Make sure you are using Internet Explorer and you should be able to login and manage your persistent chatroooms.

Lync Server 2013 - All the channel servers are down

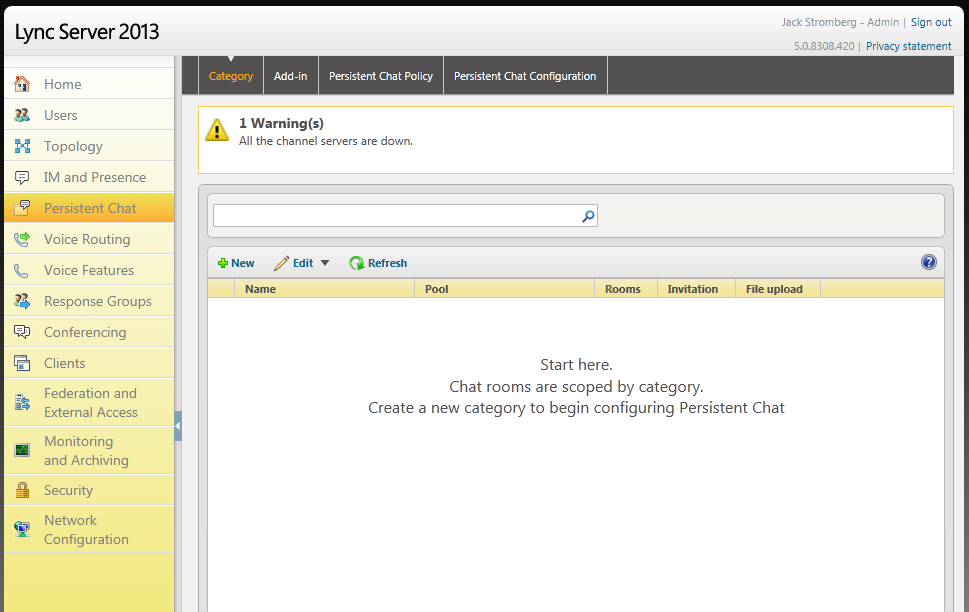
Symptom: After installing the Persistent Chat module for Lync Server 2013, you receive the following error when trying to manage Persistent Chat from the Lync Admin Web GUI (CSCP).

1 Warning(s) All the channel servers are down. All the channel servers are down.

Solution: Unfortunately, there are a few issues that could cause this.  Here are a few that I tried to get things working.

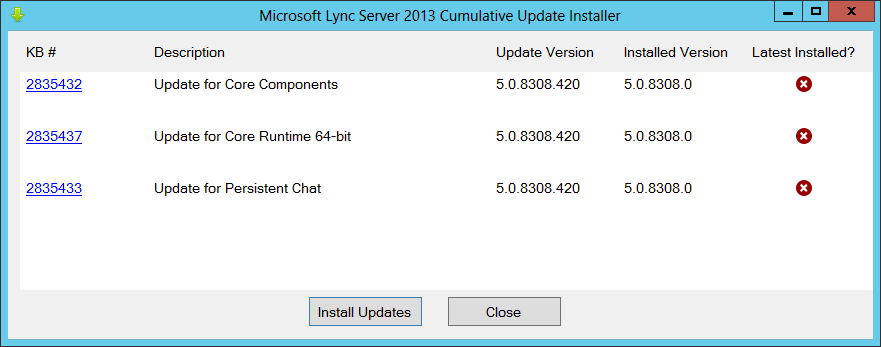
Solution #1: Ensure Cumulative Update 2 is installed.

  1. Download a copy of the Lync Update on the persistent chat server
    1. http://www.microsoft.com/en-us/download/details.aspx?id=36820
  2. Double click LyncServerUpdateInstaller.exe
  3. Click the Install Updates button
    Microsoft Lync Server 2013 Cumulative Update Installer for Persistent Chat
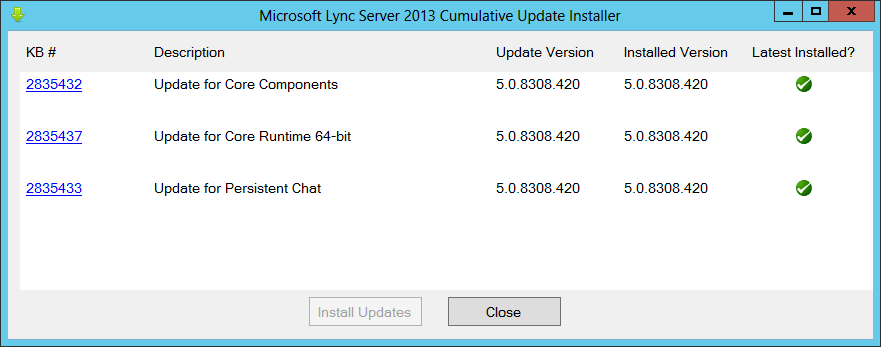
  4. Once all the updates have finished installing, click Close
    Microsoft Lync Server 2013 Cumulative Update Installer for Persistent Chat Updated

Solution #2: Add only 1 server to the pool, then add the rest

  1. Login to one of your front end servers and open up the Lync Server 2013 Topology Builder
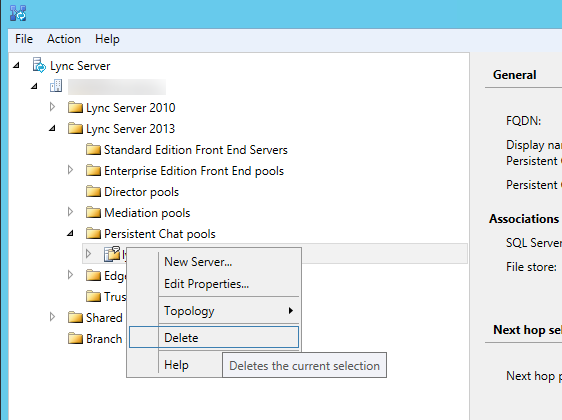
  2. Delete the persistent chat pool you currently have deployed
    Delete Lync Persistent Chat Pool - Topology Builder
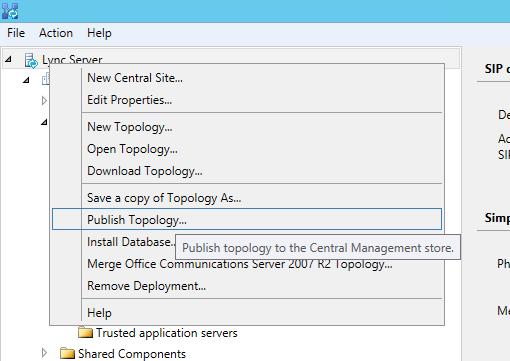
  3. Publish your topology
    Publish the Topology
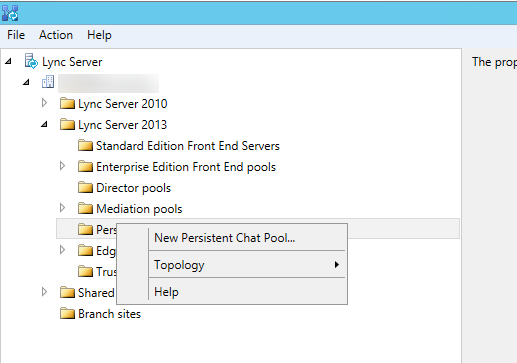
  4. Recreate your persistent chat pool, but only add 1 server during the setup wizard.
    Create new persistent chat pool
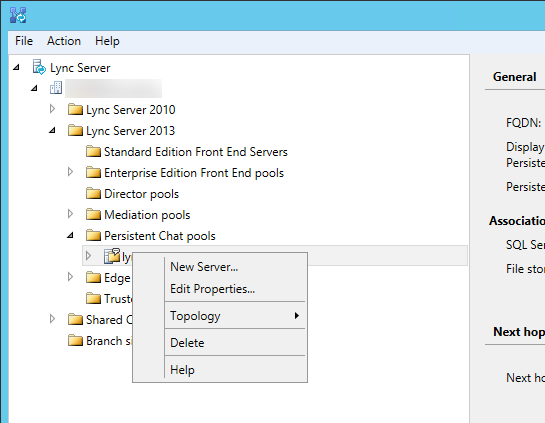
  5. Once done running through the wizard, right click on your persistent chat pool and select New Server...
    New Server - Persistent Chat - Lync Topology Builder

    1. Repeat this until all the servers you wanted to deploy are part of the topology
  6. Publish the topology
    Publish the Topology

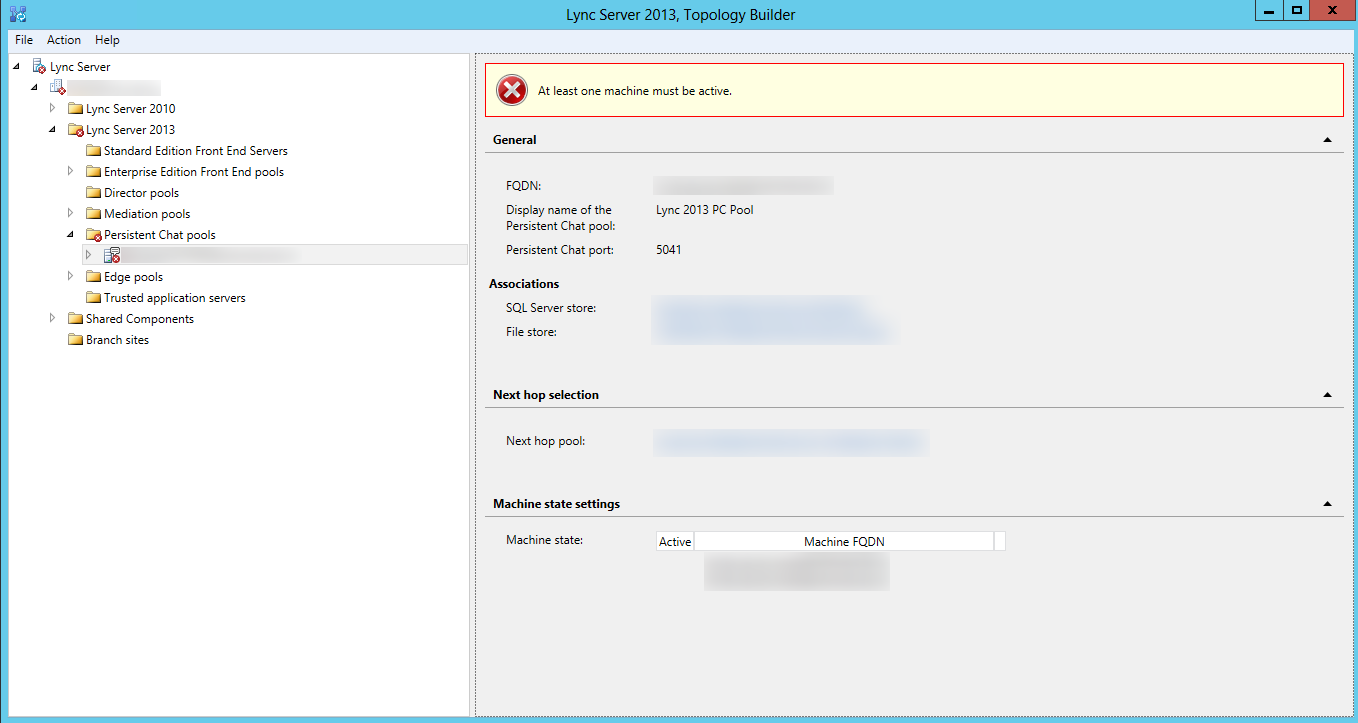
Notes: I couldn't get event viewer to log anything referencing this error, which I thought was weird.   Additionally, I noticed that when originally deploying my topology, the topology wizard was complaining saying that "At least one machine must be active." in order to successfully deploy the persistent chat pool.  I believe this is a bug in the topology builder and the only way I could get the topology builder to deploy properly, was by following Solution #2.  This ensured at least one server in the pool had a machine state marked as "Active".

Here is a screenshot showing the persistent chat servers in an enterprise pool marked as inactive and topology builder complaining with the error "At least one machine must be active."

At least one machine must be active - Lync Persistent Chat - Topology Builder


Lync Server 2013 Error after applying CU1

Symptom: You receive the following errors in Event Viewer after installing the February Cumulative Update 1 for Lync Server 2013.

The database being used by Group Pickup is not the appropriate version.

Event ID: 31059
The database is not the correct version:
Connection: Data Source=sqlserver.mydomain.local;Initial Catalog=cpsdyn;Integrated Security=True
Expected... SchemaVersion: 1, SprocVersion: 1, UpgradeVersion: 2
Actual... SchemaVersion: 0, SprocVersion: 0, UpgradeVersion: 0
Cause: The database has not been upgraded.
Resolution:
Upgrade the database to CU1.

Event ID: 31055
There was a problem communicating with the Group Pickup backend database.

There were problems accessing SQL server:
Connection: Data Source=sqlserver.mydomain.local;Initial Catalog=cpsdyn;Integrated Security=True
Message: The EXECUTE permission was denied on the object 'DbpGetVersionSchema', database 'cpsdyn', schema 'dbo'.
Error code: -2146232060
Error number: 229
Cause: This may be caused by connectivity issues with the backend database.
Resolution:
Check if SQL backend is running and accepts connections from Group Pickup.

Solution:
When installing Cumulative Update 1 for Lync Server 2013 from the following KB article http://support.microsoft.com/kb/2809243, make sure you follow the last step to update the backend database.  To finish the steps, execute the following command via the Lync Server 2013 PowerShell prompt.

Lync Server 2013 Standard Edition

Install-CsDatabase -ConfiguredDatabases -SqlServerFqdn frontendserver.fqdn -Verbose

Lync Server 2013 Enterprise Edition

If the Lync Server 2013 Enterprise Edition back end servers do not have SQL mirroring configured, run the following cmdlet to apply the changes:

Install-CsDatabase -ConfiguredDatabases -SqlServerFqdn sqlserver.fqdn -Verbose

See the following KB article if you have mirroring configured on your backend database servers.

Removing last Lync 2010 Front End – Unassigned Number Error

Symptom:
You receive the following error when trying to publish your new Lync Topology, after removing the last Lync 2010 Front End Server.

Result: Call orbit depends on an application server that is being removed.
ServiceInUse: The new topology XML removes services that will create stale configuration settings.
ServiceInUseResolution: Consult your Lync Server documentation to learn how to to disassociate the service of the settings using it.

Error: Cannot publish topology changes. Unassigned number still exists on one or more deleted application servers.
▼ Details
└ Type: InvalidOperationException
└ ▼ Stack Trace
└ at Microsoft.Rtc.Management.Deployment.Tasks.PublishTopologyTask.CheckIfVacantNumberRangesInUse(DeletedServices deletedServices) at Microsoft.Rtc.Management.Deployment.Tasks.PublishTopologyTask.VerifyServiceDependentSettings(DeletedServices deleteServices) at Microsoft.Rtc.Management.Internal.Utilities.LogWriter.InvokeAndLog[T](Action`1 action, T arg)

Error: An error occurred: "System.InvalidOperationException" "Cannot publish topology changes. Unassigned number still exists on one or more deleted application servers."

Solution:
Open up the Lync Server Management Shell as an Administrator on a different Front End server that you aren't retiring and execute the following command:

Get-CsUnassignedNumber

For each of the returned results with the AnnouncementServerFqdn matching the server you are trying to retire, execute the following command:

Set-CsUnassignedNumber -Identity IdentityFromPreviousCommand -AnnouncementService newlyncpoolorfrontend.mydomain.local

Alternately, you can change the Front End server these numbers are on through the Lync Web GUI (Cscp).  To do so, navigate to the Lync Server 2013 Control Panel, click on Voice Features->Unassigned Number, and then double click every entry that has a destination with the old Front End.  When the Edit Unassigned Number Range dialog shows up, type in the FQDN to the new Front End Pool/Server and then click OK. Repeat for each number.

Lastly, if you want to cleanup your Lync server, you can remove all instances of the old Announcements using the following command:

Remove-CsAnnouncement -Identity "ApplicationServer:myoldfrontend.mydomain.local"

Alternately, if you published the topology, you may have to remove the Announcements individually by using entering the command below with the entire Identity value or via the old ApplicationServer's name (in my case it was 1-ApplicationServer-1 as shown below):

Remove-CsAnnouncement -Identity "ApplicationServer:probablysays1-ApplicationServer-1/1951f734-c80f-4fb2-965d-51807c792b90"

Once all Unassigned Numbers have been moved to the new Front End server or pool, you should be able to successfully publish your topology.
Removing last Lync 2010 Front End - Conference Error

Symptom:
You receive the following error when trying to publish your new Lync Topology, after removing the last Lync 2010 Front End Server.

ConferencingPoolInUse: The new topology XML removes services that will orphan existing conference directories.

Error: Cannot publish topology changes. Conference directories still exist on a pool that would be deleted. Remove the conference directories before continuing.
▼ Details
└ Type: InvalidOperationException
└ ▼ Stack Trace
└ at Microsoft.Rtc.Management.Deployment.Tasks.PublishTopologyTask.VerifyOrphanedDirectories()
at Microsoft.Rtc.Management.Internal.Utilities.LogWriter.InvokeAndLog(Action action)

Error: An error occurred: "System.InvalidOperationException" "Cannot publish topology changes. Conference directories still exist on a pool that would be deleted. Remove the conference directories before continuing."

Solution:
On one of your front end lync servers, open up the Lync Server Management Shell as an Administrator.  Once open, execute the following command:

Get-CsConferenceDirectory

For each of the items that have a ServiceID referencing the Front End server you are trying to retire, execute the following command (replacing the appropriate values with the output found from the previous command):

Move-CsConferenceDirectory -Identity X -TargetPool poolorfrontendserver.mydomain.local

After all conferences have been moved off of your Lync 2010 Front End server, you should be able to successfully publish the topology.

Lync 2012 Creating CommonAreaPhone - Filter failed to return unique result

Symptom:

You receive the following error when executing the New-CsCommonAreaPhone command via PowerShell.

New-CsCommonAreaPhone : Filter failed to return unique result, "[LineURI : tel:+15555555555] [PrivateLine : tel:+15555555555] "
At line:1 char:1
+ New-CsCommonAreaPhone -LineUri "tel:+15555555555" -RegistrarPool "lync.mydomain ...
+ ~~~~~~~~~~~~~~~~~~~~~~~~~~~~~~~~~~~~~~~~~~~~~~~~~~~~~~~~~~~~~~~~~~~~~~~~~~~~~~~~
+ CategoryInfo          : NotSpecified: (:) [New-CsCommonAreaPhone], InvalidOperationException
+ FullyQualifiedErrorId : System.InvalidOperationException,Microsoft.Rtc.Management.AD.Cmdlets.NewOcsCommonAreaPhoneCmdlet

Solution:
This means that the phone number has been assigned to either another user or response group. Make sure the number is not in use by Lync.