Monthly Archives: January 2013

How to prevent users from adding a machine from Active Directory - the domain

Interestingly enough, by default Microsoft's Active Directory ships out with the ability for all Authenticated Users to join their machine to a domain up to 10 times.  Why 10?  Who knows.  Personally, I do not want my users to be able to add machines to the domain, so the steps below can be achieved to prevent these actions.

  1. Logon to one of your domain controllers or a machine with ADSI Edit
  2. Open up ADSI Edit
    1. Start->Administrative Tools->ADSI Edit
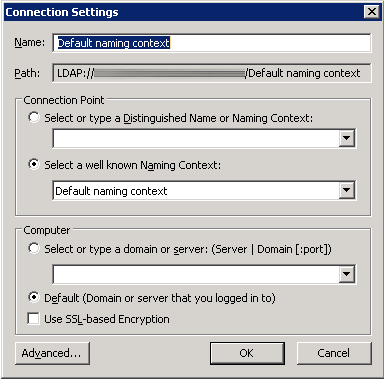
  3. If you have logged into one of your DCs, you can leave the Name, Connection Point, and Computer to default, otherwise enter in the proper information to connect to your DC and click OK.
    1. Image of default settings to connect
    2. ADSEI Edit - Connection Settings
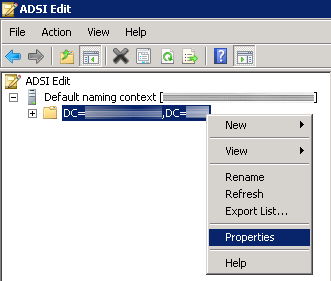
  4. Expand the context that was added and right click on DC=[domain],DC=[TLD] and click Properties.
    1. ADSI Edit - Properties
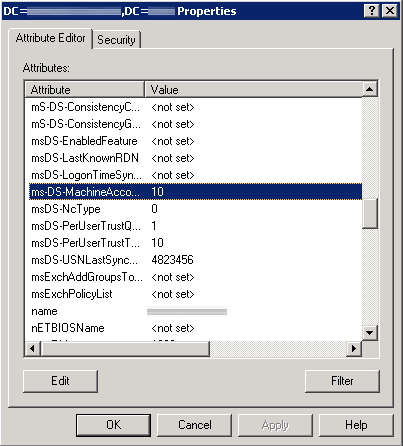
  5. Scroll down to ms-DS-MachineAccountQuota and click Edit
    1. ADSI - ms-DS-MachineAccount
  6. Change the Value of 10 to 0, click OK
    1. ADSI Edit - Integer Attribute Editor
  7. Click OK on the DC=[domain],DC=[TLD] dialog box

At this point, users inside of the Domain Admins or Enterprise Admins groups will only be able to add machines to the domain.

How to move a column in a table in mySQL

Execute the following query:
ALTER TABLE mytable MODIFY COLUMN columntobemoved INT AFTER columnbefore;

mytable = the table you are modifying
columntobemoved = the column that will move in the table
columnbefore = the column that will be before the column you move. I.e. if you have columns a, b, c and you want to put columntobemoved after b (so between b and c), you would use b as the columnbefore value


msSQL Server 2008 R2 - Restore Failed

Symptom: When restoring a database in Microsoft SQL Server Management Studio, you receive the following dialog box similar to something below:

Restore failed for Server 'myserver'. (Microsoft SqlServer.SmoExtended)

Additional Information
System.Data.SqlClient.SqlError: File 'C:\Program Files\Microsoft SQL Server\MSSQL10_50.MSSQLSERVER\MSSQL\DATA\mydatabase.mdf' is claimed by 'mydatabase_FG1'(3) and 'mydatabase'(1).  The WITH MOVE clause can be used to relocate one or more files. (Microsoft.SqlServer.Smo)

Solution: On the Restore Database - mydatabase window inside of Microsoft SQL Server Management Studio:

  1. Click on the Options page.
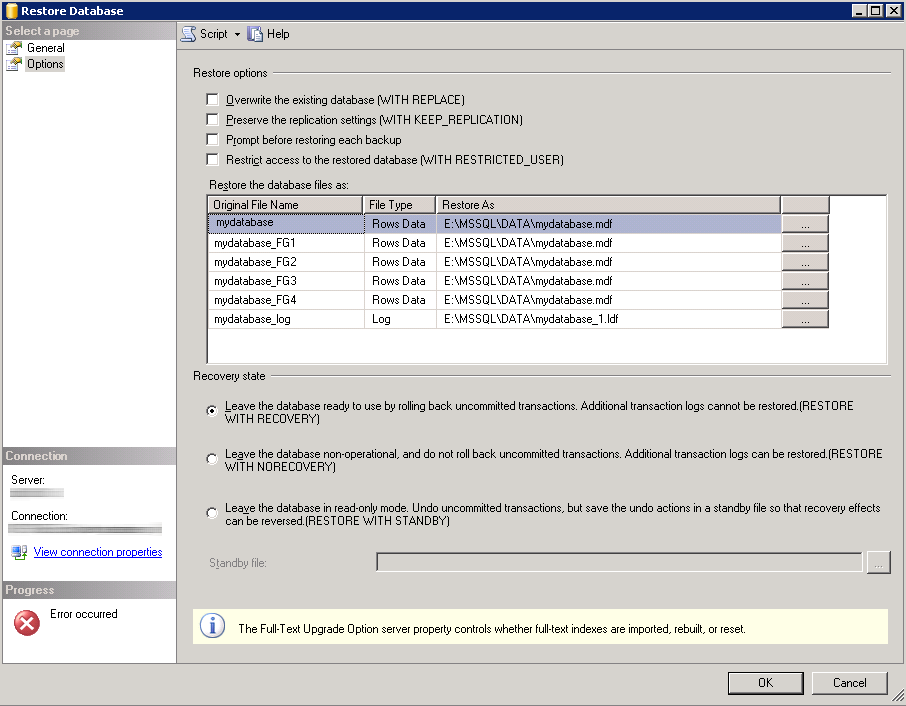
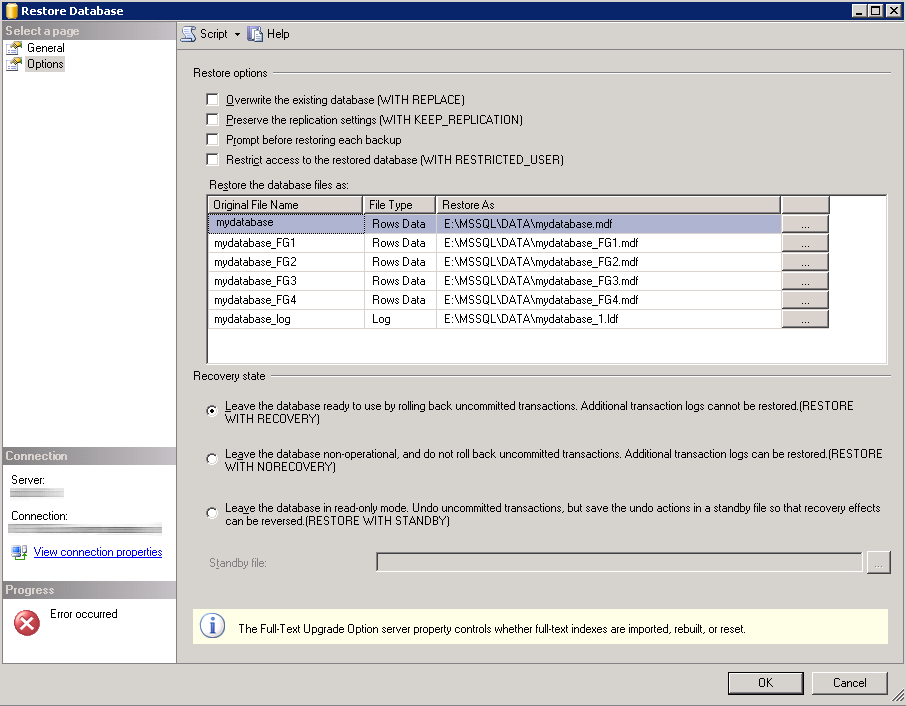
  2. Underneath Restore the database files as: label, make sure all of the "Restore As" values are unique.  In this case, I renamed each *.mdf file to it's "Original File Name" column value.
    1. Before
      1. Restore Database msSQL
    2. After
      1. Restore Database msSQL
  3. Click OK

Viola!  Your database should now successfully restore 🙂

Managing Adobe Reader files with iTunes - on your iPad or iPod Touch

This tutorial assumes you already have iTunes setup, you are logged into it with your Apple account, and your iPad has been synchronized to your iTunes account.  Also, this guide assumes you are using an iPad, but I believe the steps are the same for an iPod touch as well.

  1. Open up iTunes
  2. Plug-in your iPad
  3. Press the Alt key, click on the View menu, and then select Show Sidebar
  4. Getting to the Adobe Reader app on your iPad
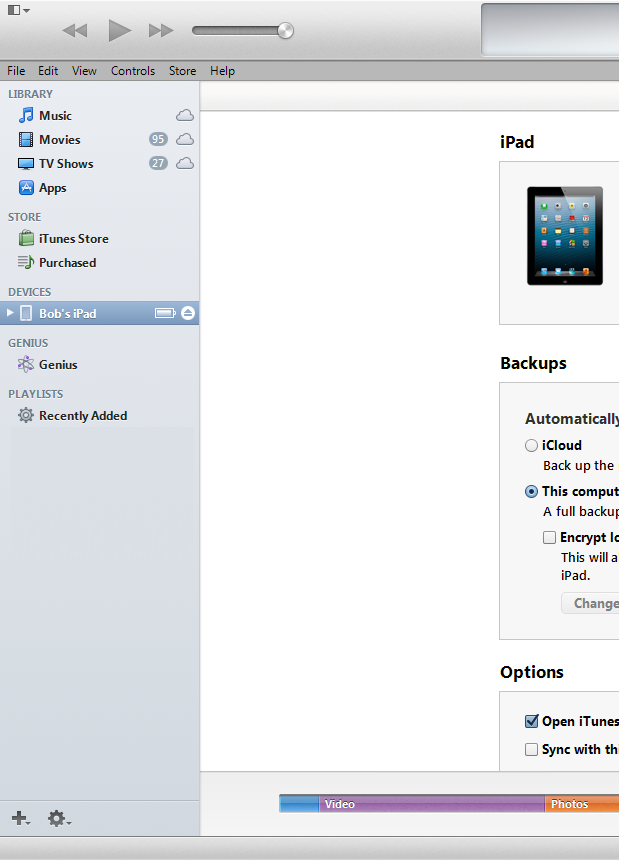
    1. Select your iPad
      1. Selecting your iPad
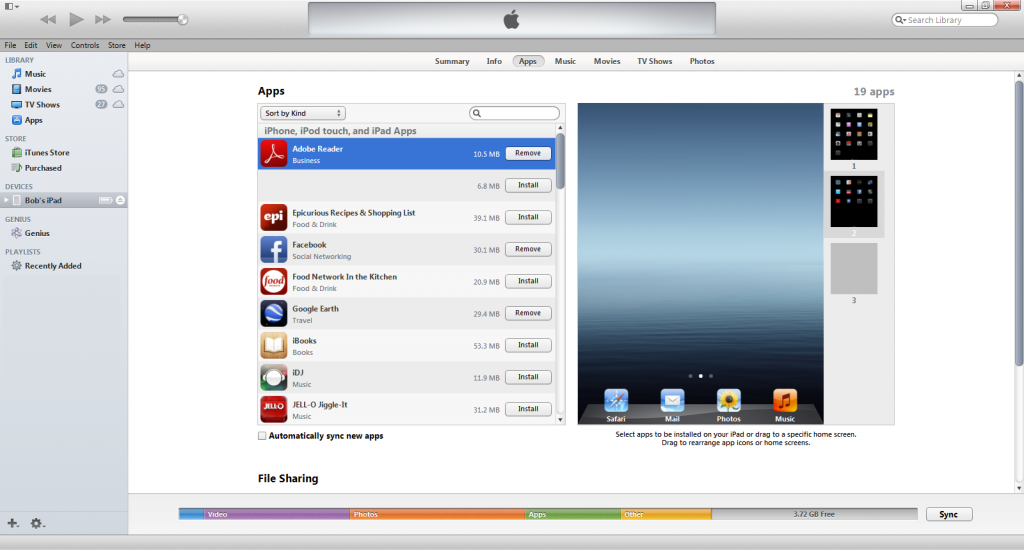
    2. Click on Apps in the top middle of the screen
      1. Selecting Apps
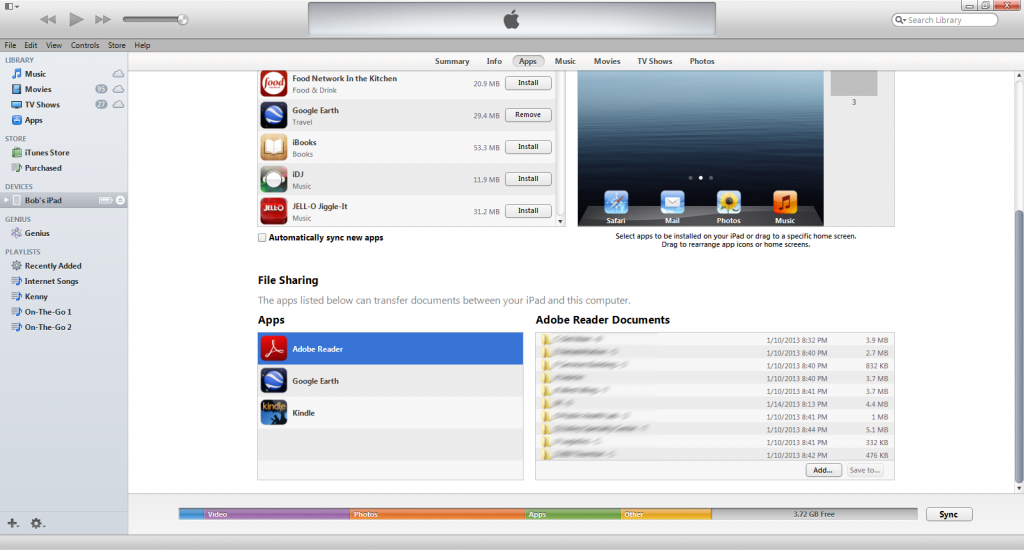
    3. Scroll down and click on the Adobe Reader app
      1. Adobe Reader App
  5. To add files to your iPad
    1. Click on the Add button
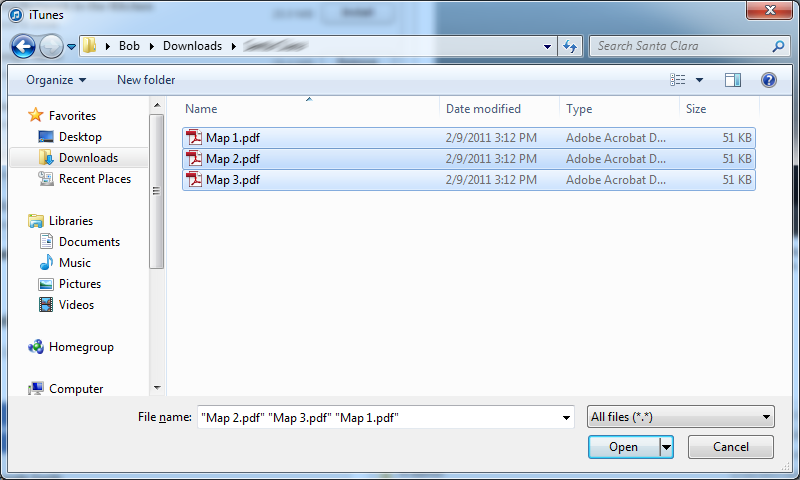
    2. Navigate to the folder you want, hold the control key, and select the files you want to send to your iPad (they must be in pdf format)
    3. Maps
    4. Click Open (note you cannot upload folders to your iPad)
  6. To backup files from your iPad to your computer
    1. Click on the folder you want and click on the Save To… button
    2. Navigate to the folder you want to place the folder in (iTunes will create the folder inside of the folder you are selecting).
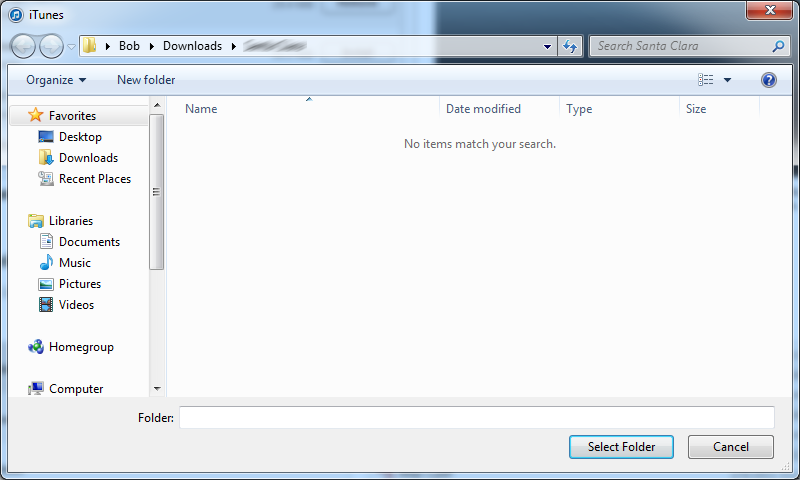
    3. Select Folder
    4. Click the Select Folder button (you do not need to type in anything, just click the button)
      1. At this point, if you were to navigate to your folder, you should see the folder you selected in iTunes, and then inside of that folder, the folder you selected to backup.
        1. Note: iTunes doesn't copy files from the folder you selected, it copies the folder and sub-items in it to a new folder that you selected.
  7. To create folders on your iPad, do the following:
    1. Launch the Adobe Reader application
    2. Click on Documents on the left side
    3. Click the Edit button in the top right
    4. Click on the Folder icon with a + sign on it
    5. Type in the folder name and click Save
  8. To move PDFs into a folder, launch the Adobe Reader app on your iPad (NOTE: you cannot drag the files inside of iTunes into the folders)
    1. Click on Documents on the left side
    2. Click the Edit button in the top right
    3. Find your PDFs and click on the little Circle icon next to it
        1. When you do that, it should turn red with a check mark
    4. Click on the icon with a diagonal arrow on a folder
    5. Click Move selected documents
    6. Select the folder you want to move the PDFs to

Lync 2010 - Deploying Monitoring Server Reports

I recently had the lovely experience of setting up the monitoring role for Lync 2010.  In doing so, I documented the steps I took to successfully deploy the Monitoring Server Reports Services.

Before beginning, here are a few notes:

  • Ensure you are using Microsoft SQL Server 2008 x64 Standard or greater (if you need to upgrade, see the following tutorial: SQL Server 2008 R2 – Updating a msSQL instance/server)
  • You have deployed Lync 2010 Standard or Enterprise
    • Both versions allow you to add this service

Alright, so lets begin!

  1. Our first step is to install the "Reporting Services" feature for SQL Server 2008
  2. Open up the Reporting Services Configuration Manager
  3. Enter the SQL Server Reporrting Services instance you want to connect to
  4. Click Web Service URL
  5. Enter the virtual directory name, port, and configure your SSL certificate
  6. Click Apply
    1. Note: If you had IIS on this box, you will need to choose different port numbers
  7. Open up Microsoft SQL Server Management Studio
  8. Login to your SQL server and create a new service account for your SQL server
    1. Make a sysadmin for the time being
  9. Head back over to the Reporting Services Configuration Manager
  10. Setup the Database Name and select the language.
  11. Leave Native Mode selected and click Next.
  12. Enter the same credentials on the Credentials step and click Next
  13. Click Next on the Summary pane
  14. Click Finish
  15. Go back to your SQL Server and deprivilege your account
    1. Uncheck sysadmin and Set the default database to ReportServer
  16. Click on the Report manager URL in the reporting Services Configuration Manager
  17. Click Reports if you are happy with the /Reports directory
  18. Once you have clicked Apply, verify you can view the website by clicking on the link it shows (it should bring you to a site that kind of reminds you of an old version of sharepoint :P)
  19. Go to your Lync Front End server and run the Lync Server Topology Builder program (Start->All Programs->Microsoft Lync Server 2010->Lync Server Topology Builder)
  20. Upon login, check "Download Topology from existing deployment" and click OK
  21. Save the topology to your desktop when prompted (or anywhere else, doesn't really matter)
  22. Expand your Site, and click on the Monitoring Servers folder
  23. Right click on Monitoring Servers and select New Monitoring Server...
  24. Enter in the server to install the role on
  25. Enter the SQL server name/instance to use
  26. Finish the installation
  27. Head over to the server where you are going to install the Monitoring/Archieving role
  28. Open up the Lync Server 2010 - Deployment Wizard (run as administrator)
  29. Click on Install or Update Lync Server System
  30. Click on Setup or Remove Lync Server Componenets
  31. Let it install/configure all of its stuff
  32. Click on Run next to Server Status (Optional)
  33. Verify Lync Server Call Detail Recording and Lync Server QoE Monitoring Service services have been started (start them if they aren't running)
  34. Go back to the Lync Server 2010 deployment wizard homepage and click on Deploy Monitoring Server Reports
  35. The server information should already be prefilled in. Click Next
  36. Enter in the SQL credentials needed to connect in
    1. For this step, I would recommend creating the account yourself (A good tutorial I came across on doing this can be found here, but I have summarized the steps below):
      1. Head over to Active Directory and create a new user
      2. Head over to the SQL Server
      3. Right click on Security->Logins and click New Login...
      4. Enter in your AD account you just created
      5. Click on User Mapping
        1. Check both the LcsCDR and QoEMetrics databases
      6. Click OK
        1. Do the following for both the LcsCDR and QoEMetrics databases
          1. Expand the database, expand Security, export Users
          2. Right click on the user you mapped to the database and click Properties
          3. Check ReportsReadOnlyRole and click OK
  37. Enter in the User Group you want access to run reports.
    1. This group is a list of users who have access to actually run the reports/will point and click on reports.
  38. Click Next, you should notice the following info when it starts configuring, that is normal:
    1. The following URL will be used for deployment: https://myserver.mydomain:443/ReportServer SQL Server logon credentials for "mydomain\myuser" already exist. Use the existing logon credentials. "[QoEMetrics]" role "[ReportsReadOnlyRole]" has already assigned to "mydomain\myuser". "[LcsCDR]" role "[ReportsReadOnlyRole]" has already assigned to "mydomain\myuser".
  39. Click Finish (Assuming all went OK) 🙂
  40. Head over to your Lync admin panel (web GUI)
  41. Click on Monitoring and Archiving
  42. Select Global and click on Action and select Enable CDR
  43. You can change any other settings in here to your preference at this point.
  44. Head over to your reports page. https://yourdomain/ReportServer
  45. Click on LyncServerReports
  46. Click on Reports Home Page

If you see the Monitoring Server Reports page with the Lync 2010 logo in the top left corner, get up, celebrate, and pat yourself on the back! 🙂

Other thoughts: The first time I deployed this, I ran into a ton of errors.  I have documented many of these issues and other issues that you might run into during your deployment.  Hopefully you don't run into any, but if you do, hopefully they help you get up-and-going again.

Lync 2010 – Publishing the topology error: Missing Machine

SQL Server 2008 R2 – Reporting Services Configuration Manager – Create certificate binding failed – HRESULT: 0×80040238

SQL Server 2008 R2 – Reporting Services Configuration Manager – The underlying connection was closed: Could not establish trust relationship for the SSL/TLS secure channel.

Lync 2010 – The feature: “Customizing security roles” is not supported in this edition of Reporting Services.

Lync 2010 – Cannot impersonate user for data source ‘CDRDB’. (rsErrorImpersonatingUser) error

Lync 2010 - Cannot impersonate user for data source 'CDRDB'. (rsErrorImpersonatingUser) error

Symptom: You receive the following error when browsing to the following page in the Reports Viewer: https://mymachine.mydomain/ReportServer/Pages/ReportViewer.aspx?%2fLyncServerReports%2fReports+Home+Page&rs:Command=Render  Alternatively, you receive this error when you go to https://mymachine.mydomain.com/Reports/ and click on LyncServerReports and then Reports Home Page.

Note: the solution below applies to the QMSDB as well.

  • An error has occurred during report processing. (rsProcessingAborted)
    • Cannot impersonate user for data source 'CDRDB'. (rsErrorImpersonatingUser)
      • Log on failed. Ensure the user name and password are correct. (rsLogonFailed)
        • For more information about this error navigate to the report server on the local server machine, or enable remote errors

Solution: For whatever reason, my service account I created actually had the incorrect password to login to the 'CDRDB' data source.  To fix/troubleshoot this, follow the steps below:

  • Head over to https://myserver.mydomain/Reports (myserver being the server with the reporting services on it)
  • Click on LyncServerReports
  • Click on Reports_Content
  • Click on CDRDB
  • Under Credentials stored securely in the report server, type in the username/password are want to use to connect to the SQL server, and then click the Test Connection button.  If you should see a Connection created successfully. message, you are good to go.  If you see a Log on failed. Ensure the user name and password are correct. message, ensure that the account you setup has the correct username/password in active directory, is Unlocked in Active Directory (due to bad password attempts), and that it has permissions to the databases mentioned in the Connection string on the same page.

Lync 2010 - The feature: "Customizing security roles" is not supported in this edition of Reporting Services.

Symptom: You receive the following log/error when on the Deploying Monitoring Server Reports step for Lync 2010.

> Deploying Monitoring Server Reports... This might take a few minutes.

The Monitoring Server is using SQL instance "mysqlserver.mydomain".

The data source is using SQL instance "(local)".

The following URL will be used for deployment: https://myserver.mydomain:443/ReportServer

SQL Server logon credentials for "MYDOMAIN\MYUSER" already exist. Use the existing logon credentials.

"[QoEMetrics]" role "[ReportsReadOnlyRole]" has already assigned to "MYDOMAIN\MYUSER".

"[LcsCDR]" role "[ReportsReadOnlyRole]" has already assigned to "MYDOMAIN\MYUSER".

Start to deploy reports...

Report: Monitoring Dashboard published successfully with no warnings

Report: Call Detail Report published successfully with no warnings

Report: Call List Report published successfully with no warnings

Report: Reports Home Page published successfully with no warnings

Report: Media Quality Summary Report published successfully with no warnings

Report: Media Quality Metrics Distribution Report published successfully with no warnings

Report: Media Quality Comparison Report published successfully with no warnings

Report: Device Report published successfully with no warnings

Report: Server Performance Report published successfully with no warnings

Report: Call Leg Media Quality Report published successfully with no warnings

Report: Call Leg Media Quality Trend Report published successfully with no warnings

Report: Server Media Quality Trend Report published successfully with no warnings

Report: QoE Call Detail SubReport published successfully with no warnings

Report: Location Trend Report published successfully with no warnings

Report: Location Report published successfully with no warnings

Report: Peer-to-Peer Voice and Video Report published successfully with no warnings

Report: Peer-to-Peer IM Report published successfully with no warnings

Report: Conference Activity Report published successfully with no warnings

Report: PSTN Conference Summary Report published successfully with no warnings

Report: Conference Summary Report published successfully with no warnings

Report: Peer-to-Peer Activity Summary Report published successfully with no warnings

Report: User Activity Report published successfully with no warnings

Report: Peer-to-Peer Session Detail Report published successfully with no warnings

Report: Conference Detail Report published successfully with no warnings

Report: Diagnostic Report published successfully with no warnings

Report: User Registration Report published successfully with no warnings

Report: Failure Distribution Report published successfully with no warnings

Report: Top Failures Report published successfully with no warnings

Report: Failure List Report published successfully with no warnings

Report: Peer-to-Peer Activity Diagnostic Report published successfully with no warnings

Report: Conference Diagnostic Report published successfully with no warnings

Report: Call Admission Control Report published successfully with no warnings

Report: P2P Summary SubReport published successfully with no warnings

Report: Conference Summary SubReport published successfully with no warnings

Report: Call Diagnostic Summary Report published successfully with no warnings

Report: IP Phone Inventory Report published successfully with no warnings

Report: Response Group Usage Report published successfully with no warnings

Report: Response Group Call List Report published successfully with no warnings

The feature: "Customizing security roles" is not supported in this edition of Reporting Services. ---> Microsoft.ReportingServices.Diagnostics.Utilities.OperationNotSupportedException: The feature: "Customizing security roles" is not supported in this edition of Reporting Services.

An error occurred when deploying Monitoring Server Reports. For details, see the log. 
Solution: Make sure the SQL server is running at least Standard or Enterprise.

To find out which version of msSQL you are running (version and 32-bit or 64-bit), follow this guide here: http://jackstromberg.com/2013/01/how-do-i-find-out-if-my-sql-server-is-32-bit-or-64-bit/

To find out how to upgrade your msSQL instance/server, follow this guide here:

SQL Server 2008 R2 - Updating a msSQL instance/server

Scenario: You have accidentally installed SQL Server 2008 R2 Workgroup and you need SQL Server 2008 R2 Standard.  Obviously, you don't want to rebuild your server from the ground up and have extended downtime, so an upgrade option would be sweet.  Luckily, Microsoft has come to the rescue with an easy way to update your msSQL server/instances.

Solution: Go to the Microsoft Licensing center or grab your SQL Server disk/installation media of the correct version.  I.e. if I was running standard, I would grab the enterprise disk to upgrade.  Once you have the disk, follow these steps:

  1. Find your installation media and double click on Setup.exe
  2. When the SQL Server Installation Center window comes up, click on Maintenance
  3. Click on Edition Upgrade
  4. On the SQL Server 2008 R2 SetupSetup Support Rules window, click OK
  5. Click Next > on the Upgrade the Edition for SQL Server 2008 R2 window
  6. Click Next > on the Enter a product key: page.
  7. Click I accept the license terms. and then click Next >
  8. Select the instance of the SQL Server you wish to upgrade and then click Next >
  9. Click Next >
  10. Click Upgrade

To verify your SQL Server upgraded, follow this guide here to pull your msSQL version: http://jackstromberg.com/2013/01/how-do-i-find-out-if-my-sql-server-is-32-bit-or-64-bit/

How do I find out if my SQL server is 32-bit or 64-bit?

Want to know what version of SQL server your have running? All we need to do is execute one SQL command and away we go 🙂

  1. Go to your SQL server
  2. Open up the Microsoft SQL Server Management Studio
    1. Start->All programs->Microsoft SQL Server 2008 R2->SQL Server Management Studio
  3. Login with your user
  4. Click the New Query button
  5. Execute the following query
    1. SELECT SERVERPROPERTY('edition')