Tag Archives: ssl

Enabling SSL on Windows Server Update Services (WSUS)

Here are the steps to configure SSL on your servers running the Windows Server Update Services.  This guide was written using Server 2012 R2, however it should be the same steps for Windows Server 2008 R2 as well.  This guide also assumes you have a working instance of WSUS installed and configured, using default ports.

  1. Login to your WSUS server
  2. Open up Server Manager
    Server 2012 R2 - Server Manager
  3. Select Tools -> Internet Information Services (IIS) Manager
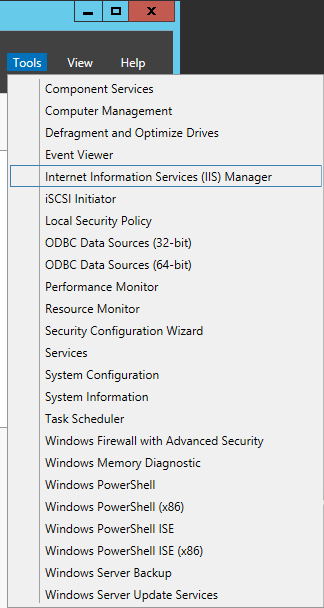
    Server Manager - Tools - Internet Information Services IIS Manager
  4. Generate a SSL certificate
    1. Click on your Server and select Server Certificates
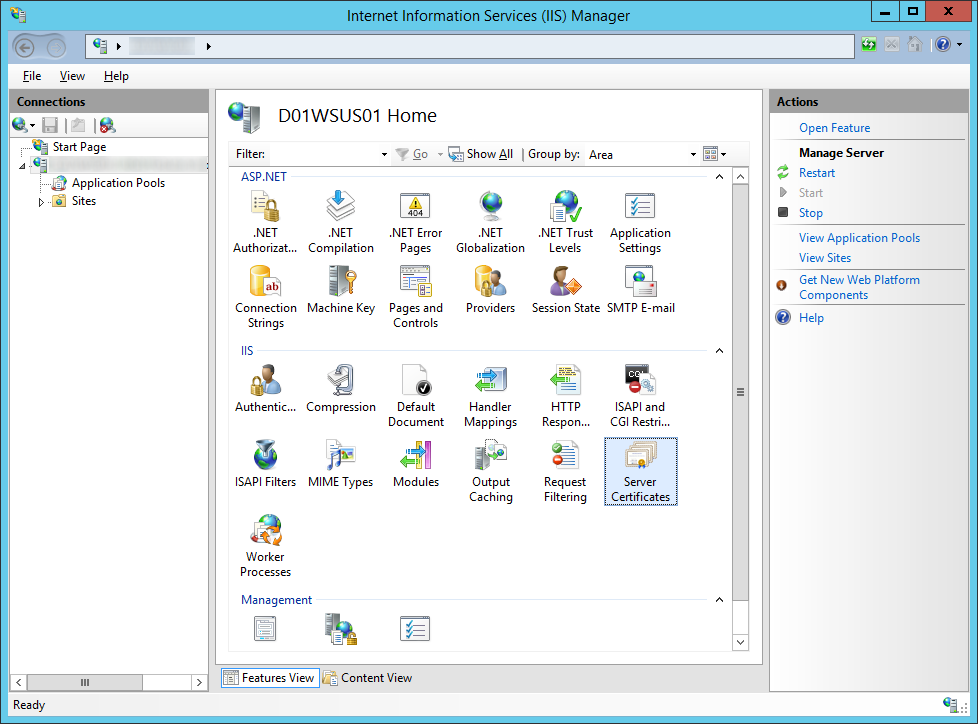
      Internet Information Services (IIS) Manager - Server Certificates
    2. If you have your own PKI environment, follow these steps, if not, jump to step three
      1. Click Create Domain Certificate on the right side
        Internet Information Services (IIS) Manager - Server Certificates - Create Domain Certificate
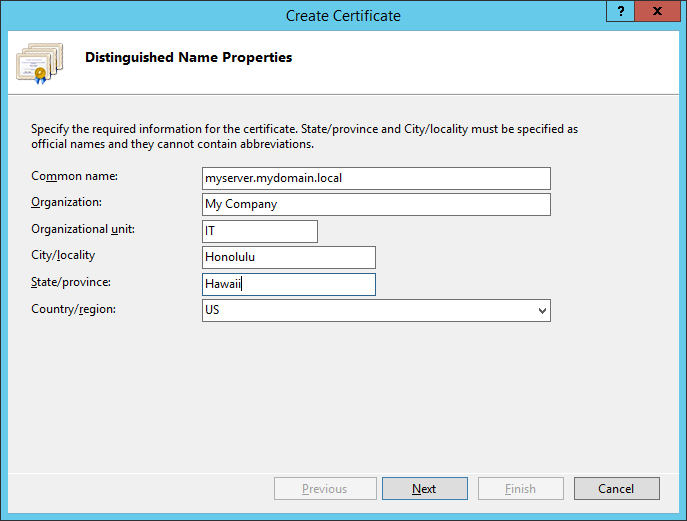
      2. Fill in the requested information on the Distinguished Name Properties page and click Next
        Internet Information Services (IIS) Manager - Server Certificates - Distinguished Name Properties
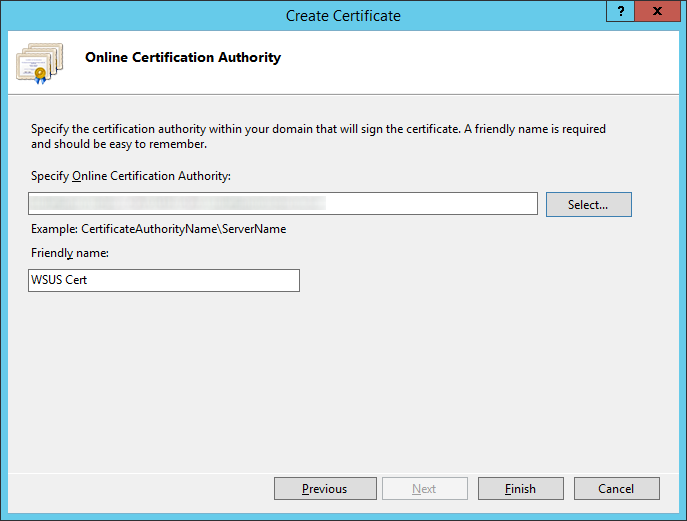
      3. Select your certificate authority and enter a friendly name (this can be anything), and then click Finish
      4. Internet Information Services (IIS) Manager - Server Certificates - Create Domain Certificate - Online Certification Authority
    3. If you need to submit a certificate request to an external certificate authority like Goaddy, Verisgn, Comodo; follow these steps
      1. Click Create Certificate Request on the right side
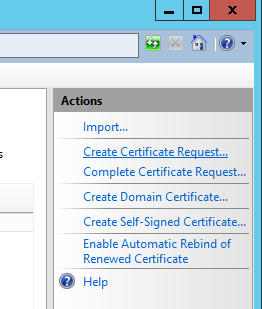
        Internet Information Services (IIS) Manager - Server Certificates - Create Certificate Request
      2. Fill out the Distinguished Name Properties and click Next
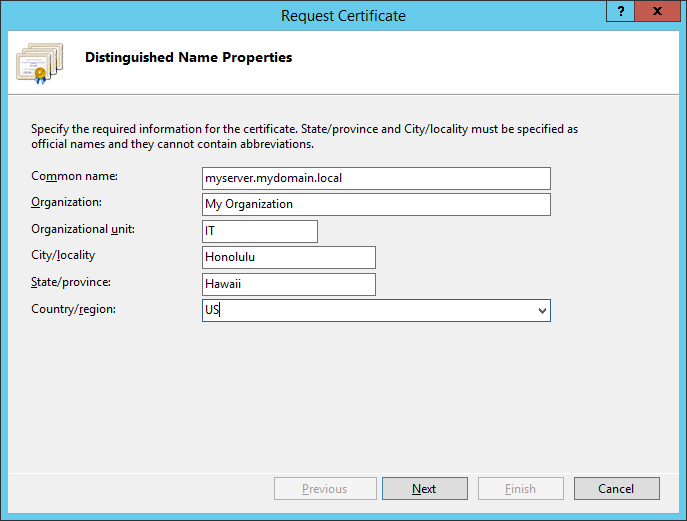
        Internet Information Services (IIS) Manager - Server Certificates - Request Certificate - Distinguished Name Properties
      3. Change the Bit length to 2048 and click Next
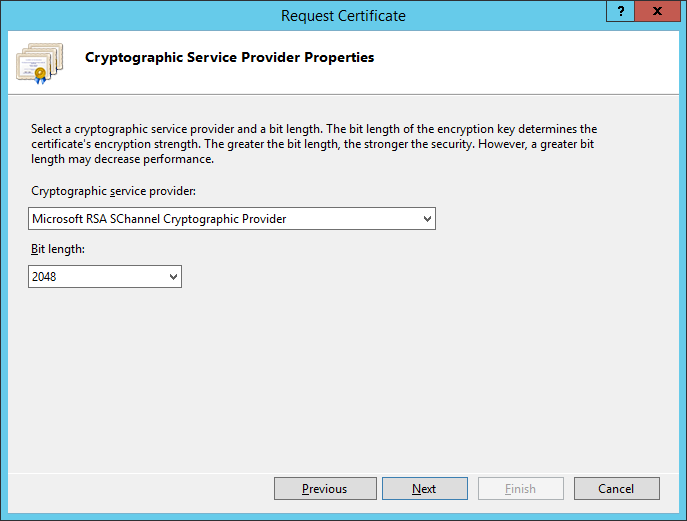
        Internet Information Services (IIS) Manager - Server Certificates - Request Certificate - Crytographic Service Provider Properties
      4. Select a location on where to place the CSR file that will be generated by the wizard and click Finish
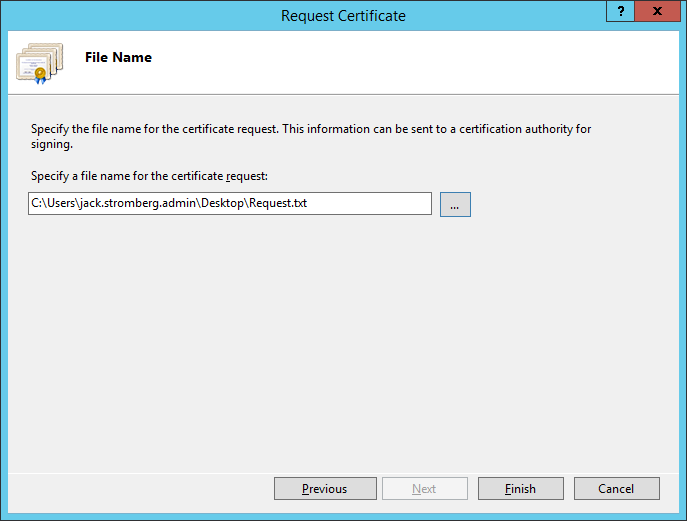
        Internet Information Services (IIS) Manager - Server Certificates - Request Certificate - File Name
      5. At this point, send the request to your certificate authority (like GoDaddy, Verisign, or your own internal certificate authority). You should receive back a .cer file once the claim has been fulfilled.
      6. Click on Complete Certificate Request on the right side
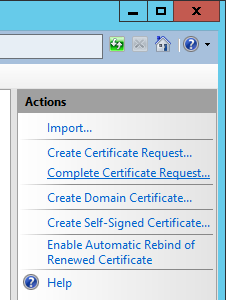
        Internet Information Services (IIS) Manager - Server Certificates - Complete Certificate Request
      7. Select the .cer file that your public certificate authority provided you, type in a friendly name (this can be anything), select Web Hosting for the certificate store, and click OK
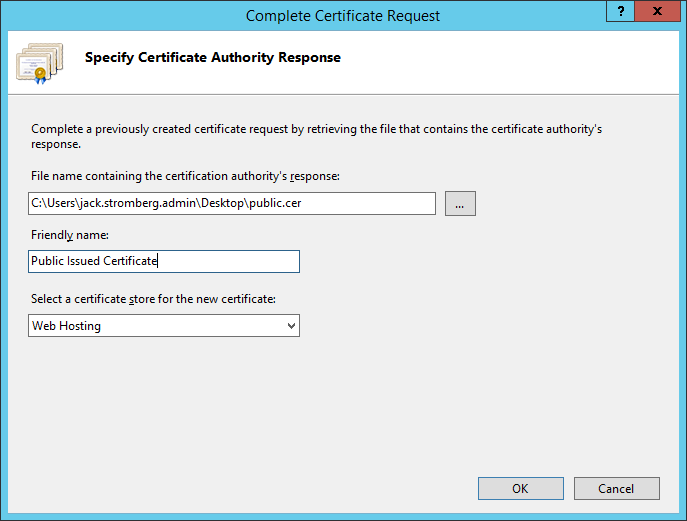
        Internet Information Services (IIS) Manager - Server Certificates - Request Certificate - Specify Certificate Authority Response
  5. Next, we need to bind the SSL certificate to your network adapter.
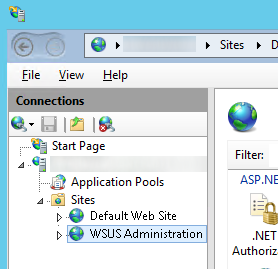
    1. Expand your server, expand Sites, and select WSUS Administration
      IIS - Sites - WSUS Administration
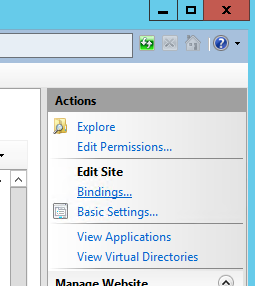
    2. Select Bindings... on the right side
      IIS - Bindings
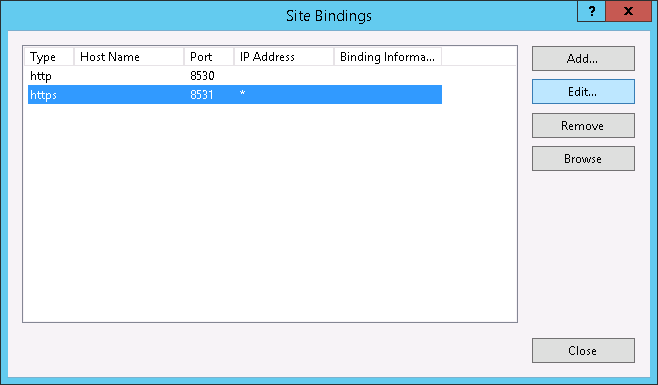
    3. Select the https site and hit the Edit... button
      Site Bindings - Port 8531
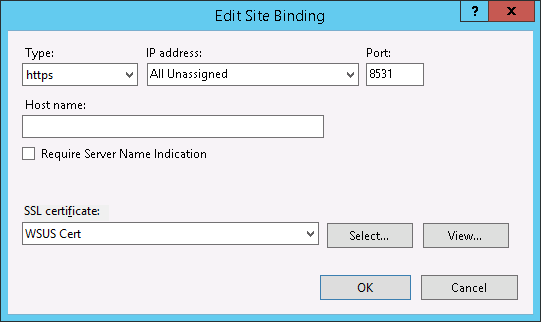
    4. Select https for the type, select the SSL certificate you created above, and click OK
      IIS - Edit Site Binding - WSUS
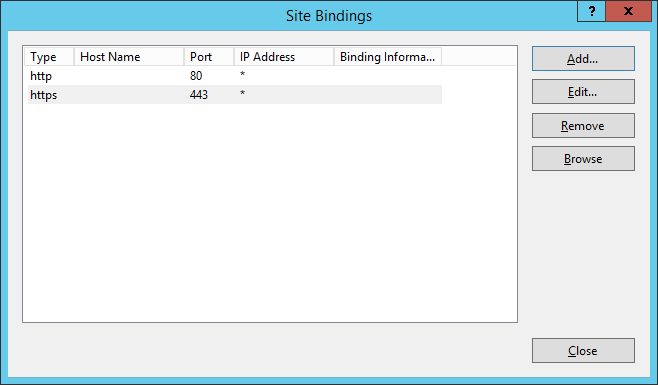
    5. Click Close on the Site Bindings window
      IIS - Site Bindings - https
  6. Next, we need to enforce SSL encryption on the following virtual roots
    • ApiRemoting30
    • ClientWebService
    • DSSAuthWebService
    • ServerSyncWebService
    • SimpleAuthWebService

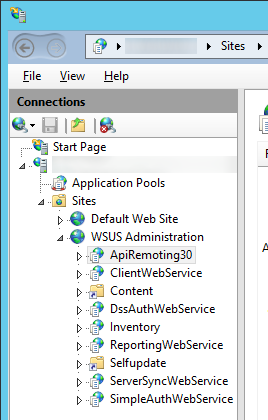
    1. Expand WSUS Administration and foreach of the directories above, complete the following steps
      1. Select the virtual site
        IIS - WSUS Administration
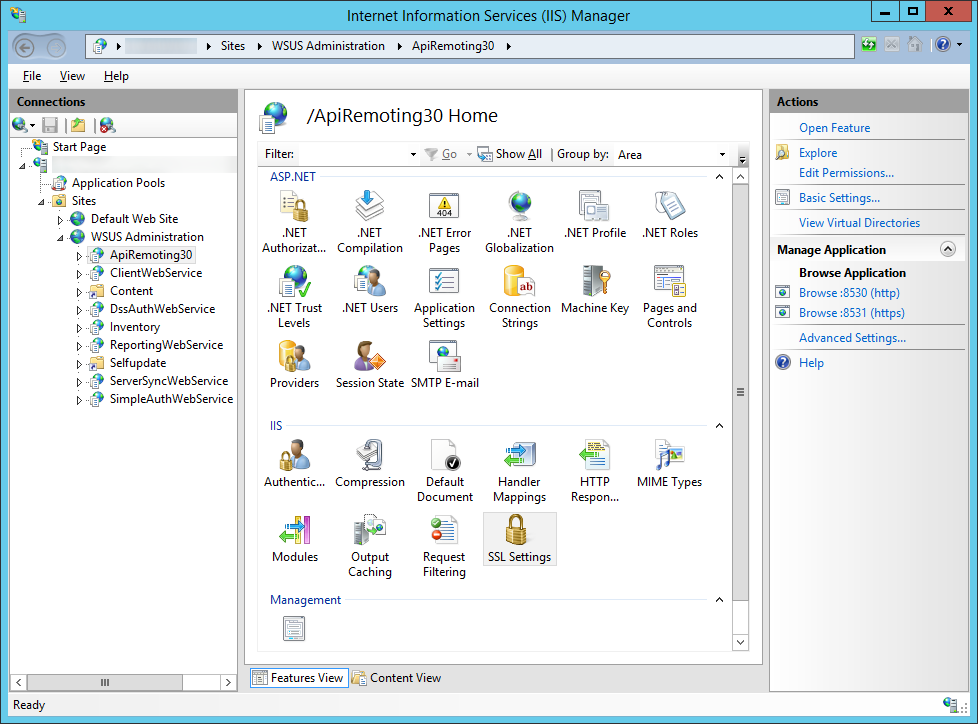
      2. Double click on SSL Settings
        IIS - WSUS Administration - SSL Settings
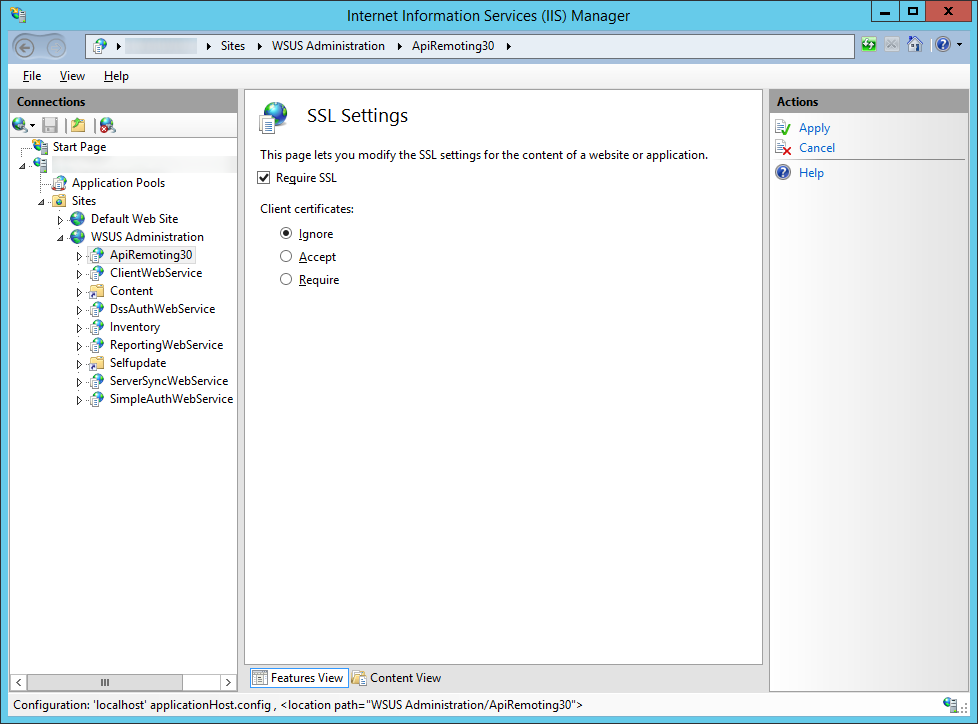
      3. Check Require SSL and leave client certificates to ignore
        IIS - WSUS Administration - SSL Settings - Require SSL
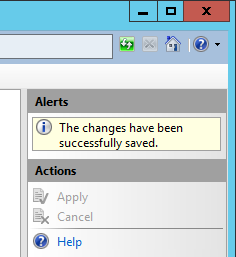
      4. Click Apply in the top right corner
        IIS - SSL Settings - Apply
  7. Next, we need to execute a command to tell WSUS to use ssl
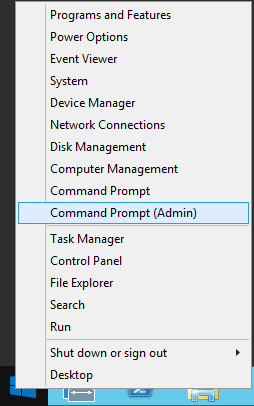
    1. Open up an elevated command prompt
      Server 2012 - Administrative Command Prompt
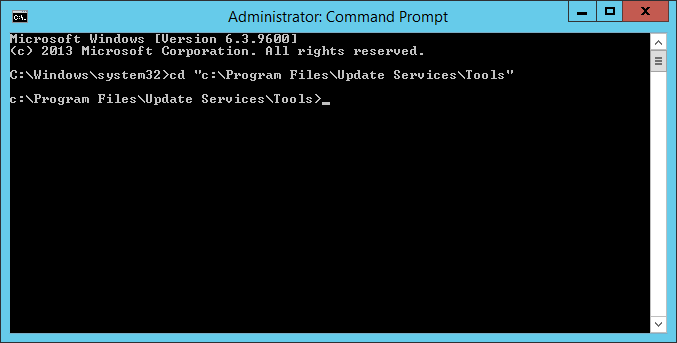
    2. Navigate to your WSUS installation folder
      1. cd "c:\Program Files\Update Services\Tools"
        cmd - program files - update services - tools
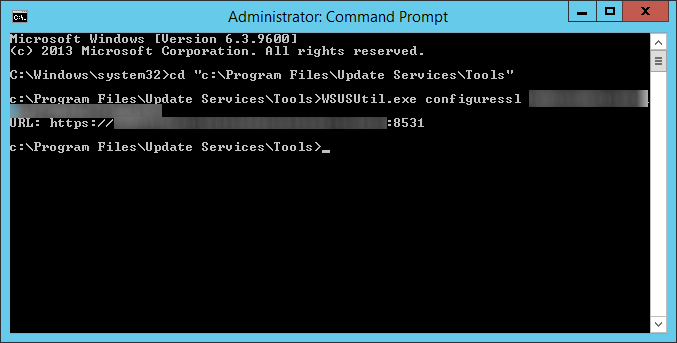
    3. Execute the following command (replace your server with the correct FQDN)
      1. WSUSUtil.exe configuressl myserver.mydomain.local
        wsusutil configuressl
  8. Restart the WSUS server to make sure all changes take effect.  You should be able to bring up the WSUS management console if all went well.
  9. Configure your clients to connect via SSL to the WSUS server via Group Policy
    1. Login to your domain controller
    2. Open up Server Manager
      Server 2012 R2 - Server Manager
    3. Open up Group Policy Management
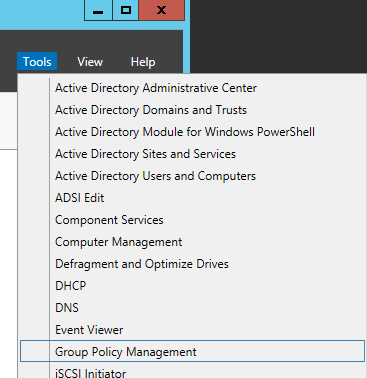
      Server Manager - Tools - Group Policy Management
    4. Right click on the policy you want to edit and select Edit
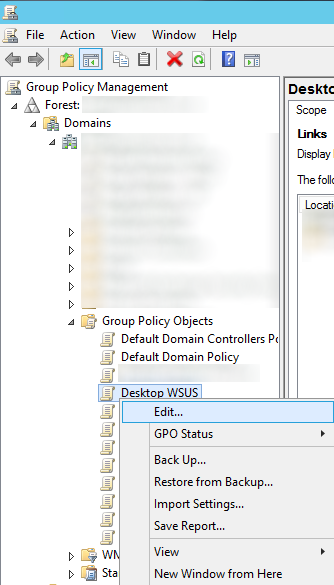
      Edit GPO
    5. Expand Computer Configuration -> Polices -> Administrative Templates -> Windows Components -> Windows Update
    6. Double click on Specify intranet Microsoft update service location
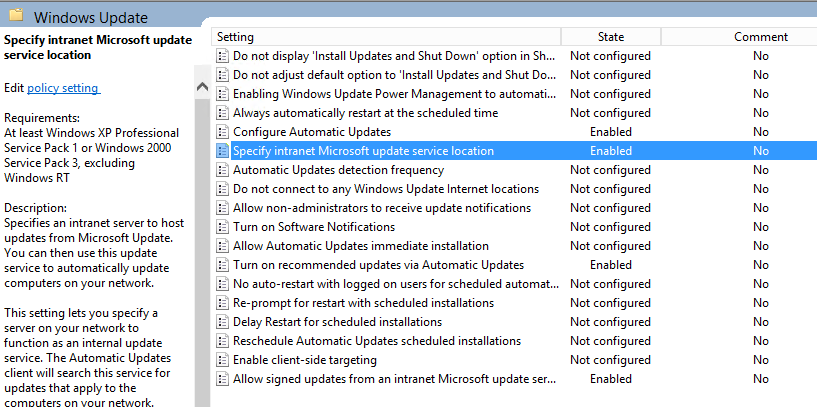
      Specify intranet Microsoft update service location
    7. Change the intranet update service url to https and specify port 8531 and then click Apply.
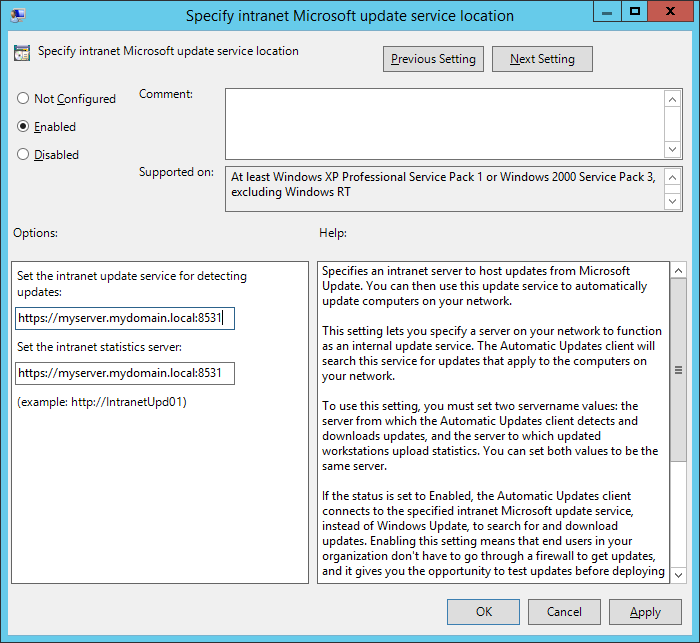
      Specify intranet Microsoft update service location - options

That should do it!  Try doing a gpupdate /force on your local machine and the check for windows updates.  If windows successfully completes checking for updates, you should be good to go! 🙂

Notes: Official documentation from Microsoft in regards to using SSL and WSUS can be found here: http://technet.microsoft.com/en-us/library/hh852346.aspx#consswsus
SQL Server 2008 R2 - Reporting Services Configuration Manager - The underlying connection was closed: Could not establish trust relationship for the SSL/TLS secure channel.

Symptom: When installing the Monitoring Agent for Lync 2010, I was receiving the following information in the "log" file:

> Deploying Monitoring Server Reports... This might take a few minutes.
The Monitoring Server is using SQL instance "myserver.mydomain".
The data source is using SQL instance "(local)".
The following URL will be used for deployment: https://myserver.mydomain:443/ReportServer
SQL Server logon credentials for "mydomain\myuser" already exist. Use the existing logon credentials.
"[QoEMetrics]" role "[ReportsReadOnlyRole]" has already assigned to "mydomain\myuser".
"[LcsCDR]" role "[ReportsReadOnlyRole]" has already assigned to "mydomain\myuser".
Start to deploy reports...
The underlying connection was closed: Could not establish trust relationship for the SSL/TLS secure channel.
An error occurred when deploying Monitoring Server Reports. For details, see the log.

Turns out this was because I had accidentally forgot to add in the common name to my SSL certificate as a SAN address.  Bottom line, the issue is that your SSL certificate is bad.

Solution:

  1. Request a new SSL certificate
    1. Start->mmc
    2. Add in the Certificates snap-in
    3. Select Local Computer
    4. Expand Certificates->Personal->Certificates
    5. Right click, All Tasks->Request new Certificate...
    6. Next
    7. Next
    8. Select your policy
    9. Enter in the information you would like.  Note, if you are adding a SAN address for the short name, make sure you add both the FQDN and the short name as DNS entries in the Alternative name box.
    10. Click on the Private Key tab, expand the little arrow and check Make private key exportable
    11. Click OK
    12. Click Enroll
  2. Click Start->All Programs->Microsoft SQL Server 2008 R2->Configuration Tools->Reporting Services Configuration Manager.
  3. Click Connect
  4. Click Web Service URL
  5. Under SSL Certificate, select the appropriate certificate and click Apply
  6. At this point, you either saw a bunch of green check marks and you are good to go, or else you probably hit the dreaded "rouge SSL cert" error.  To fix that, please see this link: http://jackstromberg.com/2013/01/sql-server-2008-r2-reporting-services-configuration-manager-create-certificate-binding-failed-hresult-0x80040238/

SQL Server 2008 R2 - Reporting Services Configuration Manager - Create certificate binding failed - HRESULT: 0x80040238

Symptom: When changing an SSL certificate inside of the SQL Server 2008 R2 Reporting Services Configuration Manager, you receive the following error:

Create certificate binding.

When you click on "Tell me more about the problem and how to resovle it." you receive the following:

Microsoft.ReportingServices.WmiProvider.WMIProviderException: An SSL binding already exists for the specified IP address and port combination. The existing binding uses a different certificate from the current request. Only one certificate can be used for each IP address and port combination. To correct the problem, either use the same certificate as the existing binding, or remove the existing SSL binding and create a new binding using the certificate of the current request.

---> System.Runtime.InteropServices.COMException (0x80040238): Exception from HRESULT: 0x80040238
--- End of inner exception stack trace ---
at Microsoft.ReportingServices.WmiProvider.RSWmiAdmin.ThrowOnError(ManagementBaseObject mo)
at Microsoft.ReportingServices.WmiProvider.RSWmiAdmin.CreateSSLCertificateBinding(String application, String certificateHash, String ipAddress, Int32 port)
at ReportServicesConfigUI.WMIProvider.RSReportServerAdmin.CreateSSLCertificateBinding(UrlApplication app, String certificateHash, String ipAddress, Int32 port)

This error really sucks and the reason behind it is that Microsoft just didn't do a good job removing/unbinding SSL certificates from an interface.  Luckily, I have the solution to get you up and going...

Solution:

  1. Download the Windows Server 2003 Support Tools from Microsoft
    1. http://www.microsoft.com/en-us/download/details.aspx?id=7911
  2. Install the tools on your local machine or on the server.  You may get a warning about incompatibility if you install it on your Windows 7 machine.  I ignored this and things seem to work fine 😛  Just note if you do this, you will need to copy the following folder from your local machine to the server with SQL Server Reporting Services Configuration Manager: C:\Program Files (x86)\Support Tools
  3. Open up a command prompt with Administrator privileges on the server with SQL Server 2008 R2 Reporting Services Configuration Manager
  4. Navigate to the following directory (if you copied the folder from your local machine, browse to the appropriate directory you copied the support tools to):
    1. cd "C:\Program Files (x86)\Support Tools"
  5. Launch SQL Server 2008 R2 Reporting Services Configuration Manager
    1. Start->All Programs->Microsoft SQL Server 2008 R2->Configuration Tools->
      Reporting Services Configuration Manager
  6. Click on Web Service URL
  7. Click on the Advanced... button
  8. Remove any items listed inside of the "Multiple SSL Identities for the Report Server Web Service" box.
  9. Click OK
  10. Go back to your command prompt with the Administrator privileges and execute the following commands to unbind the old SSL certificate
    1. netsh http delete sslcert ipport=[::]:443
      1. You should see something like "SSL Certificate successfully deleted" -- If not, that is fine
    2. httpcfg delete ssl /i 0.0.0.0:443
      1. You should see something like "HttpDeleteServiceConfiguration completed with 0." -- If not, that is fine as long as the command above said it removed a certificate
  11. Go back to the Reporting Services Configuration Manager and select your SSL certificate in the  SSL Certificate dropdown.
  12. Click Apply

At this point, your certificate should have bound to the interface successfully.

Hope this helps someone!

How do I setup msSQL to use SSL?

Want to encrypt your msSQL traffic?  Here is how to do it.

  1. Request/Install a certificate in the Windows Certificate store
    1. If you are on a domain with a certificate authority, you can do this by clicking Start->run->mmc
    2. Click File->Add/Remove Snap-in
    3. Select Certificates, click the Add button, select Computer account, click OK, click Finish the wizard.
    4. Expand Certificates (Local Computer) and navigate to Personal->Certificates
    5. Right click All Tasks -> Import... or Request New Certificate (depending on what you want to do)
  2. Once you have finished installing the certificate, click Start->All Programs->Microsoft SQL Server 2008 R2->Configuration Tools->SQL Server Configuration Manager (Launch SQL Server Configuration Manager)
  3. Expand SQL Server Network Configuration
  4. Right click on "Protocols for MSSQLSERVER" (or whatever your instance name is on the left side) and click Properties
  5. On the Flags tab, you can optionally set "Force Encyrption" to Yes, which will make your msSQL server only allow connections that are secure.  You may skip this step if you don't want to do this.
  6. Click on the Certificate tab.
  7. Select your certificate that you installed in Step 1 in the Certificate dropdown box.
  8. Click OK
  9. Click on SQL Server Services
  10. Right click on the SQL Server (MSSQLSERVER) service and click Restart (MSSQLSERVER==your instance name)

That's all that's to it.  Note, if you receive an error that the service cannot run (I forgot what the original error was), try disabling the VIA Client Protocol underneath SQL Native Client 10.0 Configuration inside of SQL Server Configuration Manager.

As a reference, you can find the official Microsoft KB article on how to do this here.

vCenter 5.1 - vSphere Web Client - Log Browser - Unauthorized access ' faultDetail:'null' Error

Symptom: When you click on the Log Browser link from the vSphere Web Client, you receive the following error:

faultCode:Server.Processing faultString:'javax.servlet.ServletException : java.lang.Exception: https://MYVCENTER.MYDOMAIN.local:12443/vmwb/logbrowser: Unauthorized access ' faultDetail:'null'

Resolution: You need to replace the SSL certificate for the Log Browser service with a valid one. Assuming you have applied a valid certificate on your SSO instance, Web Client, and have done the necessary steps to generate the rui.pfx, rui.key, and rui.crt files, here are the steps to apply the certificate:

  1. Stop the VMware Log Browser service
  2. Navigate to C:\Program Files\VMware\Infrastructure\vSphereWebClient\logbrowser\conf via Windows Explorer
  3. Backup the rui.crt, rui.key, rui.pfx to your Desktop (or some other folder incase we have to roll-back)
  4. Replace the rui.crt, rui.key, rui.pfx files with the ones you have created.
  5. Next, we need to create a new java keystore with the chain trust for our certificate
    1. Open up an elevated command prompt
    2. Change directories to the VMware JRE
      1. cd /d C:\Program Files\VMware\Infrastructure\jre\bin
    3. Generate the new keystore (Do not change the testpassword or changeit password) (Change the Paths to point to your pfx certificate and the destination path to output the java Keystore)
      1. keytool -v -importkeystore -srckeystore C:\PATHTOYOURSSOCERTPFXFILE\rui.pfx -srcstoretype pkcs12 -srcstorepass testpassword -srcalias rui -destkeystore C:\OUTPUTPATHYOUKNOWMAYBEYOURDESKTOP\rui.jks -deststoretype JKS -deststorepass changeit -destkeypass changeit
    4. Copy the C:\OUTPUTPATHYOUKNOWMAYBEYOURDESKTOP\rui.jks to:
      1.  C:\Program Files\VMware\Infrastructure\SSOServer\Security\
    5. Login to your vSphere Web Client with the admin@System-domain account
    6. Navigate to Administration > Sign-On and Discovery > Configuration
    7. Click on the STS Certificate tab and the click Edit
    8. Select the rui.jks file from C:\Program Files\VMware\Infrastructure\SSOServer\Security\
    9. When prompted for a keystore password enter changeit
    10. Click on the rui line to highlight it, then click OK
    11. Enter changeit again for the password
    12. Acknowledge the dialog box that says you need to restart the server in order for the changes to take effect.
      1. Note, if you receive the following error below, that means you have not fully established a certificate trust.  If you have an intermediate certificate, you will need to put all of those certificates inside of your pfx file (see my notes at the end).
        1. The last operation failed for the entity with the following error message.An error ocurred while updating server configuration

    13. Reboot your server
  6. Log back into your vSphere Web Client
  7.  Click on the Log Browser link and verify the error has been resolved

----Notes for people with tiered PKI environments----
If you have intermediate certificates, when you generate the pfx file you HAVE to import the entire chain into the pfx, otherwise the certificate will not be imported when using the vSphere Web Client.  To include the chain in your pfx file, use the following command:

openssl.exe pkcs12 -export -in C:\PATHTOMYSSOCERT\rui.crt -inkey C:\PATHTOMYSSOPRIVATEKEY\rui.key -name "rui" -chain -CAfile C:\PATHTOCACHAIN\certs.pem -passout pass:testpassword -out C:\PATHTOOUTPUTPFXFILE\rui.pfx

Notice the certs.pem file I have created.  This includes the public keys from each intermediate cert, and then followed by the root certificate.  I.e. Your file will look something like this:

-----BEGIN CERTIFICATE-----
INTERMEDIATECERTIFICATEBASE64STUFFHERE.crt
-----END CERTIFICATE-----
-----BEGIN CERTIFICATE-----
ROOTCERTIFICATEBASE64STUFFHERE.crt
-----END CERTIFICATE-----

Where the first BEGIN CERTIFICATE would be your intermediate certificate, and the second certificate your root certificate.  If you have multiple intermediate certificates, always put them before the root.  The root certificate should be the last in the pem file.

The official VMware KB article on how to do this can be found here (note, it does not cover the pfx file creation for tiered PKI environments): http://kb.vmware.com/selfservice/microsites/search.do?language=en_US&cmd=displayKC&externalId=2037927

Generating a PKCS12 file with openSSL

  1. Generate the CSR
    1. openssl req -new -newkey rsa:2048 -nodes -keyout yourdomain.key -out yourdomain.csr
  2. Sign the CSR with your Certificate Authority
    1. Send the CSR (or text from the CSA) to VeriSign, GoDaddy, Digicert, internal CA, etc.
  3. Download the CRT
    1. Grab a copy of the signed certificate from your CA and place both the signed certificate and the CA chain certificate inside the same folder as your csr
  4. Create the PKCS#12 file (.pfx .p12)
    1. openssl pkcs12 -export -out nameofpkcsfilewearegoingtogenerate.pfx -inkey yourdomain.key -in publiccertfromCA.crt -certfile CAcertificatechain.crt
    2. Enter in a password that will be used to protect your PKCS file's private key

That's all that's to it!

Note: If you have multiple certificate authorities, you will have to create a certificate chain.  Use the following command for Step 4:

openssl.exe pkcs12 -export -in publiccertfromCA.crt -inkey yourdomain.key -name “MyCertYouCanChangeThisToWhateverItsAnAliasFriendlyName” -chain -CAfile certs.pem -passout pass:testpassword -out nameofpkcsfilewearegoingtogenerate.pfx

The certs.pem file will contain a list of your certificate authorities, starting from your intermediate authorities to the root authorities.

—–BEGIN CERTIFICATE—–
INTERMEDIATECERTIFICATEBASE64STUFFHERE.crt
—–END CERTIFICATE—–
—–BEGIN CERTIFICATE—–
ROOTCERTIFICATEBASE64STUFFHERE.crt
—–END CERTIFICATE—–

Replacing SSL Certificates on View Connection Servers 5.1

Here are the steps involved to change the SSL certificates from the default VMware Self-Signed certificate to one signed by either your internal CA or a public CA.  This tutorial works for both the View Connection Server or Security Server services.  An official KB article by VMware on this subject can be found here: http://kb.vmware.com/selfservice/microsites/search.do?language=en_US&cmd=displayKC&externalId=2020913

In this particular guide, we cover generating an SSL certificate with an Internal CA.  If we wanted to sign our server with a public CA, we could use a tool like openSSL to generate a certificate request, send the request to a public CA.  Next, we would import a PFX12 file with the private and public key into the Local computer's Personal certificates and change set Friendly Name to vdm.

Opening the Certificates Management Console

  1. In the Connection Server, click Start, type mmc, and click OK.
  2. Click File > Add/Remove Snap-in.
  3. Select Certificates and click Add.
  4. Select Computer account and click Next.
  5. Select Local computer and click Finish > OK.

Requesting a new certificate

  1. Expand Certificates and click Personal.
  2. Under Object Type, right-click and select All Tasks > Request New Certificate.
  3. Read the information on certificate enrollment and click Next.
  4. Click Active Directory Enrollment Policy > Next.
  5. Select the template for certificate enrollment and click Details > Properties.
    1. Notes:
      1. Ensure you choose the Windows Server 2003 certificate template option. Do NOT choose Windows Server 2008.
        For information on creating a certificate template, see the Microsoft Technet article Creating Certificate Templates.
      2. If you notice that the service starts but you are unable to navigate to the SSL page, this is because the Windows Server template was set to Server 2008.
  6. Click the General tab.
  7. Under Friendly name, type vdm.
  8. Click the Private Key tab.
  9. Click the arrow next to Key options and select the Make private key exportable option.
  10. Click OK > Enroll.
  11. Click Finish.
  12. Restart the Connection Server service.Notes:
    • If you use any browser other than Internet Explorer to access the View Administration console, you must add an exception for the connection to be trusted.
    • It may take a few minutes for the certificate to be recognized as valid in the View Administration console.

All credit for this guide goes to VMware for this information. This post is merely for archival purposes and self-reflections on the subject.

Replacing SSL Certificates on View Connection Servers 5.0

This process does NOT work for VMWare View 5.1 only 5.0

Here are the steps involved to change the SSL certificates from the default VMware Self-Signed certificate to one signed by either your internal CA or a public CA.  This tutorial works for both the View Connection Server or Security Server services.

  1. Navigate to the following directory via command prompt (if running server 2008, make sure you run command prompt as an administrator):
    1. C:\Program Files\VMware\VMware View\Server\jre\bin
  2. Execute the following command to generate a new Java Keystore:
    1. keytool -genkeypair -keyalg "RSA" -keysize 2048 -keystore keys.jks -storepass secret
      1. Note: This will ask for your first and last name, type in your FQDN here (I.e. viewserver.mydomain.com); also hit RETURN to use the same password as your keystore password when you are done.
  3. Execute the following command to generate a CSR:
    1. keytool -certreq -file certificate.csr -keystore keys.jks -storepass secret
  4. Sign the certificate.csr file that was just generated with your certificate authority (GoDaddy, Verisign, Internal CA, etc.)
  5. Copy the signed .cer or .crt file that you just received from your CA to the same keytool directory
  6. Copy any root or intermediate public certificates to the same keytool direcotry
  7. Execute the following commands for each of your root and intermediate certificates
    1. Root CA Example
      1. keytool -importcert -keystore keys.jks -storepass secret -alias rootCA -file rootCA.cer
    2. Intermediate CA Example
      1. keytool -importcert -keystore keys.jks -storepass secret -alias intermediateCA -file intermediateCA.cer
  8. Execute the following command to import your public certificate for your certificate.csr file:
    1. keytool -importcert -keystore keys.jks -storepass secret -keyalg "RSA" -trustcacerts -file certificate.cer
  9. Next, we need to configure a View Connection Server Instance or Security Server to use the new certificate
    1. Move the keys.jks file that we just created (C:\Program Files\VMware\VMware View\Server\jre\bin\keys.jks) to the following directory:
      1. c:\Program Files\VMware\VMware View\Server\sslgateway\conf\keys.jks
    2. Next, we need to add the keyfile, keypass, and storetype properties to the locked.properties file
      1. If the locked.properties file does not already exist,go ahead and create a new file with notepad.
      2. Once the locked.properties file is open, ensure the following lines are in it:
        1. keyfile=keys.jks
        2. keypass=secret
        3. storetype=jks
  10. Restart the View Connection Server service or Security Server service for your changes to take effect.
  11. Once you have verified the new certificate works, delete the following files from C:\Program Files\VMware\VMware View\Server\jre\bin
    1. certificate.cer
    2. rootCA.cer
    3. intermediateCA.cer
    4. certficate.csr


Updating the View Composer SSL certificate

To update the certificate for the View Composer server, complete the following steps:

  1. Login to the View Composer Server.
  2. Stop the VMware View Composer service
  3. Open up command prompt as an administrator
  4. Navigate to c:\Program Files (x86)\VMware\VMware view Composer
    1. Exclude the (x86) if on a 32-bit machine
  5. Execute the following command:
    1. sviconfig -operation=ReplaceCertificate -delete=false
      1. The -delete command will either delete the certificate from windows or leave it.  False leaves it, true deletes it.
  6. Start the VMware View Composer service


Additional information on the sviconfig tool can be found here: http://pubs.vmware.com/view-50/index.jsp?topic=/com.vmware.view.upgrade.doc/GUID-C22EAD48-88BA-4DE8-A70F-202A954DF047.html

Original support article can be found here: http://pubs.vmware.com/view-51/index.jsp?topic=%2Fcom.vmware.view.installation.doc%2FGUID-5ED2A8AB-0D5F-495F-B2F7-D7C64C7A021E.html


Method Invocation Result: vpx.fault.SecurityConfigFault when replacing vmware ssl certificates

Symptom: When replacing my VMWare certificates with signed certificates, I was receiving the following error when running the Invoke Certificates command:

Method Invocation Result: vpx.fault.SecurityConfigFault

Solution: Unfortunately, the only way I could figure out how to fix this issue was to reboot the vCenter server and try again. The error went away upon reboot.