Here is a recap of some of the reflections I have with deploying Fortinet’s FortiGate appliance on Azure. This is more of a reflection of the steps I took rather than a guide, but you can use the information below as you see fit. At a high level, you will need to deploy the device on Azure and then configure the internal “guts” of the device to allow it to route traffic properly on your Virtual Network (VNet) in Azure. While Fortinet does have some documentation on deploying their appliance, I found it very confusing, so I hope this helps walk through deployment. At the time of writing this, v6.2 was the latest version; however I recommend using at least version 6.0 or greater as it provides support for auto-scaling, which is what we will be looking at for this guide.
First, just want to provide a quick overview of the different options you can take and a rough overview of each architecture:
- Single FortiGate (One VM, easiest to deploy, but is not highly available)
- HA FortiGate in Active/Passive mode (Two VMs with a public IP that gets manually attached to a given instance and updates to route tables)
- Notes: Fortinet in active/passive deployment requires the modification of UDRs and Public IPs. Please note, any manipulation of UDRs or public IPs for Active/Passive solutions can take about 30 seconds to be applied after the failover is initiated. This deployment typically contains 4 IPs on each appliance, one used for external traffic, another for internal traffic, a third for heartbeat traffic, and a fourth for management traffic.
- Docs: https://docs.fortinet.com/vm/azure/fortigate/6.2/azure-cookbook/6.2.0/227656/deploying-and-configuring-active-passive-ha-between-multiple-zones
- HA FortiGate in Active/Active mode (Two VMs load balanced by Azure Load Balancer for high availability; a little more complex to manage; sometimes called the “load balancer sandwhich”)
- Auto-scaling FortiGate (most complex architecture, cannot be deployed from Azure Marketplace, but most scalable)
- Docs: https://docs.fortinet.com/vm/azure/fortigate/6.2/azure-cookbook/6.2.0/161167/deploying-auto-scaling-on-azure
- Note: As of 8/20/2019 – the only downside to this deployment method is BYOL isn’t officially supported yet (you must use Pay as you go (PAYG) licensing) and this mode will not let you easily establish VPN connections to the appliance vs Azure VPN Gateway. If using this deployment strategy, I would recommend pairing it with Azure’s VPN Gateway to handle VPN connectivity.
- Note: As of 8/20/2019 – I don’t believe this deployment works for Azure’s sovereign clouds. The image for the FortiGate appliance is only up to v6.1.0 in Azure Government Cloud and I don’t see a way to specify within the FortiGate that it needs to use the Government Cloud APIs. You would need to manually modify the templates and work with Fortinet to ensure the images work for Azure’s sovereign clouds. In this case, I would recommend deploying the HA FortiGate in Active/Active mode listed above.
Deploy the Appliance in Azure
As part of this tutorial, we will look at FortiGate’s Autoscaling deployment as this will allow us to dynamically scale up or down depending on load. In addition, this deployment will provide us high availability, so in the event we lose a VM, network traffic will automatically failover to another appliance.
Architecture
Deployment
- Login to the Azure Portal
- Create two new Resource Groups
- Navigate to All services -> Resource Groups
- Click Add
- Create two new resource groups with the following names (they can be different if you wish, but you will need at least 2)
- Fortigate-Handler-RG
- Fortigate-VMSS-RG
- Create a Service Principal
- Navigate to All services -> Azure Active Directory
- Select App registrations
- Click New Registration
- Name: Fortigate-NVA
- Supported account types: Accounts in this organizational directory only
- Redirect URI: leave blank
- Click Register
- Write down the Application (client) ID, Directory (tenant) ID, and Object ID.
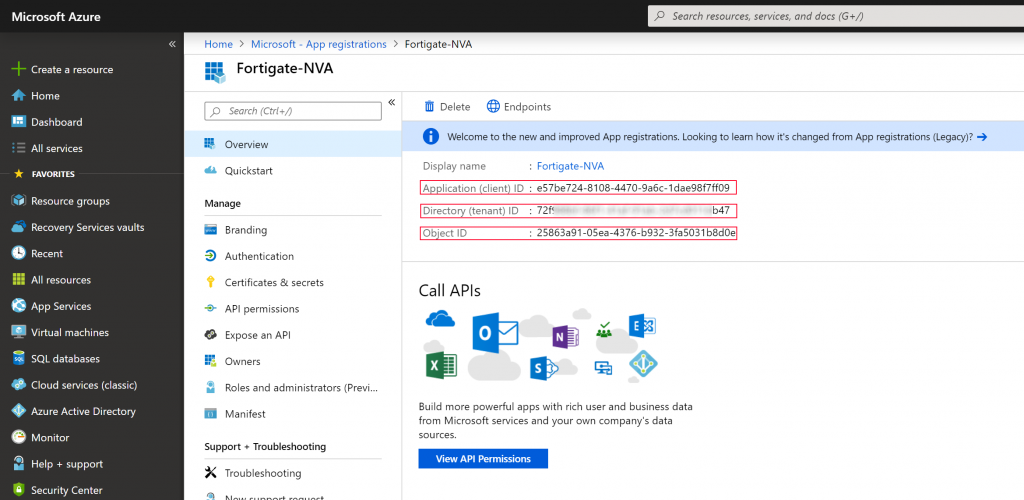
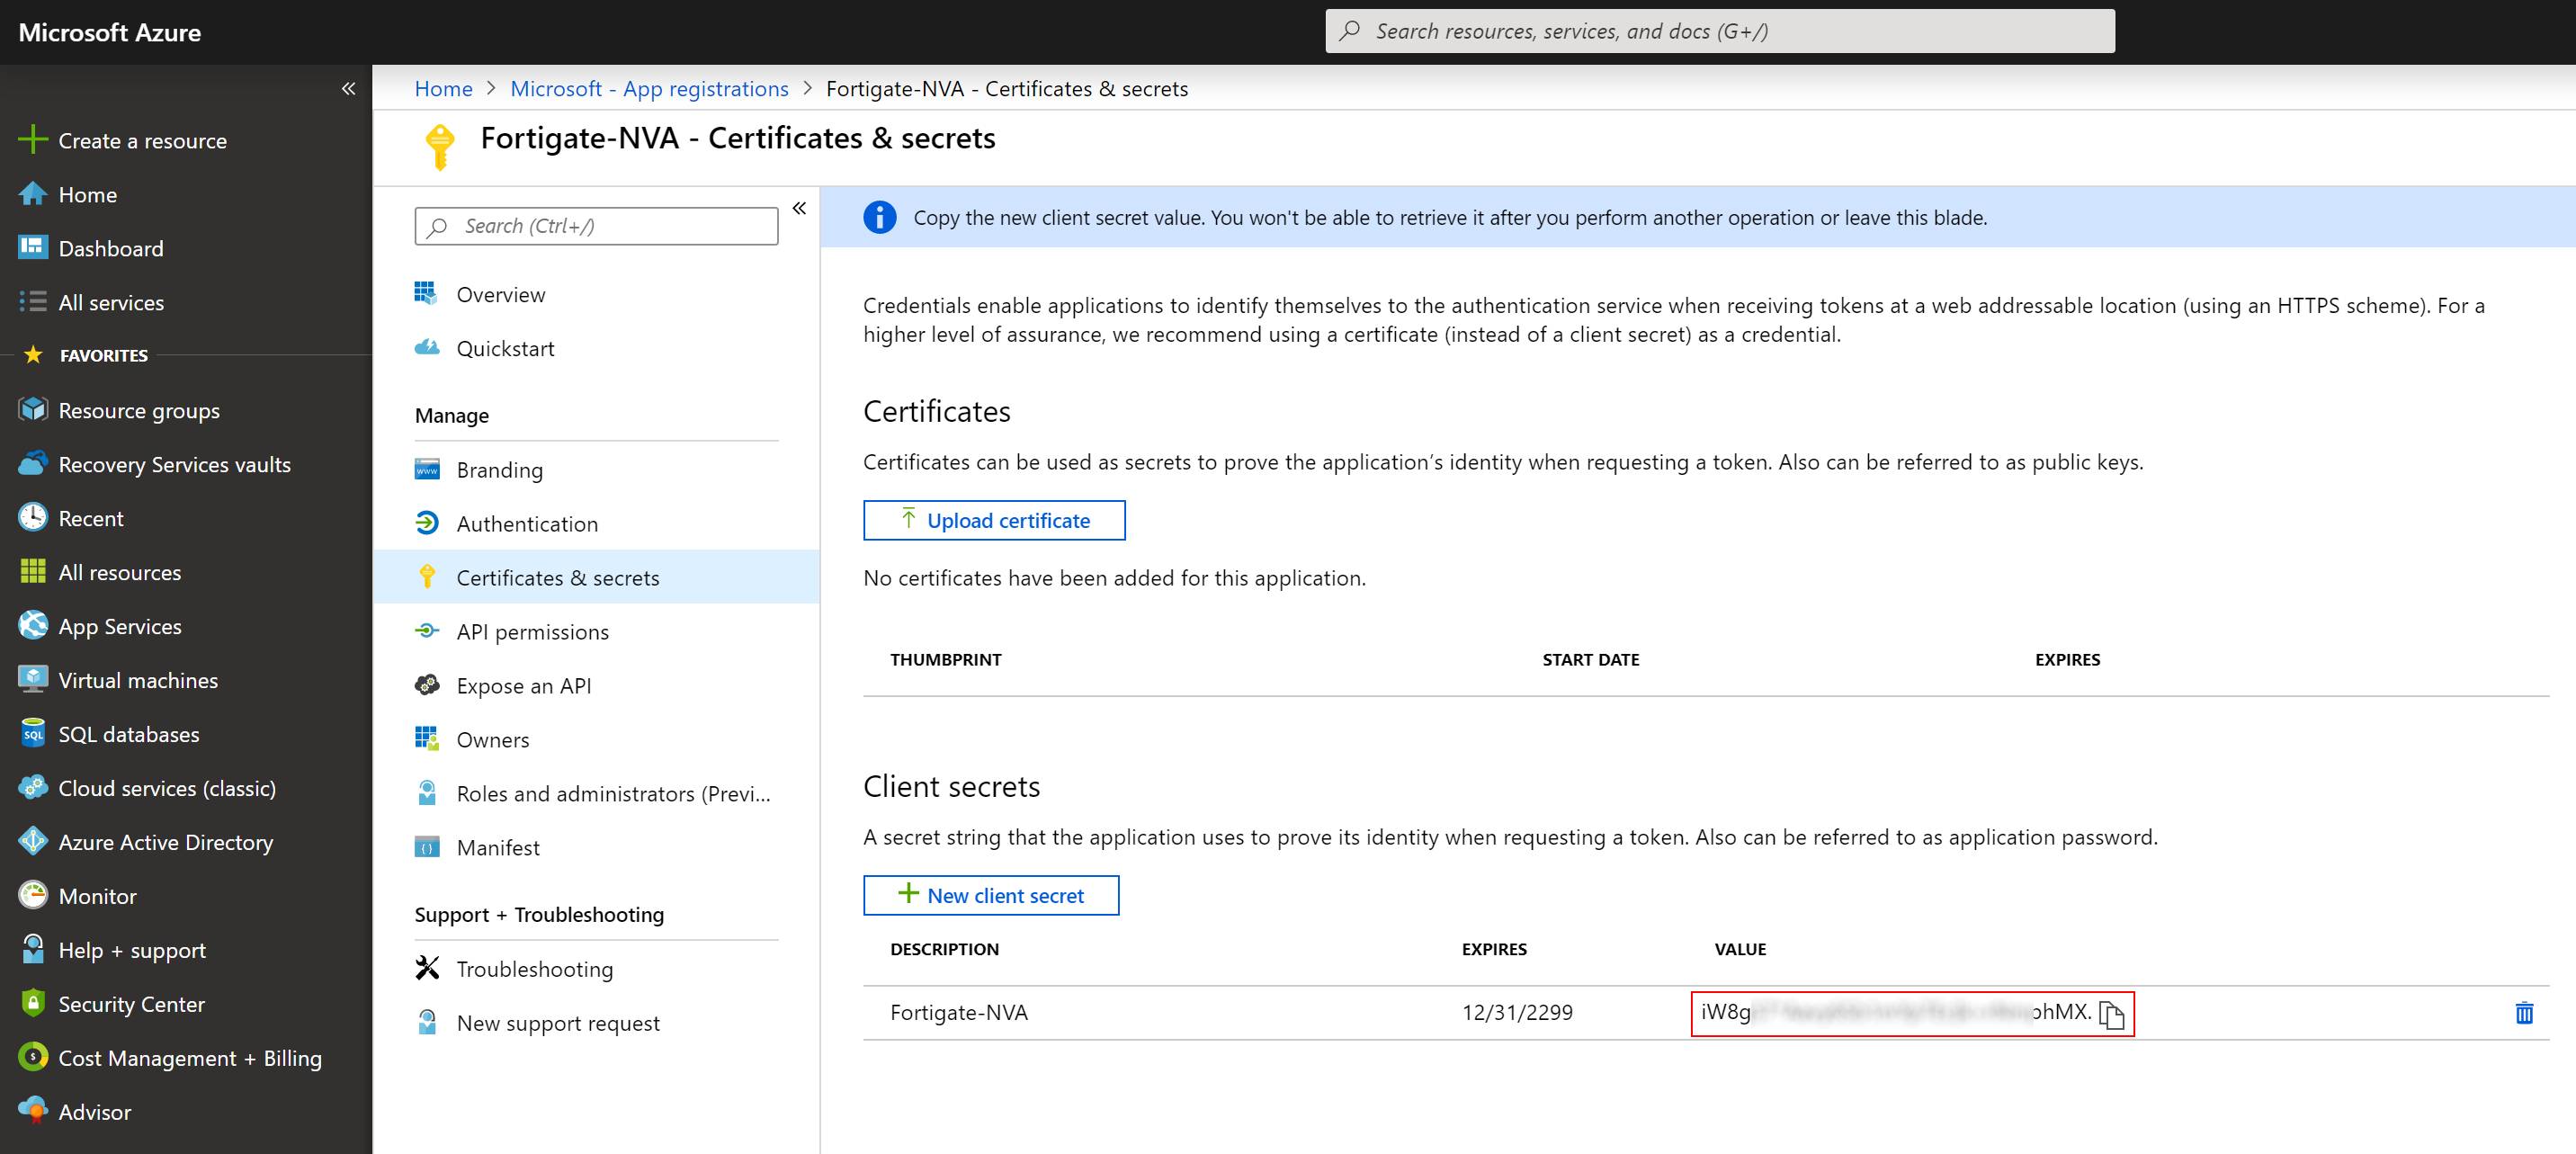
- Click on Certificates & secrets
- Click on the New client secret button and set the description to Fortigate-NVA, set the password expiry to your preference and click Add
- Write down the value of your client secret
- Note: once you navigate away from the blade you won’t be able to retrieve it again

- Note: once you navigate away from the blade you won’t be able to retrieve it again
- Delegate the Service Principal
- Navigate to All services -> Subscriptions -> select your subscription -> and select Access control (IAM)
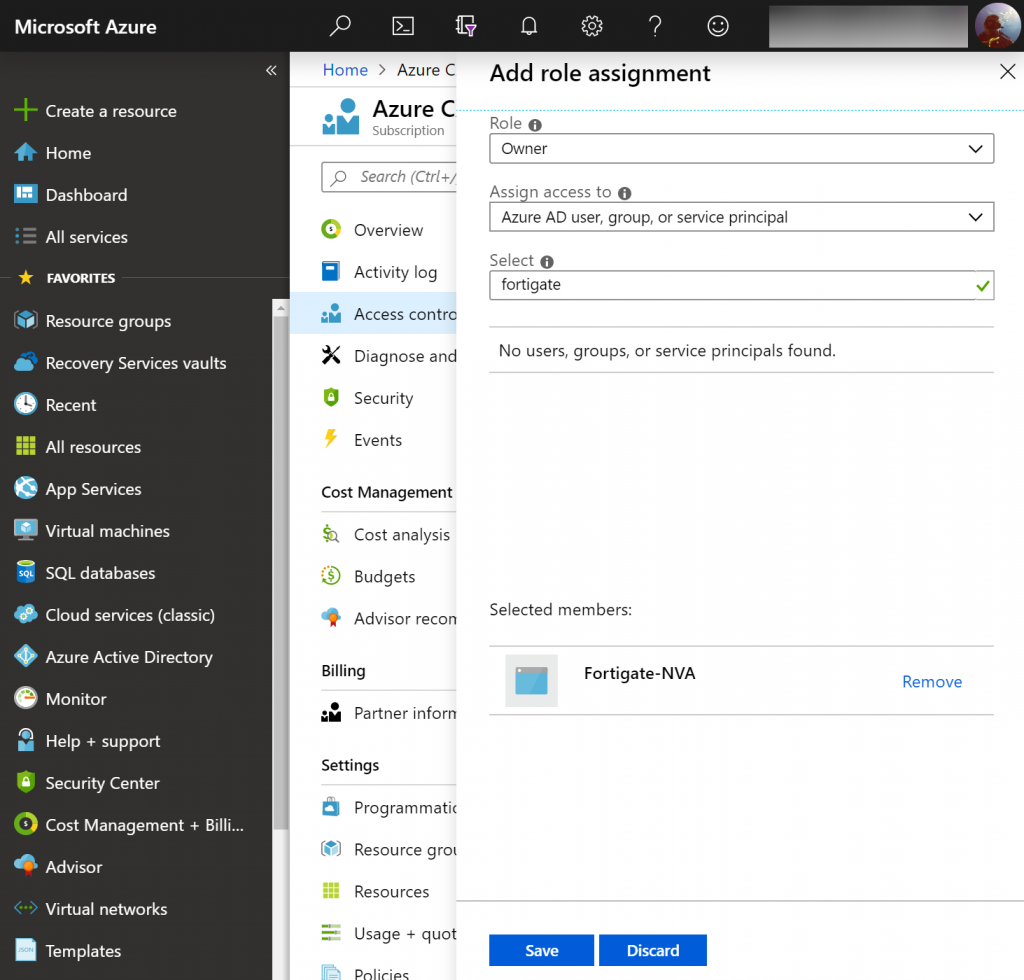
- Click Add, Add role assignment, and use the following configuration
- Role: Owner
- Assign access to: Azure AD user, group, or service principal
- Select: Search for Fortigate-NVA and select it
- Click Save
- Note: I didn’t have a chance to test, but I think these permissions could likely be delegated down at the resource group level vs subscription. If someone could confirm, please leave a comment below.
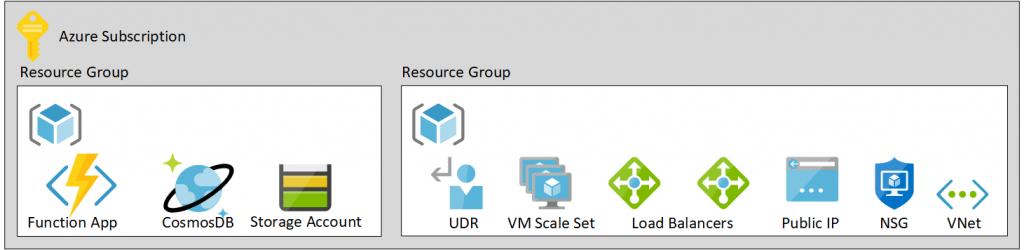
- Deploy the Fortigate Handler (CosmosDB and Function App)

- Once you click the button above to deploy the template, use the following configuration
- Function App Name
- This is the name of the Azure Function resource that gets created. This must be globally unique across all customers within Azure.
- Cosmos DB Name
- Name of the Cosmos DB that will be created. This field must be between 3 and 31 characters and can contain only lowercase letters, numbers and -. This value should be globally unique across all customers within Azure.
- Storage Account Type: Standard_LRS
- Tenant ID
- Use the Directory (tenant) ID from the Service Principal we created earlier.
- Subscription ID
- Enter the subscription ID to the Azure Subscription you wish to deploy to. You can find your subscription ID by navigating to All services -> Subscriptions and selecting your subscription.
- Rest App ID
- Use the Application (client) ID from the Service Principal we created earlier.
- Rest App Secret: iW8gS………………………pMX
- Use the value you wrote down when generating the Client Secret when creating the Service Principal.
- Heart Beat Loss Count: 3
- Number of consecutively lost heartbeats. When the heartbeat loss count has been reached, the VM is deemed unhealthy and failover activities commence.
- Scaling Group Resource Group Name: Fortigate-VMSS-RG
- This is the value of the secret Resource Group you created at the beginning of this guide. This Resource Group will contain the VM Scale Set and it’s corresponding resources.
- Script Timeout: 230
- This is the timeout for the Function App script to run. By default this is 230 seconds.
- Election Wait Time: 90
- This is the maximum time (in seconds) to wait for a master election for the FortiGate’s to complete.
- PSK Secret: mysupersecretpassphrase
- This is a random string of characters used by the FortiGates in the scale set to synchronize configuration items.
- Package Res URL: https://github.com/fortinet/fortigate-autoscale/releases/download/1.0.3/fortigate-autoscale-azure-funcapp.zip
- Grab the latest version of the package for the Azure Function App from GitHub. You can find the latest compiled versions here: https://github.com/fortinet/fortigate-autoscale/releases
- Function App Name
- Deploy the VM Scale Set
- Once you click the button above to deploy the template, use the following configuration
- Instance Type: Standard_F2
- FOS Version: 6.2.1
- VNet New Or Existing: new
- Select whether you wish to use an existing or new Virtual Network
- VNet Name: AzureHubVNet
- The name of the VNet to be used or created.
- Subnet Address Prefix: 10.0.0.0/16
- The address space of the VNet to be used or created.
- Subnet1Name: Untrust
- The name of the subnet that will be public facing to the internet.
- Subnet1Prefix: 10.0.1.0/24
- The address space of the subnet to be created for the public facing zone.
- Subnet2Name: Trust
- The name of the subnet that will contain the private NICs of the FortiGate’s.
- Subnet2Prefix: 10.0.2.0/24
- The address space of the subnet to be created for the private facing zone.
- Subnet2Load Balancer IP: 10.0.2.10
- The IP address of the load balancer in the private zone.
- Subnet3Name: Private
- The name of the subnet that will contain the private machines that are behind the FortiGate appliance.
- Subnet3Prefix: 10.0.3.0/24
- The address space of the subnet that will contain the private machines that are behind the FortiGate. Note: this is more of a place holder in FortiGate’s template, you can create additional subnets later on/use a different subnet for your private resources.
- Public IP New or Existing: new
- The Public IP address to be associated as the VIP of the Azure Load Balancer for incoming traffic.
- Scaling Group Name Prefix: fgtasg
- The prefix each VMSS Name is given when deploying the FortiGate autoscale template. The value of this parameter should be the same as for deploy_funcapp.json. The prefix cannot contain special characters \/””[]:|<>+=;,?*@& or begin with ‘_’ or end with ‘.’ or ‘-‘.
- Initial Capacity: 2
- How many FortiGate’s should be deployed. Default value is 1, however I recommend at least 2 for high availability.
- Min Capacity: 2
- The smallest amount of FortiGate’s that should be running. Default value is 1, however I recommend at least 2 for high availability.
- Max Capacity: 3
- The max amount of FortiGate’s that should be deployed.
- Scale Out Threshold: 80
- Percentage of CPU utilization at which scale-out should occur.
- Scale In Threshold: 20
- Percentage of CPU utilization at which scale-in should occur.
- Admin Username: azureadmin
- FortiGate administrator username on all VMs.
- Admin Password: azurepassword
- FortiGate administrator password on all VMs. This field must be between 11 and 26 characters and must include at least one uppercase letter, one lowercase letter, one digit, and one special character such as (! @ # $ %).
- Endpoint URL: https://yourfunctionappurl.azurewebsites.net
- This can be found by navigating to All services -> Function App -> YourFunctionApp -> URL on the overview blade.


At this point, your FortiGate deployment should be completed. When a FortiGate appliance comes up, it will reach out to the Azure Function to pull down its base configuration. Any changes to the primary FortiGate will be synchronized to any additional FortiGates deployed as well.
For those using a hub/spoke network, you will want to associate a UDR to each of your subnets to force traffic back to the internal load balancer’s VIP. You can do this by creating a new Route Table, add a Route, set the next hop type to Virtual Appliance, and set the IP address to the IP address you specified for the “Subnet2Load Balancer IP”.
You can connect to the primary FortiGate for management via web console on Port 8443 (https://IP.AD.DR.ESS:8443) or via SSH on Port 22.