Introduction: This document shows an example of how to configure a VPN tunnel between 2 SonicWALL firewalls, one running SonicOS Enhanced at the main site (central site) and the other one running SonicOS standard at the remote site. Remote PC’s located behind the SonicWALL appliance on the remote site will obtain IP addresses automatically from a DHCP server located on the LAN zone of the Enhanced unit.
Versions Used: SonicWALL recommends using the latest firmware version on the units. On this document this feature has been tested on SonicOS Enhanced 5.6.0.11-61o and SonicOS Enhanced 4.2.1.0-20e. SonicWALL's original document, which can be found here, shows support for this configuration on SonicOS Enhanced 3.0.0.4-21e and SonicOS Standard 3.0.0.1-28s. Please note that SonicOS Enhanced runs on TZ170, PRO2040, PRO3060, PRO 4060, Pro 5060 models, and NSA 3500. SonicOS Standard only runs on the TZ 150, TZ170, PRO2040, and PRO3060 models. Customers with current service/software support contracts can obtain updated versions of SonicWALL firmware from the MySonicWALL customer portal at https://www.mysonicwall.com. Updated firmware is also freely available to customers who have registered the SonicWALL device on MySonicWALL for the first 90 days.
Network Topology: 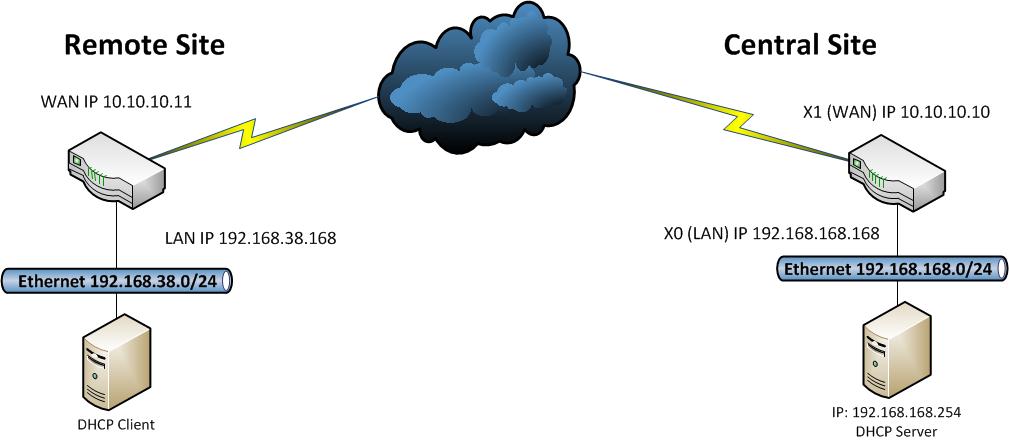
Prerequisites: This guide assumes the following:
- DHCP Server is up and running on the Central Site
- The DHCP Server is in the LAN Zone
- WAN Interfaces have been configured properly for internet access at both the remote and central site
Task List:
- Configurations at the central site:
- Set Firewall Unique Identifier
- Add and configure a VPN policy
- Configure DHCP over VPN
- Configurations at the remote site:
- Set Firewall Unique Identifier
- Add and configure a VPN policy
- Configure DHCP over VPN
- Testing
- Verify that the VPN tunnel comes up
- Verify that the DHCP client at the remote site obtains an IP address
- Verify that traffic flows correctly between the sites
- Verify that the DHCP client has access to its own network
~~~~~~~~~~~~~~~~~~~~~~~~~~~~~~~~~~~~~~~~~~~~~~~~~~~~~~~~~~~~~~~~~~~~~~~~~~~ SonicWALL Central Site Configuration
- Login to your SonicWALL at the Central Site
- Click on VPN->Settings
- In the Unique Firewall Identifier box, enter CentralSite and click Apply
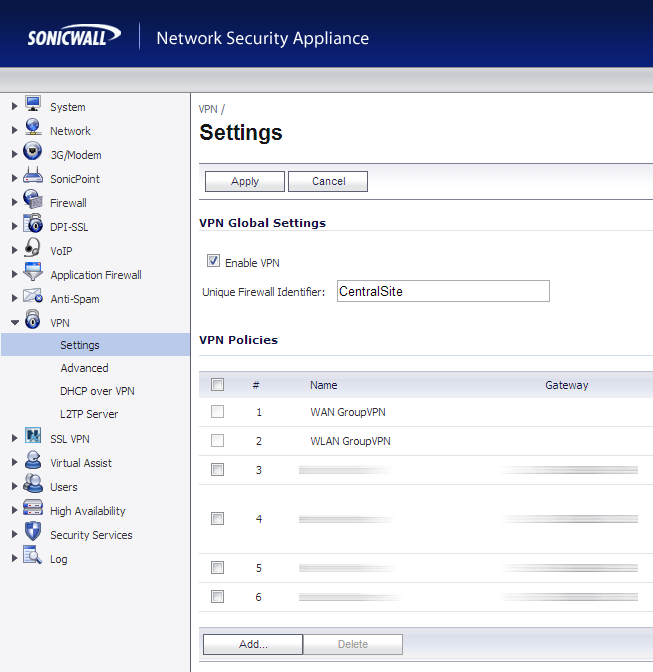
- On the VPN->Settings page, click the Add... button
- Use the configuration below:
- General Tab
- Policy Type: Site to Site
- Authentication Method: IKE using Preshared Secret
- Name: RemoteSite
- IPsec Primary Gateway Name or Address: yourwanipaddressoftheremotesite
- IPsec Secondary Gateway Name or Address: Leave this blank
- Shared Secret: Enter a good long password here!
- Confirm Shared Secret: Enter the same good long password you used above!
- Local IKE ID and Peer IKE ID: Leave these settings their default values

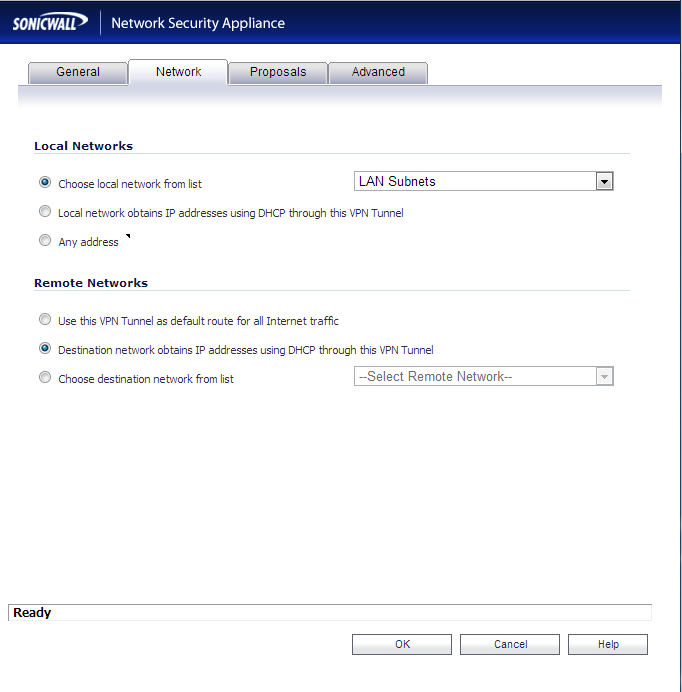
- Network Tab
- Local Networks: Select Choose local network from list and select LAN Subnets
- Remote Networks: Select Destination network obtains IP addresses using DHCP through this VPN tunnel
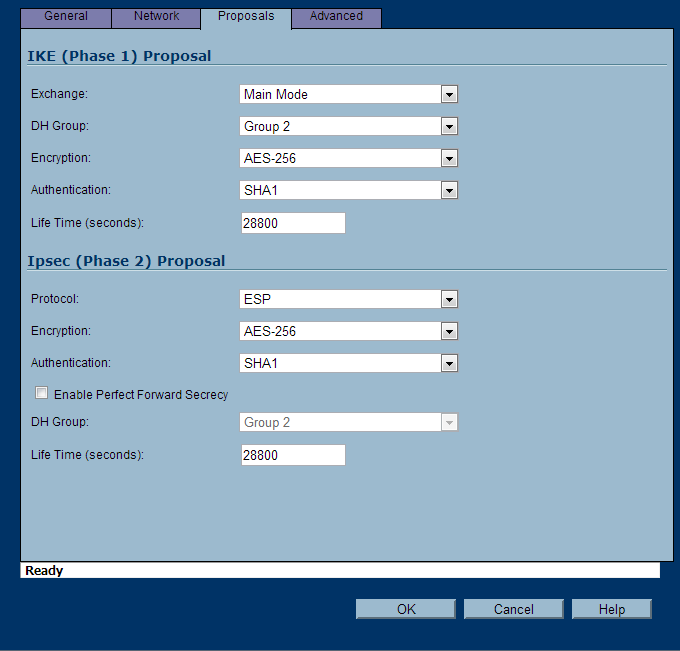
- Proposals Tab
- IKE (Phase 1) Proposal
- Exchange: Main Mode
- DH Group: Group 2
- Encryption: AES-256
- Authentication: SHA1
- Life Time (seconds): 28800
- IKE (Phase 2) Proposal
- Protocol: ESP
- Encryption: AES-256
- Authentication: SHA1
- Enable Perfect Forward Secrecy: unchecked
- Life Time (seconds): 28800

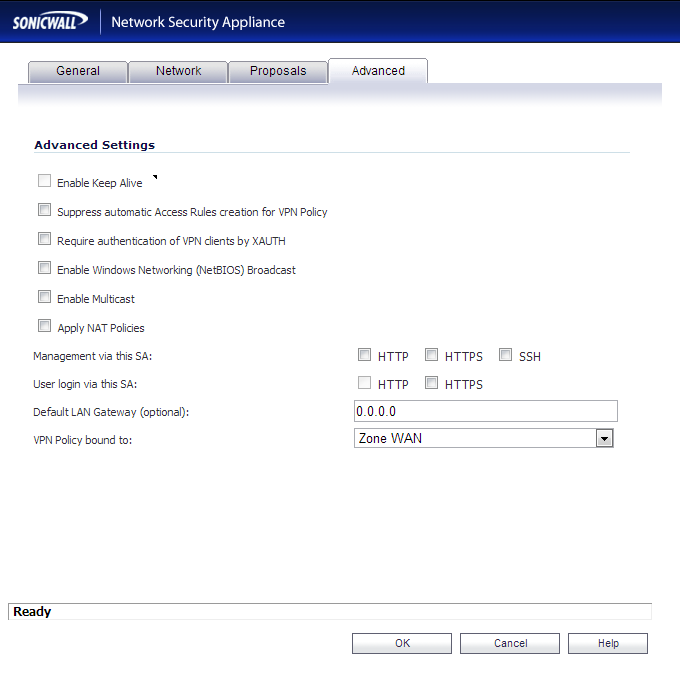
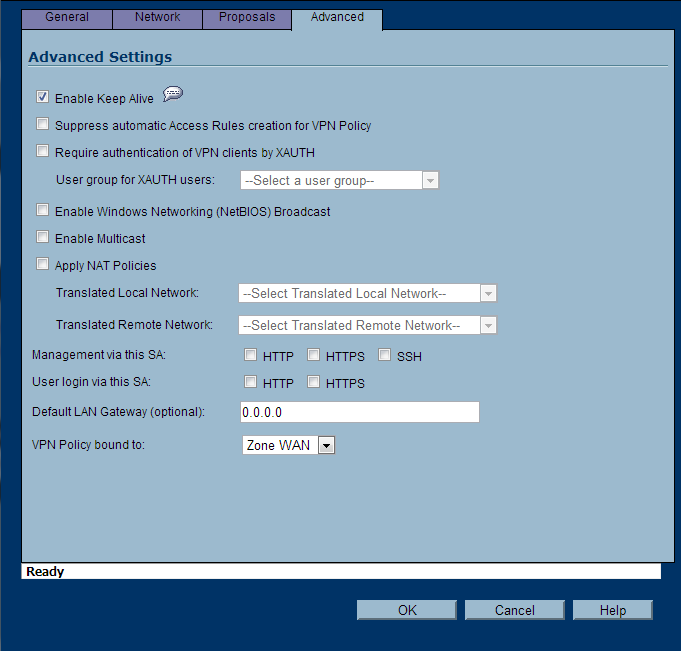
- Advanced Tab
- Enable Keep Alive: this should be unchecked and grayed out
- Suppress automatic Access Rules creation for VPN Policy: unchecked
- Require authentication of VPN clients by XAUTH: unchecked
- Enable Windows Networking (NetBIOS) Broadcast: unchecked
- Enable Multicast: unchecked
- Apply NAT Policies: unchecked
- Management via this SA: all options unchecked
- User login via this SA: all options unchecked
- Defualt LAN Gateway (optional): 0.0.0.0
- VPN Policy bound to: Zone WAN
- Click OK
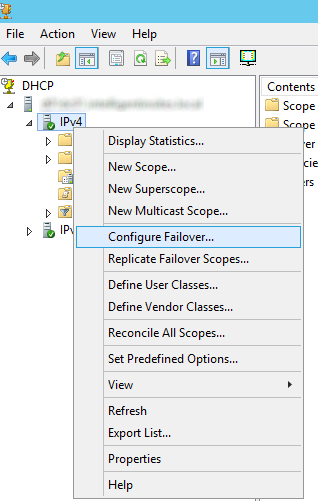
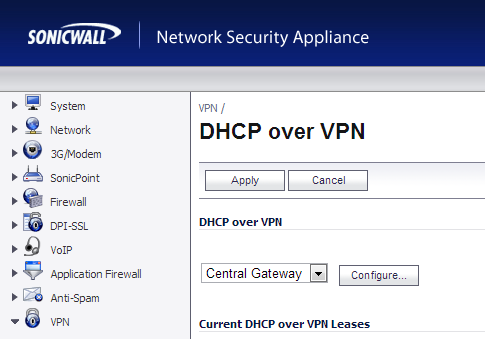
- Click on VPN->DHCP over VPN
- Select Central Gateway from the dropdown and click the Configure... button
- Click on the Add... button and then type in the IP address of your DHCP server at the CentralSite.
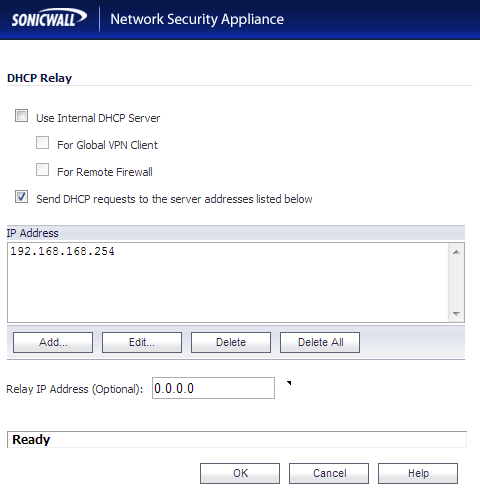
- Click OK
SonicWALL Remote Site Configuration
- Login to your SonicWALL at the remote site
- Click on VPN->Settings
- In the Unique Firewall Identifier box, enter RemoteSite and click Apply

- On the VPN->Settings page, click the Add... button
- Use the configuration below:
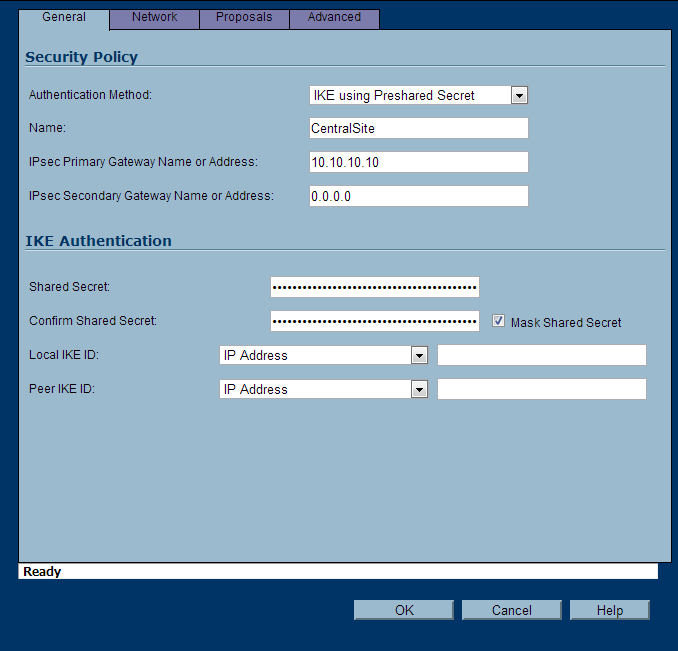
- General Tab
- Authentication Method: IKE using Preshared Secret
- Name: CentralSite
- IPsec Primary Gateway Name or Address: yourwanipaddressofthecentralsite
- IPsec Secondary Gateway Name or Address: Leave this blank
- Shared Secret: Use the same secret as the CentralSite
- Confirm Shared Secret: Use the same password as the CentralSite
- Local IKE ID and Peer IKE ID: Leave these settings their default values
- Network Tab
- Local Networks: Select Local network obtains IP addresses using DHCP through this VPN Tunnel
- Remote Networks: Select Create new address object
- Enter in your CentralSite's LAN information (this will be the network you pull DHCP IPs from.
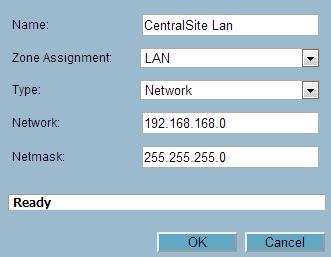
- On the Choose destination network from list, you can now select CentralSite LAN

- Proposals Tab
- IKE (Phase 1) Proposal
- Exchange: Main Mode
- DH Group: Group 2
- Encryption: AES-256
- Authentication: SHA1
- Life Time (seconds): 28800
- IKE (Phase 2) Proposal
- Protocol: ESP
- Encryption: AES-256
- Authentication: SHA1
- Enable Perfect Forward Secrecy: unchecked
- Life Time (seconds): 28800
- Advanced Tab
- Enable Keep Alive: check this option if it is not grayed out
- Suppress automatic Access Rules creation for VPN Policy: unchecked
- Require authentication of VPN clients by XAUTH: unchecked
- Enable Windows Networking (NetBIOS) Broadcast: unchecked
- Enable Multicast: unchecked
- Apply NAT Policies: unchecked
- Management via this SA: all options unchecked
- User login via this SA: all options unchecked
- Defualt LAN Gateway (optional): 0.0.0.0
- VPN Policy bound to: Zone WAN
- Click OK
~~~~~~~~~~~~~~~~~~~~~~~~~~~~~~~~~~~~~~~~~~~~~~~~~~~~~~~~~~~~~~~~~~~~~~~~~~~ Testing/Verification
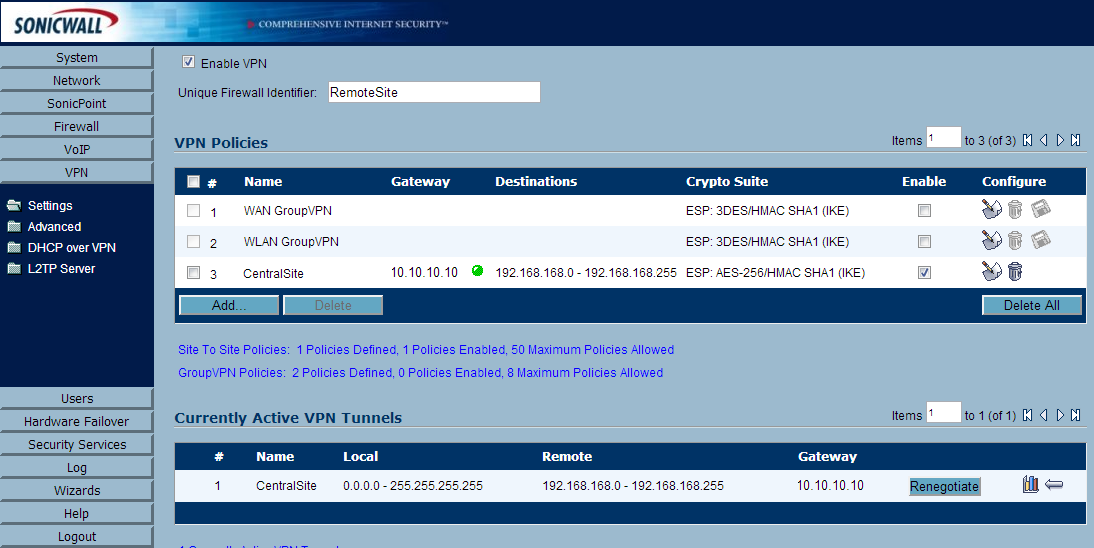
- Open up one of the SonicWALL devices (either Central or Remote) and head over to VPN->Settings
- You should see a green dot indicating the connection is active. Additionally, at the bottom of the same page, you can see the "Current Active VPN Tunnels". You should see the tunnel has been established their as well.

- Active connections from the RemoteSite's SonicWALL
- Next, head over to a workstation on the RemoteSite's network.
- Type ipconfig /release on the workstation
- Type ipconfig /renew on the workstation
- Type ipconfig and verify the IP address is in the correct range from the Central Site.
- On the CentralSite's SonicWALL, go to VPN->DHCP over VPN
- Under Current DHCP over VPN Leases, you should see your client
- Try to ping a server at the CentralSite, you should receive a successful reply.