Tag Archives: Lync Server 2013

[Tutorial] Configuring Lync Server 2013 to block calls based on Caller ID

Synopsis: Out of the box, Lync Server 2013 does not have any way to block specific calls destined to any user or specific user inside of an organization.  However, Microsoft added in the ability for users/partners/etc. to write custom scripts to help allow flexibility in Lync.  That being said, this tutorial will go over deploying a custom script to allow Lync Server to block calls based on caller ID.

Before we begin, I would like to give credit to a few individuals.  This guide will make use of David Paulino's guide/script for Lync Server 2013 (http://uclobby.com/2014/07/31/calleridblock/), which was a converted script from VoIP Norm's original Lync Server 2010 script (http://voipnorm.blogspot.co.uk/2011/06/blocking-calls-in-lync-based-on-caller.html).  The only changes in this article is a more step-by-step deployment guide as well as the ability to control blocking of numbers at a user level and the ability to optionally leave comments on why a rule was added.

Tutorial

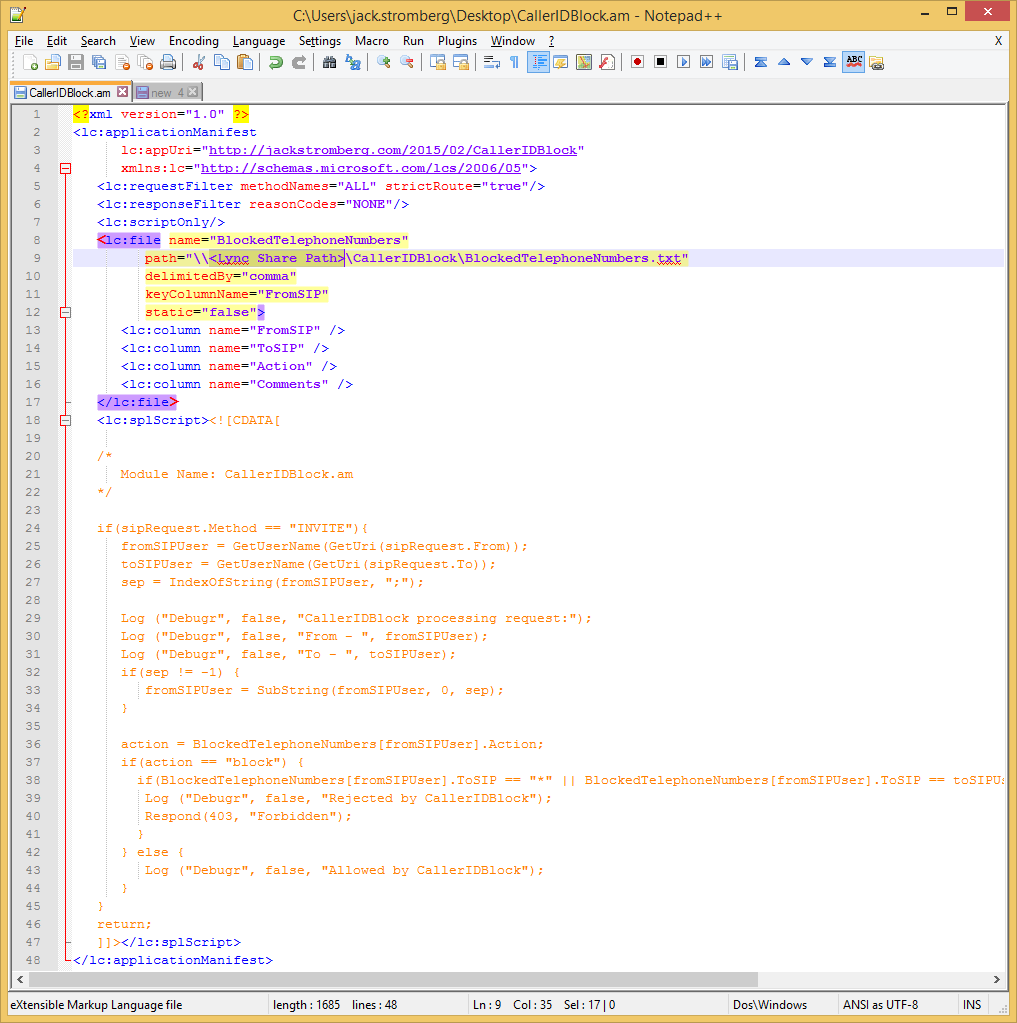
  1. Download a copy of the CallerIDBlock.am.txt script (or copy and paste this script into a file called CallerIDBlock.am) (if you downloaded this file, make sure you remove the .txt at the end)
    1. <?xml version="1.0" ?>
      <lc:applicationManifest
      lc:appUri="http://jackstromberg.com/2015/02/CallerIDBlock"
      xmlns:lc="http://schemas.microsoft.com/lcs/2006/05">
      <lc:requestFilter methodNames="ALL" strictRoute="true"/>
      <lc:responseFilter reasonCodes="NONE"/>
      <lc:scriptOnly/>
      <lc:file name="BlockedTelephoneNumbers"
      path="\\<Lync Share Path>\CallerIDBlock\BlockedTelephoneNumbers.txt"
      delimitedBy="comma"
      keyColumnName="FromSIP"
      static="false">
      <lc:column name="FromSIP" />
      <lc:column name="ToSIP" />
      <lc:column name="Action" />
      <lc:column name="Comments" />
      </lc:file>
      <lc:splScript><![CDATA[
      /*
      Module Name: CallerIDBlock.am
      */if(sipRequest.Method == "INVITE"){
      fromSIPUser = GetUserName(GetUri(sipRequest.From));
      toSIPUser = GetUserName(GetUri(sipRequest.To));
      sep = IndexOfString(fromSIPUser, ";");Log ("Debugr", false, "CallerIDBlock processing request:");
      Log ("Debugr", false, "From - ", fromSIPUser);
      Log ("Debugr", false, "To - ", toSIPUser);
      if(sep != -1) {
      fromSIPUser = SubString(fromSIPUser, 0, sep);
      }

      action = BlockedTelephoneNumbers[fromSIPUser].Action;
      if(action == "block") {
      if(BlockedTelephoneNumbers[fromSIPUser].ToSIP == "*" || BlockedTelephoneNumbers[fromSIPUser].ToSIP == toSIPUser){
      Log ("Debugr", false, "Rejected by CallerIDBlock");
      Respond(403, "Forbidden");
      }
      } else {
      Log ("Debugr", false, "Allowed by CallerIDBlock");
      }
      }
      return;
      ]]></lc:splScript>
      </lc:applicationManifest>

  2. Download a copy of the BlockedTelephoneNumbers.txt file (or copy and paste the code below into a file called BlockedTelephoneNumbers.txt)
    1. FromSIP,ToSIP,Action,Comments
  3. Edit the CallerIDBlock.am file and change the BlockedTelephoneNumbers path to be your fileshare
    CallerIDBlock - LyncPath - Notepad
  4. Edit the list of blocked numbers inside the BlockedTelephoneNumbers.txt file
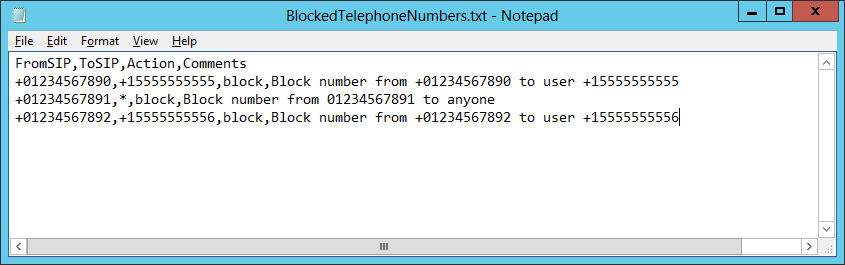
    1. Notes: The FromSIP address is the Caller ID of the incoming call; the ToSIP is the individual that is trying to be reached (side-note, in this particular script, if you set this field so an asterisk (*), this will be a wildcard for any/every user; the Action should be set to "block" to block the call; the Comments field is an optional field to document when/why the number was added to be blocked
      BlockedTelephoneNumbers Example
  5. Create a new folder where your Lync share is
    LyncShare - CallerIDBlock
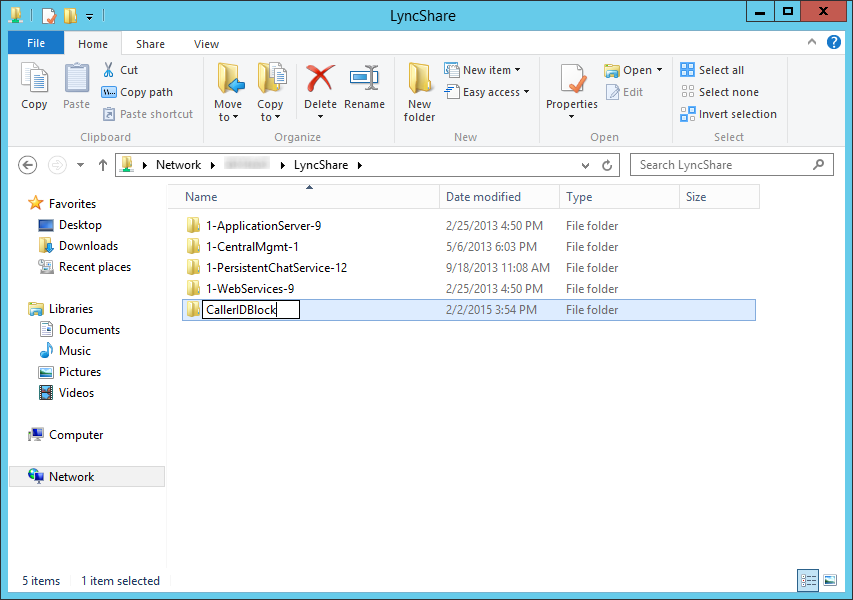
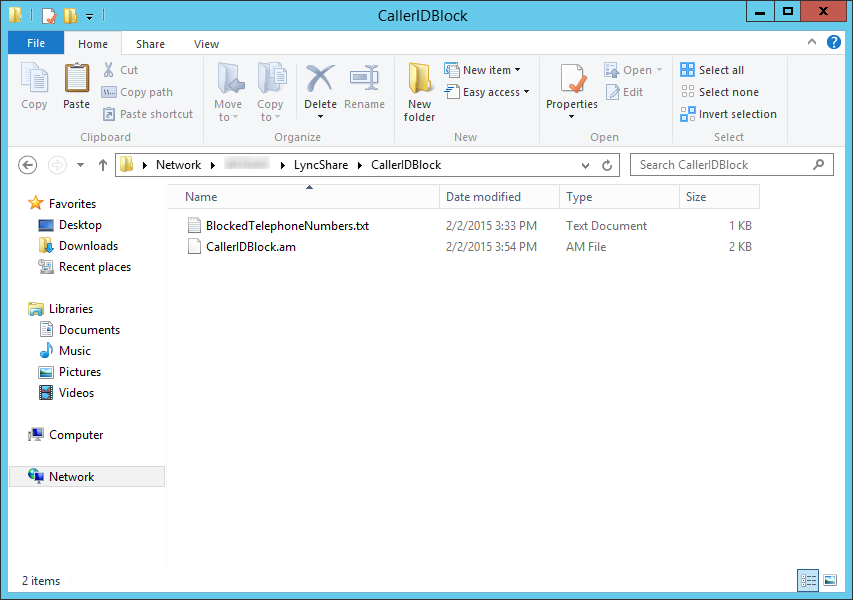
  6. Copy the CallerIDBlock.am and BlcokedTelephoneNumbers.txt files to your Lync Share where your new CallerIDBlock folder is
    LyncShare - CallerIDBlock - Script and Numbers
  7. Add the CallerIDBlock script as a Lync Server Application
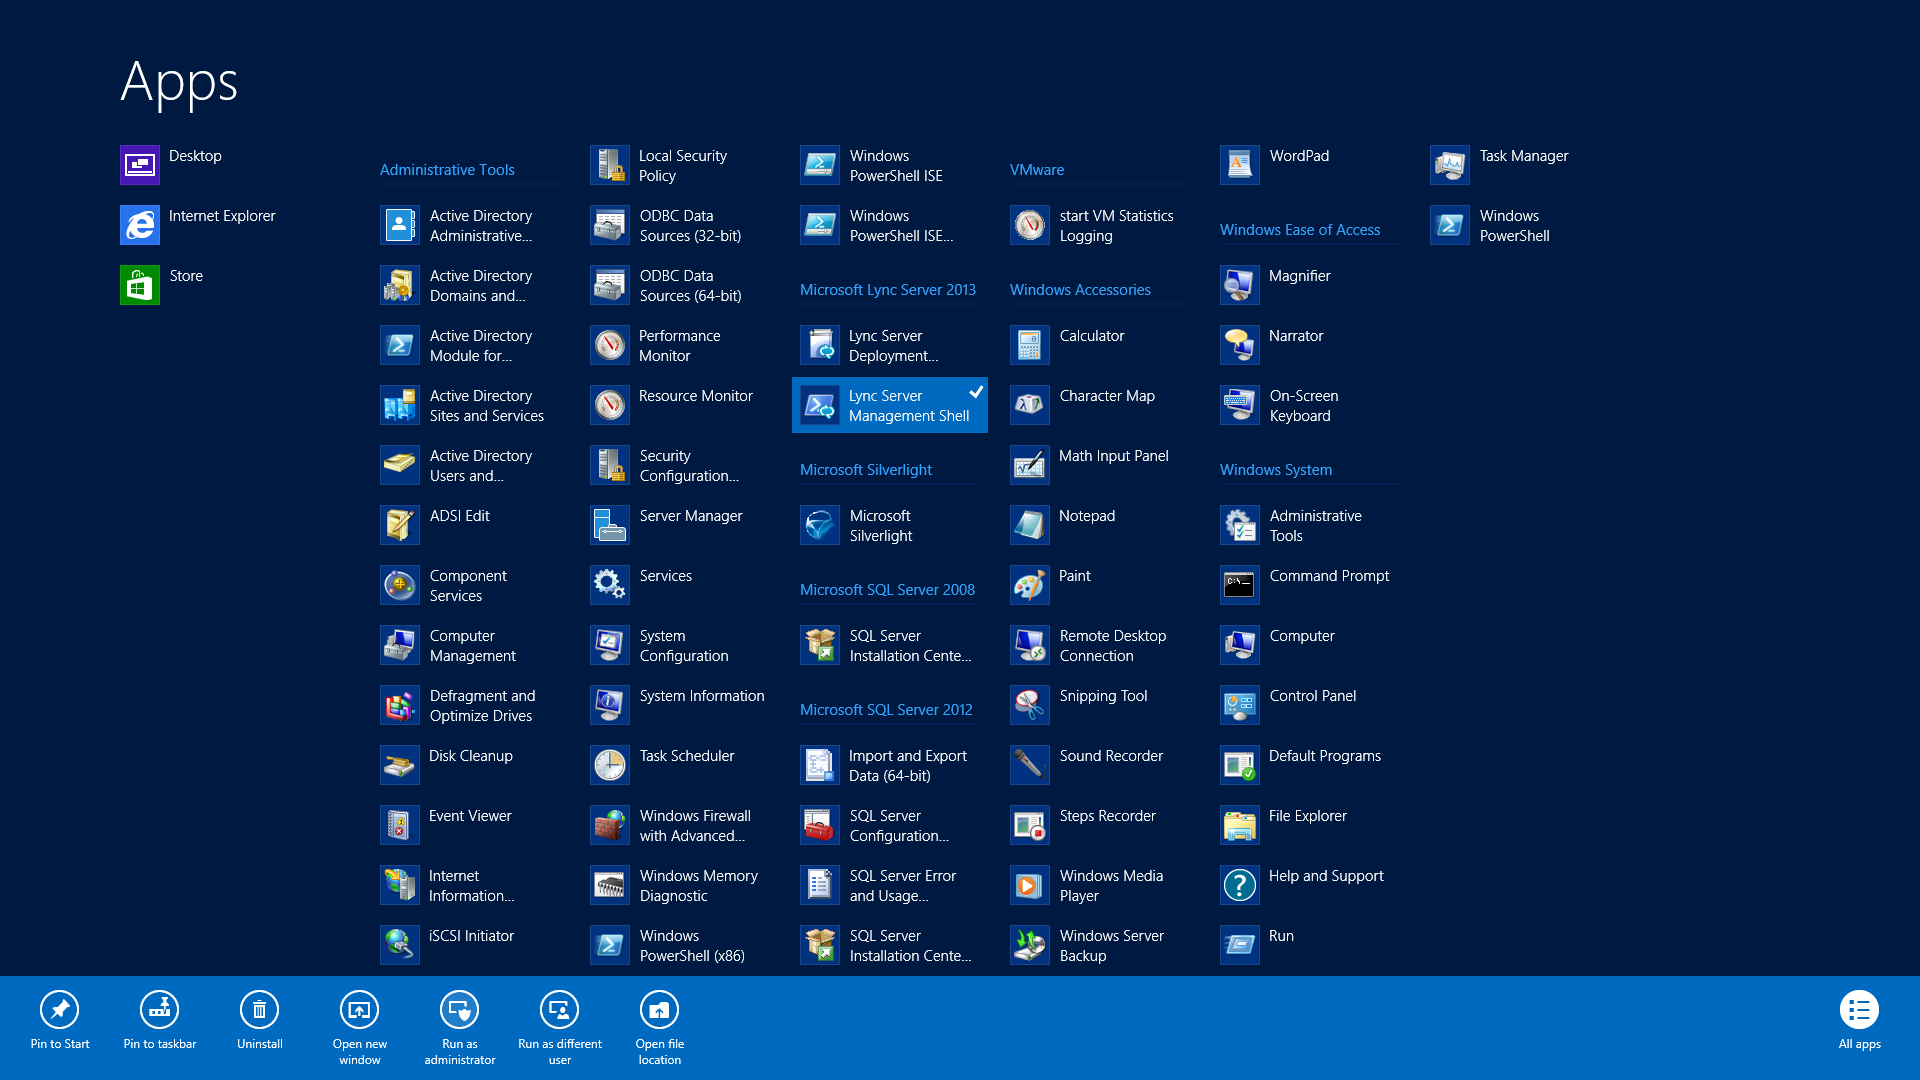
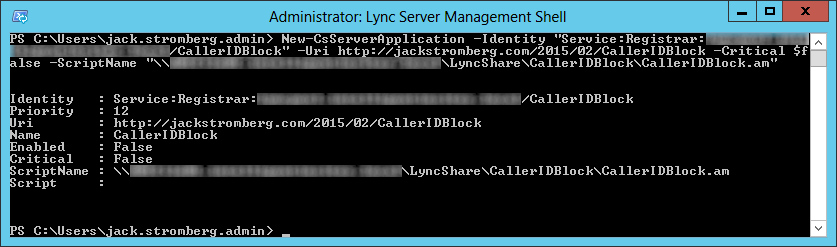
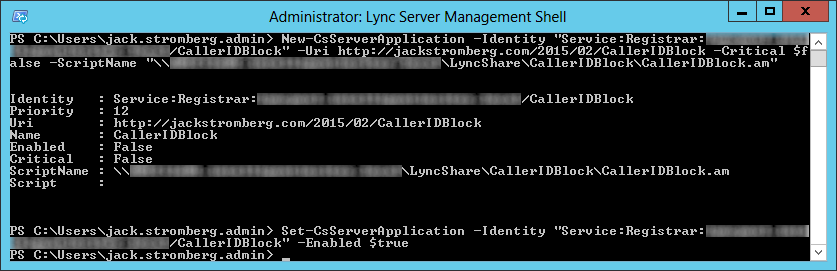
    1. Open up the Lync Server Manage Shell as an Administrator
      Lync Server Management Shell - Run as administrator
    2. New-CsServerApplication -Identity "Service:Registrar:<Lync Front End Pool>/CallerIDBlock" -Uri http://jackstromberg.com/2015/02/CallerIDBlock -Critical $false -ScriptName "\\<Lync Share Path>\CallerIDBlock\CallerIDBlock.am"
      New-CsServerApplication -Identity CallerIDBlock
  8. Enable the CallerIDBlockLync Server Application
    1. Set-CsServerApplication -Identity "Service:Registrar:<Lync Front End Pool>/CallerIDBlock" -Enabled $true
      Set-CsServerApplication -Identity CallerIDBlock
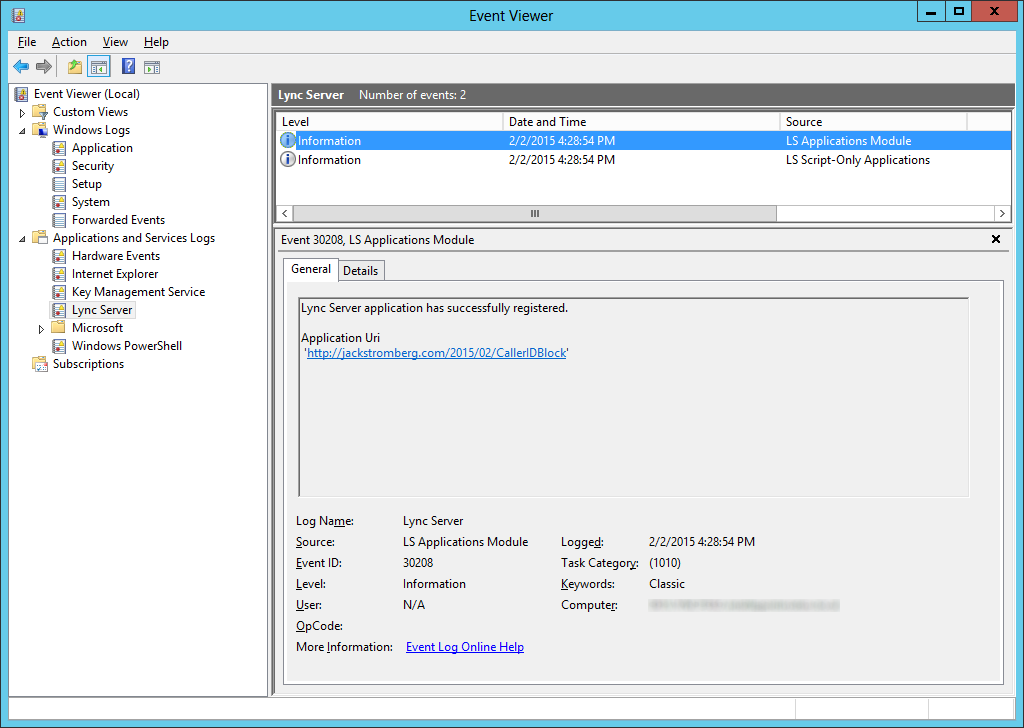
  9. Verify the script is actively listening for calls
    1. Open up Event Viewer, navigate to Applications and Services Logs, Lync Server, and verify you see Event ID 30208
      Event Viewer - Applications and Services Logs - Lync Server - Event ID 30208

[Tutorial] Deploying a reverse proxy for Lync Server 2013

In this tutorial we will go over deploying a reverse proxy for Lync Server 2013.  The original method for deploying a reverse proxy was to use Microsoft's product ForeFront TMG (Threat Management Gateway), however shortly after the release of Lync Server 2013, TMG was discontinued.  In turn, a few tutorials have popped up on how to achieve this using Apache and IIS, but there wasn't an official recommendation on what to use until Server 2012 was released.

Per Microsoft's documentation, we can use IIS with an additional extension called Application Request Routing to achieve this task: http://technet.microsoft.com/en-us/library/gg398069.aspx

Details on the IIS Application and Request Routing extension can be found here: http://www.iis.net/downloads/microsoft/application-request-routing

Side note, much of this guide is largely based on an older technet article published here, which has some additional fine details on how exactly IIS is working to proxy the requests: http://blogs.technet.com/b/nexthop/archive/2013/02/19/using-iis-arr-as-a-reverse-proxy-for-lync-server-2013.aspx

This tutorial will go over installation instructions from start to finish for Server 2012 and Server 2012 R2.  I have attached the links on how to get Server 2008 and Server 2008 R2 prepped, so you can continue the tutorial once the IIS Application Request Routing extension has been installed.

Download Prerequisite Software

  1. Windows Server 2012 R2
    1. Download IIS Application Request Routing (ARR): http://www.microsoft.com/web/gallery/install.aspx?appid=ARRv3_0
  2. Windows Server 2012
    1. Download (don't install yet) Hotfix for Microsoft Application Request Routing Version 2.5 for IIS7 (KB 2732764) (x64)
    2. Download IIS Application Request Routing (ARR): http://www.microsoft.com/web/gallery/install.aspx?appid=ARRv2_5
  3. Windows Server 2008 and 2008 R2
    1. Ensure you have IIS v7.X installed; instructions on how to do this can be found here: http://www.iis.net/learn/install/installing-iis-7/installing-iis-7-and-above-on-windows-server-2008-or-windows-server-2008-r2
    2. Install Application Request Routing version 2
      1. Instructions can be found here: http://www.iis.net/learn/extensions/installing-application-request-routing-(arr)/install-application-request-routing-version-2

Install IIS for Server 2012 and Server 2012 R2

  1. Please follow my tutorial here: http://jackstromberg.com/2014/11/tutorial-how-to-install-iis-on-server-2012-and-server-2012-r2/

Installing IIS Application Request Routing (ARR) 3

  1. Run the ARRv3_0.exe application as an administrator
    ARRv3_0 - Run as administrator
  2. Click Install
    Web Platform Installer 5.0 - Aplication Request Routing 3.0 - Cart

    1. Note:  The cart for the v3.0 installer is shown above.  If you are running version 2.5, you will see 2 items needed for install.  Version 3, only needs one.  This is okay.
      Web Platform Installer 5.0 - Aplication Request Routing 2.5 - Cart
  3. Click I Accept
    Web Platform Installer 5.0 - Aplication Request Routing 3.0 - I Accept
  4. Click Finish
    Web Platform Installer 5.0 - Aplication Request Routing 3.0 - Finish
  5. Click Exit
    Web Platform Installer 5.0 - Aplication Request Routing 3.0 - Exit

Configuring IIS for SSL

  1. Open up Internet Information Services (IIS) Manager
    Server Manager - Tools - Internet Information Services IIS Manager
  2. Select your server and double click on Server Certificates
    LyncRP - Internet Information Services IIS Manager - Home - Server Certificates
  3. Generate or Import your SSL Certificate trusted by a public CA (VeriSign, GoDaddy, etc.)
    1. Note: Generation of this certificate is outside the scope of this tutorial.  This SSL certificate should be the UCC certificate that allows for SAN addresses such aslync, meet, dialin, lyncdiscover, etc.
      LyncRP - Internet Information Services IIS Manager - Server Certificates
  4. Expand your server, expand Sites, select Default Web Site, select Bindings...
    LyncRP - Internet Information Services IIS Manager - Sites - Default Web Site - Bindings
  5. Click on Add...
    LyncRP - Internet Information Services IIS Manager - Sites - Default Web Site - Bindings - Add
  6. Select https, and choose your SSL certificate you imported in the previous step, click OK
    LyncRP - Internet Information Services IIS Manager - Sites - Default Web Site - Bindings - Add - https
  7. Click Close
    LyncRP - Internet Information Services IIS Manager - Sites - Default Web Site - Bindings - Add - Close

Create Server Farms

  1. Select Server Farms and then click on Create Server Farm...
    LyncRP - Internet Information Services IIS Manager - Server Farms - Create Server Farm
  2. Enter in the Server farm name and click Next
    1. Note: We will end up creating farm names for each externally published URL.  This can be lync, dialin, meet, etc, order will not matter. For the sake of this tutorial, I am going to use lync first.
      LyncRP - Internet Information Services IIS Manager - Server Farms - Create Server Farm - Server Farm Name
  3. Enter the Server address (same as farm name before), click Advanced Settings..., expand applicationRequestRouting
    LyncRP - Internet Information Services IIS Manager - Server Farms - Create Server Farm - Add Server
  4. Change the httpPort to 8080 and httpsPort to 4443 and click Add
    LyncRP - Internet Information Services IIS Manager - Server Farms - Create Server Farm - Add Server - applicationRequestRouting Ports
  5. Click Finish
    LyncRP - Internet Information Services IIS Manager - Server Farms - Create Server Farm - Add Server - applicationRequestRouting Ports - Finish
  6. Click Yes on the Rewrite Rules dialog
    LyncRP - Internet Information Services IIS Manager - Server Farms - Create Server Farm - Add Server - applicationRequestRouting Ports - Finish - Rewrite Rules Dialog
  7. Repeat steps 1-6 for dialin, meet, and lyncdiscover
    LyncRP - Internet Information Services IIS Manager - Server Farms - meet-dialin-lyncdiscver
  8. For your Lync Web Apps server (lyncwac), continue repeat steps 1-6, however ensure you use ports 80 and 443 instead of 8080 and 4443.  This is needed to communicate properly with the WAC server.
    LyncRP - Internet Information Services IIS Manager - Server Farms - Create Server Farm - Add Server - lyncwacLyncRP - Internet Information Services IIS Manager - Server Farms - meet-dialin-lyncdiscver-lyncwac

Configure IIS Caching, Proxy Timeouts, and Routing Rules

For each of the server farms we created, repeat the following steps:

  1. Select a Server Farm and double click on Caching
    LyncRP - Internet Information Services IIS Manager - Server Farms - Caching
  2. Uncheck Enable disk cache and click Apply
    LyncRP - Internet Information Services IIS Manager - Server Farms - Caching - Uncheck Enable disk cache
  3. Select the same Server Farm object and double click on Proxy
    LyncRP - Internet Information Services IIS Manager - Server Farms - Proxy
  4. Change the Time-out (seconds) from 30 seconds to 600 and click Apply
    1. Note: This is needed to prevent the Lync Web Apps server from timing out unexpectedly.  Microsoft recommends this setting to be 200, but this isn't long enough for iOS clients.  Increasing this to 600 will fix the issue where iOS clients prompt with the following error message "Your server configuration has changed. Please restart Lync.".LyncRP - Internet Information Services IIS Manager - Server Farms - Proxy - Time-out 200
  5. Select the same Server Farm object and double click on Routing Rules
    LyncRP - Internet Information Services IIS Manager - Server Farms - Routing Rules
  6. Uncheck Enable SSL offloading and click Apply
    LyncRP - Internet Information Services IIS Manager - Server Farms - Routing Rules - Uncheck Enable SSL offloading

Configure IIS URL Rewrites

  1.  Select your IIS Server and double click on URL Rewrite
    LyncRP - Internet Information Services IIS Manager - URL Rewrite
  2. Go through and Remove all of the non _SSL Inbound Rules
    LyncRP - Internet Information Services IIS Manager - URL Rewrite - Remove - Non-SSL
    The result should look like this:
    LyncRP - Internet Information Services IIS Manager - URL Rewrite - Remove - Non-SSL - Removed
  3. Select a rule and click on Add... underneath the Conditions actions pane
    LyncRP - Internet Information Services IIS Manager - URL Rewrite - Add
  4. Enter {HTTP_HOST} for the Condition input and enter role.* for your Pattern
    1. Where role is meet, dialin, lyncdiscover, etc.
      LyncRP - Internet Information Services IIS Manager - URL Rewrite - Add - HTTP_HOST
  5. Repeat steps 3-4 for each SSL rule for a result like this
    LyncRP - Internet Information Services IIS Manager - URL Rewrite - Rules

That should be it! 🙂

[Tutorial] Setting up and installing persistent chat for Lync Server 2013

Here is how to configure persistent chat for your Lync 2013 deployment.

  1. Login to your Lync Front End Server and start the Lync Server Topology Builder
  2. When the Topology Builder window opens, select Download Topology from existing deployment and select OK
    Download Topology from existing deployment
  3. Save the file to your desktop
    Save current topology
  4. Expand Lync Server -> Your Site -> Lync Server 2013 -> Persistent Chat pools
  5. Right click Persistent Chat pools and select New Persistent Chat Pool...
    Create new persistent chat pool
  6. On the Define the fully qualified domain name (FQDN) page, enter the FQDN your standard front end server and check Single computer pool.  If you want to deploy a highly available environment for persistent chat, you will need to deploy 2 new machines to put into a persistent chat pool and check Multiple computer pool.  It is not supported by Microsoft at this time to collocate the persistent chat service on the same machines in an enterprise front end pool.  Once done, click Next.
    Define New Persistent Chat Pool

    1. In this tutorial, I am going to go over deploying persistent chat in a highly available environment.
  7. If you clicked on Multiple computer pool, enter in the machine names where the persistent chat service will be installed, and click Next.
    Define computers in persistent chat pool
  8. On the Define properties of the Persistent Chat pool page, enter in the Display name of the Persistent Chat pool (you can name this whatever you would like to) and click Next
    Define properties of the persistent chat pool
  9. Select the SQL Server store you wish to use and select Next
    Define SQL Server Store for the persistent chat pool
  10. Select or create a new file store and click Next
    Define the file store for the persistent chat pool
  11. Select the Front End pool/server as the next hop pool and click Finish
    Define the next hop server for the persistent chat pool
  12. Once done with the Persistent Chat wizard, right click on Lync Server in the Topology Builder and select Publish Topology...
    Publish the Topology
  13. Click Next on the Publish the topology window
    Publish the Topology Wizard
  14. Click Next on the Create databases screen
    Publish the Topology Wizard - Create databases
  15. Click Finish once the topology has been published
    Publish the Topology - complete
  16. Complete the following steps on each of the Persistent Chat servers you created
    1. Login to the server that will be running the persistent chat service
    2. Copy/mount the Lync Server 2013 installation media
    3. Run the setup.exe program from the Lync Server 2013 installation media
      Lync Server 2013 Installation Media - Setup
    4. Click Yes on the "In order to run the software on this CD, the Microsoft Visual C++ 2012 x64 Minimum Runtime - 11.0.50727 Package must be installed." Dialog box.
      Lync Server 2013 Visual C++ Library
    5. Click Install on the Microsoft Lync Server 2013 dialog box
      Lync Server 2013 Installation Path
    6. Check I accept the terms in the license agreement and click OK
      Lync Server 2013 Installation EULA
    7. Once installed, click on Install or Update Lync Server System
      Lync Server 2013 - Install or Update Lync Server System
    8. Click Run next to Step 1: Install Local Configuration Store
      Lync Server 2013 - Step 1
    9. Check Retrieve directly from the Central Management store and click Next
      Lync Server 2013 - Retrieve Central Management Store
    10. Click Finish once the installation has completed.
      (oops, no picture for this one :()
    11. Click Run next to Step 2: Setup or Remove Lync Server Components
      Run Step 2 Setup or Remove Lync Server Components
    12. Click Next
      Set up Lync Server Components
    13. Click Finish
      Set up Lync Server Components - Finish
    14. Click Run next to Step 3: Request, Install or Assign Certificates
      Step 3 - Request, Install or Assign Certificates
    15. Click Request on the Certificate Wizard screen
      Certificate Wizard - Request
    16. Check Send the request immediately to an online certification authority and hit Next
      Certificate Request - Send the request immediately to an online certification authority
    17. Click Next on the Certification Authority (CA) page
      Certificate Request - Choose a certification authority
    18. Click Next on the Certification Authority Account page
      Certificate Request - Certification Authority Account
    19. Click Next on the Specify Alternate Certificate Template page
      Certificate Request - Specify Alternate Certificate Template
    20. Type in a Friendly name for the certificate (I would just use whatever you used for the Persistent Chat Pool Display Name) and click Next
      Certificate Request - Name and Security Settings

      1. NOTE: If you are deploying multiple servers in the Lync Persistent Chat Pool, make sure to check the Mark the certificate's private key as exportable box.
    21. Enter in your Organization and Organizational Unit and hit Next
      Certificate Request - Organization Information
    22. Enter in your Country/Region, State/Province, City/Locality, and hit Next
      Certificate Request - Geographical Information
    23. Hit Next on the Subject Name / Subject Alternative Names screen
      Certificate Request - Subject Name - Subject Alternative Names
    24. Hit Next on the Configure Additional Subject Alternative Names screen
      Certificate Request - Configure Additional Subject Alternative Names
    25. Hit Next on the Certificate Request Summary page
      Certificate Request - Summary
    26. Hit Next once the certificate request process has finished executing commands
      Certificate Request - Executing Commands
    27. Hit Finish on the Online Certificate Request Status screen
      Certificate Request - Online Certificate Request Status
    28. Hit Next on the Certificate Assignment screen
      Certificate Assignment
    29. Hit Next on the Certificate Assignment Summary screen
      Certificate Assignment - Summary
    30. Hit Finish on the Executing Commands screen
      Certificate Assignment - Executing Commands
    31. Close the Certificate Wizard screen
      Certificate Wizard
    32. Click Run next to Step 4: Start Services
      Step 4 - Start Services
    33. Click Next on the Start Services screen
      Start Services Wizard
    34. Click Finish on the Executing Commands screen
      Start Services Wizard - Finish
    35. Click Run next to Service Status (Optional)
      Step 4 - Start Services
    36. Scroll through the list of services and find Lync Server Persistent Chat and verify it is Running.
      Services - Lync Server Persistent Chat
  17. At this point of the deployment, the infrastructure should be in place to actually push Persistent Chat out to your clients.  Next we will create a test group.
  18. Login to the Lync Admin Panel (Cscp)
  19. Select the Persistent Chat tab
    cscp - Persistent Chat
  20. Click New and select your persistent chat pool and click OK
    cscp - Persistent Chat - Select a Service
  21. Type in a Name for your persistent chat category and select who can have access to the category.  This category will be the container that holds a set of chatrooms.  Click Commit when finished.
    cscp - Persistent Chat - New Category
  22. Next, select the Persistent Chat Policy tab and double click on the Global policy.
    cscp - Persistent Chat - Persistent Chat Policy
  23. Check Enable Persistent Chat and click Commit
    cscp - Persistent Chat - Edit Global Policy
  24. Next, we need to create the actual chatroom.  This step needs to be done via PowerShell, so open up the Lync Server Management Console.
    Lync Server Management Console
  25. Execute the following command
    New-CsPersistentChatRoom -Name "My test chatroom" -Category "Test Category"
    Lync Server Management Console - New-CsPersistentChatRoom
  26. Next, we will assign a user to the chatroom, so execute the following command:
    Set-CsPersistentChatRoom -Identity "My test chatroom" -members @{Add="sip:[email protected]"}
    Lync Server Management Console - Set-CsPersistentChatRoom
  27. Now, we are ready to join our test chatroom.  First, close your Lync client if it is already running.
    Lync 2013 Client - File - Exit
  28. Relaunch Lync, and you should see the persistent chatroom icon.
    Persistent Chat - Chatrooms
  29. Double click on the chatroom and try sending a message.
    Persistent Chat - Hello World
  30. Congrats!  If you have made it to this point, you should now be able to offer a new collaborative feature to your users at your organization! 🙂

Lync Server 2013 - All the channel servers are down

Symptom: After installing the Persistent Chat module for Lync Server 2013, you receive the following error when trying to manage Persistent Chat from the Lync Admin Web GUI (CSCP).

1 Warning(s) All the channel servers are down. All the channel servers are down.

Solution: Unfortunately, there are a few issues that could cause this.  Here are a few that I tried to get things working.

Solution #1: Ensure Cumulative Update 2 is installed.

  1. Download a copy of the Lync Update on the persistent chat server
    1. http://www.microsoft.com/en-us/download/details.aspx?id=36820
  2. Double click LyncServerUpdateInstaller.exe
  3. Click the Install Updates button
    Microsoft Lync Server 2013 Cumulative Update Installer for Persistent Chat
  4. Once all the updates have finished installing, click Close
    Microsoft Lync Server 2013 Cumulative Update Installer for Persistent Chat Updated

Solution #2: Add only 1 server to the pool, then add the rest

  1. Login to one of your front end servers and open up the Lync Server 2013 Topology Builder
  2. Delete the persistent chat pool you currently have deployed
    Delete Lync Persistent Chat Pool - Topology Builder
  3. Publish your topology
    Publish the Topology
  4. Recreate your persistent chat pool, but only add 1 server during the setup wizard.
    Create new persistent chat pool
  5. Once done running through the wizard, right click on your persistent chat pool and select New Server...
    New Server - Persistent Chat - Lync Topology Builder

    1. Repeat this until all the servers you wanted to deploy are part of the topology
  6. Publish the topology
    Publish the Topology

Notes: I couldn't get event viewer to log anything referencing this error, which I thought was weird.   Additionally, I noticed that when originally deploying my topology, the topology wizard was complaining saying that "At least one machine must be active." in order to successfully deploy the persistent chat pool.  I believe this is a bug in the topology builder and the only way I could get the topology builder to deploy properly, was by following Solution #2.  This ensured at least one server in the pool had a machine state marked as "Active".

Here is a screenshot showing the persistent chat servers in an enterprise pool marked as inactive and topology builder complaining with the error "At least one machine must be active."

At least one machine must be active - Lync Persistent Chat - Topology Builder


Lync Server 2013 - Installation error: Prerequisite not satisfied: Windows Identity Foundation is required.

Symptom:
You receive the following error when running Step 1: Install Local Configuration Store in the Lync Server 2013 - Deployment Wizard.

Prerequisite not satisfied: Windows Identity Foundation is required.

Prerequisite not satisfied - Windows Identity Foundation is required.

Solution:
Complete the steps below to install the Windows Identity Foundation.

  1. Start Server Manager
    Server Manager
  2. Click Manage -> Add Roles and Features
    Server 2012 - Manage - Add Roles and Features
  3. Click on Features on the left side, and then scroll down and check Windows Identity Foundation 3.5.  Click Next >
    Server 2012 - Add Roles and Featuers Wizard - Windows Identity Foundation 3.5
  4. Click Install
    Server 2012 - Add Roles and Featuers Wizard - Windows Identity Foundation 3.5.png - Install
  5. Click Close once the installation has completed.
    Server 2012 - Add Roles and Featuers Wizard - Windows Identity Foundation 3.5.png - Install Finish
  6. Rerun Step 1: Install Local Configuration Store in the Lync 2013 - Deployment Wizard and you should notice the prerequisite is now satisfied.
    Install Local Configuration Store - WindowsIdentityFoundation prerequisite satisfied

Lync Server 2013 Error after applying CU1

Symptom: You receive the following errors in Event Viewer after installing the February Cumulative Update 1 for Lync Server 2013.

The database being used by Group Pickup is not the appropriate version.

Event ID: 31059
The database is not the correct version:
Connection: Data Source=sqlserver.mydomain.local;Initial Catalog=cpsdyn;Integrated Security=True
Expected... SchemaVersion: 1, SprocVersion: 1, UpgradeVersion: 2
Actual... SchemaVersion: 0, SprocVersion: 0, UpgradeVersion: 0
Cause: The database has not been upgraded.
Resolution:
Upgrade the database to CU1.

Event ID: 31055
There was a problem communicating with the Group Pickup backend database.

There were problems accessing SQL server:
Connection: Data Source=sqlserver.mydomain.local;Initial Catalog=cpsdyn;Integrated Security=True
Message: The EXECUTE permission was denied on the object 'DbpGetVersionSchema', database 'cpsdyn', schema 'dbo'.
Error code: -2146232060
Error number: 229
Cause: This may be caused by connectivity issues with the backend database.
Resolution:
Check if SQL backend is running and accepts connections from Group Pickup.

Solution:
When installing Cumulative Update 1 for Lync Server 2013 from the following KB article http://support.microsoft.com/kb/2809243, make sure you follow the last step to update the backend database.  To finish the steps, execute the following command via the Lync Server 2013 PowerShell prompt.

Lync Server 2013 Standard Edition

Install-CsDatabase -ConfiguredDatabases -SqlServerFqdn frontendserver.fqdn -Verbose

Lync Server 2013 Enterprise Edition

If the Lync Server 2013 Enterprise Edition back end servers do not have SQL mirroring configured, run the following cmdlet to apply the changes:

Install-CsDatabase -ConfiguredDatabases -SqlServerFqdn sqlserver.fqdn -Verbose

See the following KB article if you have mirroring configured on your backend database servers.

OCSLogger Options Defined for Lync 2013

Here is a very incomplete list of what each option means on the Lync Server 2013 Logging Tool (OCSLogger.exe).  I am still trying to learn how this tool works and am in search of a complete list of what each Logging Options does, so if you have any information on what each option does please drop a comment below so I can add it to the table. --Thanks and hope this helps someone else!

Notes:

Here is a very thorough guide from Microsoft on Specifying Options for Logging for Communications Server 2007

Here is a guide from Microsoft on Using Lync Server 2013 Logging Tool

Component Description
ABCommon Enables logging for the Address Book service.
ABServer Enables logging for the Address Book service that provides global address list information from Active Directory to the Office Communicator client.
ABServerIISModule
ADConnect Enables logging for Active Directory connectivity.
ADminUI Enables logging information for the Lync Admin Control Panel, logging interactions and calls.
AggregationScript Enables logging for the component that determines the aggregate user state and capabilities across all endpoints.
ApiModule Enables logging for the component that exposes the Office Communications Server API to MSPL (Microsoft SIP Processing Language) and managed code applications.
ApplicationServer
AppShareOoty
ArchivingAgent Enables logging for the Archiving agent that runs on the Front End Server and writes SIP messages to Message Queuing.
ArchJournal
AsMcu
AutoDiscover
AvMcu Enables logging for the A/V Conferencing Server.
AvMP
CAAServer
CASServer
CertProvisioning
ChatCommon
ChatEndpoint
ChatRoomManagement
ChatSDK
ChatWebService
ClientVersionFilter Enables logging for the Client Version Filter, an application that can be used to allow/block access from clients that conform to certain versions.
CLSAgent
CLSCommon
CLSController
CLSControllerLib
CLSFormat
Collaboration Logs activities of the collaboration object layer pertaining to instant messaging.
CpsDiagnostics
CpsHostingFramework
DataMCU Enables logging for the Web Conferencing Server.
DataMCURunTime
Deployment
DeviceUpdate
DeviceUpdateHttpHandler
Dialin
Dlx Enables logging for the Group (DL) Expansion service.
ExumRouting Enables logging for the component that routes calls to Exchange Unified Messaging for voice mail.
HybridConfig
IIMFilter Enables logging for the Intelligent Instant Messaging (IIM) application that filters incoming IM traffic using criteria specified by administrators.
ImMcu Enables logging for the IM Conferencing Server, which enables group IM by relaying IM traffic among all participants.
InboundRouting Enables logging for the Inbound Routing component that handles incoming calls largely according to preferences that are specified by users on their Enterprise Voice clients.
IncomingFederation
Infrastrucutre
InterClusterRouting
InternalCommon
JoinLauncher
LCCertHelper Enables logging of the component used for certificates-related functionality in SipStack, MMC, WMI, and the Certificates Wizard.
LcsServer Enables logging of the RtcSrv service. On a Front End Server the RtcSrv service is the Office Communications Server Front End service. On an Access Edge Server, the RtcSrv service is the Office Communications Server Access Edge service.
LDM  Enables logging of Web Conferencing Server Connection Management which manages TLS/MTLS connections from clients and other servers such as the Web Conferencing Edge Server.
LocationInformationService
Lyss
Mach
ManagementCore
MCUFactory Enables logging for the Focus Factory which determines which conferencing server is available to service the conference scheduling request.
MCUInfra Enables logging for the component that provides communication between the Focus and the conferencing servers.
McxService
Media_MMVR
Media_PAL
MediaStack_AUDIO_AGC
MediaStack_AUDIO_DRC
MediaStack_AUDIO_ECHODT
MediaStack_AUDIO_FAXDT
MediaStack_AUDIO_HEALER
MediaStack_AUDIO_NOISEDT
MediaStack_AUDIO_VAD
MediaStack_AUDIO_VSP
MediaStack_AudioCodes
MediaStack_AudioEngine
MediaStack_COMAPI
MediaStack_COMMON
MediaStack_Crossbar
MediaStack_Crypto
MediaStack_DebugUI
MediaStack_DebugUI_AEC
MediaStack_DEVICE
MediaStack_MassConvertedTraces1
MediaStack_MediaManager
MediaStack_PerFrame
MediaStack_PerPacket
MediaStack_QualityController
MediaStack_RTCP
MediaStack_RTP
MediaStack_StreamingEngine
MediaStack_TLS
MediaStack_Transport
MediaStack_VIDEO
MediaStack_VOICEENHANCE
MediationServer Enables logging for the Mediation Server that translates between the Office Communications Servers and the media gateway.
MRAS Enables logging for the Office Communications Server Audio/Video Authentication service, which provides authentication services for the A/V Edge Server, the component that provides the functionality to share audio and video with external users.
OutboundRouting Enables logging for the Outbound Routing component that routes calls to PBX or PSTN destinations, applies call authorization rules to callers, and determines the optimal media gateway for routing each call.
OutgoingFederation
PDP
PowerShell Enables logging for most of the PowerShell interfaces from the Lync Amdin Control Panel.
QueueDLL Enables logging for the component that facilitates inter-process communication between the server and applications.
RDPApiTrace
RDPEncComTrace
ReachJoin
ReachPerf
RgsClientLib
RgsCommonLibrary
RgsDatastores
RgsDeploymentApi
RgsDeploymentLibrary
RgsDiagnostics
RgsHostingFramework
RgsMatchMakingService
Routing_data_Sync_agent
RtcDbSyncAgent
RtcHost Enables logging for the component that is the host for all server API applications.
RTCSPL Enables logging for the component that is the host for running MSPL (Microsoft SIP Processing Language) script based applications.
S4 Logs all SIP messages between the Mediation server and PSTN gateways
ServerAgent
ServerConfiguration
ServerTransportAdaptor
SIPStack Enables logging for the SipStack component that handles TLS/MTLS connection management and SIP call flows.
StoreWeb
TranslationApplication Enables logging for the Translation Service which is the server component that is responsible for translating a dialed number into E.164 format based on the normalization rules defined by the administrator.
UCMA_Workflow
UCWA
UdcAgent
UserPinService
UserServices Enables logging for the UserServices component that provides closely integrated IM, presence, and conferencing features built on top of the SIP proxy. Includes the Focus and Focus Factory.
WebInfrastructure
WebRelay
WebScheduler
WPP_OC_RDP_APPSHAPI
XDS_File_transfer_agent Enables logging of replication data, specifically file transfer aspects.
XDS_Master_replicator Enables logging for the creation of replication packges and notifications.
XDS_Replica_Replicator Enables logging for receipts of replication packages and notifications.
XmppCommonLibrary
XmppListener
XmppRouting
XmppTGW