One of the side projects I have is rebroadcasting local ATC (Air Traffic Control) audio from my local airport to LiveATC.net. I previously had an RTL-SDR dongle connected to a RaspberryPi 1 Model B, which then rebroadcasted to LiveATC via IceCast. While I've had success the past few years broadcasting, overhead plans were really the only thing that was clear; being distant from the airport, receiving broadcasts from the tower were a slim to none at best.
In doing a bit of research I settled on purchasing a SDRplay RSPduo and Raspberry Pi 4, which seems to help with noise. Pairing the SDRplay with the newest version of RTLSDR-Airplay, I was able to achieve much clearer audio/hear things I couldn't before. While I'm using the SDRplay RSPduo, this guide can be used for their other devices such as the Rsp1a and RSPdx as well (likely others as this guide ages). Here's a reflection on how I got things setup.
Update Raspbian packages
First, update your Linux packages to latest version. I'm running the latest version of Raspbian / Debian.
sudo apt-get update && sudo apt-get upgradeDisable WiFi/Bluetooth
This is optional, but I figured I'd disable the radios on the RaspberryPi to further mitigate as much possible noise as possible. First, you can disable both radios by editing /boot/config.txt via the vi text editor (this can actually be configured by placing this file on your SD-Card you attach to your Raspberry Pi during first-time boot). Official details on the boot overlays can be found here.
sudo vi /boot/config.txtOnce in vi, press i to insert the following lines:
dtoverlay=disable-bt
dtoverlay=disable-wifi
Press the escape key and then type :wq to write the changes to the file and exit vi.
Lastly, execute the following command to disable the UART bluetooth service.
sudo systemctl disable hciuartDownload & Install RSP Control Library + Driver
First, you will want to grab the latest SDRplay Drivers and Libraries. You can do this by navigating to SDRplay's website and selecting RSPduo and ARM Raspberry Pi OS for the download. Then click the API button. Now this is kinda difficult if you are SSHed into the Pi, so I'd find the latest version from their website and then use the following commands below to remotely download the software (substituting in the version number to grab the latest download) and install it and reboot after install (rebooting after installation is strongly recommended).
Execute the following commands:
# Navigate to home directory
cd ~
# Download latest API Library + Driver
wget https://www.sdrplay.com/software/SDRplay_RSP_API-Linux-3.15.2.run
# Provide execution rights to install the software
chmod a+x SDRplay_RSP_API-Linux-3.15.2.run
# Run the installer
sudo ./SDRplay_RSP_API-Linux-3.15.2.run
# Reboot the machine
sudo reboot now
Build and install SoapySDR from source
In this section, we need to install SoapySDR which is a vendor and platform neutral SDR support library. Essentially this means that instead of needing a bunch of developers to write integrations into all the different SDRs, other software can leverage these interfaces to skip worrying about device compatibility and focus on what the application needs to do. As we'll see later, RTLSDR-Airband does exactly this to provide support for tons of different SDRs. Kudos to the PothosWare team for enabling developers all over the world to build all sorts of SDR projects!
So, to get this installed, we need to clone the source code from their GitHub repo and compile the project. Official documentation on this process can be found on their wiki, but I'm going to try and simplify everything here.
Since Raspberry Pi doesn't come with Git, I am going to use wget and unzip to do this, but if you don't mind installing Git, that'd be the easier way to "clone" down the latest source code from GitHub (make sure you replace versions where appropriate, at time of writing this, 0.8.1 is the latest version).
# Install dependencies needed to build this project
sudo apt-get install cmake g++ libpython-dev python-numpy swig
# Make sure we are back in our home directory
cd ~
# Grab latest tarball from GitHub
wget -O soapy-sdr-0.8.1.tar.gz https://github.com/pothosware/SoapySDR/archive/soapy-sdr-0.8.1.tar.gz
# Extract the tarball (this is like unzipping a .zip on Windows)
tar xvfz soapy-sdr-0.8.1.tar.gz
# Change directories into the new SoapSDR folder
cd SoapySDR-soapy-sdr-0.8.1
# Make a new folder called build
mkdir build
# Change directories into the build folder
cd build
# Execute cmake build automation
cmake ..
# Make installer (-j4 parameter increases build threads to make compilation quicker)
make -j4
# Make the installer copy files to right locations
sudo make install
sudo ldconfig #needed on debian systems
# Navigate back to home directory
cd ~
# Delete the SoapySDR folder since we are done with it
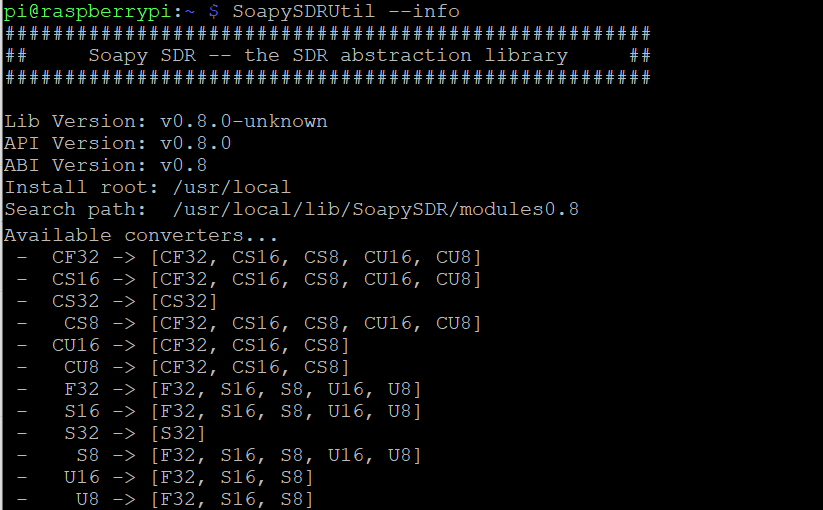
sudo rm -R SoapySDR-soapy-sdr-0.8.1At this point, you should be able to execute the SoapySDRUtil command and see the version you installed.
SoapySDRUtil --infoYou should get something like this (note: you will likely see a missing module; that's ok for right now!):
Build and install SoapySDR Play module from source
Now that we have SoapySDR installed, we need to install the module to allow it to control the SDRplay device. Similiar to SoapySDR install, we'll pull down the latest files from the SoapySDR Play Module GitHub repo, build the installer, execute it, and verify that all went well. Official instructions can be found on their wiki as well.
# Make sure we are back in our home directory
cd ~
# Grab latest tarball from GitHub
wget -O SoapySDRPlay.zip https://github.com/pothosware/SoapySDRPlay3/archive/refs/heads/master.zip
# Unzip the archive
unzip SoapySDRPlay.zip
# Change directories into the new SoapSDR folder
cd SoapySDRPlay3-master
# Make a new folder called build
mkdir build
# Change directories into the build folder
cd build
# Execute cmake build automation
cmake ..
# Make installer
make
# Make the installer copy files to right locations
sudo make install
sudo ldconfig #needed on debian systems
# Navigate back to home directory
cd ~
# Delete the SoapySDR folder since we are done with it
rm -R SoapySDRPlay3-master
Plug in SDRplay RSPduo device and verify we see it
If you haven't already, go ahead and plug in your SDRplay RSPduo. Next, let's verify we see it using the SopaySDRUtil command.
SoapySDRUtil --probe="driver=sdrplay"You should see something like this and you should see your device and hardware version (note the hardware hardware= value as you may need that later). In addition, one thing that is neat about the RSPduo is there are multiple tuners/antennas. You will be able to see these values in the probe output. Once you enable RTLSDR-Airplay, you'll notice active antennas are removed from the list of available devices.
pi@raspberrypi:~ $ SoapySDRUtil --probe="driver=sdrplay"
######################################################
##     Soapy SDR -- the SDR abstraction library     ##
######################################################

Probe device driver=sdrplay
[INFO] devIdx: 0
[INFO] hwVer: 3
[INFO] rspDuoMode: 1
[INFO] tuner: 1
[INFO] rspDuoSampleFreq: 0.000000

----------------------------------------------------
-- Device identification
----------------------------------------------------
  driver=SDRplay
  hardware=RSPduo
  sdrplay_api_api_version=3.070000
  sdrplay_api_hw_version=3

----------------------------------------------------
-- Peripheral summary
----------------------------------------------------
  Channels: 1 Rx, 0 Tx
  Timestamps: NO
  Other Settings:
     * RF Gain Select - RF Gain Select
       [key=rfgain_sel, default=4, type=string, options=(0, 1, 2, 3, 4, 5, 6, 7, 8, 9)]
     * IQ Correction - IQ Correction Control
       [key=iqcorr_ctrl, default=true, type=bool]
     * AGC Setpoint - AGC Setpoint (dBfs)
       [key=agc_setpoint, default=-30, type=int, range=[-60, 0]]
     * ExtRef Enable - External Reference Control
       [key=extref_ctrl, default=true, type=bool]
     * BiasT Enable - BiasT Control
       [key=biasT_ctrl, default=true, type=bool]
     * RfNotch Enable - RF Notch Filter Control
       [key=rfnotch_ctrl, default=true, type=bool]
     * DabNotch Enable - DAB Notch Filter Control
       [key=dabnotch_ctrl, default=true, type=bool]

----------------------------------------------------
-- RX Channel 0
----------------------------------------------------
  Full-duplex: NO
  Supports AGC: YES
  Stream formats: CS16, CF32
  Native format: CS16 [full-scale=32767]
  Antennas: Tuner 1 50 ohm, Tuner 1 Hi-Z, Tuner 2 50 ohm
  Corrections: DC removal
  Full gain range: [0, 48] dB
    IFGR gain range: [20, 59] dB
    RFGR gain range: [0, 9] dB
  Full freq range: [0.001, 2000] MHz
    RF freq range: [0.001, 2000] MHz
    CORR freq range:  MHz
  Sample rates: 0.0625, 0.096, 0.125, 0.192, 0.25, ..., 6, 7, 8, 9, 10 MSps
  Filter bandwidths: 0.2, 0.3, 0.6, 1.536, 5, 6, 7, 8 MHz
Build and install RTLSDR-Airband from source
RTLSDR-Airband is an open source project that allows you to receive analog radio voice channels and produce audio streams which can be routed to various outputs, such as online streaming via Icecast server, PulseAudio server, Audio file, or Raw I/Q file. In our case, we are going to stream to an Icecast server in this example.
Similar to our previous section in SoapySDR, we need to download the latest source code, build and install RTLSDR, and then modify the configuration file. Official documentation can be found on the RTLSDR-Airplay GitHub Wiki.
# Install RTLSDR-Airplay dependencies
sudo apt-get install build-essential cmake pkg-config libmp3lame-dev libshout3-dev 'libconfig++-dev' libraspberrypi-dev libfftw3-dev
# Navigate back to our home directory
cd ~
# Download the latest source from GitHub
wget -O v5.1.1.tar.gz https://github.com/rtl-airband/RTLSDR-Airband/archive/refs/tags/v5.1.1.tar.gz
# Extract the tarball
tar xvfz v5.1.1.tar.gz
# Change directory into the RTLSDR-Airband folder
cd RTLSDR-Airband-5.1.1
mkdir build
cd build
cmake ../
make
# Install the program
sudo make install
Configure RTLSDR-Airband
For my particular setup, I want to stream to an external icecast server. To do that, I recommend creating a backup of the default configuration file (as a backup).
# Rename the original config file as a backup
sudo mv /usr/local/etc/rtl_airband.conf /usr/local/etc/rtl_airband.conf.bak
Next, we can create a new configuration file with the proper configuration. Execute the following command to open vi.
sudo vi /usr/local/etc/rtl_airband.confPress i to go into insert mode and paste the following (replacing the values applicable to your environment; you may want to change the name of the stream, authentication parameters, and gain"). Also, note that we are using the first Antenna and specifying the hardware version of RSPduo from the previous step where we probed the SDRplay device (if you have a different SDRplay device, substitute that value accordingly).
# Configure IceCast Stream
devices:
({
  type = "soapysdr";
  index = 0;
  device_string = "driver=sdrplay,hardware=RSPduo";
  channel = 0;
  gain = 35;
  correction = 1;
  antenna = "Tuner 1 50 ohm";
  mode = "scan";
  channels: (
    {
      freqs = ( 133.8 );
      outputs: (
          {
             type = "icecast";
             server = "audio-in.myicecastserver.net";
             port = 8010;
             mountpoint = "station"
             username = "username"
             password = "mypassword";
             name = "Tower";
             description = "Tower - 133.8Mhz";
             genre = "ATC";
          }
       );
    }
 );
});
Type :wq to write and save the changes to the file.
Validate RTLSDR-Airband Configuration
Once you have your configuration, you can validate everything is ready to go by running RTLSDR-Airplay in foreground mode.
From their wiki: you will see simple text waterfalls, one per each configured channel. This is an example for three devices running in multichannel mode. The meaning of the fields is as follows:
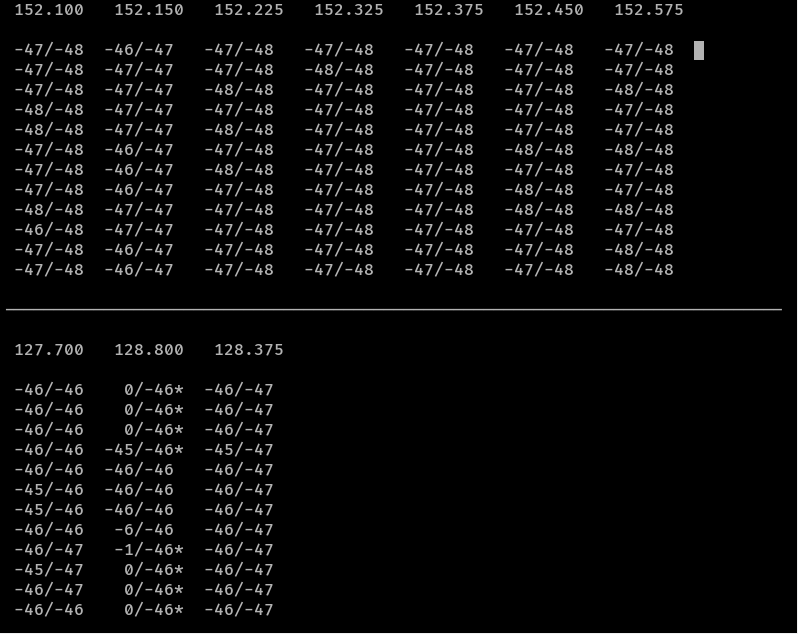
- The number at the top of each waterfall is the channel frequency. When running in scan mode, this will be the first one from the list of frequencies to scan.
- The number before the forward slash is the current signal level
- The number after the forward slash is the current noise level estimate.
- If there is an asterisk
*after the second number, it means the squelch is currently open. - If there is a
>or<character after the second number, it means AFC has been configured and is currently correcting the frequency in the respective direction.
Execute the following command to start running in foreground mode:
# Test in foreground mode
/usr/local/bin/rtl_airband -f
Press Cntrl+C to break out of the stream once you are satisfied with your testing.
Enable RTLSDR-Airband to autostart
To enable RTLSDR-Airband to automatically start up each time your Raspberry Pi is rebooted, you can execute the following commands from within the RTLSDR-Airband directory.
sudo cp init.d/rtl_airband.service /etc/systemd/system
sudo chown root:root /etc/systemd/system/rtl_airband.service
sudo systemctl daemon-reload
sudo systemctl enable rtl_airband
sudo systemctl start rtl_airband
Hurray! We are done!
If you made it this far you have completed all the steps! Enjoy your new streaming SDR solution!
Thank you for the step by step command line especially double thanks for the comment line explaining each entry. I'm new to Linux, it really helps.