Tag Archives: sso

[Tutorial] Configuring an Azure Acitve Directory (AAD) Application to leverage multiple Reply URLs

Use Case:

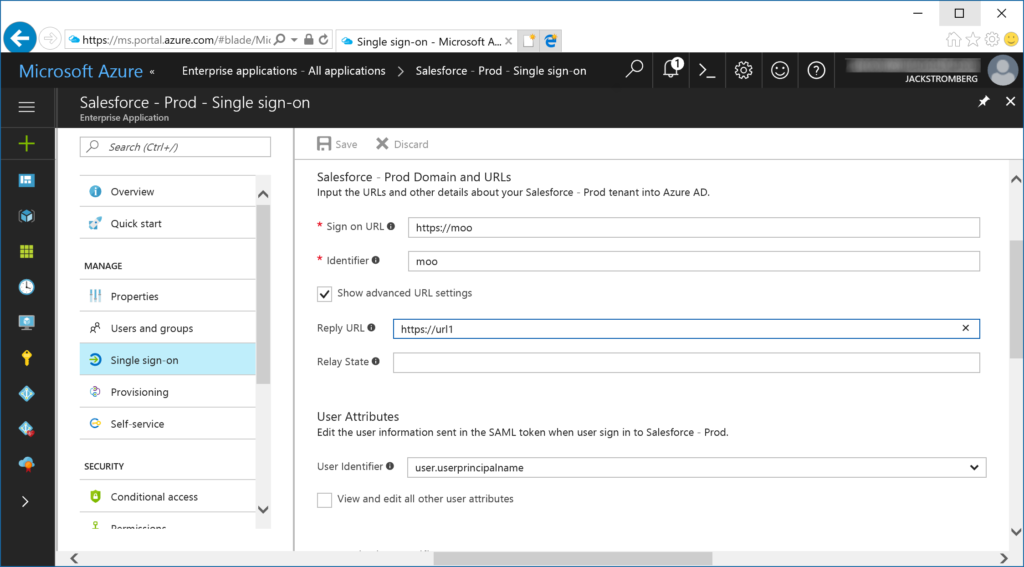
I was recently asked if it is possible to configure multiple Sign-On URLs for a SalesForce application by a customer.  Per the customer, the Sign on URL and the Identifier URL are how Salesforce HR agents log in, in addition to the forms filled out via the web application. When multiple Reply URLs are configured, SSO is possible between both the agent and web application.  Without configuring multiple URLs, you will receive an error stating that the Reply URL is incorrect via the Agent or Web Application.

In this case, this tutorial will cover how to configure multiple Reply URLs for a single Azure AD Application; whether created from the Azure AD Marketplace or custom.

Here is a link to a customer on SalesForce's forums asking a very similar question as well: https://developer.salesforce.com/forums/?id=9060G000000ICYYQA4

Configure Multiple Reply URLs in Azure AD

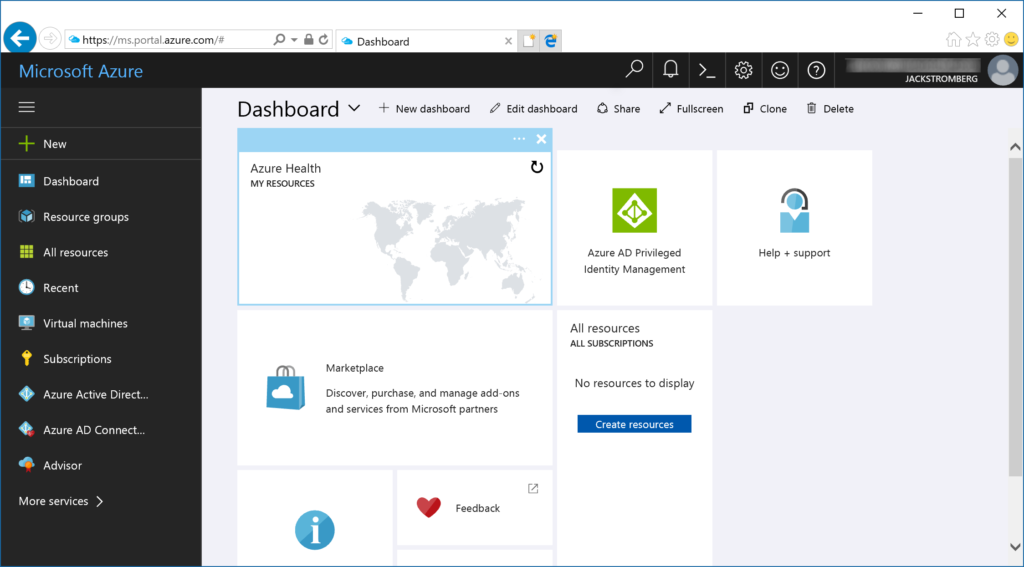
  1. Login to https://portal.azure.com and select Azure Active Directory
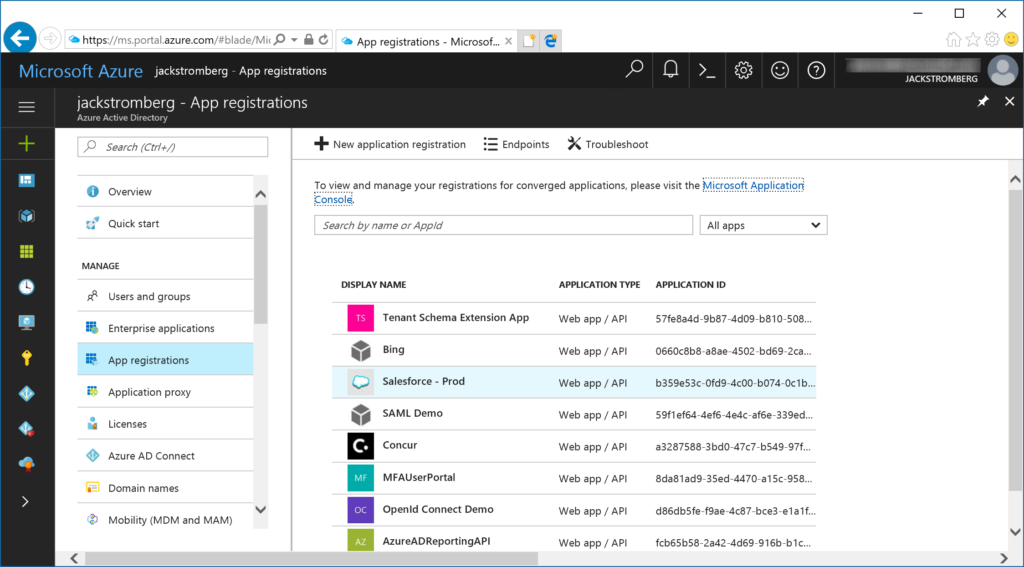
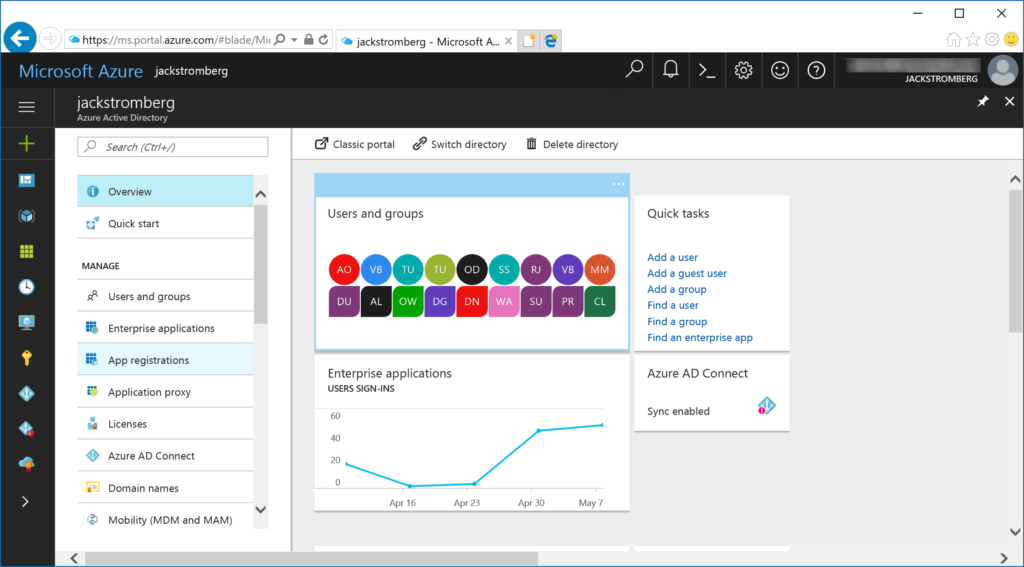
  2. Select App Registrations (even though an application may be an Enterprise application, please proceed with App registrations)
  3. Select your application from the list
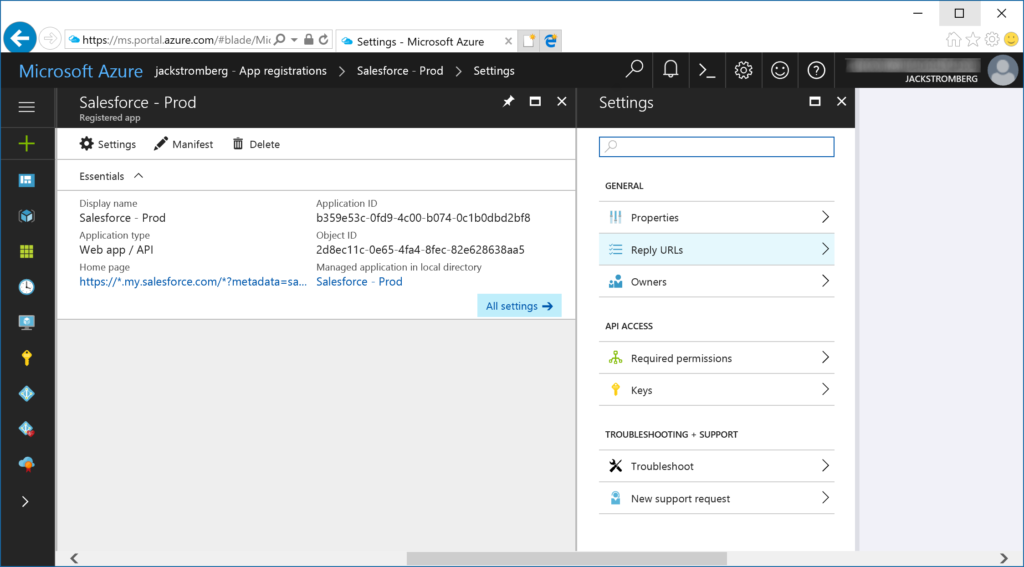
  4. Select Reply URLs on the right side of the blade
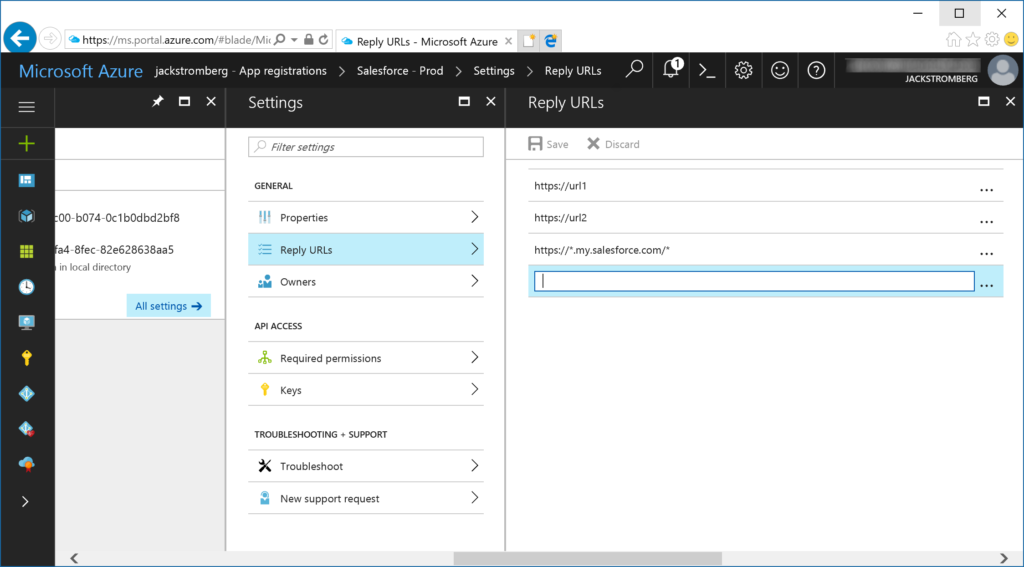
  5. Add/Remove the URLs to the desired configuration and then click Save

Please note that if you do browse back to Enterprise Applications, today the portal will only reflect one-URL as of 7/24/2017.

Enable SSO (Single Sign On) to On-Premises Exchange OWA (Outlook Web Access) via Azure AD Application Proxy

Edit: This scenario is unofrtunately no longer supported by Microsoft.  More details can be found here: https://learn.microsoft.com/microsoft-365/enterprise/configure-exchange-server-for-hybrid-modern-authentication

Wouldn't it be awesome to be able to do the following with Outlook Web Access being published in your on-premises environment today?

  • Cheap proxy solution to prevent direct internet access to your servers
  • Mask the IPs of your on-premises infrastructure
  • Enable Azure MFA (Multi-Factor Authentication) for OWA?
  • Have a Single-Sign on experience into Outlook Web Application via federation?
  • Have the application be selectable from your "My Apps" page (myapps.microsoft.com)
  • Have the application be selectable from the "Waffle Menu" of Office 365

If you are looking for any of the above, you are in-luck and we can enable this easily through Azure AD Application Proxy.  If you organization is using Office 365 or Azure AD already and have licensing for Azure AD Premium or Basic, you are good to go.  If you have the Enterprise Mobility Suite, this will grant you to Azure AD Premium licensing which should make you good to go as well.

Configuration

  1. Prerequisite: Enable Kerberos Authentication for Outlook Web Access On-Premises
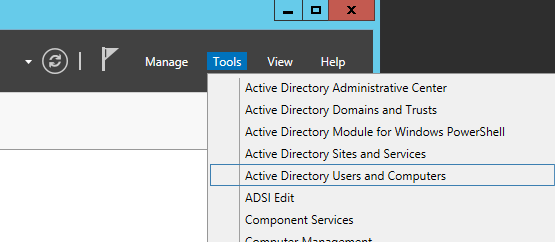
    1. Login to one of your domain controllers and open up Active Directory Users and Computers
      Server Manager - Active Directory Users and Computers
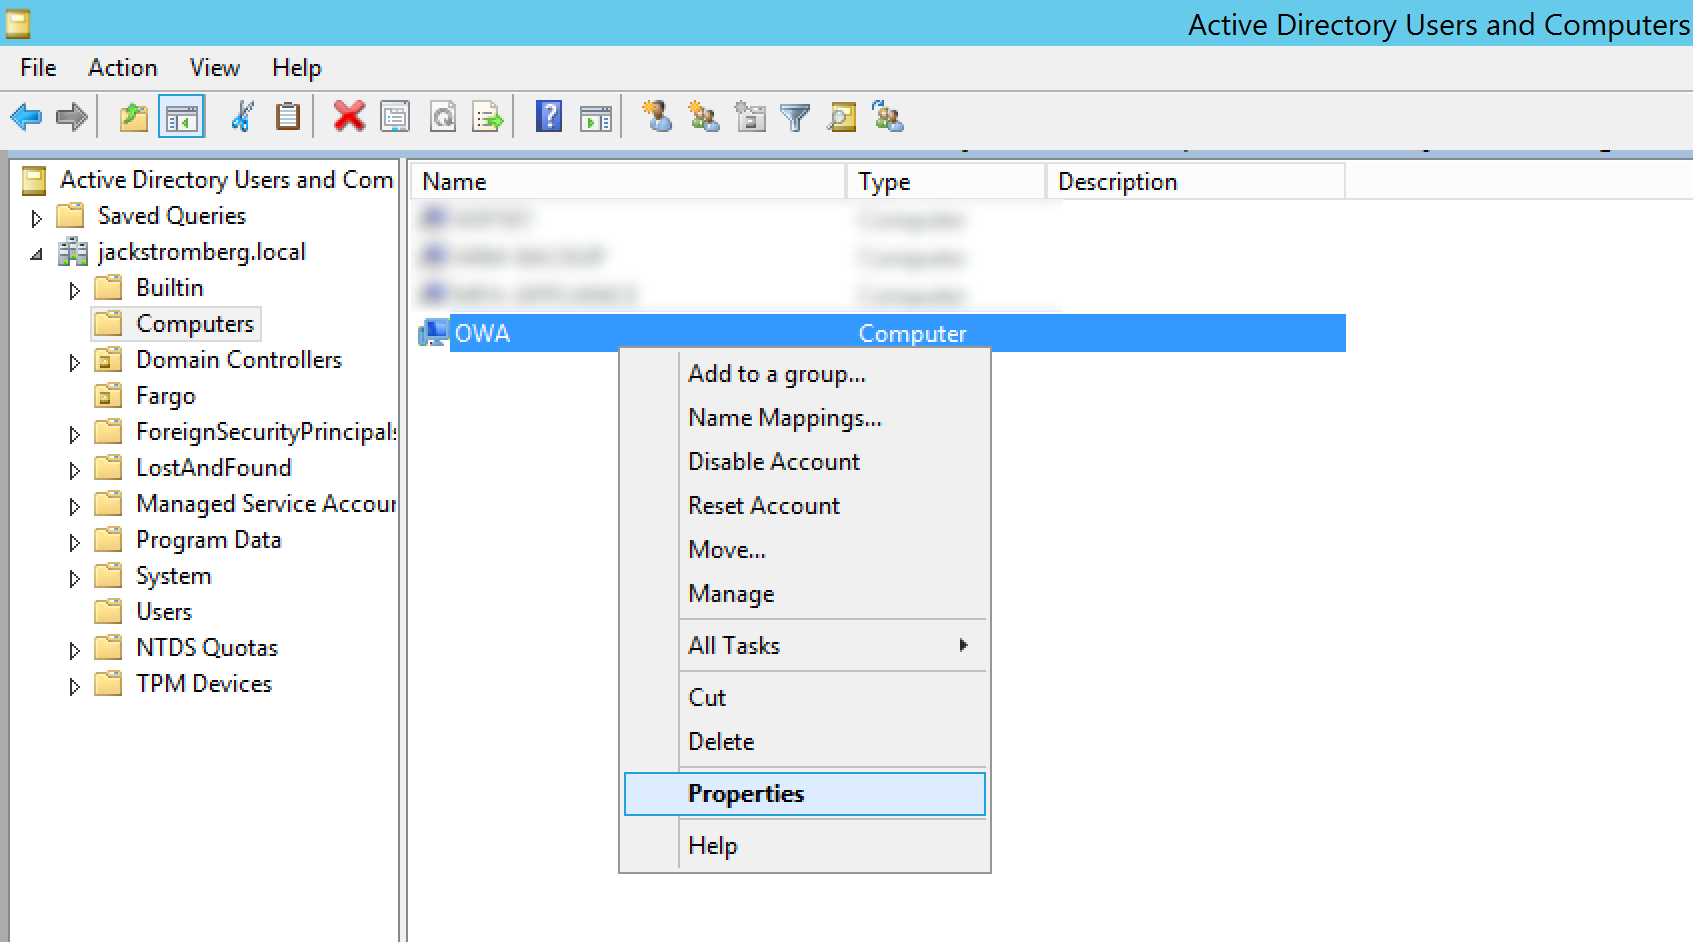
    2. Find the Computer object within your organization we will run the Azure AD Connector on later in the tutorial and right click Properties on it
      Active Directory Users and Computers - Computers - OWA - Properties
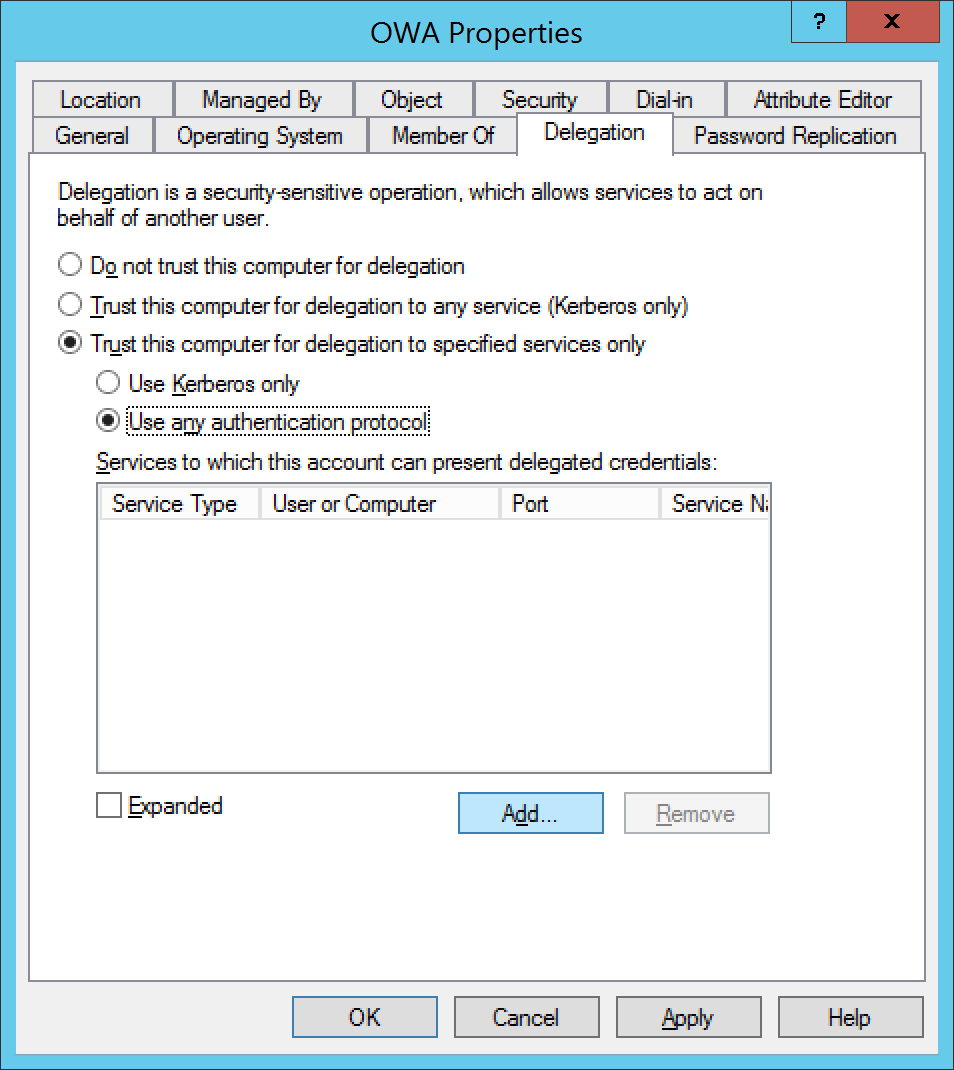
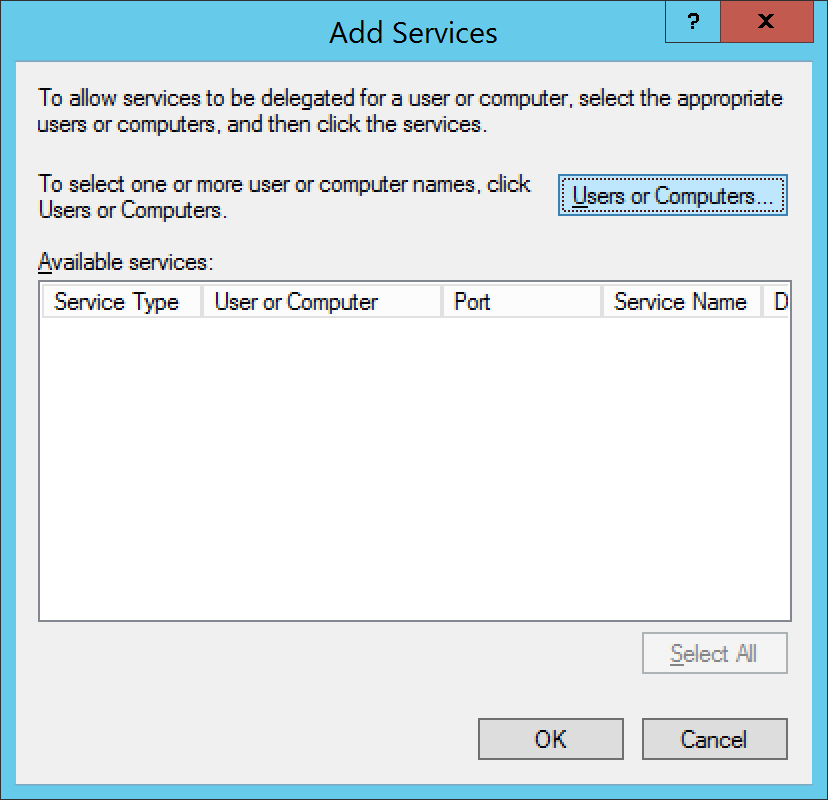
    3. Select the Delegation tab, select Trust this computer for delegation to specified services only, check Use any authentication protocol, and click on Add...
      Active Directory Users and Computers - Computers - OWA - Properties - Delegation - Add
    4. Select Users or Computers...
      Active Directory Users and Computers - Computers - OWA - Properties - Delegation - Add - users or Computers
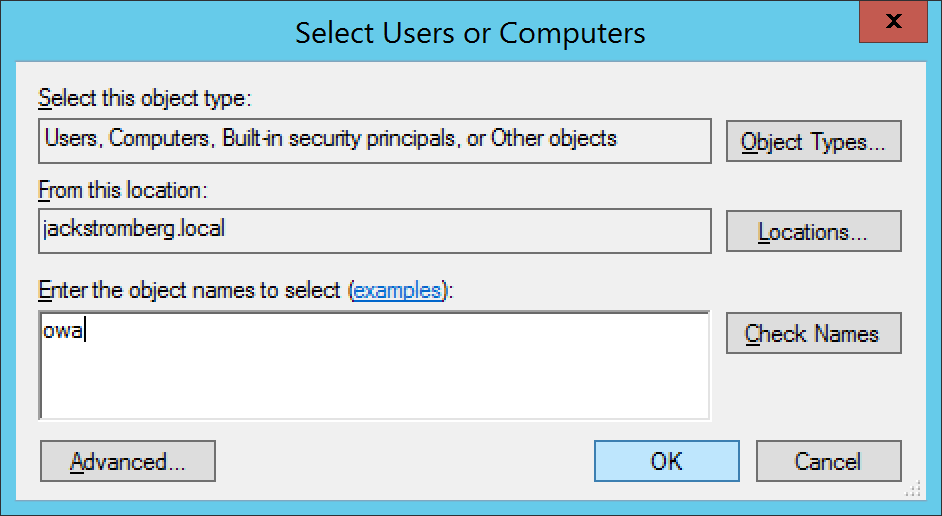
    5. Type in the machine name and click OK
      Active Directory Users and Computers - Computers - OWA - Properties - Delegation - Add - users or Computers - Select Users or Computers
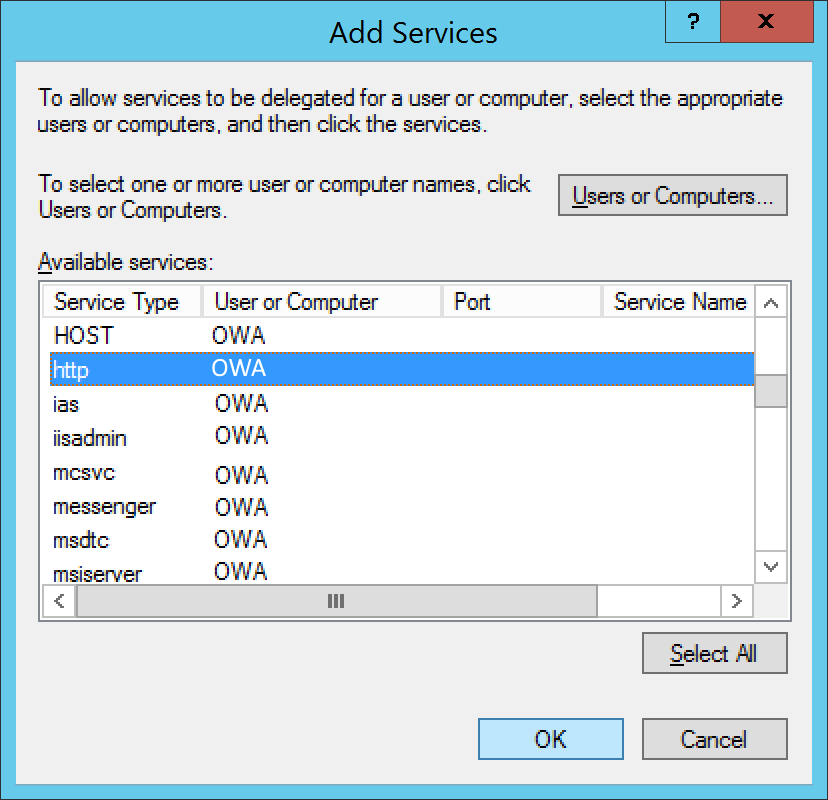
    6. Select http and click OK
      Active Directory Users and Computers - Computers - OWA - Properties - Delegation - Add - users or Computers - http
    7. Click OK on the Add Services page
  2. Pre-Requisite: Enable Exchange On-Premises to use Integrated Windows Authentication (instructions for Exchange 2010 or 2013 can be found below)
    1. Exchange 2010
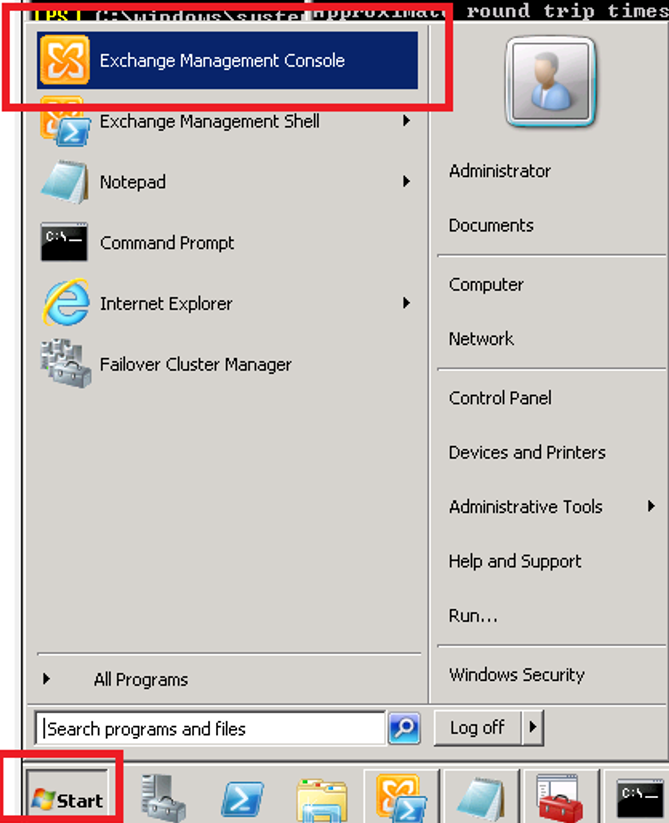
      1. Open the Exchange Management Console for your Exchange server
        Exchange Management Console (2010)
      2. Expand Server Configuration, select Client Access, under Outlook Web App, right click on your web app and select Properties
        Exchange Management Console (2010) - Outlook Web App
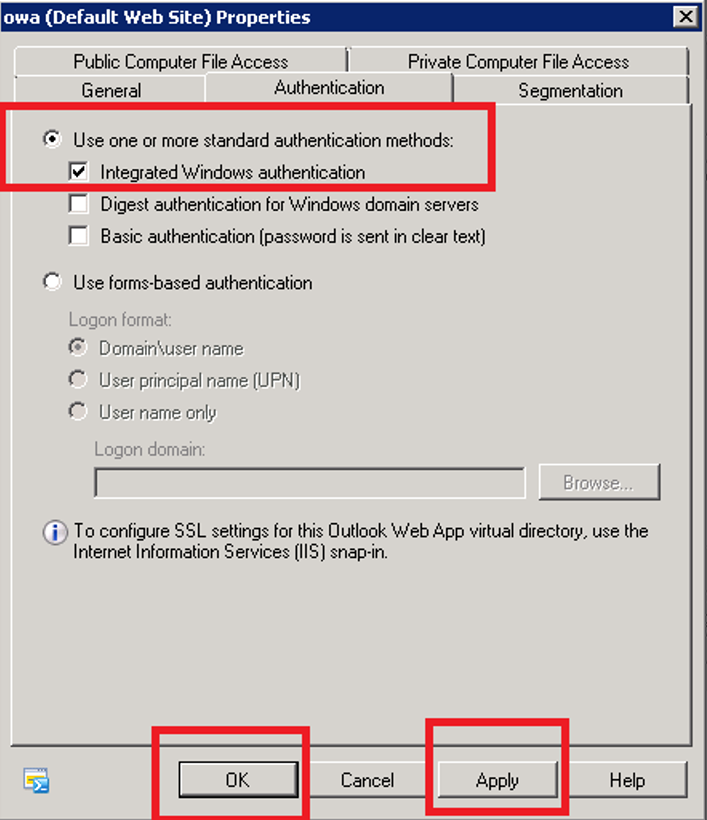
      3. Select the Authentication tab and check Use one or more standard authentication methods.  Once checked, check Integrated Windows authentication and click the Apply and OK buttons.
        Exchange Management Console (2010) - Outlook Web App Properties - Authentication - Integrated Windows Authentication
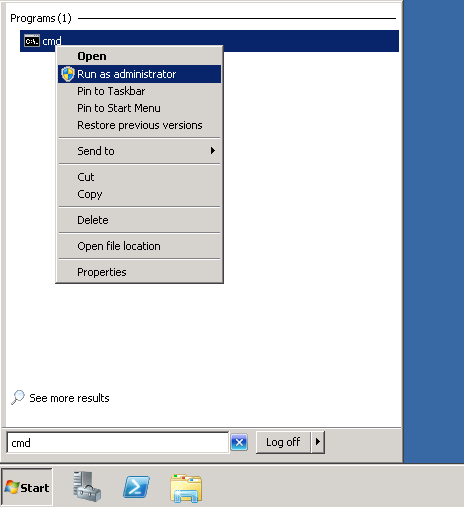
      4. Open a command prompt
        cmd as Administrator
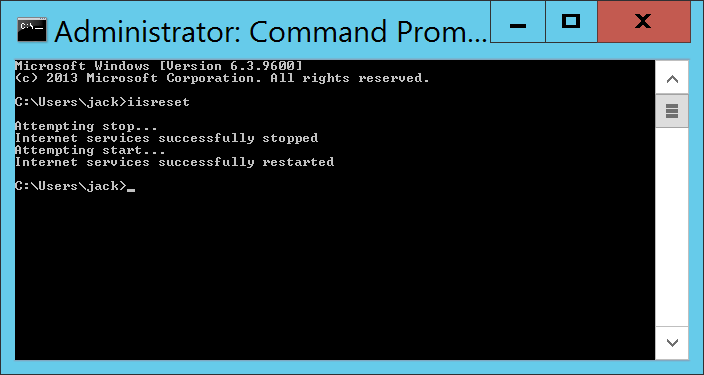
      5. Execute the iisreset command
        cmd - iisreset
    2. Exchange 2013
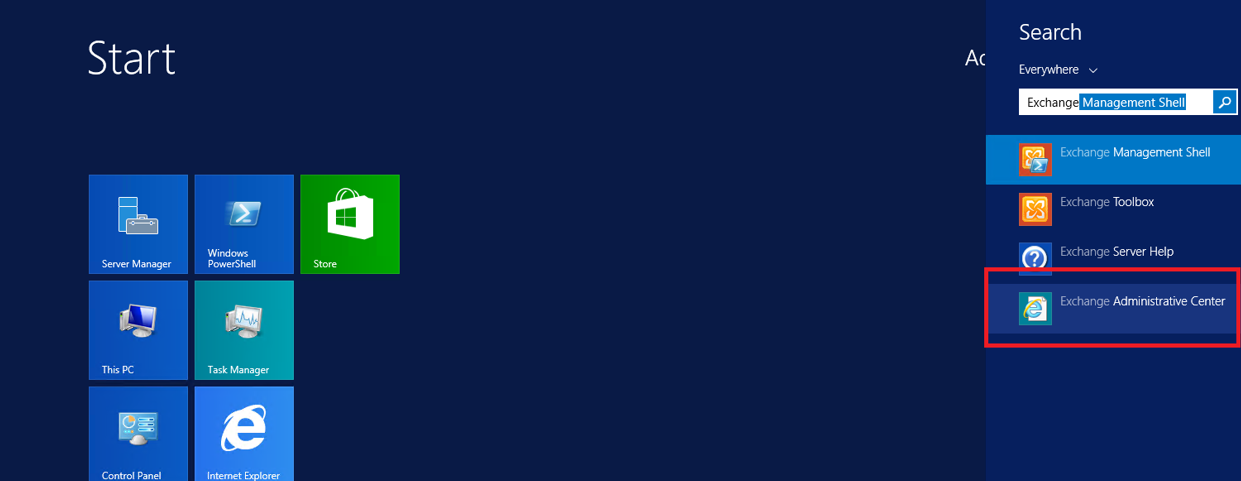
      1. Open the Exchange Administrative Center
        Exchange Administrative Center (2013)
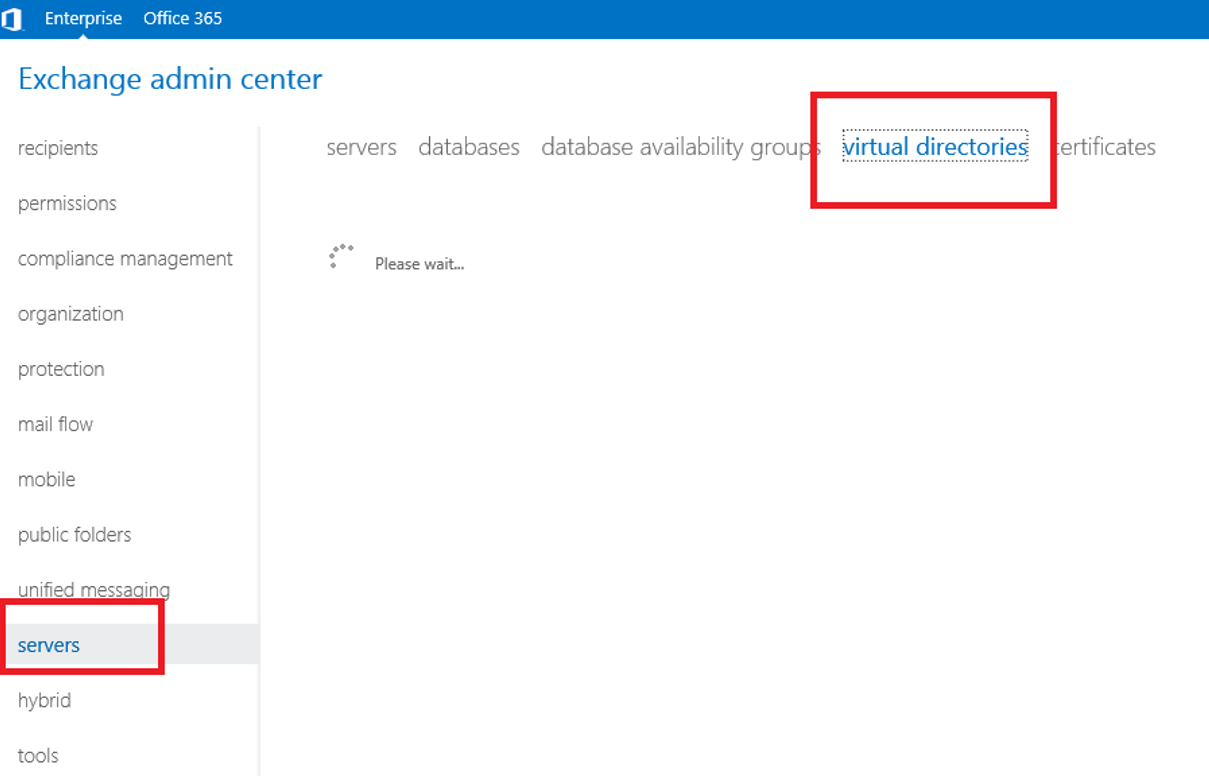
      2. Login to the admin center, click on Servers and select the Virtual Directories tab
        Exchange Administrative Center (2013) - admin center - servers -virtual directories
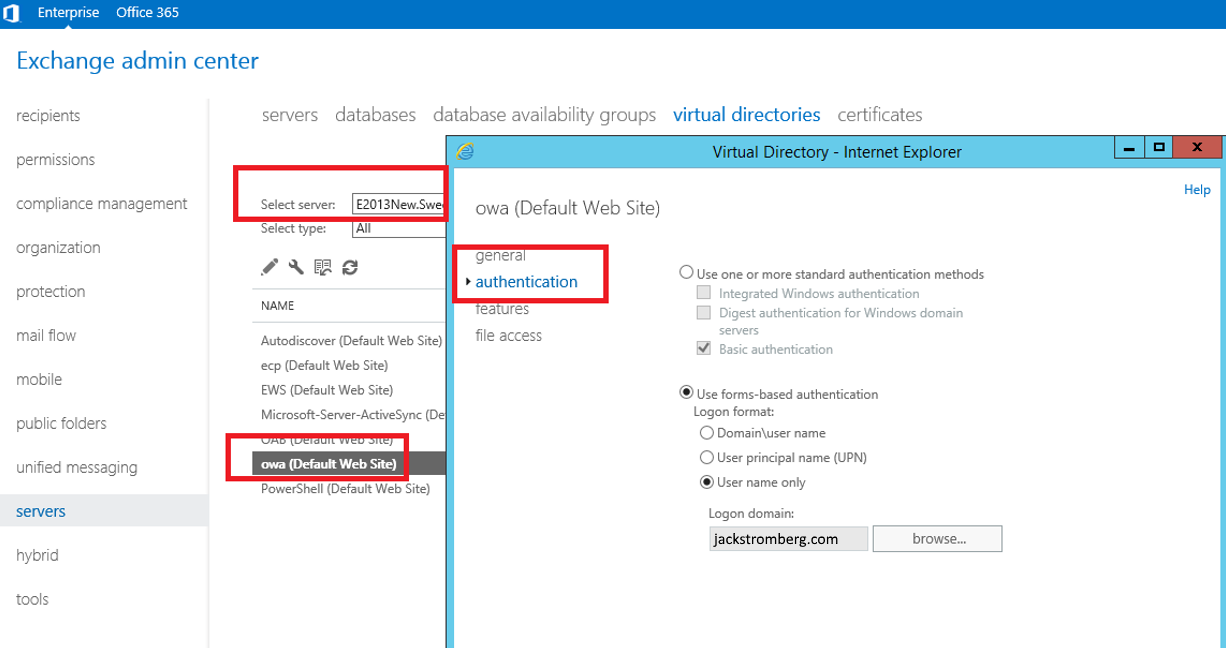
      3. Select server and then double click on the OWA Virtual Directory and select the applications tab
        Exchange Administrative Center (2013) - admin center - servers -virtual directories - owa - authentication
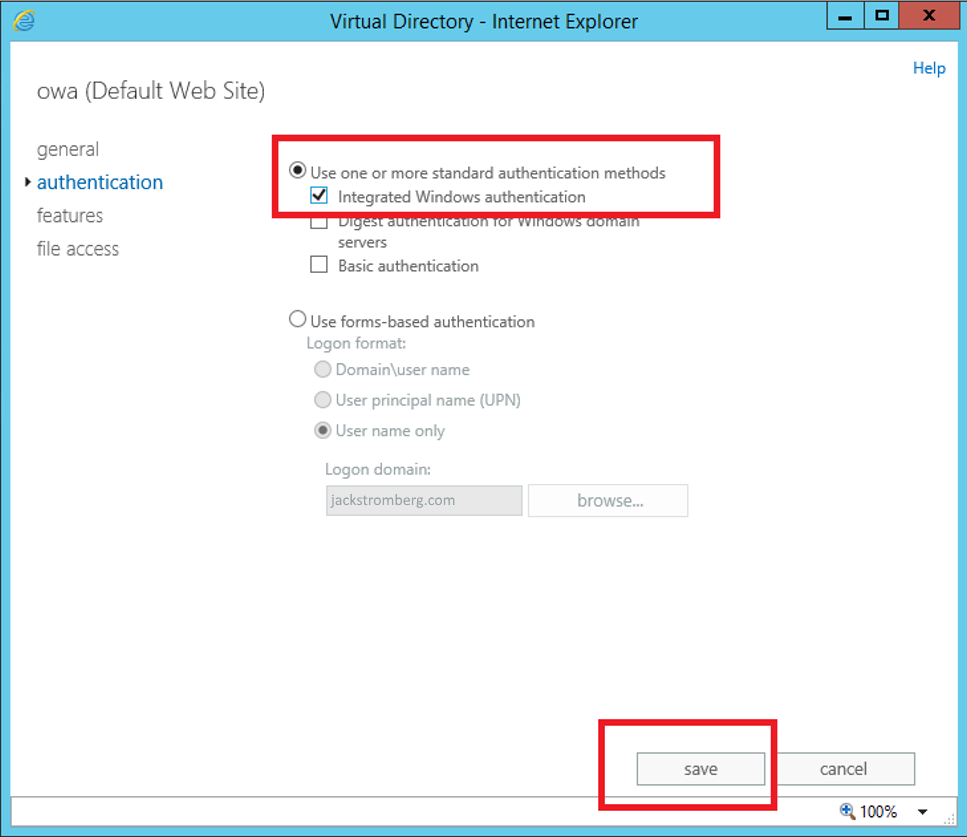
      4. On the authentication tab, select Use one or more standard authentication methods, select Integrated Windows authentication, and click save
        Exchange Administrative Center (2013) - admin center - servers -virtual directories - owa - authentication - integrated windows authentication
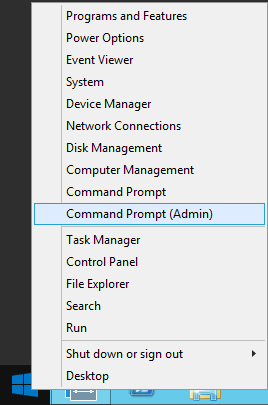
      5. Open a command prompt
        Elevated Command Prompt
      6. Execute the iisrest command
        cmd - iisreset
  3. Login to the Azure Portal
    1. https://portal.azure.com
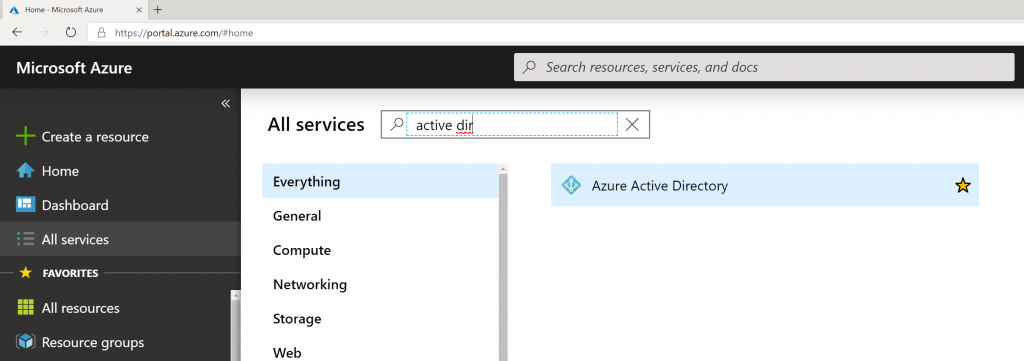
  4. Select All services -> Azure Active Directory on the left side
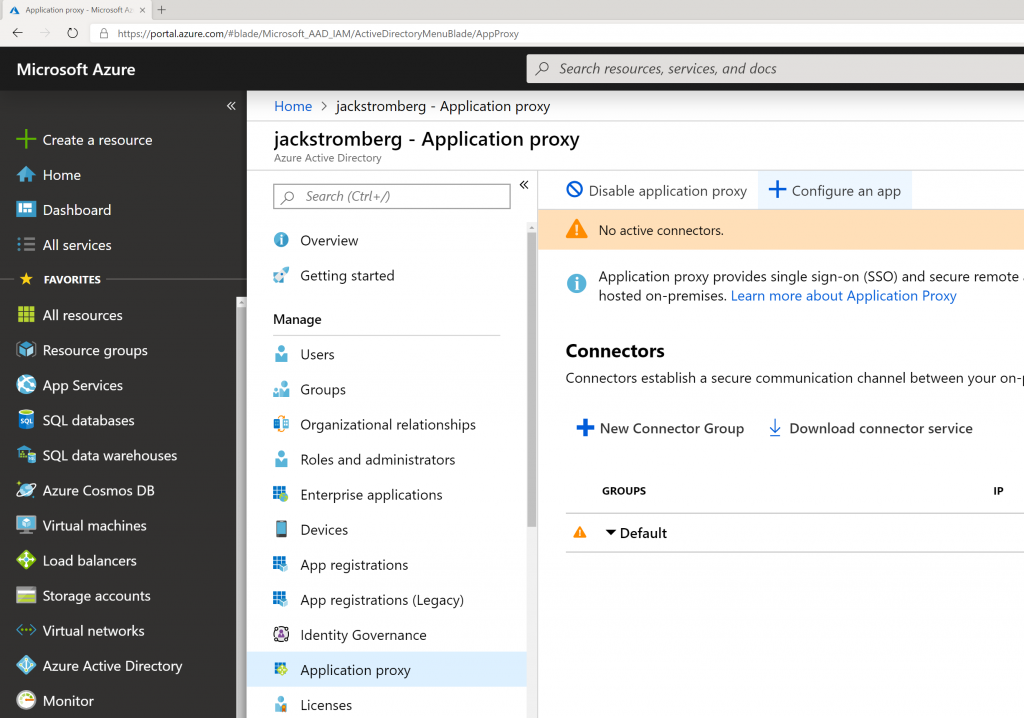
  5. Select Application proxy in the sub blade and select + Configure app

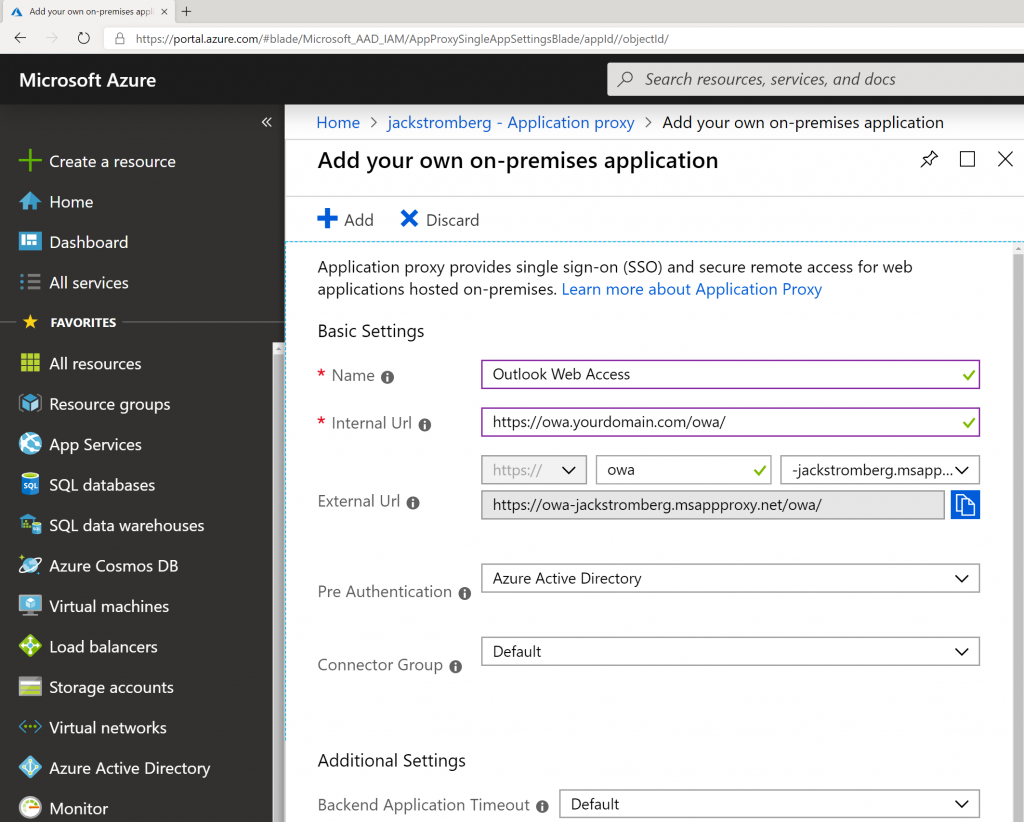
  6. Enter in the following information for the application:
    1. Name: Outlook Web Access
    2. Internal URL: https://owa.yourdomain.com/owa/ (this is the internal URL to owa)
    3. Pre-Authentication: Azure Active Directory
    4. Connector Group: Default
    5. Click + Add

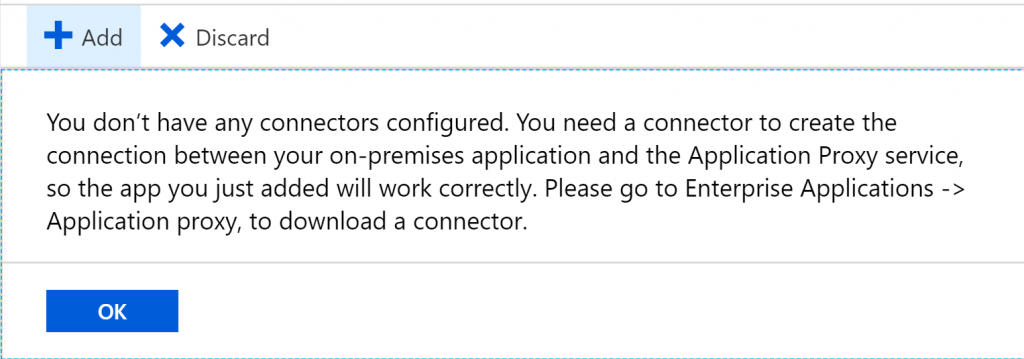
    6. Select OK if not prompted about having a connector
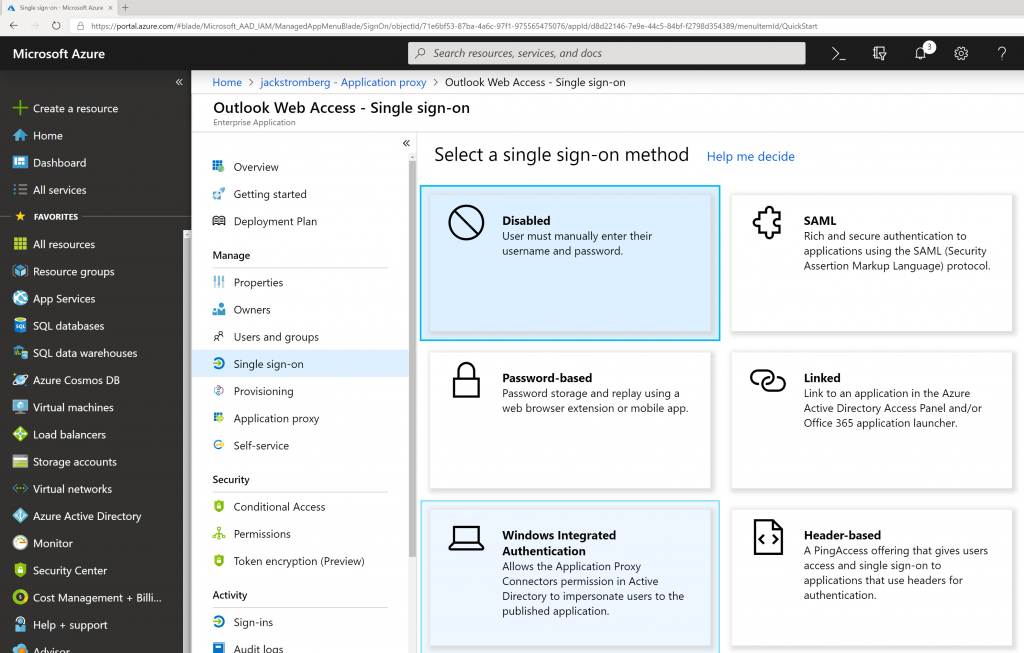
  7. Once your application is created, you should be redirected to Azure Active Directory -> Enterprise Applications -> Outlook Web Access.  On this blade, select Single sign-on and then select the Windows Integrated Authentication button

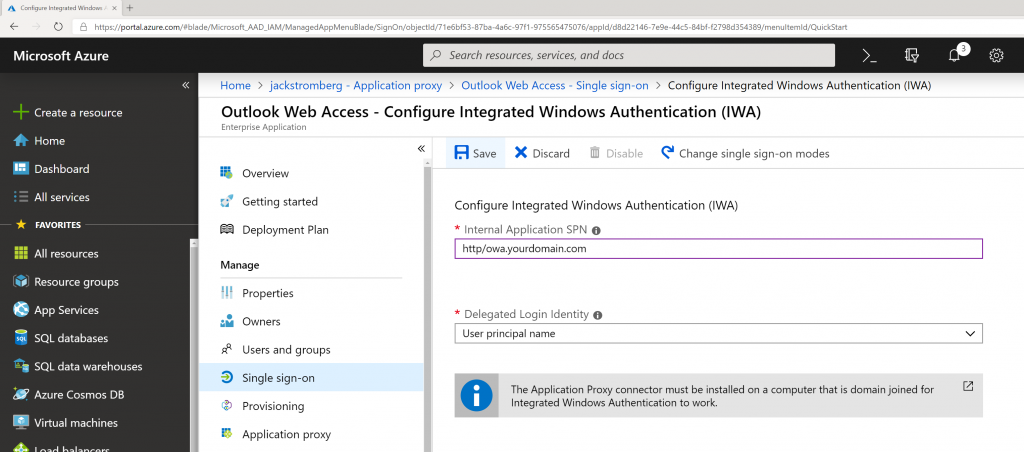
  8. Use the following configuration
    1. Internal Application SPN: http/owa.yourdomain.com
      1. This is the Service Principal Name to the Exchange Server.  The value for this was provided earlier in this tutorial.
    2. Delegated Login Identity: User Principal Name
    3. Click Save
    4. Note: If you cannot do Kerberos based authentication (Integrated Windows Authentication) in your environment, you can Discard the changes continue to use Azure AD Application proxy, however the end user will be prompted for credentials just as if they browsed directly to OWA.
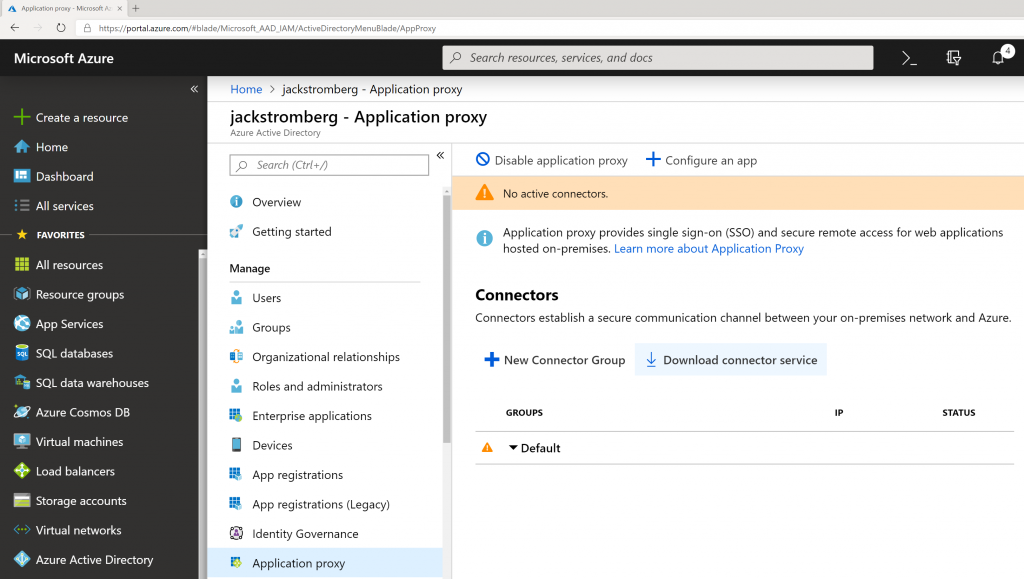
  9. Go back to All Services -> Azure Active Directory -> Application Proxy and click the Download connector service button


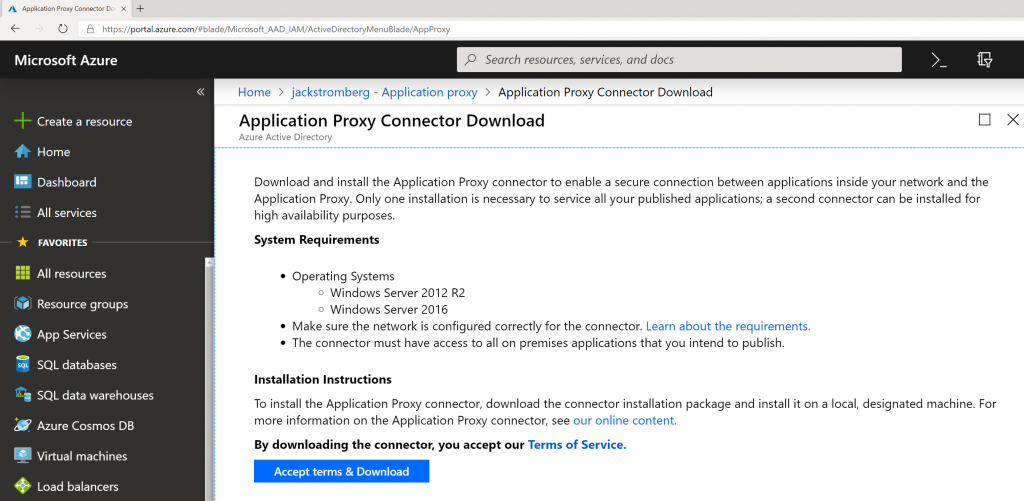
    1. Click the Accept terms & Download button
    2. Note: Although the download has a generic name, the download is customized specifically for your application (Outlook Web Access in this case).  If you create other applications within your Azure AD tenant, make sure you always use the Download button inside of each application so it generates the correct installer.
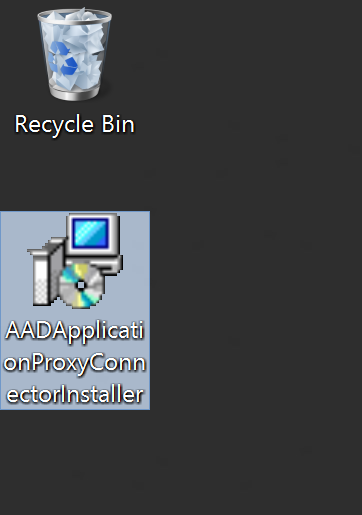
  10. Copy the AADApplicationProxyConnectorInstaller.exe connector to any server in your environment that can access your OWA instance internally and run the installer
    AADApplicationProxyConnectorInstaller Downloaded
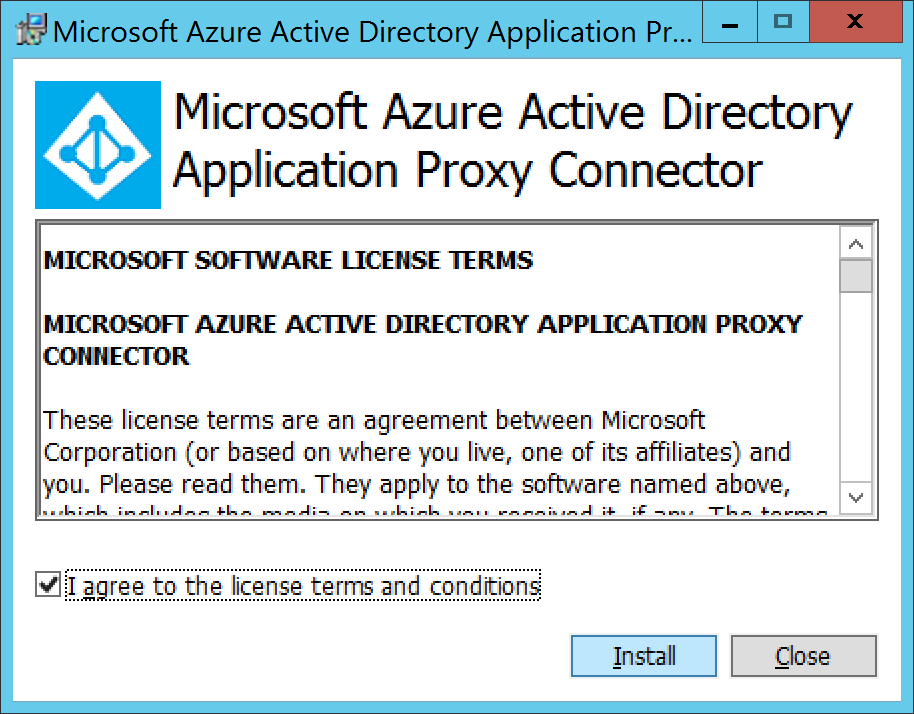
  11. Check I agree to the license terms and conditions and click Install
    Microsoft Azure Active Directory Application Proxy Connector - I agree
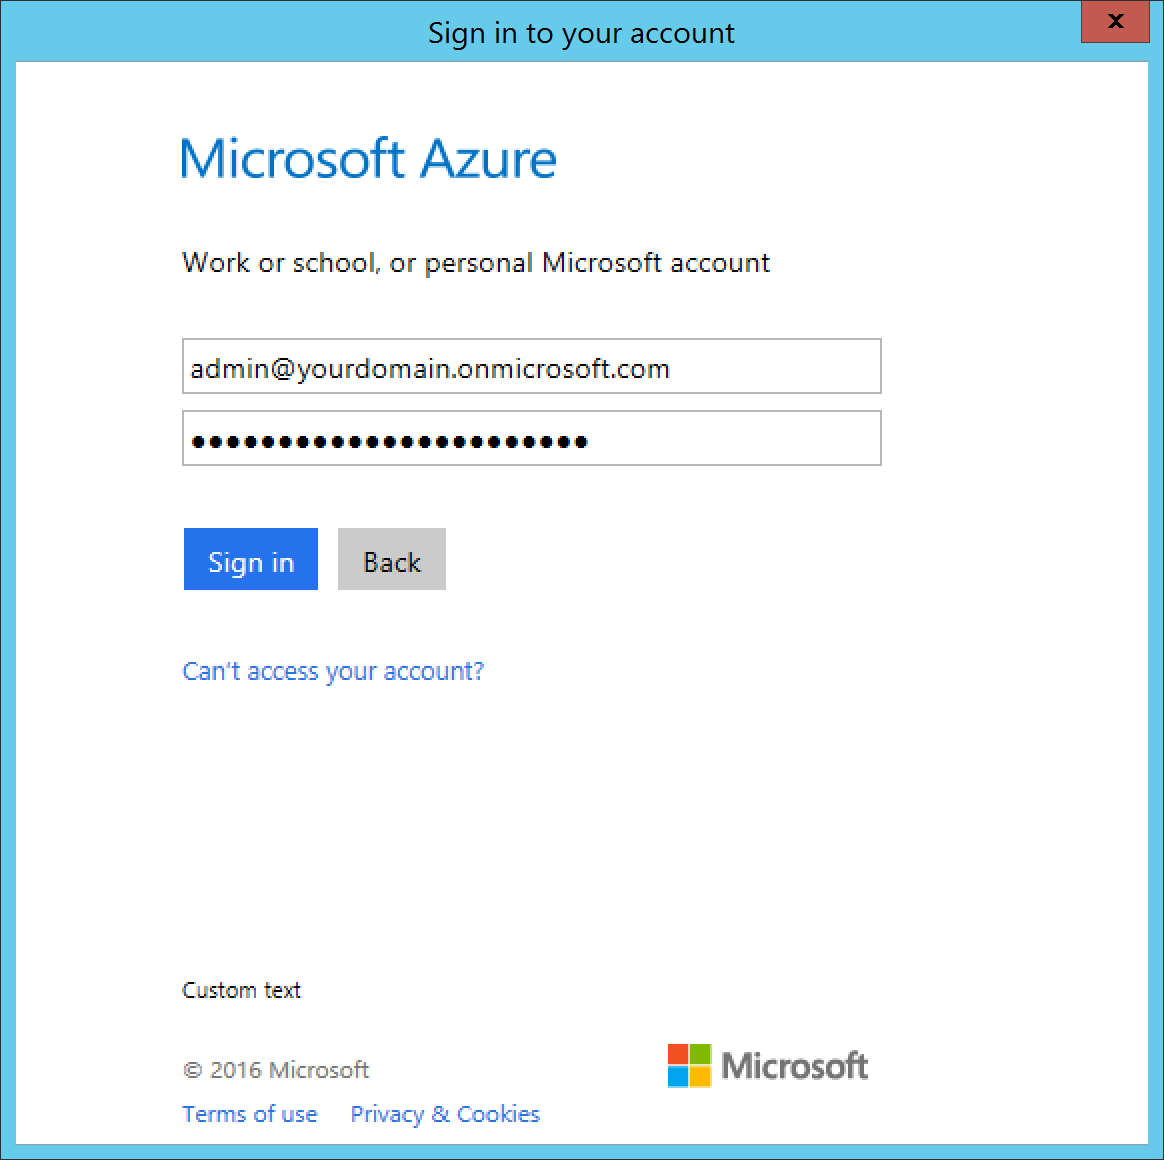
  12. Type in your Global Administrator credentials to register the agent to your Azure AD tenant and click Sign in
    Microsoft Azure Active Directory Application Proxy Connector - Credential Prompt
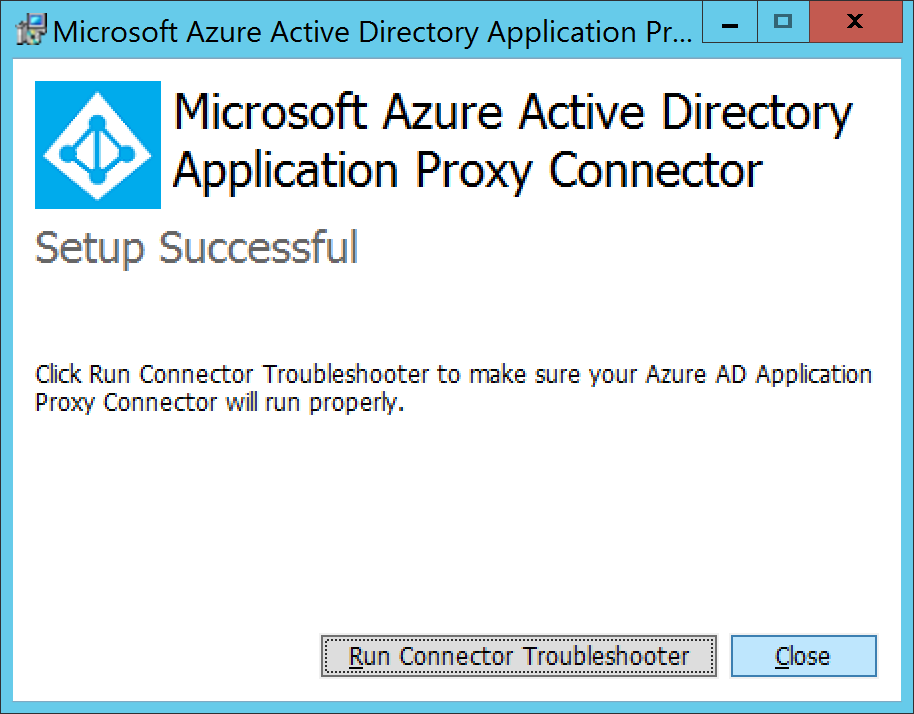
  13. Click Close if it shows Setup Success
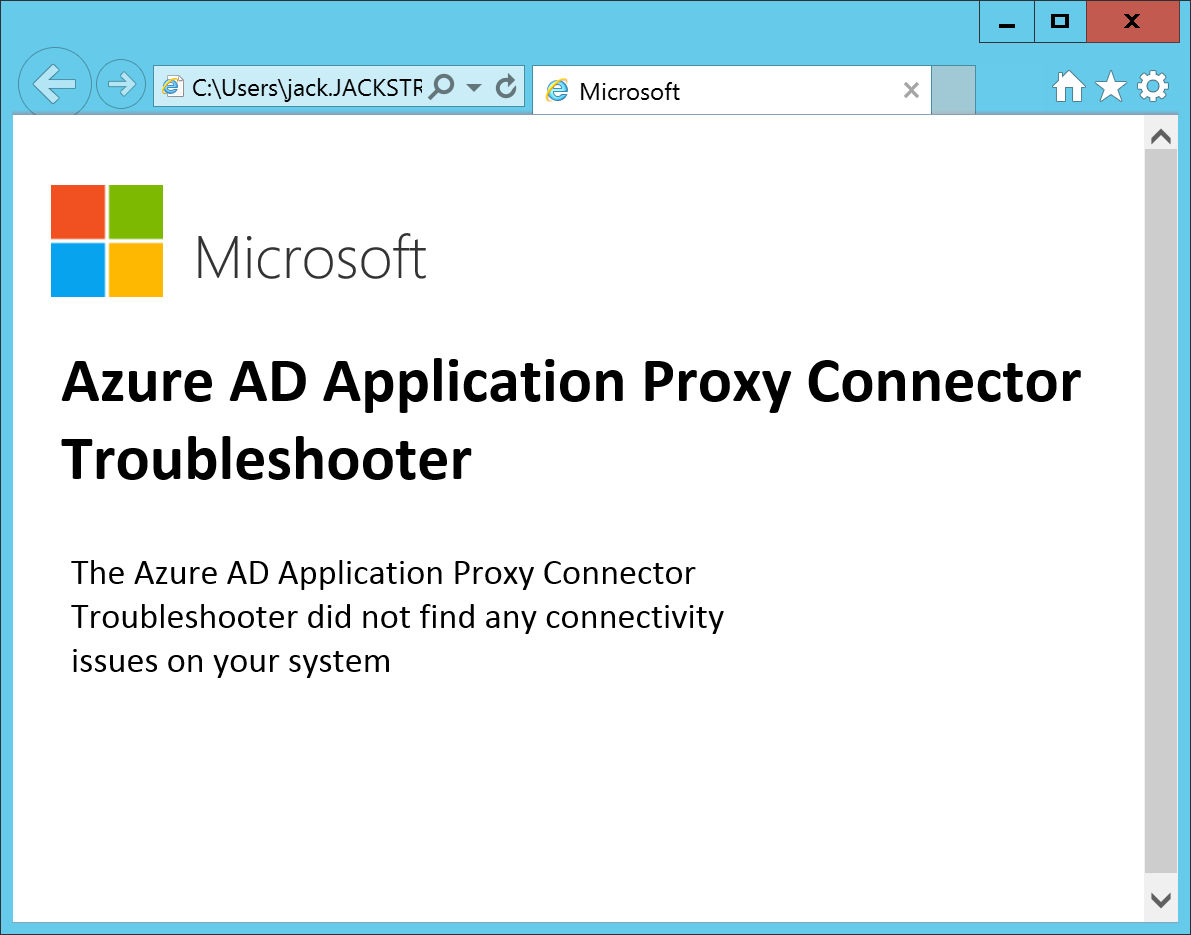
    Microsoft Azure Active Directory Application Proxy Connector - SuccessOptional: You can run the Connector Troubleshooter if you would like.  It will install a quick application that will show you the results of the test in your web browser once it has completed.
    Azure AD Application Proxy Connector Troubleshooter
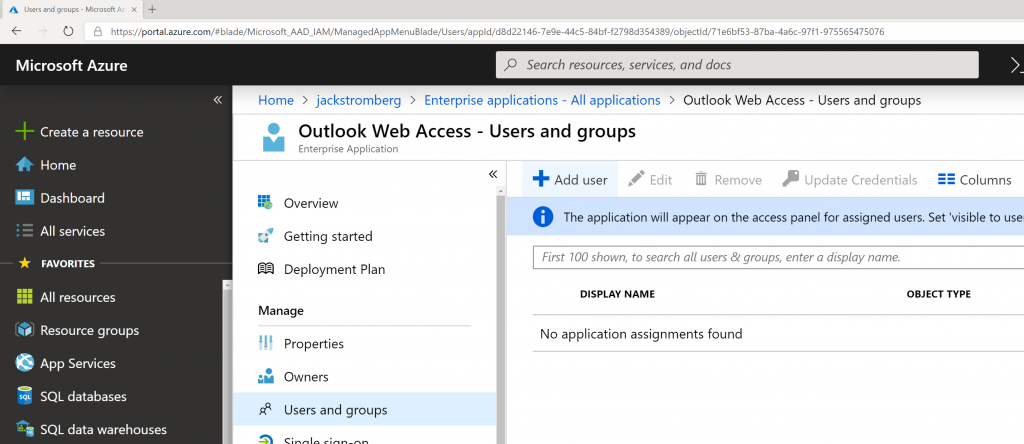
  14. Go back to the Azure Portal and navigate to Azure Active Directory -> Enterprise Applications -> Outlook Web Access.  Select Users and groups and click the +Add user button to assign the group or users that should use the application.
      

    1. Note: This group could be synchronized from on-premises to Azure AD or created in the cloud
    2. Note: Assigning a user or group to this application will automatically make the application show up in the My Apps portal
    3. Note: Users or Groups must be defined to use the application or they will receive an error upon logging in

Test

  1. Login to https://myapps.microsoft.com as one of the assigned users to the Outlook Web Access application
  2. Select the Outlook Web Access application

If all went well, you should be logged into Outlook Web Access on-premises and see your corresponding mailbox.  At this point, I would proceed with adding a vanity domain name that matches your organization as well as corresponding SSL certificate for the domain name instead of leveraging the default msapprpoxy.net domain name.  Additionally, you can always find a nice little icon for the application to make it look like OWA as well 🙂

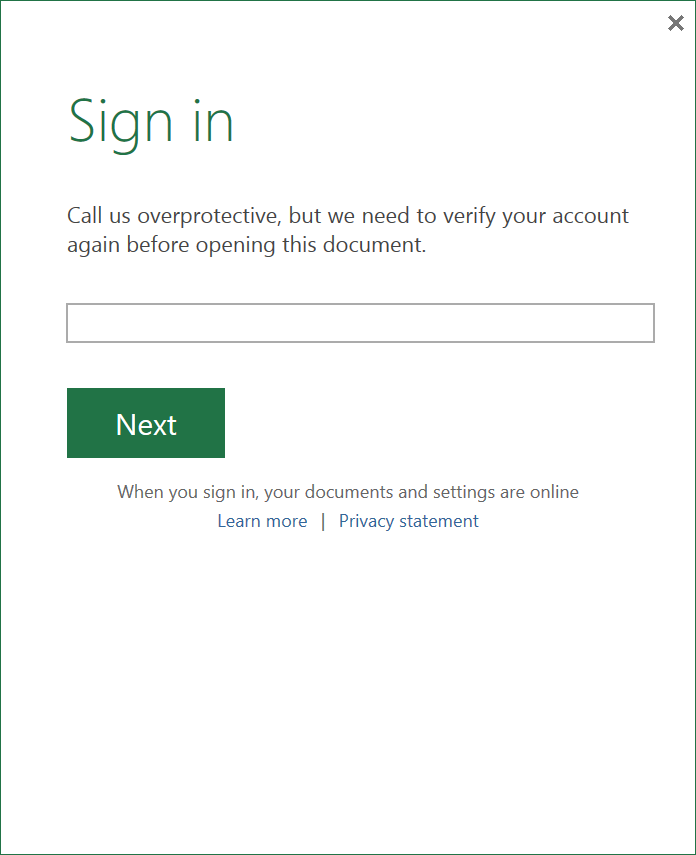
Office 365 - Call us overprotective, but we need to verify your account again before opening this document.

Symptom:

When trying to open a document in Office 2013 ProPlus from Office 365's SharePoint environment, you are periodically prompted for credentials to SharePoint Online, OneDrive, and Lync Onlinet (using your email address and password).  Additionally, the affected users are those that have been synchronized from an on-premise Active Directory environment via ADFS.

Side Note: Not sure if this is relevent or not, but we noticed this started to happen after upgrading our ADFS Proxy Servers to Server 2012 R2 (ADFS v3).

You are prompted with the following Sign In box:

Call us overprotective, but we need to verify your account again before opening this document.
Sign In

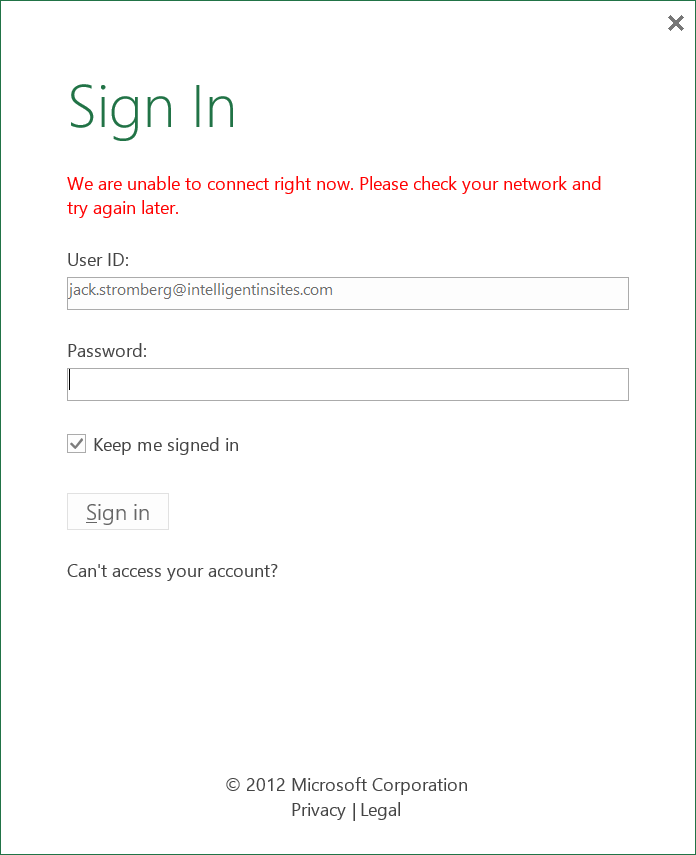
Once you try signing in, you receive the following error:

We are unable to connect right now. Please check your network and try again later.

Sign In 2

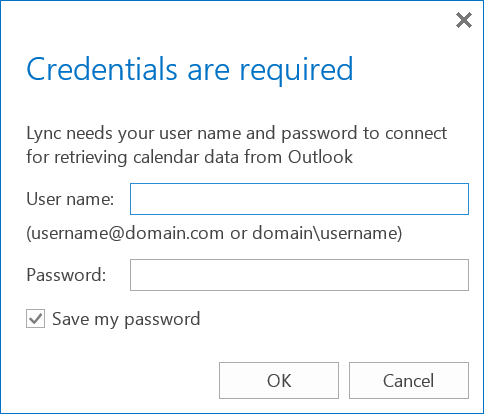
Inside of the Lync 2013 client, you might see the following dialog as well:

Credentials are required

Lync needs your user name and password to connect for retrieving calendar data from Outlook

Sign In 3

Solution:

This error is caused by a variety of different issues.  Please try all of the following below.

If you have a single client having issues

  • Clearing cache of Internet Explorer
  • Running an online repair of Office 365 ProPlus
  • Switching Accounts inside of Outlook (File->Office Account->Switch Account)
  • Deactiving office from Office 365 settings and reactivating

If this is a widespread issue on multiple machines in your environment

  • Verify all proxy servers are functioning
    • If you have multiple proxy servers, ensure your Network Load Balancer is functioning correctly
  • You might be hitting a known bug with the Office 2013 Suite.  See the following KB article on how to try a workaround (this was the fix for an environment I worked on using ADFS and Server 2012): http://support.microsoft.com/kb/2913639

ADFS v3 on Server 2012 R2 - Allow Chrome to automatically sign-in internally

Symptom: When upgrading from ADFS v2.0 to ADFS v3 built natively into Server 2012 R2, I noticed Chrome stopped auto-logging in people when trying to hit the ADFS server from inside the corporate network.

Solution: We need to allow NTLM authentication for the Google Chrome useragent.

  1. Login to your primary ADFS server
  2. NOTE: This step is no longer applicable on newer versions of Chrome.
    This is only applicable if running extremely old versions of Chrome (v50 or lower) -- the fix has been added in Chrome v51 and higher.

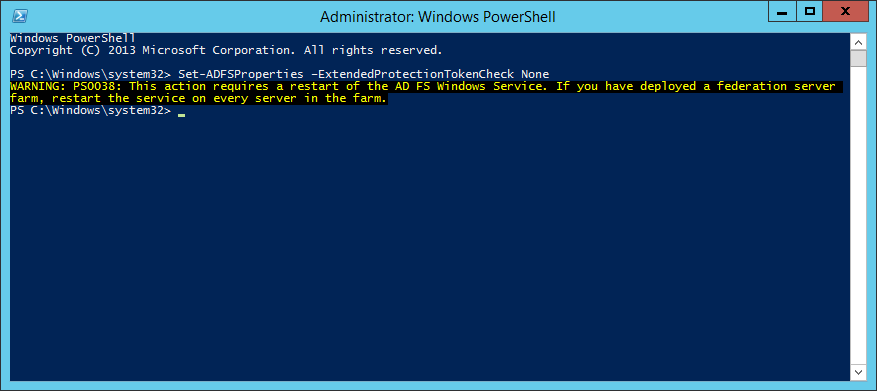
    Execute the following command to disable Extended Protection TokenCheck (See notes for what this is at the bottom of this article)

    1. Set-ADFSProperties –ExtendedProtectionTokenCheck None
      Set-ADFSProperties -ExtendedProtectionTokenCheck None
  3. Execute the following command to get the current list of supported user-agents for NTLM authentication
    1. [System.Collections.ArrayList]$UserAgents = Get-AdfsProperties | select -ExpandProperty WIASupportedUserAgents

  4. Execute the following command to inject the user agent into a temporary array of user agents already added to ADFS.
    1. $UserAgents.Add("Mozilla/5.0")
  5. Execute the following command to commit the change.
    1. Set-ADFSProperties -WIASupportedUserAgents $UserAgents
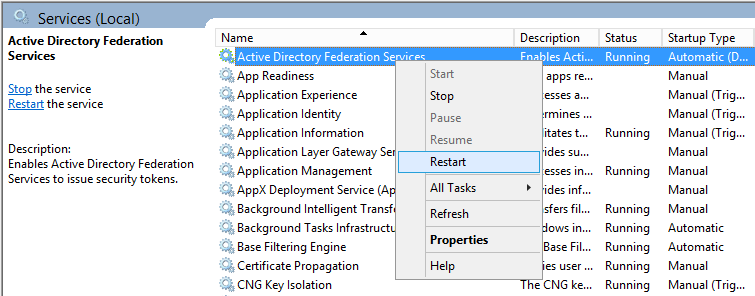
  6. Restart the Active Directory Federation Services service on each of the ADFS farm servers for the changes to take effect.  You do not need to make any changes to the proxy servers.
    Restart Active Directory Federation Services - Restart

Notes

Shout out to Jon Payne in the comments section below for the idea of putting all the values into an ArrayList and then committing the arraylist to ADFS vs adding in all the strings manually.

ExtendedProtectionTokenCheck - Copied directly from technet - Specifies the level of extended protection for authentication supported by the federation server. Extended Protection for Authentication helps protect against man-in-the-middle (MITM) attacks, in which an attacker intercepts a client's credentials and forwards them to a server. Protection against such attacks is made possible through a Channel Binding Token (CBT) which can be either required, allowed or not required by the server when establishing communications with clients.  http://technet.microsoft.com/en-us/library/ee892317.aspx

Office 365 - Single Sign-On for SharePoint, Skydrive, CRM, etc. via Smart Links

Update: I have released a smart link generator to have these items created automatically, please find this here: http://jackstromberg.com/o365-smart-linksso-link-generator/

Synopsis: One of the biggest problems I have seen with Office 365 is ease in accessibility to all of the Office365 resources.  As pointed out on many of the Microsoft forums, SharePoint, CRM, Skydrive, etc. do not automatically complete a single-sign on request when browsing the website.

Problem: When a user browses https://mydomain.sharepoint.com for example, the user is prompted to enter in their email address.  What a user expects is that they should automatically be logged in and see sharepoint when navigating to https://mydomain.sharepoint.com  Additionally, for whatever reason, users cannot remember the website address to https://mydomain.sharepoint.com  Instead, they want to do something like http://sharepoint.mydomain.com

Solution: Create name branded "fancy URLs" that will complete an idp claim to give the user a true SSO experience.

  • http://owa.mydomain.com
  • http://sharepoint.mydomain.com
  • http://skydrive.mydomain.com
  • http://crm.mydomain.com

Solution:

  1. Open up Internet Explorer
  2. Navigate to https://mydomain.sharepoint.com
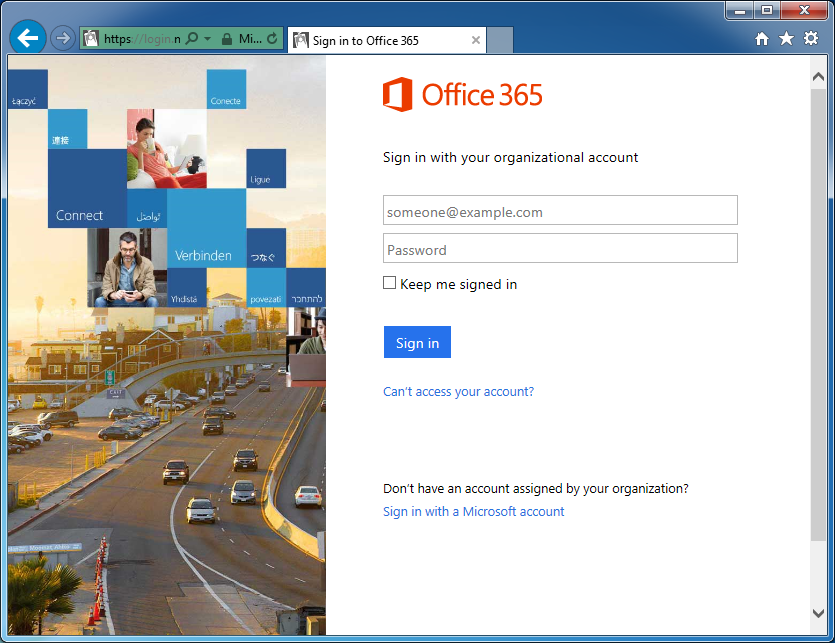
    Sign into Office 365
  3. Press F12 to open up the developer tools console (I am running IE 11, the console looks way different than previous versions of IE)
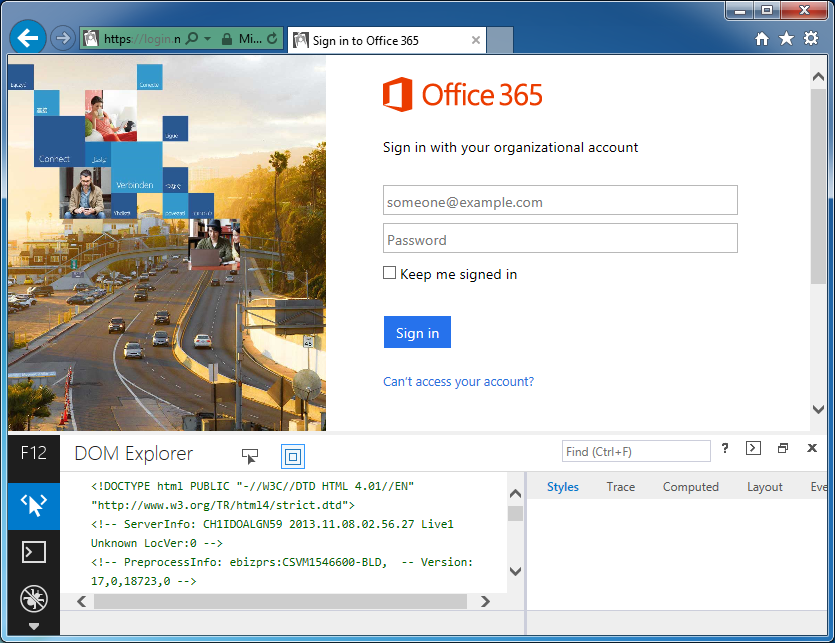
    Sign into Office 365 - Developer Console
  4. Scroll down and select the icon that looks like a little WiFi antenna
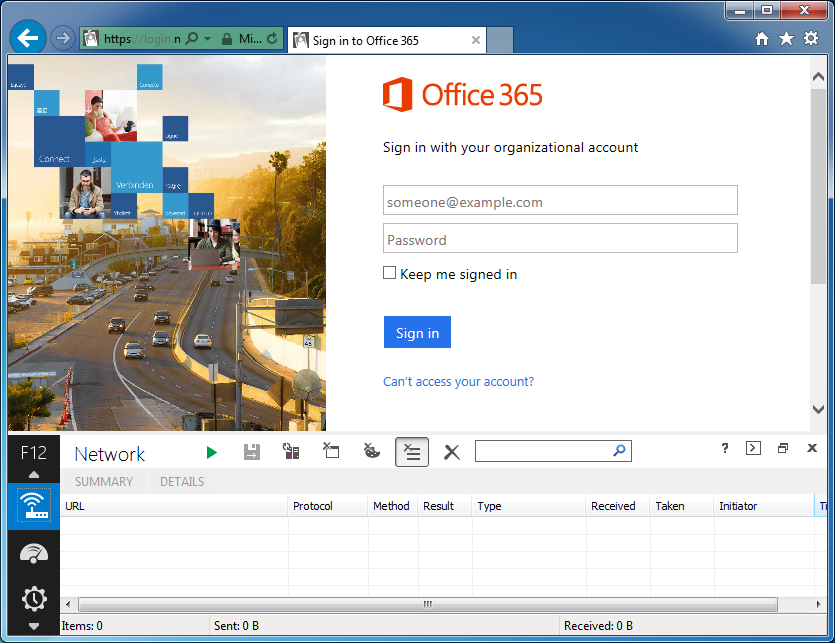
    Sign into Office 365 - Developer Console - Network
  5. Click the green play button
    Sign into Office 365 - Developer Console - Network - Start Capture
  6. Type in your email address as you would to login to sharepoint ([email protected])
  7. You should be redirected to your ADFS server and inside the network console, you should see a link like https://sts.mydomain.com/adfs/ls/?..................  Copy this link into notepad.
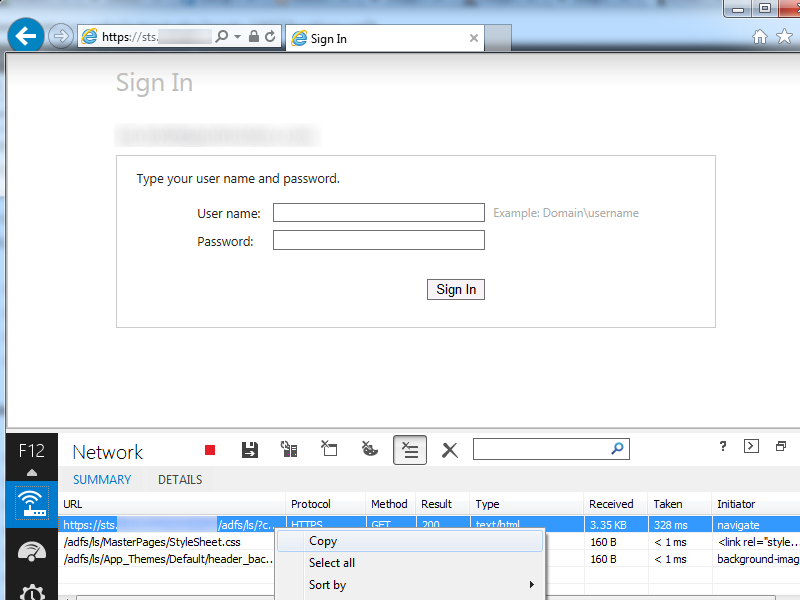
    Office 365 - Federated URL
  8. Remove the extra stuff from the debug console
    Before
    Office 365 - Federated URL - Notepad

    After
    Office 365 - Federated URL - Cleaned - Notepad
  9. Remove everything from cbcxt=..... to wa=wsignin1.0
    Office 365 - Federated URL - cbcxt removed
  10. Remove the ct%3D1386214464%26 and bk%3D1386214464%26 parameters
    Office 365 - Federated URL - ct and bk removed
  11. Next, open up another new notepad document named index.html and paste the following text into it
    1. <!DOCTYPE html PUBLIC "-//W3C//DTD XHTML 1.0 Strict//EN"
      "http://www.w3.org/TR/xhtml1/DTD/xhtml1-strict.dtd"><html xmlns="http://www.w3.org/1999/xhtml"><head>
      <title>CRM</title>
      <meta http-equiv="refresh" content="0; url=https://sts.mydomain.com link goes here" /></head>

      <body>

      </body>
      </html>
      Redirect to URL template

  12. Replace https://sts.mydomain.com link goes here with your new smart link and save the document.
    Redirect to federated URL
  13. Upload the index.html file to one of your your webservers
  14. Create a new A record called sharepoint.mydomain.com pointing to your webserver
  15. Now when a user browses http://sharepoint.mydomain.com, the user will automatically be redirected to your secure ADFS Proxy and authenticate automatically.

You will need to repeat the steps above for each of the Office 365 products your company uses.  The federated addresses do change, so you will have to follow all of the steps over again for each Smart Link you wish to create.

NOTES:

Here is an official article on creating smart links: http://community.office365.com/en-us/wikis/sso/using-smart-links-or-idp-initiated-authentication-with-office-365.aspx
Office 365 - Sorry, but we're having trouble signing you in: error 80041034

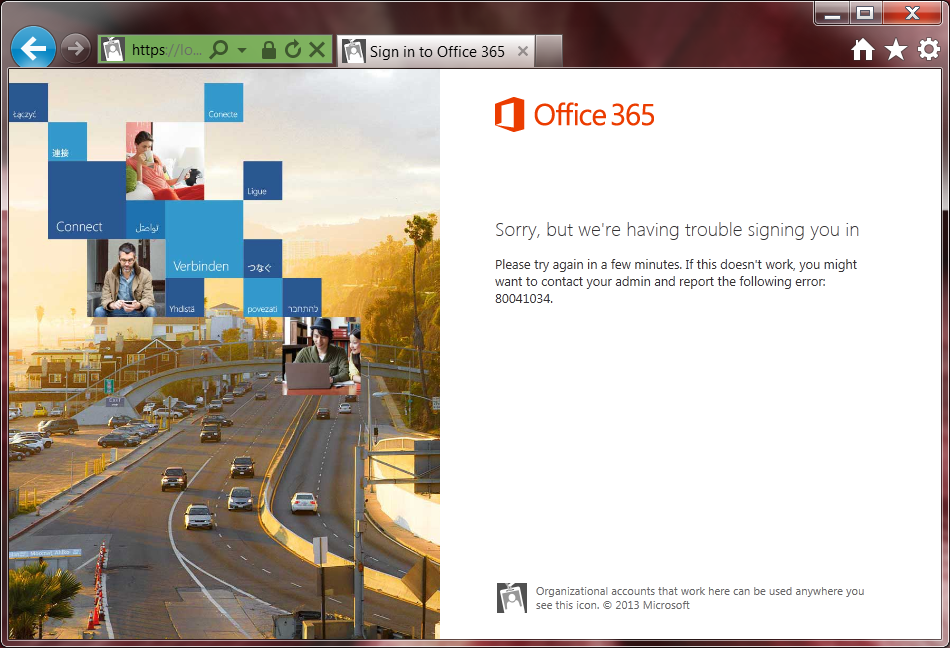
Symptom: After changing the samAccountName (User Principal Name (UPN)) of a user in your on-premise Active Directory environment, run the DirSync tool to update the user on Office 365 (or wait 3 hours) [and have verified the user's new UPN synchronized in the Office 365 admin portal], the user is presented with the following error when trying to sign into Outlook, SharePoint, CRM, etc. on Office 365.

Sorry, but we're having trouble signing you in  Please try again in a few minutes.  If this doesn't work, you might want to contact your admin and report the following error: 80041034.

Office 365 - Error 80041034


Solution: This turns out to be an issue with ADFS (Active Directory Federated Services), caching user account attributes, which prevents a successful login.  Here are a couple of solutions to solve this issue:

  1. Try reupdating/repairing party trust with Office 365.
    1. Login to one of your ADFS servers.
    2. Click Start, All Programs, Windows Azure Active Directory, and then select Windows Azure Active Directory Module for Windows PowerShell.
    3. Execute the following command to connect to Microsoft's online services (when prompted, type in your Office 365 Administrator credentials)
      1. Connect-MSOLService
    4. Execute the following command to update federated trust
    5. Update-MSOLFederatedDomain –DomainName:<Federated Domain Name>
  2. Try temporarily disabling Local Security Authority (LSA) credential caching on your AD FS servers (note this can increase the load on your ADFS and AD DS servers)
    1. Login to each of your ADFS servers and complete the following steps
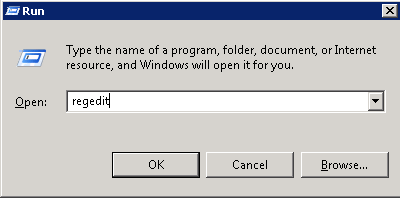
      1. Click Start -> Run -> regedit to open up the registry editor
      2. run - regedit
      3. Navigate to the following registry key
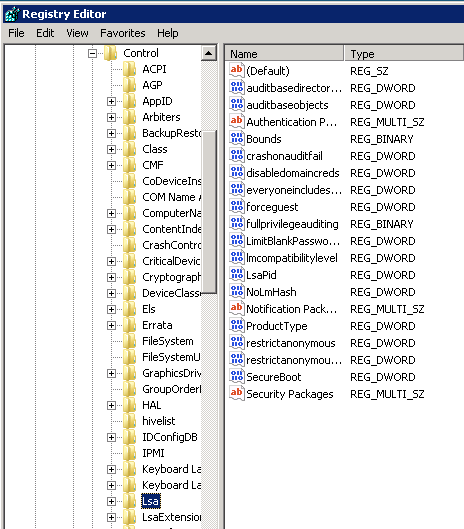
        1. HKEY_LOCAL_MACHINE\SYSTEM\CurrentControlSet\Control\Lsa
          HKEY_LOCAL_MACHINE-SYSTEM-CurrentControlSet-Control-Lsa
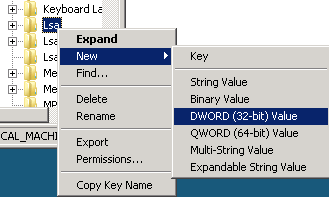
      4. Right click on Lsa, select New -> DWORD (32-bit) Value
        HKEY_LOCAL_MACHINE-SYSTEM-CurrentControlSet-Control-Lsa - new DWORD
      5. Enter LsaLookupCacheMaxSize as the value name and press Enter
        LsaLookupCacheMaxSize
      6. Right click on LsaLookupCacheMaxSize and select Modify
        Modify LsaLookupCacheMaxSize
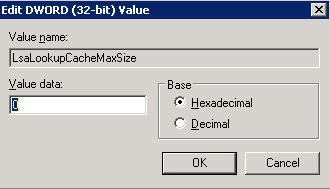
      7. Ensure the value data is set to 0 and select OK
        LsaLookupCacheMaxSize - Edit DWORD
    2. Verify the user can successfully login.  Once they can, continue on to delete the key we created
    3. Right click on the LsaLookupCacheMaxSize value we created and select Delete
      Delete LsaLookupCacheMaxSize
  3. Reboot all ADFS and ADFS proxy servers in your environment

Microsoft has released an official KB article referencing this issue, you can find it here: http://support.microsoft.com/kb/2535191