Category Archives: Active Directory

List of schema versions for Windows Server Active Directory

Here's the current list of Schema Versions for Active Directory on Windows Server.

OS Schema Version
Windows 2000 Server 13
Windows Server 2003 30
Windows Server 2003 R2 31
Windows Server 2008 44
Windows Server 2008 R2 47
Windows Server 2012 56
Windows Server 2012 R2 69
Windows Server 2016 87


You can validate the current schema version you have in your environment via PowerShell or Registry Editor.

Validate schema version via PowerShell:

Get-ADObject (Get-ADRootDSE).schemaNamingContext -Property objectVersion

In this screenshot, I have ObjectVersion equal to 69, denoting the schema has been extended for AD on Windows Server 2012 R2.

Validate schema version via Registry Editor:

  1. Click Start and search for
  2. regedit
    regedit
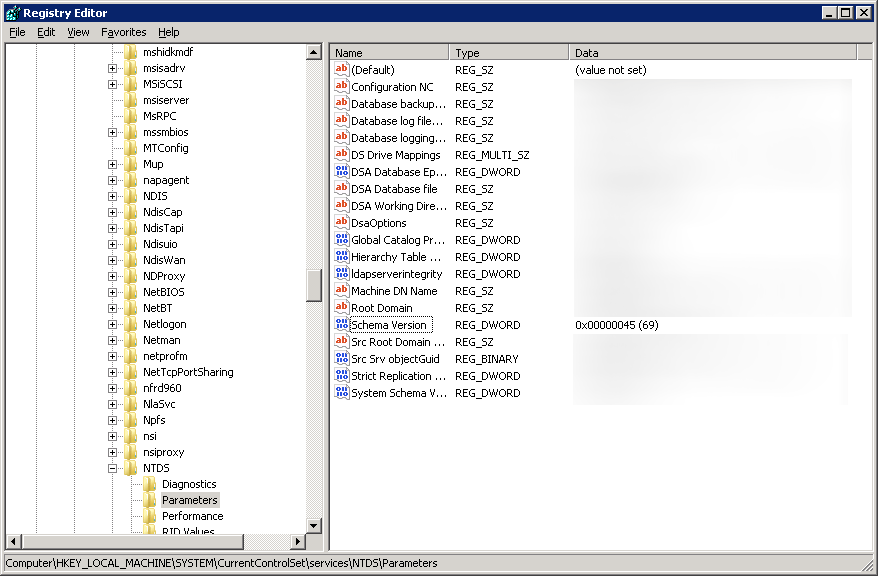
  3. Open up regedit and navigate to Computer\HKEY_LOCAL_MACHINE\SYSTEM\CurrentControlSet\services\NTDS\Parameters
  4. In this screenshot, I have Schema Version equal to 69, denoting the schema has been extended for AD on Windows Server 2012 R2.
    regedit - schema version

Exporting TPM Owner Key and BitLocker Recovery Password from Active Directory via PowerShell

Synopsis: When looking up a BitLocker Recovery Password or TPM Owner Key, the process can be quite laborious.  This post contains a PowerShell script to help automate the process of manually looking at attributes in Active Directory to pull such information.

Download a copy of the script here (make sure to remove the .txt at the end): Get-TPMandBitlockerInfo.ps1.txt

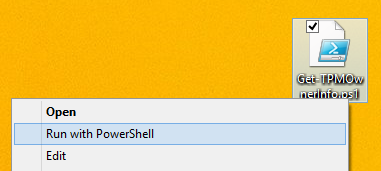
Run the script with PowerShell

Get-TPMOwnerInfo - Run with PowerShell

Here are the results it should return
Get-TPMOwnerInfo - PowerShell


Here is a copy of the script in Plain Text

<#
.SYNOPSIS
    Automates the process on gathering BitLocker recovery password and TPM owner password.

.DESCRIPTION
    This script will lookup multiple attribute in Active Directory and display the correlating
    values that hold sensitive BitLocker information.  Additionally, the TPM Owner Password
    can be exported to a .tpm file, which can be used to make changes to the correlating machine.

.NOTES
    File Name      : Get-TPMandBitlockerInfo.ps1
    Author         : Jack Stromberg (jackstromberg.com)
    Prerequisite   : PowerShell V2 over Vista and upper
    Version History: 2/5/2015 (original release)

.LINK
    Script posted over at:
    http://jackstromberg.com/2015/02/exporting-tpm-owner-key-and-bitlocker-recovery-password-from-active-directory-via-powershell/
#>

clear
Write-Host "~Enter in the correct credentials to access the BitLocker and TPM Owner attributes~"
$UserName = Read-Host "Enter User Name" 
$Password = Read-Host -AsSecureString "Enter Your Password" 
$credential = New-Object -TypeName System.Management.Automation.PSCredential -ArgumentList $UserName , $Password 

# Get input on which machine to lookup
$computer = Read-Host 'Enter in machine name'

# Import our Active Directory PowerShell commands
Import-Module ActiveDirectory

# Check if the Computer Object exists in AD
$computerObject = Get-ADComputer -Filter {cn -eq $computer} -Property msTPM-OwnerInformation, msTPM-TpmInformationForComputer -Credential $credential
if($computerObject -eq $null){
    Write-Host "Computer object not found.  Exiting the script..."
    Cmd /c pause
	Exit
}

# Windows Vista and 7 stores the TPM owner password in the msTPM-OwnerInformation attribute, check that first.
# If the key hasn't been stored there, check the msTPM-TpmInformationForComputer object to see if it was backed up on a Win 8 or greater machine
if($computerObject.'msTPM-OwnerInformation' -eq $null){
    #Check if the computer object has had the TPM info backed up to AD
    if($computerObject.'msTPM-TpmInformationForComputer' -ne $null){
        # Grab the TPM Owner Password from the msTPM-InformationObject
        $TPMObject = Get-ADObject -Identity $computerObject.'msTPM-TpmInformationForComputer' -Properties msTPM-OwnerInformation  -Credential $credential
        $TPMRecoveryKey = $TPMObject.'msTPM-OwnerInformation'
    }else{
        $TPMRecoveryKey = '<not set>'
    }
}else{
    # Windows 7 and older OS TPM Owner Password
    $TPMRecoveryKey = $computerObject.'msTPM-OwnerInformation'
}

# Check if the computer object has had a BitLocker Recovery Password backed up to AD
$BitLockerObject = Get-ADObject -Filter {objectclass -eq 'msFVE-RecoveryInformation'} -SearchBase $computerObject.DistinguishedName -Properties 'msFVE-RecoveryPassword' -Credential $credential | Select-Object -Last 1
if($BitLockerObject.'msFVE-RecoveryPassword'){
    $BitLockerRecoveryKey = $BitLockerObject.'msFVE-RecoveryPassword'
}else{
    $BitLockerRecoveryKey = '<not set>'
}

#Print out our findings
Write-Host 'TPM Owner Recovery Key:' $TPMRecoveryKey
Write-Host 'BitLocker Recovery Password:' $BitLockerRecoveryKey

# Export TPM Owner Password File
if($computerObject.'msTPM-TpmInformationForComputer' -ne $null){
    $exportToFile = Read-Host 'Would you like to export the recovery key [y or n]'
    if($exportToFile -ne 'y'){
        Exit
    }

    $TPMOwnerFile = '<?xml version="1.0" encoding="UTF-8"?><ownerAuth>' + $TPMRecoveryKey + '</ownerAuth>'
    $TPMOwnerFile | Out-File "TPMOwnerPasswordFile.tpm"
}else{
    Cmd /c pause
}

[Tutorial] Configuring BitLocker to store recovery keys in Active Directory

This guide is more of a reflection on the steps I took to publish the BitLocker recovery keys of machines deployed on an Active Directory domain.  Microsoft has gobs and gobs of information on this subject which can be a tad overwhelming, so I have tried to consolidate this article down as much as possible, citing Microsoft sources where found.  If you have any questions, comments, feedback, please feel free to leave a message below.

Prerequisites

  • Domain Controllers are running Windows Server 2003 SP1 or greater
  • Schema Admin or an Enterprise Admin user account privileges

Step 1: Verify your schema is ready (and extend it if applicable)

Based on what I have read, if your DCs were introduced with Server 2008 Beta 3 or later, your schema will be ready, if you started with anything older, your AD environment will more than likely will not have the schema objects/attributes.

Verify you have the schema changes if running Server 2003 R2 or older:

If you are on Server 2003 you will need to open up ADSI edit and verify you have the schema changes (here you can see we are missing the five schema changes for BitLocker)
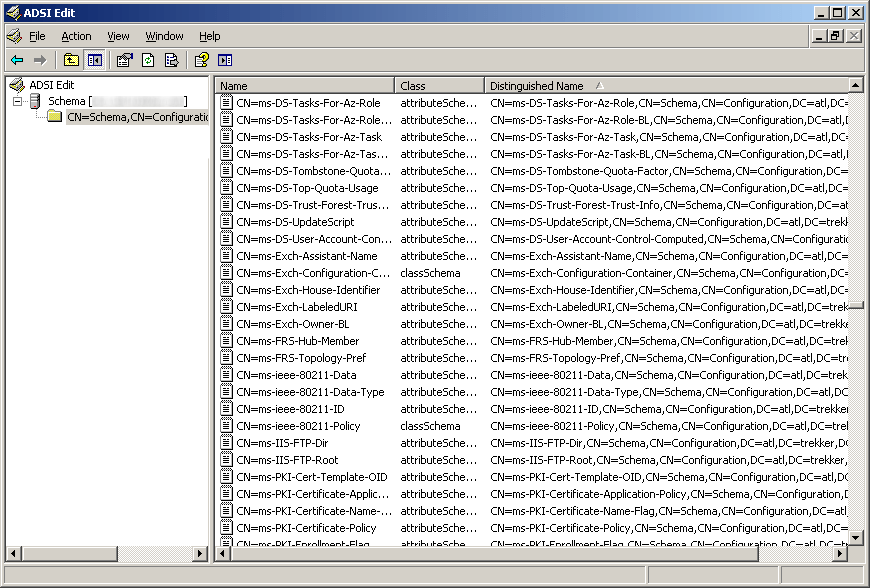
ADSI Edit - Server 2003 R2 - BitLocker

Verify you have the schema changes if running Server 2008 or newer:

If you are on Server 2008 or greater and have powershell, you can execute the following command (here you can see we have the necessary schema changes to proceed, if you receive 0 results, you will need to extend your schema):

Get-ADObject -SearchBase ((GET-ADRootDSE).SchemaNamingContext) -Filter {Name -like "ms-FVE-*"}

AD-Schema objects for BitLocker

Extending your schema if you don't have the schema changes above

If you need the schema update (you are missing the five schema objects listed in the above powershell command), you can execute the following command via Command Prompt on your Domain Controller:

Note: If you are on Server 2008 r2, it is recommended you extend your schema to Server 2012 or if you just want the BitLocker attributes, use these two ldf files: https://technet.microsoft.com/en-us/library/jj635854.aspx

ldifde -i -v -f BitLockerTPMSchemaExtension.ldf -c "DC=X" "DC=mydomain,DC=local" -k -j .

Yes, you do want the trailing period (.) at the end of the command.  It is literally apart of the command, so ensure you execute the command exactly like above (changing your domain of course).   You can see the official technet article here for more information on the command: https://technet.microsoft.com/en-us/library/cc766015(v=ws.10).aspx

If you would like to verify everything went well, Microsoft has posted some output on what the command should write: https://technet.microsoft.com/en-us/library/cc722060(v=ws.10).aspx

Step 2: Set the required permissions for backing up TPM password information

Next, we need to add an access control entry (ACE) so that backing up TPM recovery information is possible.

Head over to the following Microsoft document and download each of the VBS scripts they have displayed: Save the following VBS scripts from the following website: https://technet.microsoft.com/en-us/library/dn466534.aspx#Sample scripts

  1. Ensure you are on one of your domain controllers
  2. Open up a command prompt as an administrator
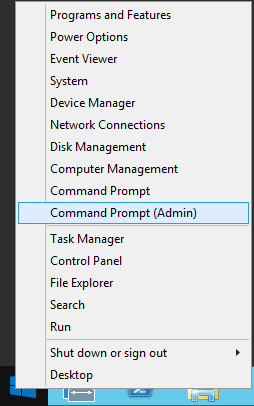
    Server 2012 - Administrative Command Prompt
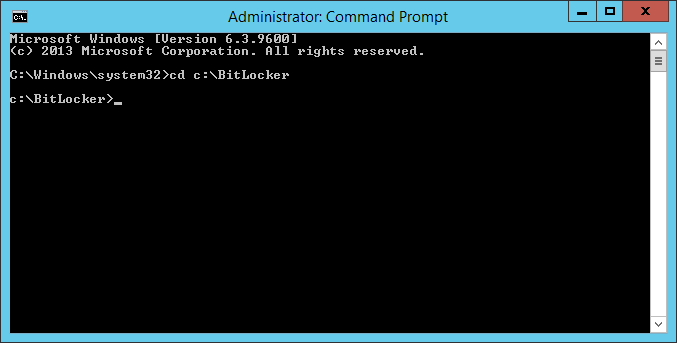
  3. Navigate to your BitLocker folder
    BitLocker Folder C Drive
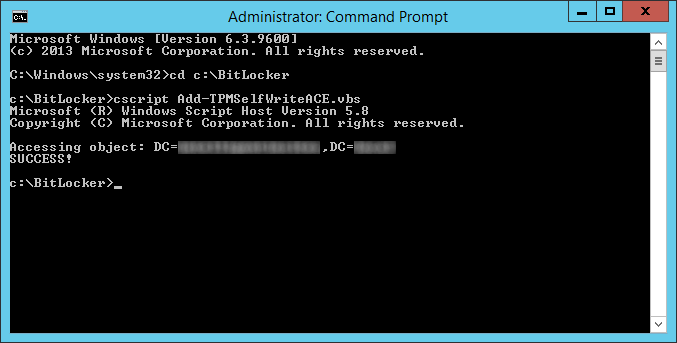
  4. Execute the following command on your domain controller
    1. cscript Add-TPMSelfWriteACE.vbs
      cscript add-tpmselfwriteace for bitlocker
  5. Delegate msTPM-OwnerInformation
    1. Open up Active Directory Users and Computers
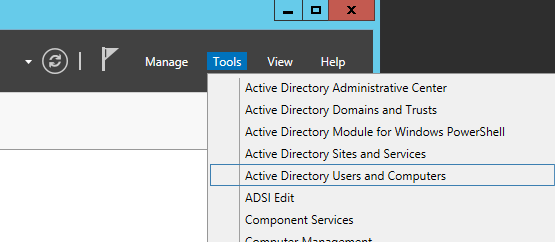
      Server Manager - Active Directory Users and Computers
    2. Navigate to the OU that stores your computers, right click, and select Delegate Control...
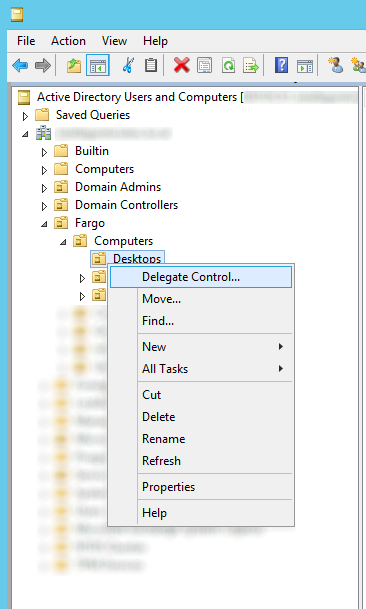
      Active Directory Users and Computers - Computers - Delegate Control
    3. Click Next > button on the welcome screen
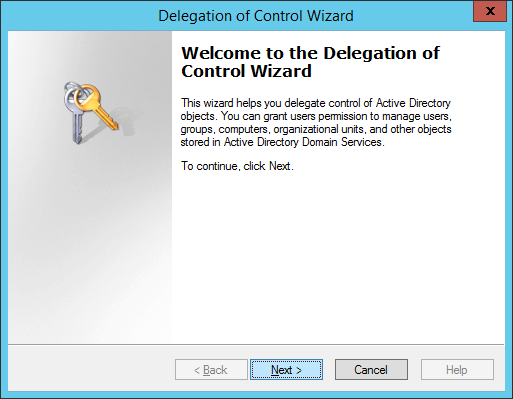
      Delegation of Control Wizard - Welcome
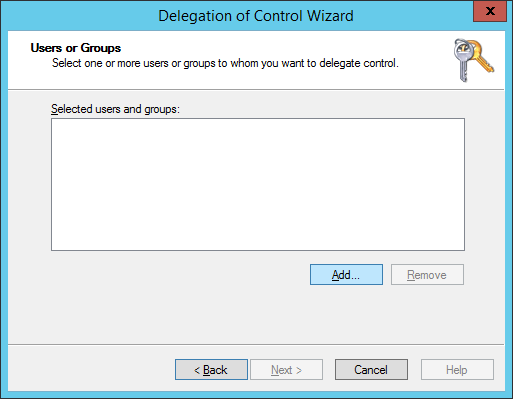
    4. Click the Add... button
      Delegation of Control Wizard - Users or Groups - Add
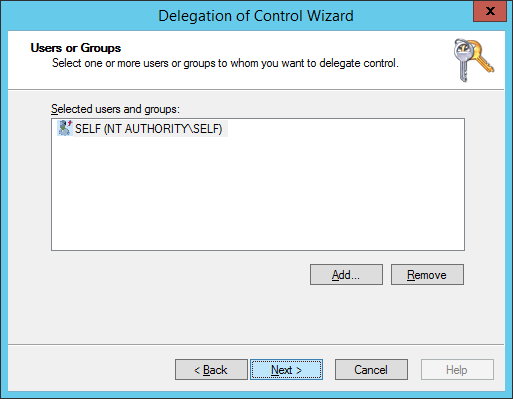
    5. Type in SELF, hit the Check Names button, and click OK
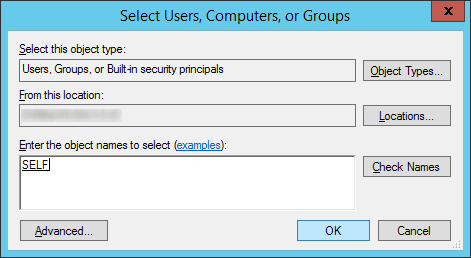
      Delegation of Control Wizard - Users or Groups - Add - SELF
    6. Click Next >
      Delegation of Control Wizard - Users or Groups - Add - SELF - Next
    7. Select Create a custom task to delegate and click Next >
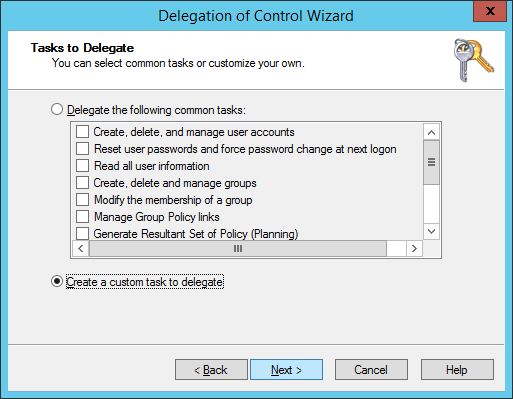
      Delegation of Control Wizard - Tasks to Delegate - Create a custom task to delegate
    8. Check Only the following objects in the folder, check Computer objects, click Next >
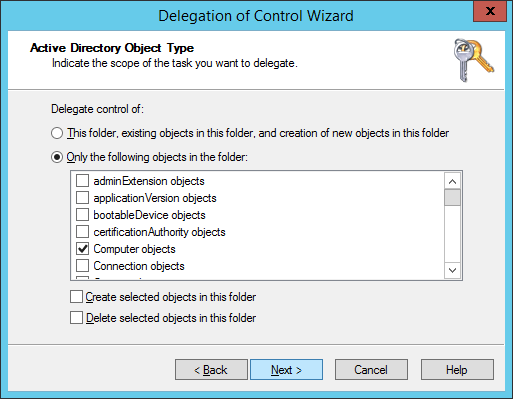
      Delegation of Control Wizard - Active Directory Object Type - Only the following objects in the folder - Computer Objects
    9. Check Property-specific, scroll down and find Write msTPM-OwnerInformation and click Next >
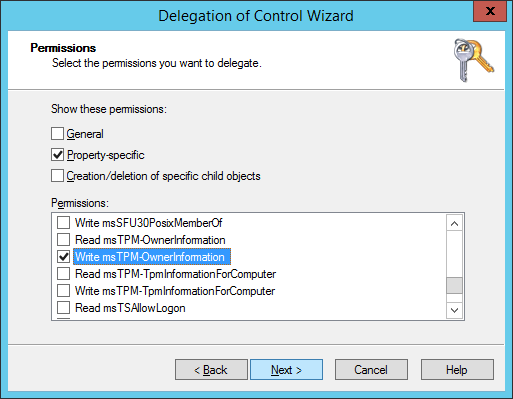
      Delegation of Control Wizard - Permissions - Property-specific - Write msTPM-OwnerInformation
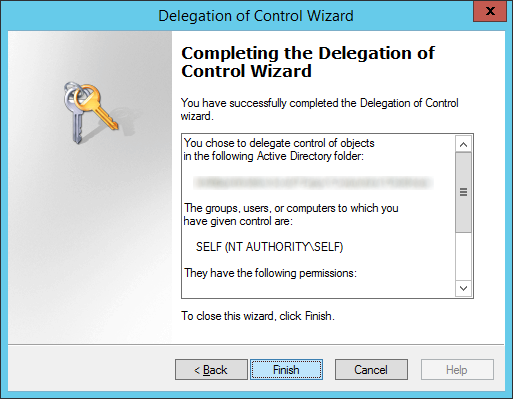
    10. Click Finish
      Delegation of Control Wizard - SELF - Finish

Step 3: Configure group policy to back up BitLocker and TPM recovery information to Active Directory

In this step, we will push out the actual policy that tells the machine to push BitLocker and TPM recovery info to Active Directory.  We will try to follow some of Microsoft's best practices on deploying the group policy here: https://technet.microsoft.com/en-us/library/dd875532(WS.10).aspx

  1. Login to your domain controller
  2. In Server Manager, open up Group Policy Management
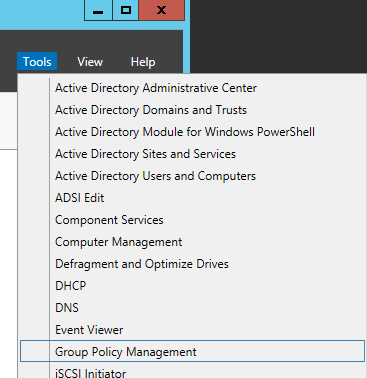
    Server Manager - Tools - Group Policy Management
  3. Select the policy you want to edit/deploy for this and hit Edit...
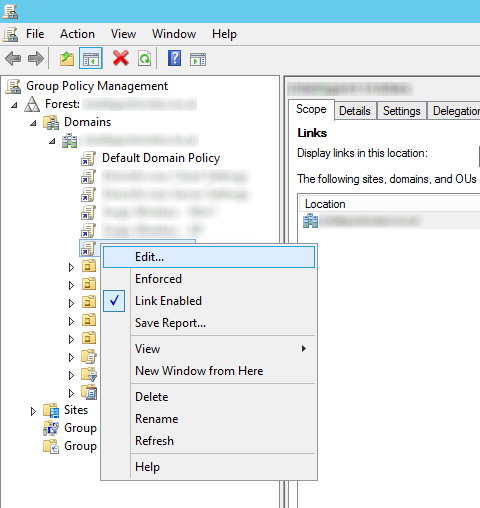
    Group Policy Management - Edit
  4. Expand Computer Configuration, expand Policies, expand Administrative Templates, open Windows Components, and then select BitLocker Drive Encryption
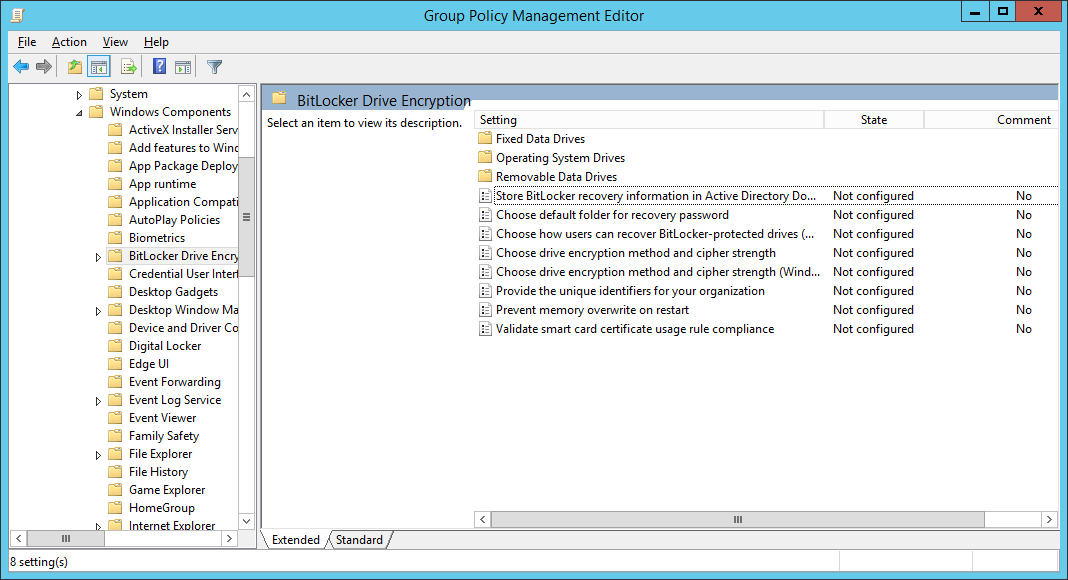
    Group Policy Management Editor - Computer - Configuration - Administrative Templates - Windows Components - BitLocker Drive Encryption
  5. Follow the below configuration for each policy (most of these are Microsoft's best practices with a few notes I have made in the Settings)
    CATEGORY SETTING NAME SETTING
    Global Store BitLocker recovery information in Active Directory Domain Services  Set to enabled, check Require BitLocker backup to AD DS, ensure Recovery passwords and key packages is selected
    Global Choose drive encryption method and cipher strength Set to not configured.
    Global Prevent memory overwrite on restart Set to not configured.
    Global Provide the unique identifiers for your organization Set to enabled, and enter an identifier in the BitLocker identification field (based on what I can tell, you can enter your organization name here).
    Operating system drives Choose how BitLocker-protected operating system drives can be recovered Set to enabled, Allow 48-digit recovery password, Allow 256-bit recovery key, omit recovery options from the BitLocker setup wizard, Store recovery passwords and key packages, Do not enable BitLocker until recovery information is stored to AD DS for operating system drives.For more information about storing BitLocker recovery information in AD DS, see Backing Up BitLocker and TPM Recovery Information to AD DS.
    Operating system drives Configure minimum PIN length for startup Set to enabled, and require a personal identification number (PIN) of at least seven numerals.
    Operating system drives Require additional authentication at startup Set to enabled, and require the use of a startup PIN with a Trusted Platform Module (TPM).
    Fixed data drives Choose how BitLocker-protected fixed drives can be recovered Set to enabled, Allow 48-digit recovery password, Allow 256-bit recovery key, omit recovery options from the BitLocker setup wizard, Store recovery passwords and key packages, Do not enable BitLocker until recovery information is stored to AD DS for operating system drives.
    Fixed data drives Configure use of passwords for fixed data drives If your organization does not have a public key infrastructure (PKI), set to enabled, require password complexity, and set a minimum password length of at least 12 characters.
    Fixed data drives Configure use of smart cards on fixed data drives If your organization has a PKI, set to enabled, and require the use of smart cards with fixed data drives.
    Removable data drives Choose how BitLocker-protected removable drives can be recovered Set to enabled, Allow 48-digit recovery password, Allow 256-bit recovery key, omit recovery options from the BitLocker setup wizard, Store recovery passwords and key packages, Do not enable BitLocker until recovery information is stored to AD DS for operating system drives.
    Removable data drives Configure use of passwords for removable data drives Set to enabled, set a minimum password length of at least 12 characters, and require password complexity if your organization does not have a PKI or if there is a need to access BitLocker-protected drives from computers running Windows XP or Windows Vista.
    Removable data drives Configure use of smart cards on removable data drives Set to enabled, and require the use of smart cards with removable data drives if your organization has a PKI.
    Removable data drives Control use of BitLocker on removable drives Set to enabled, Allow users to apply BitLocker protection on removable data drives, and uncheck Allow users to suspend and decrypt BitLocker protection on removable data drives.
    Removable data drives Deny write access to removable data drives not protected by BitLocker Set to enabled, and Do not allow write access to devices configured in another organization.

    noteNOTE
    This policy cannot be enabled if your organization uses recovery keys or startup keys. Recovery keys and startup keys must be stored on unencrypted USB drives.
  6. Next, configure Group Policy to backup the TPM owner information; open Computer Configuration, open Administrative Templates, open System, and then open Trusted Platform Module Services
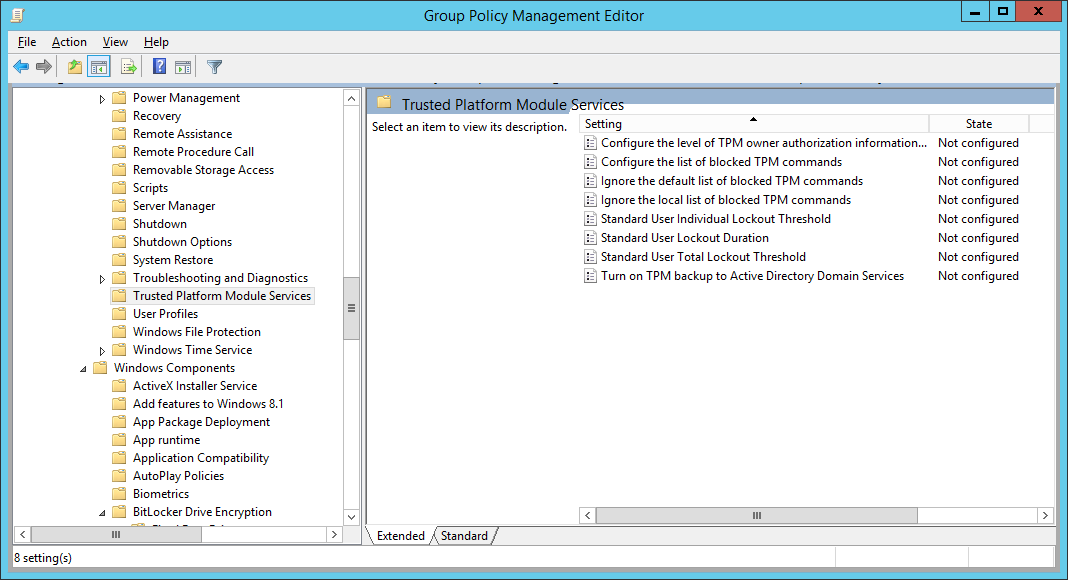
    Group Policy Management Editor - Computer - Configuration - Administrative Templates - System - Trusted Platform Module Services
  7. Double-click Turn on TPM backup to Active Directory, check Enabled, and click OK
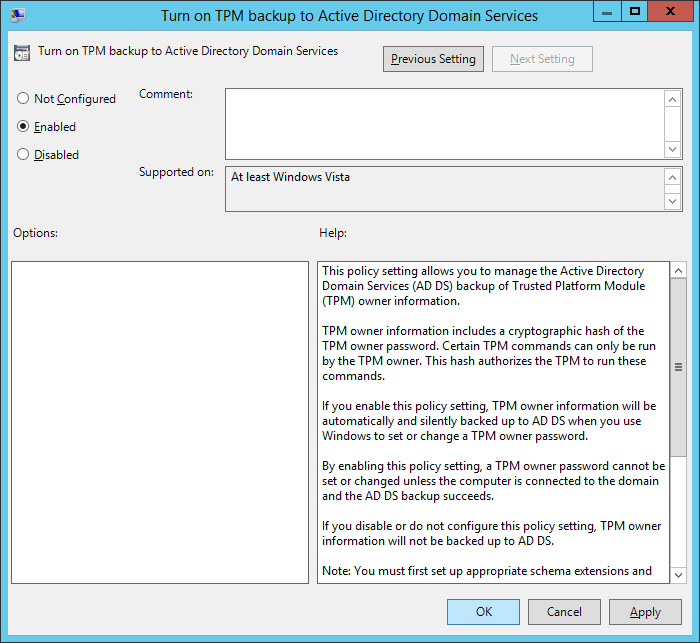
    Group Policy Management Editor - Computer - Configuration - Administrative Templates - System - Trusted Platform Module Services - Turn on TPM backup to ADDS - Enabled

    1. Note: If you are on Server 2008 R2, make sure you select Require TPM backup to AD DS.  Based on what I can find, if you are on Server 2012 R2, this option has been removed.
  8. Define a BitLocker Drive Encryption Data Recovery Agent
    1. Open Computer Configuration, open Policies, open Windows Settings, open Security Settings, open Public Key Policies, and right click on BitLocker Drive Encryption and select Add Data Recovery Agent...
    2. Click Next > on the Add Recovery Agent Wizard
    3. Select a Recovery agent and click Next >
      1. If you are using PKI, select the Browse Directory... button and select a user that has been configured with an EFS certificate.  I found this guide the most helpful on setting this process up (if anyone has a guide to an official Microsoft document explaining the best practices on configuring this, please drop a comment below: http://technetlibrary.com/use-data-recovery-agent-dra-decrypt-encrypted-files-domain/163)
        1. Here is the only official Microsoft article that I could find that explains the configuration of the Data Recovery Agent: https://technet.microsoft.com/en-us/library/dd875560%28v=ws.10%29.aspx#BKMK_proc_dra
      2. If you don't have a PKI environment setup, you can use a self signed certificate by opening up a command prompt and executing the following command: cipher /r:administrator
        1. Copied from the cipher command: This command generates an EFS recovery key and certificate, then writes them to a .PFX file (containing certificate and private key) and a .CER file (containing only the certificate). An administrator may add the contents of the .CER to the EFS recovery policy to create the recovery key for users, and import the .PFX to recover individual files. If SMARTCARD is specified, then writes the recovery key and certificate to a smart card. A .CER file is generated (containing only the certificate). No .PFX file is generated.
    4. Click Finish on the Add Recovery Agent Wizard

Step 4: Install the BitLocker Password Recovery Viewer

  1. On your domain controller, open up Server Manager
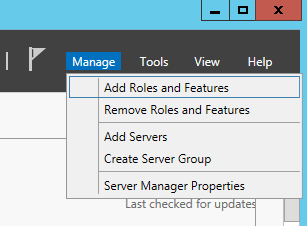
  2. Select Manage, Add Roles and Features
    Server 2012 - Manage - Add Roles and Features
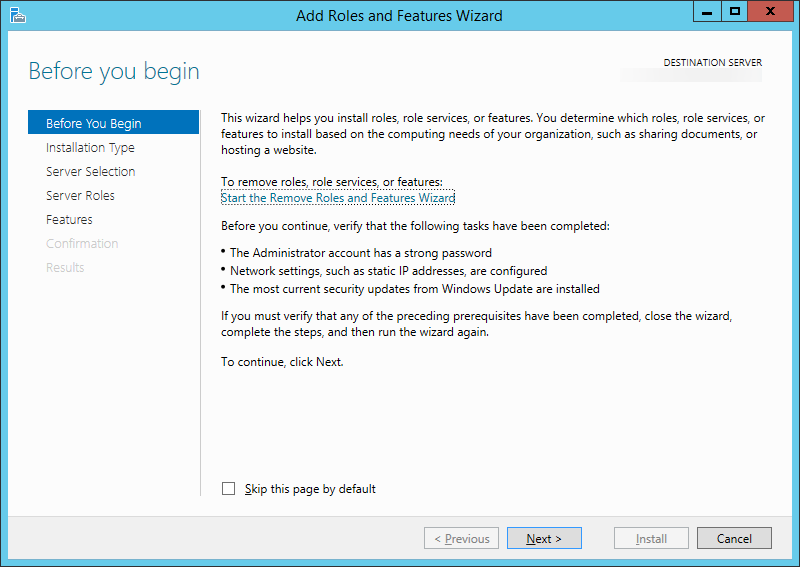
  3. Click Next >
    Add Roles and Features Wizard - Before you begin
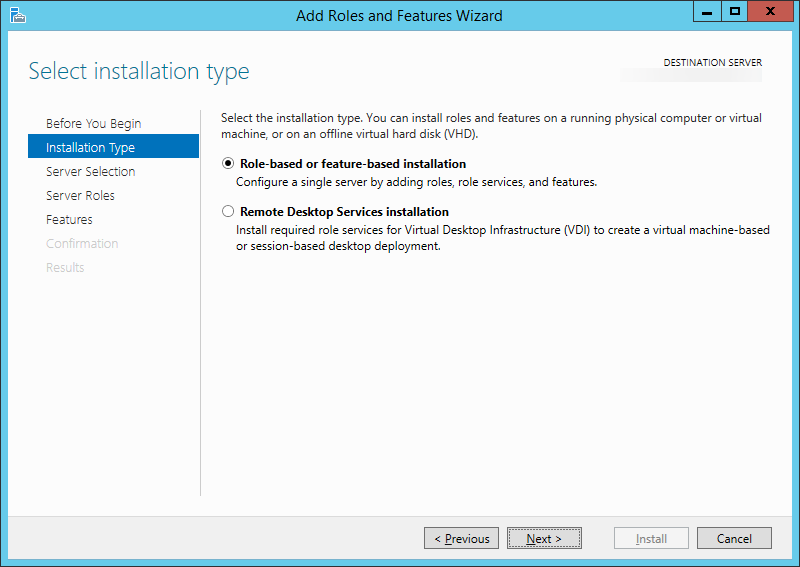
  4. Click Next >
    Add Roles and Features Wizard - Select installation type
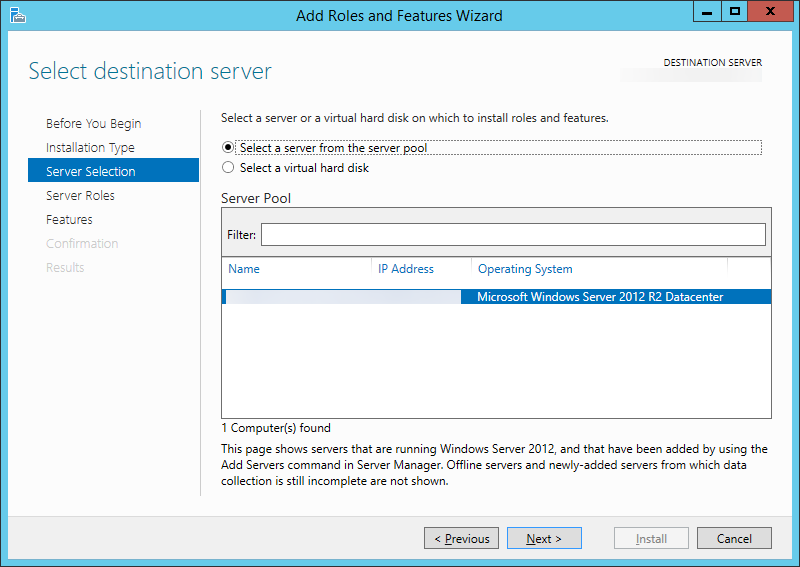
  5. Click Next >
    Add Roles and Features Wizard - Select destination server
  6. Click Next > (You don't need to add any additional roles)
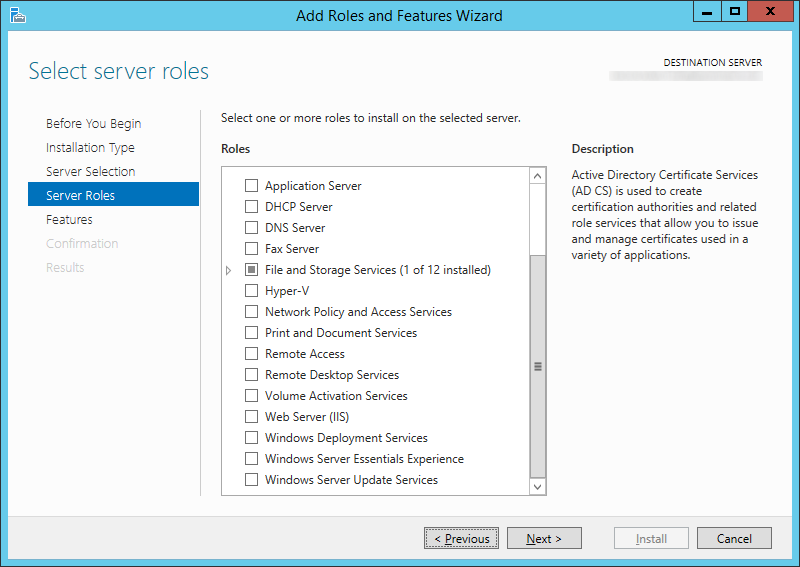
    Add Roles and Features Wizard - Server Roles - Default
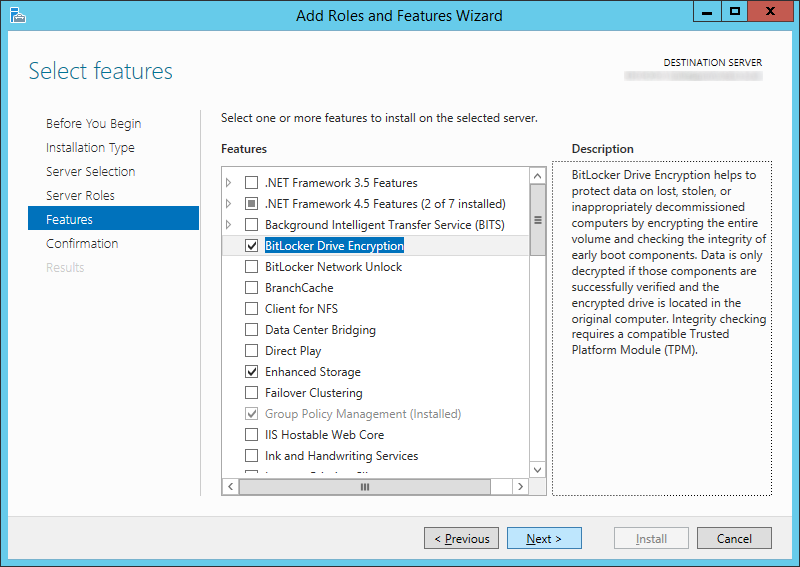
  7. Check BitLocker Drive Encryption (click Add Features when prompted) and click Next >
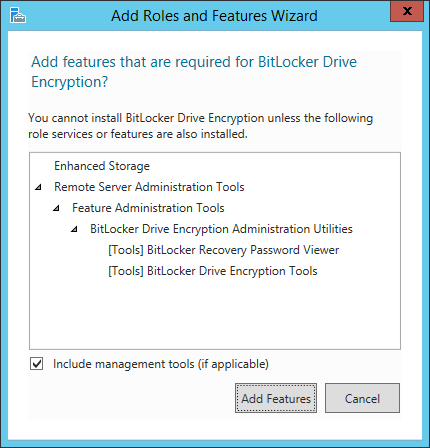
    Add Roles and Features Wizard - Features - BitLocker Drive Encryption - Add features dialog
    Add Roles and Features Wizard - Features - BitLocker Drive Encryption
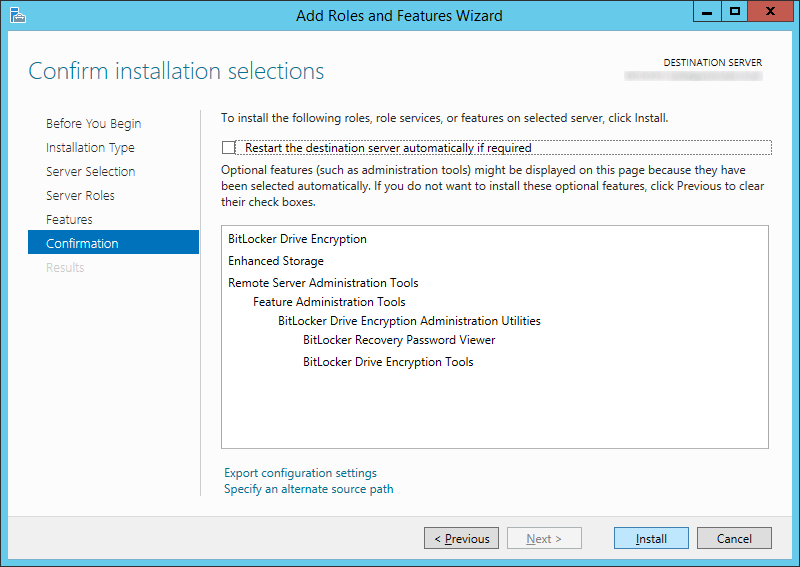
  8. Click Install
    Add Roles and Features Wizard - Features - BitLocker Drive Encryption - Install
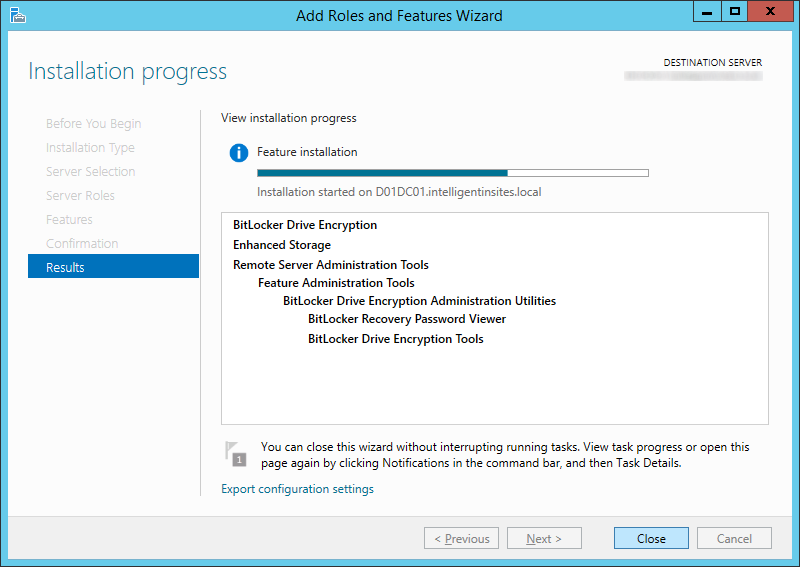
  9. Click Close
    Add Roles and Features Wizard - Features - BitLocker Drive Encryption - Install - Close
  10. Repeat these steps for each domain controller you want to manage BitLocker on

Step 5: Push existing BitLocker protected machines to Active Directory (optional step)

  1. Open an Administrative Command prompt on the client machine that has a BitLocker enabled drive
    Server 2012 - Administrative Command Prompt
  2. Execute the following command to get your current BitLocker information
    manage-bde -protectors -get c:
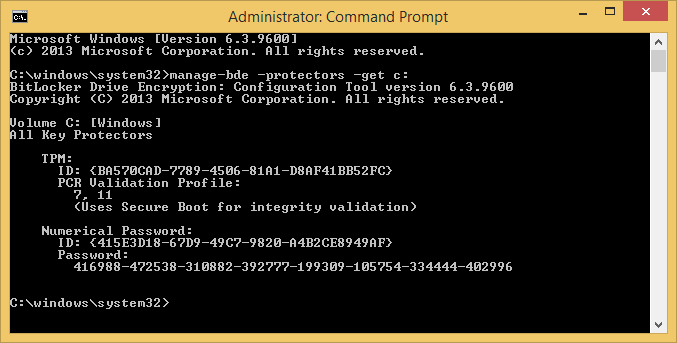
    command prompt - manage-bde -protectors -get c
  3. Execute the following command to publish this information to AD
    manage-bde -protectors -adbackup c: -id {yourNumericalPasswordID}
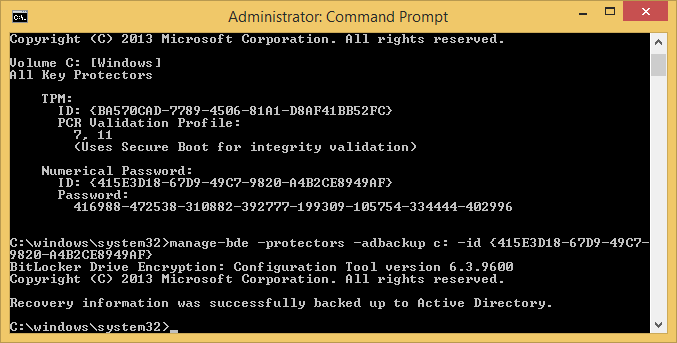
    command prompt - manage-bde -protectors -adbackup c-id
  4. Login to one of the domain controllers you installed the BitLocker Recovery Viewer feature and open up Active Directory Users and Computers
    Server Manager - Active Directory Users and Computers
  5. Find your computer object and right click Properties on it
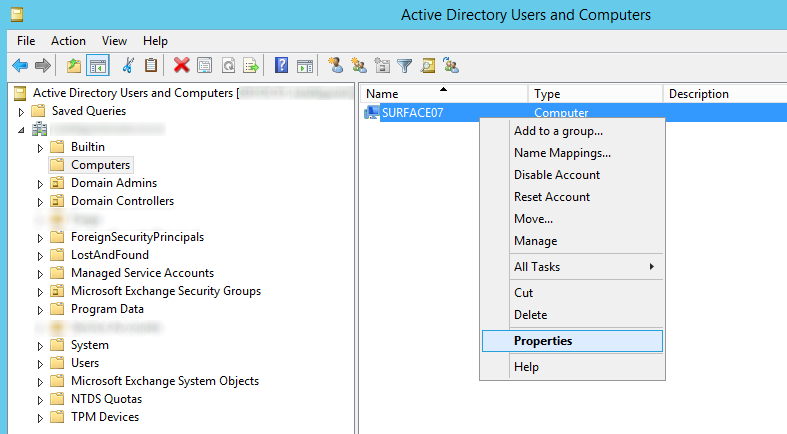
    Active Directory Users and Computers - Computers - Computer - Properties
  6. Select the BitLocker Recovery tab and verify the recovery passwords have been published
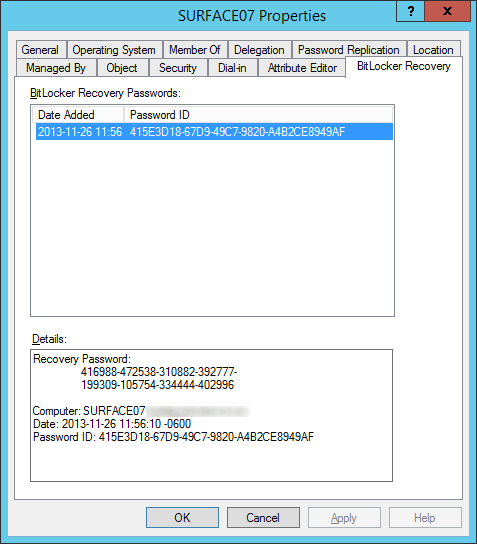
    Active Directory Users and Computers - Computers - Computer - Properties - BitLocker Recovery Tab


Notes: By default, Windows Vista and greater clients running BitLocker will backup the owner the owner password to the msTPM-OwnerInformation attribute.  If you notice this field is <Not Set> for your Windows 8 and greater machines, ensure you check the TPM Devices container in Active Directory Users and Computers for the recovery information.

To automate the process of looking up the Bitlocker Recovery Password and Owner TPM Recovery Key, I have written a powershell script which can be found here: http://jackstromberg.com/2015/02/exporting-tpm-owner-key-and-bitlocker-recovery-password-from-active-directory-via-powershell/

SYSVOL and Group Policy out of Sync on Server 2012 R2 DCs using DFSR

Recently while making changes to group policy, I noticed a slew of issues between clients not accepting the policy.  This eventually led me to the discovery that two of the DCs in this particular environment were not replicating properly and were resulting in inconsistent SYSVOL shares.

Symptoms

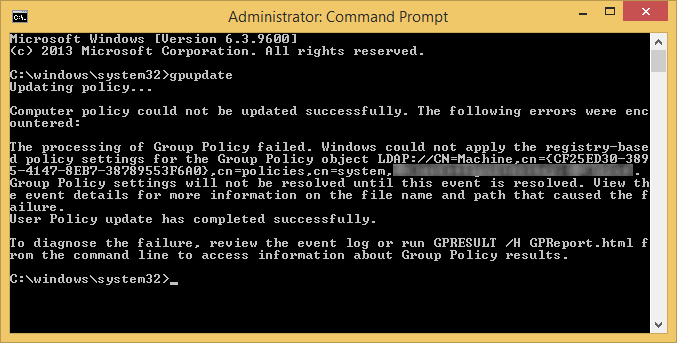
On the clients we were seeing the following errors when executing the gpupdate command:

gpupdate - processing of group policy failed - registry-based policy settings

Event Viewer Logs

Log Name: System
Source: Microsoft-Windows-GroupPolicy
Date: 7/25/2014 10:46:45 AM
Event ID: 1096
Task Category: None
Level: Error
Keywords:
User: SYSTEM
Computer: mymachine.mydomain.local
Description:
The processing of Group Policy failed. Windows could not apply the registry-based policy settings for the Group Policy object LDAP://CN=Machine,cn={CF25ED30-3895-4147-8EB7-38789553F6A0},cn=policies,cn=system,DC=mydomain,DC=local. Group Policy settings will not be resolved until this event is resolved. View the event details for more information on the file name and path that caused the failure.

On the DCs we were seeing the following events inside of Event Viewer -> Applications and Service Logs -> DFS Replication

Log Name: DFS Replication
Source: DFSR
Date: 7/25/2014 1:04:30 PM
Event ID: 4612
Task Category: None
Level: Error
Keywords: Classic
User: N/A
Computer: DC02.mydomain.local
Description:
The DFS Replication service initialized SYSVOL at local path C:\Windows\SYSVOL\domain and is waiting to perform initial replication. The replicated folder will remain in the initial synchronization state until it has replicated with its partner DC01.mydomain.local. If the server was in the process of being promoted to a domain controller, the domain controller will not advertise and function as a domain controller until this issue is resolved. This can occur if the specified partner is also in the initial synchronization state, or if sharing violations are encountered on this server or the sync partner. If this event occurred during the migration of SYSVOL from File Replication service (FRS) to DFS Replication, changes will not replicate out until this issue is resolved. This can cause the SYSVOL folder on this server to become out of sync with other domain controllers.

Additional Information:
Replicated Folder Name: SYSVOL Share
Replicated Folder ID: 2276C68D-BC24-46BF-B492-067919163EDA
Replication Group Name: Domain System Volume
Replication Group ID: D50C64AE-0A01-4F97-B838-069F0BCBE369
Member ID: 7ADF2D7C-7947-412C-A619-C0C0D72F6A9C
Read-Only: 0


Log Name: DFS Replication
Source: DFSR
Date: 7/25/2014 1:04:30 PM
Event ID: 5002
Task Category: None
Level: Error
Keywords: Classic
User: N/A
Computer: DC02.mydomain.local
Description:
The DFS Replication service encountered an error communicating with partner DC01 for replication group Domain System Volume.

Partner DNS address: DC01.mydomain.local

Optional data if available:
Partner WINS Address: DC01
Partner IP Address: 192.168.1.5

The service will retry the connection periodically.

Additional Information:
Error: 1753 (There are no more endpoints available from the endpoint mapper.)
Connection ID: D50C64AE-0A01-4F97-B838-069F0BCBE369
Replication Group ID: 4DCE6A8E-6271-48B6-A0D0-5447718B8FAB

Solution

We ended up having to manually preform an authoritive synchronization between the two DCs.  As you may know, DFSR no longer uses the same steps as FSR to do an authoritive sync.  Below are my notes and expereinces on completing an authoritive DFSR sync.  You can find the ofificial notes from Microsoft here: http://support.microsoft.com/kb/2218556/en-us

  1. Logon to your primary DC
  2. Stop the DFS Replication service
    1. Click on the Start menu, select Administrative Tools, and then click ServicesServices
    2. In the Name column, right-click DFS Replication or Netlogon, and then click Stop
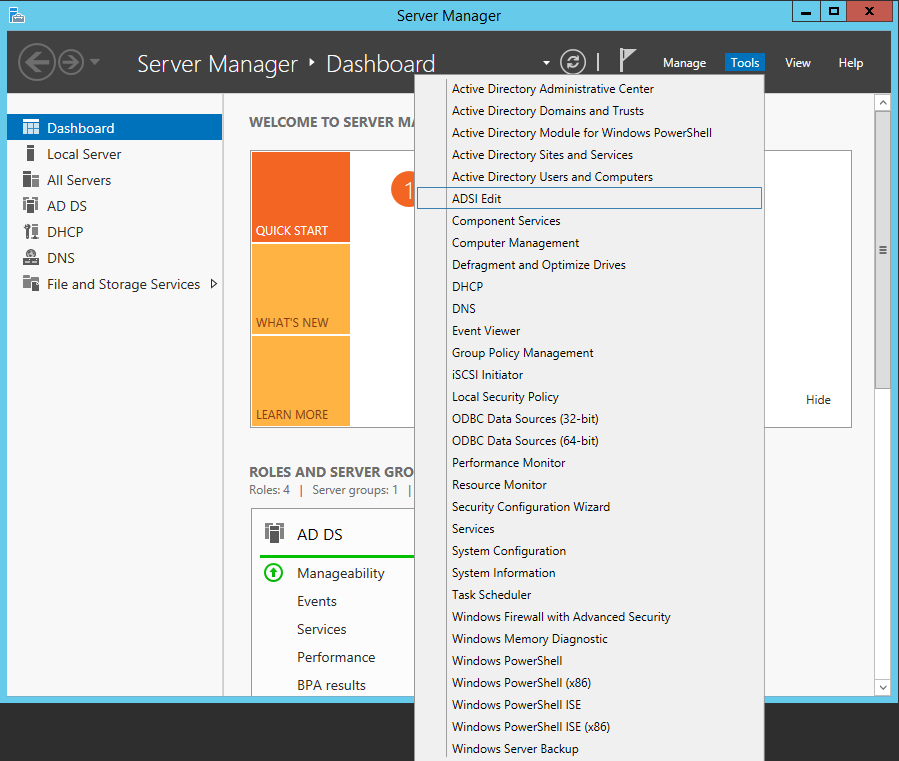
  3. Open up ADSI Edit
    Server Manager - ADSI Edit
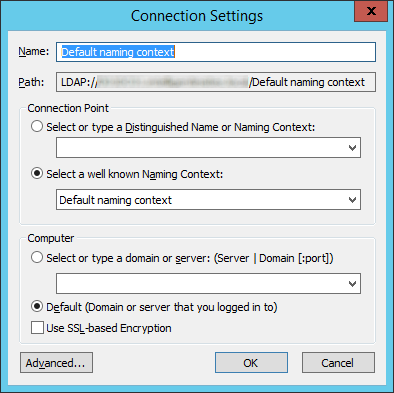
  4. Open up the Default naming context
    ADSI Edit - Connection Settings - Default naming context
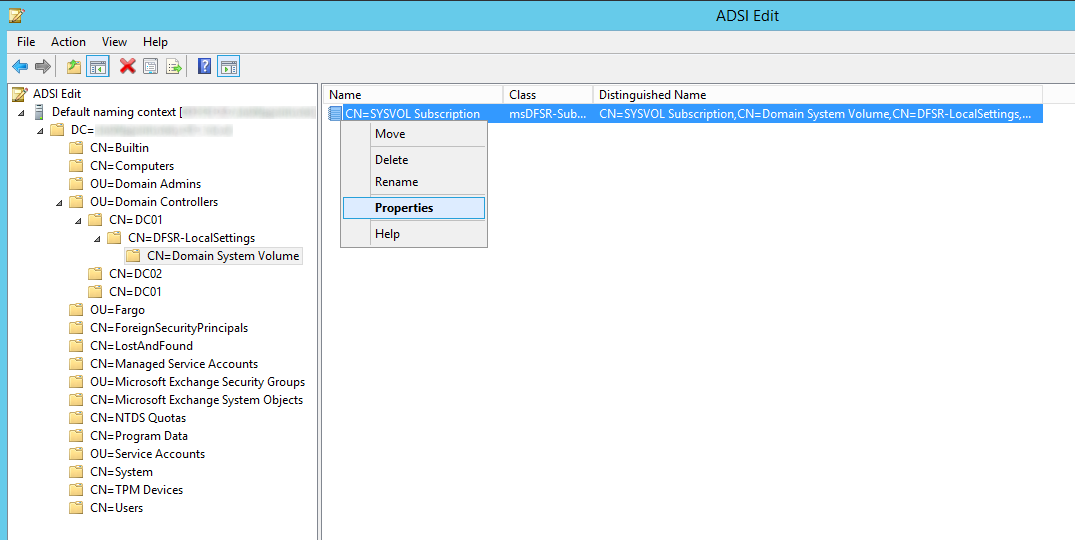
  5. Navigate to the following
    1. CN=SYSVOL Subscription,CN=Domain System Volume,CN=DFSR-LocalSettings,CN=<the server name to replicate from>,OU=Domain Controllers,DC=<domain>
      ADSI Edit - Default Naming Context - Domain Controllers - DC01 - DFSR-LocalSettings - Domain System Volume
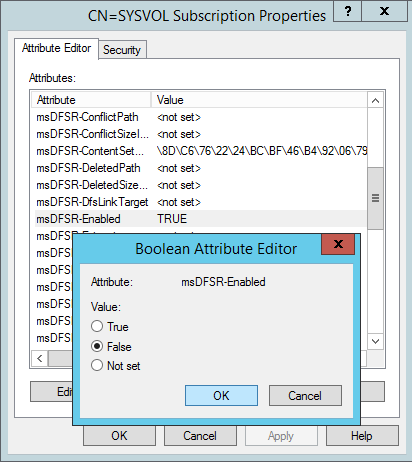
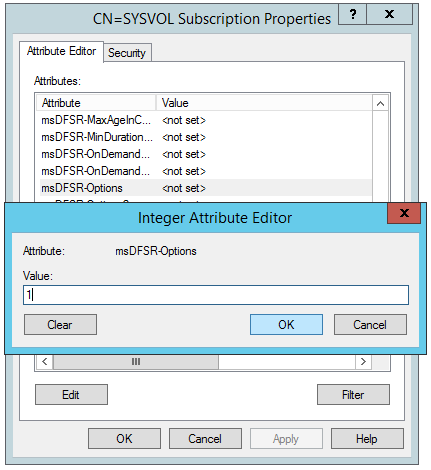
  6. Change the following attributes to the following values
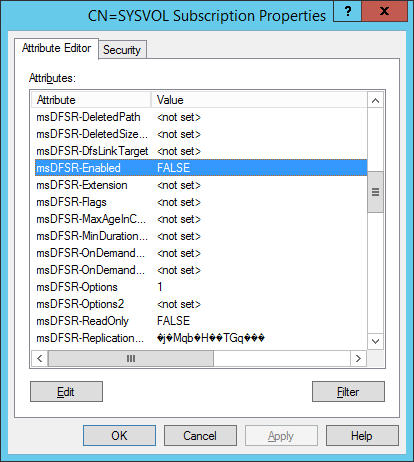
    1. msDFSR-Enabled=FALSE
      msDFSR-options=1
      ADSI Edit - Default Naming Context - Domain Controllers - DC01 - DFSR-LocalSettings - Domain System Volume - msDFSR-Enabled - False
      ADSI Edit - Default Naming Context - Domain Controllers - DC01 - DFSR-LocalSettings - Domain System Volume - msDFSR-Options - 1
      Both values applied
      ADSI Edit - Default Naming Context - Domain Controllers - DC01 - DFSR-LocalSettings - Domain System Volume - msDFSR-Options - msDFSR-Enabled

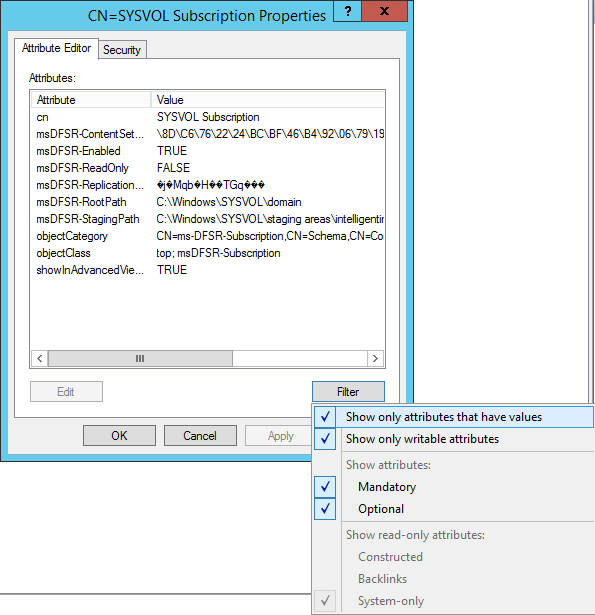
      1. Note: If you cannot see msDFSR-options, uncheck Show only attributes that have values
        ADSI Edit - Default Naming Context - Domain Controllers - DC01 - DFSR-LocalSettings - Domain System Volume - Show only attributes that have values
  7. On the ALL other DCs, change the msDFSR-Enabled attribute to False
    ADSI Edit - Default Naming Context - Domain Controllers - DC01 - DFSR-LocalSettings - Domain System Volume - msDFSR-Enabled - False
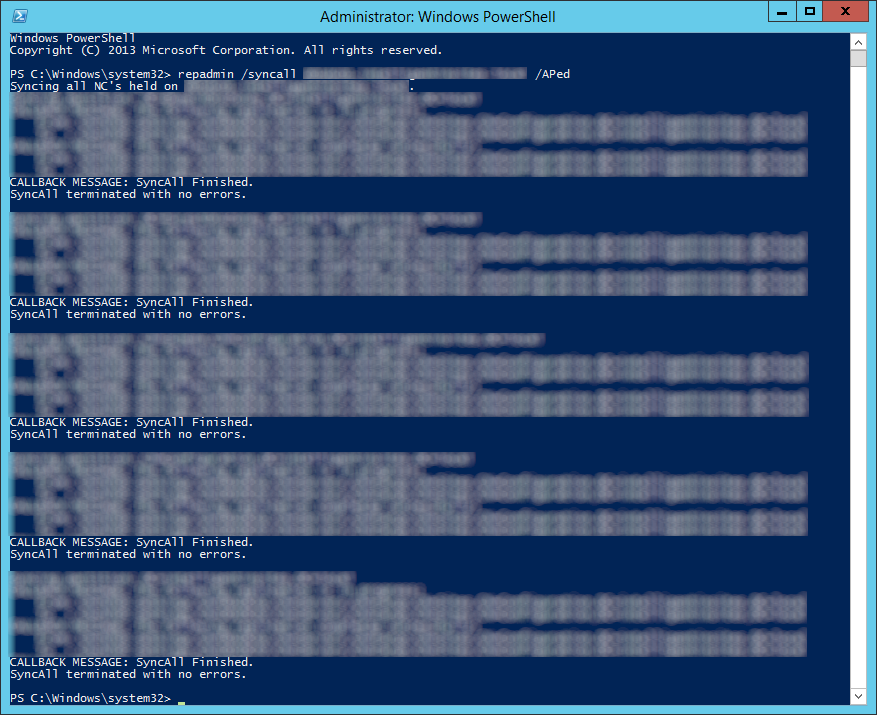
  8. Force Active Directory replication throughout the domain (ensure all sync resposnes terminate with no errors).
    1. repadmin /syncall primary_dc_name /APed
      repadmin -syncall -aped

      1. NOTE: Here is a list of what the switches mean
        1. /A: Perform /SyncAll for all NC's held by <Dest DSA> (ignores <Naming Context>)
        2. /P: Push changes outward from home server (default: pull changes)
        3. /e: Enterprise, cross sites (default: only home site)
        4. /d: ID servers by DN in messages (instead of GUID DNS)
  9. Start the DFSR service back up on the authoritive DC
    1. Click on the Start menu, select Administrative Tools, and then click Services
      Services
    2. In the Name column, right-click DFS Replication or Netlogon, and then click Start
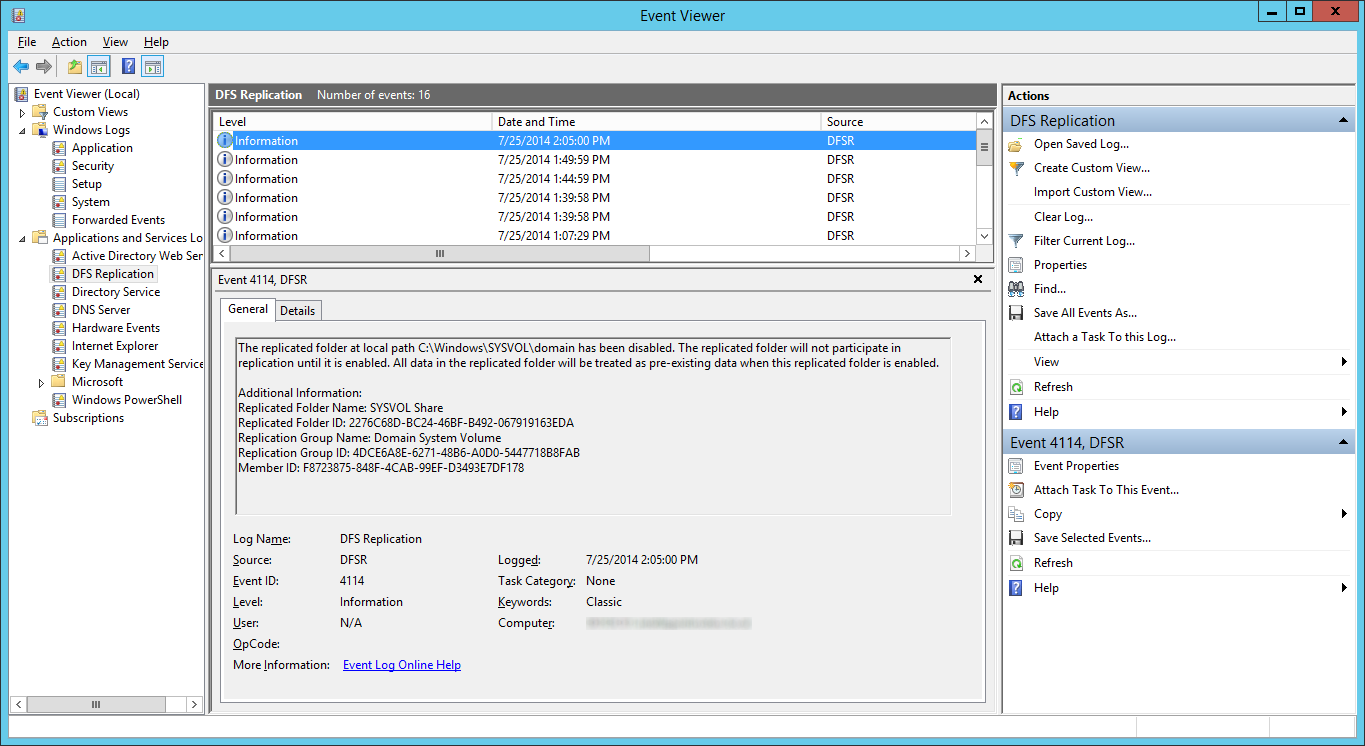
  10. Open up event viewer and navigate to Applications and Services Logs -> DFS Replication.  Verify you see Event ID 4114.
    Event Viewer - Applications and Services Logs - DFS Replication - Event 4114
  11. Navigate back to the following in ADSI
      1. CN=SYSVOL Subscription,CN=Domain System Volume,CN=DFSR-LocalSettings,CN=<the server name to replicate from>,OU=Domain Controllers,DC=<domain>
        ADSI Edit - Default Naming Context - Domain Controllers - DC01 - DFSR-LocalSettings - Domain System Volume
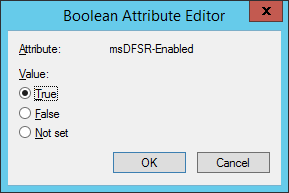
  12. Set the value of msDFSR-Enabled to TRUE
    ADSI Edit - Default Naming Context - Domain Controllers - DC01 - DFSR-LocalSettings - Domain System Volume - msDFSR-Enabled - True
  13. Execute the following via an elevated command prompt
    1. DFSRDIAG POLLAD
      1. NOTE: This is a utility apart of DFS Managment Tools.  I completed the guide successfully without running this command, but Microsoft recommends you do run this command.
  14. Force Active Directory replication throughout the domain
    1. repadmin /syncall primary_dc_name /APed
      repadmin -syncall -aped
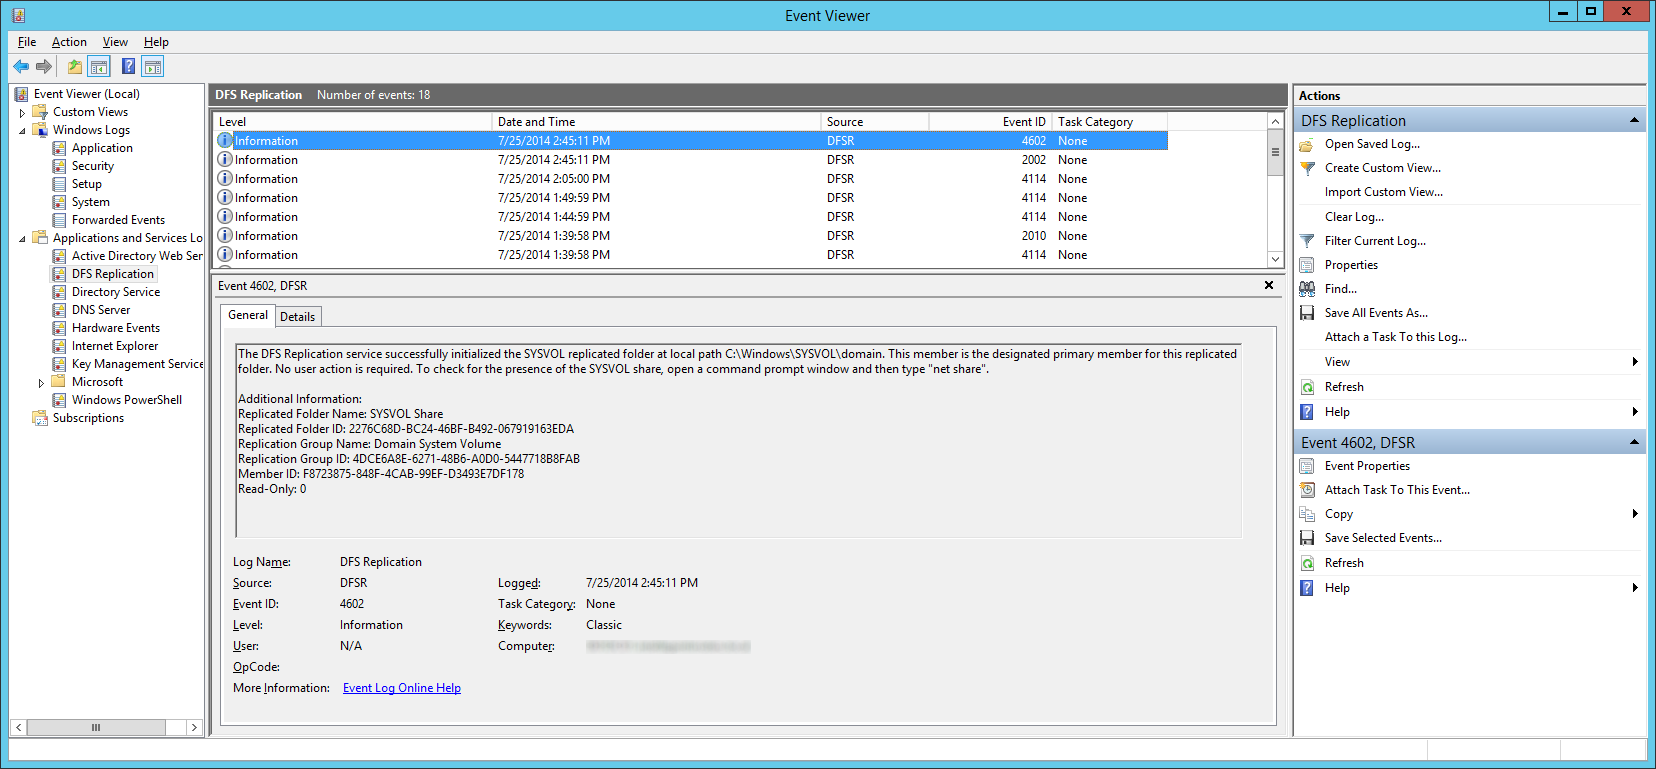
  15. Wait a few minutes and you should see Event ID 2002 and 4602
    Event Viewer - Applications and Services Logs - DFS Replication - Event 4602 - Event 2002
  16. Navigate back to each of your secondary DCs and change the value of msDFSR-Enabled to TRUE
    ADSI Edit - Default Naming Context - Domain Controllers - DC01 - DFSR-LocalSettings - Domain System Volume - msDFSR-Enabled - True
  17. Execute the following via an elevated command prompt
    1. DFSRDIAG POLLAD
      1. NOTE: This is a utility apart of DFS Managment Tools. I completed the guide successfully without running this command, but Microsoft recommends you do run this command. Force Active Directory replication throughout the domain
  18. Verify you see Event ID 2002 and 4602 on each of the secondary DCs
    Event Viewer - Applications and Services Logs - DFS Replication - Event 4602 - Event 2002

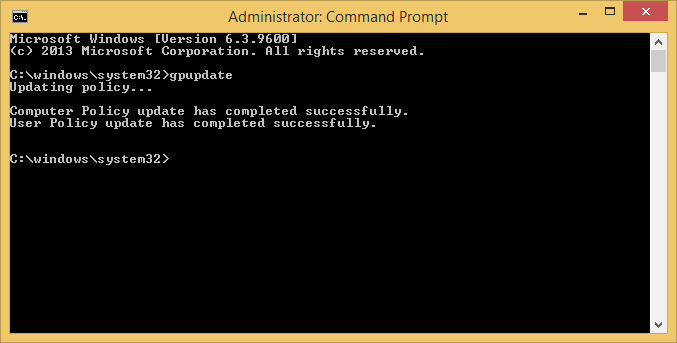
At this point, try running a gpupdate on your client.  If all has gone well, each of your shared SYSVOL folders on your DCs should contain the same amount of policies and your client should successfully pull down all policies.

gpupdate - success

ADFS v3 on Server 2012 R2 - Allow Chrome to automatically sign-in internally

Symptom: When upgrading from ADFS v2.0 to ADFS v3 built natively into Server 2012 R2, I noticed Chrome stopped auto-logging in people when trying to hit the ADFS server from inside the corporate network.

Solution: We need to allow NTLM authentication for the Google Chrome useragent.

  1. Login to your primary ADFS server
  2. NOTE: This step is no longer applicable on newer versions of Chrome.
    This is only applicable if running extremely old versions of Chrome (v50 or lower) -- the fix has been added in Chrome v51 and higher.

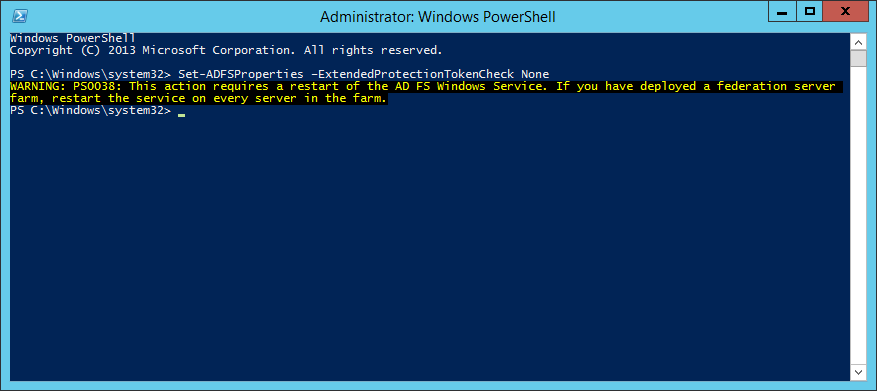
    Execute the following command to disable Extended Protection TokenCheck (See notes for what this is at the bottom of this article)

    1. Set-ADFSProperties –ExtendedProtectionTokenCheck None
      Set-ADFSProperties -ExtendedProtectionTokenCheck None
  3. Execute the following command to get the current list of supported user-agents for NTLM authentication
    1. [System.Collections.ArrayList]$UserAgents = Get-AdfsProperties | select -ExpandProperty WIASupportedUserAgents

  4. Execute the following command to inject the user agent into a temporary array of user agents already added to ADFS.
    1. $UserAgents.Add("Mozilla/5.0")
  5. Execute the following command to commit the change.
    1. Set-ADFSProperties -WIASupportedUserAgents $UserAgents
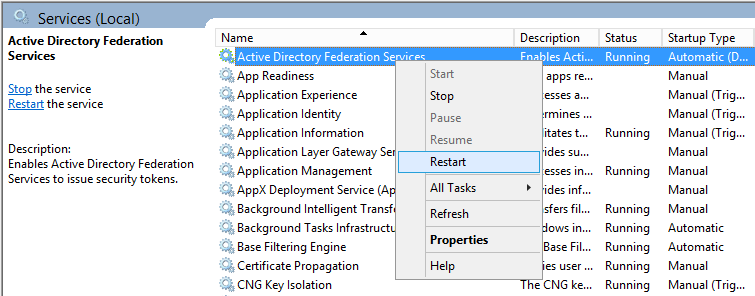
  6. Restart the Active Directory Federation Services service on each of the ADFS farm servers for the changes to take effect.  You do not need to make any changes to the proxy servers.
    Restart Active Directory Federation Services - Restart

Notes

Shout out to Jon Payne in the comments section below for the idea of putting all the values into an ArrayList and then committing the arraylist to ADFS vs adding in all the strings manually.

ExtendedProtectionTokenCheck - Copied directly from technet - Specifies the level of extended protection for authentication supported by the federation server. Extended Protection for Authentication helps protect against man-in-the-middle (MITM) attacks, in which an attacker intercepts a client's credentials and forwards them to a server. Protection against such attacks is made possible through a Channel Binding Token (CBT) which can be either required, allowed or not required by the server when establishing communications with clients.  http://technet.microsoft.com/en-us/library/ee892317.aspx

PowerShell command to find all disabled users in Active Directory

Here is a quick powershell command to find all users inside of your Active Directory domain that have been marked as disabled (this will exclude disabled computers):

Get-ADUser -Filter {Enabled -eq $false} | FT samAccountName

Additionally, you can specify which additional options you would like to show by change the filter table command we are piping the results to.  For example, this command will show the samAccountName, first name, and last name of the disabled users.

Get-ADUser -Filter {Enabled -eq $false} | FT samAccountName, GivenName, Surname

If you want no formatting whatsoever and have AD spit a bunch of information back at you, try running just the Get-ADUser part with the filter applied.

Get-ADUser -Filter {Enabled -eq $false

The following command below can be used to pull a list of disabled users and computers:

Search-ADAccount -AccountDisabled


Upgrading Network Policy Server from Server 2008 R2 to Server 2012 R2

Synopsis: This tutorial will cover a basic "upgrade" path to go from Server 2008 R2 to Server 2012 R2.  This tutorial assumes you have a single Network Policy Server and you are wishing to reuse the same machine name, IP, and settings.  In environments needing high availability, you will need to complete each of the steps below, adding/removing each server being upgraded from your network load balancer.

In a standalone instance, you will experience some downtime as you will have to retire the old machine and setup a new one.

Tutorial

  1. Login to your Server 2008 R2 NPS server
  2. Open up a command prompt with Administrative Privileges
  3. Execute the following command
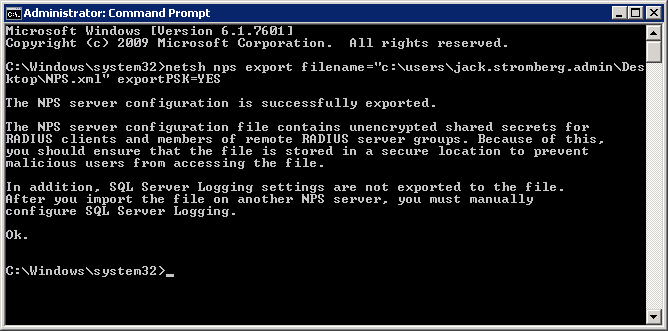
    1. netsh nps export filename="c:\users\YOURUSERNAME\Desktop\NPS.xml" exportPSK=YES
      netsh nps export
  4. Copy the NPS.xml file to your local machine
  5. Disjoin the NPS server from the domain
  6. Retire the machine
  7. Recreate a new Server 2012 R2 machine with the same name and IP address
  8. Join the Server 2012 R2 machine to the domain
  9. Open up Server Manager and select Add Roles and Features
    Server 2012 - Manage - Add Roles and Features
  10. Click Next > on the Before You Begin screen
    Add Roles and Features Wizard - Before you begin
  11. Click Next > on the Installation Type screen
    Add Roles and Features Wizard - Select installation type
  12. Click Next > on the Server Selection screen
    Add Roles and Features Wizard - Select destination server
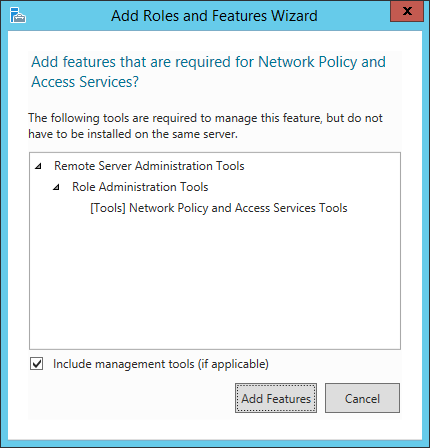
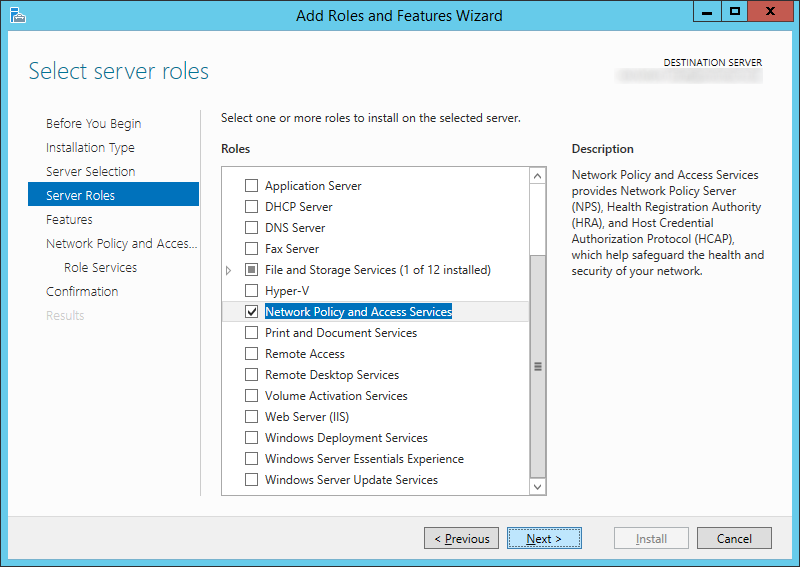
  13. Check Network Policy and Access Services (click Add Features when the screen pops up)
    Add Roles and Features Wizard - Network Policy and Access Services
    Add Roles and Features Wizard - Server Roles - Network Policy and Access Services
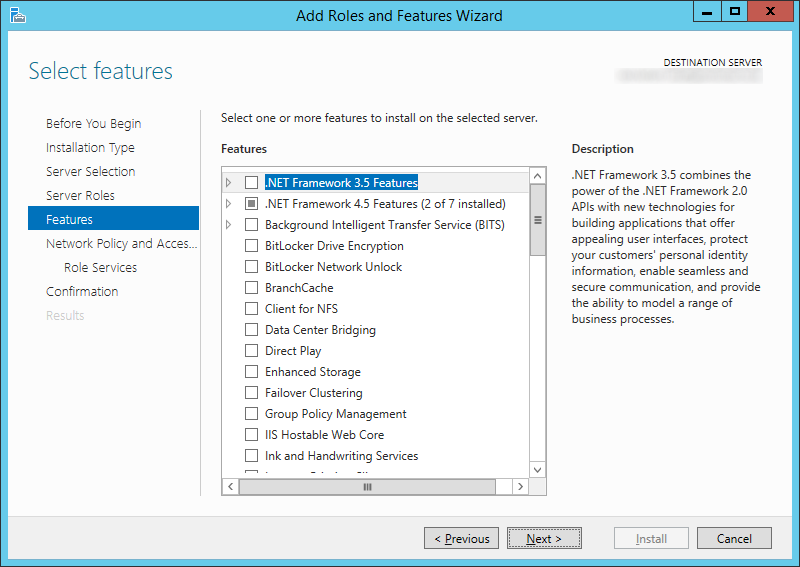
  14. Click Next > on the Features screen
    Add Roles and Features Wizard - Default - Network Policy and Access Services
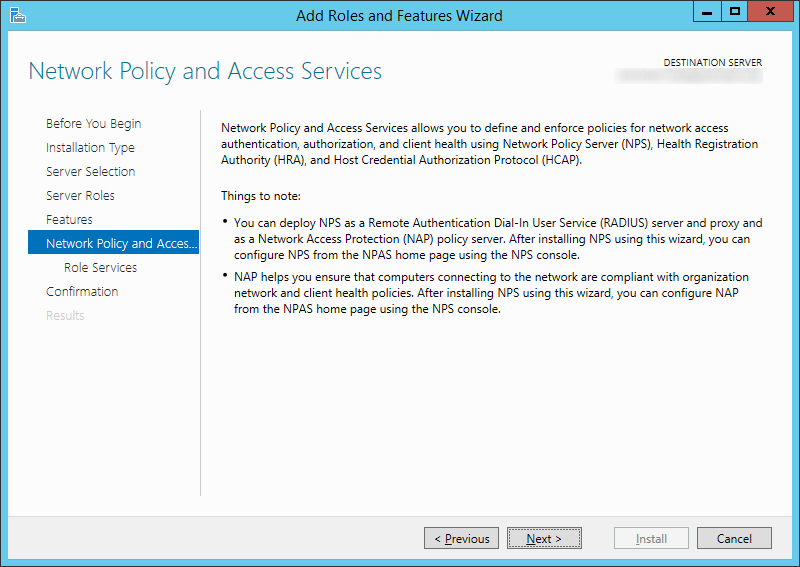
  15. Click Next > on the Network Policy and Access Services screen
    Add Roles and Features Wizard - Network Policy and Access Services Welcome
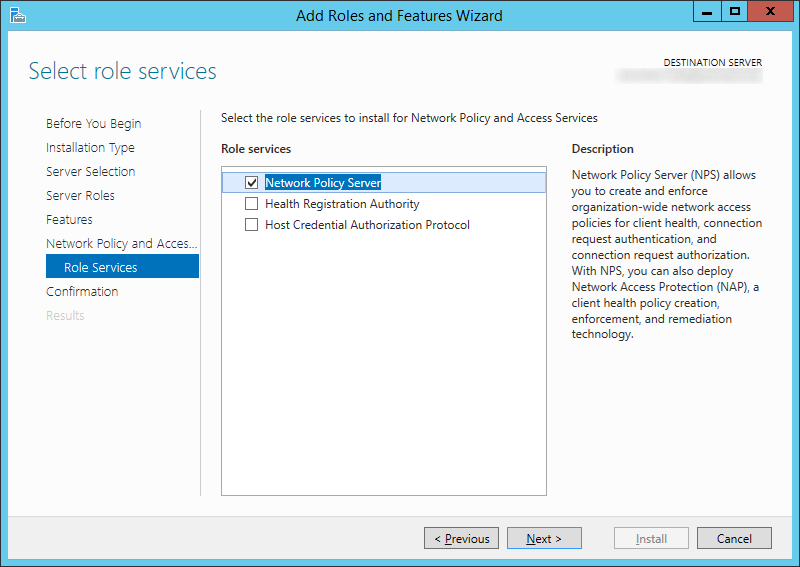
  16. Check Network Policy Server and click Next >
    Add Roles and Features Wizard - Role Services - Network Policy Server
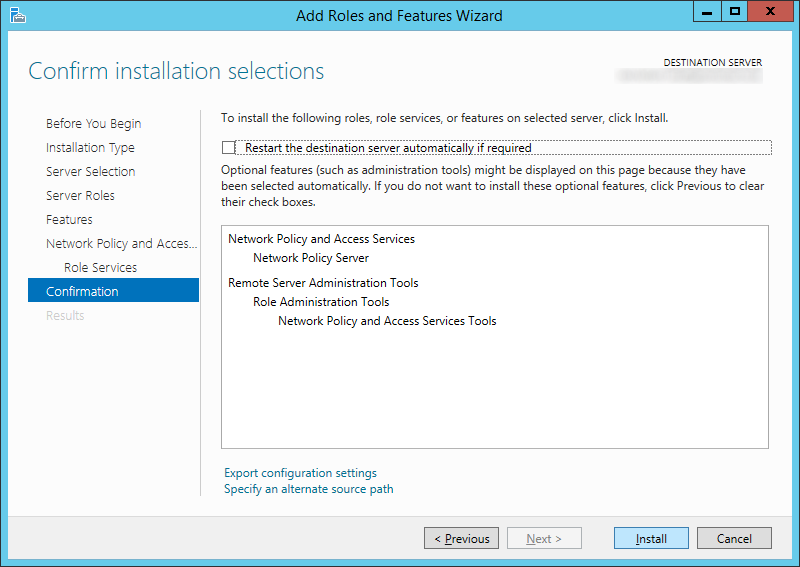
  17. Click Install
    Add Roles and Features Wizard - Network Policy and Access Services - Confirmation
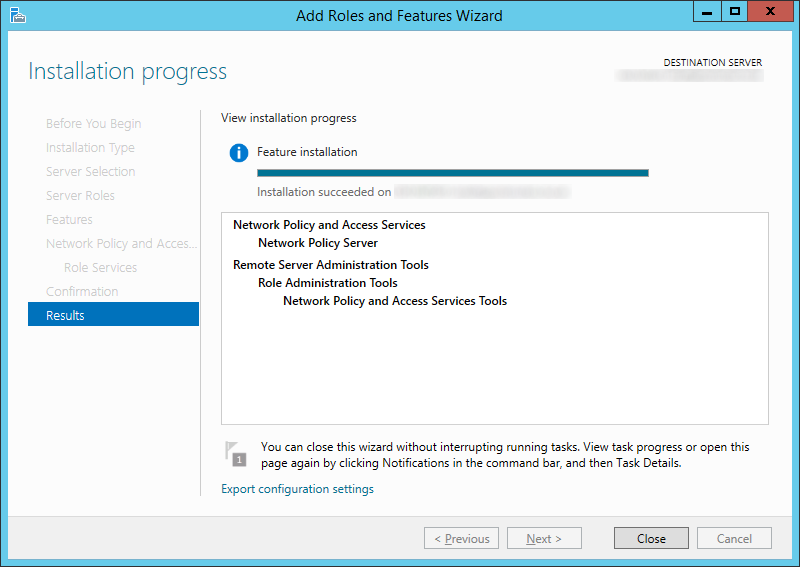
  18. Click Close once the installation has successfully completed
    Add Roles and Features Wizard - Network Policy and Access Services - Results
  19. Copy over your XML file from the old NPS server to your new Server 2012 R2 NPS server.
  20. Open up an administrative powershell prompt
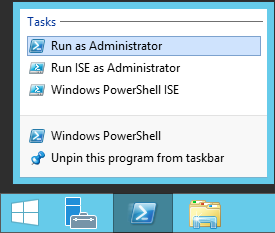
    Server 2012 - PowerShell - Run as Administrator
  21. Execute the following command
    1. Import-NpsConfiguration -Path c:\users\YOURUSERNAME\Desktop\NPS.xml
      Server 2012 R2 - Powershell - Import-npsconfiguration
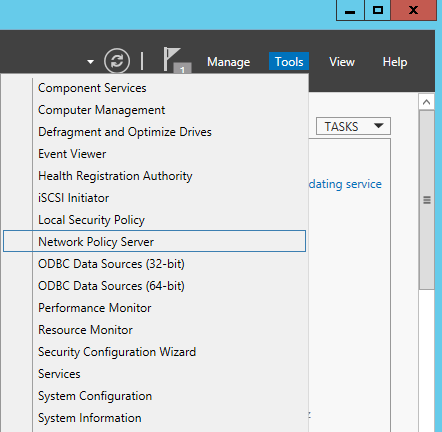
  22. Head over to Server Manager and select Tools -> Network Policy Server
    Server Manager - Tools - Network Policy Server
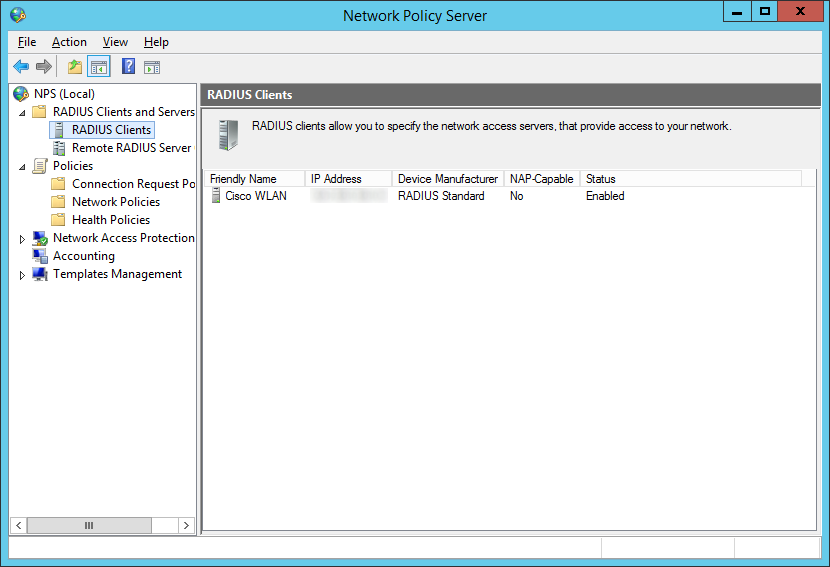
  23. Verify the rules imported (I selected RADIUS Clients and Servers -> RADIUS Clients to see if it imported my WLAN controller)
    Network Policy Server - RADIUS Clients
  24. Connect your machine to your wireless network! 🙂

[Tutorial] Configuring Direct Access on Server 2012 R2

This tutorial will cover deployment of Windows Server 2012 R2's latest version of DirectAccess.  While there are multiple ways to configure Direct Access, I tried to pull together what I believe are the best/recommended practices and what I believe would be a common deployment between organizations.  If you have any thoughts/feedback on how to improve this deployment, please leave a comment below.

Before beginning, if you are curious what DirectAccess is, here is a brief overview of what it is and what it will allow us to accomplish.

DirectAccess, also known as Unified Remote Access, is a VPN-like technology that provides intranet connectivity to client computers when they are connected to the Internet. Unlike many traditional VPN connections, which must be initiated and terminated by explicit user action, DirectAccess connections are designed to connect automatically as soon as the computer connects to the Internet. DirectAccess was introduced in Windows Server 2008 R2, providing this service to Windows 7 and Windows 8 "Enterprise" edition clients.
http://en.wikipedia.org/wiki/DirectAccess

Prerequisites

  • Domain Admin rights to complete the tutorial below
  • Windows Server 2012 R2 machine
    • Two network cards - One in your internal network, the other in your DMZ
    • Joined to your domain
    • Latest Windows Updates
      (seriously, apply these, there are updates released specifically for DirectAccess)
  • DMZ
  • PKI Setup (Public Key Infrastructure to issue self-signed certificates)
    • Custom template setup for issuing servers with an intended purpose of Server Authentication
    • Certificate auto-enrollment has been configured
  • Active Directory Security Group designated with Computer Objects allowed to use DirectAccess
  1. Login to your Server 2012 R2 server we will be using for installing the Direct Access
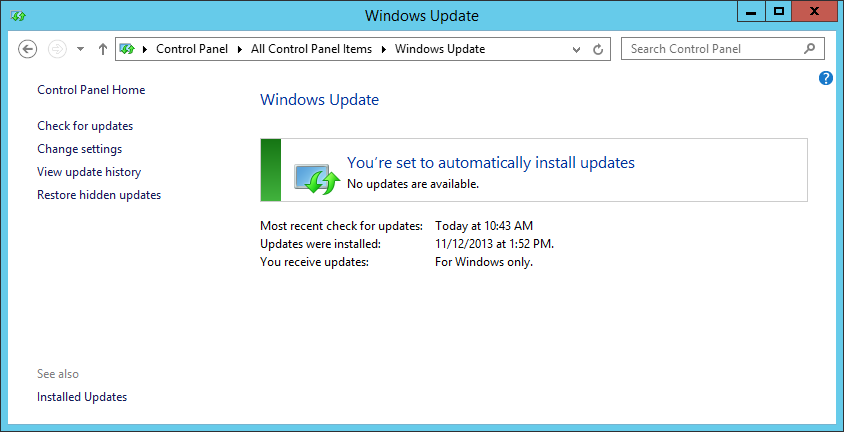
  2. Ensure all windows updates have been applied.
    Latest Windows Updates
  3. Open up Server Manager
    Server 2012 R2 - Server Manager
  4. Select Manage -> Add Roles and Features
    Server 2012 - Manage - Add Roles and Features
  5. Click Next > on the Before you Begin step
    Add Roles and Features Wizard - Before you begin
  6. Ensure Role-based or feature-based installation is checked and click Next >
    Add Roles and Features Wizard - Select installation type
  7. Select Next > on the Select destination server step
    Add Roles and Features Wizard - Select destination server
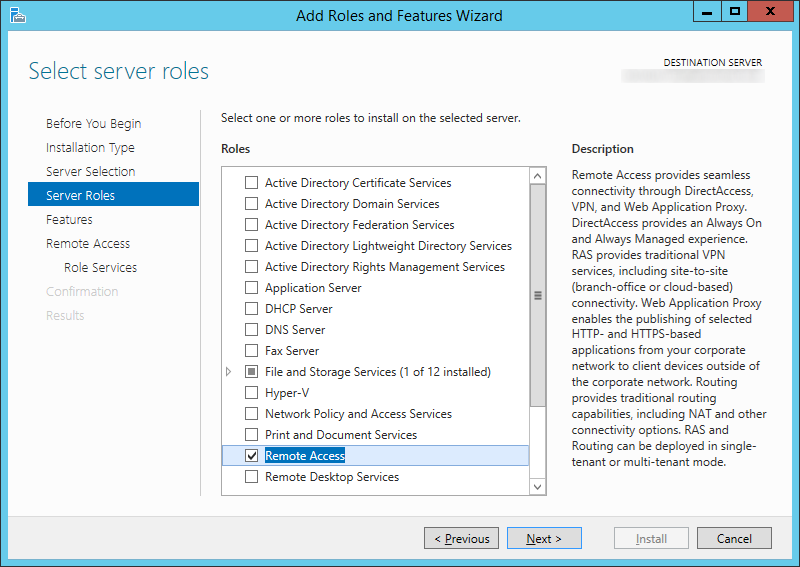
  8. Check Remote Access and click Next >Add Roles and Features Wizard - Server Roles - Remote Access
  9. Click Next > on the Select Features step
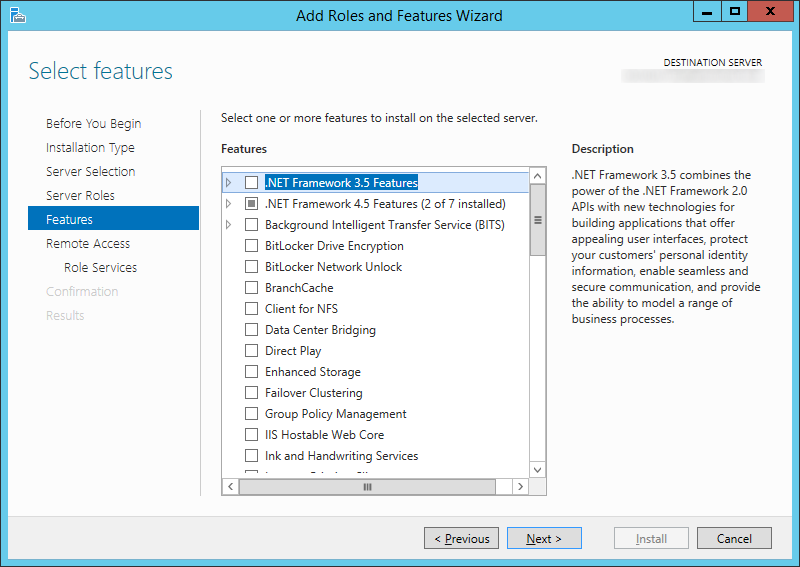
    Add Roles and Features Wizard - Server Roles - Features
  10. Click Next > on the Remote Access step
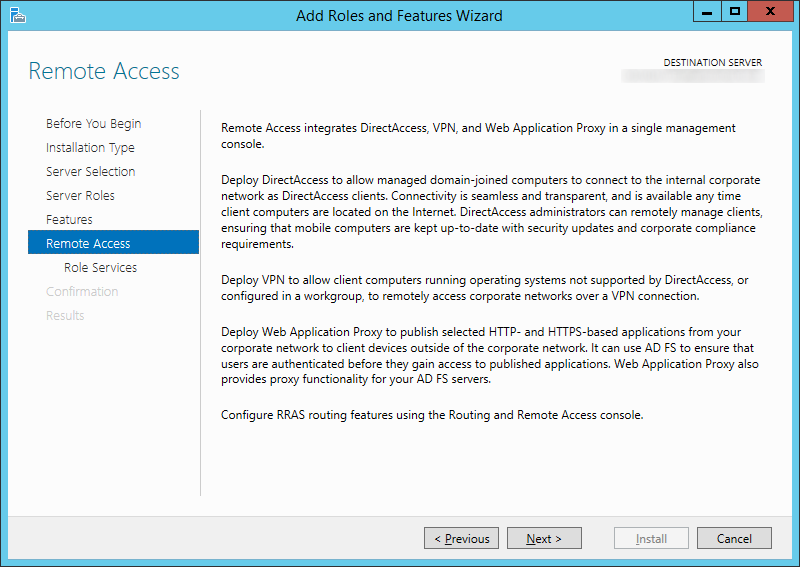
    Add Roles and Features Wizard - Remote Access
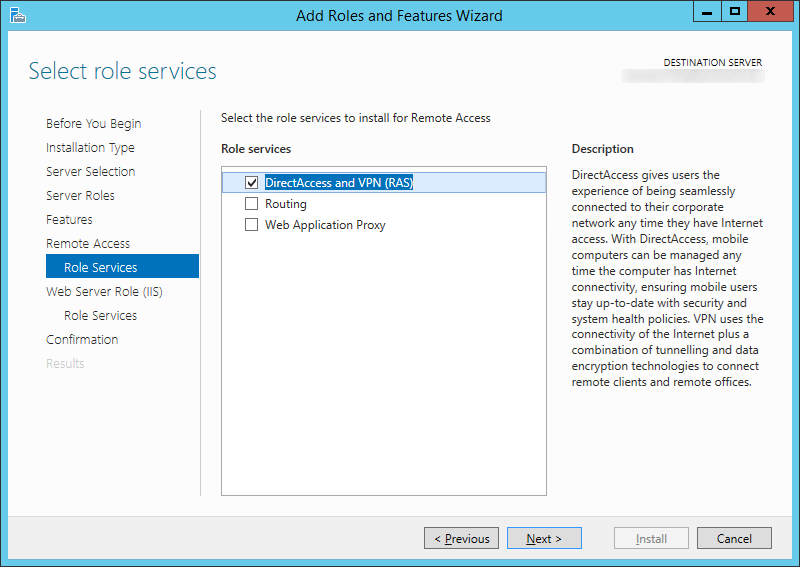
  11. Check DirectAccess and VPN (RAS)
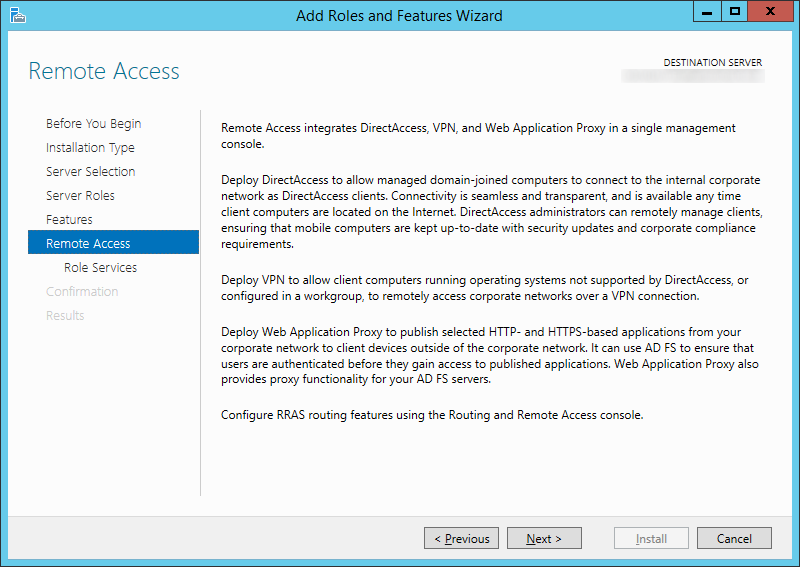
    Add Roles and Features Wizard - Remote Access
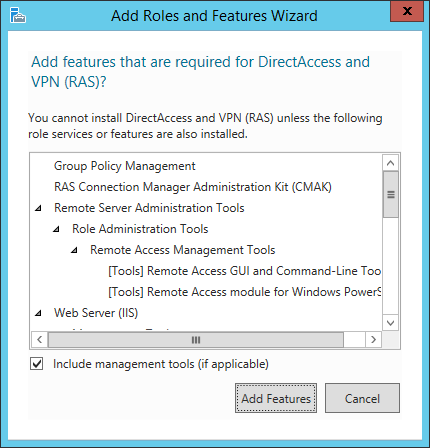
  12. Click the Add Features button on the dialog box that prompts
    Add Roles and Features Wizard - Remote Access - Add Features
  13. Check DirectAccess and VPN (RAS) and then click Next >
    Add Roles and Features Wizard - Remote Access - Select role services
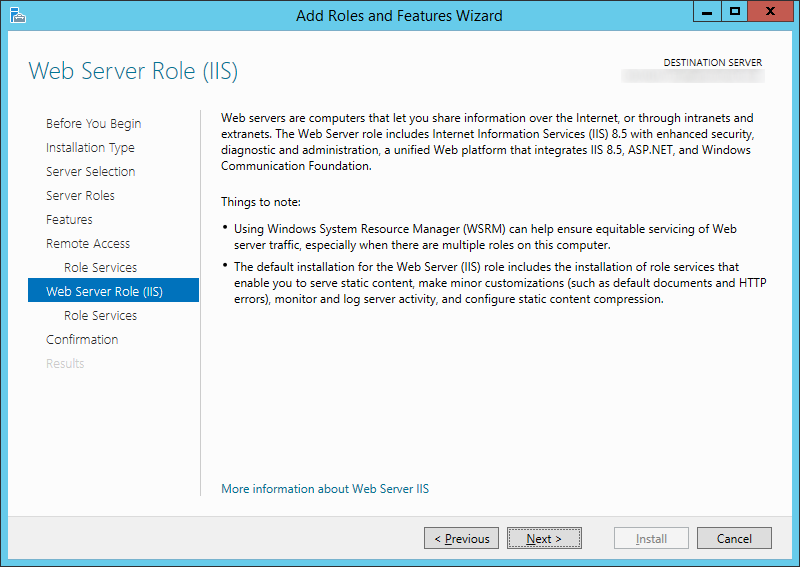
  14. Click Next > on the Web Server Role (IIS) page
    Add Roles and Features Wizard - Web Server Roll IIS
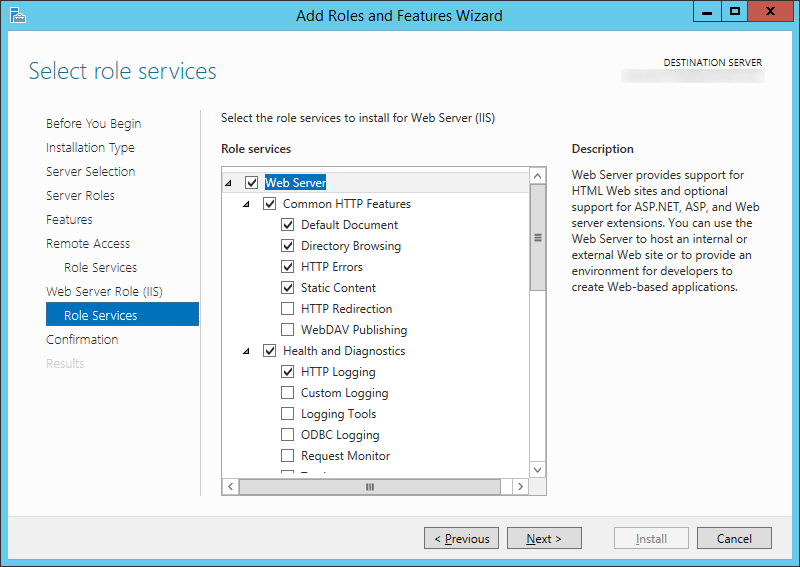
  15. Click Next > on the Role Services page
    Add Roles and Features Wizard - Web Server Roll IIS - Roll Services
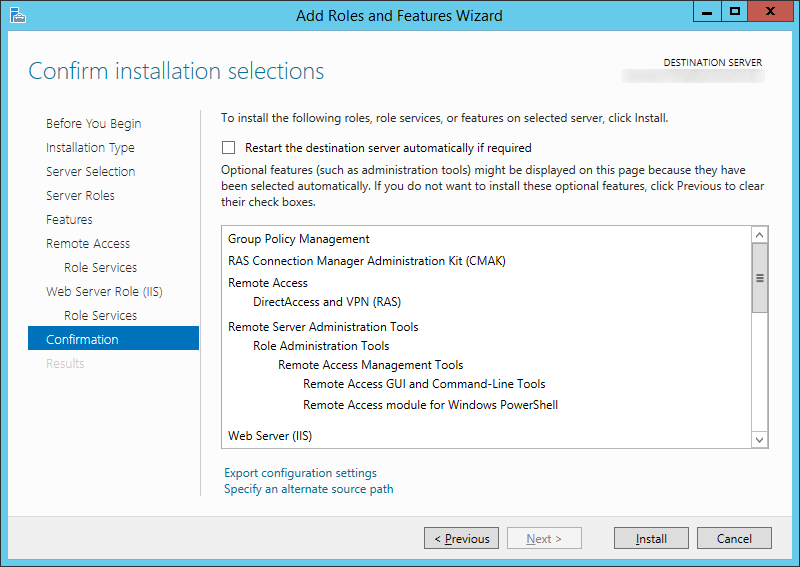
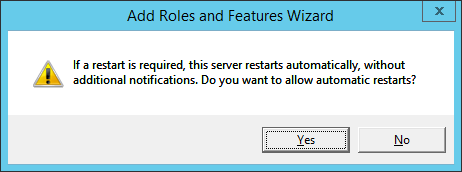
  16. Check the Restart the destination server automatically if required checkbox and click Yes on the dialog box.
    Add Roles and Features Wizard - Confirm installation selections
    Add Roles and Features Wizard - Restart is required dialog
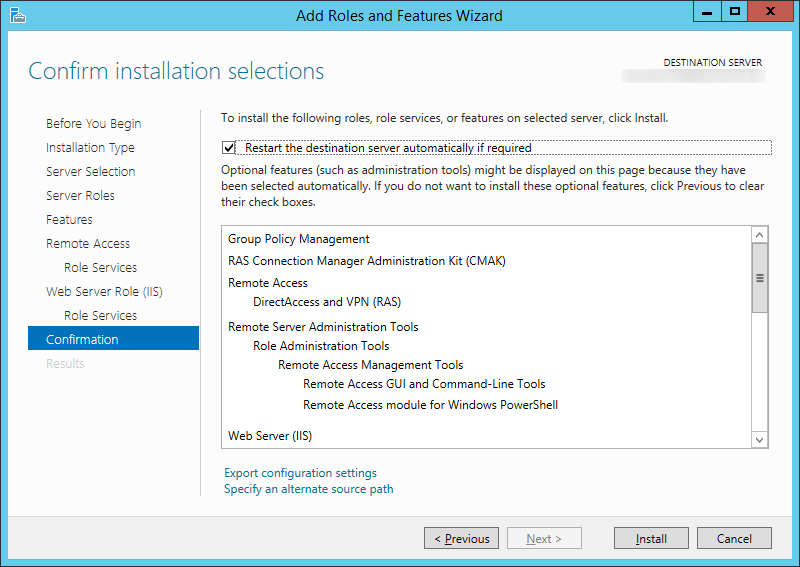
  17. Click Install
    Add Roles and Features Wizard - Confirm installation selections - Restart the destination server automatically if required
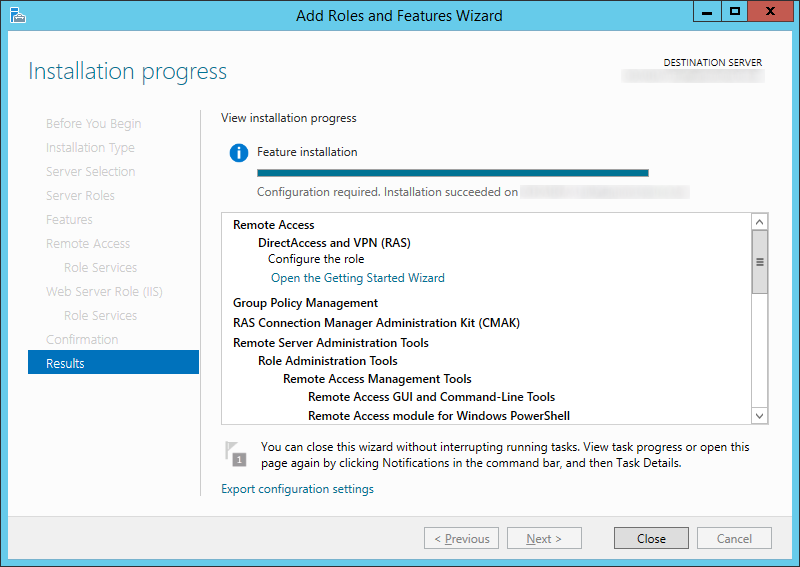
  18. Click Close when the install has completed
    Add Roles and Features Wizard - Results
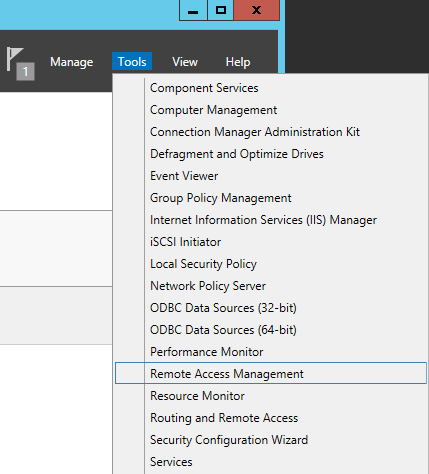
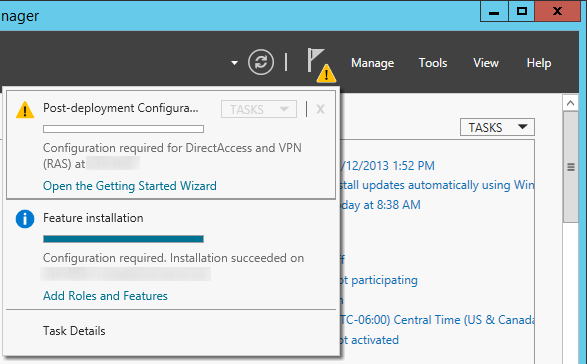
  19. Back in Server Manager, click on Tools -> Remote Access Management (You can ignore the warning icon, the Open the Getting Started Wizard will only do a quick setup of DirectAccess.  We want to do a full deployment).
    Server Manager - Tools - Remote Access Management
    Here is what the quick deployment looks like.  Don't click on this. Server Manager - Post-Deployment Configuration - DirectAccess
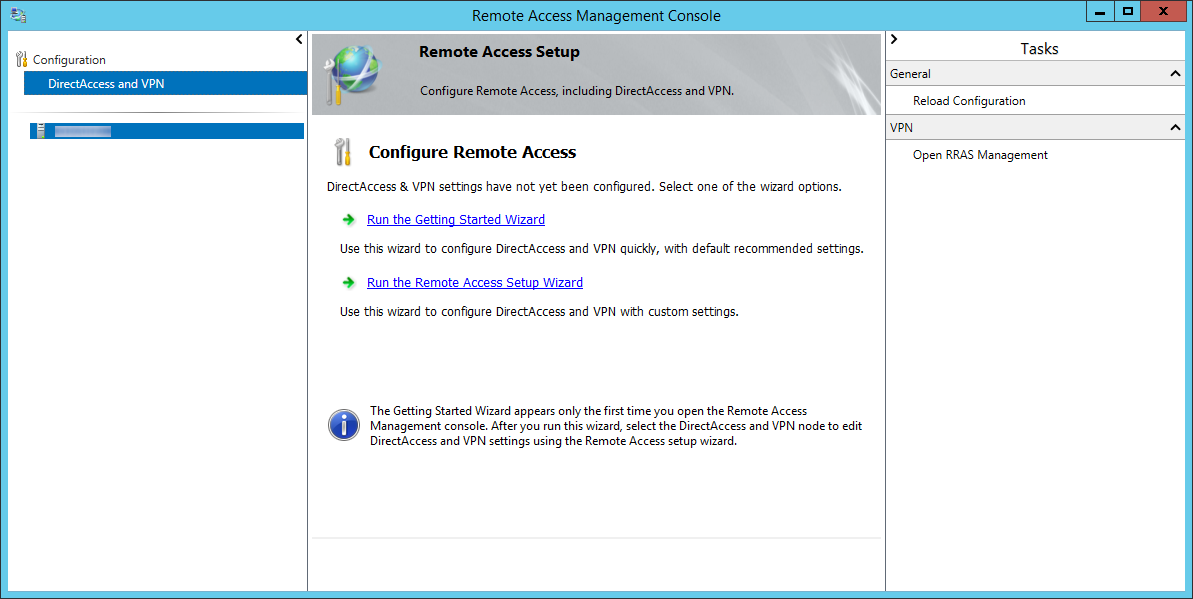
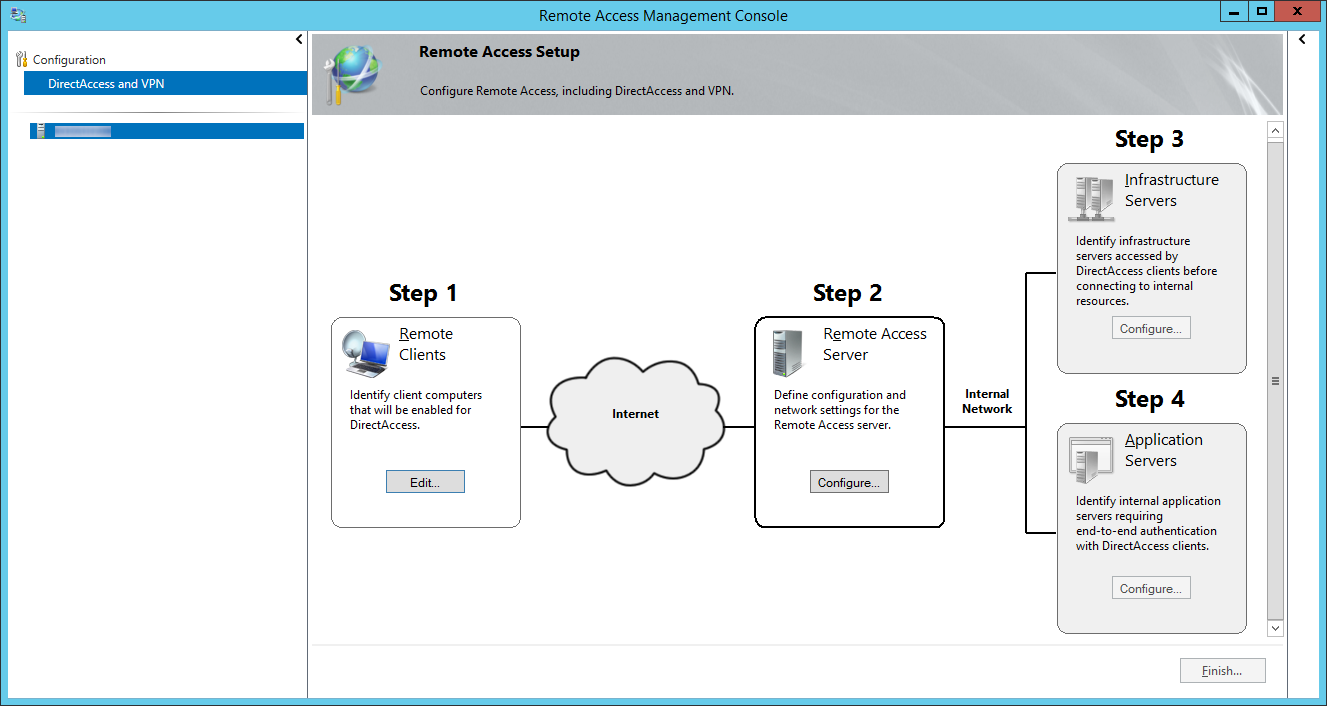
  20. On the Remote Access Management Console, click on DirectAccess and VPN on the top left and then click on the Run the Remote Access Setup Wizard.
    Remote Access Management Console - DirectAccess and VPN
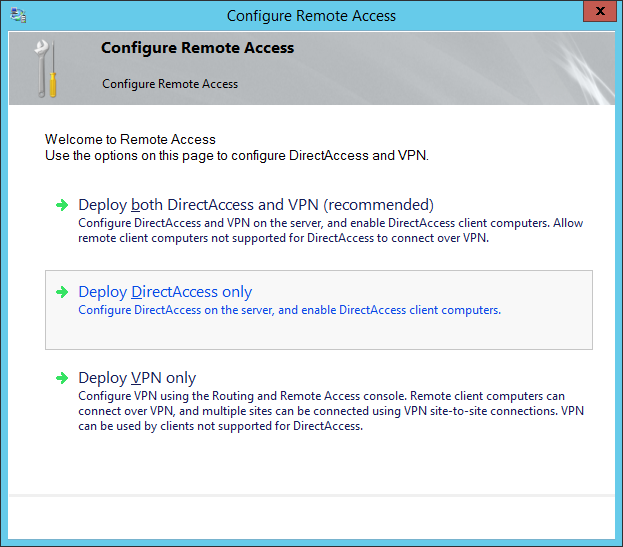
  21. On the Configure Remote Access window, select Deploy DirectAccess only
    Configure Remote Access - Deploy DirectAccess Only
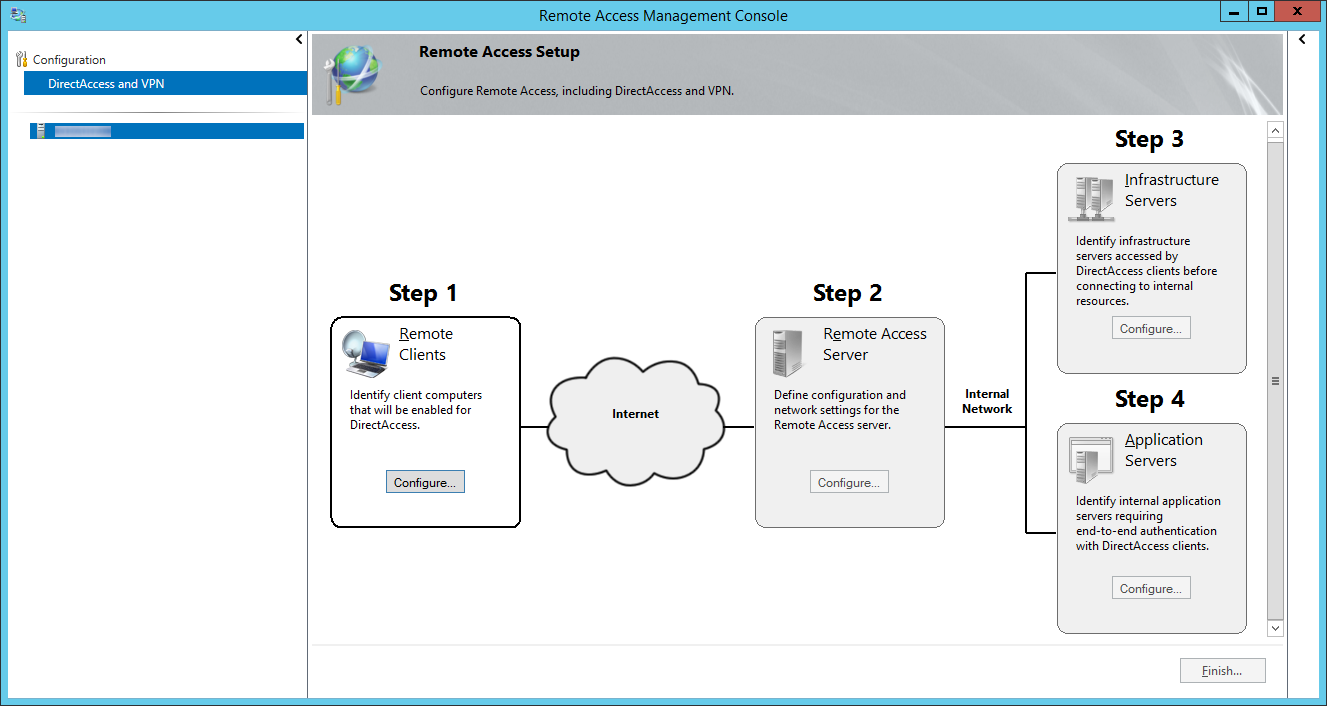
  22. Click on the Configure... button for Step 1: Remote Clients
    Remote Access Management Console - DirectAccess and VPN - Step 1 Remote Clients
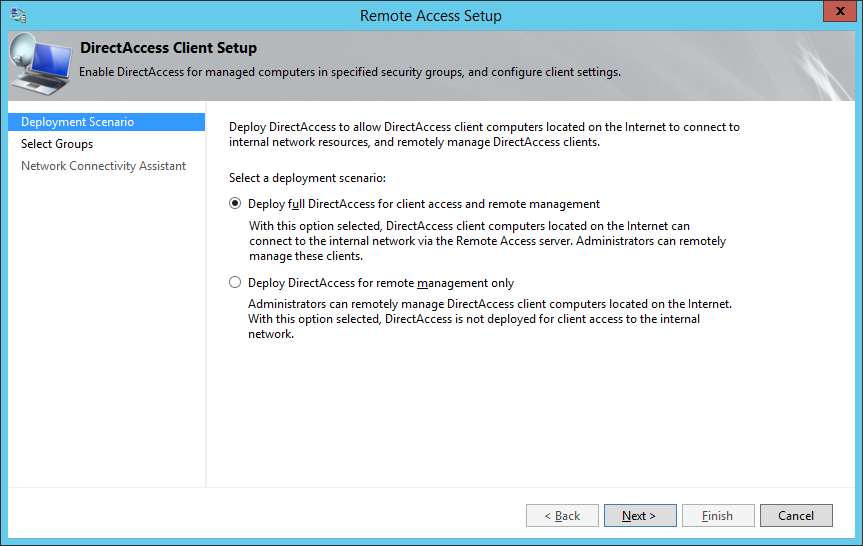
  23. Select Deploy full DirectAccess for client access and remote management and click Next >
  24. Remote Access Setup - Deploy full DirectAccess for client access and remote managment
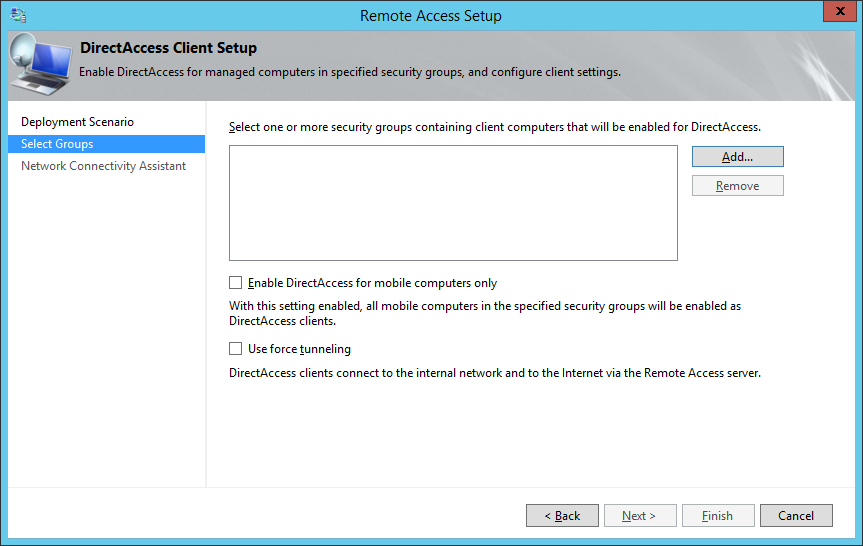
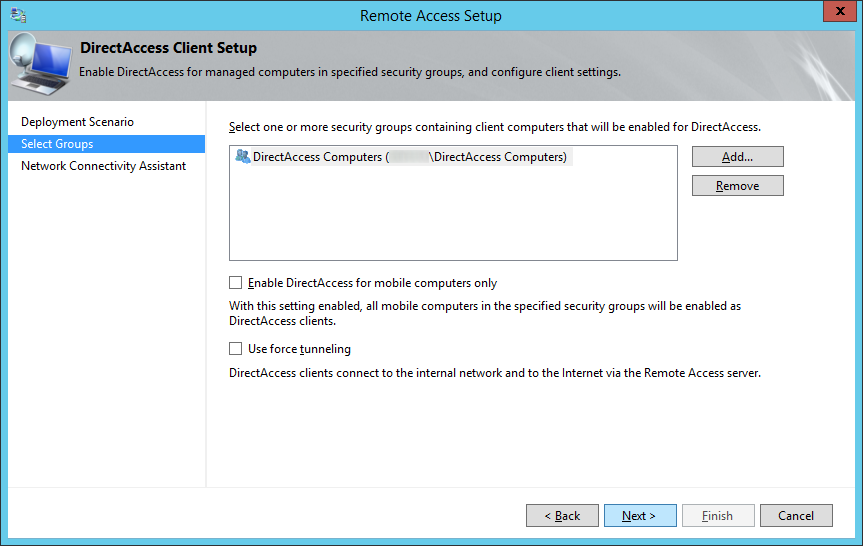
  25. Click on the Add... button
  26. Remote Access Setup - Select one or more security grups containing client computers that will be enabled for DirectAccess
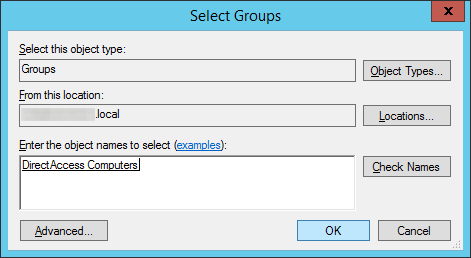
  27. Select the security group inside of Active Directory that will contain computer objects allowed to use DirectAccess and click OK
    Remote-Access-Setup-Select-Groups
  28. Optionally, uncheck or check Enable DirectAccess for mobile computers only as well as Use force tunneling and click Next >
    1. If Enable DirectAccess for mobile computers is checked, WMI will query the machine to determine if it is a laptop/tablet.  If WMI determines the machine is not a "mobile device", the group policy object will not be applied to those machines in the security group.  In short, if checked, DirectAccess will not be applied to computers that are desktops or VMs placed inside the security group.
    2. If Use force tunneling is checked, computers will always use the direct access server when remote.  For example, if the user surfs the web to a public website like jackstromberg.com, the traffic will go through the DirectAccess tunnel and back to the machine, rather than directly to the ISP.  Generally, this is used for strict compliance environments that want all network traffic to flow through a central gateway.
    3. Remote Access Setup - Select Groups - Next
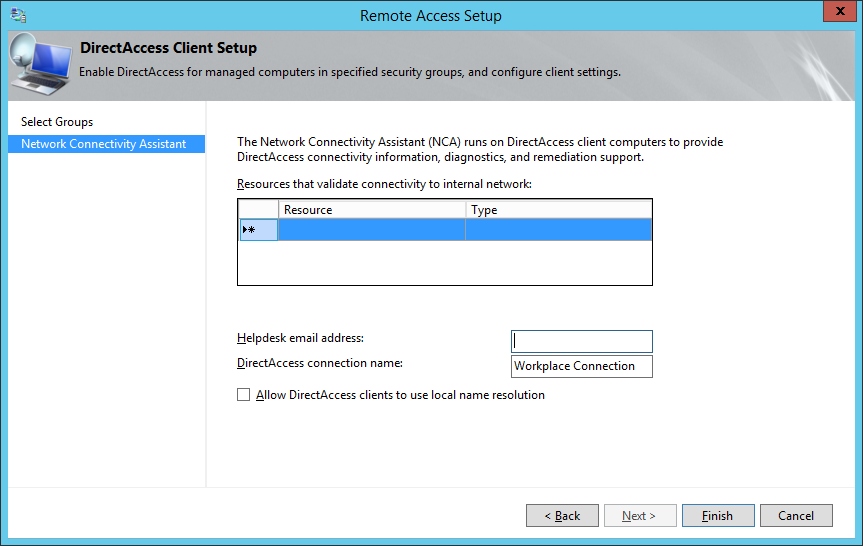
  29. Double click on the Resource | Type row
    1. What this step is trying to do is find a resource on the internal network that the client can "ping" to ensure the DirectAccess client has successfully connected to the internal network.
      Remote Access Setup - Network Connectivity Assistant - Resource Type
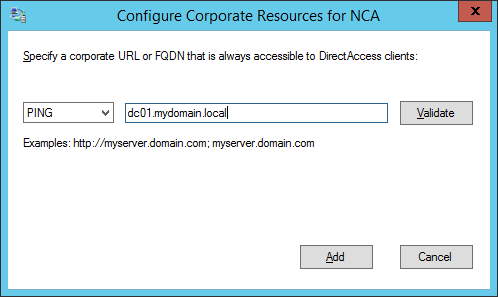
  30. Select whether you want the client to verify it has connected to the internal network via a HTTP response or network ping, optionally click the validate button to test the connection, and then click Add
    1. You may want to add a couple resources for failover testing purposes, however it isn't recommended to list every resource on your internal network.
      Remote Access Setup - Network Connectivity Assistant - Configure Corporate Resources for NCA
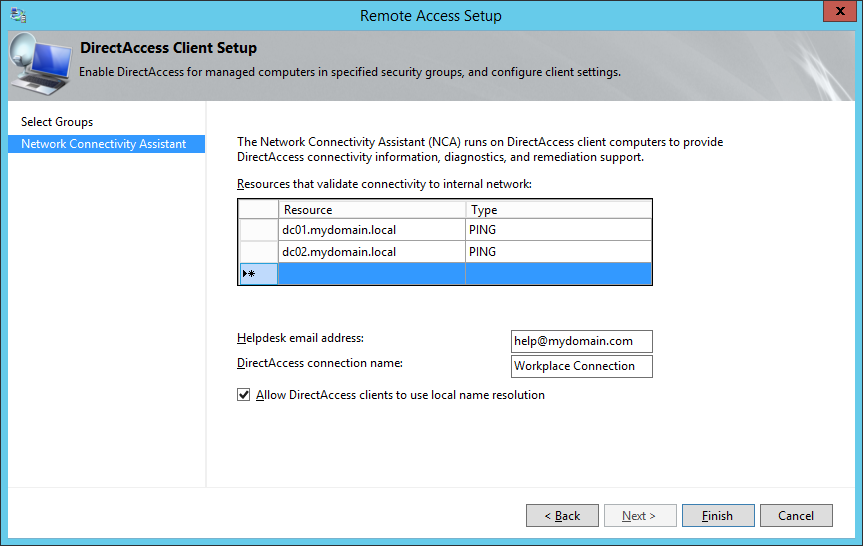
  31. Enter in your Helpdesk email address and DirectAccess connection name (this name will show up as the name of the connection a user would use), and check Allow DirectAccess clients to use local name resolution and click Finish.
    1. Based on what I could find, checking Allow DirectAccess clients to use local name resolution will allow the DirectAccess client to use the DNS server published by DHCP on the physical network they are connected to.  In the event the Network Location server is unavailable, the client would then use the local DNS server for name resolution; allowing the client to at least access some things via DNS.
      Remote Access Setup - Network Connectivity Assistant - Helpdesk email address - DirectAccess connection name
  32. Click on Configure... next to Step 2: Remote Access Server
    Remote Access Management Console - DirectAccess and VPN - Step 2 Remote Access Server
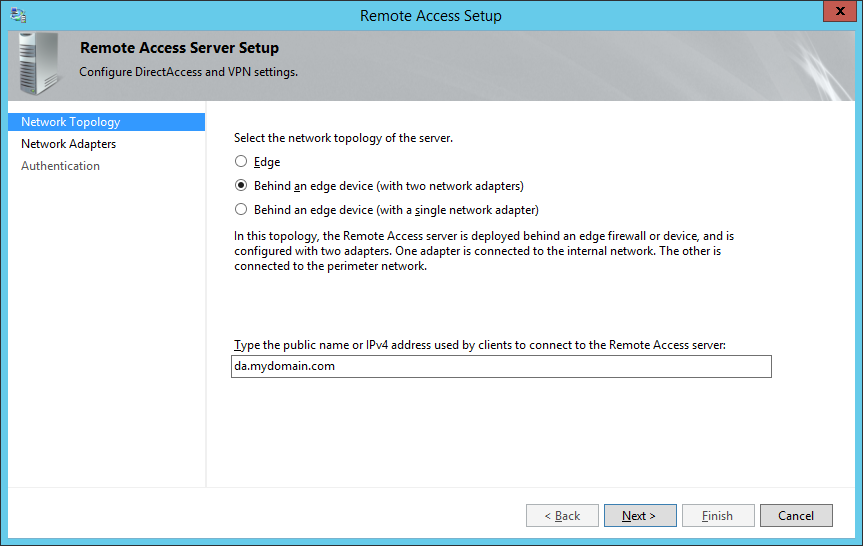
  33. On the Remote Access Server Setup page, select Behind an edge device (with two network adapters) and ensure you specify a public facing DNS record that DirectAccess will use to connect back to your environment, and then click Next >
    1. NOTE: By default, your domain's FQDN will be used, so if you have a .local domain, you will want to switch this to your actual .com, .net, .org, .whatever.
    2. As an additional side note, hereis some information from the following KB article on what the differences are between each of the topologies.  From what I gather, using the dual NIC configuration is Microsoft's best practice from a security standpoint.
      • Two adapters—With two network adapters, Remote Access can be configured with one network adapter connected directly to the Internet, and the other is connected to the internal network. Or alternatively the server is installed behind an edge device such as a firewall or a router. In this configuration one network adapter is connected to the perimeter network, the other is connected to the internal network.
      • Single network adapter—In this configuration the Remote Access server is installed behind an edge device such as a firewall or a router. The network adapter is connected to the internal network.

    Remote Access Server Setup - Network Topology

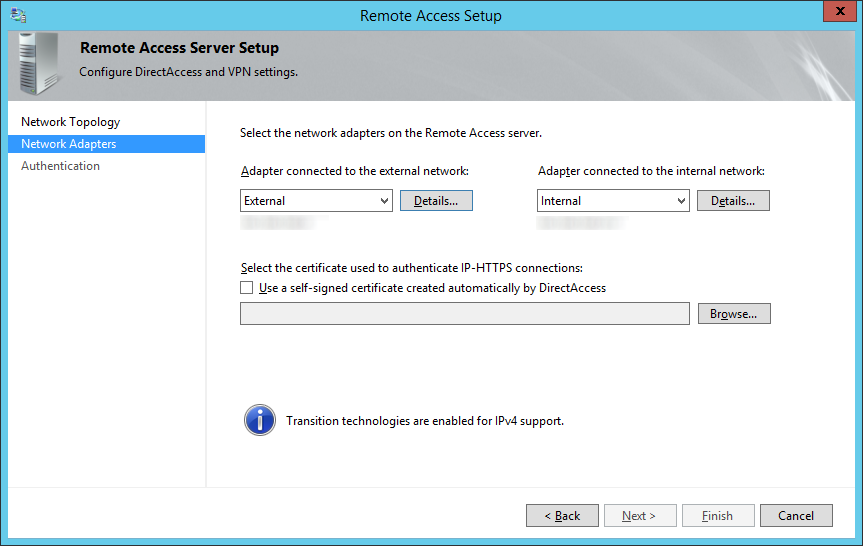
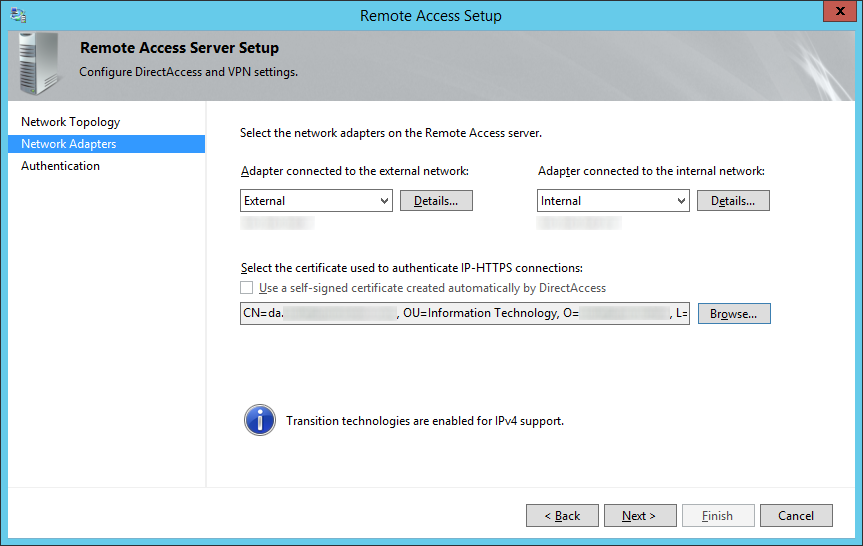
  34. On the Network Adapters step, select your External (DMZ) and Internal (LAN) adapters.Remote Access Server Setup - Network Adapters - External Internal
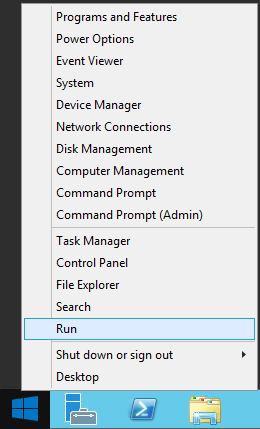
  35. Leave the Remote Access Setup screen open and right click on Start button and select Run
    Server 2012 - Run
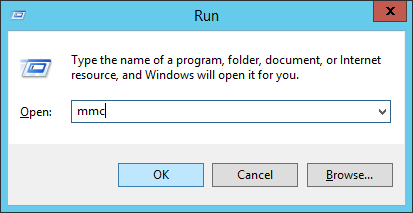
  36.  Type mmc and select OK
    Server 2012 - Run - mmc
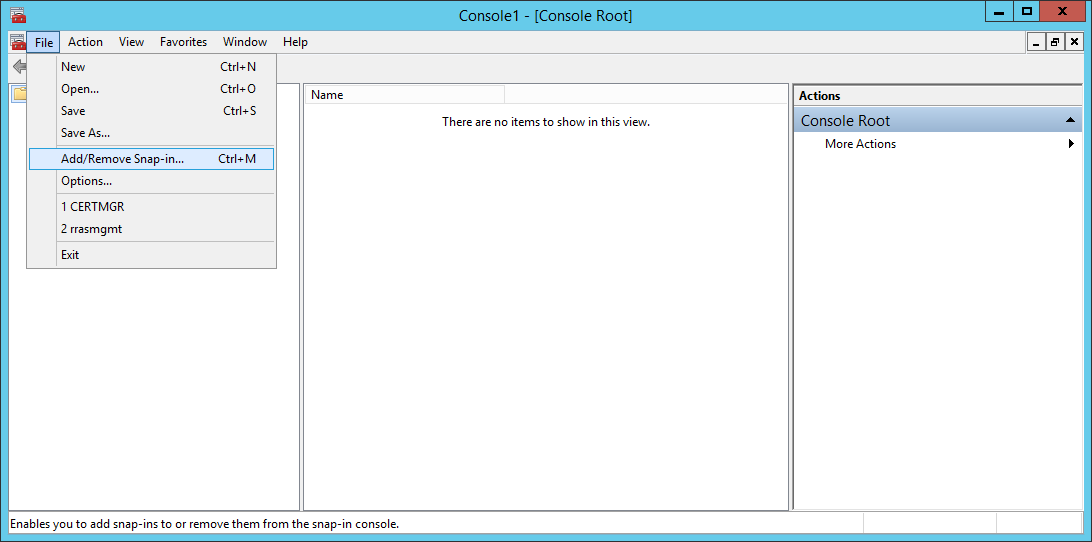
  37. Click File -> Add/Remove Snap-in...
    mmc - File - Add-Remove Snap-in
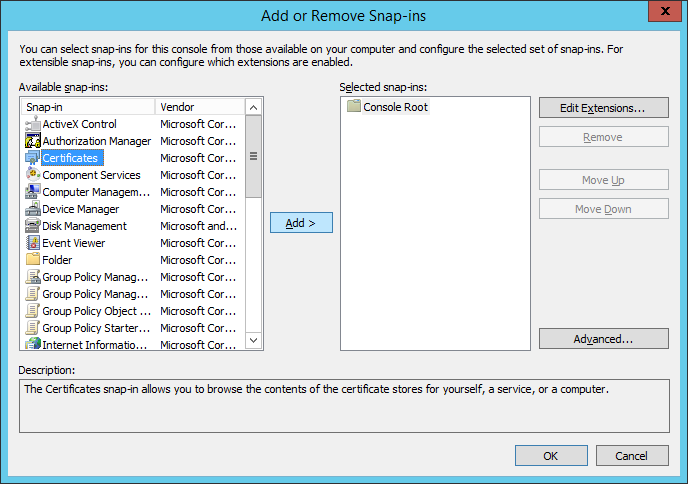
  38. Select Certificates and click Add >
    Add or Remote Snap-ins - Certificates
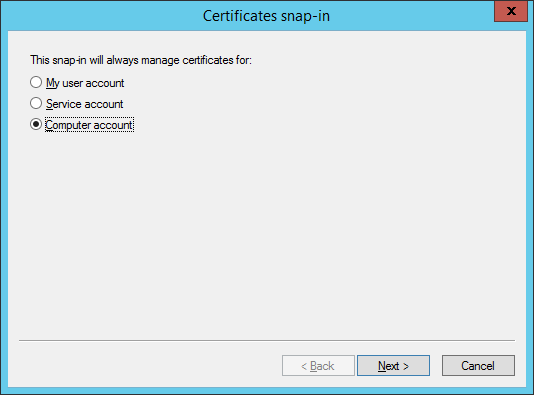
  39. Select Computer account and click Next >
    Certificates snap-in - Computer Account
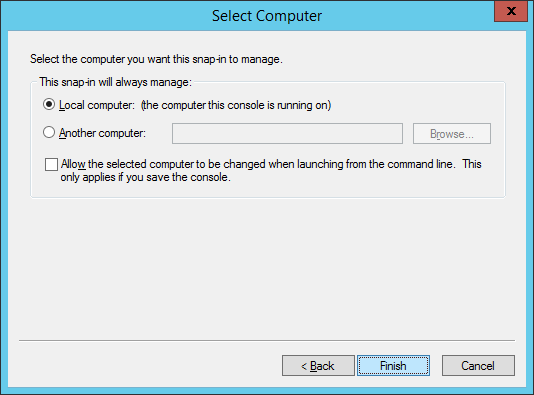
  40. Ensure Local Computer is selected and click Finish
    Certificates snap-in - Select Computer
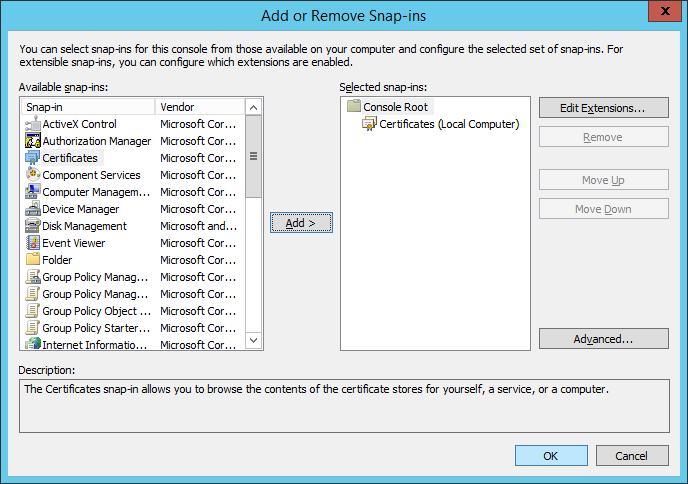
  41. Click OK on the Add or Remove Snap-ins machine
    Add or Remove Snap-ins - Certificates - Local Computer
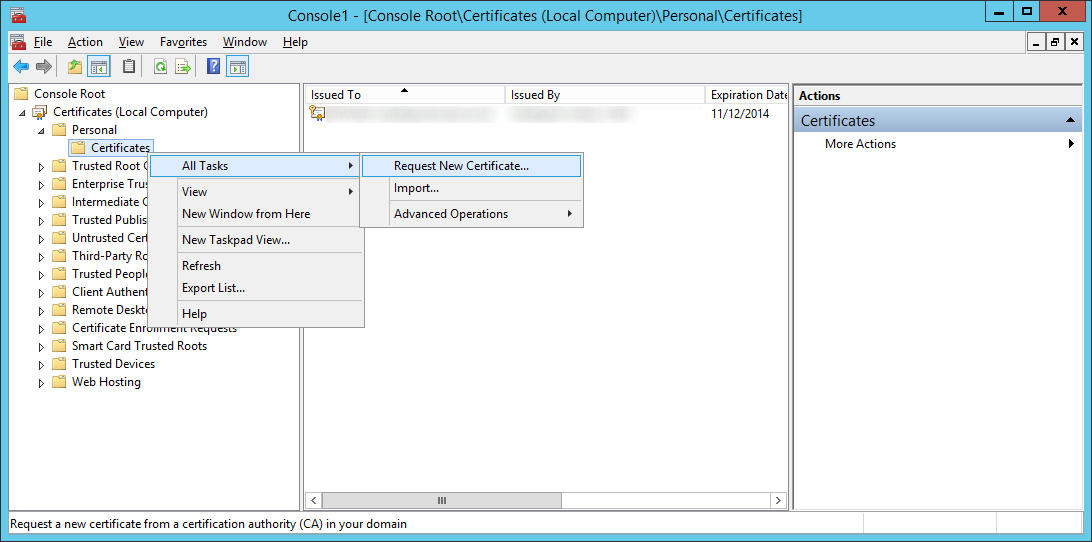
  42. Expand Certificates (Local Computer) -> Personal -> Certificates, right click on Certificates and select Request New Certificate...
    Certificates - All Tasks - Request new certificate
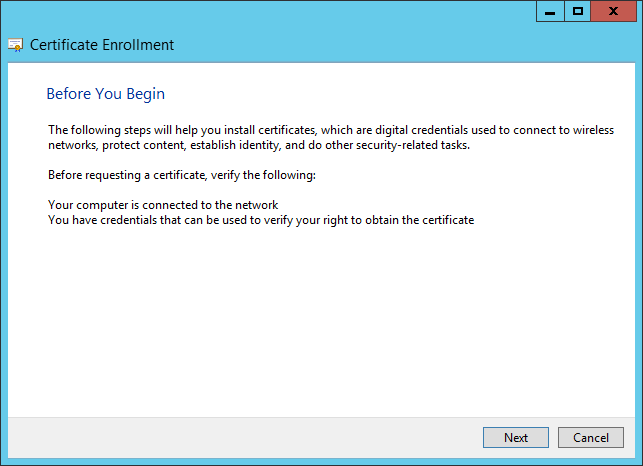
  43. Click Next on the Before You Begin screen
    Certificate Enrollment - Before You Begin
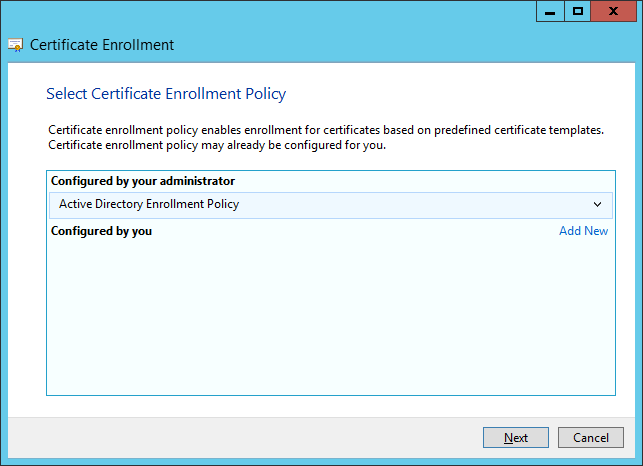
  44. Click Next on the Select Certificate Enrollment Policy
    Certificate Enrollment - Select Certificate Enrollment Policy
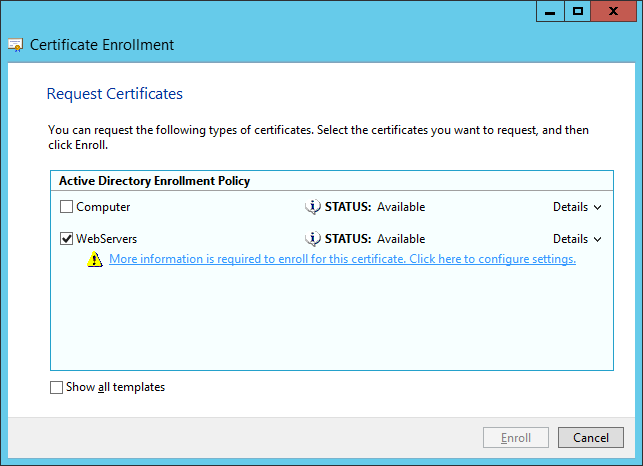
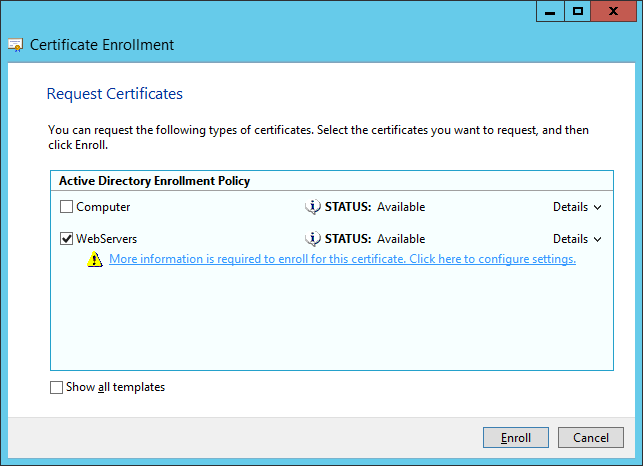
  45. Select your template that will support server authentication and click More information is required to enroll for this certificate.  Click here to configure settings.
    Certificate Enrollment - Request Certificates

    1. Note: The WebServers enrollment policy is not something out of the box configured by Microsoft.  You will need to manually login to your certificate authority, duplicate the Web Servers template with the settings you wish, ensure your usergroup can Enroll for a certificate, and then publish it to AD.
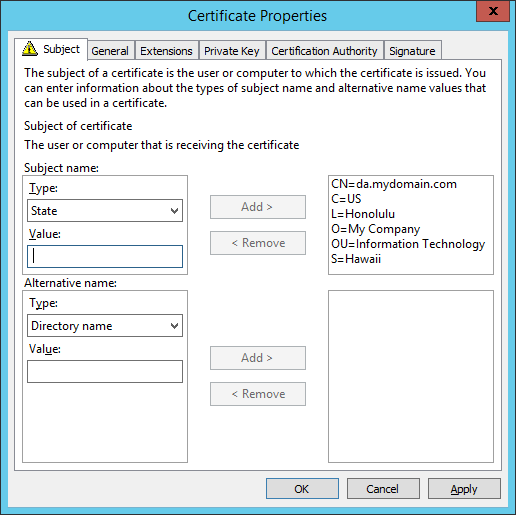
  46. On the Subject tab, enter the following values (substituting in your company's information):
    Common name: da.mydomain.com
    Country: US
    Locality: Honolulu
    Organization: My Company
    Organization Unit: Information Technology
    State: Hawaii
    Certificate Enrollment - Certificate Properties - Subject Tab
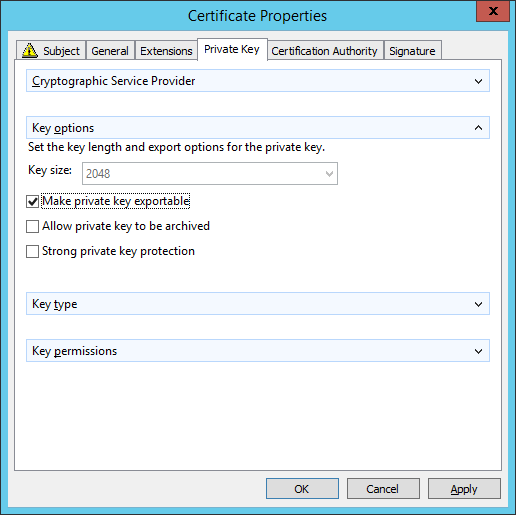
  47. On the Private Key tab, expand Key options and check Make private key exportable.  Click Apply when done.
    Certificate Enrollment - Certificate Properties - Private Key Tab
  48. Click Enroll.
    Certificate Enrollment - Request Certificates - Enroll
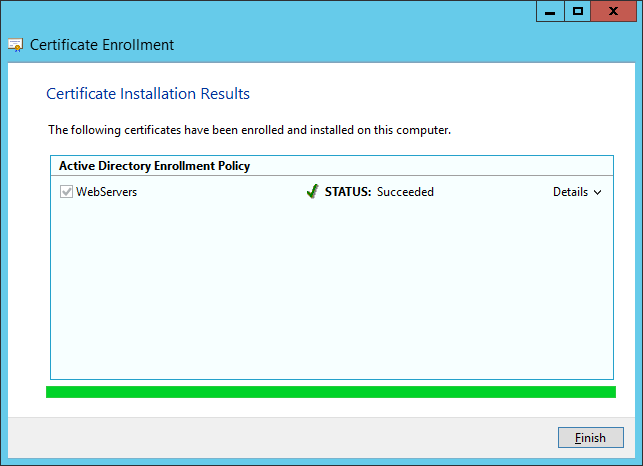
  49. Click Finish.
    Certificate Enrollment - Certificate Installation Results
  50. Go back to the Remote Access Setup screen and click Browse...
    Remote Access Server Setup - Network Adapters - External Internal
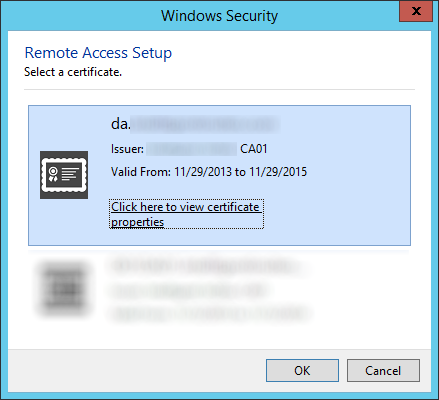
  51. Select your da.mydomain.com certificate we just created and click OK.
    Remote Access Setup - Select a certificate
  52. Click Next >
    Remote Access Setup - Network Adapters - External Internal Certificate
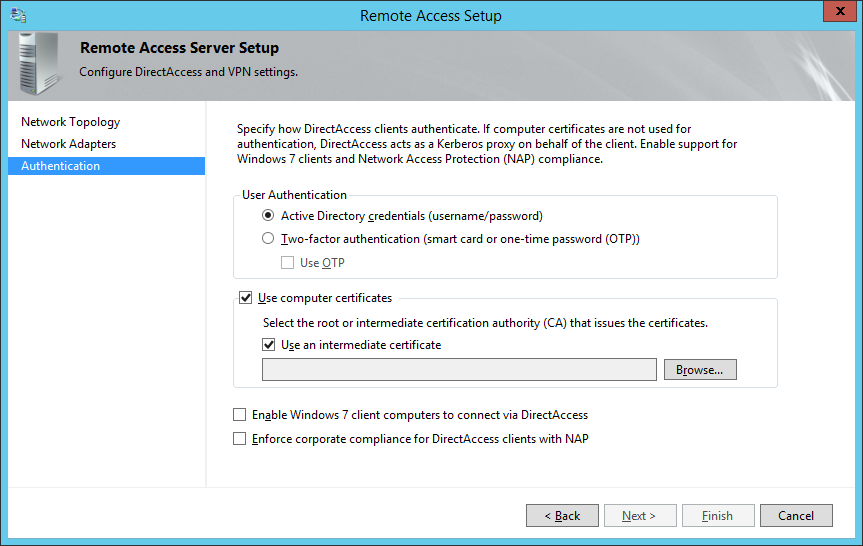
  53. Check Use computer certificates and check Use an intermediate certificate and then click Browse...
    Remote Access Setup - Authentication - Active Directory Credentials
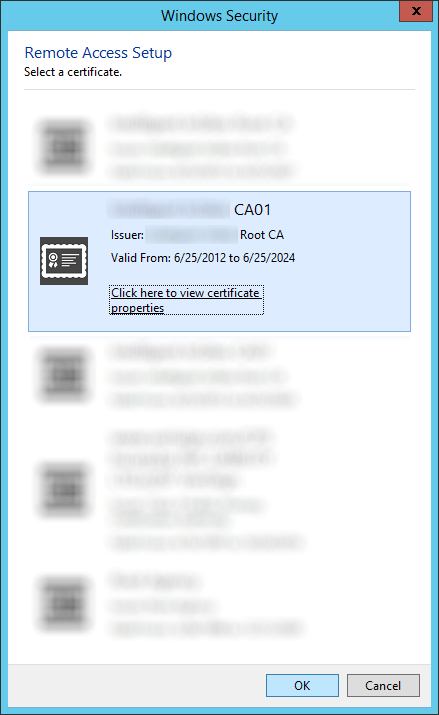
  54. Select the certificate authority that will be issuing the client certificates and click click OK
    Remote Access Setup - Authentication - Select a certificate
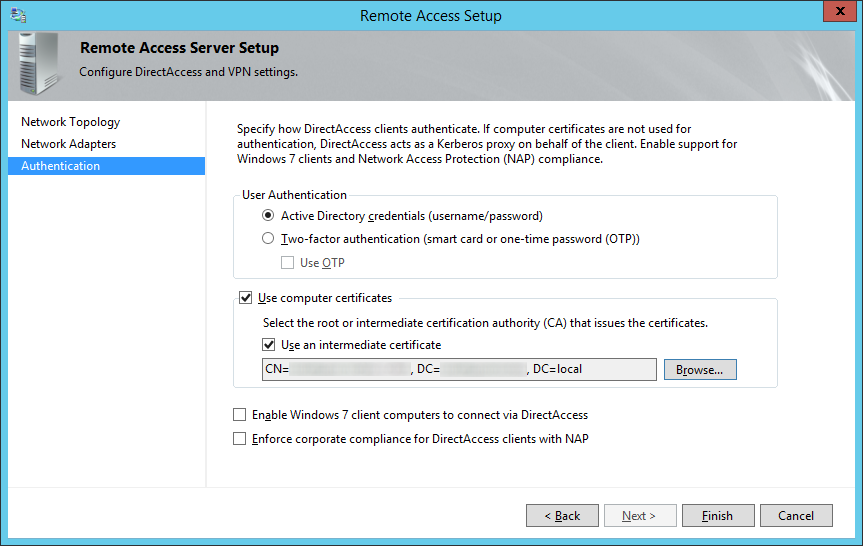
  55. Optionally, you may enable Enable Windows 7 client computers to connect via DirectAccess as well as Enforce corporate compliance for DirectAccess clients with NAP.  Note: Configuring these two options are not covered in the scope of this tutorial.  Click Finish when done.
    Remote Access Setup - Authentication - Finish
  56. Click on Configure... next to Step 3: Infrastructure Servers
    Remote Access Management Console - DirectAccess and VPN - Step 3 Infrastructure Servers
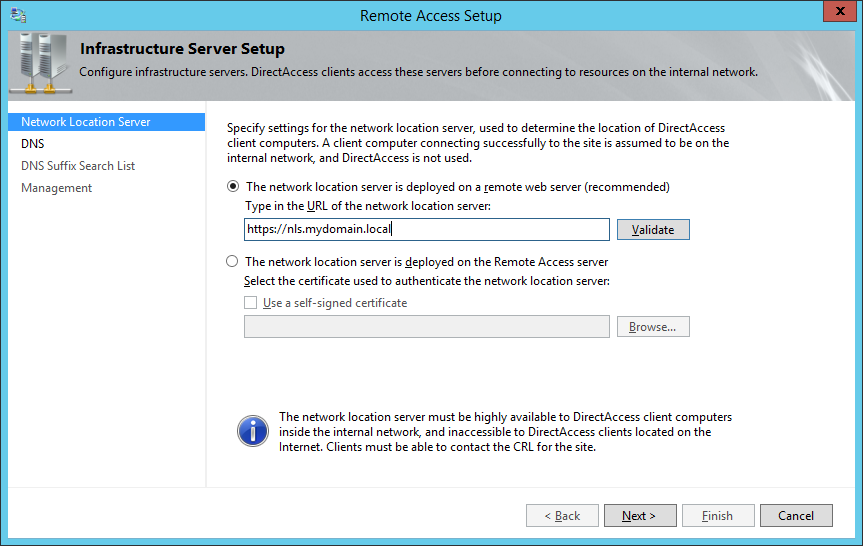
  57. On the Remote Access Setup screen, check The network location server is deployed on a remote web server (recommended), type in the website address to the Network Location Server, and click Next >
    1. So for whatever reason, there aren't many articles explaining what exactly the network location server is and how to set it up.  From what I gather, the Network Location Server is merely a server with a website running on it that the client can contact to ensure it has reached the internal network.  The webpage can be the default IIS webpage; just ensure the website is NOT accessible externally.
      Remote Access Setup - Network Location Server
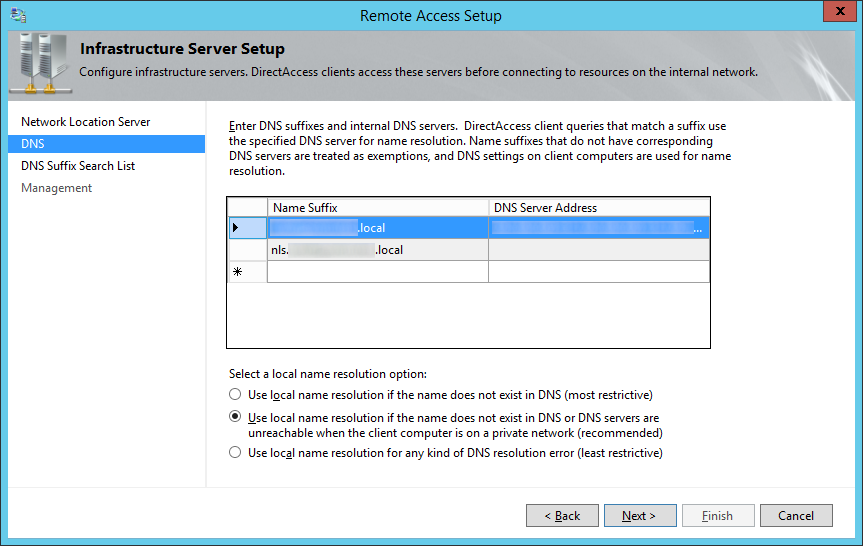
  58. Specify any additional DNS servers you wish to use for name resolution, ensure Use local name resolution if the name does not exist in DNS or DNS servers are unreachable when the client computer is on a private network (recommended) is checked and click Next >
    Remote Access Setup - Infrastructure Server Setup - DNS
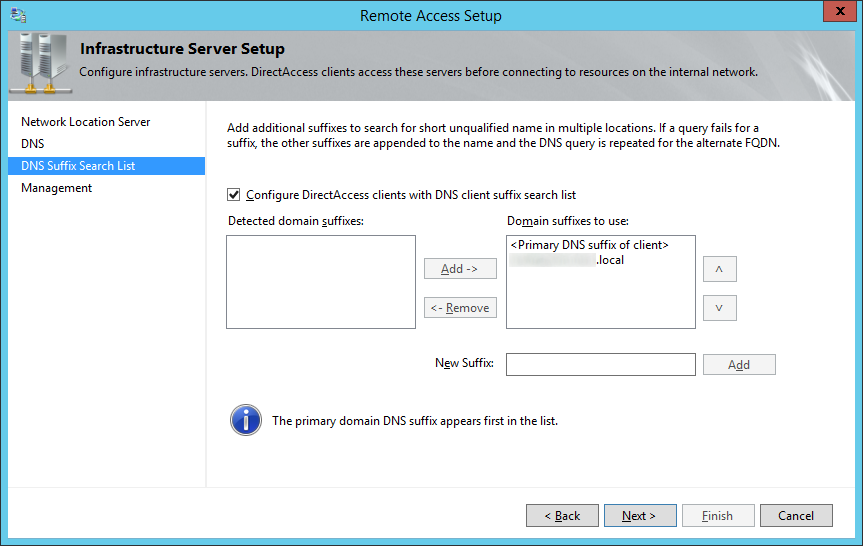
  59. Check Configure DirectAccess clients with DNS client suffix search list, ensure your local domain's suffix has been added, and click Next >
    Remote Access Setup - DNS Suffix Search List
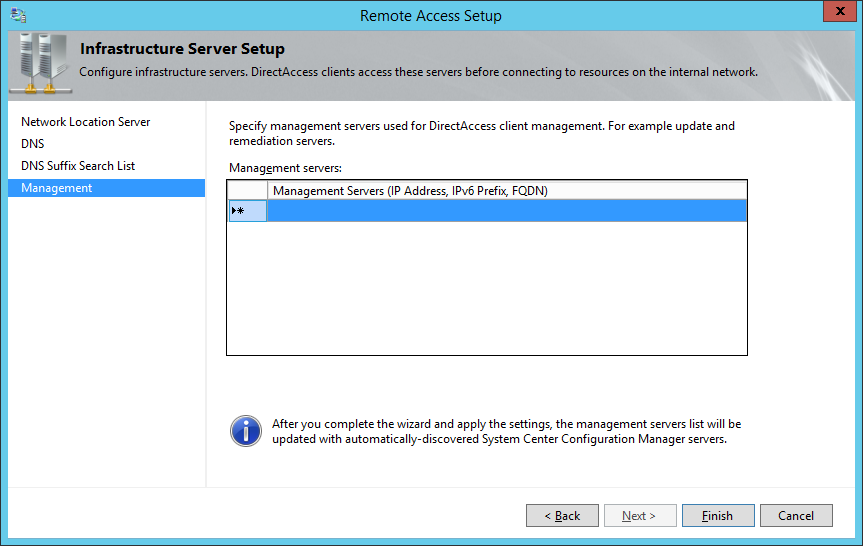
  60. Click Finish on the Management page.
    Remote Access Setup - Management
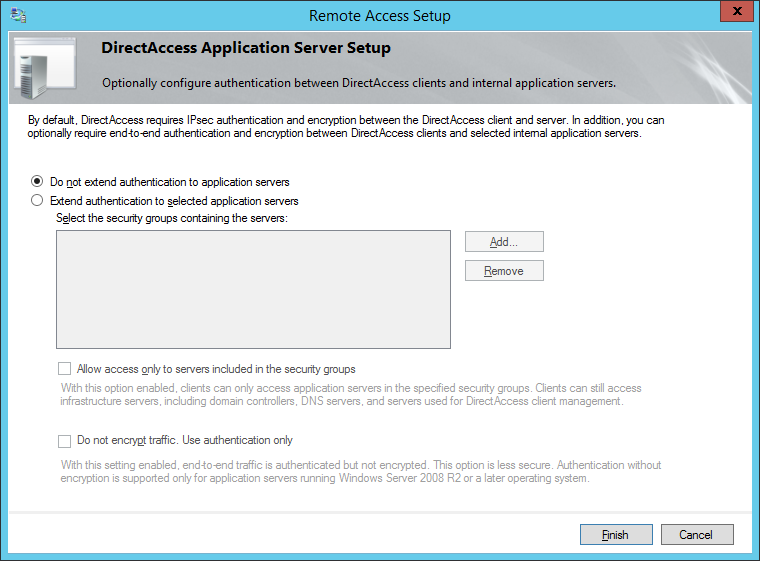
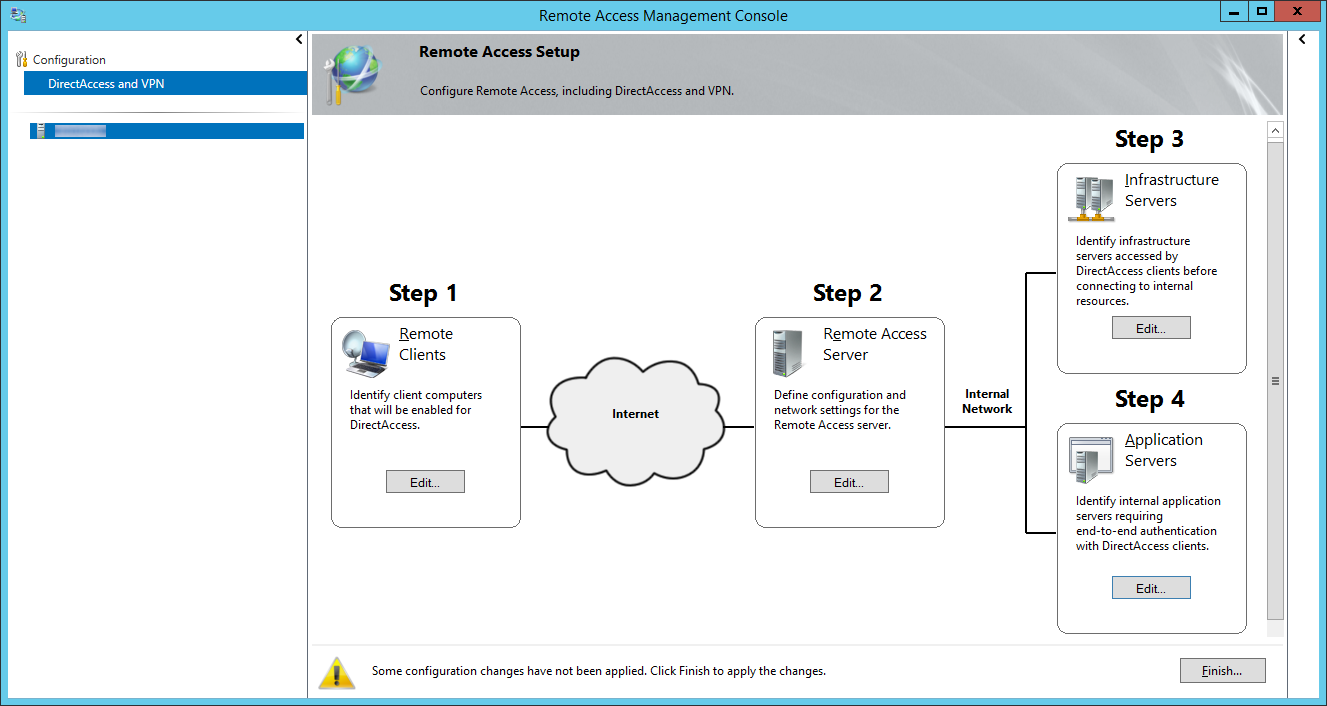
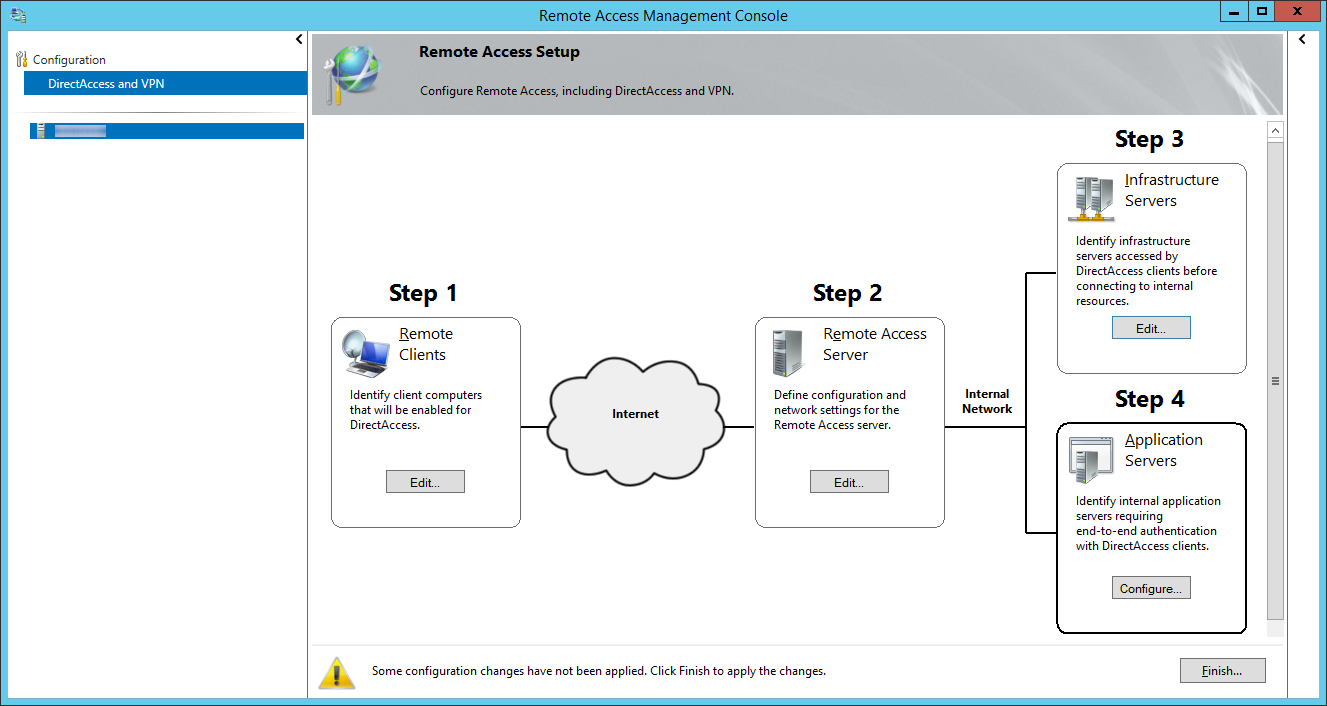
  61. Click the Configure.... button on Step 4: Application Servers
    Remote Access Management Console - Step 4 Application Servers
  62. Check Do not extend authentication to application servers and click Finish
    Remote Access Setup - Do not extend authentication to application servers
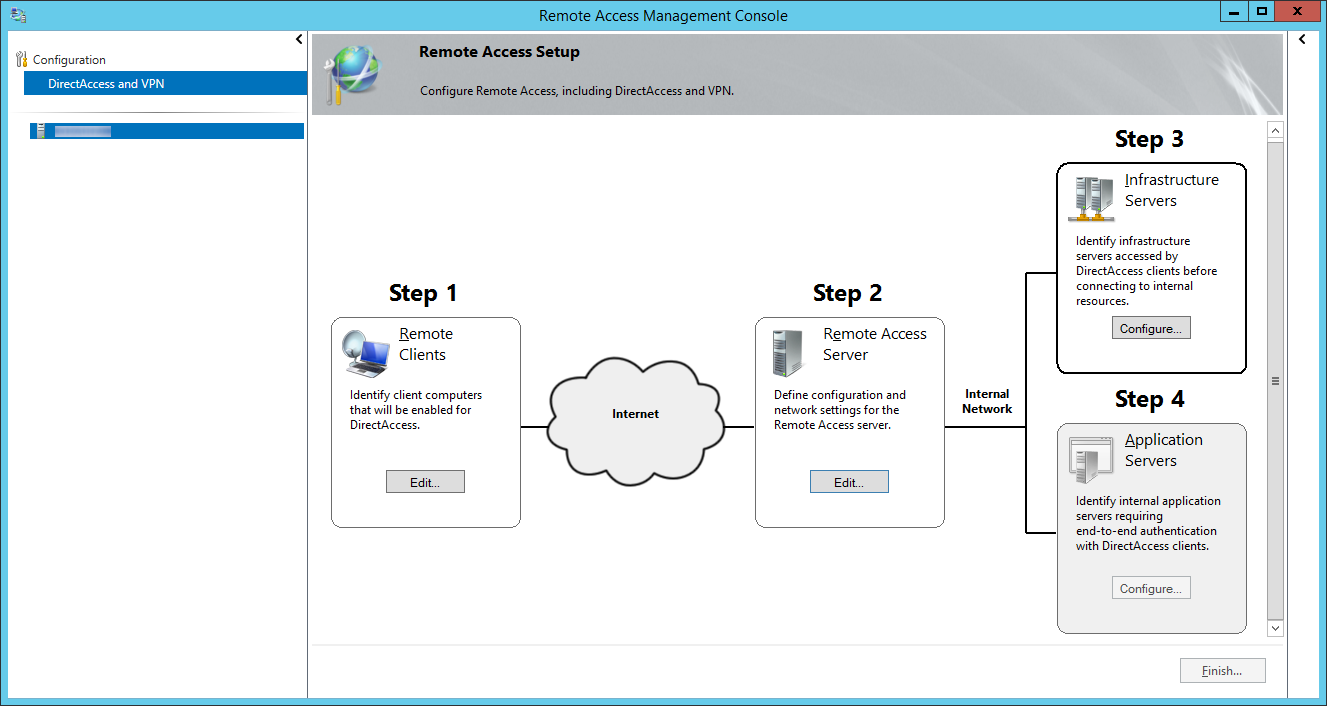
  63. Click Finish... on the Remote Access Management Console page
    Remote Access Management Console - Finish
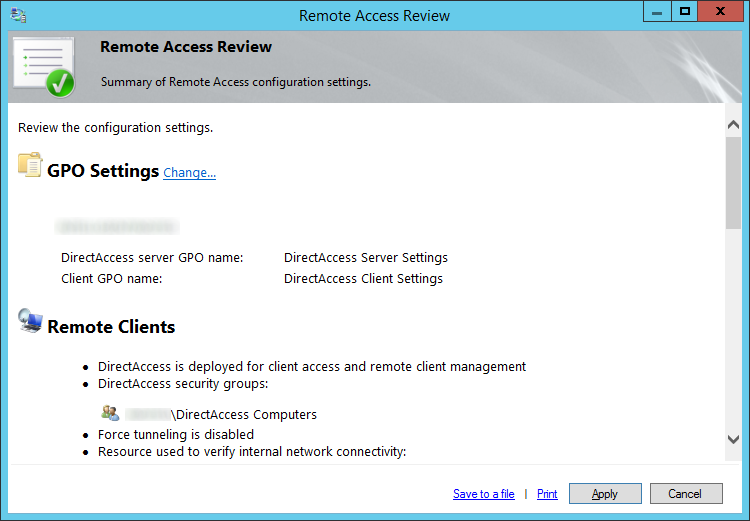
  64. Click Apply on the Remote Access Review page
    Remote Access Review - Summary of Remote Access configuration settings
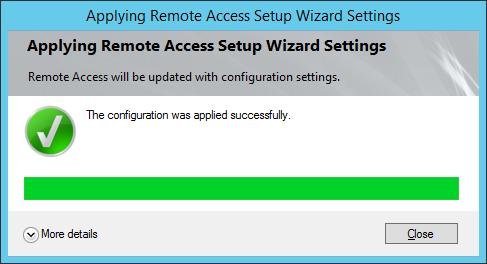
  65. Click Close once direct access has successfully finished deploying
    Apply Remote Access Setup Wizard Settings - The configuration was applied successfully
  66. Login to one of your Windows 8.X Enterprise machines that is inside of your DirectAccess Compuers security group and run a gpupdate from command line to pull down the latest group policy.
  67. At this point, you should now be able to login to your network via DirectAccess!

NOTES:

Here is a pretty good resource from Microsoft on helping plan your DirectAccess deployment.  Once you click on the link, in the bottom left corner, you will find two steps to some good KB articles: http://technet.microsoft.com/en-us/library/jj134262.aspx

Here is another article from Microsoft with a more indepth explanation about where to place the Network Location Server: http://technet.microsoft.com/en-us/library/ee382275(v=ws.10).aspx

Server 2012 R2 - Missing Group Policy - Internet Explorer Maintenance

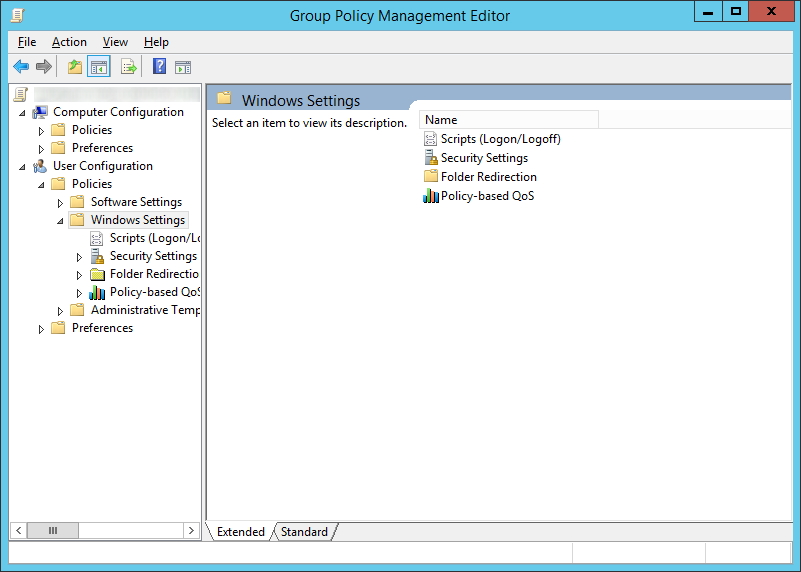
Symptom: When navigating to User Configuration - Policies - Windows Settings via Group Policy Management Editor, Internet Explorer Maintenance is missing from the list of configurable policies.

Server 2012 - Group Policy Management Editor - User Configuration - Policies - Windows Settings

Explanation: Internet Explorer 10 (which is installed by Default on Server 2012 R2) deprecates Internet Explorer Maintenance (IEM) in favor of a more robust tool called Group Policy Preferences.  As you can see in the following Microsoft KB article, a link to the Internet Explorer Maintenance policy alternatives can be found here: http://technet.microsoft.com/library/hh846772.aspx

Solution: Remove the old Internet Explorer Maintenance policies and switch over to use Preferences to manage your domain machines.  This tutorial will not go into using Preferences, however it will go over removing the Internet Explorer Maintenance policies from your GPO.  Since I went ahead and upgraded our environment to Server 2012 R2 I ended up having to configure a new Server 2008 R2 machine.  If someone has an easier solution, please let me know in the comments below.

  1. Login to any member machine of the domain that is running Server 2008 R2 or earlier and does not contain Internet Explorer 10 or greater
  2. Open up Server Manager
    Server Manager
  3. Install Group Policy Management if it is not installed
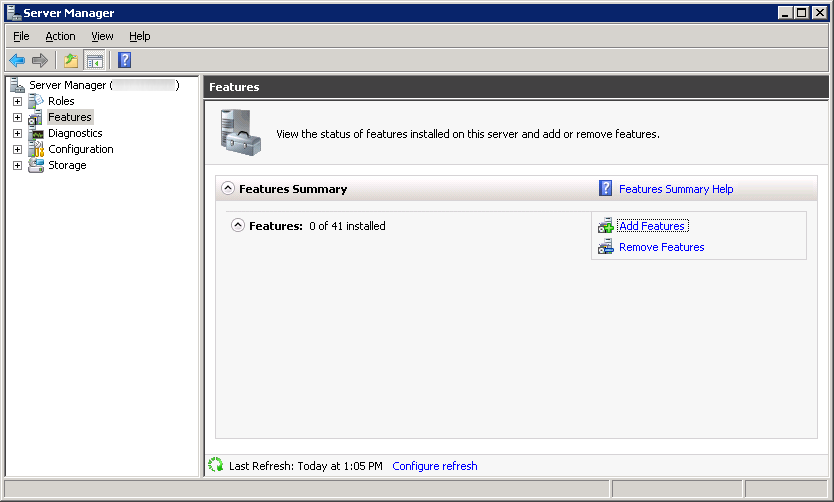
    1. Select Features and click Add Features
      Server Manager 2008 R2 - Add Features
    2. Select Group Policy Management and click Next >
      Server 2008 R2 - Add Features Wizard - Group Policy Management
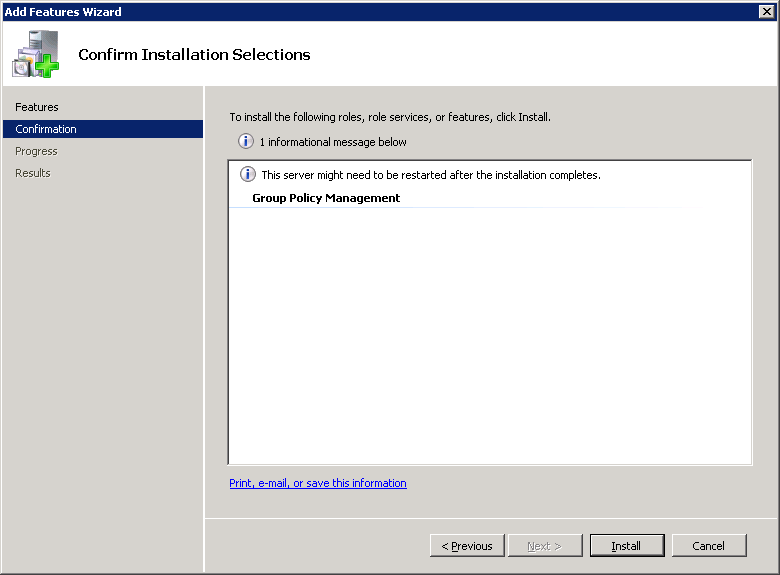
    3. Click Install
      Server 2008 R2 - Add Features Wizard - Group Policy Management - Install
    4. Click Close
      Server 2008 R2 - Add Features Wizard - Group Policy Management - Close
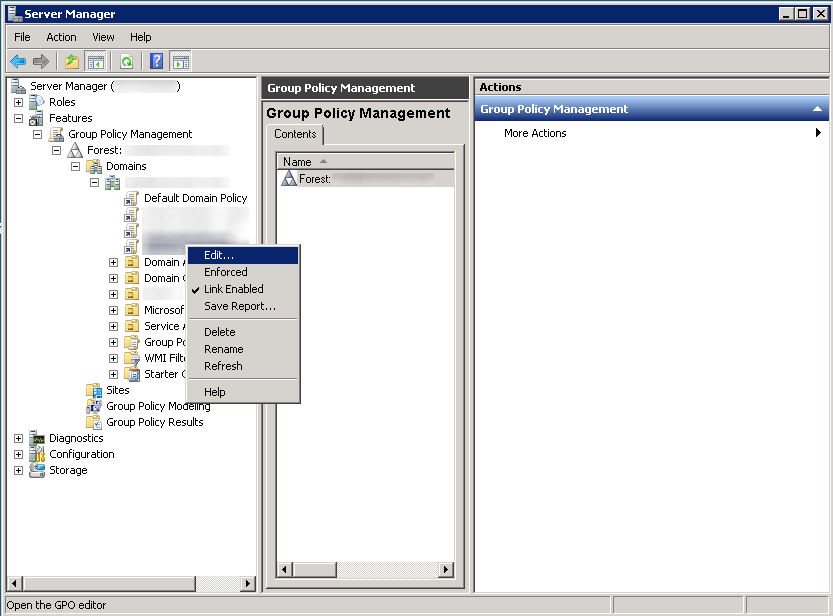
  4. Select Features- > Group Policy management -> Expand your forest -> Expand Domains -> Select your domain -> Right click and Edit... one of your policies
    Server Manager 2008 R2 - Features - Group Policy Management - Edit GPO
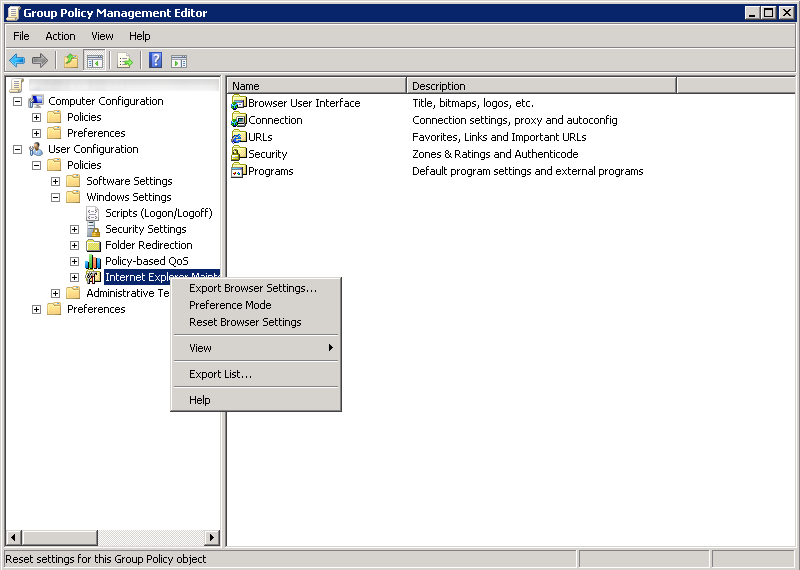
  5. Expand User Configuration -> Policies -> Software Settings -> Windows Settings and select Internet Explorer Maintenance.
  6. Right click on Internet Explorer Maintenance and select Reset Browser Settings
    Group Policy Management Editor - User Configuration - Policies - Windows Settings - Internet Explorer Maintenance - Reset Browser Settings
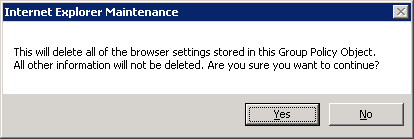
  7. Click Yes on the Internet Explorer Maintenance dialog box
    Internet Explorer Maintenance Dialog Box
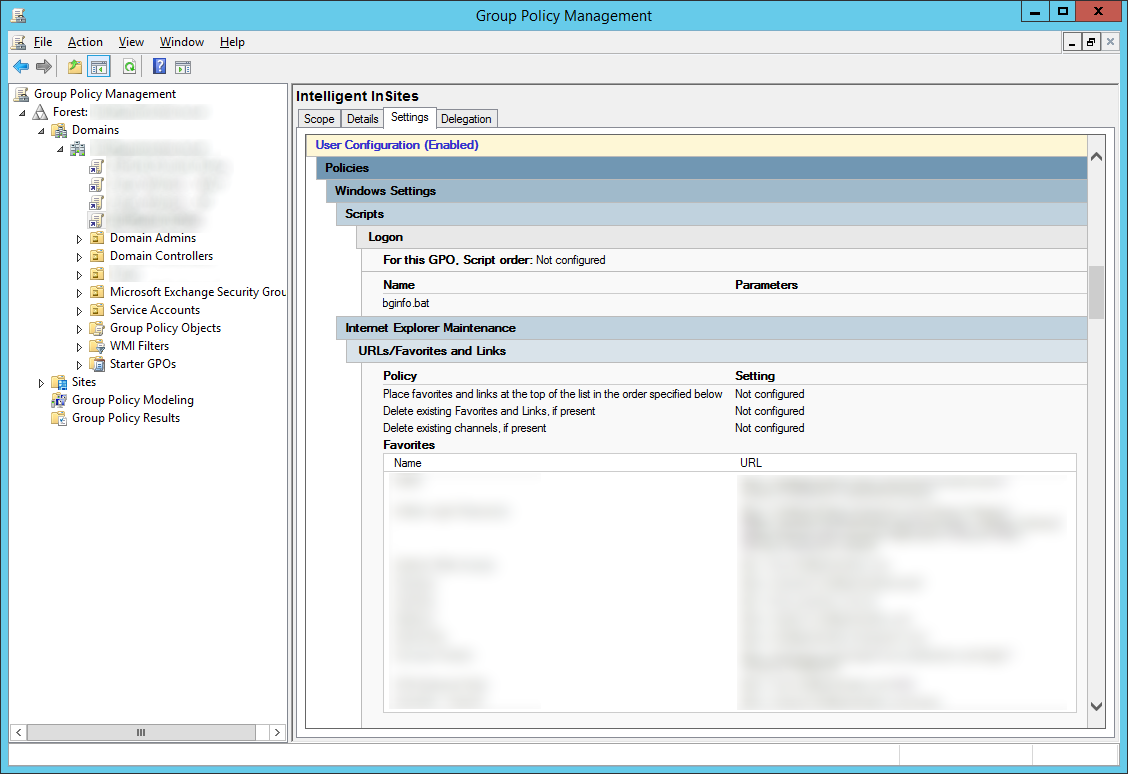
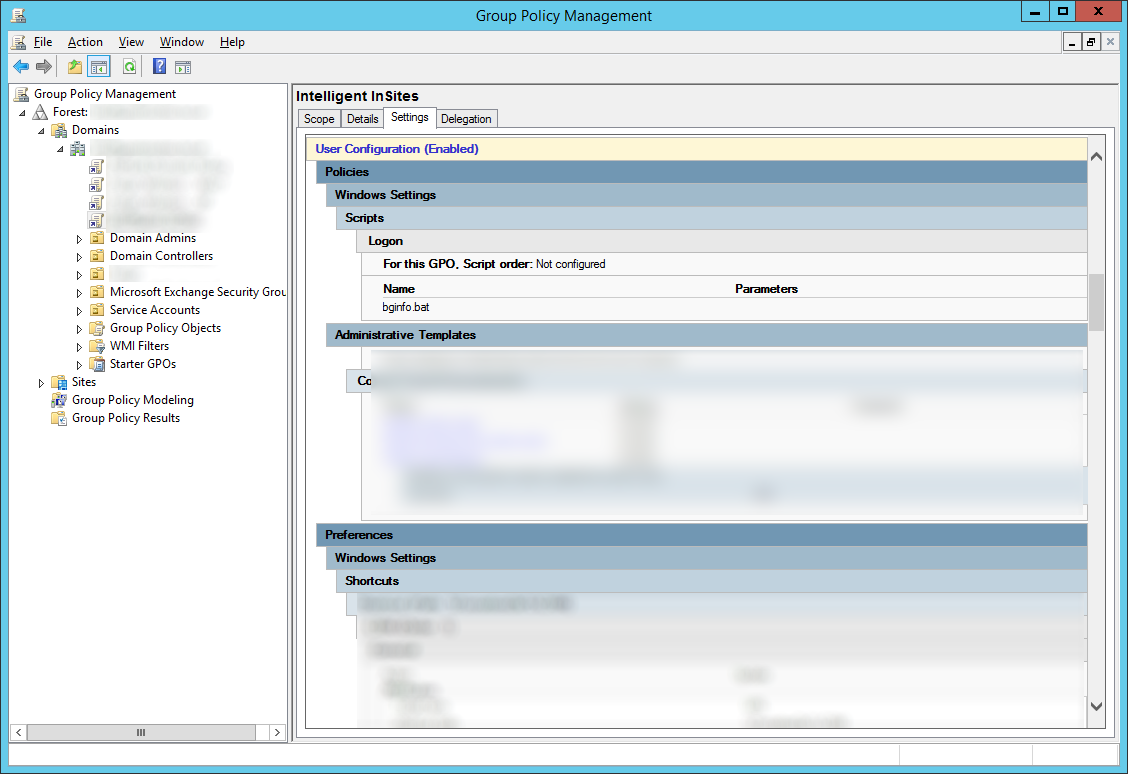
  8. If all went well, you should now see all of the deprecated Internet Explorer Maintenance policies removed from your Group Policy Object.
    Before
    Group Policy Management - Before
    After
    Group Policy Management - After

Notes:
Official KB on installed Group Policy Manager: http://technet.microsoft.com/en-us/library/cc725932.aspx

Official KB article on replacements for Internet Explorer Maintenance: http://technet.microsoft.com/en-us/library/jj890998.aspx

Forum post showing frustration over this: http://social.technet.microsoft.com/Forums/windowsserver/en-US/1f6a0d43-e81f-4038-88f6-75d8921fdf82/missing-group-policy-internet-explorer-maintenance?forum=winserver8gen

Configuring external time source on your Primary Domain Controller

Here we will configure your primary domain controller (PDC) to connect to an external source to keep your time synchronized up with the rest of the world.  By changing the primary DC's time source to an external source, the changes will be replicated from the PDC to other clients in your domain; limiting the amount of bandwidth needed to synchronize with an external source.  First, I am going to reference much of the information provided by .  I would highly recommend you check out his blog post as it contains a ton of valuable information on the subject as well as more information/best practicies in regards to keeping time in your organization's infrastrucutre: http://binarynature.blogspot.co.uk/2012/04/configure-active-directory.html

  1. Find out what your primary domain controller (PDC) is for your domain by executing the following powershell commands from any machine in the domain
    1. [System.DirectoryServices.ActiveDirectory.Forest]::GetCurrentForest().RootDomain.PdcRoleOwner.Name
      PowerShell - PdcRoleOwner
  2. Login to your primary domain controller
  3. Open up a command prompt/powershell window with administrative privilegesServer 2012 - PowerShell - Run as Administrator
  4. Execute the following command to configure the domain controller to look at an external time source
    1. w32tm.exe /config /manualpeerlist:"0.us.pool.ntp.org 1.us.pool.ntp.org 2.us.pool.ntp.org 3.us.pool.ntp.org" /syncfromflags:manual /reliable:YES /update
      w32tm config manualpeerlist syncfromflags manual ntp

      1. Notes: You can find the closest time server near you by browsing the following page and clicking on the nearest zone: http://www.pool.ntp.org/zone/@
  5. Execute the following command to actually perform a time synchronization with the external source
    1. w32tm.exe /config /update
      w32tm config update
  6. Execute the following command for the changes to take effect
    1. Restart-Service w32time
      Restart-Service w32time

That's all that is to it!