Tag Archives: Command Line

[Tutorial] Adding firewall rules via system-config-firewall-tui on CentOS 6

Here is a quick tutorial on how to add an ingress firewall rule on your CentOS 6 machine.  In this example, we will be forwarding port 443 for HTTPS.

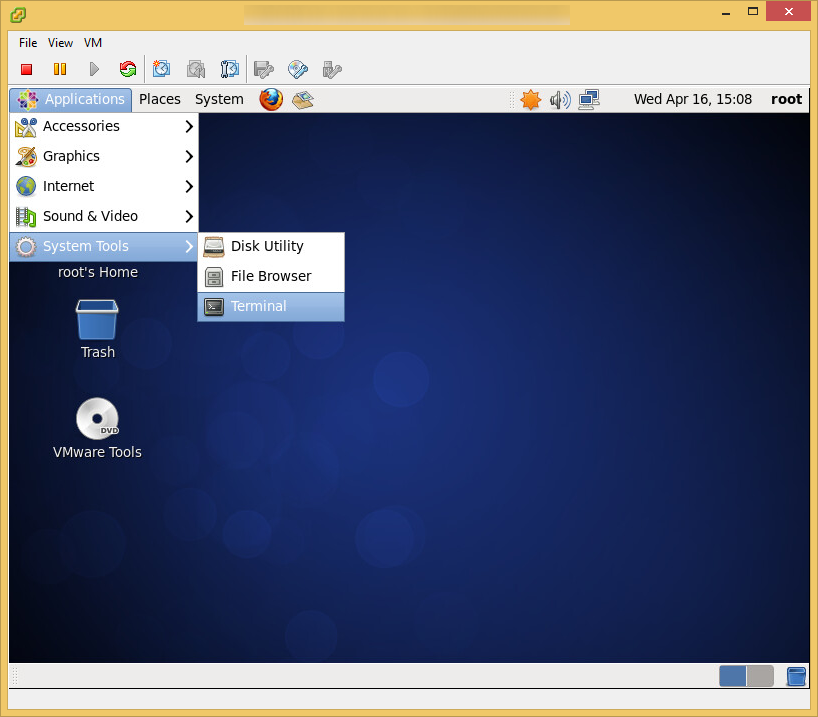
  1. Open up terminal if you are on the GUI version of CentOS 6
    CentOS6 - Terminal
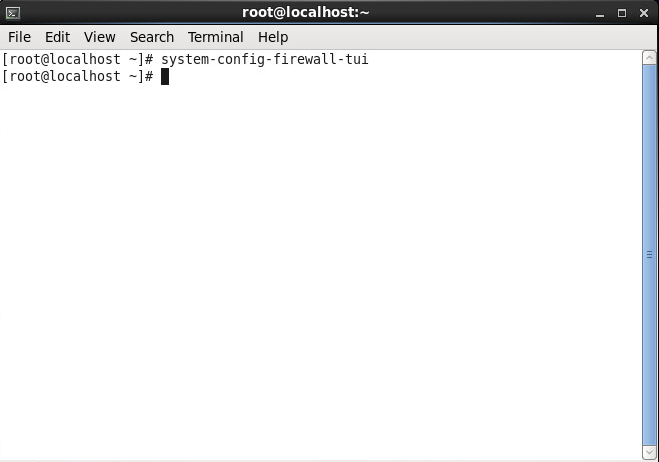
  2. Execute the following command
    1. system-config-firewall-tui
      Terminal - system-config-firewall-tui
  3. Use your arrow keys to select Customize and hit enter
    system-config-firewall-tui - Customize Rules
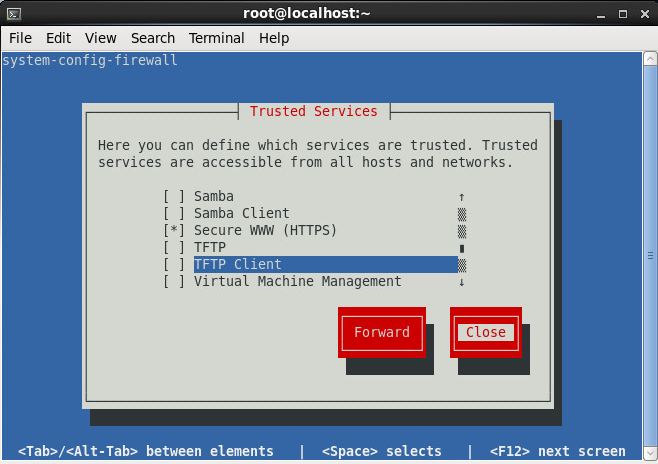
  4. Use your arrow keys to select which service you would like to allow.  Hit the spacebar to enable or disable the rule and then select Close once you have enabled/disabled the rules you wish.
    1. In this case, I arrowed down to HTTPS and hit the spacebar.
      system-config-firewall-tui - Select Rules
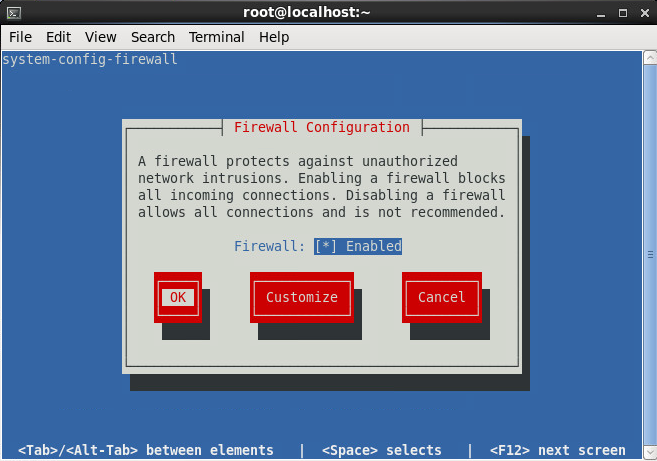
  5. Select OK
    system-config-firewall-tui - Apply Rules
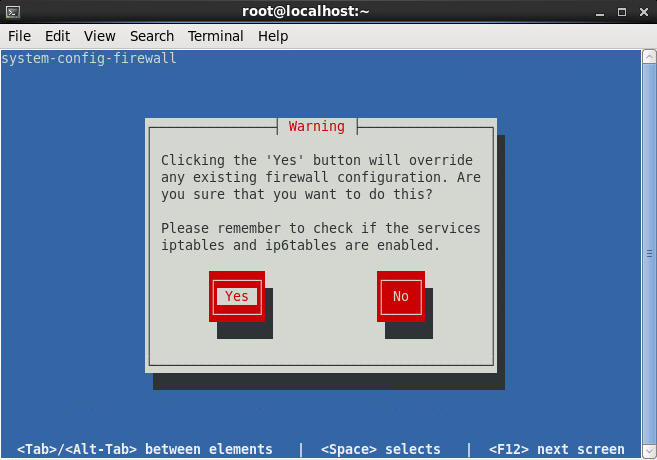
  6. Select Yes
    system-config-firewall-tui - Apply Rules - Confirmation

Set static IP on CentOS 6 via command line

Here is how to configure a static IP on CentOS 6 via command line.

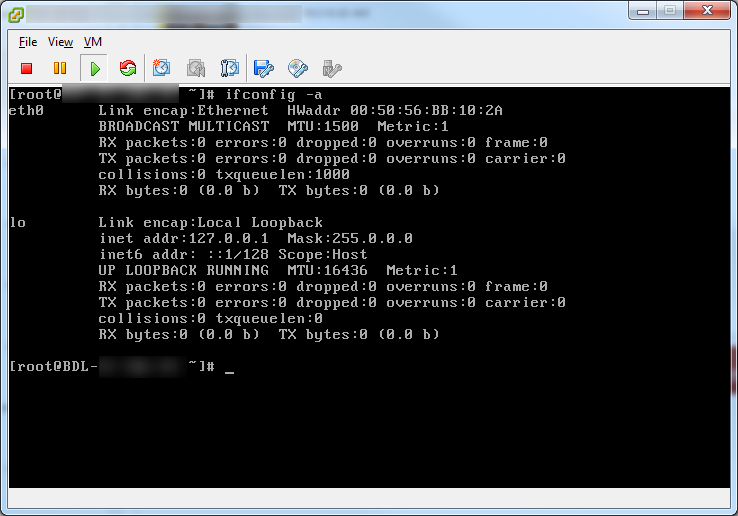
  1. Determine which interface you want to configure--in this example, I will be using eth0
    1. ifconfig -a
    2. Show all linux interfaces
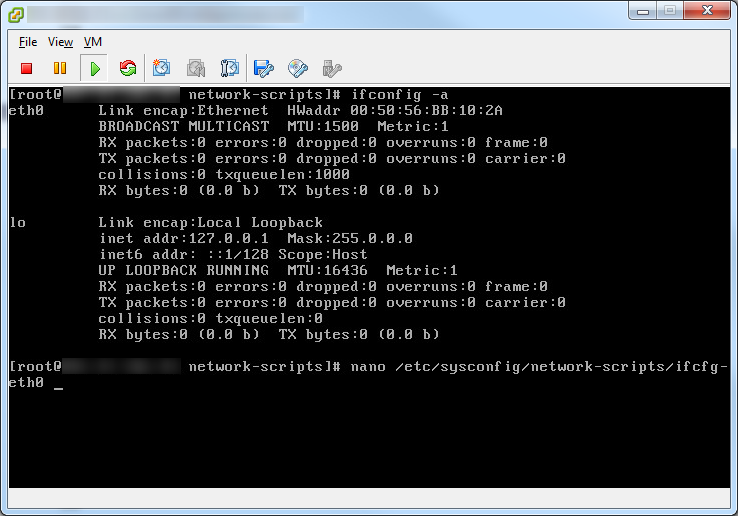
  2. Edit the interface you wish to configure (I'll use nano as vi requires some knowledge for beginner Linux users)
    1. nano /etc/sysconfig/network-scripts/ifcfg-eth0
    2. nano ifcfg-eth0
  3. Use the following settings and then use Control+O to Save and Control+X to Exit
    1. nano /etc/sysconfig/network-scripts/ifcfg-eth0
    2. DHCPCLASS=
      IPADDR=192.168.1.100
      NETMASK=255.255.255.0
      ONBOOT=yes
      BOOTPROTO=STATIC
    3. static IP CentOS
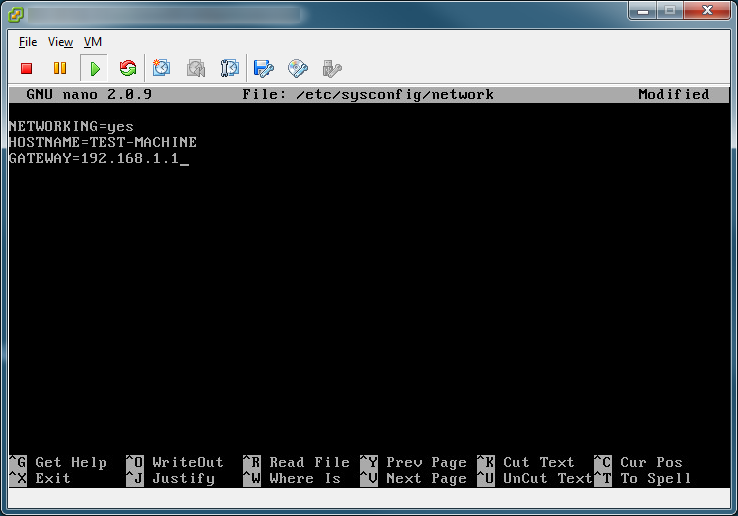
  4. Next, let's configure the hostname and default gateway.  We will use nano again to edit the file.
    1. nano /etc/sysconfig/network
    2. Ensure GATEWAY=192.168.1.1 has been set
    3. Static Gateway
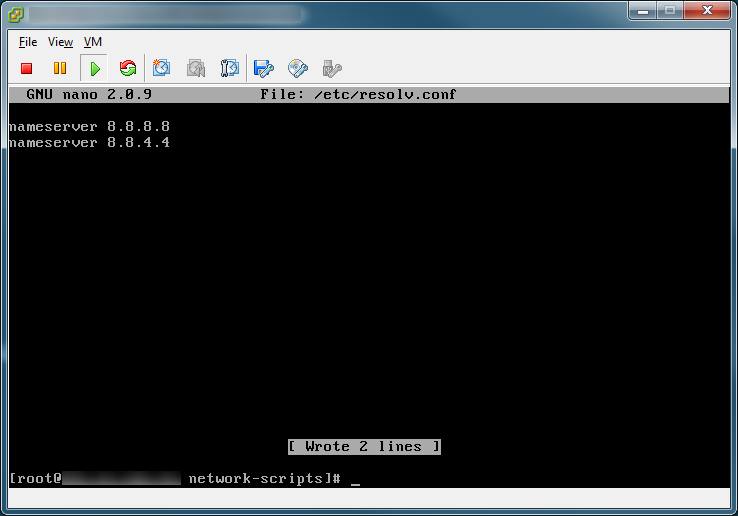
  5. Next, let's configure our DNS servers to resolve domain names (in this case, I will set mine to use Google's DNS servers)
    1. nano /etc/resolv.conf
    2. nameserver 8.8.8.8
      nameserver 8.8.4.4
    3. static nameservers
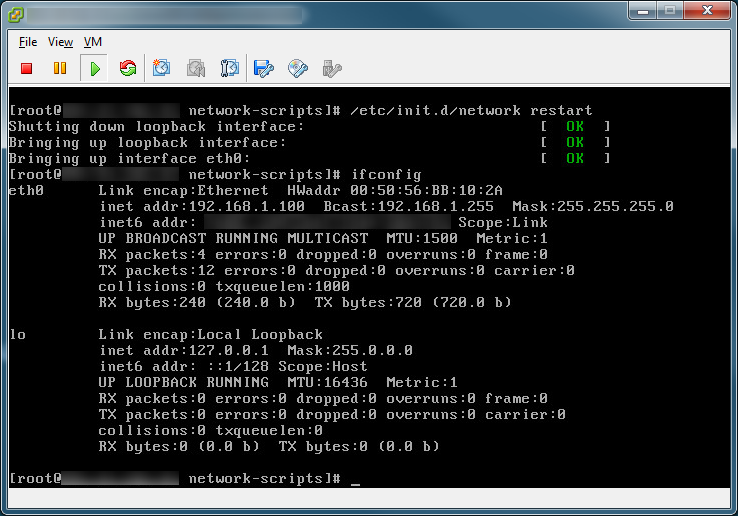
  6. Restart the networking service for the changes to take effect
    1. /etc/init.d/network restart
    2. restart interface

Setting up Java Runtime Environment 7 (JRE7) on Ubuntu 12.04 via Command Line

Need Java to run an application on your Linux workstation/server?  Follow the steps below via the terminal to install the latest version of Java.

  1. Head over to http://www.java.com/en/download/manual.jsp to find the latest Linux download from your client machine.
  2. Look at the link for the latest Java release for Linux.  Since we are using Ubuntu we do not need the RPM release.  In this case, I will be downloading Java 1.7.0_25-b15 for Linux x64.
    1. The download url is http://javadl.sun.com/webapps/download/AutoDL?BundleId=78697
  3. Head over to the Linux terminal on the machine you want to install Java on, and execute the following command to download the files from Java's website
    1. wget http://javadl.sun.com/webapps/download/AutoDL?BundleId=78697
  4. Extract the tarball.  Since wget cannot pull the filename like a modern webrbowser, you will have to reference the weird filename AutoDL?BundleId=78697
    1. tar -xvzf AutoDL?BundleId=78697
  5. Find out what the name of the folder is of the java files you extracted by listing the files in the current directory.  At the time of writing this, the extracted folder I had was jre1.7.0_25, so I will continue to reference that moving forward.
    1. ls
  6. Create a folder in the usr folder for Java to reside.
    1. sudo mkdir /usr/java/
  7. Move the files we extracted Java files to the java folder
    1. sudo mv jre1.7.0_25/ /usr/java/
  8. Execute the following to enable the Java Runtime Environment
    1. sudo update-alternatives --install /usr/bin/java java /usr/java/jre1.7.0_25/bin/java 1
  9. Execute the following command to set the default Java to use
    1. sudo update-alternatives --config java
  10. Execute the following command to verify that the latest version of java is installed
    1. java -version
  11. Remove the tarball we downloaded from Java's website to free up some space
    1. rm ~/AutoDL?BundleId=78697

Dell PowerConnect 5548 - Enable port mirroring/monitoring via command line

To enable port mirror/monitoring on the Dell PowerConnect 5548 series switches, please follow the following steps:

  1. SSH or Telnet to the switch
  2. Login to the switch
  3. Execute the command: enable
  4. Execute the command: config
  5. Execute the command: interface gigabitethernet 1/0/##
    1. In this case, use the port number of the device that will be getting the traffic to analyze.  This is the interface your "wireshark" machine would be connected to, to do a packet capture.
  6. Execute the command: port monitor gigabitethernet 1/0/##
    1. In this case, use the port number of the device you want to see the network traffic/activity on.  For example, if my device that I wanted to monitor was on gigabit port 1/0/5, I would use that, not the machine that is going to receive the traffic (not your "wireshark" machine).

Once you are done with the forward, you can disable port monitoring/mirror by executing the following command after running through steps 1-5 again: no port monitor gigabitethernet 1/0/##

Last, if you want to see the status of your mirrored/monitored port, you can do so by executing the following command after repeating steps 1-3: show ports monitor

How do I find the Cisco MSE Version Number via command line?

If you are trying to find the version number of your Cisco Mobility Services Engine, SSH into the machine and execute the following command:
/etc/init.d/msed status

You should see something similar to the output below:

[root@MYMSE ~]# /etc/init.d/msed status
STATUS: Starting MSE Platform, Waiting to check the status. MSE Platform is up, getting the status

-------------
Server Config
-------------

Product name: Cisco Mobility Service Engine
Version: 7.0.220.0
Hw Version: V01
....

Hope this helps!

How to install Python via command line on Linux

At the time of writing this, Python 2.7.3 is the latest build of the 2.7 builds. You can simply replace the wget url with the Python 3.x build you wish to download if you want to use those releases instead.

  1. Download the tarball
    1. wget http://www.python.org/ftp/python/2.7.3/Python-2.7.3.tgz
  2. Extract the contents
    1. tar -xzf Python-2.7.3.tgz
  3. Navigate to the extracted folder
    1. cd Python-2.7.3
  4. Configure/Install Python
    1. ./configure
    2. make
    3. sudo make install

How to export a VM from Amazon EC2 to VMware On-Premise

Here are the instructions on how to communicate with Amazon's API to export a VM from Amazon EC2 to a VMware image that gets put into S3 storage.  From that point, you can simply download the VMware image and import it into your VMware environment.

0. Open up a command prompt

1. Setup your java path (you can use JRE or JDK):
set JAVA_HOME="C:\Program Files\Java\jre6"

2. Verify your version with this command (you should see the java version number):
%JAVA_HOME%\bin\java -version

3. Add the bin directory that contains the java executable to your path before other versions of java
set PATH=%java_home%\bin;"%Path%"

4. Verify you can see the java version by executing the following command:
java -version

5. Set the EC2_HOME path
SET EC2_HOME=c:\ec2-api-tools-1.6.5.4

6. Verify the ec2_home using
dir %EC2_HOME%

7. Update the path
set PATH="%PATH%";%EC2_HOME%\bin

8. Setup access key environment variables
set AWS_ACCESS_KEY=XXXXXXXXXXXXXXXXXX
set AWS_SECRET_KEY=XXXXXXXXXXXXXXXXXXXXXXXXXXXXXXXXXX

9. Verify the tools setup -- if setup correctly, we should be able to view our available regions.
ec2-describe-regions

10. Execute the following command:
ec2-create-instance-export-task i-EC2INSTANCENAME -e VMware -f VMDK -c ova -b S3STORAGEBUCKET

Once you have executed the command above, you can use the following commands to track/manage the cloning process.

  • Use ec2-describe-export-tasks to monitor the export progress
  • Use ec2-cancel-export-task to cancel an export task prior to completion


Notes: You could easily take steps 1-8 to setup an automated script to connect to amazon's services.  If you would like more information on these steps, here was a great article I ran across explaining everything in detail.

http://docs.amazonwebservices.com/AWSEC2/latest/UserGuide/SettingUp_CommandLine.html
 

Install Self-Signed CA Certificates on Ubuntu 12.04 via Command Line

Copy your .crt files to /usr/share/ca-certificates

Run: sudo update-ca-certificates

Hit yes to trust the certificates in the wizard (text based for CLI), and away you go! 🙂

How To Install VMWare Tools v4 on Ubuntu 12.04 LTS Server

Today I was faced the challenge of installing VMware Tools on a Ubuntu server via command line.  I stumbled accross a step-by-step tutorial on the exact steps to accomplish this task.  I am reposting for archival purposes, but all credit goes to @justinschier from http://ghosttx.com/2012/03/how-to-install-vmware-tools-v4-on-ubuntu-11-10-server/

Written: March 13, 2012
Last Updated: April 27, 2012
Tested With: Ubuntu 12.04 LTS Server, Ubuntu 11.10 Server

All the guides I found on the Internet, including VMWare’s website were outdated in some way, so I decided to write a guide of my own. I just went through these steps from start to finish on a fresh server and had no problems.

  1. Use Install VMWare Tools option in VMWare Client/Console to attach media
  2. Update the server
    sudo apt-get update
    sudo apt-get upgrade
  3. Create the mount point
    sudo mkdir -p /media/cdrom
  4. Mount the ISO
    sudo mount /dev/cdrom /media/cdrom

    You should see the message: mount: block device /dev/sr0 is write-protected, mounting read-only

  5. Change Directory
    cd /media/cdrom
  6. Copy the tar file to your /tmp directory
    sudo cp VM*.tar.gz /tmp
  7. Install Build tools if necessary
    sudo apt-get install linux-headers-server build-essential
  8. Change Directory
    cd /tmp
  9. Unmount the ISO
    sudo umount /media/cdrom
  10. Expand the tar
    sudo tar xzvf VM*.tar.gz
  11. Change Directory
    cd vmware-tools-distrib
  12. To prevent a potential error in the install script on Ubuntu 11.10, create a special directory
    Unable to create symlink “/usr/lib64/libvmcf.so” pointing to file ”/usr/lib/vmware-tools/lib64/libvmcf.so/libvmcf.so”.

    sudo mkdir /usr/lib64
  13. Run the Install Script. The -d flag automatically answers the default to all questions. To customize it, just omit the -d.
    sudo ./vmware-install.pl -d
  14. Reboot
    sudo reboot

Let me know if this worked for you!

Also, please follow me on Twitter: @justinschier

Show hard drive size in Linux via command line

If you have ever wanted to view how big your hard drive/partition sizes are in Linux, but only have access to the command line interface, here is the command to do it:
df
df -H (This will show the partition sizes in MB, GB, TB, etc.)
fdisk -l | grep Disk (This will show the physical disks and their corresponding sizes)