Tag Archives: event viewer

[Tutorial] Gathering trace/event logs in ADFS v2.0 and v3.0

Problem:

Gathering trace/event logs in ADFS is not a trivial task.  The following article will show you how to gather these logs to further help investigate relying party trust issues or issues with end users authenticating to the service.  This tutorial will be leveraging ADFS v3.0 on Server 2012 R2.  The same steps should apply for v2.0 on Server 2008 R2.  This process does change slighting in ADFS on Server 2016 as the logging engine was rewritten.  Depending on demand, a second article will be released for ADFS on Server 2016.

Caviets:

Before beginning, as a side note, debugging in ADFS v2-3 is honestly a total PITA (pain in the... butt).  The problem with ADFS logging is logs are stored on the machines serving the requests, not centrally.  In this case, you will likely have to enable tracing on each ADFS server, or configure your load balancer/host file to temporarly route requests to a specific machine so you know which server to hunt down for the logs.  Likewise, as you will find at the end of the tutorial, the logs gathered from ADFS are very verbose.  Take some time to familiarize yourself with the logs of a working request vs a failure to get used to what logs are actually meaningful.

Tutorial:

Enable list of events/audits to be logged

  1. Login to one of your ADFS servers that you believe will be authenticating the end users
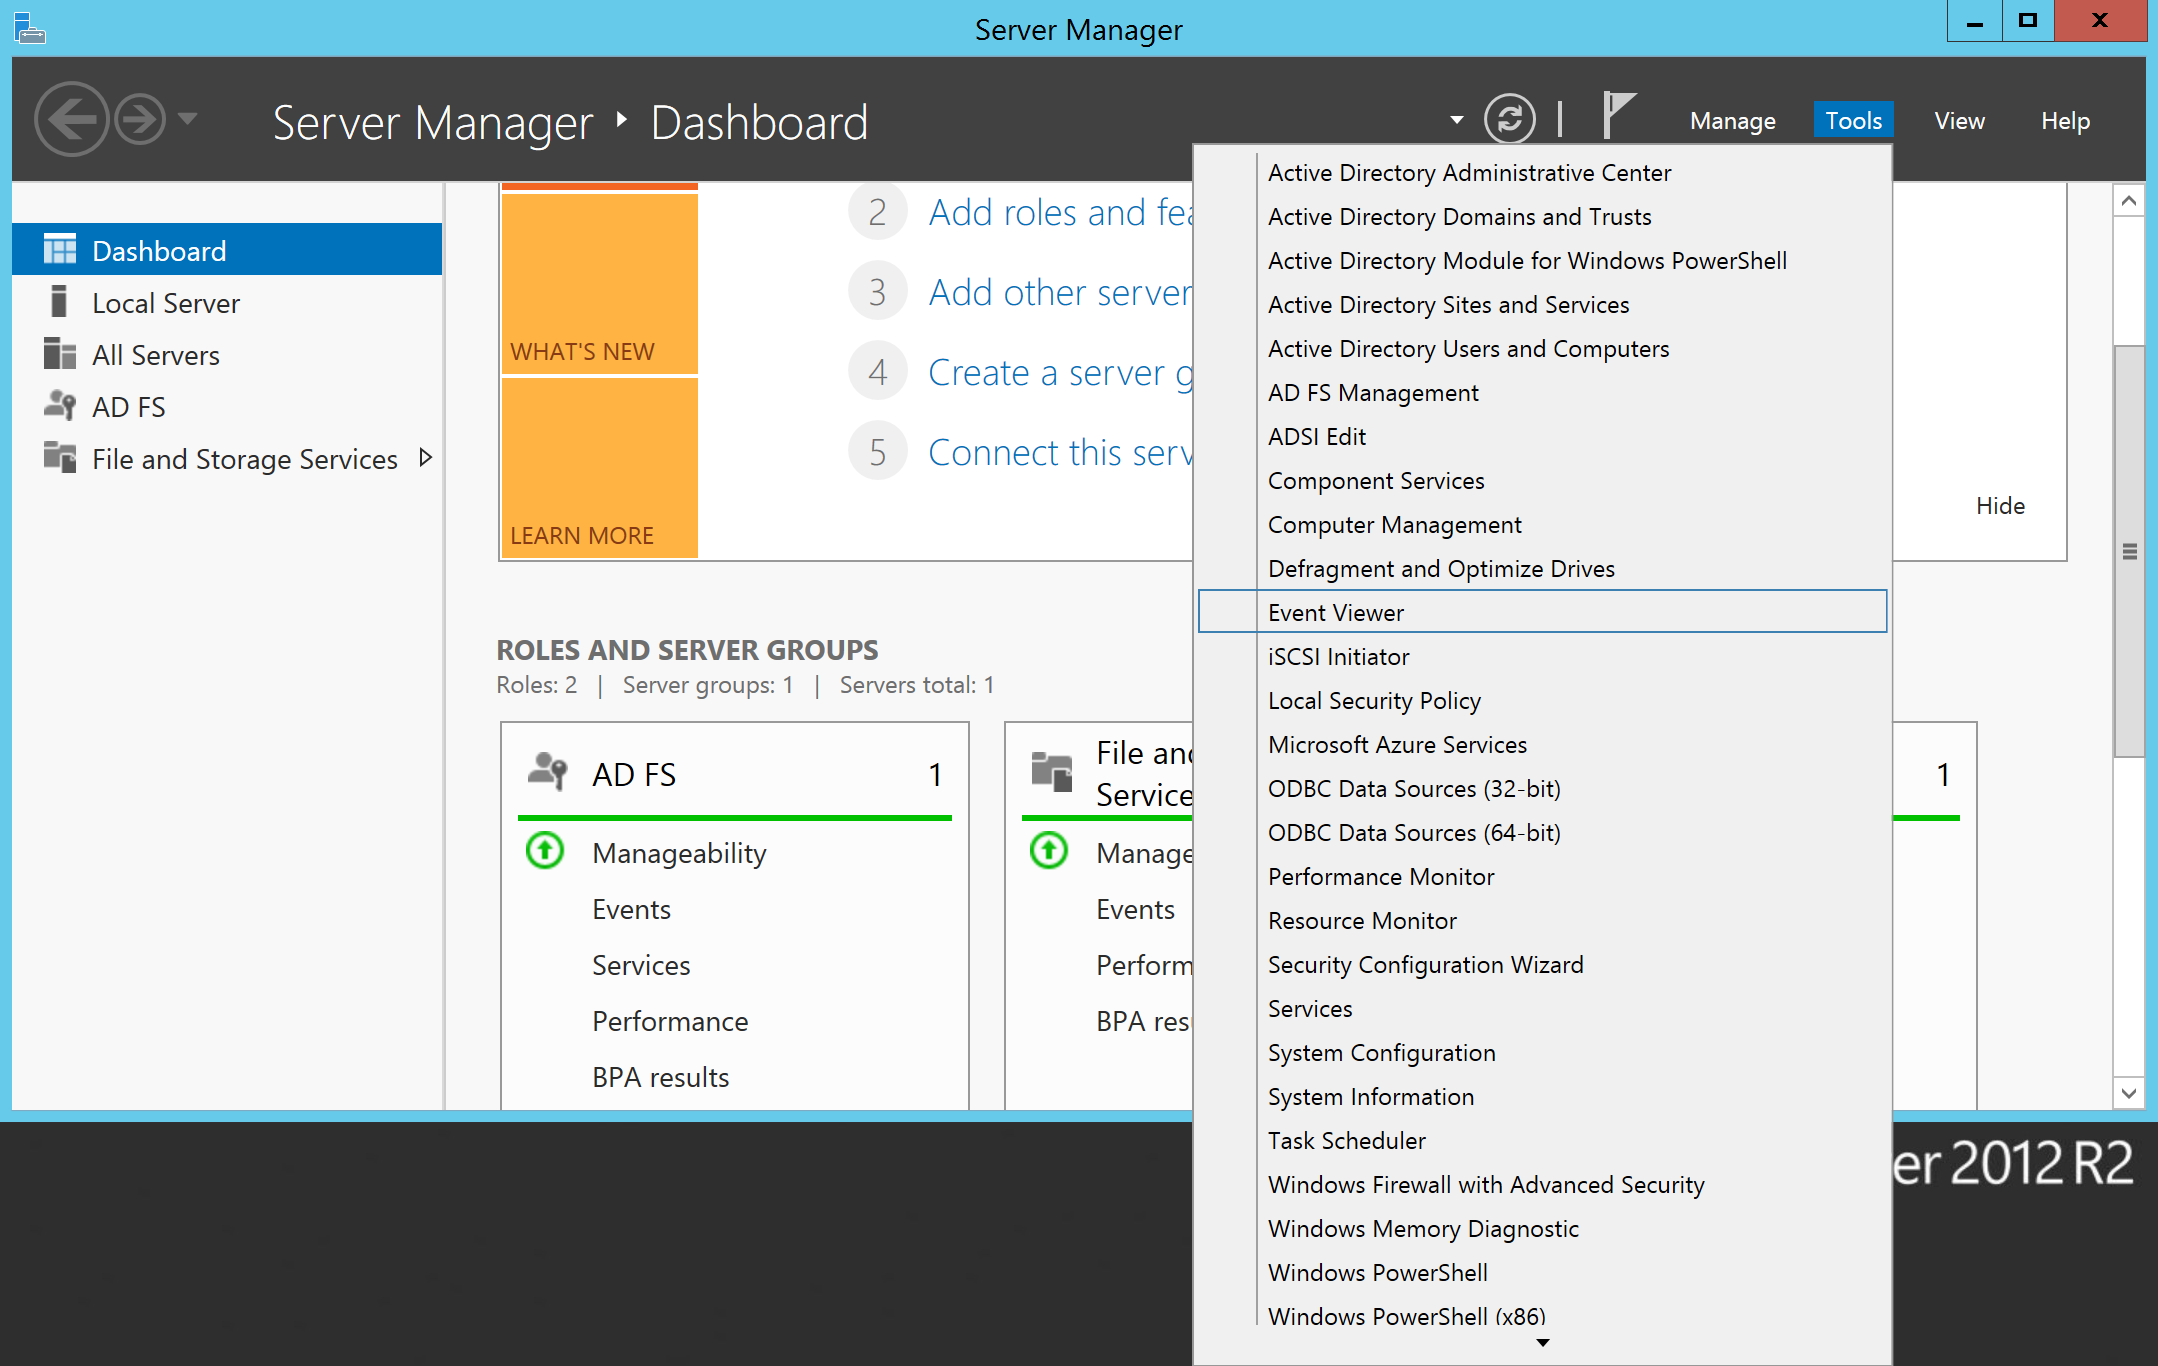
  2. Open Server Manager

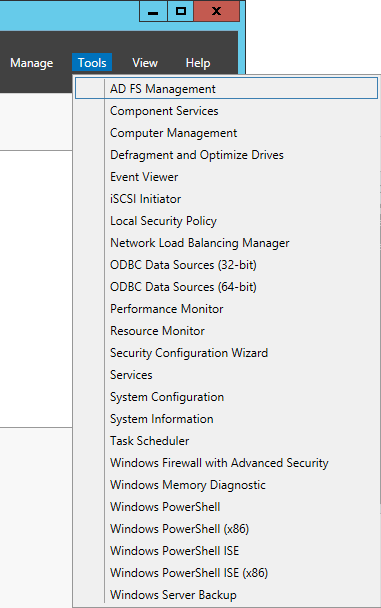
  3. In Server Manager, select Tools -> AD FS Management
  4. In AD FS Management, select AD FS in the top left and select Edit Federation Service Properties...
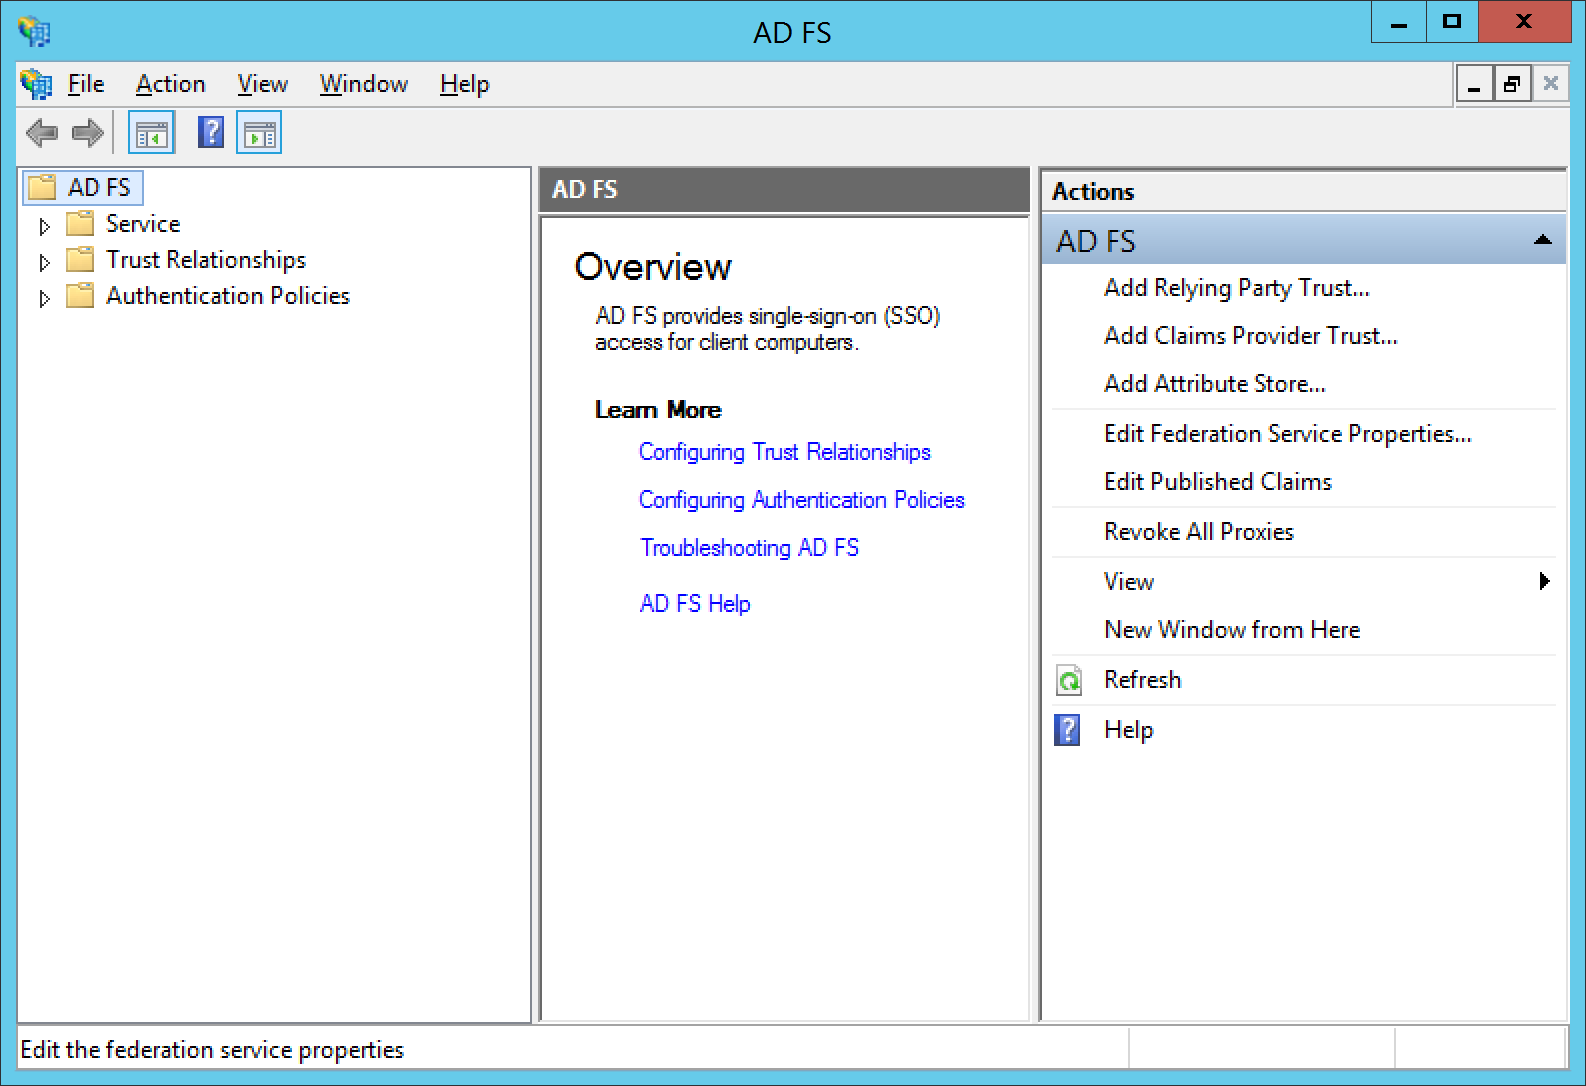
  5. Click on the Events tab and check all the items you wish to log and click OK

Enable tracing

  1. Open Server Manager
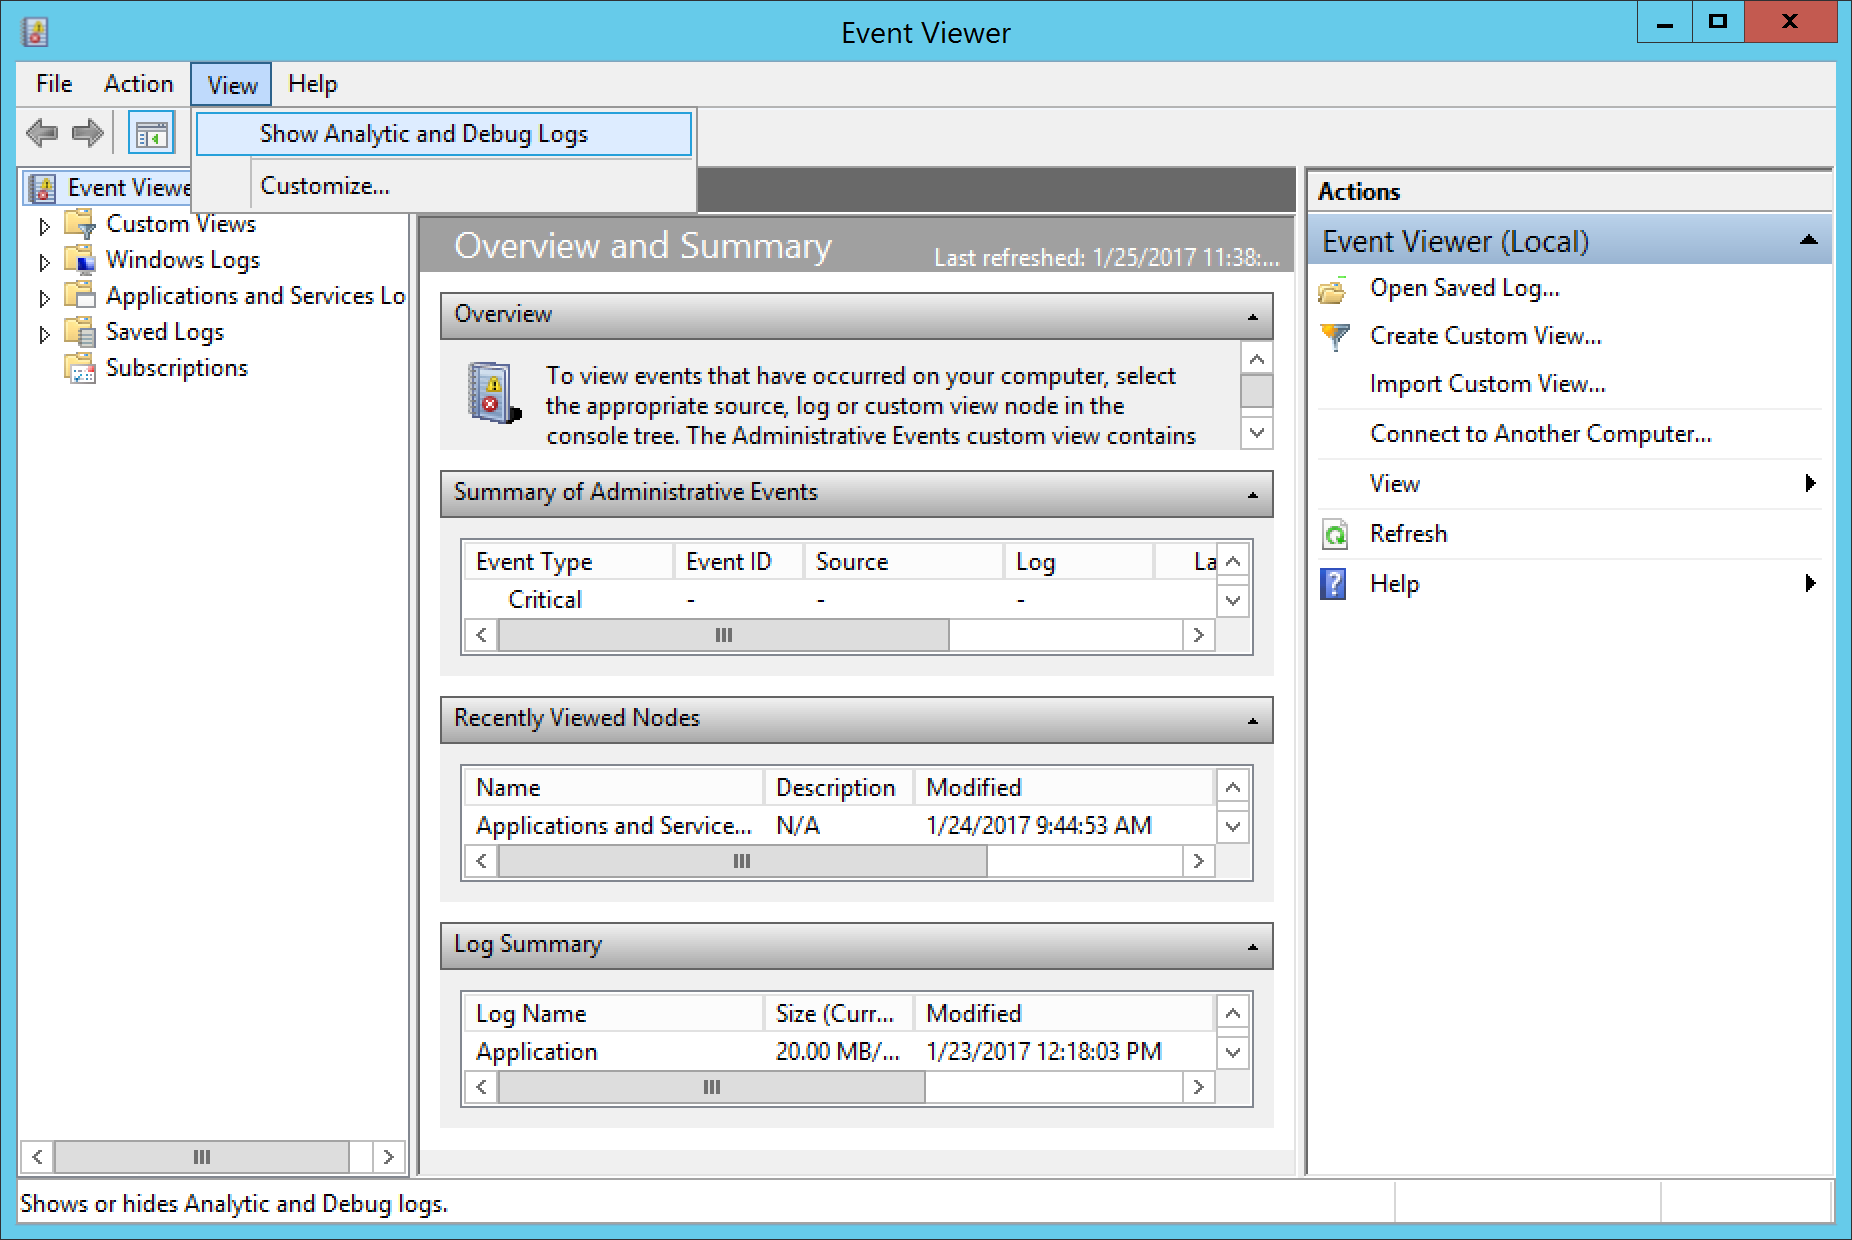
  2. Select Tools -> Event Viewer
  3. In Event Viewer, select View in the top menu, and select Show Analytic and Debug Logs
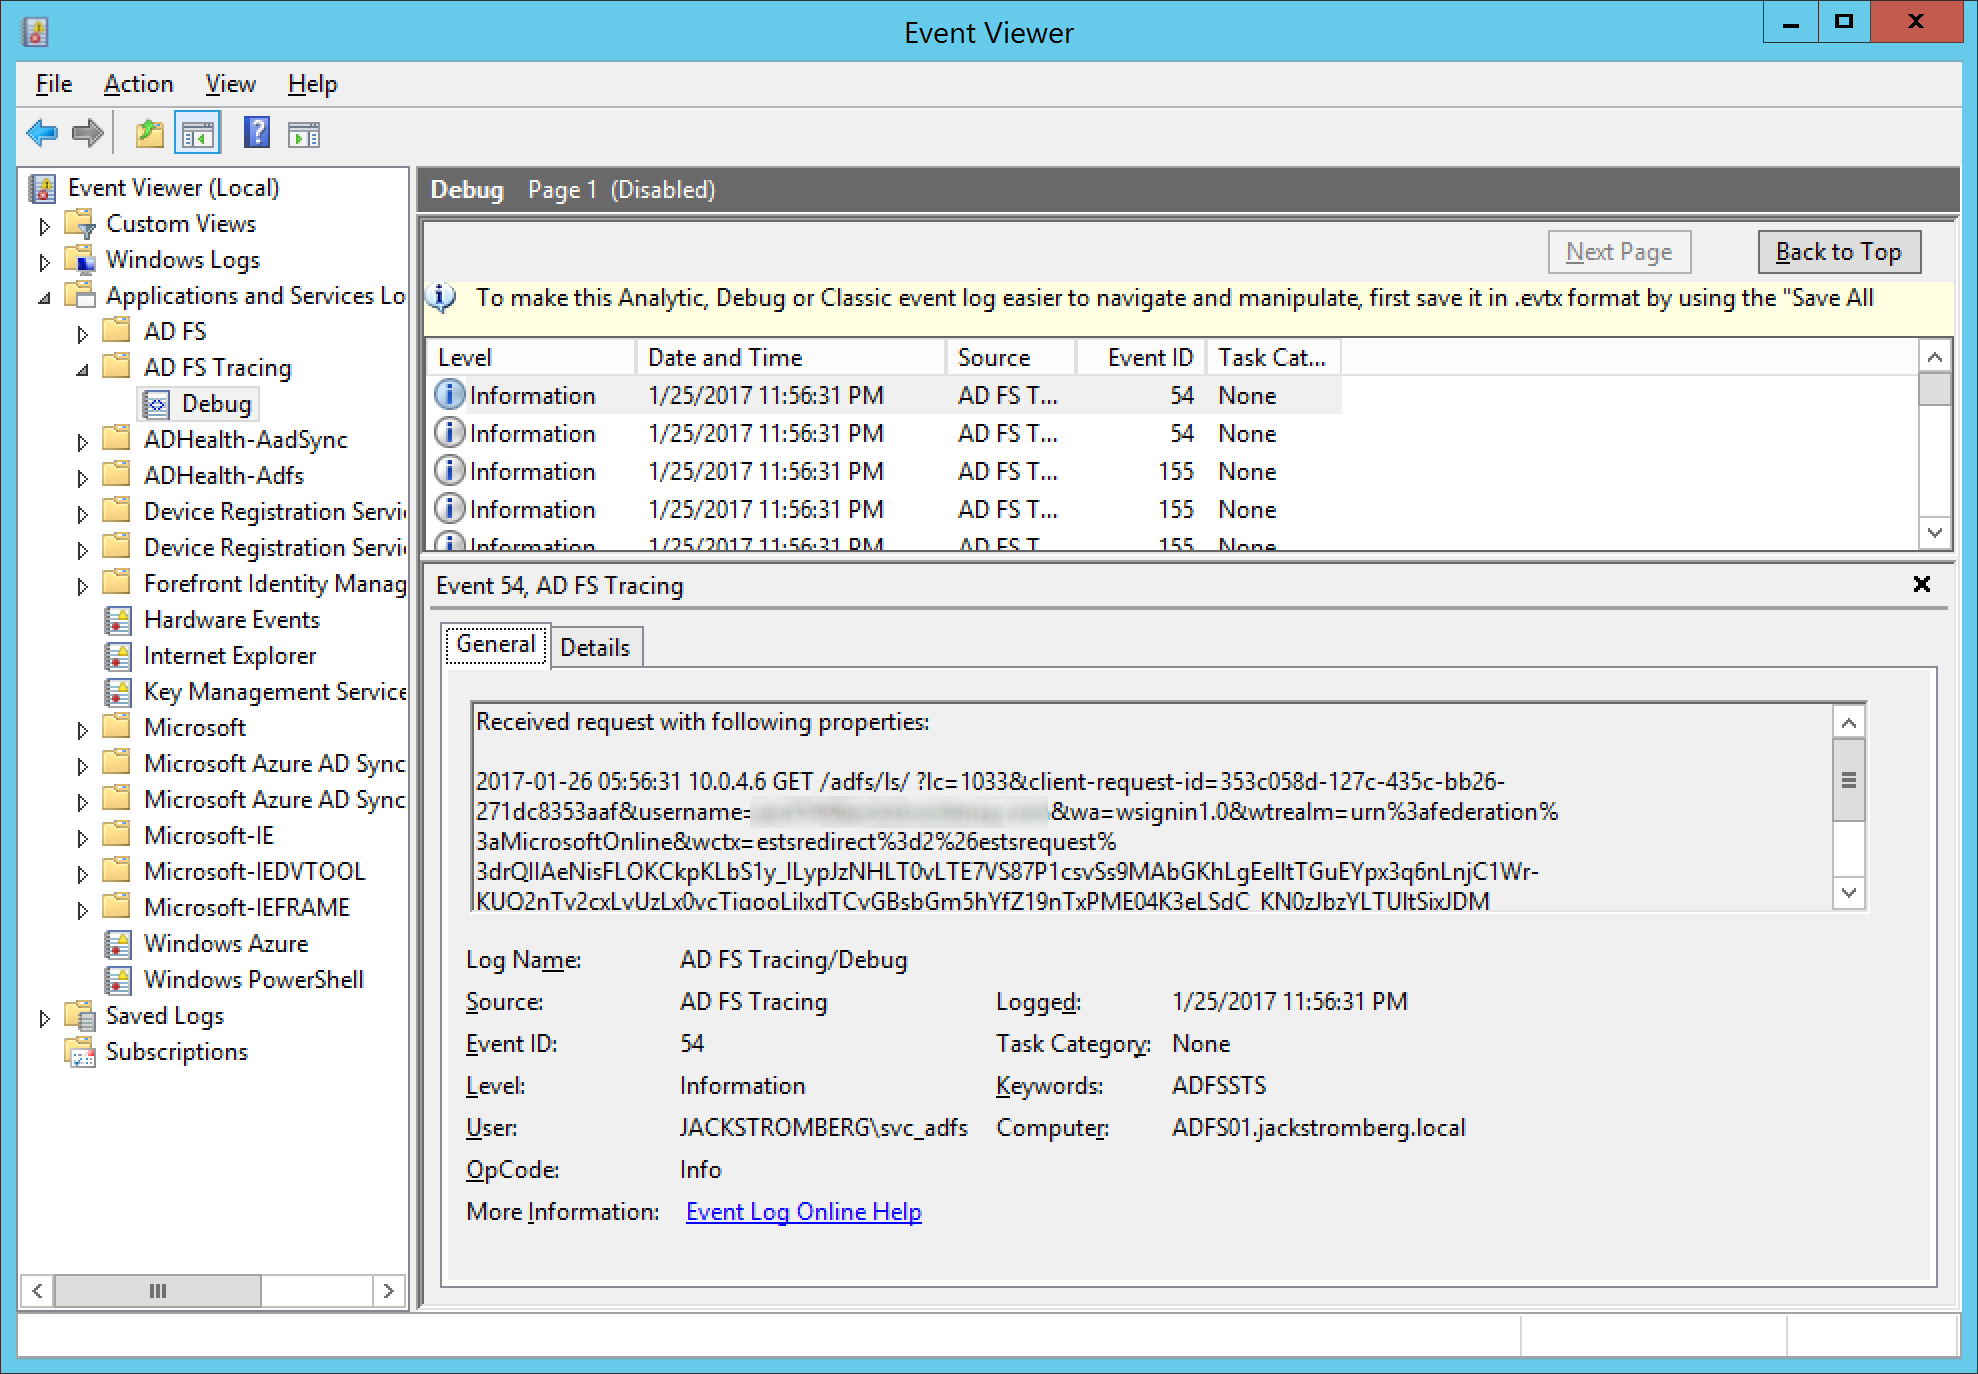
  4. Expand Applications and Services Logs, expand AD FS Tracing, and select Debug
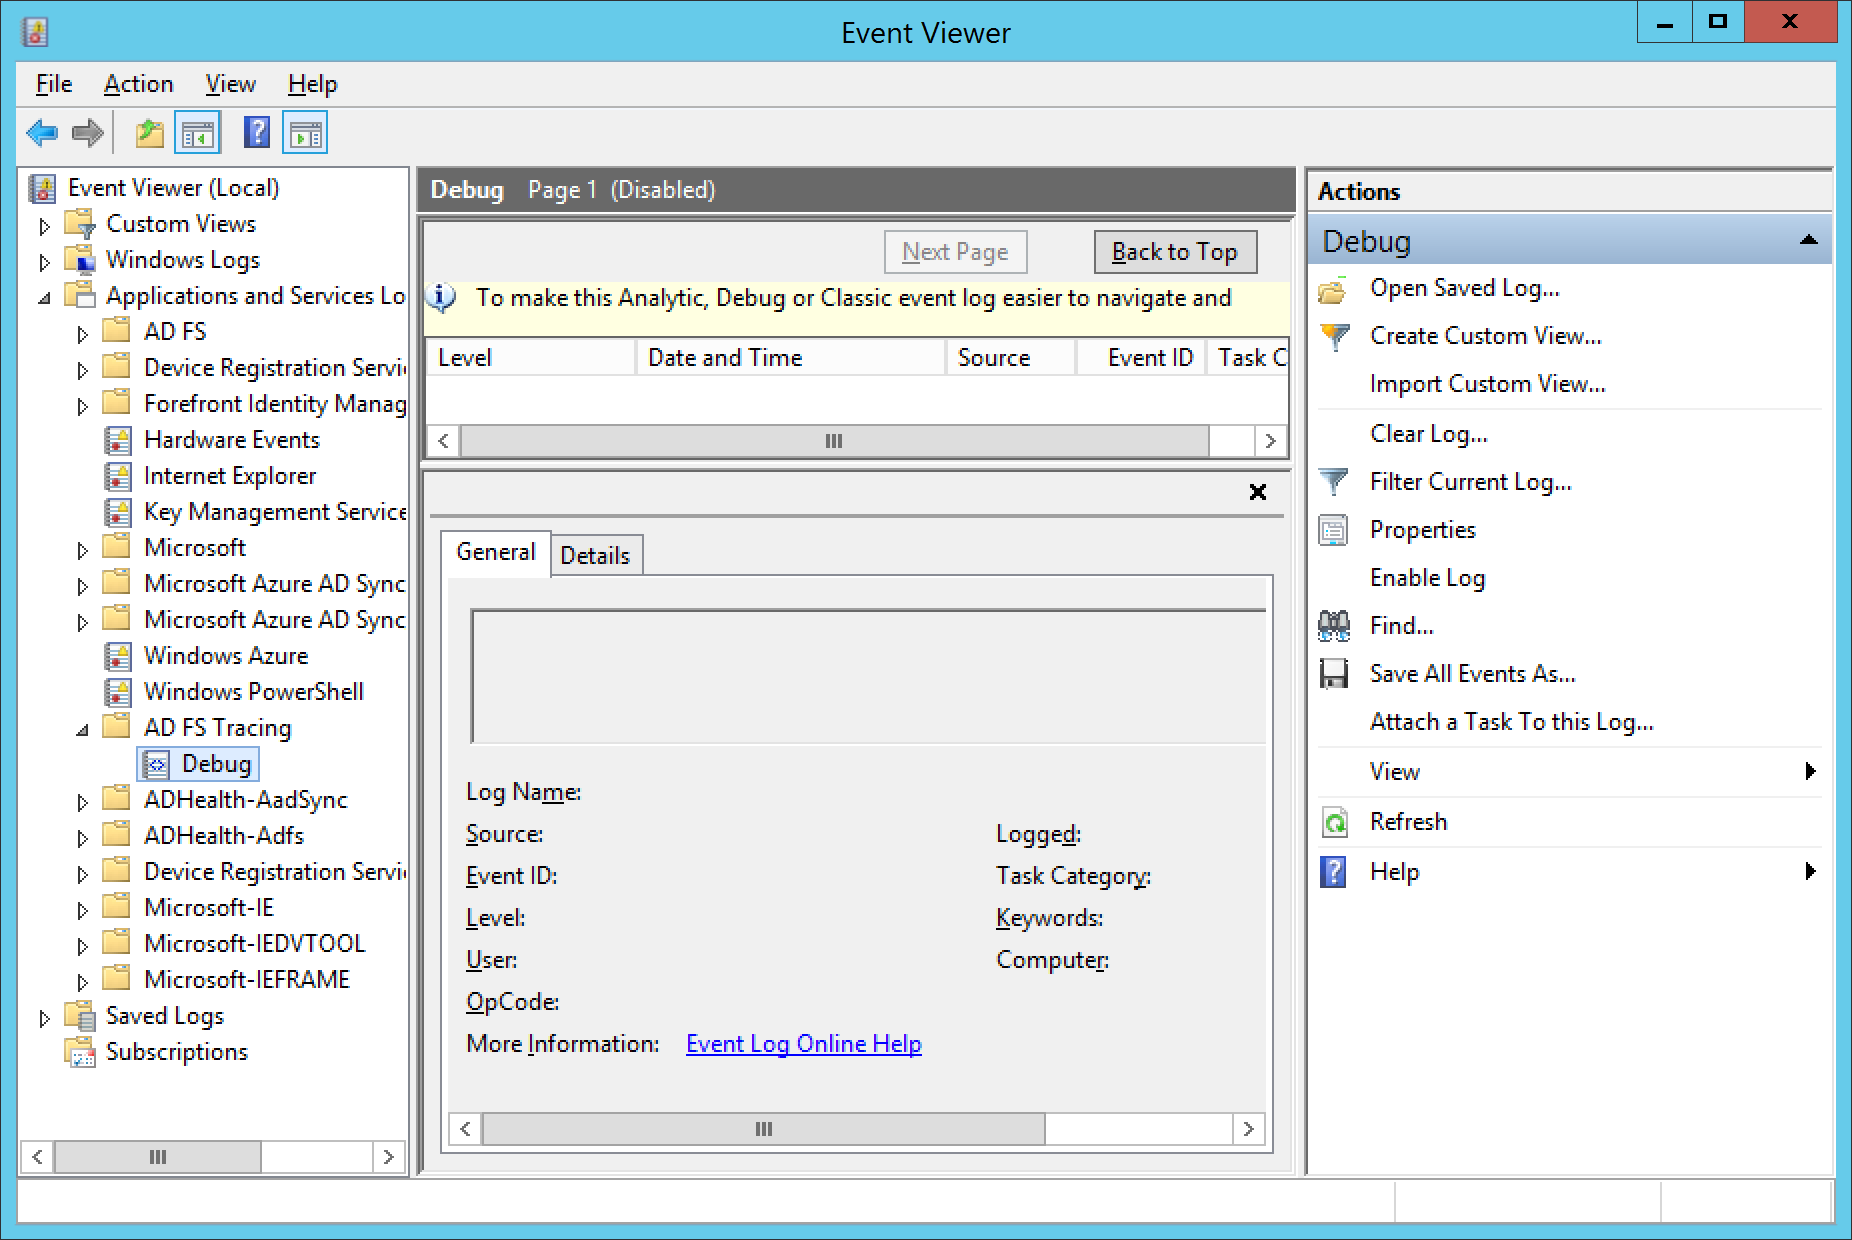
    1. Note: In ADFS v2, the AD FS Tracing folder will be called AD FS 2.0 Tracing
  5. When you are ready to begin collecting logs, right click on Debug and select Enable Log
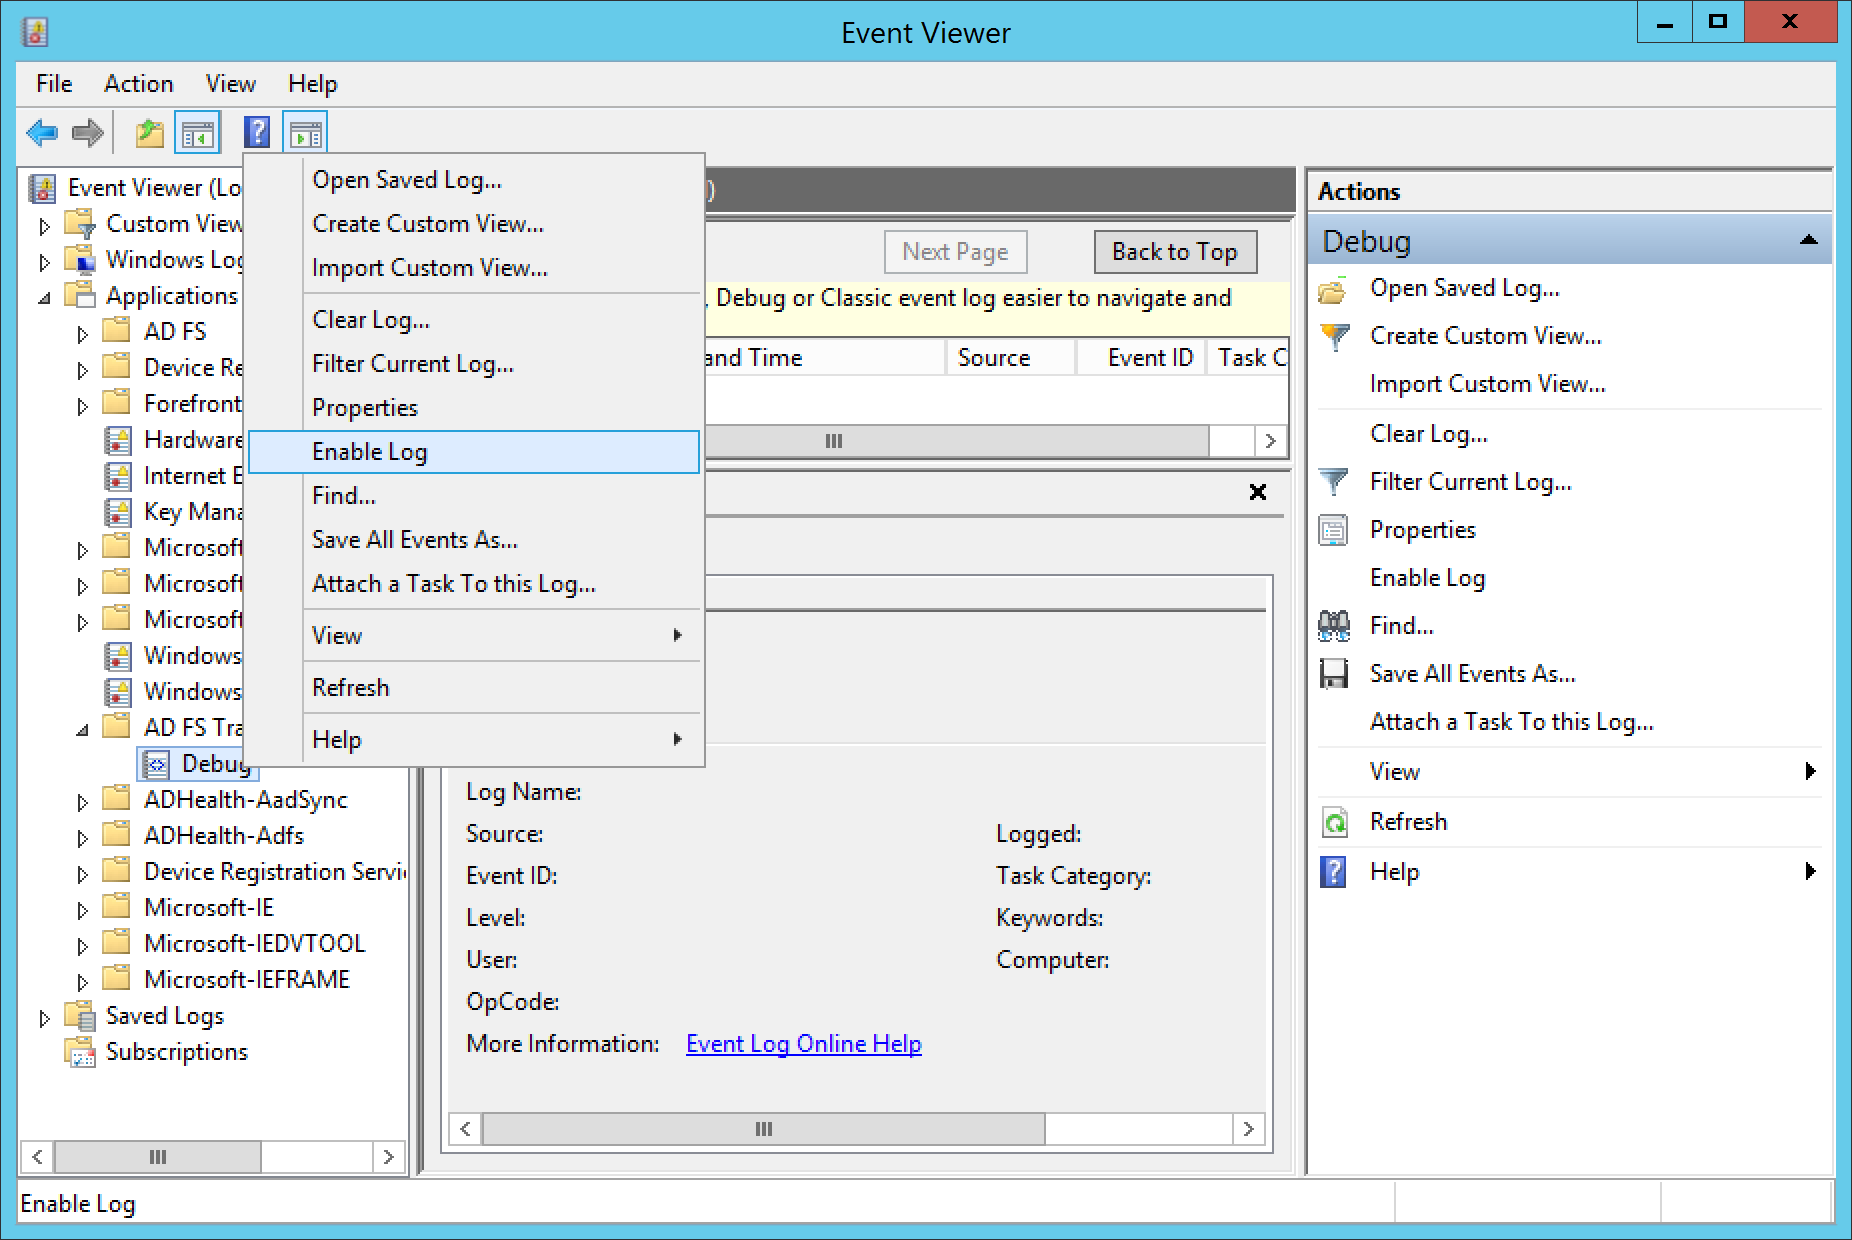
  6. Click OK when prompted to write over the existing event logs
    1. Note: Each time you enable/disable AD FS Tracing, Event Viewer will purge your last results.  I highly recommend you export your logs if you need them for comparison at a later time.
  7. At this point, recreate the issue, error, or login to the relying party you want to debug.
  8. Once you have recreated the error or logged in, go back to Event Viewer, right click on Debug and select Disable Log
  9. At this point, you should have some events captured to further analyse 🙂
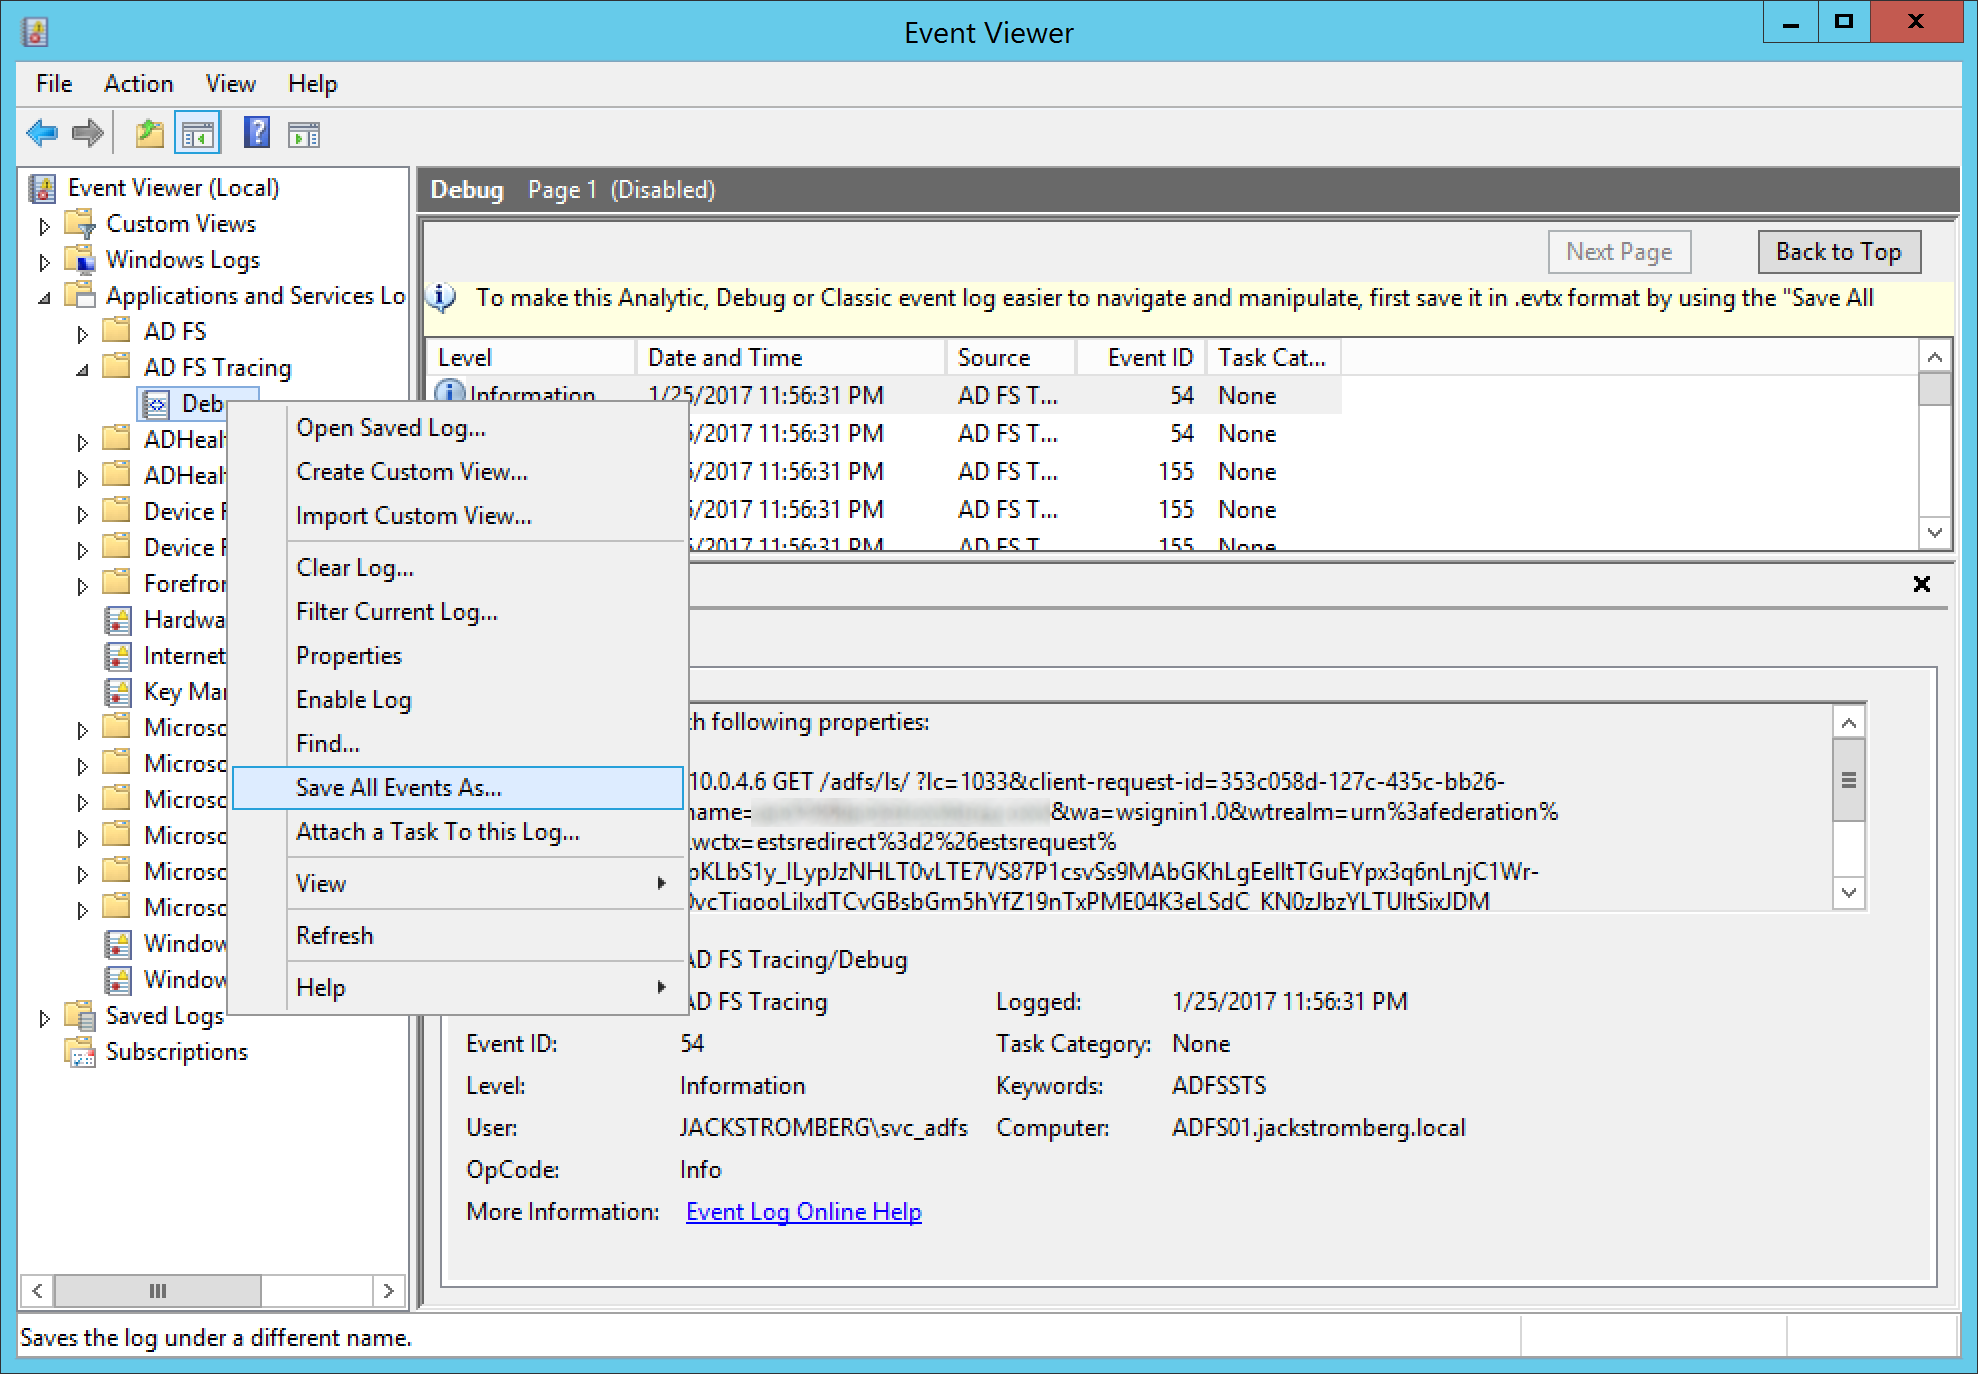
  10. Optional Step: Right click on Debug and select Save All Events As...  This will export to a evtx file, in which this can be sent to another team for analysis or you can reference the logs at a later time.
    1. Note: If you are sending the events over to another team for analysis, zip the logs as it will greatly decrease the file size 🙂

Common error when enabling Debug logging

One error I typically see is the following:

AD FS Debug - The requested operation cannot be performed over an enabled direct channel.  The channel must first be disabled before performing the requested operation

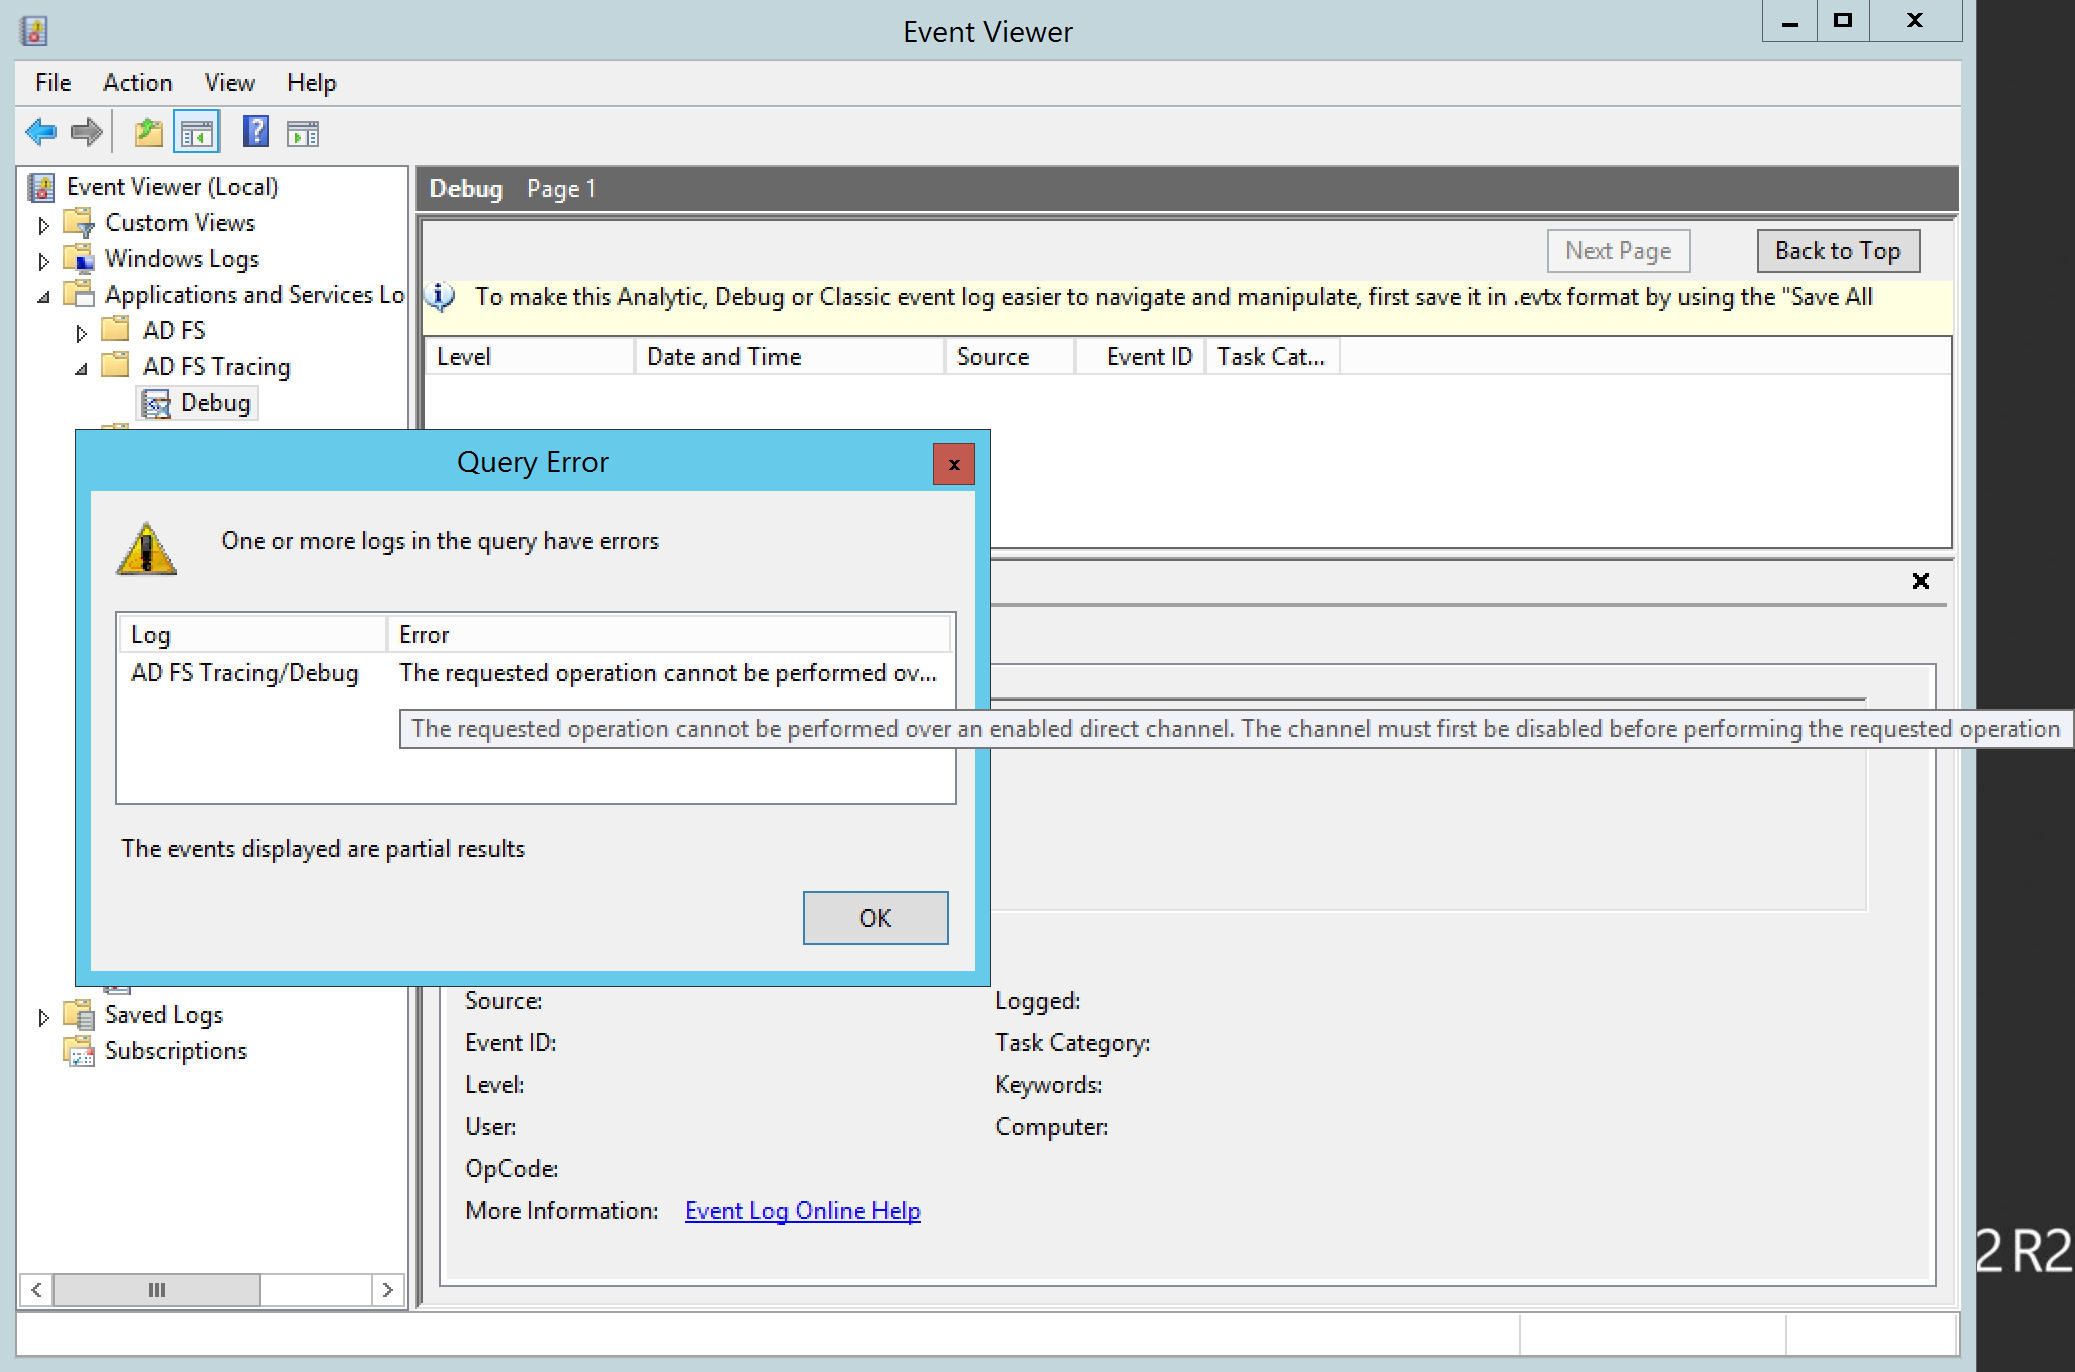
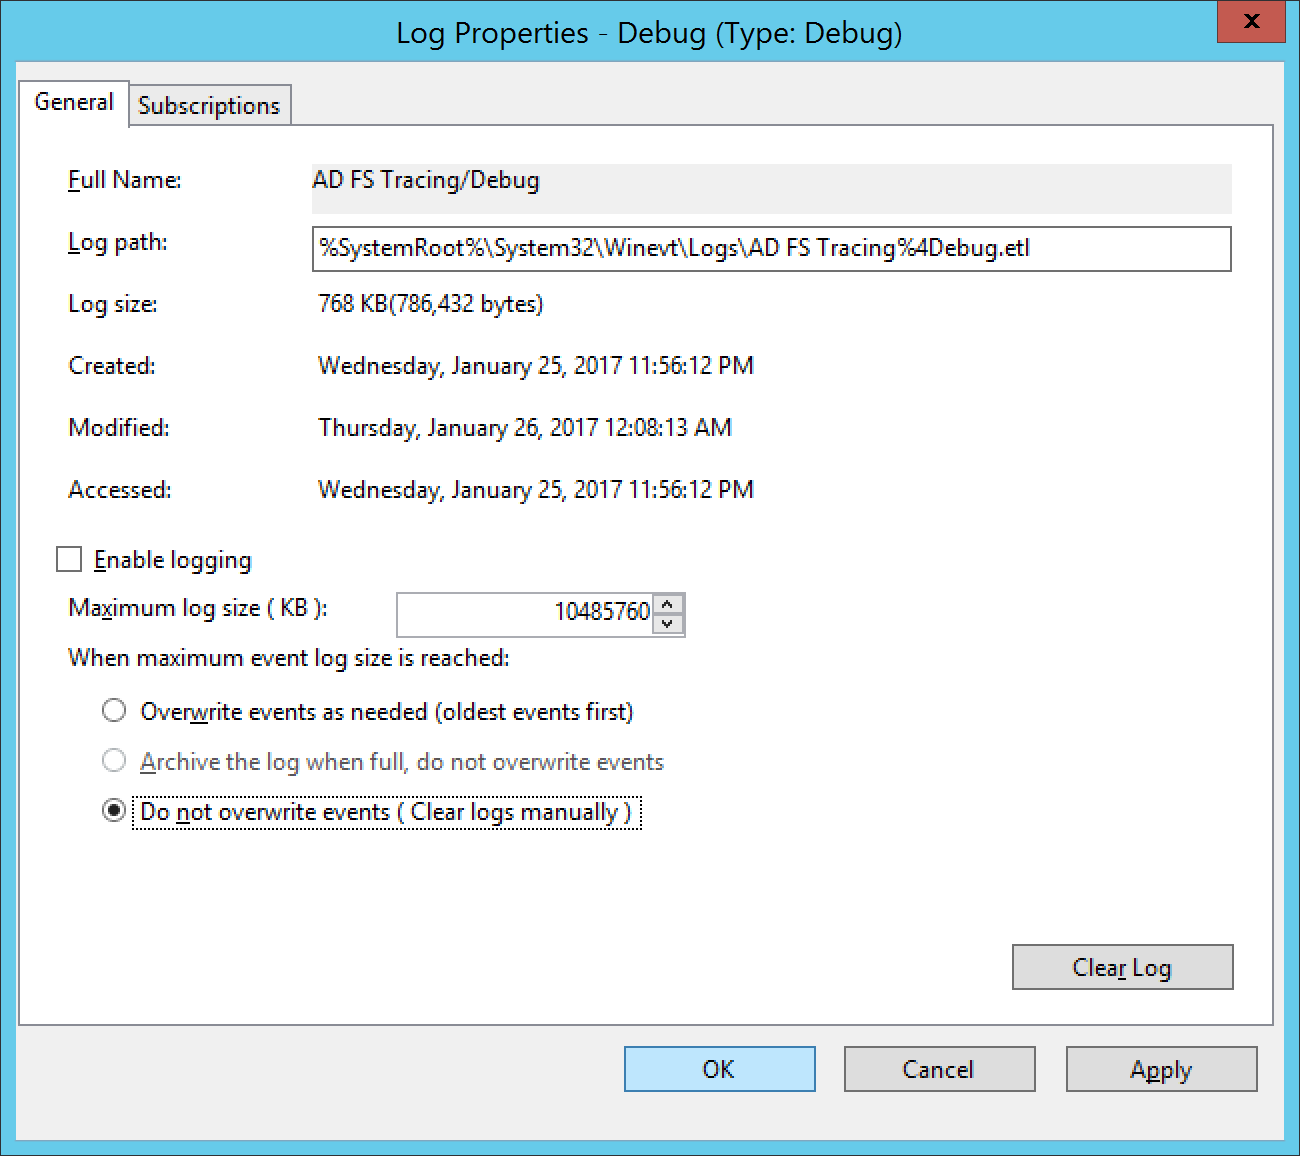
This error is caused by a misconfiguration on the logging properties of the Debug log.  Please verify that you have not manually enabled the debug log nor have the maximum log file size set to Overwrite events as needed.

To fix, right click on Debug and select Properties

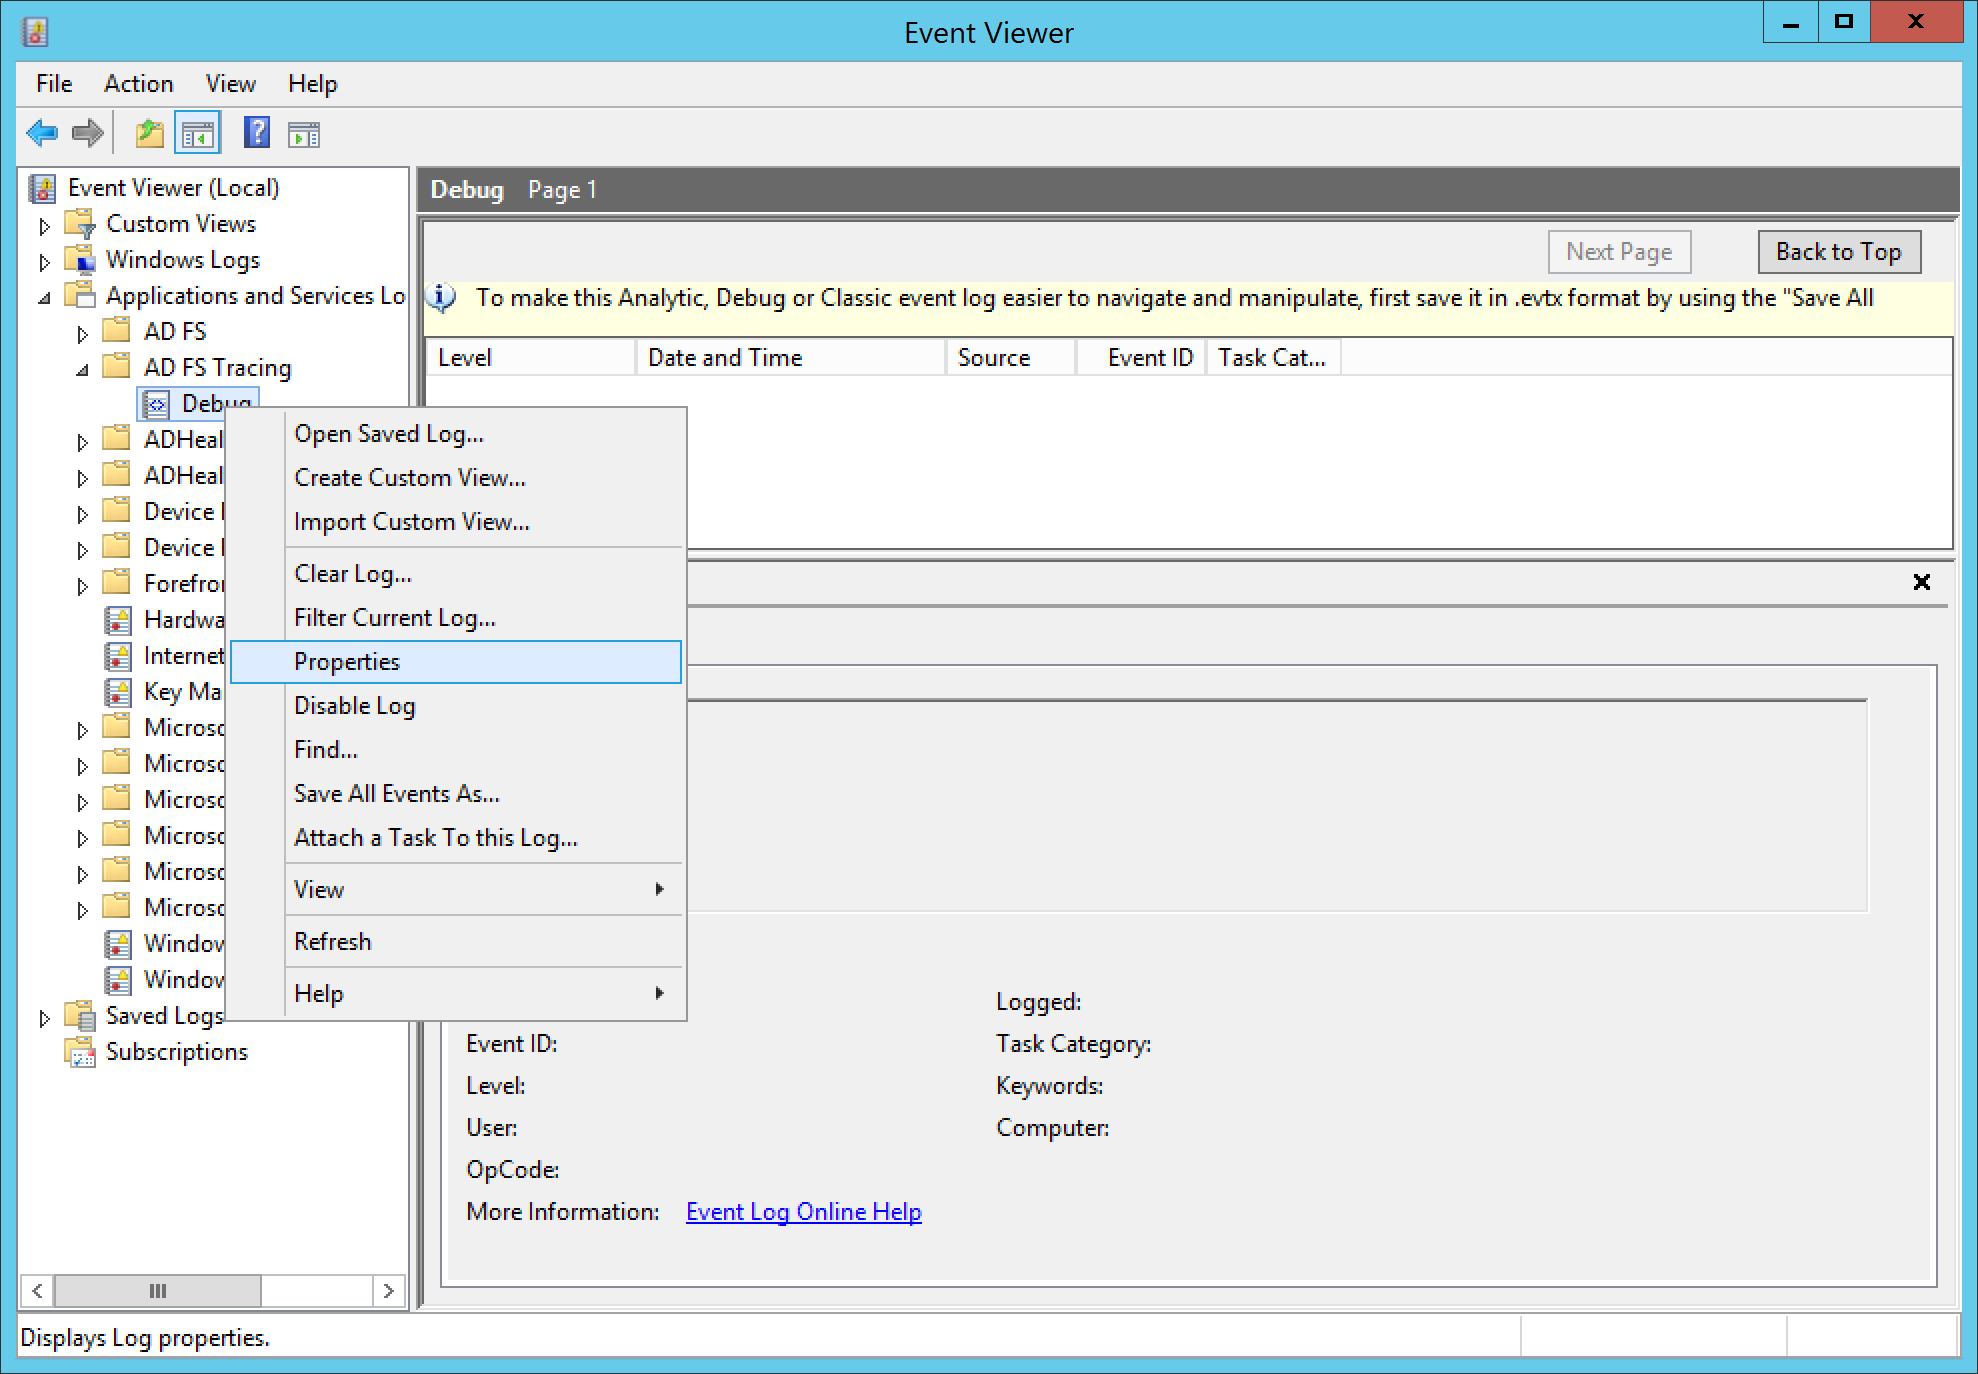
Typically, the screenshot below is an example of the incorrect settings used; make sure that Enable Logging is unchecked and is Do not overwrite events ( Clear logs manually ) is checked

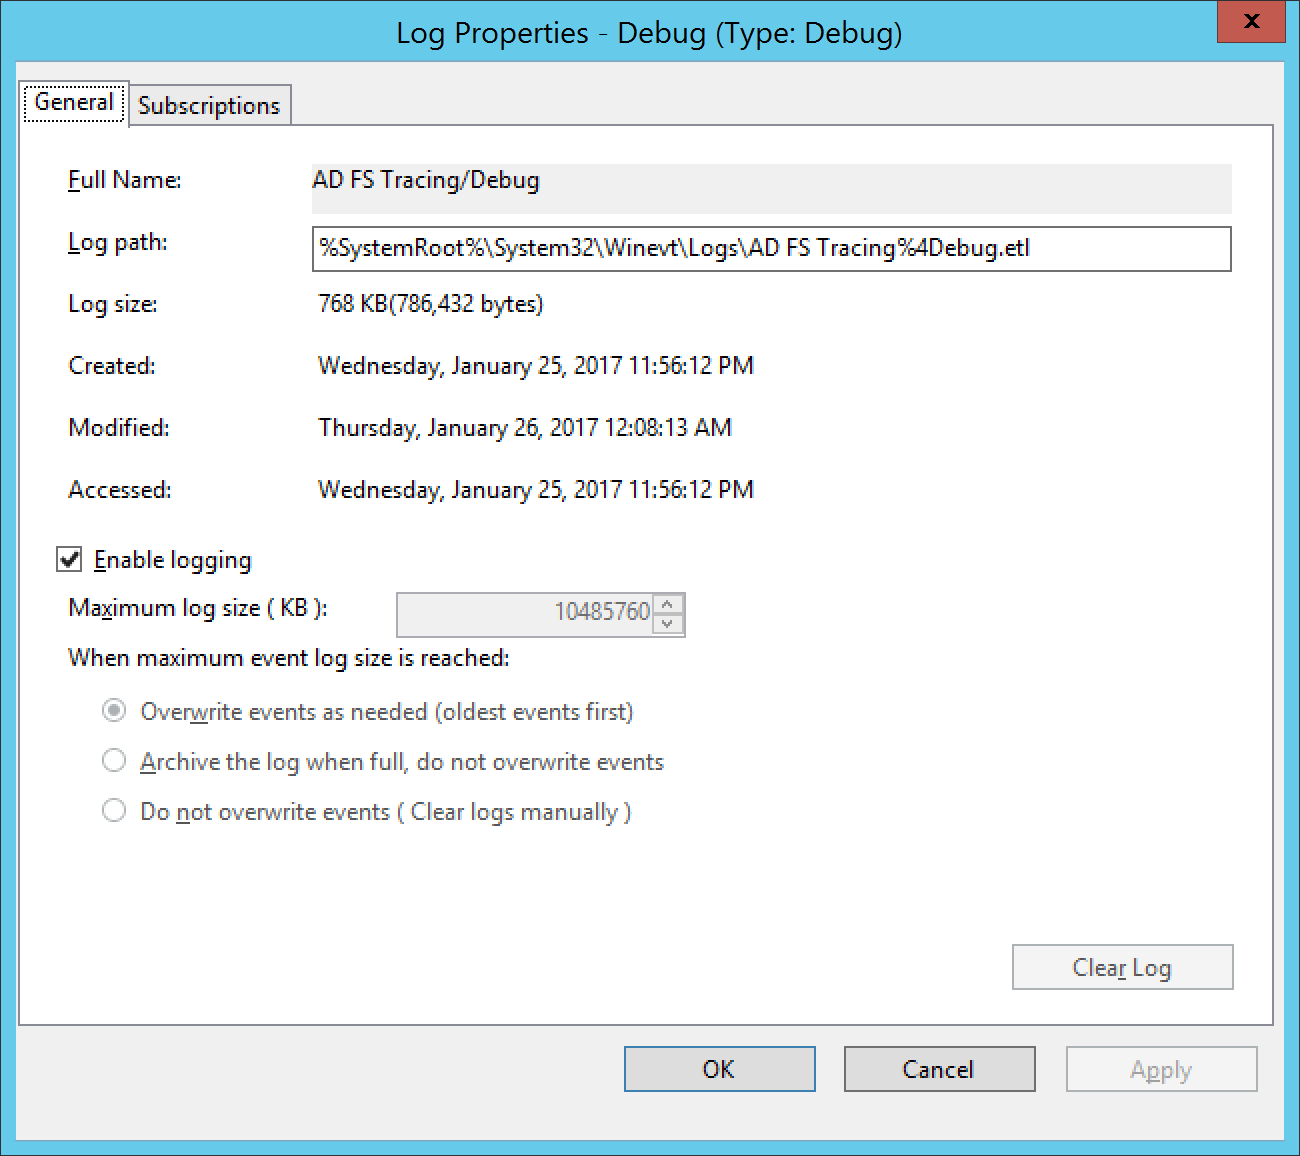
Here is a picture of the correct settings for the AD FS Tracing Debug Logs; at which point, once the settings are applied, you should no longer receive this error when conducting your debug/trace logging.

Windows Update Services - Multiple Errors in Event Viewer - Event ID 12052,12042, 12022, 12032, 12012, 12002,13042

Symptom: When browsing through the event viewer logs on your Windows Update Services server, you notice the following Event IDs with a Level of Error in the following order: 12052, 12042, 12022, 12032, 12012, 12002, 13042.

Event Viewer - WSUS Errors

Log Name: Application
Source: Windows Server Update Services
Event ID: 12052
Task Category: 9
Level: Error
Description: The DSS Authentication Web Service is not working.

Log Name: Application
Source: Windows Server Update Services
Date: 10/3/2013 4:53:26 AM
Event ID: 12042
Task Category: 9
Level: Error
Description: The SimpleAuth Web Service is not working.

Log Name: Application
Source: Windows Server Update Services
Date: 10/3/2013 4:53:26 AM
Event ID: 12022
Task Category: 9
Level: Error
Description: The Client Web Service is not working.

Log Name: Application
Source: Windows Server Update Services
Date: 10/3/2013 4:53:26 AM
Event ID: 12032
Task Category: 9
Level: Error
Description: The Server Synchronization Web Service is not working.

Log Name: Application
Source: Windows Server Update Services
Date: 10/3/2013 4:53:26 AM
Event ID: 12012
Task Category: 9
Level: Error
Description: The API Remoting Web Service is not working.

Log Name: Application
Source: Windows Server Update Services
Date: 10/3/2013 4:53:26 AM
Event ID: 12002
Task Category: 9
Level: Error
Description: The Reporting Web Service is not working.

Log Name: Application
Source: Windows Server Update Services
Date: 10/3/2013 4:53:26 AM
Event ID: 13042
Task Category: 6
Level: Error
Description: Self-update is not working.

Additionally, you can recreate these events by running the following command: wsusutil.exe checkhealth

Solution: Reconfigure the WSUS server via the wsusutil.exe command.

  1. Login to the WSUS server
  2. Open up a command prompt with Administrative rights
    cmd as Administrator
  3. Navigate to the Update Services\Tools directory.
    1. By default you can find it on your C drive by executing the following command
      1. cd "c:\Program Files\Update Services\Tools"
        cmd Update Services - Tools
  4. Execute one of the following commands
    1. If updates are configured for port 80 execute this command
      1. wsusutil.exe usecustomwebsite false
    2. If updates are configured for port 8530 execute this command
      1. wsusutil.exe usecustomwebsite true
    3. wsusutil usecustomwebsite
  5. Execute the following command to verify the WSUS service is running correctly
    1. wsusutil.exe checkhealth
      wsusutil checkhealth
  6. You should see Event ID 10000 in event viewer confirming all is wellWSUS is working correctly

Lync Server 2013 Error after applying CU1

Symptom: You receive the following errors in Event Viewer after installing the February Cumulative Update 1 for Lync Server 2013.

The database being used by Group Pickup is not the appropriate version.

Event ID: 31059
The database is not the correct version:
Connection: Data Source=sqlserver.mydomain.local;Initial Catalog=cpsdyn;Integrated Security=True
Expected... SchemaVersion: 1, SprocVersion: 1, UpgradeVersion: 2
Actual... SchemaVersion: 0, SprocVersion: 0, UpgradeVersion: 0
Cause: The database has not been upgraded.
Resolution:
Upgrade the database to CU1.

Event ID: 31055
There was a problem communicating with the Group Pickup backend database.

There were problems accessing SQL server:
Connection: Data Source=sqlserver.mydomain.local;Initial Catalog=cpsdyn;Integrated Security=True
Message: The EXECUTE permission was denied on the object 'DbpGetVersionSchema', database 'cpsdyn', schema 'dbo'.
Error code: -2146232060
Error number: 229
Cause: This may be caused by connectivity issues with the backend database.
Resolution:
Check if SQL backend is running and accepts connections from Group Pickup.

Solution:
When installing Cumulative Update 1 for Lync Server 2013 from the following KB article http://support.microsoft.com/kb/2809243, make sure you follow the last step to update the backend database.  To finish the steps, execute the following command via the Lync Server 2013 PowerShell prompt.

Lync Server 2013 Standard Edition

Install-CsDatabase -ConfiguredDatabases -SqlServerFqdn frontendserver.fqdn -Verbose

Lync Server 2013 Enterprise Edition

If the Lync Server 2013 Enterprise Edition back end servers do not have SQL mirroring configured, run the following cmdlet to apply the changes:

Install-CsDatabase -ConfiguredDatabases -SqlServerFqdn sqlserver.fqdn -Verbose

See the following KB article if you have mirroring configured on your backend database servers.