Category Archives: Lync

Lync 2013 Logging Tool

After installing Lync 2013 RTM, I noticed that the Lync Logging Tool doesn't exist.  As you can see below, when you search for the tool under Server 2012, it is missing from the list of Apps.

Lync Logging

Solution:

You can manually grab a copy of the Microsoft Lync Server 2013 Debugging Tools (this includes both OCSLogger.exe and Snooper.exe) from here: http://www.microsoft.com/en-us/download/details.aspx?id=35453

Once installed, you can access the tool by browsing to: C:\Program Files\Microsoft Lync Server 2013\Debugging Tools\OCSLogger.exe

Lync Debugging Tools 2013

Lync 2012 Creating CommonAreaPhone - Filter failed to return unique result

Symptom:

You receive the following error when executing the New-CsCommonAreaPhone command via PowerShell.

New-CsCommonAreaPhone : Filter failed to return unique result, "[LineURI : tel:+15555555555] [PrivateLine : tel:+15555555555] "
At line:1 char:1
+ New-CsCommonAreaPhone -LineUri "tel:+15555555555" -RegistrarPool "lync.mydomain ...
+ ~~~~~~~~~~~~~~~~~~~~~~~~~~~~~~~~~~~~~~~~~~~~~~~~~~~~~~~~~~~~~~~~~~~~~~~~~~~~~~~~
+ CategoryInfo          : NotSpecified: (:) [New-CsCommonAreaPhone], InvalidOperationException
+ FullyQualifiedErrorId : System.InvalidOperationException,Microsoft.Rtc.Management.AD.Cmdlets.NewOcsCommonAreaPhoneCmdlet

Solution:
This means that the phone number has been assigned to either another user or response group. Make sure the number is not in use by Lync.

Configuring Common Area Phones for Lync 2010-2013

This guide will go over configuring phones for Lync 2010/2013.  Particularly, this is going to go over configuring phones for conference rooms or any other public area that you would like a phone, but the same steps can be used to force users to login/authenticate to a phone with their number/extension and pin.  That being said, purchasing some Polycom CX3000 phones prompted me to write this guide, so if all goes well, your Polycom phones should work like a charm (Aastra phones should follow this guide as well) 😛

Making sure DHCP and DNS can dish out configurations to phones

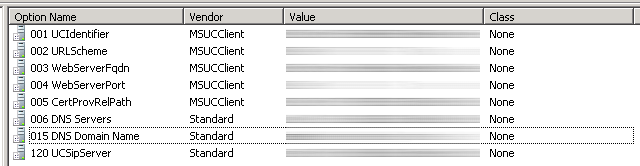
The first thing to do is make sure you have your DHCP server setup to get your phones working (we will push settings out to the clients/phones so they can find your Lync server, pull down certificates, etc).  In order to do this, you will have to complete the following tasks on your DHCP, DNS, and Lync Front End servers.

  1. Create a DNS record to point to your NTP servers (if you haven't already)
      • Service: _ntp
      • Protocol: _udp
      • Port Number: 123
      • Host: xxx.xxx.xxx (your time server (probably your DC))
  2. Copy the DHCPUtil.exe and DHCPConfigScript.bat from the paths below to the Desktop on your DHCP Server
    1. %ProgramFiles%\Common Files\Microsoft Lync Server 2010 or 
      1. %ProgramFiles%\Common Files\Microsoft Lync Server 2013
  3. Open up a command prompt as Administrator on your DHCP server
  4. Execute the following commands on your DHCP Server
    1. DHCPUtil.exe -SipServer mylyncpoolorserver.mydomain.local –RunConfigScript
      1. If you receive the following
        1. The program can't start because MSVCR110.dll is missing from your computer. Try reinstalling the program to fix this problem.
      2. You can find MSVCR110.dll in the Lync 2013 media (D:\Setup\amd64 for example)
  5. To see if everything ran smoothly, open up the DHCP role and verify the entries were made in the IPv4 section
    1. Phone DHCP
  6. Execute the following from your Lync Server to verify the DHCP settings are correct (Note, if you run this from your DHCP server, it will always come back with a failed result).
    1. DHCPUtil.exe -EmulateClient
  7. Next, you will need to set a PIN policy for any users who will want to login.  Open the Lync Control Panel and click on Security.  Select the PIN Policy tab and double click on the Global policy.  Change the PIN Length to at least 4 you want.  Now click on Commit.

Creating the Common Area Phones Lync Policies

First, create a policy that will Enable Hotdesking.  This will log out a user that may have signed in to the phone and revert the phone back to a Common Area phone after 10 minutes of timeout.

New-CsClientPolicy -Identity CommonAreaClient -EnableHotdesking $True -HotdeskingTimeout 00:10:00

Next, we create a new voice policy to lockdown what the phone can do.  This will prevent users from  setting the phone to do call forwarding, delegation, call transfer, etc.  Alternatively, if you don't want to run the PowerShell command, you can browse use the Lync Server Control Panel web GUI to create a new Voice Policy.  Go to the Lync Control Panel, click on Voice Routing, and then the Voice Policy tab.  The command below will add the Internal policy, you can add others if you desire.

New-CsVoicePolicy -Identity CommonAreaVoice -PstnUsages @{add="Internal"} -AllowSimulRing $FALSE -AllowCallForwarding $FALSE -Name CommonAreaVoice -EnableDelegation $FALSE -EnableTeamCall $FALSE -EnableCallTransfer $FALSE -AllowPSTNReRouting $FALSE -Description "Feature-Restricted Common Area Phone Policy"

Next, we create a policy to restrict what the Common Area phone can do in conferences.  Execute the following command to create a new Conferencing Policy.  Alternatively, we could create this using the Lync Server Control Panel web GUI by clicking on Conferencing and then selecting the Conferencing Policy tab.

New-CsConferencingPolicy -Identity CommonAreaConf -AllowIPAudio $FALSE -AllowIPVideo $FALSE -EnableFileTransfer $FALSE -EnableP2PFileTransfer $FALSE -EnableDataCollaboration $FALSE

Last, we need to create a PIN policy for these guys to login.  I suppose you could use the global one for this step, but we could set this rule to be stricter for just these phones.  This will require all CommonArea phones to use a 4 digit pin to login.

New-CsPINPolicy -Identity CommonAreaPIN -Description "Common Area Phone 
Authentication PIN Policy" -MinPasswordLength 6 -AllowCommonPatterns $TRUE

Creating the Common Area Phones With Our policies

Next, create the commonarea phone:

New-CsCommonAreaPhone -LineUri "tel:+15555555555" -RegistrarPool "lync.mydomain.local" -OU "OU=CommonAreaPhones,DC=mydomain,DC=local" -Description "Batline 1" -DisplayName "Conference Room Batline" -DisplayNumber "1 (555) 555-5555"

Next, we need to set the new account we created with a PIN policy.  To do so, execute the following command (keeping in mind you need this to be at least 4 digits or longer depending on your policy you created earlier).

Set-CsClientPin –Identity “Batline 1” -Pin 123123

Lastly, we need to assign all of the polices we created earlier to this Common Area Phone account. To do so, execute the following commands:

Grant-CsClientPolicy -PolicyName CommonAreaClient -Identity "Batline 1
Grant-CsConferencingPolicy -PolicyName CommonAreaConf -Identity "Batline 1
Grant-CsPINPolicy -PolicyName CommonAreaPIN -Identity "Batline 1

Grant-CsVoicePolicy -PolicyName CommonAreaVoice -Identity "Batline 1

Last, you can execute the following powershell command on your Lync Front End server to try and emulate logging in to the phone.  This is great for debugging where the Lync Phone login would fail:

Test-CsPhoneBootstrap -PhoneOrExt 5555 -Pin 12345 -Verbose


Notes: If you have a polycom phone and you receive the following error "Certificate web service cannot be found. Please contact your support team." -- You need to configure the DHCP options as noted above in the "Making sure DHCP and DNS can dish out configurations to phones" section.

When executing the New-CsCommonAreaPhone command above, you receive the following powershell error "New-CsCommonAreaPhone : Management object not found for identity." I saw this error being an issue with your distinguishedName attribute.  Make sure you spelled your OU correctly, and that you are not using an OU that is built into AD like Users.

Good resources that explain exactly what is going on in greater detail.

http://blog.schertz.name/2010/12/configuring-lync-server-for-phone-edition-devices/

http://blog.schertz.name/2011/04/common-area-phone-configuration-in-lync/

http://www.graham-walsh.com/blog/?p=593

Enabling XMPP Federation to Google Talk on Lync 2013

Execute the following PowerShell command:

New-CsXmppAllowedPartner gmail.com -TlsNegotiation NotSupported -SaslNegotiation NotSupported -EnableKeepAlive $false -SupportDialbackNegotiation $true

If you don't want to use PowerShell, you can setup the federated partner through CSCP with the following settings:

Gmail XMPP Federated Partners


Error:

The XMPP Translating Gateway Proxy failed to send a stanza to a remote server.

Remote domain: gmail.com
Detail: MS diagnostic code: 32019

--------------------------------------Another Event--------------------------------------

The XMPP Translating Gateway Proxy encountered an error communicating with a remote server.

Remote domain: gmail.com
Direction: Outbound
State: STREAM_WaitingForStreamFeatures
Category: Stream
Detail: NotAuthorized
Diagnostic code:32019
Exception:-

Solution:

Both events above have to do with issues hinting at split-dns.  Make sure each of your Lync DNS records are pointing to the correct servers.  Here are the records I used below (each point to the internal servers as we are configuring a split-dns environment (nothing should have changed on DNS from 2010 to 2013 other than adding the service record _xmpp-server._tcp.mydomain.com to your public and private DNS servers)):

lyncdiscover.mydomain.com (this should point to your lync proxy's address)
sip.mydomain.com (this may be different depending on how you configured it, I have seen a lot of guides use this though -- this should point to your front end servers/pool)
_xmpp-server._tcp.mydomain.com (point to the domain above: sip.mydomain.com) (port 5269, priority 0, weight 0)
_sipfederationtls._tcp.mydomain.com (point to sip.mydomain.com, port 5061, weight 0, priority 0)

Attempts to route to servers in an Exchange UM Dialplan failed - Lync 2010-2013

Symptom: When trying to check your voicemail from Lync, you notice that you call gets dropped/disconnected.  Inside of the front end server, you notice the following error log:

Attempts to route to servers in an Exchange UM Dialplan failed

No server in the dialplan [Hosted__exap.um.outlook.com__mydomain.onmicrosoft.com] accepted the call with id [c347a4ecc6e74651a2bdce6c43552e53].

Cause: Dialplan is not configured properly.

Resolution:

Check the configuration of the dialplan on Exchange UM Servers.

ExUM Error

Solution: Unfortunately, this seems to be caused by a couple of different things, so I would give all of the following below a shot.

First, make sure you have created a Unified Messaging plan in your Office 365 Exchange Control Panel:

  1. Login to https://portal.microsoftonline.com/
  2. Click the Manage link next to Exchange on the dashboard
    1. Exchange Manage
  3. Click the Phone & Voice tab
    1. Phone & Voice
  4. Ensure you have a UM Dial Plan with the number you used in the New-CsExUmContact powershell command you ran earlier.  Your settings might differ on the screenshot below, but just make sure you have SIP URI selected.
    1. New UM Dial Plan
  5. Select your policy from the UM Dial Plans list and click the Configure UM Dial Plan button as shown below:
    1. UM Dial Plan Configuration
  6. Make sure you configure the number you want your users to dial to access their voicemail in the E.164 routing numbers for your SIP server and Numbers for users to access voice mail boxes.
    1. Configure Voicemail Plan


If your running Lync 2010/2013 at the same time, check out this option in topology builder to make sure you have enabled federation:

  1. Open up the Lync Server Topology Builder
  2. Download the latest topology
  3. Right click on the first site (the node under Lync Server) and then click Edit Properties...
  4. Scroll down to Site federation route assignment and make sure Apply federation route assignments to all sites is checked.
  5. Make sure Enable sip federation is checked as well and then click OK
  6. Click on Action->Topology->Publish...

If the above doesn't work, try running the following powershell commands on your front-end server.

  1. Modify the global hostedvoicemailpolicy (make sure to use your onmicrosoft domain name, not your FQDN you would use normally):
    1. Set-CsHostedVoicemailPolicy -global -Destination exap.um.outlook.com -Organization domain.onmicrosoft.com
  2. Create Lync contact for Hosted UM (make sure to set the number as the same one in the Office 365 Unified Messaging area. The last value below can be changed to put the UM contact that will be generated in AD, in any OU of your choosing; I just picked the default users one for simplicity.
    1. New-CsExUmContact -DisplayNumber +15555555555 -SipAddress sip:[email protected] -RegistrarPool FQDNTOPOOL -OU "CN=Users,DC=domain,DC=com"
  3. Associate your newly created Lync contact with your Hosted Voicemail Policy:
    1. Grant-CsHostedVoicemailPolicy -identity "sip:[email protected]" -policyname global

Lastly, if things still aren't working, make sure you have enabled federation with Office 365's exchange server for Unified Messaging by executing the following command:

  1. New-CsHostingProvider -Identity "Exchange Online" -Enabled $True -EnabledSharedAddressSpace $True -HostsOCSUsers $False -ProxyFQDN "exap.um.outlook.com" -IsLocal $False -VerificationLevel UseSourceVerification

How to activate Lync Evaluation to Licensed Version

Have Lync 2010 Standard, Enterprise or Lync 2013 in evaluation mode and want to activate it with your licensed version? Here are the steps to do it!

  1. Download the Lync Server version from the Microsoft Licensing portal (or where ever else you obtain your licensed software).
  2. Extract the ISO to a folder/burn it to a disk and pop it into the Lync server.
  3. Open up the Lync Server Management Shell as an Administrator
    1. Start->All Programs->Microsoft Lync Server 2010 (or 2013)->Lync Server Management Shell
  4. Navigate to the installation media
    1. cd PATHTOYOURLYNCSERVERINSTALLER\Setup\amd64\Setup
  5. Execute the following command
    1. msiexec.exe /fvomus server.msi EVALTOFULL=1 /qb
  6. Use the following command to update the services
    1. Enable-CsComputer
  7. Use the following command to verify your copy of Lync is now licensed
    1. Get-CsServerVersion


Lync 2010 - Deploying Monitoring Server Reports

I recently had the lovely experience of setting up the monitoring role for Lync 2010.  In doing so, I documented the steps I took to successfully deploy the Monitoring Server Reports Services.

Before beginning, here are a few notes:

  • Ensure you are using Microsoft SQL Server 2008 x64 Standard or greater (if you need to upgrade, see the following tutorial: SQL Server 2008 R2 – Updating a msSQL instance/server)
  • You have deployed Lync 2010 Standard or Enterprise
    • Both versions allow you to add this service

Alright, so lets begin!

  1. Our first step is to install the "Reporting Services" feature for SQL Server 2008
  2. Open up the Reporting Services Configuration Manager
  3. Enter the SQL Server Reporrting Services instance you want to connect to
  4. Click Web Service URL
  5. Enter the virtual directory name, port, and configure your SSL certificate
  6. Click Apply
    1. Note: If you had IIS on this box, you will need to choose different port numbers
  7. Open up Microsoft SQL Server Management Studio
  8. Login to your SQL server and create a new service account for your SQL server
    1. Make a sysadmin for the time being
  9. Head back over to the Reporting Services Configuration Manager
  10. Setup the Database Name and select the language.
  11. Leave Native Mode selected and click Next.
  12. Enter the same credentials on the Credentials step and click Next
  13. Click Next on the Summary pane
  14. Click Finish
  15. Go back to your SQL Server and deprivilege your account
    1. Uncheck sysadmin and Set the default database to ReportServer
  16. Click on the Report manager URL in the reporting Services Configuration Manager
  17. Click Reports if you are happy with the /Reports directory
  18. Once you have clicked Apply, verify you can view the website by clicking on the link it shows (it should bring you to a site that kind of reminds you of an old version of sharepoint :P)
  19. Go to your Lync Front End server and run the Lync Server Topology Builder program (Start->All Programs->Microsoft Lync Server 2010->Lync Server Topology Builder)
  20. Upon login, check "Download Topology from existing deployment" and click OK
  21. Save the topology to your desktop when prompted (or anywhere else, doesn't really matter)
  22. Expand your Site, and click on the Monitoring Servers folder
  23. Right click on Monitoring Servers and select New Monitoring Server...
  24. Enter in the server to install the role on
  25. Enter the SQL server name/instance to use
  26. Finish the installation
  27. Head over to the server where you are going to install the Monitoring/Archieving role
  28. Open up the Lync Server 2010 - Deployment Wizard (run as administrator)
  29. Click on Install or Update Lync Server System
  30. Click on Setup or Remove Lync Server Componenets
  31. Let it install/configure all of its stuff
  32. Click on Run next to Server Status (Optional)
  33. Verify Lync Server Call Detail Recording and Lync Server QoE Monitoring Service services have been started (start them if they aren't running)
  34. Go back to the Lync Server 2010 deployment wizard homepage and click on Deploy Monitoring Server Reports
  35. The server information should already be prefilled in. Click Next
  36. Enter in the SQL credentials needed to connect in
    1. For this step, I would recommend creating the account yourself (A good tutorial I came across on doing this can be found here, but I have summarized the steps below):
      1. Head over to Active Directory and create a new user
      2. Head over to the SQL Server
      3. Right click on Security->Logins and click New Login...
      4. Enter in your AD account you just created
      5. Click on User Mapping
        1. Check both the LcsCDR and QoEMetrics databases
      6. Click OK
        1. Do the following for both the LcsCDR and QoEMetrics databases
          1. Expand the database, expand Security, export Users
          2. Right click on the user you mapped to the database and click Properties
          3. Check ReportsReadOnlyRole and click OK
  37. Enter in the User Group you want access to run reports.
    1. This group is a list of users who have access to actually run the reports/will point and click on reports.
  38. Click Next, you should notice the following info when it starts configuring, that is normal:
    1. The following URL will be used for deployment: https://myserver.mydomain:443/ReportServer SQL Server logon credentials for "mydomain\myuser" already exist. Use the existing logon credentials. "[QoEMetrics]" role "[ReportsReadOnlyRole]" has already assigned to "mydomain\myuser". "[LcsCDR]" role "[ReportsReadOnlyRole]" has already assigned to "mydomain\myuser".
  39. Click Finish (Assuming all went OK) 🙂
  40. Head over to your Lync admin panel (web GUI)
  41. Click on Monitoring and Archiving
  42. Select Global and click on Action and select Enable CDR
  43. You can change any other settings in here to your preference at this point.
  44. Head over to your reports page. https://yourdomain/ReportServer
  45. Click on LyncServerReports
  46. Click on Reports Home Page

If you see the Monitoring Server Reports page with the Lync 2010 logo in the top left corner, get up, celebrate, and pat yourself on the back! 🙂

Other thoughts: The first time I deployed this, I ran into a ton of errors.  I have documented many of these issues and other issues that you might run into during your deployment.  Hopefully you don't run into any, but if you do, hopefully they help you get up-and-going again.

Lync 2010 – Publishing the topology error: Missing Machine

SQL Server 2008 R2 – Reporting Services Configuration Manager – Create certificate binding failed – HRESULT: 0×80040238

SQL Server 2008 R2 – Reporting Services Configuration Manager – The underlying connection was closed: Could not establish trust relationship for the SSL/TLS secure channel.

Lync 2010 – The feature: “Customizing security roles” is not supported in this edition of Reporting Services.

Lync 2010 – Cannot impersonate user for data source ‘CDRDB’. (rsErrorImpersonatingUser) error

Lync 2010 - Cannot impersonate user for data source 'CDRDB'. (rsErrorImpersonatingUser) error

Symptom: You receive the following error when browsing to the following page in the Reports Viewer: https://mymachine.mydomain/ReportServer/Pages/ReportViewer.aspx?%2fLyncServerReports%2fReports+Home+Page&rs:Command=Render  Alternatively, you receive this error when you go to https://mymachine.mydomain.com/Reports/ and click on LyncServerReports and then Reports Home Page.

Note: the solution below applies to the QMSDB as well.

  • An error has occurred during report processing. (rsProcessingAborted)
    • Cannot impersonate user for data source 'CDRDB'. (rsErrorImpersonatingUser)
      • Log on failed. Ensure the user name and password are correct. (rsLogonFailed)
        • For more information about this error navigate to the report server on the local server machine, or enable remote errors

Solution: For whatever reason, my service account I created actually had the incorrect password to login to the 'CDRDB' data source.  To fix/troubleshoot this, follow the steps below:

  • Head over to https://myserver.mydomain/Reports (myserver being the server with the reporting services on it)
  • Click on LyncServerReports
  • Click on Reports_Content
  • Click on CDRDB
  • Under Credentials stored securely in the report server, type in the username/password are want to use to connect to the SQL server, and then click the Test Connection button.  If you should see a Connection created successfully. message, you are good to go.  If you see a Log on failed. Ensure the user name and password are correct. message, ensure that the account you setup has the correct username/password in active directory, is Unlocked in Active Directory (due to bad password attempts), and that it has permissions to the databases mentioned in the Connection string on the same page.

Lync 2010 - The feature: "Customizing security roles" is not supported in this edition of Reporting Services.

Symptom: You receive the following log/error when on the Deploying Monitoring Server Reports step for Lync 2010.

> Deploying Monitoring Server Reports... This might take a few minutes.

The Monitoring Server is using SQL instance "mysqlserver.mydomain".

The data source is using SQL instance "(local)".

The following URL will be used for deployment: https://myserver.mydomain:443/ReportServer

SQL Server logon credentials for "MYDOMAIN\MYUSER" already exist. Use the existing logon credentials.

"[QoEMetrics]" role "[ReportsReadOnlyRole]" has already assigned to "MYDOMAIN\MYUSER".

"[LcsCDR]" role "[ReportsReadOnlyRole]" has already assigned to "MYDOMAIN\MYUSER".

Start to deploy reports...

Report: Monitoring Dashboard published successfully with no warnings

Report: Call Detail Report published successfully with no warnings

Report: Call List Report published successfully with no warnings

Report: Reports Home Page published successfully with no warnings

Report: Media Quality Summary Report published successfully with no warnings

Report: Media Quality Metrics Distribution Report published successfully with no warnings

Report: Media Quality Comparison Report published successfully with no warnings

Report: Device Report published successfully with no warnings

Report: Server Performance Report published successfully with no warnings

Report: Call Leg Media Quality Report published successfully with no warnings

Report: Call Leg Media Quality Trend Report published successfully with no warnings

Report: Server Media Quality Trend Report published successfully with no warnings

Report: QoE Call Detail SubReport published successfully with no warnings

Report: Location Trend Report published successfully with no warnings

Report: Location Report published successfully with no warnings

Report: Peer-to-Peer Voice and Video Report published successfully with no warnings

Report: Peer-to-Peer IM Report published successfully with no warnings

Report: Conference Activity Report published successfully with no warnings

Report: PSTN Conference Summary Report published successfully with no warnings

Report: Conference Summary Report published successfully with no warnings

Report: Peer-to-Peer Activity Summary Report published successfully with no warnings

Report: User Activity Report published successfully with no warnings

Report: Peer-to-Peer Session Detail Report published successfully with no warnings

Report: Conference Detail Report published successfully with no warnings

Report: Diagnostic Report published successfully with no warnings

Report: User Registration Report published successfully with no warnings

Report: Failure Distribution Report published successfully with no warnings

Report: Top Failures Report published successfully with no warnings

Report: Failure List Report published successfully with no warnings

Report: Peer-to-Peer Activity Diagnostic Report published successfully with no warnings

Report: Conference Diagnostic Report published successfully with no warnings

Report: Call Admission Control Report published successfully with no warnings

Report: P2P Summary SubReport published successfully with no warnings

Report: Conference Summary SubReport published successfully with no warnings

Report: Call Diagnostic Summary Report published successfully with no warnings

Report: IP Phone Inventory Report published successfully with no warnings

Report: Response Group Usage Report published successfully with no warnings

Report: Response Group Call List Report published successfully with no warnings

The feature: "Customizing security roles" is not supported in this edition of Reporting Services. ---> Microsoft.ReportingServices.Diagnostics.Utilities.OperationNotSupportedException: The feature: "Customizing security roles" is not supported in this edition of Reporting Services.

An error occurred when deploying Monitoring Server Reports. For details, see the log. 

Solution: Make sure the SQL server is running at least Standard or Enterprise.

To find out which version of msSQL you are running (version and 32-bit or 64-bit), follow this guide here: http://jackstromberg.com/2013/01/how-do-i-find-out-if-my-sql-server-is-32-bit-or-64-bit/

To find out how to upgrade your msSQL instance/server, follow this guide here:

Lync 2010 - Publishing the topology error: Missing Machine

Symptom: When you publish something to the topology in Lync 2010, you receive the following error:

The following machines from the topology you are publishing were not found in Active Directory and will result in errors during Enable-CsTopology as it tries to prepare Active Directory entries for the topology machines.  If you choose to publish this topology Enable-CsTopology will have to be re-run once the missing machines are domain-joined:

mymachine.mydomain

Solution: Exit out of the topology builder and relaunch it.  However, when you relaunch the topology builder, right click on it and Run as different user.  Type in your domain admin credentials.  You should now be able to successfully publish your topology.