Author Archives: Jack

Tutorial - How to setup a KMS server for a Windows Domain

Copied from Microsoft, here is what we can achieve by configuring a KMS server on our local network for a windows domain: http://technet.microsoft.com/en-us/library/ff793434.aspx

KMS activates computers on a local network, eliminating the need for individual computers to connect to Microsoft. To do this, KMS uses a client–server topology. KMS client computers can locate KMS host computers by using Domain Name System (DNS) or a static configuration. KMS clients contact the KMS host by using remote procedure call (RPC). KMS can be hosted on computers that are running the Windows Vista, Windows 7, Windows Server 2003, Windows Server 2008, or Windows Server 2008 R2 operating systems.

  1. Go to the volume licensing center and grab a copy of the KMS key for your server OS
    1. Navigate to https://www.microsoft.com/Licensing/servicecenter/home.aspx
    2. Login
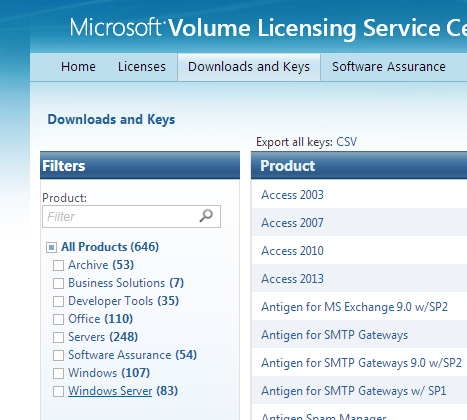
    3. Select Downloads and Keys
      Volume Licensing Service Center - Downloads and Keys
    4. Select Windows Server
      Volume Licensing Service Center - Windows Server
    5. Finder your server version and click Key
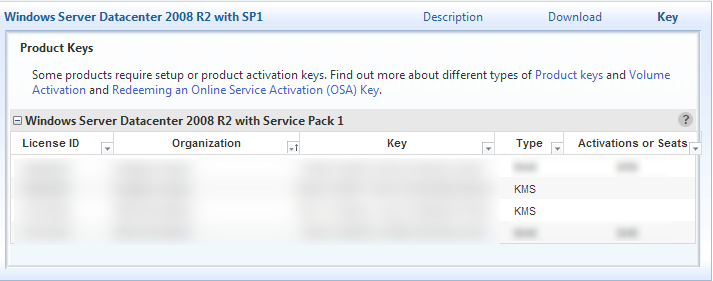
      Volume Licensing Service Center - Windows Server - Key
    6. Copy the KMS type key
  2. Login to the server you want to setup as the KMS server.
  3. Open up a command prompt as an administrator.
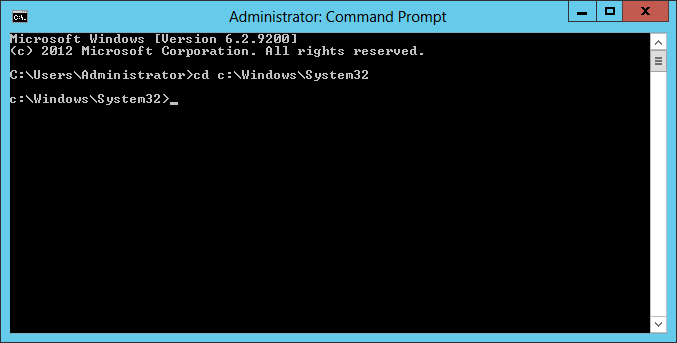
  4. Ensure you are in the system32 folder of Windows
    1. cd c:\Windows\System32
      windows - System 32
  5. Execute the following command to setup your license key
    1. cscript slmgr.vbs /ipk WINDOWS-KMS-LICENSE-KEY-HERE
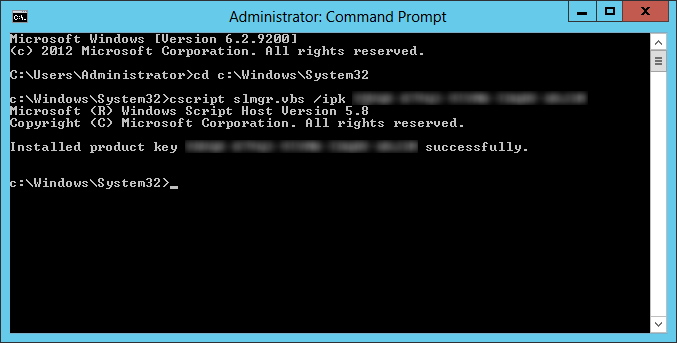
      cscript slmgr ipk
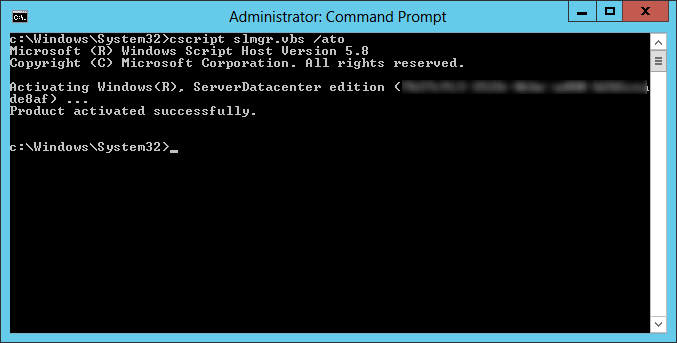
  6. Execute the following command to activate the host
    1. cscript slmgr.vbs /ato
      Activating Windows
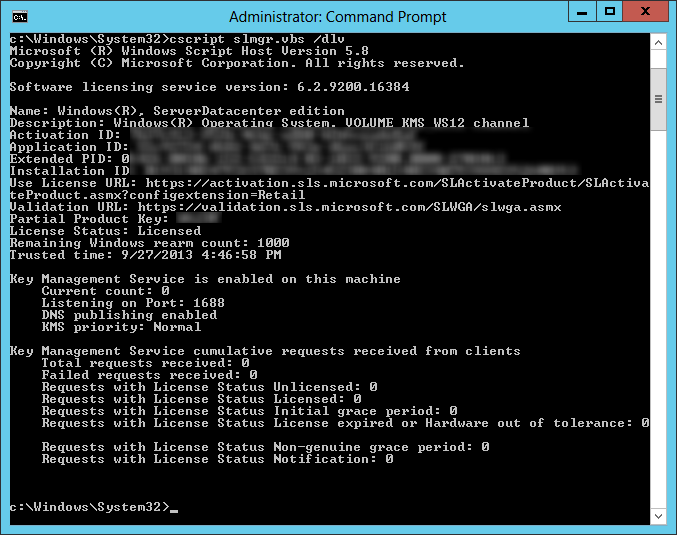
  7. Execute the following command to verify the host has the Key Management Service enabled
    1. cscript slmgr.vbs /dlv
      cscript slmgr dlv
  8. Next, we need to open the firewall for the server to accept activation requests
    1. Open up Windows Firewall with Advanced Security
      Windows 8 - Windows Firewall with Advanced Security
    2. Right click on Inbound Rules and select New Rule...
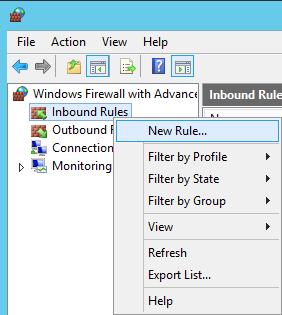
      Windows Firewall with Advanced Security - New Rule
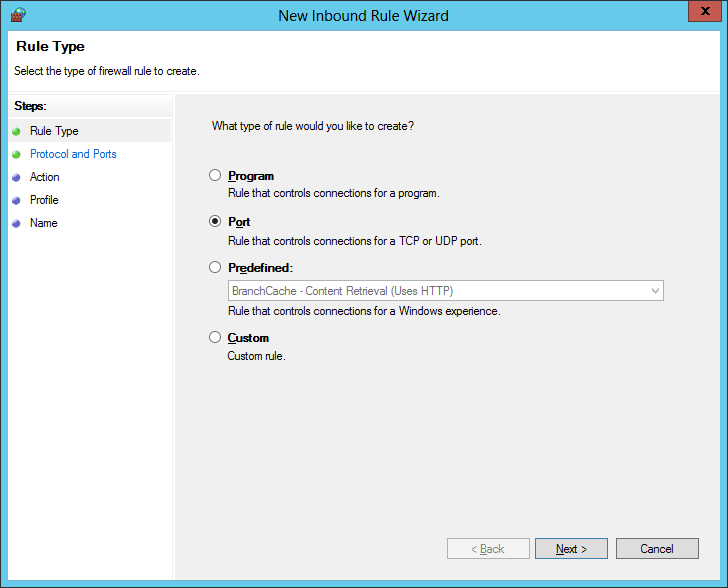
    3. Select Port and click Next >
      New Inboud Rule Wizard - Port
    4. Check TCP, check Specific Local Ports and enter port 1688, click Next >
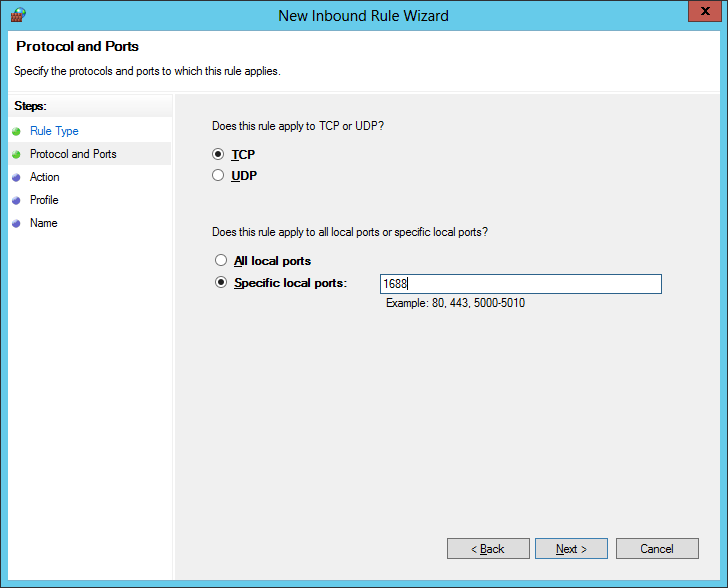
      New Inboud Rule Wizard - Specific local ports
    5. Check Allow the connection and click Next >
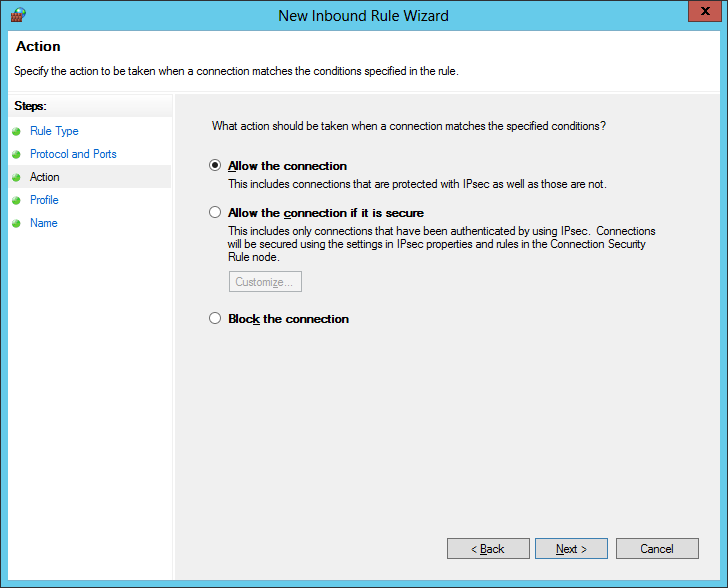
      New Inboud Rule Wizard - Allow the connection
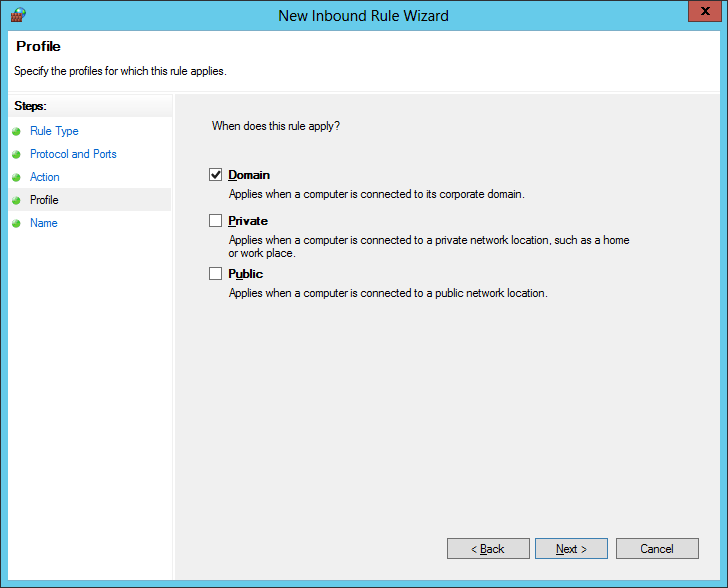
    6. Check Domain and click Next >
      New Inboud Rule Wizard - Domain
    7. Enter a name for the rule and click Finish
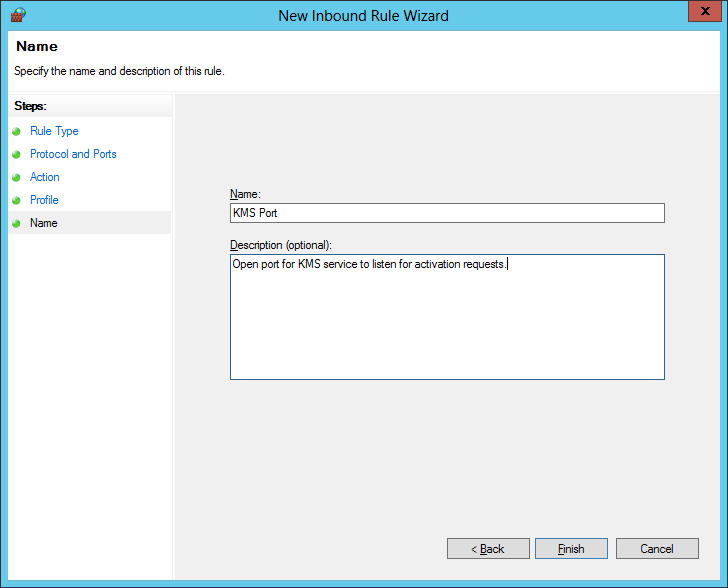
      New Inboud Rule Wizard - Rule Name

Congrats!  Your KMS server should now be ready to accept activation requests!

Notes: Here is a full listing of the commands/switches you can execute using the Software Licensing Management Tool.

C:\Windows\System32>cscript slmgr.vbs
Microsoft (R) Windows Script Host Version 5.8
Copyright (C) Microsoft Corporation. All rights reserved.

Invalid combination of command parameters.

Windows Software Licensing Management Tool
Usage: slmgr.vbs [MachineName [User Password]] [<Option>]
MachineName: Name of remote machine (default is local machine)
User: Account with required privilege on remote machine
Password: password for the previous account

Global Options:
/ipk <Product Key>
Install product key (replaces existing key)
/ato [Activation ID]
Activate Windows
/dli [Activation ID | All]
Display license information (default: current license)
/dlv [Activation ID | All]
Display detailed license information (default: current license)
/xpr [Activation ID]
Expiration date for current license state

Advanced Options:
/cpky
Clear product key from the registry (prevents disclosure attacks)
/ilc <License file>
Install license
/rilc
Re-install system license files
/rearm
Reset the licensing status of the machine
/upk [Activation ID]
Uninstall product key

/dti [Activation ID]
Display Installation ID for offline activation
/atp <Confirmation ID> [Activation ID]
Activate product with user-provided Confirmation ID

Volume Licensing: Key Management Service (KMS) Client Options:
/skms <Name[:Port] | : port> [Activation ID]
Set the name and/or the port for the KMS computer this machine will use. IPv6 address must be specified in the format [hostname]:port
/ckms [Activation ID]
Clear name of KMS computer used (sets the port to the default)
/skms-domain <FQDN> [Activation ID]
Set the specific DNS domain in which all KMS SRV records can be found. This setting has no effect if the specific single KMS host is set via /skms option.
/ckms-domain [Activation ID]
Clear the specific DNS domain in which all KMS SRV records can be found. The specific KMS host will be used if set via /skms. Otherwise default KMS auto-discovery will be used.
/skhc
Enable KMS host caching
/ckhc
Disable KMS host caching

Volume Licensing: Token-based Activation Options:
/lil
List installed Token-based Activation Issuance Licenses
/ril <ILID> <ILvID>
Remove installed Token-based Activation Issuance License
/ltc
List Token-based Activation Certificates
/fta <Certificate Thumbprint> [<PIN>]
Force Token-based Activation

Volume Licensing: Key Management Service (KMS) Options:
/sprt <Port>
Set TCP port KMS will use to communicate with clients
/sai <Activation Interval>
Set interval (minutes) for unactivated clients to attempt KMS connection. The activation interval must be between 15 minutes (min) and 30 days (max) although the default (2 hours) is recommended.
/sri <Renewal Interval>
Set renewal interval (minutes) for activated clients to attempt KMS connection. The renewal interval must be between 15 minutes (min) and 30 days (max) although the default (7 days) is recommended.
/sdns
Enable DNS publishing by KMS (default)
/cdns
Disable DNS publishing by KMS
/spri
Set KMS priority to normal (default)
/cpri
Set KMS priority to low
/act-type [Activation-Type] [Activation ID]
Set activation type to 1 (for AD) or 2 (for KMS) or 3 (for Token) or 0 (for all).

Volume Licensing: Active Directory (AD) Activation Options:
/ad-activation-online <Product Key> [Activation Object name]
Activate AD (Active Directory) forest with user-provided product key
/ad-activation-get-iid <Product Key>
Display Installation ID for AD (Active Directory) forest
/ad-activation-apply-cid <Product Key> <Confirmation ID> [Activation Object name]
Activate AD (Active Directory) forest with user-provided product key and Confirmation ID
/ao-list
Display Activation Objects in AD (Active Directory)
/del-ao <Activation Object DN | Activation Object RDN>
Delete Activation Objects in AD (Active Directory) for user-provided Activation Object

Lync Persistent Chat Error - User is not sip-enabled

Symptom: When you try to create a new chatroom from the Lync 2010/2013 client, you are redirected to a webpage that shows the following error:

User is not sip-enabled.

User is not sip-enabled


Solution: Turns out this is an issue with cross-compatibility between Single-sign on and 3rd party browsers.  Make sure you are using Internet Explorer and you should be able to login and manage your persistent chatroooms.

[Tutorial] Setting up and installing persistent chat for Lync Server 2013

Here is how to configure persistent chat for your Lync 2013 deployment.

  1. Login to your Lync Front End Server and start the Lync Server Topology Builder
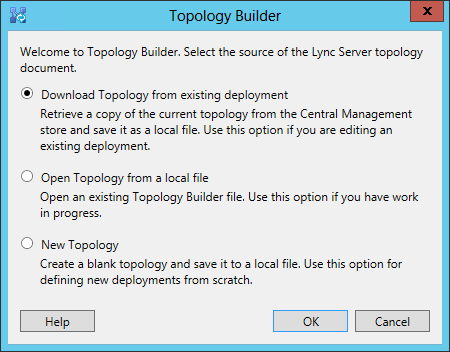
  2. When the Topology Builder window opens, select Download Topology from existing deployment and select OK
    Download Topology from existing deployment
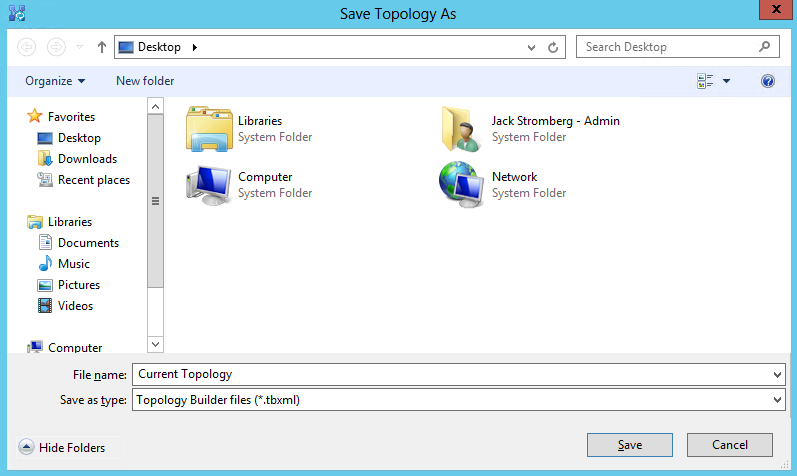
  3. Save the file to your desktop
    Save current topology
  4. Expand Lync Server -> Your Site -> Lync Server 2013 -> Persistent Chat pools
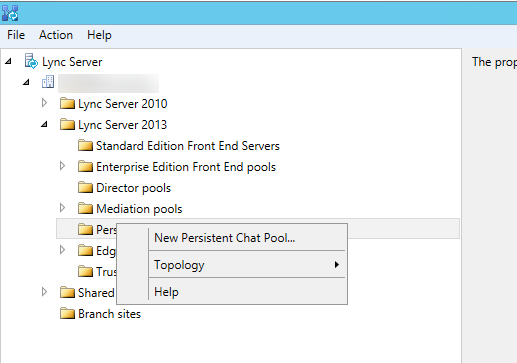
  5. Right click Persistent Chat pools and select New Persistent Chat Pool...
    Create new persistent chat pool
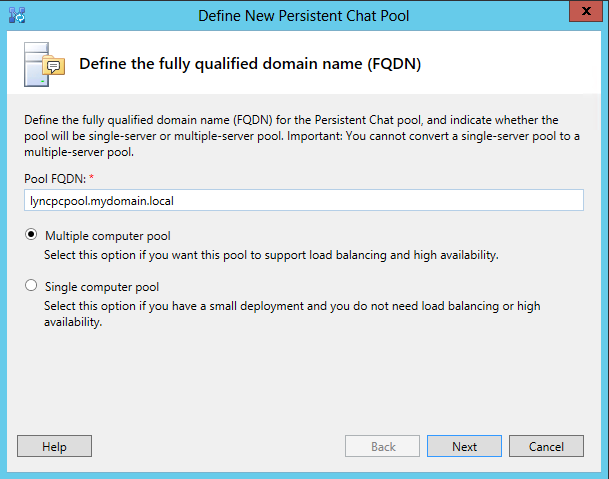
  6. On the Define the fully qualified domain name (FQDN) page, enter the FQDN your standard front end server and check Single computer pool.  If you want to deploy a highly available environment for persistent chat, you will need to deploy 2 new machines to put into a persistent chat pool and check Multiple computer pool.  It is not supported by Microsoft at this time to collocate the persistent chat service on the same machines in an enterprise front end pool.  Once done, click Next.
    Define New Persistent Chat Pool

    1. In this tutorial, I am going to go over deploying persistent chat in a highly available environment.
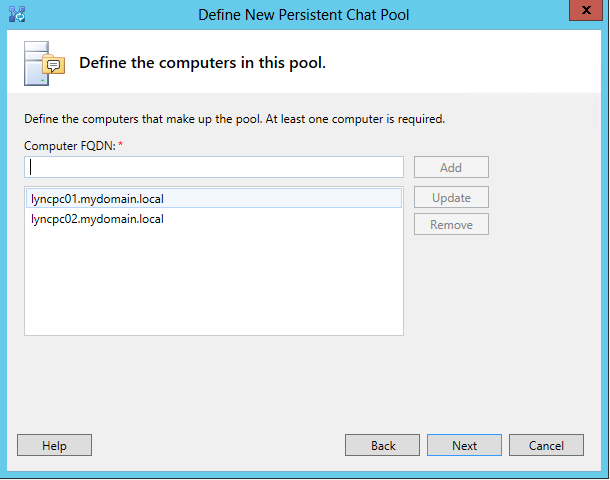
  7. If you clicked on Multiple computer pool, enter in the machine names where the persistent chat service will be installed, and click Next.
    Define computers in persistent chat pool
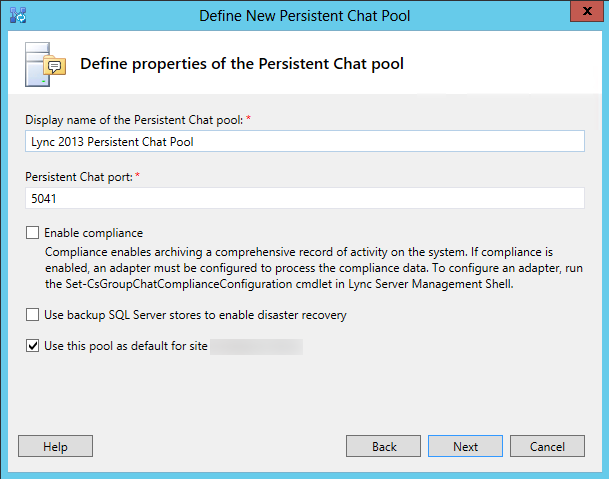
  8. On the Define properties of the Persistent Chat pool page, enter in the Display name of the Persistent Chat pool (you can name this whatever you would like to) and click Next
    Define properties of the persistent chat pool
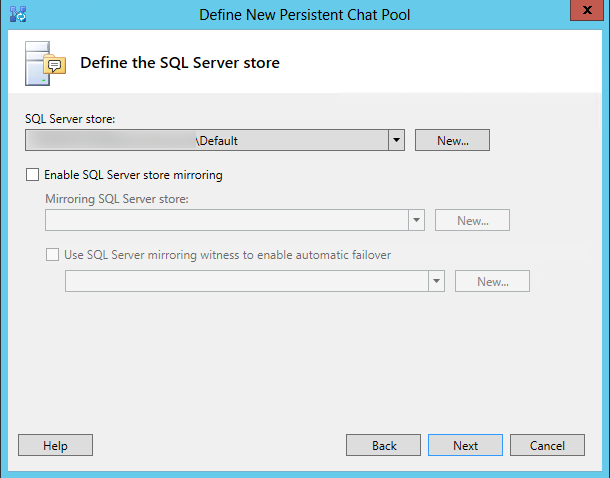
  9. Select the SQL Server store you wish to use and select Next
    Define SQL Server Store for the persistent chat pool
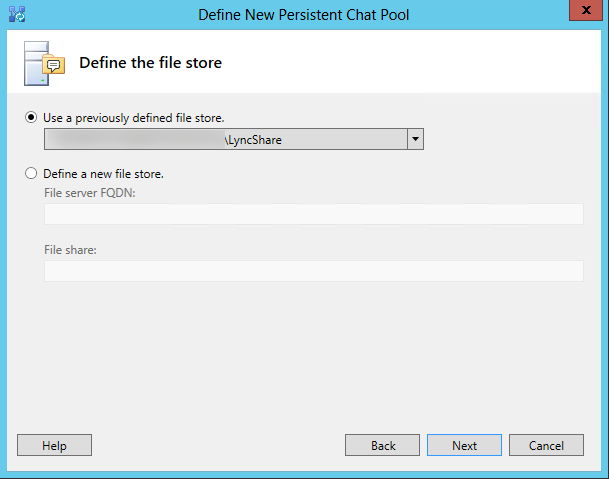
  10. Select or create a new file store and click Next
    Define the file store for the persistent chat pool
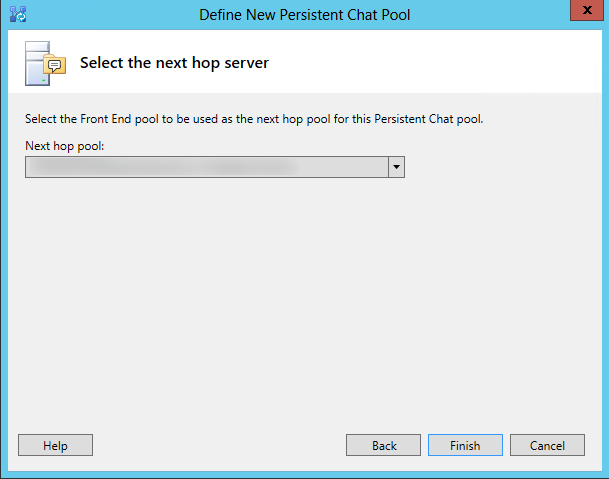
  11. Select the Front End pool/server as the next hop pool and click Finish
    Define the next hop server for the persistent chat pool
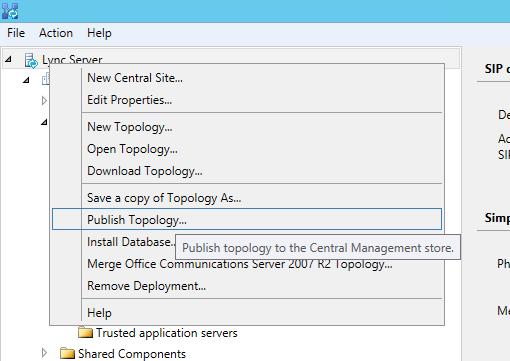
  12. Once done with the Persistent Chat wizard, right click on Lync Server in the Topology Builder and select Publish Topology...
    Publish the Topology
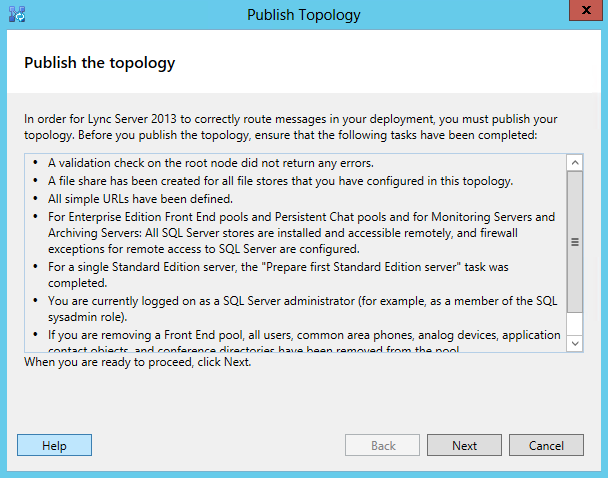
  13. Click Next on the Publish the topology window
    Publish the Topology Wizard
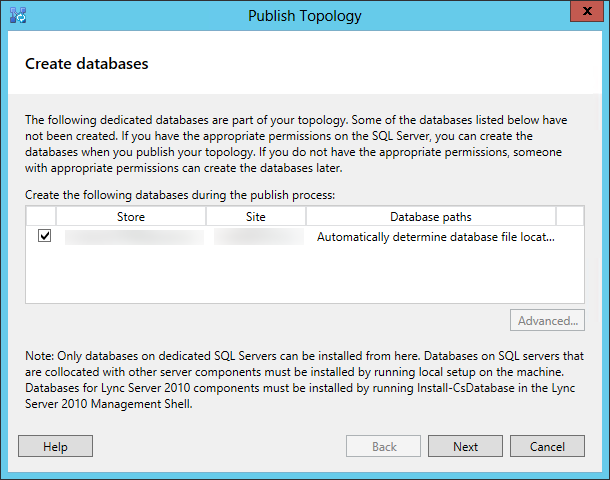
  14. Click Next on the Create databases screen
    Publish the Topology Wizard - Create databases
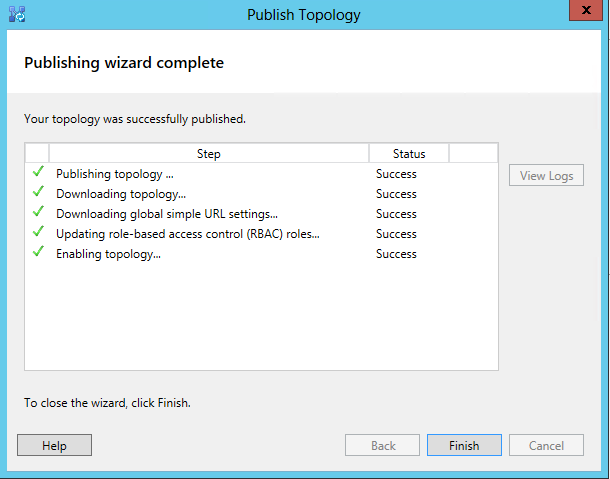
  15. Click Finish once the topology has been published
    Publish the Topology - complete
  16. Complete the following steps on each of the Persistent Chat servers you created
    1. Login to the server that will be running the persistent chat service
    2. Copy/mount the Lync Server 2013 installation media
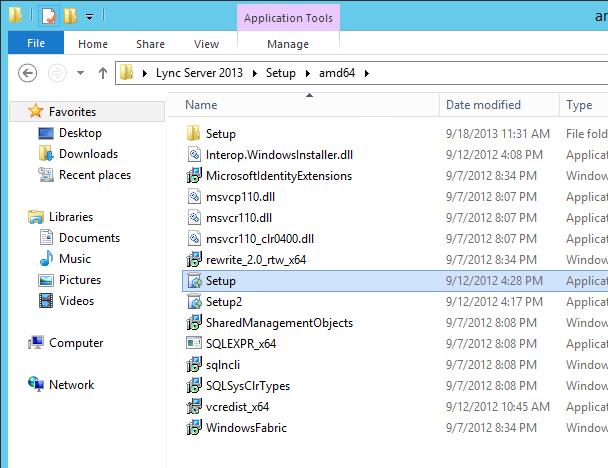
    3. Run the setup.exe program from the Lync Server 2013 installation media
      Lync Server 2013 Installation Media - Setup
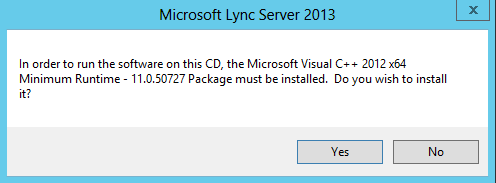
    4. Click Yes on the "In order to run the software on this CD, the Microsoft Visual C++ 2012 x64 Minimum Runtime - 11.0.50727 Package must be installed." Dialog box.
      Lync Server 2013 Visual C++ Library
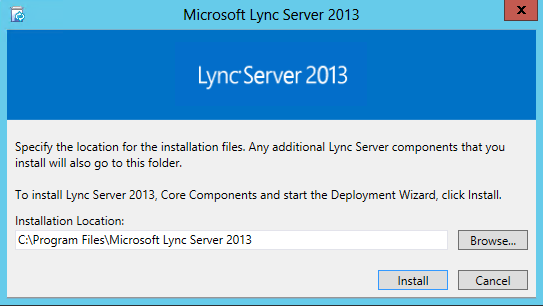
    5. Click Install on the Microsoft Lync Server 2013 dialog box
      Lync Server 2013 Installation Path
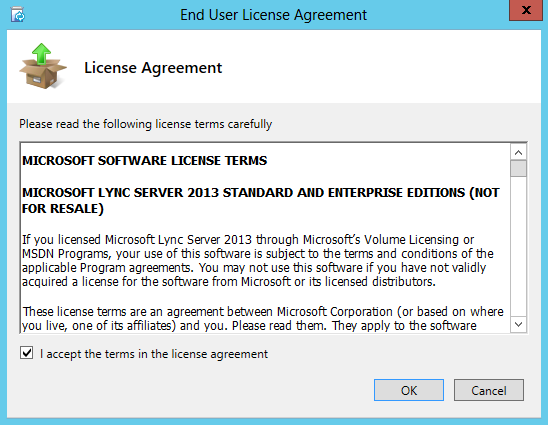
    6. Check I accept the terms in the license agreement and click OK
      Lync Server 2013 Installation EULA
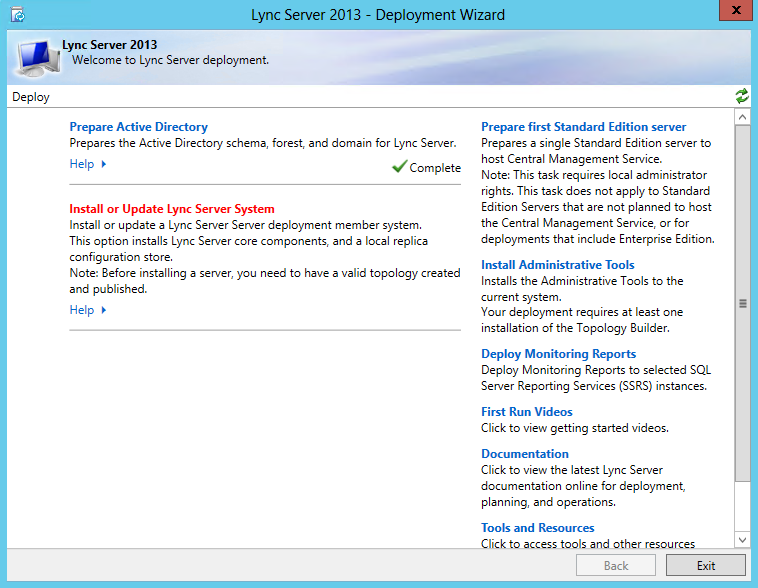
    7. Once installed, click on Install or Update Lync Server System
      Lync Server 2013 - Install or Update Lync Server System
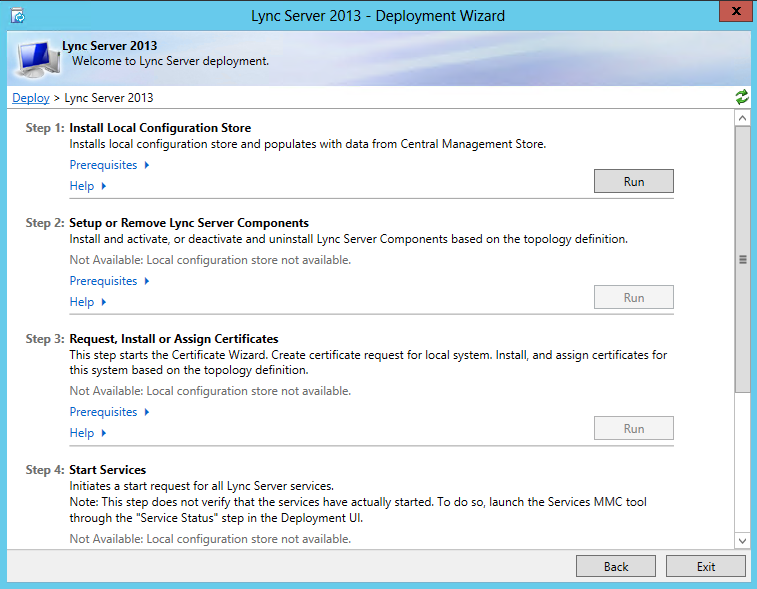
    8. Click Run next to Step 1: Install Local Configuration Store
      Lync Server 2013 - Step 1
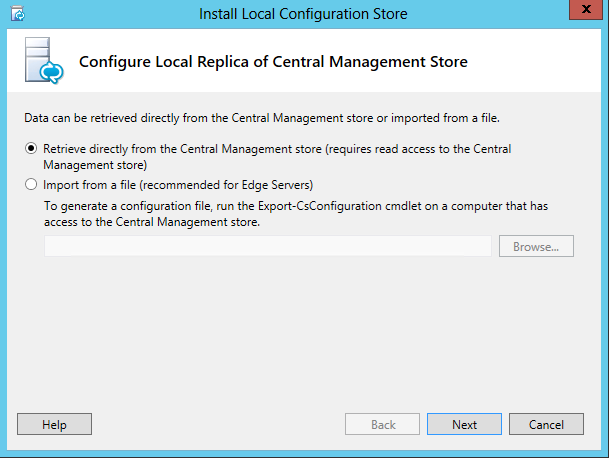
    9. Check Retrieve directly from the Central Management store and click Next
      Lync Server 2013 - Retrieve Central Management Store
    10. Click Finish once the installation has completed.
      (oops, no picture for this one :()
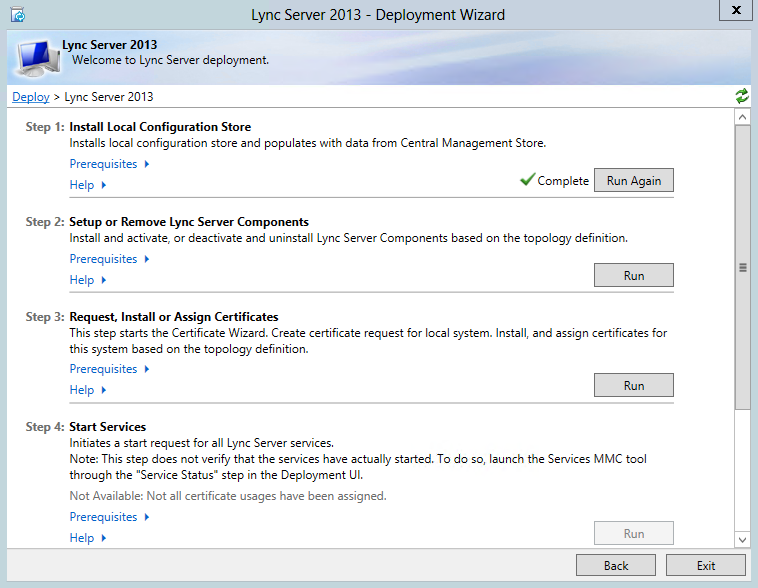
    11. Click Run next to Step 2: Setup or Remove Lync Server Components
      Run Step 2 Setup or Remove Lync Server Components
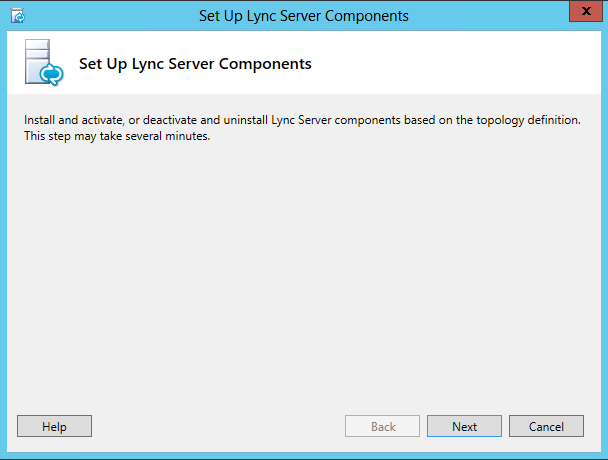
    12. Click Next
      Set up Lync Server Components
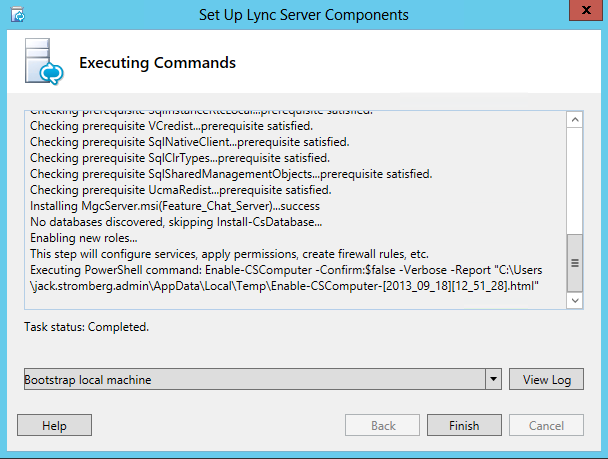
    13. Click Finish
      Set up Lync Server Components - Finish
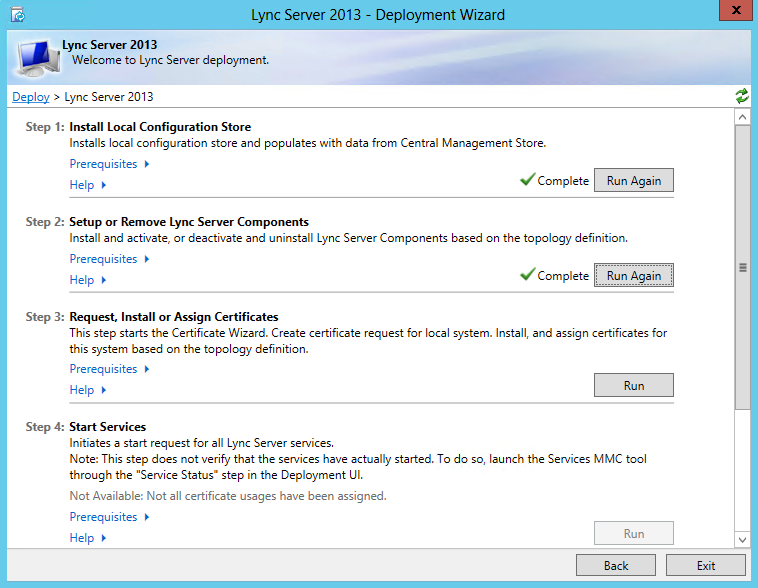
    14. Click Run next to Step 3: Request, Install or Assign Certificates
      Step 3 - Request, Install or Assign Certificates
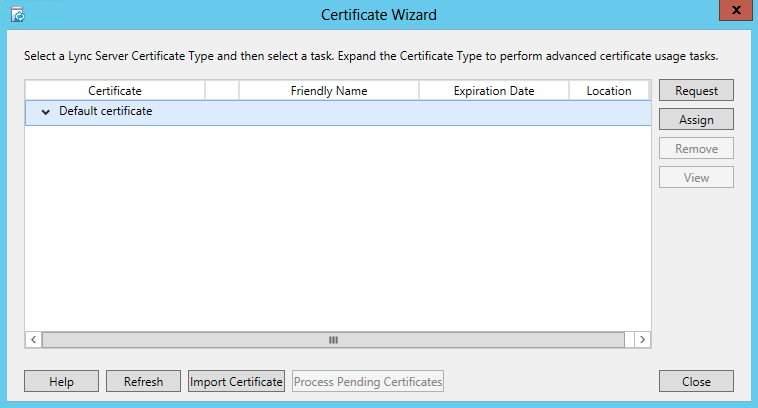
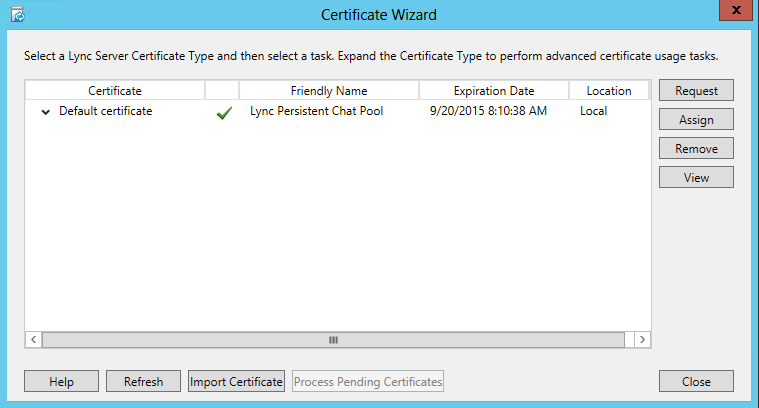
    15. Click Request on the Certificate Wizard screen
      Certificate Wizard - Request
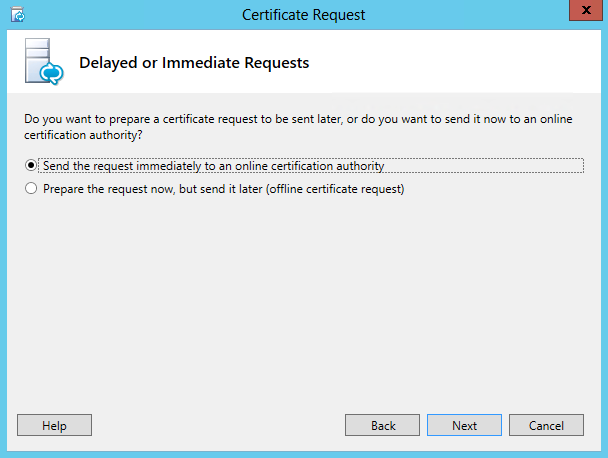
    16. Check Send the request immediately to an online certification authority and hit Next
      Certificate Request - Send the request immediately to an online certification authority
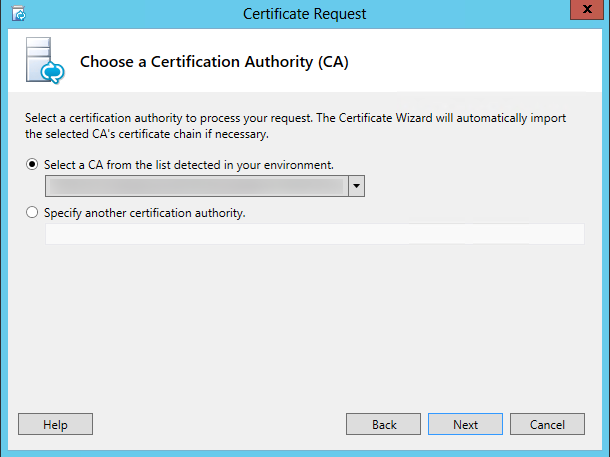
    17. Click Next on the Certification Authority (CA) page
      Certificate Request - Choose a certification authority
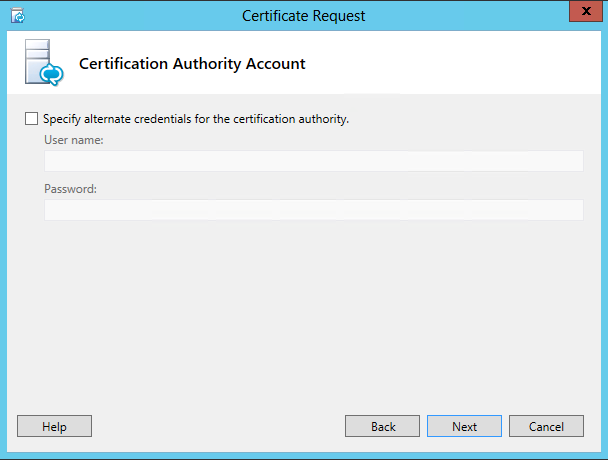
    18. Click Next on the Certification Authority Account page
      Certificate Request - Certification Authority Account
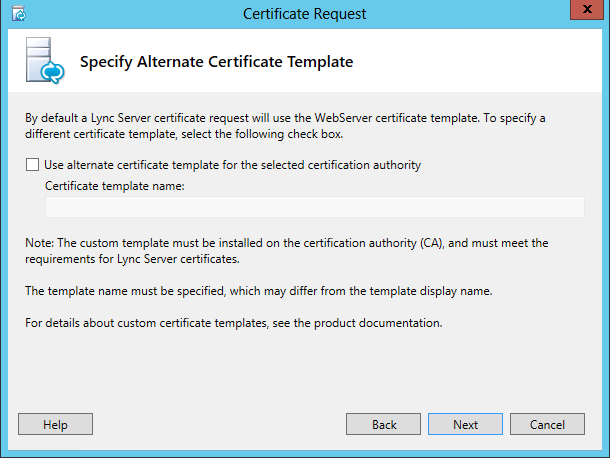
    19. Click Next on the Specify Alternate Certificate Template page
      Certificate Request - Specify Alternate Certificate Template
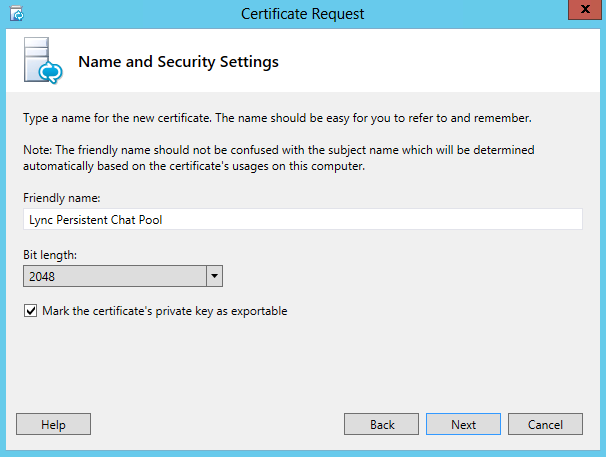
    20. Type in a Friendly name for the certificate (I would just use whatever you used for the Persistent Chat Pool Display Name) and click Next
      Certificate Request - Name and Security Settings

      1. NOTE: If you are deploying multiple servers in the Lync Persistent Chat Pool, make sure to check the Mark the certificate's private key as exportable box.
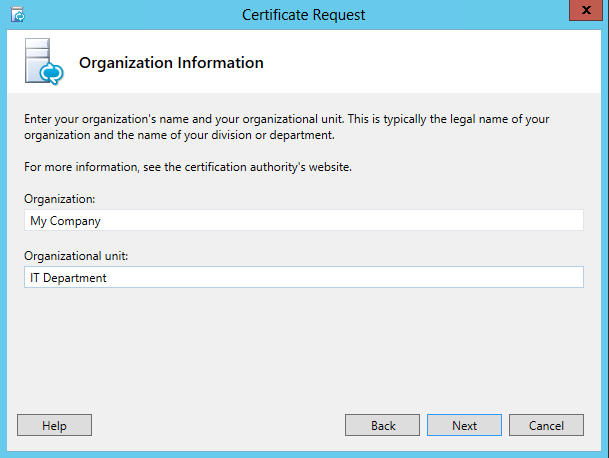
    21. Enter in your Organization and Organizational Unit and hit Next
      Certificate Request - Organization Information
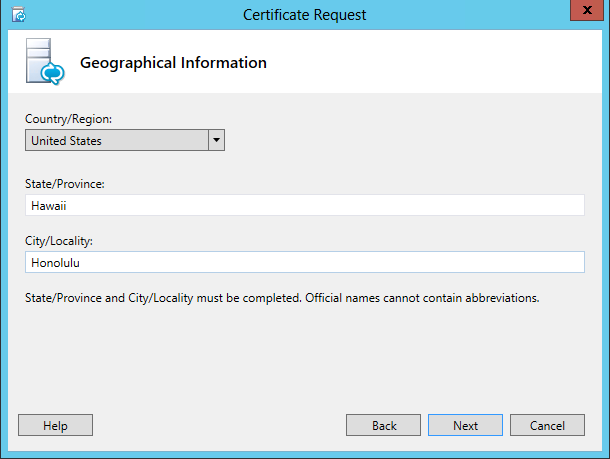
    22. Enter in your Country/Region, State/Province, City/Locality, and hit Next
      Certificate Request - Geographical Information
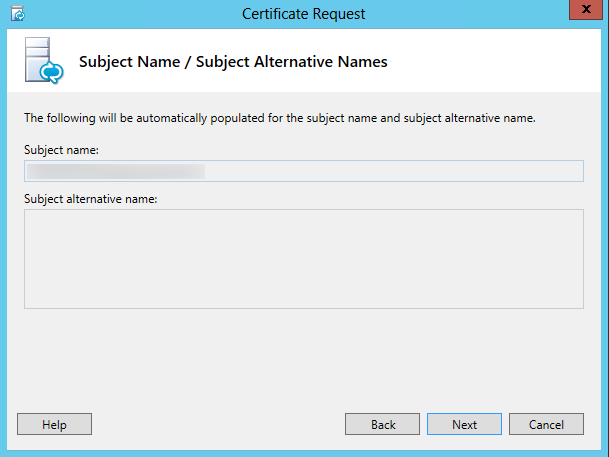
    23. Hit Next on the Subject Name / Subject Alternative Names screen
      Certificate Request - Subject Name - Subject Alternative Names
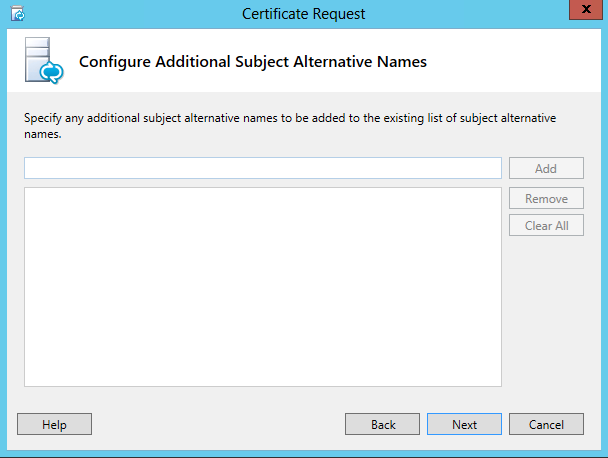
    24. Hit Next on the Configure Additional Subject Alternative Names screen
      Certificate Request - Configure Additional Subject Alternative Names
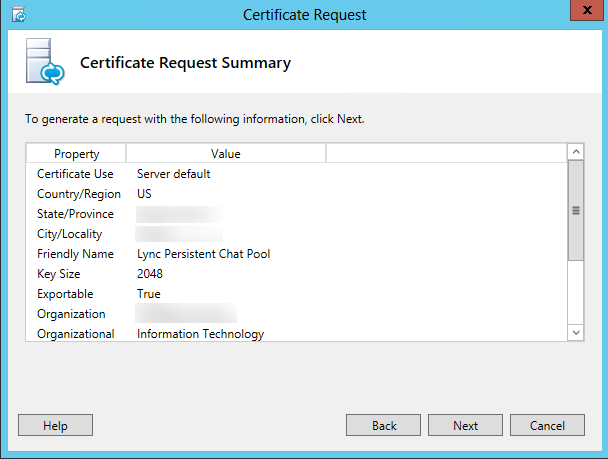
    25. Hit Next on the Certificate Request Summary page
      Certificate Request - Summary
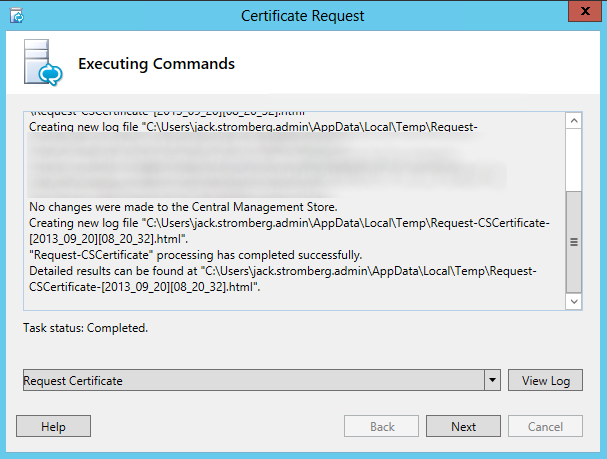
    26. Hit Next once the certificate request process has finished executing commands
      Certificate Request - Executing Commands
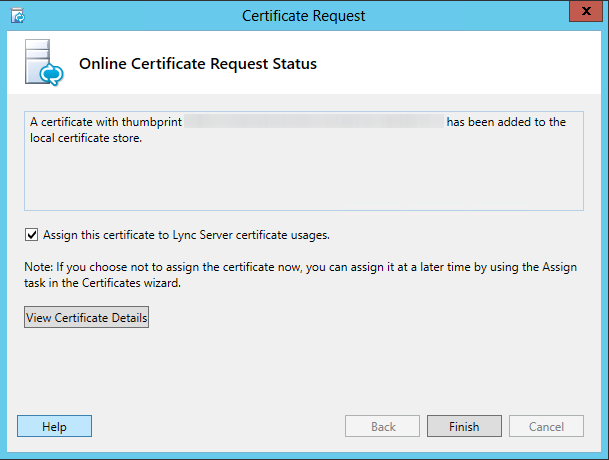
    27. Hit Finish on the Online Certificate Request Status screen
      Certificate Request - Online Certificate Request Status
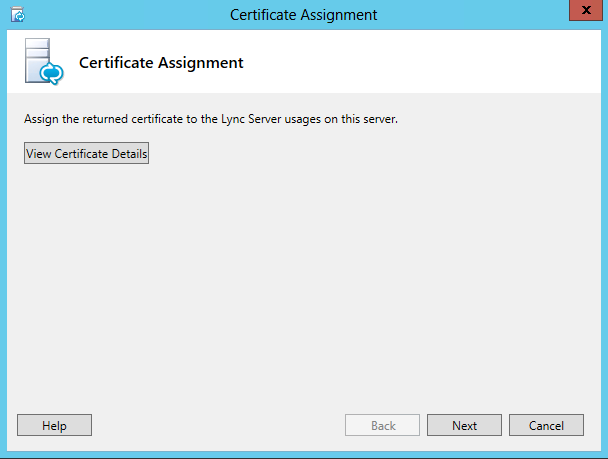
    28. Hit Next on the Certificate Assignment screen
      Certificate Assignment
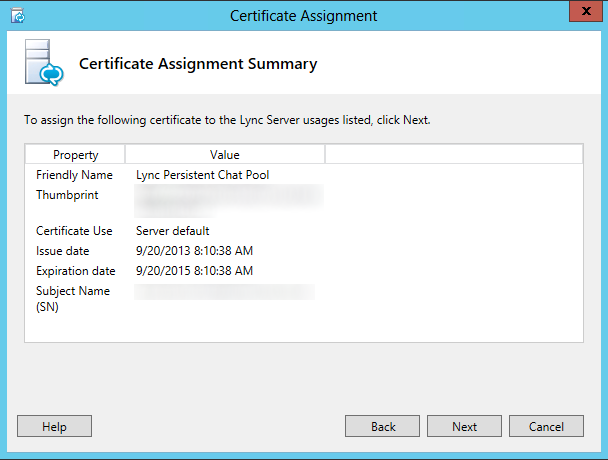
    29. Hit Next on the Certificate Assignment Summary screen
      Certificate Assignment - Summary
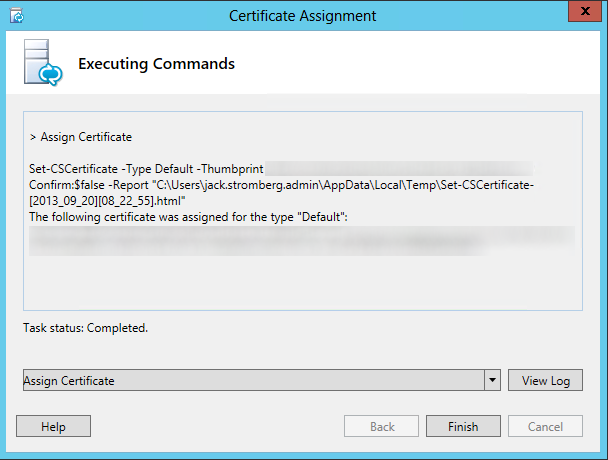
    30. Hit Finish on the Executing Commands screen
      Certificate Assignment - Executing Commands
    31. Close the Certificate Wizard screen
      Certificate Wizard
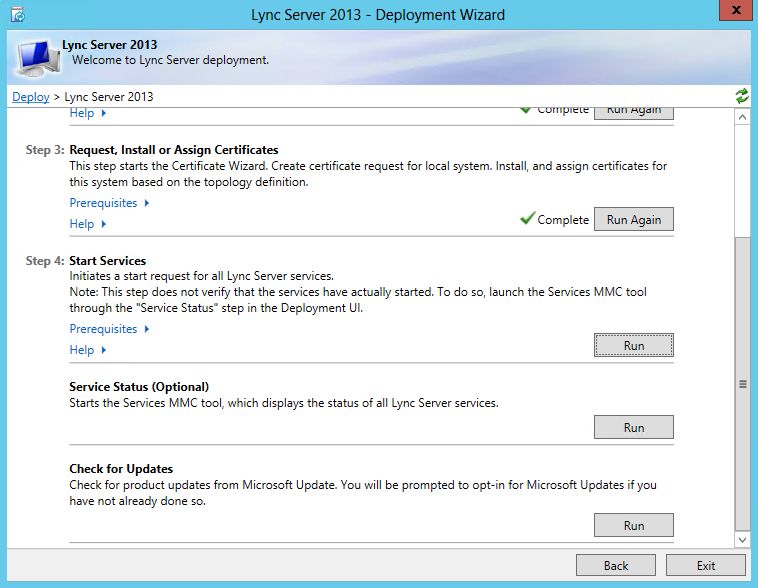
    32. Click Run next to Step 4: Start Services
      Step 4 - Start Services
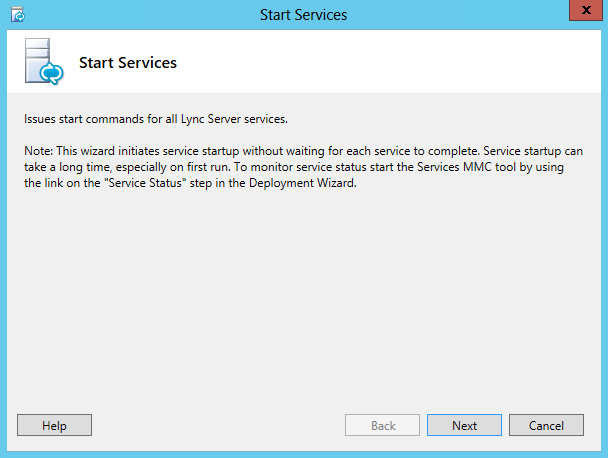
    33. Click Next on the Start Services screen
      Start Services Wizard
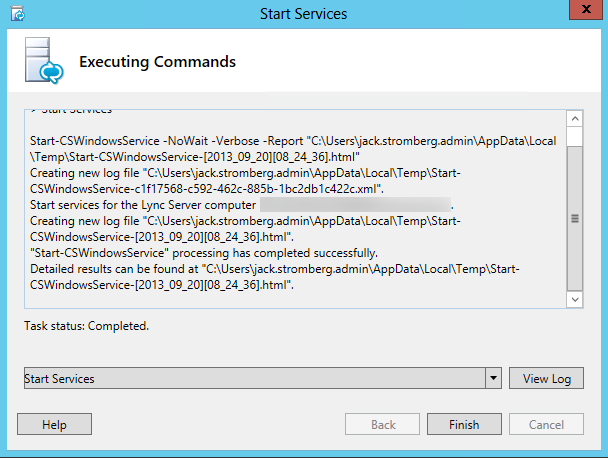
    34. Click Finish on the Executing Commands screen
      Start Services Wizard - Finish
    35. Click Run next to Service Status (Optional)
      Step 4 - Start Services
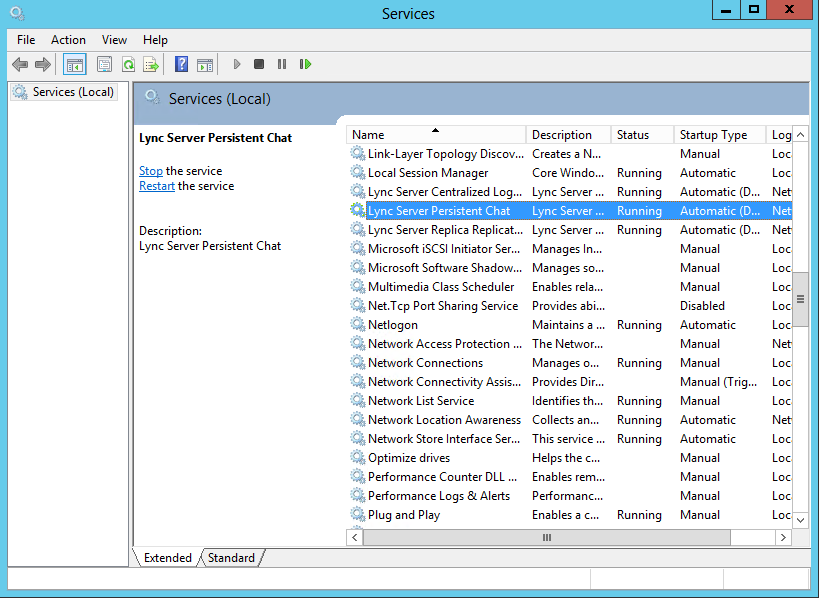
    36. Scroll through the list of services and find Lync Server Persistent Chat and verify it is Running.
      Services - Lync Server Persistent Chat
  17. At this point of the deployment, the infrastructure should be in place to actually push Persistent Chat out to your clients.  Next we will create a test group.
  18. Login to the Lync Admin Panel (Cscp)
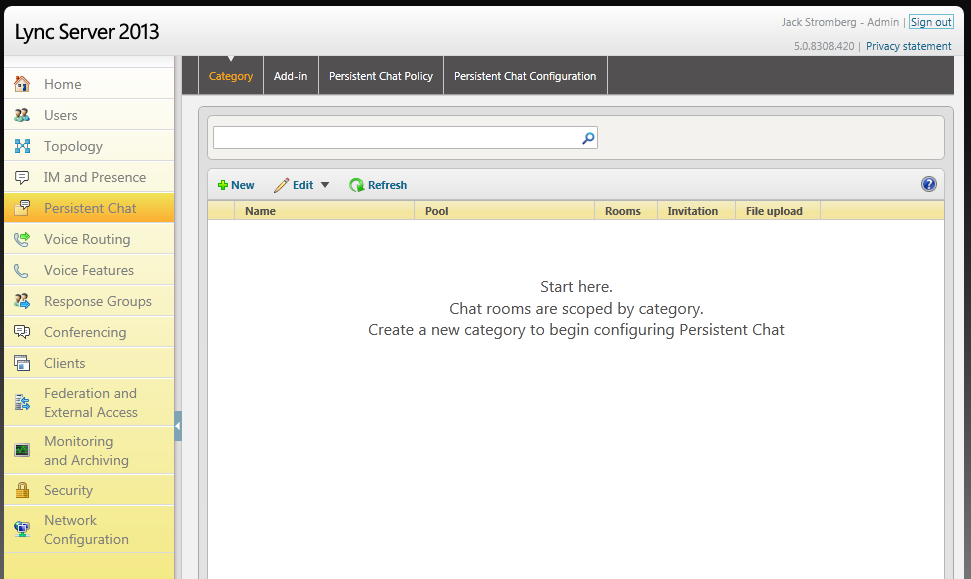
  19. Select the Persistent Chat tab
    cscp - Persistent Chat
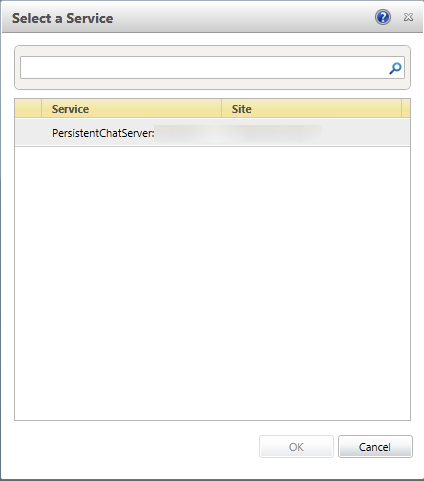
  20. Click New and select your persistent chat pool and click OK
    cscp - Persistent Chat - Select a Service
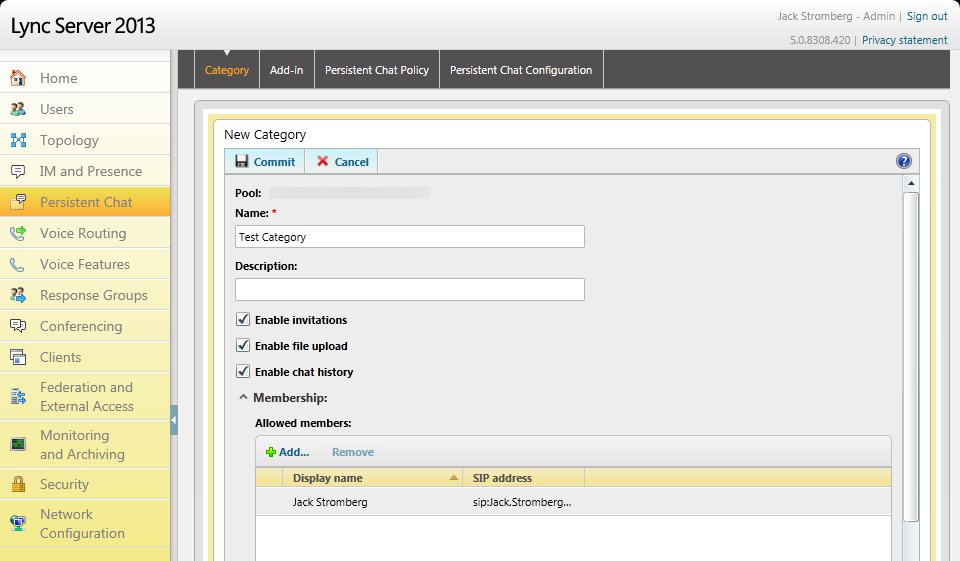
  21. Type in a Name for your persistent chat category and select who can have access to the category.  This category will be the container that holds a set of chatrooms.  Click Commit when finished.
    cscp - Persistent Chat - New Category
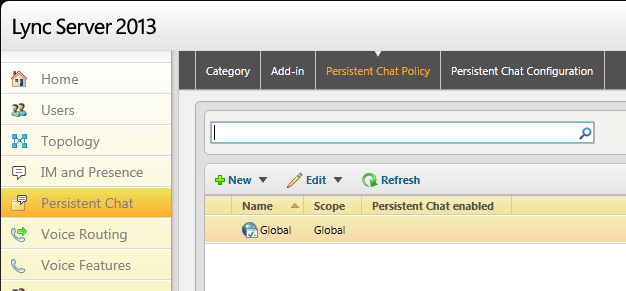
  22. Next, select the Persistent Chat Policy tab and double click on the Global policy.
    cscp - Persistent Chat - Persistent Chat Policy
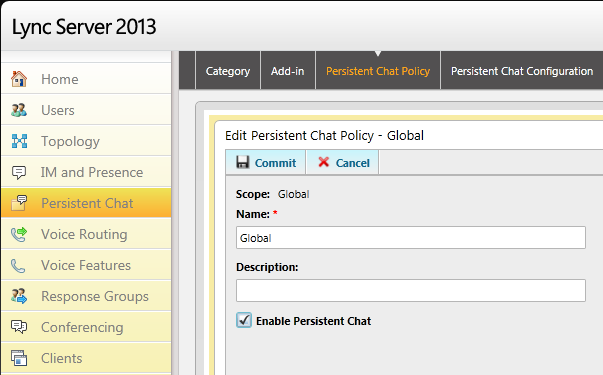
  23. Check Enable Persistent Chat and click Commit
    cscp - Persistent Chat - Edit Global Policy
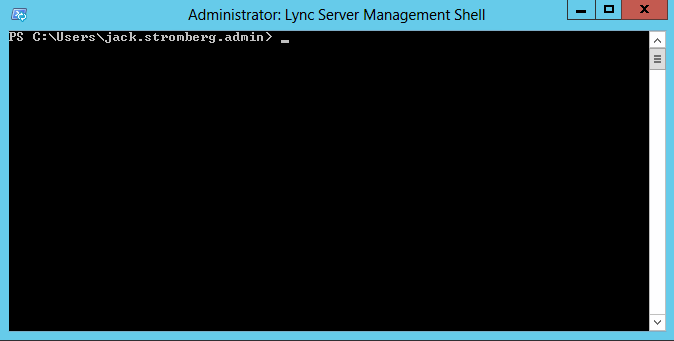
  24. Next, we need to create the actual chatroom.  This step needs to be done via PowerShell, so open up the Lync Server Management Console.
    Lync Server Management Console
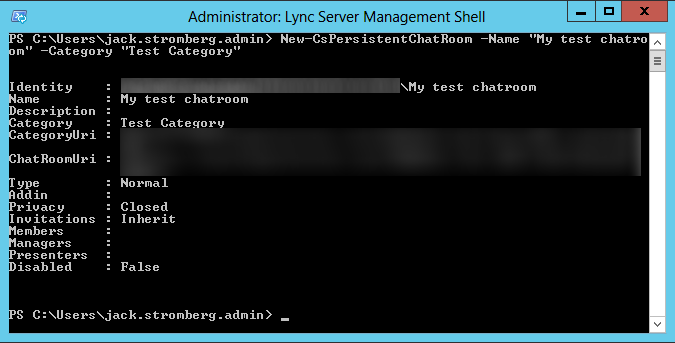
  25. Execute the following command
    New-CsPersistentChatRoom -Name "My test chatroom" -Category "Test Category"
    Lync Server Management Console - New-CsPersistentChatRoom
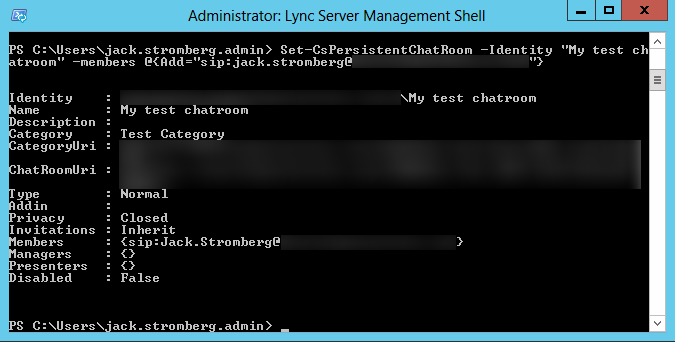
  26. Next, we will assign a user to the chatroom, so execute the following command:
    Set-CsPersistentChatRoom -Identity "My test chatroom" -members @{Add="sip:[email protected]"}
    Lync Server Management Console - Set-CsPersistentChatRoom
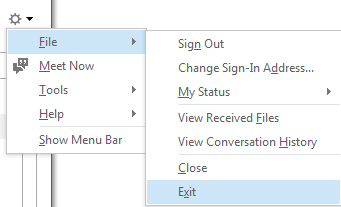
  27. Now, we are ready to join our test chatroom.  First, close your Lync client if it is already running.
    Lync 2013 Client - File - Exit
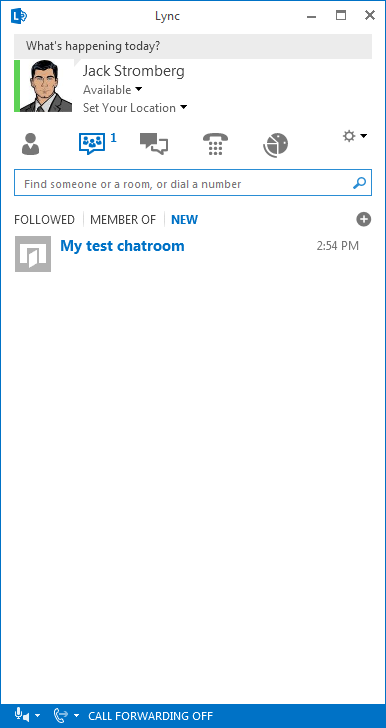
  28. Relaunch Lync, and you should see the persistent chatroom icon.
    Persistent Chat - Chatrooms
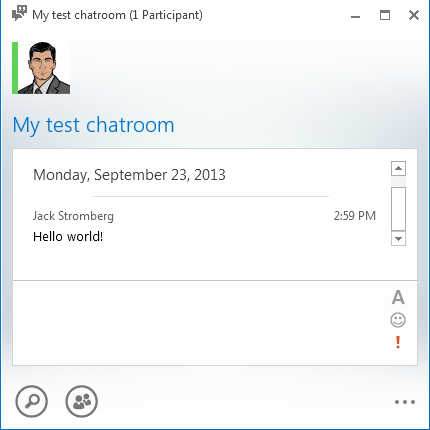
  29. Double click on the chatroom and try sending a message.
    Persistent Chat - Hello World
  30. Congrats!  If you have made it to this point, you should now be able to offer a new collaborative feature to your users at your organization! 🙂

Lync Server 2013 - All the channel servers are down

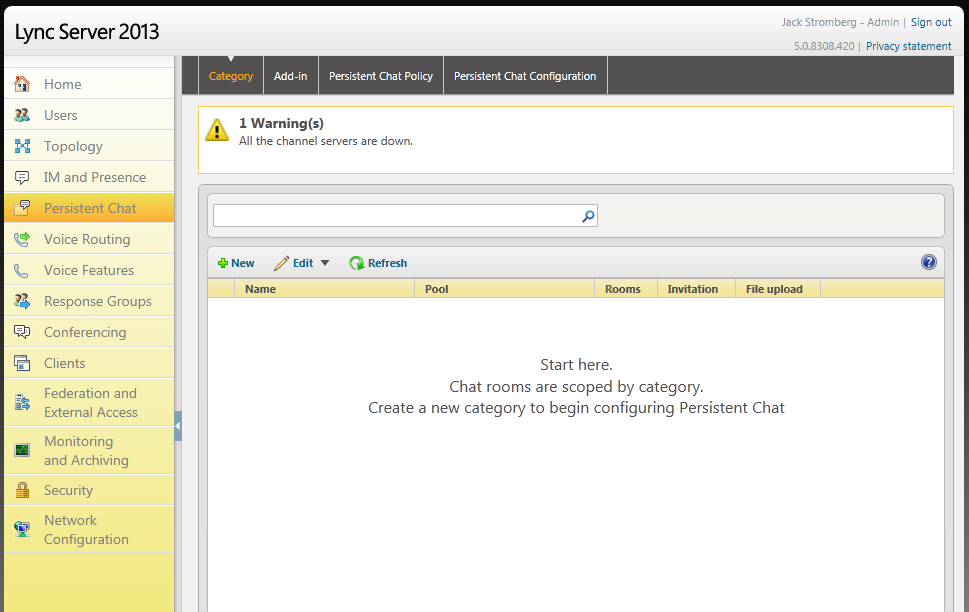
Symptom: After installing the Persistent Chat module for Lync Server 2013, you receive the following error when trying to manage Persistent Chat from the Lync Admin Web GUI (CSCP).

1 Warning(s) All the channel servers are down. All the channel servers are down.

Solution: Unfortunately, there are a few issues that could cause this.  Here are a few that I tried to get things working.

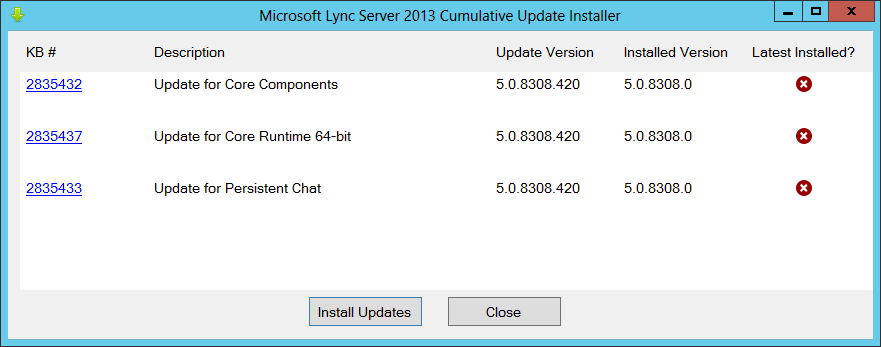
Solution #1: Ensure Cumulative Update 2 is installed.

  1. Download a copy of the Lync Update on the persistent chat server
    1. http://www.microsoft.com/en-us/download/details.aspx?id=36820
  2. Double click LyncServerUpdateInstaller.exe
  3. Click the Install Updates button
    Microsoft Lync Server 2013 Cumulative Update Installer for Persistent Chat
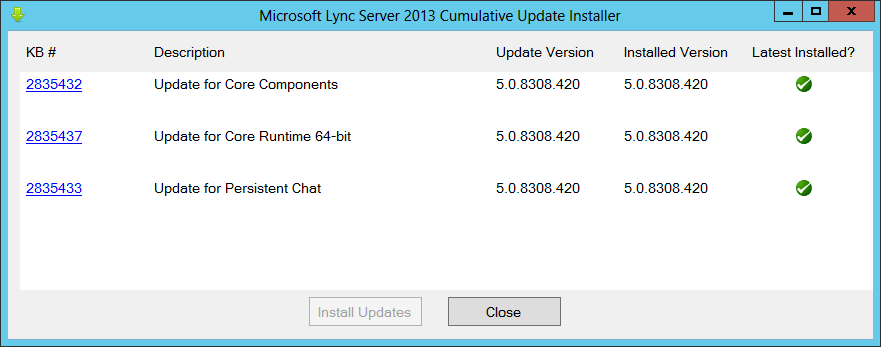
  4. Once all the updates have finished installing, click Close
    Microsoft Lync Server 2013 Cumulative Update Installer for Persistent Chat Updated

Solution #2: Add only 1 server to the pool, then add the rest

  1. Login to one of your front end servers and open up the Lync Server 2013 Topology Builder
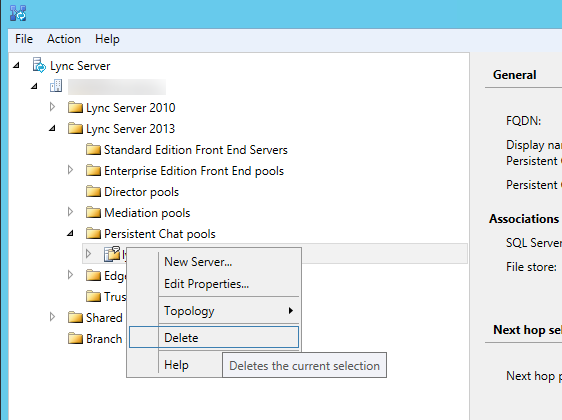
  2. Delete the persistent chat pool you currently have deployed
    Delete Lync Persistent Chat Pool - Topology Builder
  3. Publish your topology
    Publish the Topology
  4. Recreate your persistent chat pool, but only add 1 server during the setup wizard.
    Create new persistent chat pool
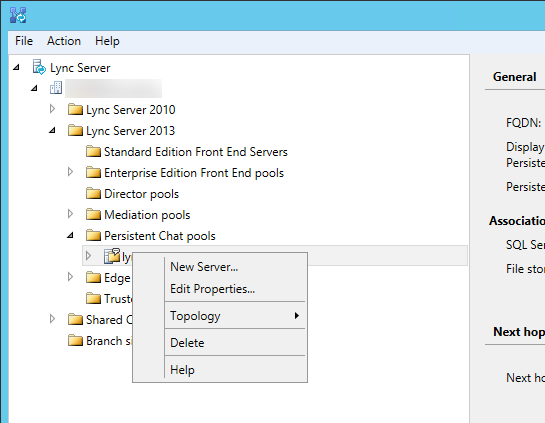
  5. Once done running through the wizard, right click on your persistent chat pool and select New Server...
    New Server - Persistent Chat - Lync Topology Builder

    1. Repeat this until all the servers you wanted to deploy are part of the topology
  6. Publish the topology
    Publish the Topology

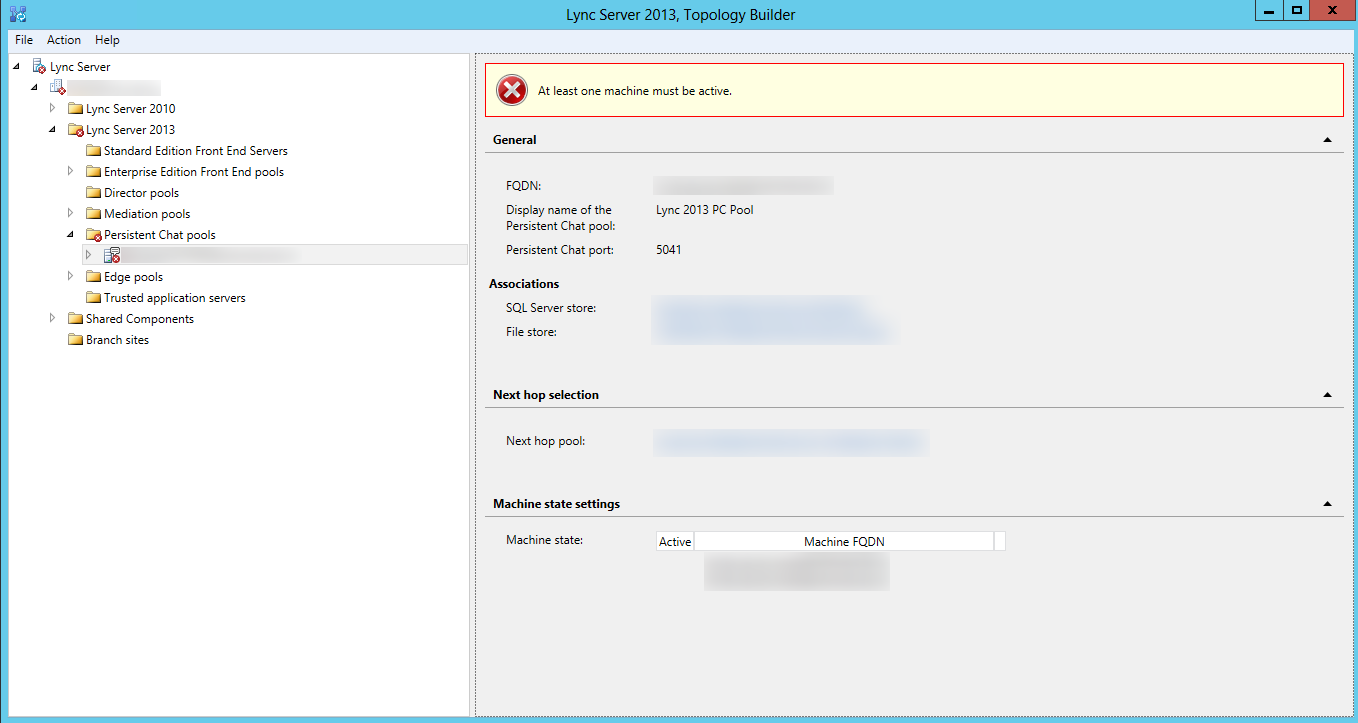
Notes: I couldn't get event viewer to log anything referencing this error, which I thought was weird.   Additionally, I noticed that when originally deploying my topology, the topology wizard was complaining saying that "At least one machine must be active." in order to successfully deploy the persistent chat pool.  I believe this is a bug in the topology builder and the only way I could get the topology builder to deploy properly, was by following Solution #2.  This ensured at least one server in the pool had a machine state marked as "Active".

Here is a screenshot showing the persistent chat servers in an enterprise pool marked as inactive and topology builder complaining with the error "At least one machine must be active."

At least one machine must be active - Lync Persistent Chat - Topology Builder


[Tutorial] Rooting and Installing Cyanogenmod 10.2 w/ Google Apps on the Droid RAZR Maxx

Check out my new tutorial for upgrading to Cyanogenmod 11! http://jackstromberg.com/2013/12/tutorial-rooting-and-installing-cyanogenmod-11-android-4-4-kitkat-w-google-apps-on-the-droid-razr-maxx/

Here are my notes on rooting and installing Cyanogenmod 10.2 on my Motorola RAZR Maxx.

By reading this, you are agreeing that I take no responsibility for what you do with your phone, nor will send me angry emails saying I janked your phone.

  1. Enable USB debugging
    1. Settings->Developer Options->Enable Developer options at the top-> (Hit ok on the notification asking for Allow development settings)->Check USB debugging (Click OK on the Allow USB debugging? dialog).
  2. Download a copy of latest build of Cyanogenmod
    1. http://wiki.cyanogenmod.org/w/Spyder_Info
    2. I am going to live on the edge and install a nightly to get to 10.2.  If you don't want bugs, use a stable version.
    3. Notes: I found a pretty sweet page that lists the nightly changes to the rom.  If you are curious, you can view the nightly changes here: http://10.2.cmxlog.com/?device=xt907
  3. Download a copy of Google Apps
    1. http://wiki.cyanogenmod.org/w/Gapps
    2. By default, Cyanogenmod cannot ship with Google Apps by default, so these will need to be installed manually.  Without these, you will not have Google Play, Music, Maps, etc.  In this case, grab a copy of gApps for 10.2.
  4. Download a copy of RazrBlade, which we will use to exploit the phone and gain root access:
    1. http://cmw.cmfs.me/razrblade/razr_blade_win.zip
  5. Extract the files of the razr_blade_win.zip archieve.
  6. If you are running windows, download a copy of the Motorola drivers to connect your phone.
    1. Motorola x86 drivers: http://goo.im/devs/Hashcode/moto_root/Motorola_End_User_Driver_Installation_5.9.0_32bit.msi
      Motorola x64 drivers: http://goo.im/devs/Hashcode/moto_root/Motorola_End_User_Driver_Installation_5.9.0_64bit.msi
  7. Run through the Motorola driver installation if you are running windows.
  8. Plug your phone in to your machine
  9. Navigate back to the files you extracted, right click Run.bat, run as Administrator
    1. If you are on Linux, execute RootLinux.sh and if you are on Mac OS, execute RootMac.sh
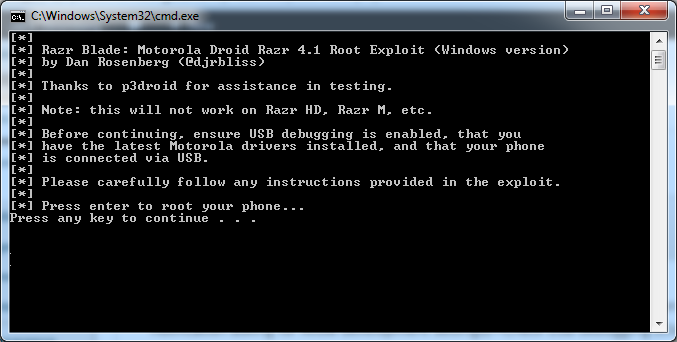
  10. Press any key to continue
    Razr Blade - Phase 1
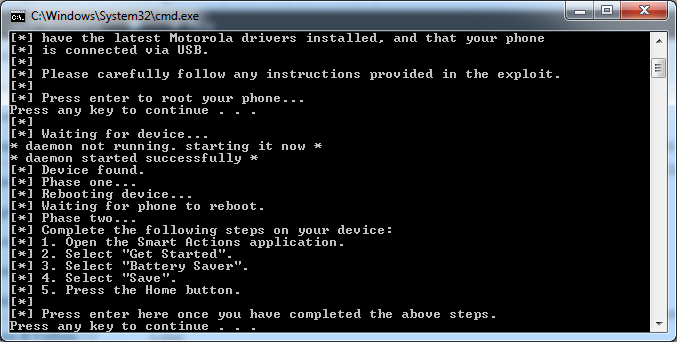
  11. Once your phone has completed phase one (which ends up with a reboot of the phone), complete the following tasks on your phone
    1. Click Apps->SmartActions->Get Started->Next->Battery Saver->Save->Home button
  12. Press any key to continue with "Phase two"
    Razr Blade - Phase 2

    1. Your phone will reboot again
    2. Phase four will start
    3. Your phone will reboot again
  13. After phase four completes, you should be notified the phone has been rooted.
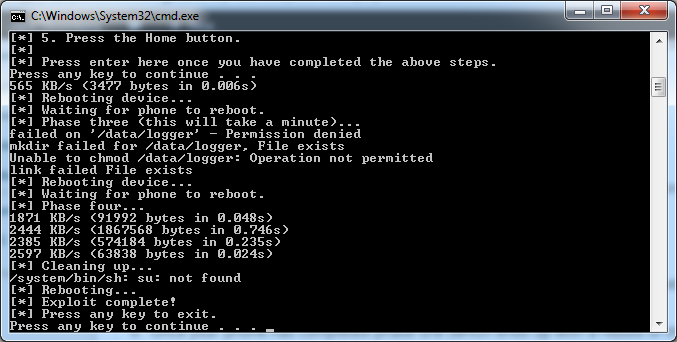
    1. Phase 3 & 4
      Notes: I received some permission errors the first time I ran through this (as shown in the picture above).  I ended up rebooting the phone, making sure I had the latest version of SmartActions and then reran the batch file.  After that, I was able to successfully get the Superuser program (which we talk about next) to run.
  14. Next, grab a copy of Superuser.apk (included inside the razr_blade zip file) and copy it over to the SD card.
  15. At this time, copy over the cyanogenmod zipped file you downloaded earlier.  Throw it on the root of your SD card.
  16. Copy over the gApps zip file we downloaded earlier and throw that on the root of your SD card as well.
  17. Disconnect the phone from the computer and install the SuperUser application.  Apps->Files->SD Card->Superuser.apk, Install, Open.  If it asks to update, go ahead and allow it to update the binaries.
  18. Next, grab a copy of SafeStrap.  We will use this as the bootstrap to flash your phone to Cyanogenmod as well as provide an easy way to switch between different ROMs.
    1. http://goo.im/devs/Hashcode/spyder/safestrap//Safestrap-Spyder-3.63.apk
  19. Copy the file over to your phone
  20. Apps->Files->SD card->Safestrap-RAZR-D4-BIO-3.11.apk->Package installer->Install->Open
  21. Hit Ok when prompted for superuser privileges, and then select Agree.
  22. Once inside the Safestrap application, click Install Recovery.
    1. Once installed, you should see the Recovery State say Installed
  23. Reboot your phone
  24. When you see the Safestrap splash screen, hit the Menu button on your phone.
  25. Once you have hit the Menu button, there will be a brief delay where you screen goes black and then redirects you to one with a couple of big buttons.  Push the button labeled Boot Options.
  26. Push the ROM-Slot-1 button.
  27. Select the size of your data store (I used 3GB, couldn't find any documentation on what that actually does), and then hit Activate.
  28. Once it is done doing its shindig, hit the back button twice to get to the screen that shows Boot Options, Install, Backup, Restore, Mount, Wipe, Advanced, and Reboot.
  29. Push the Install button.
    1. Note, if the Install button is Red, you are going to override your stock ROM.  Make sure that you have activated ROM-Slot-1 before proceeding.
  30. Scroll down and select the Cyanogenmod zip file you copied to the SD card earlier.
  31. Swipe the "Swipe to Confirm Flash" area to begin flashing your phone with Cyanogenmod.
  32. Once done, it should say Successful in blue text.  Hit the Wipe cache/dalvik button.
    1. Swipe the Swipe to Wipe area (lol)
  33. Hit the Back button.
  34. Hit the Reboot System button.
  35. At this point, you should be greeted by the Cyanogenmod welcome screen upon boot.  I opted out of the Cyangenmod account and decided to continue on.
  36. Next, we need to install Google Apps on the phone.  To do this, reboot the phone and press the Menu button when you see the SafeStrap splash screen.
    1. Note, Google Apps are totally optional.  If you want to roll with Stock Cyanogenmod and manually install apps via their APK files for ultra security, that is totally cool.
  37. Hit the Install button.
  38. Select the gApps zip file from your SD card
  39. Swipe the Swipe to Confirm Flash area
  40. Once the apps have been successfully installed, hit the Wipe cache/dalvik button.
  41. Swipe the Swipe to Wipe area
  42. Hit the Back button
  43. Hit the Reboot System button
  44. Once you are greeted by a "Allow Google's location service to collect anonymous location data." prompt, you will know you have successfully installed the Google apps! 😛

That should do it!  Enjoy Cyanogenmod 10.2! 🙂

P.S. Here is the official Cyanogenmod info page for the Motorola Droid RAZR/RAZR MAXX (CDMA)
http://wiki.cyanogenmod.org/w/Spyder_Info

Lync Server 2013 - Installation error: Prerequisite not satisfied: Windows Identity Foundation is required.

Symptom:
You receive the following error when running Step 1: Install Local Configuration Store in the Lync Server 2013 - Deployment Wizard.

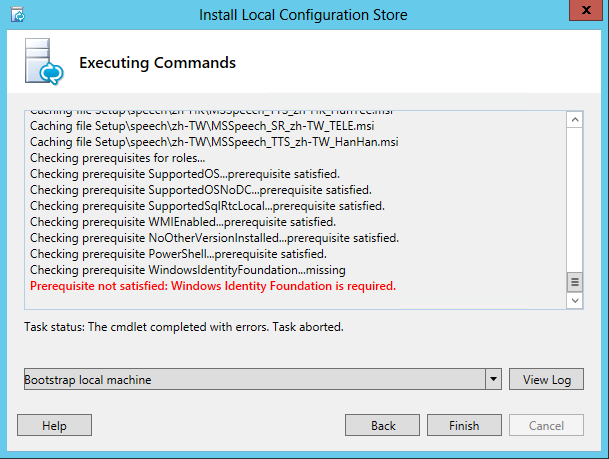
Prerequisite not satisfied: Windows Identity Foundation is required.

Prerequisite not satisfied - Windows Identity Foundation is required.

Solution:
Complete the steps below to install the Windows Identity Foundation.

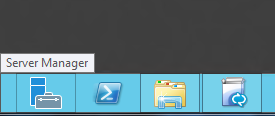
  1. Start Server Manager
    Server Manager
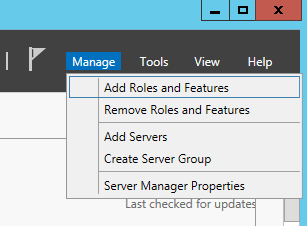
  2. Click Manage -> Add Roles and Features
    Server 2012 - Manage - Add Roles and Features
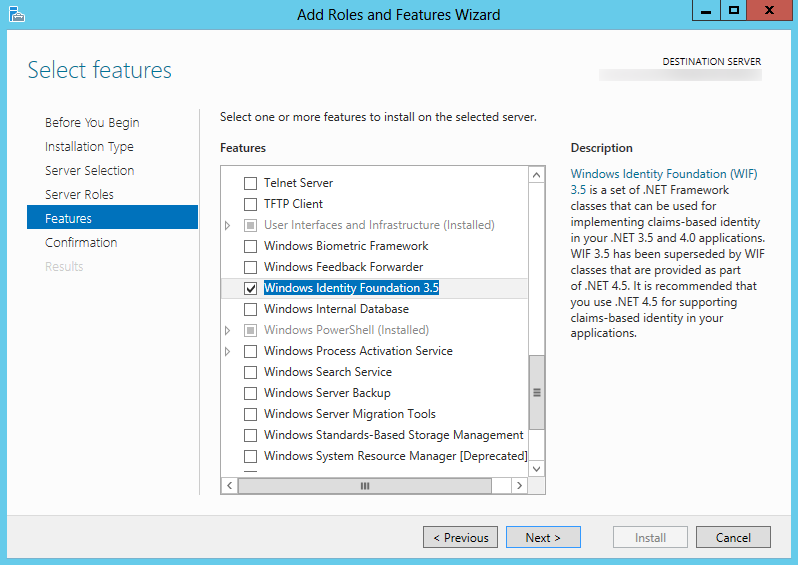
  3. Click on Features on the left side, and then scroll down and check Windows Identity Foundation 3.5.  Click Next >
    Server 2012 - Add Roles and Featuers Wizard - Windows Identity Foundation 3.5
  4. Click Install
    Server 2012 - Add Roles and Featuers Wizard - Windows Identity Foundation 3.5.png - Install
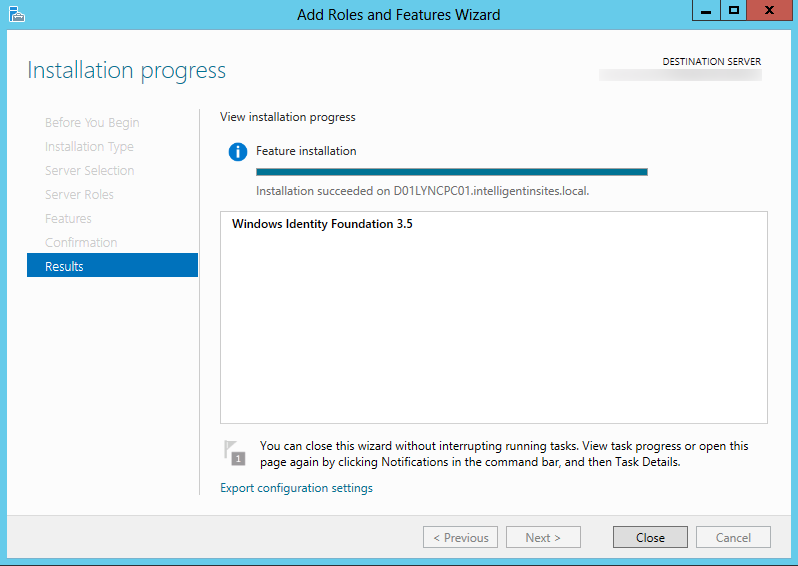
  5. Click Close once the installation has completed.
    Server 2012 - Add Roles and Featuers Wizard - Windows Identity Foundation 3.5.png - Install Finish
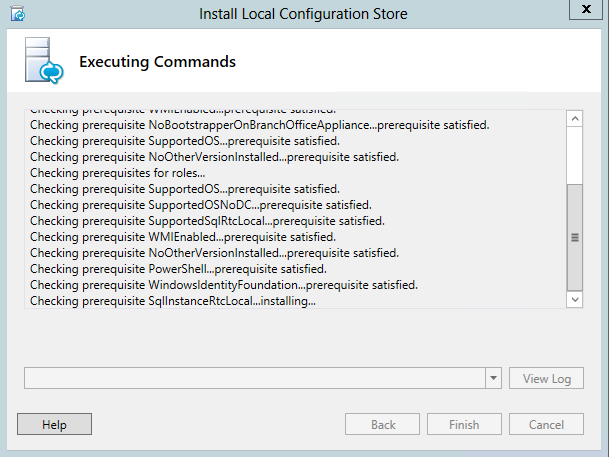
  6. Rerun Step 1: Install Local Configuration Store in the Lync 2013 - Deployment Wizard and you should notice the prerequisite is now satisfied.
    Install Local Configuration Store - WindowsIdentityFoundation prerequisite satisfied

How do I analyze log files off Polycom phones?

We have a boatload of Polycom CX600 phones for our Lync deployment and recently came across one device that would not connect up to the network.  In doing so, I tried to pull the log files off the device, but as you have probably found, there is no web management gui for the phones at all.  Additionally, if you have figured out how to pull the files off the phone, you are probably wondering how you analyze the files as the log files are in a weird format.

  1. Find the IP address of the phone
    1. Press the middle button on the phone, select System Information, and you should see the IP address.
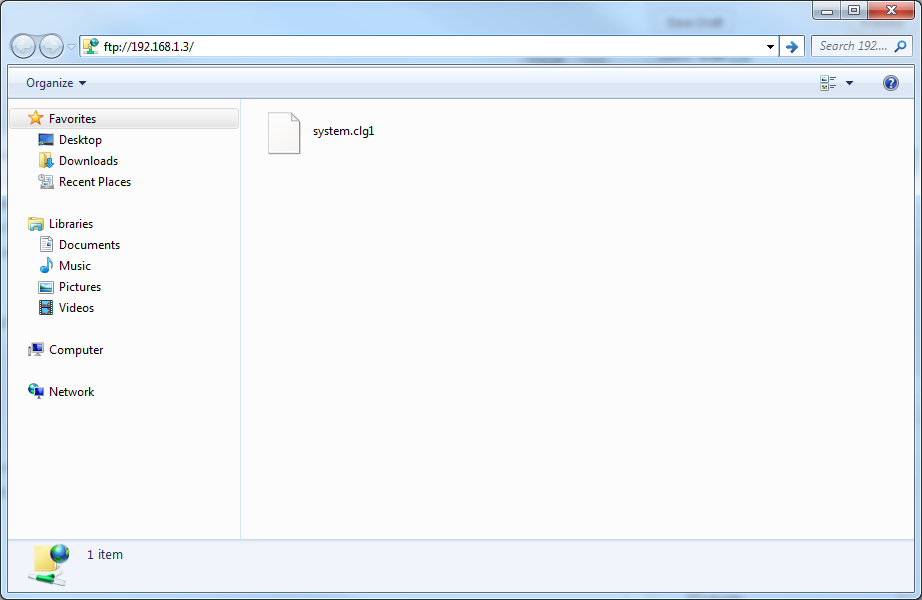
  2. Navigate to ftp://xxx.xxx.xxx.xxx where the x's is the IP address of the phone
    ftp clg file
  3. Copy the clg* files from the phone over to your desktop
  4. Download a copy of readlog.zip (contains readlog.exe)

    1. Please thank user NeedsCoffee over on the technet forum for providing this! 🙂
      http://social.technet.microsoft.com/Forums/lync/en-US/762fd63a-0813-4474-aa2f-8e633d669362/download-readlogexe-to-review-log-files-from-lync-phone-edition-devices#bd3c9cd0-aff5-4473-b616-07fc751a12fe
    2. Please thank John from my comments below for providing another copy
    3. Note: I scanned the version of readfile John provided in the comments below with http://virustotal.com and uploaded it to my site so we don't have to worry about the free upload sites expiring the download.  If you are the original author of this file and do not wish for it to be distributed, please let me know and I will remove the link.  Here are the virustotal results: https://www.virustotal.com/en/file/2a081b552f0d5678122f00ed796e1aeff376d7feb5033adf99149403a0296d61/analysis/1391885100/
  5. Execute the following command to covert the clg file to text
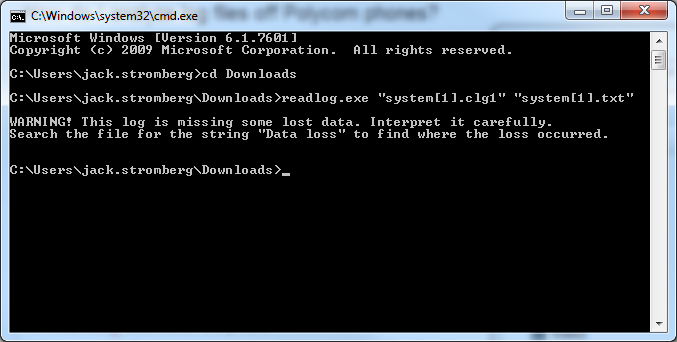
    1. readlog.exe "system[1].clg1" "system[1].txt"
      readlog clg to txt
  6. Open up the text file in notepad
    1. Here you can see some info about the phone trying to pull the certificate from the lync provisioning service.
      clg txt log

That should do it!  The log file contains a lot of debugging information that Polycom can use to figure out what is going on, or every once in awhile you will luck out and see if the phone is having a tough time finding the certificate server, time server, etc.

Enabling TLS 1.2 on IIS 7.5 for 256-bit cipher strength

So strangely enough, I always thought submitting a 2048bit CSR to my CA and receiving a 256-bit SSL cert would automatically force connections to use a 256-bit cipher strength over the established SSL connection, however it turns out that most connections will stay at 128-bit unless you tell your server to utilize TLS 1.2.  In this tutorial, we will go over how to enable TLS v1.2 for IIS to increase the cipher strength to 256-bits.

Here is what a certificate's connection info looked like before the tutorial

SSL Cert Info - 128-bit

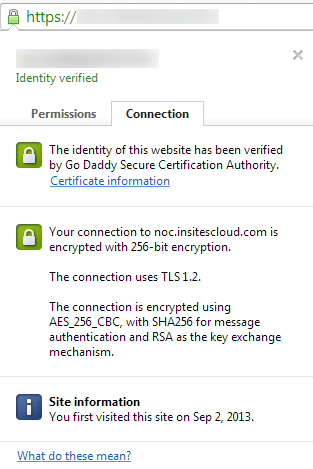
Here is what a certificate's connection info looks like after the tutorial

SSL Cert Info - 256-bit

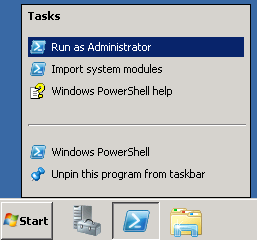
  1. Execute the following commands via an elevated PowerShell command prompt to enable TLS v1.2:
    Elevated Powershell

    1. # Create keys in registry (not created by Windows out of the box)
      md "HKLM:\SYSTEM\CurrentControlSet\Control\SecurityProviders\SCHANNEL\Protocols\TLS 1.2"
      md "HKLM:\SYSTEM\CurrentControlSet\Control\SecurityProviders\SCHANNEL\Protocols\TLS 1.2\Server"
      md "HKLM:\SYSTEM\CurrentControlSet\Control\SecurityProviders\SCHANNEL\Protocols\TLS 1.2\Client"
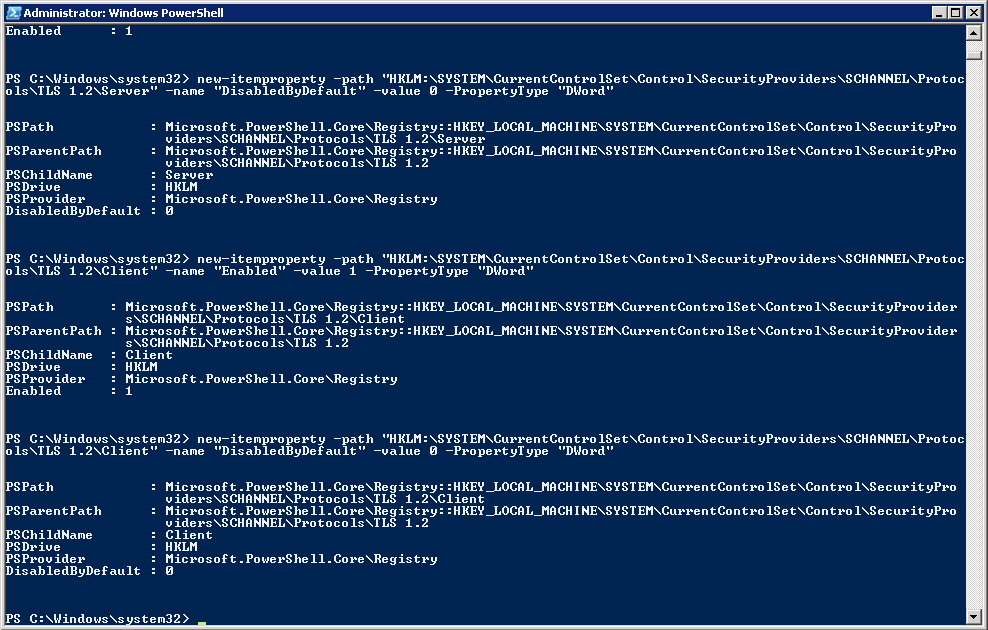
      # Enable TLS 1.2 for client and server SCHANNEL communications
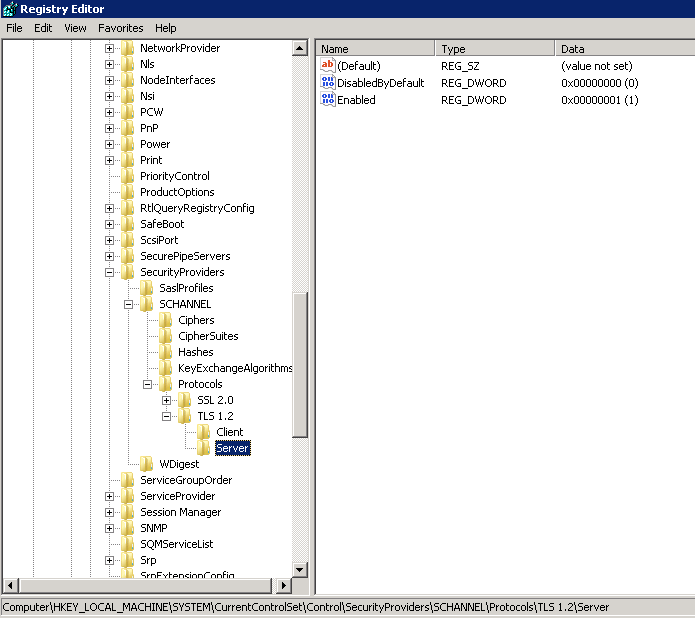
      new-itemproperty -path "HKLM:\SYSTEM\CurrentControlSet\Control\SecurityProviders\SCHANNEL\Protocols\TLS 1.2\Server" -name "Enabled" -value 1 -PropertyType "DWord"
      new-itemproperty -path "HKLM:\SYSTEM\CurrentControlSet\Control\SecurityProviders\SCHANNEL\Protocols\TLS 1.2\Server" -name "DisabledByDefault" -value 0 -PropertyType "DWord"
      new-itemproperty -path "HKLM:\SYSTEM\CurrentControlSet\Control\SecurityProviders\SCHANNEL\Protocols\TLS 1.2\Client" -name "Enabled" -value 1 -PropertyType "DWord"
      new-itemproperty -path "HKLM:\SYSTEM\CurrentControlSet\Control\SecurityProviders\SCHANNEL\Protocols\TLS 1.2\Client" -name "DisabledByDefault" -value 0 -PropertyType "DWord"
      PowerShell TLS 1.2 Registry Edits
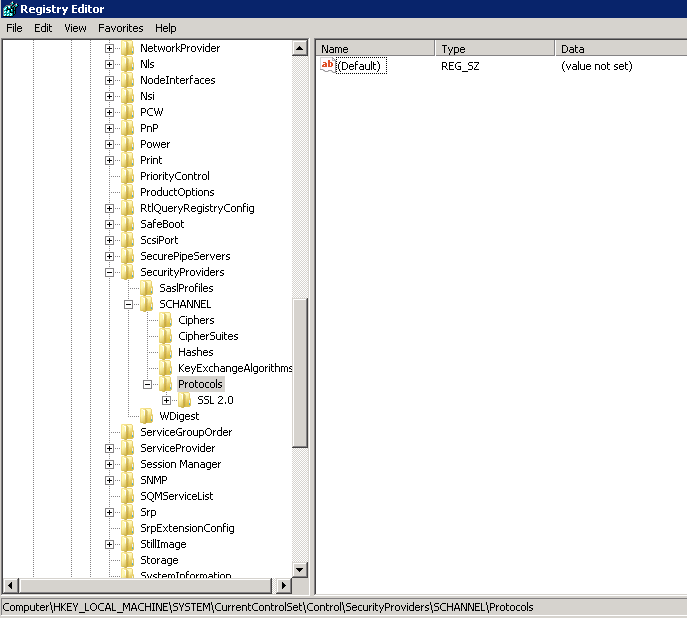
    2. Registry before powershell commands
      Registry - Before TLS v1.2
    3. Registry after powershell commands
      Registry - After TLS v1.2
  2. Next, we need to edit the server to default the use of the 256-bit ciphers
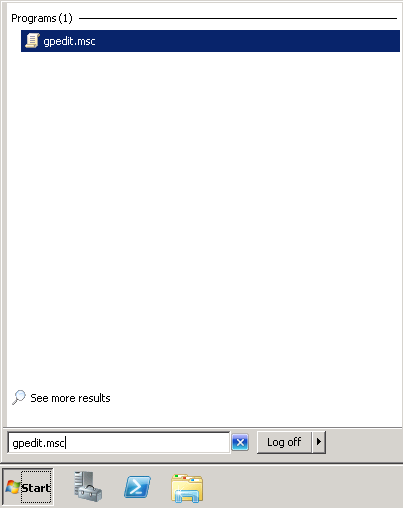
    1. Click Start->gpedit.msc
      Start -> gpedit.msc
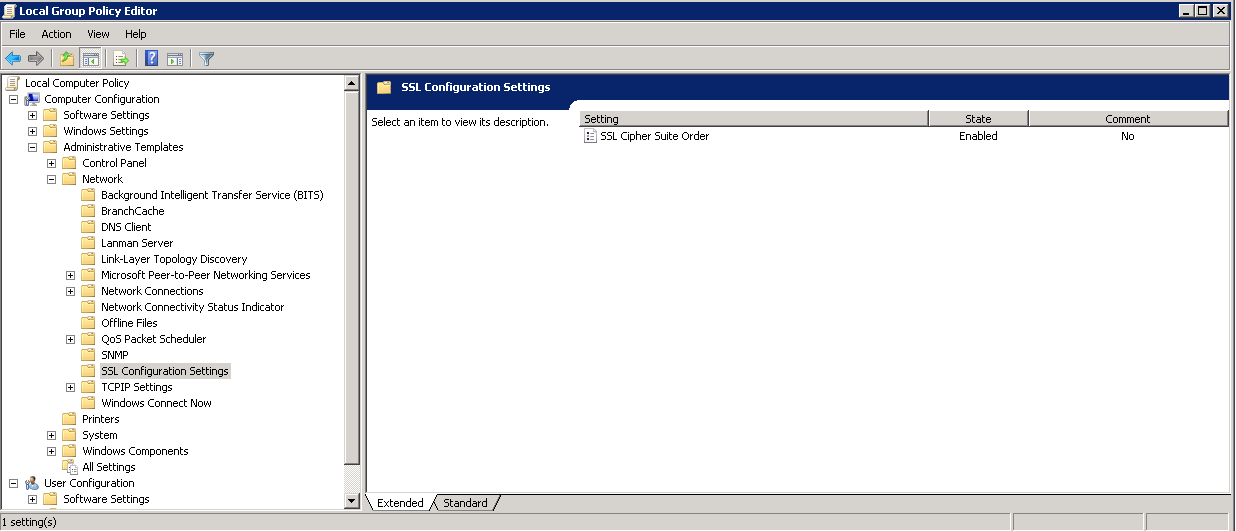
    2. Expand Computer Configuration -> Administrative Templates -> Network and select SSL Configuration Settings
      Group Policy Editor - SSL Configuration Settings
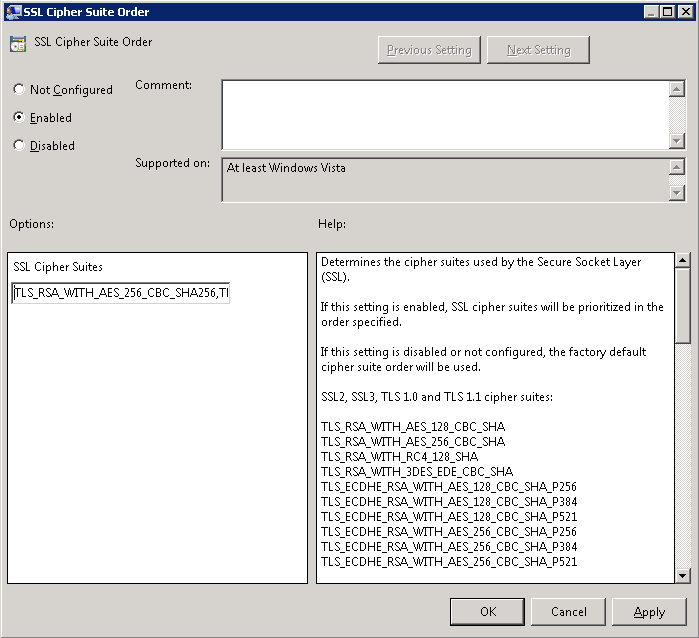
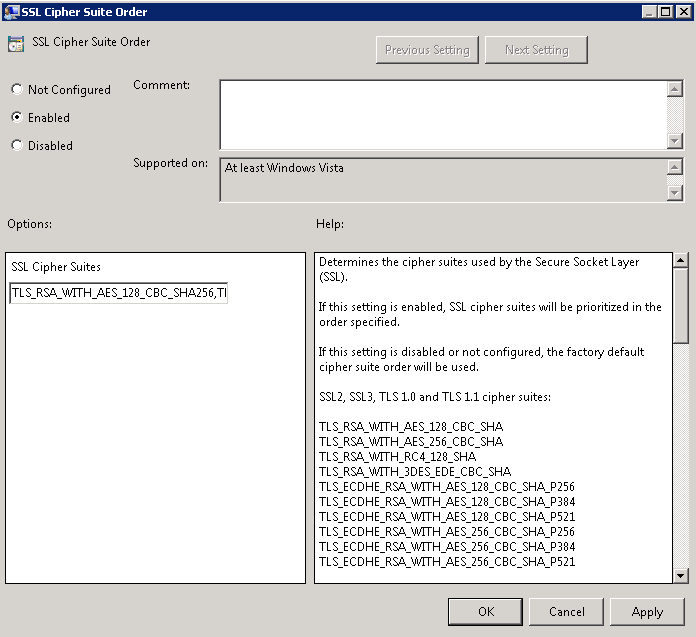
    3. Double click SSL Cipher Suite Order and check Enabled
      SSL Cipher Suite Order 128-bit
    4. Copy the text from the SSL Cipher Suites and paste it into notepad.
      SSL Cipher Suite Order
    5. Move the following to the beginning of the text document: TLS_RSA_WITH_AES_256_CBC_SHA256,TLS_RSA_WITH_AES_256_CBC_SHA (Note: here you could remove lower strength ciphers from the order to prevent the server from accepting those connections).
      TLS_RSA_WITH_AES_256_CBC_SHA256,TLS_RSA_WITH_AES_256_CBC_SHA Cipher Suite order
    6. Paste the Cipher Suites back into the SSL Cipher Suites box in Group Policy and click OK
      SSL Cipher Suite Order 256-bit
    7. Restart the server for the changes to take effect

References:

Changing the order of the Cipher Strengths:
http://social.technet.microsoft.com/Forums/forefront/en-US/ec033ff6-091d-441d-8ad3-7ea411100009/ssl-with-256bit-strength

Original source I found for the quick powershell commands to enable TLS v1.2:
http://www.derekseaman.com/2010/06/enable-tls-12-aes-256-and-sha-256-in.html

Where did FOPE go in the Office 365 Admin Portal?

Today a coworker logged into one of our Office 365 Admin Portals and noticed that the Forefront Online Protection for Exchange (FOPE) link was removed to manage mail flow rules.  After searching the entire admin panel, turns out Microsoft removed access to FOPE and has instead integrated a new "mail flow" area to manage the Exchange rules.  While this is all good and fine, would have been nice to get an email saying the changes to the portal were going to be done.

Any who, here is where you can now begin to create/edit/delete your mailflow rules (note, all previous rules were automatically migrated from Forefront Online Protection for Exchange (FOPE) to what is now called Exchange Online Protection (EOP).

  1. Login to Office 365 Admin Portal
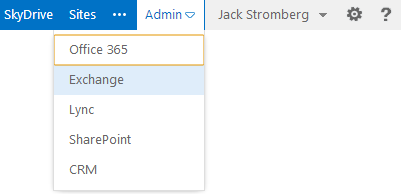
  2. Click on Admin -> Exchange
    Office 365 Admin Portal - Exchange Link
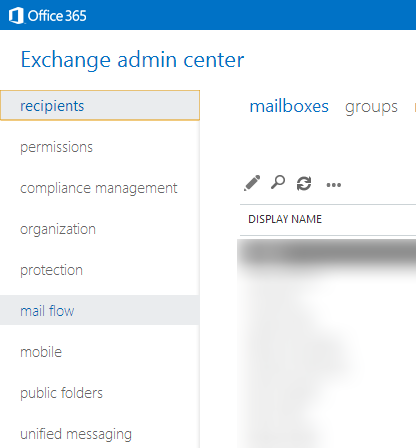
  3. Select the mail flow link on the left
    Exchange admin center - mail flow
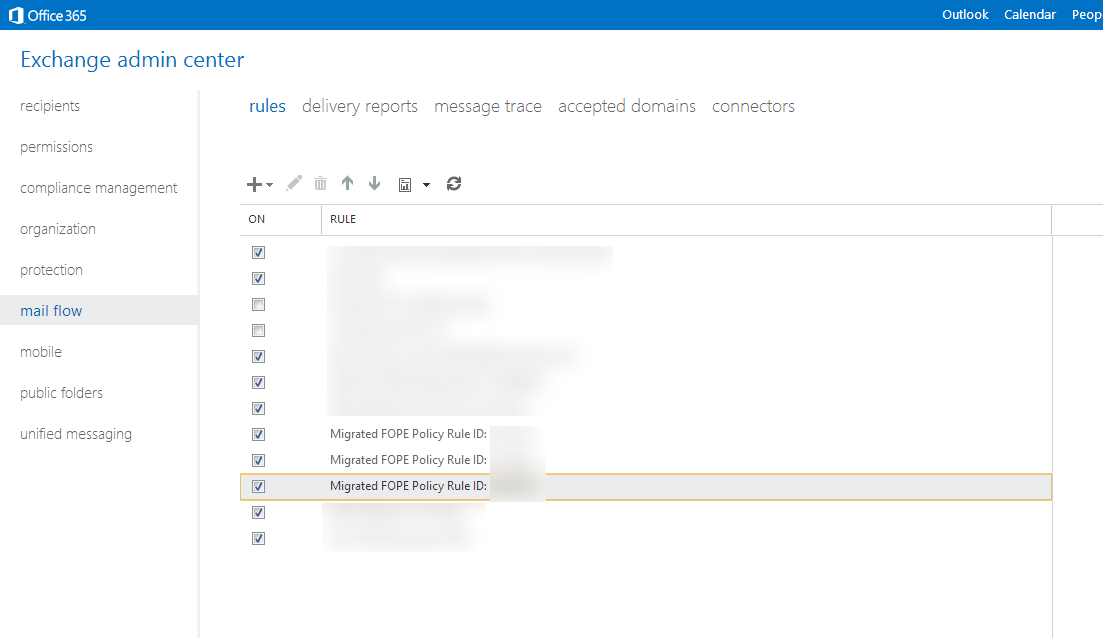
  4. On the rules tab, you can now manage all of the mail rules as you would have done in FOPE.
    1. In the picture below, you can see some of the rules that were automatically moved from FOPE over to Microsoft's new system (Migrated FOPE Policy Rule ID: xxxxxx).
      Exchange admin center - mail flow - rules


Notes: It looks like Microsoft has released one official knowledge base article regarding this, which can be found here: http://technet.microsoft.com/en-us/library/dn308542%28v=exchg.150%29.aspx

Code 80243004 - Windows Update encountered an unknown error.

When trying to install Windows Updates, you receive the following error:

Code 80243004 - Windows Update encountered an unknown error.

Code 80243004 - Windows Update encountered an unknown error

This used to be a documented issue by Microsoft prior to them replacing the page with a fixit installer.  The solution is a super weird workaround.  Please follow the steps below for updates to continue installing.

  1. Right click on the taskbar and select Properties.
    Code 80243004 - Properties
  2. Click the Customize... button on the Taskbar and Start Menu Properties window.
    Code 80243004 - Customize
  3. On the Notification Area Icons window, make sure Always show all icons and notifications on the taskbar is checked and click OK.
    Always show all icons and notifications on the taskbar
  4. At this point, try running Windows Update again and the updates should begin to install properly.

Not sure why this fixes the issue, but it worked for me on a couple of virtual machines running in a VMware environment.  An additional thing I noticed is you can see the tray has "null icons", where they are blanks of open applications; once you hover over them, they disappear/close.  Not sure if this is a bug with Windows and VMware VMs, but just thought it was a weird coincidence.  If you have had this same issue, could you please drop a comment below stating whether or not you received the same issue in a virtual environment?