Tag Archives: Tutorial

[Tutorial] Rooting and Installing Cyanogenmod 11 (Android 4.4 KitKat) w/ Google Apps on the Droid RAZR Maxx

Here are my notes on rooting and installing Cyanogenmod 11 (Android 4.4 KitKat) on my Motorola RAZR Maxx.  This guide follows almost the exact same steps as my previous guide found here: http://jackstromberg.com/2013/09/tutorial-rooting-and-installing-cyanogenmod-10-2-w-google-apps-on-the-droid-razr-maxx/

If you followed my previous tutorial and are trying to upgrade to Cyanogenmod 11, follow this guide starting at step 18.  If you receive Error Status 6 when installing new Cyanogenmod version, please see the notes at the bottom of this guide.

By reading this, you are agreeing that I take no responsibility for what you do with your phone, nor will send me angry emails saying I janked your phone.

  1. Enable USB debugging
    1. Settings->Developer Options->Enable Developer options at the top-> (Hit ok on the notification asking for Allow development settings)->Check USB debugging (Click OK on the Allow USB debugging? dialog).
  2. Download a copy of latest build of Cyanogenmod
    1. http://wiki.cyanogenmod.org/w/Spyder_Info
    2. I am going to live on the edge and install a nightly to get to 11.  If you don't want bugs, use a stable version (As of right now (12/21/2013), Cyanogenmod has not officially released a stable version of Cyanogenmod 11 for the Droid RAZR Maxx).
    3. Notes: I found a pretty sweet page that lists the nightly changes to the rom.  If you are curious, you can view the nightly changes here: http://www.cmxlog.com/11/spyder/
  3. Download a copy of Google Apps
    1. http://wiki.cyanogenmod.org/w/Gapps
    2. By default, Cyanogenmod cannot ship with Google Apps due to legality reasons, so these will need to be installed manually.  Without these, you will not have Google Play, Music, Maps, etc.  In this case, grab a copy of gApps for 11.  If you don't have a program to download torrent files, you will need to download the gApps package from the AFH link provided on the cyanogenmod page.
  4. Download a copy of RazrBlade, which we will use to exploit the phone and gain root access:
    1. For Windows: http://cmw.cmfs.me/razrblade/razr_blade_win.zip
    2. For Mac: http://cmw.cmfs.me/razrblade/razr_blade_mac.zip
    3. For Linux: http://cmw.cmfs.me/razrblade/razr_blade_linux.zip
  5. Extract the files of the razr_blade_XXX.zip archive.
  6. If you are running windows, download a copy of the Motorola drivers to connect your phone.
    1. Motorola x86 drivers: http://goo.im/devs/Hashcode/moto_root/Motorola_End_User_Driver_Installation_5.9.0_32bit.msi
      Motorola x64 drivers: http://www.adbtoolkit.com/drivers/applications/motorola/Motorola_End_User_Driver_Installation_5.9.0_64bit.msi
  7. Run through the Motorola driver installation if you are running windows.
  8. Plug your phone in to your machine
  9. Navigate back to the files you extracted, right click Run.bat, run as Administrator
    1. If you are on Linux, execute RootLinux.sh and if you are on Mac OS, execute RootMac.sh
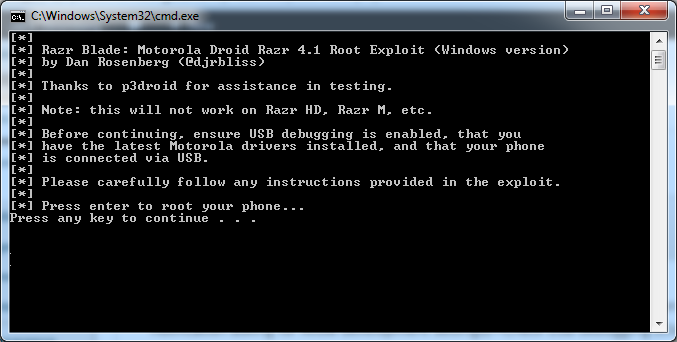
  10. Press any key to continue
    Razr Blade - Phase 1
  11. Once your phone has completed phase one (which ends up with a reboot of the phone), complete the following tasks on your phone
    1. Click Apps->SmartActions->Get Started->Next->Battery Saver->Save->Home button
  12. Press any key to continue with "Phase two"
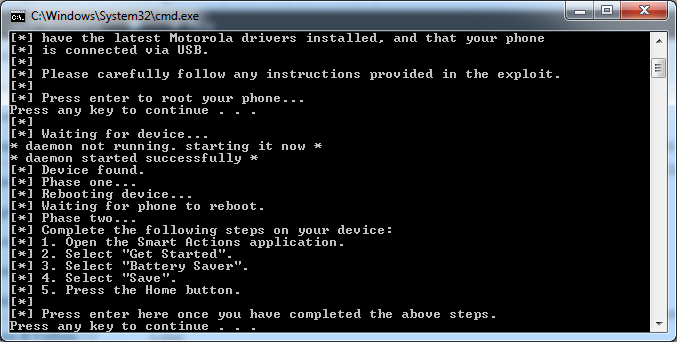
    Razr Blade - Phase 2

    1. Your phone will reboot again
    2. Phase four will start
    3. Your phone will reboot again
  13. After phase four completes, you should be notified the phone has been rooted.
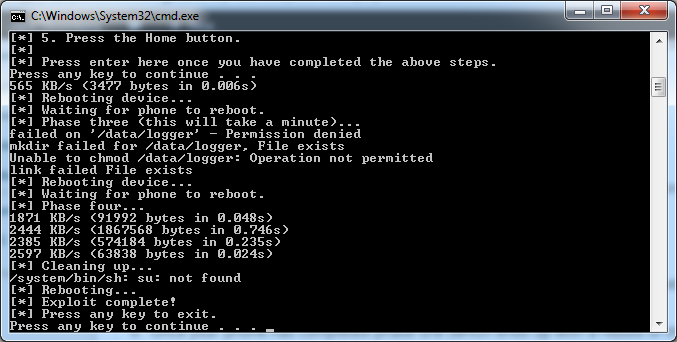
    1. Phase 3 & 4
      Notes: I received some permission errors the first time I ran through this (as shown in the picture above).  I ended up rebooting the phone, making sure I had the latest version of SmartActions and then reran the batch file.  After that, I was able to successfully get the Superuser program (which we talk about next) to run.
  14. Next, grab a copy of Superuser.apk (included inside the razr_blade zip file) and copy it over to the SD card.
  15. At this time, copy over the cyanogenmod zipped file you downloaded earlier.  Throw it on the root of your SD card.
  16. Copy over the gApps zip file we downloaded earlier and throw that on the root of your SD card as well.
  17. Disconnect the phone from the computer and install the SuperUser application.  Apps->Files->SD Card->Superuser.apk, Install, Open.  If it asks to update, go ahead and allow it to update the binaries.
  18. Next, grab a copy of SafeStrap.  We will use this as the bootstrap to flash your phone to Cyanogenmod as well as provide an easy way to switch between different ROMs.
    1. https://goo.im/devs/Hashcode/spyder/safestrap/Safestrap-Spyder-3.73.apk
  19. Copy the file over to your phone
  20. Apps->Files->SD card->Safestrap-Spyder-3.73.apk->Package installer->Install->Open
  21. Hit Ok when prompted for superuser privileges, and then select Agree.
  22. Once inside the Safestrap application, click Install Recovery.
    1. Once installed, you should see the Recovery State say Installed
  23. Reboot your phone
  24. When you see the Safestrap splash screen, hit the Menu button on your phone.
  25. Once you have hit the Menu button, there will be a brief delay where you screen goes black and then redirects you to one with a couple of big buttons.  Push the button labeled Boot Options.
  26. Push the ROM-Slot-1 button.
  27. Select the size of your data store and then hit Activate.
    1. Note: This is the amount of space in the partition for Cyanogenmod operating system and associated apps. If you plan to only use the one slot, I would set the slot to 3GB. If you are going to be using multiple ROM slots and space was is an issue you might want to lower the allocation.
  28. Once it is done doing its shindig, hit the back button twice to get to the screen that shows Boot Options, Install, Backup, Restore, Mount, Wipe, Advanced, and Reboot.
  29. Push the Install button.
    1. Note, if the Install button is Red, you are going to override your stock ROM.  Make sure that you have activated ROM-Slot-1 before proceeding.
  30. Scroll down and select the Cyanogenmod zip file you copied to the SD card earlier.
  31. Swipe the "Swipe to Confirm Flash" area to begin flashing your phone with Cyanogenmod.
  32. Once done, it should say Successful in blue text.  Hit the Wipe cache/dalvik button.
    1. Swipe the Swipe to Wipe area (lol)
  33. Hit the Back button.
  34. Hit the Reboot System button.
  35. At this point, you should be greeted by the Cyanogenmod welcome screen upon boot.  I opted out of the Cyangenmod account and decided to continue on.
  36. Next, we need to install Google Apps on the phone.  To do this, reboot the phone and press the Menu button when you see the SafeStrap splash screen.
    1. Note: Google Apps are totally optional.  If you want to roll with Stock Cyanogenmod and manually install apps via their APK files for ultra security, that is totally cool.
    2. Note 2: If you receive an error saying "unable to mount '/osh' gapps", simply ignore the error and boot back into Cyanogenmod.  I received this error, but all the Google Apps seemed to have installed just fine.
  37. Hit the Install button.
  38. Select the gApps zip file from your SD card
  39. Swipe the Swipe to Confirm Flash area
  40. Once the apps have been successfully installed, hit the Wipe cache/dalvik button.
  41. Swipe the Swipe to Wipe area
  42. Hit the Back button
  43. Hit the Reboot System button
  44. Once you are greeted by a "Allow Google's location service to collect anonymous location data." prompt, you will know you have successfully installed the Google apps! 😛

That should do it!  Enjoy Cyanogenmod 11! 🙂

Notes:

If you receive the following error when trying to install the Cyanogenmod 11 package:

Finding update package...
Opening update package...
Installing update...
E: Error in /sdcard-ext/cm-11-2013-12-21-NIGHTLY-spyder.zip (Status 6)
Error flashing zip '/sdcard-ext/cm-11-2013-12-21-NIGHTLY-spyder.zip'

Please make sure you have upgraded to the latest version of SafeStrap.  SafeStrap v3.65 or higher must be installed for Cyanogenmod 11 to properly install.  As a heads up, you will need to open the SafeStrap app and press the Install Recovery button to actually get SafeStrap to upgrade to the latest version.  Simply upgrading the SafeStrap apk file will NOT complete the upgrade.

P.S. Here is the official Cyanogenmod info page for the Motorola Droid RAZR/RAZR MAXX (CDMA)
http://wiki.cyanogenmod.org/w/Spyder_Info
[Tutorial] Setting up and installing persistent chat for Lync Server 2013

Here is how to configure persistent chat for your Lync 2013 deployment.

  1. Login to your Lync Front End Server and start the Lync Server Topology Builder
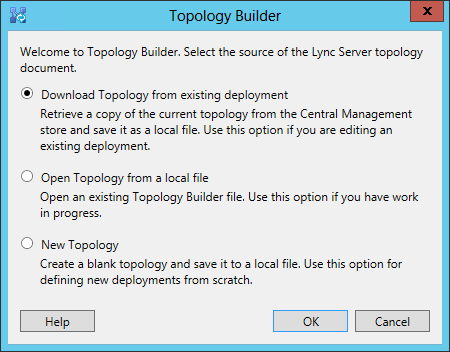
  2. When the Topology Builder window opens, select Download Topology from existing deployment and select OK
    Download Topology from existing deployment
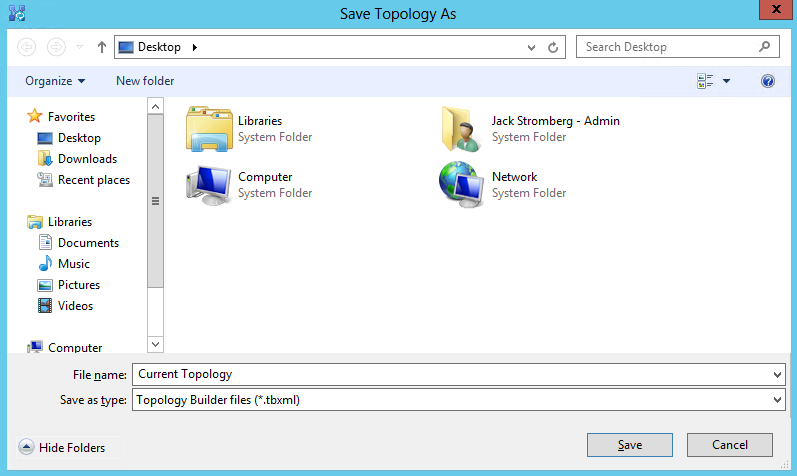
  3. Save the file to your desktop
    Save current topology
  4. Expand Lync Server -> Your Site -> Lync Server 2013 -> Persistent Chat pools
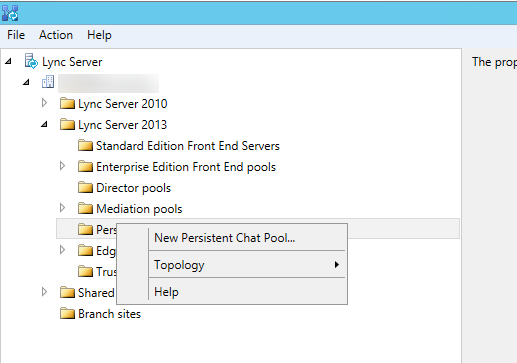
  5. Right click Persistent Chat pools and select New Persistent Chat Pool...
    Create new persistent chat pool
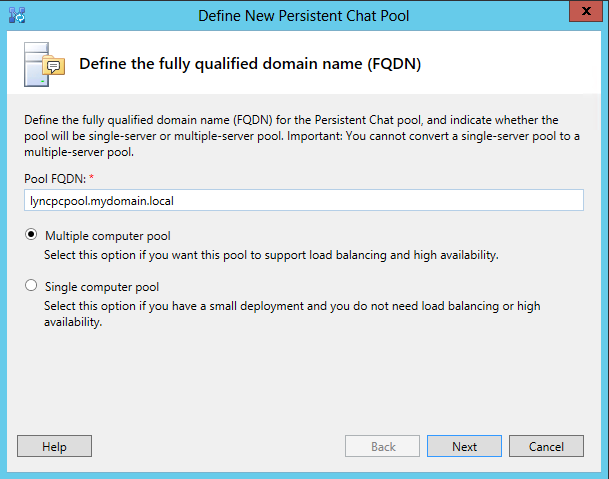
  6. On the Define the fully qualified domain name (FQDN) page, enter the FQDN your standard front end server and check Single computer pool.  If you want to deploy a highly available environment for persistent chat, you will need to deploy 2 new machines to put into a persistent chat pool and check Multiple computer pool.  It is not supported by Microsoft at this time to collocate the persistent chat service on the same machines in an enterprise front end pool.  Once done, click Next.
    Define New Persistent Chat Pool

    1. In this tutorial, I am going to go over deploying persistent chat in a highly available environment.
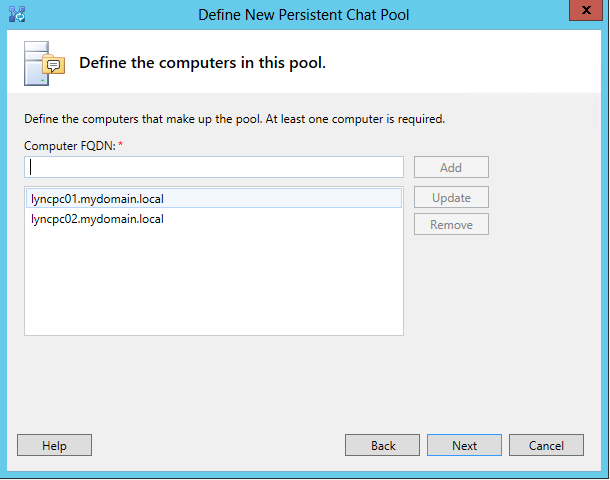
  7. If you clicked on Multiple computer pool, enter in the machine names where the persistent chat service will be installed, and click Next.
    Define computers in persistent chat pool
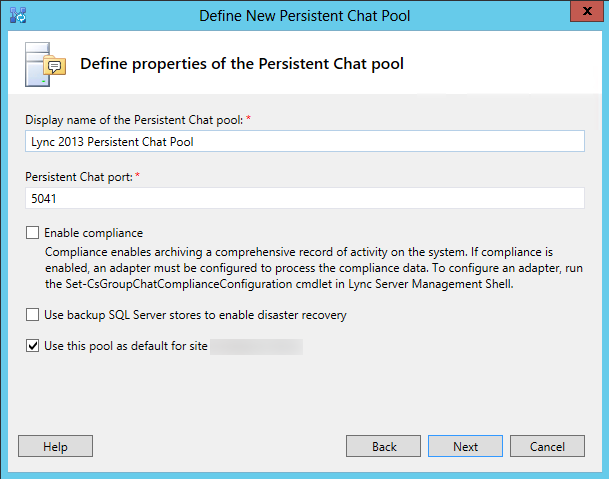
  8. On the Define properties of the Persistent Chat pool page, enter in the Display name of the Persistent Chat pool (you can name this whatever you would like to) and click Next
    Define properties of the persistent chat pool
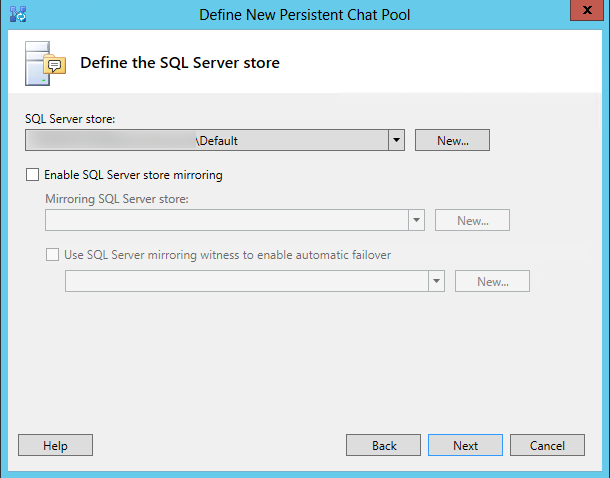
  9. Select the SQL Server store you wish to use and select Next
    Define SQL Server Store for the persistent chat pool
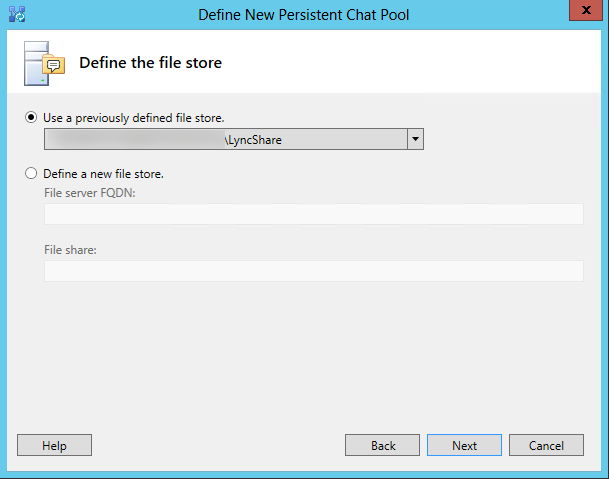
  10. Select or create a new file store and click Next
    Define the file store for the persistent chat pool
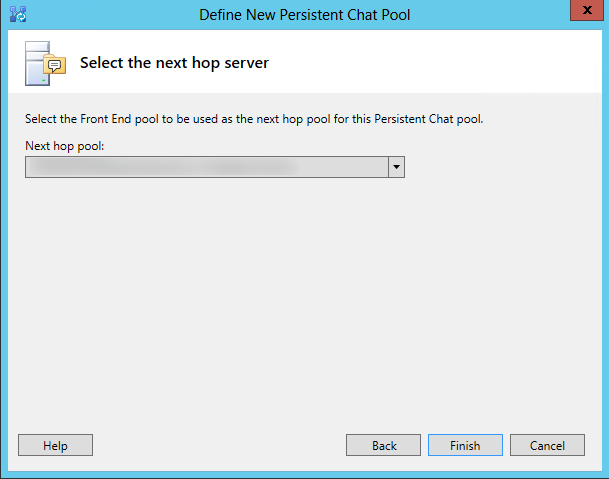
  11. Select the Front End pool/server as the next hop pool and click Finish
    Define the next hop server for the persistent chat pool
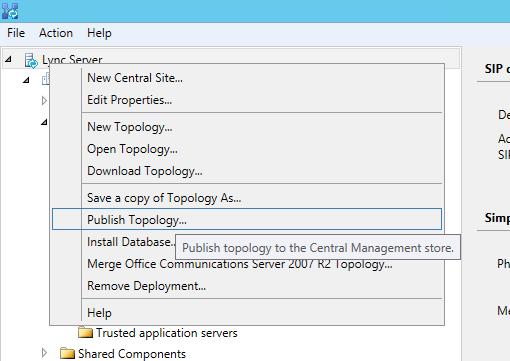
  12. Once done with the Persistent Chat wizard, right click on Lync Server in the Topology Builder and select Publish Topology...
    Publish the Topology
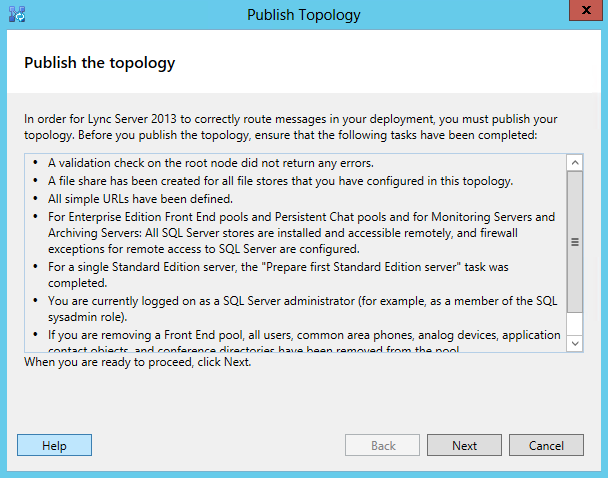
  13. Click Next on the Publish the topology window
    Publish the Topology Wizard
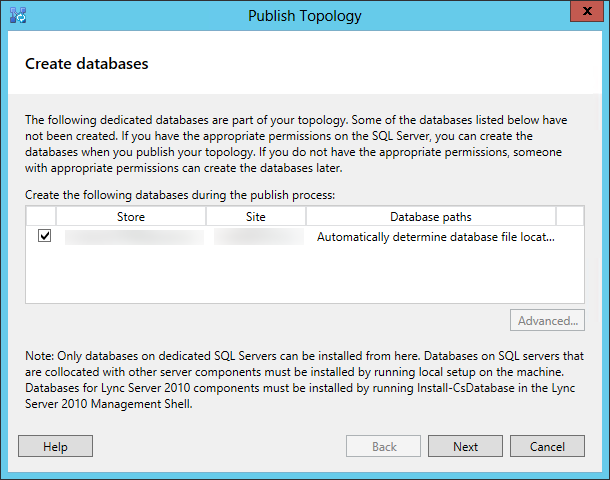
  14. Click Next on the Create databases screen
    Publish the Topology Wizard - Create databases
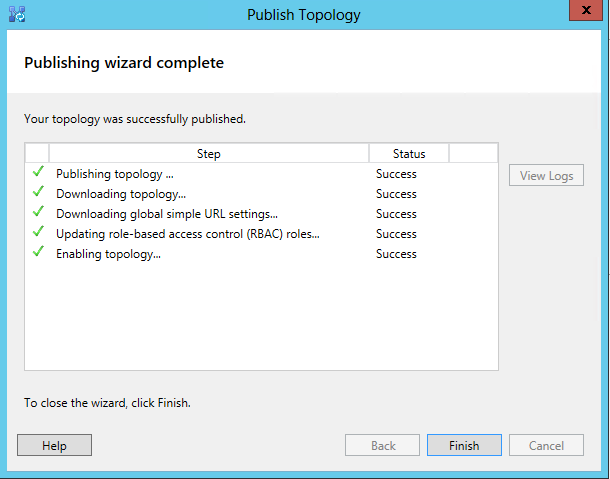
  15. Click Finish once the topology has been published
    Publish the Topology - complete
  16. Complete the following steps on each of the Persistent Chat servers you created
    1. Login to the server that will be running the persistent chat service
    2. Copy/mount the Lync Server 2013 installation media
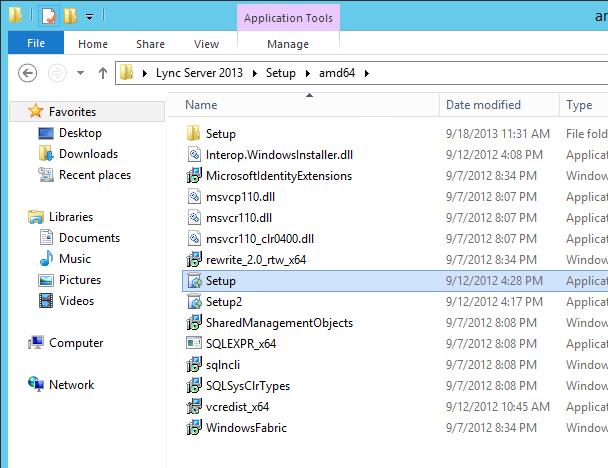
    3. Run the setup.exe program from the Lync Server 2013 installation media
      Lync Server 2013 Installation Media - Setup
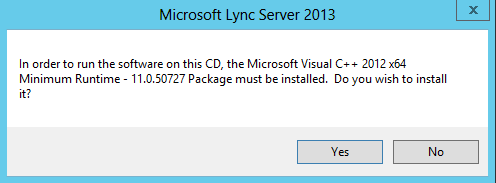
    4. Click Yes on the "In order to run the software on this CD, the Microsoft Visual C++ 2012 x64 Minimum Runtime - 11.0.50727 Package must be installed." Dialog box.
      Lync Server 2013 Visual C++ Library
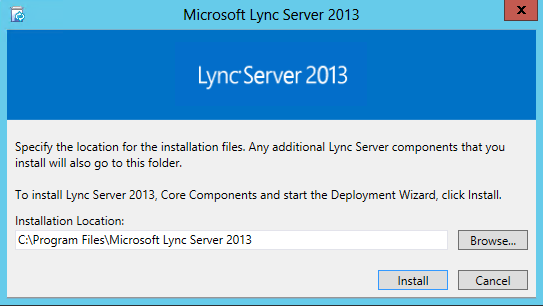
    5. Click Install on the Microsoft Lync Server 2013 dialog box
      Lync Server 2013 Installation Path
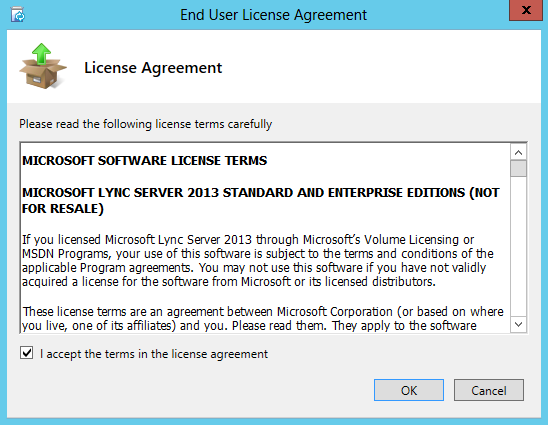
    6. Check I accept the terms in the license agreement and click OK
      Lync Server 2013 Installation EULA
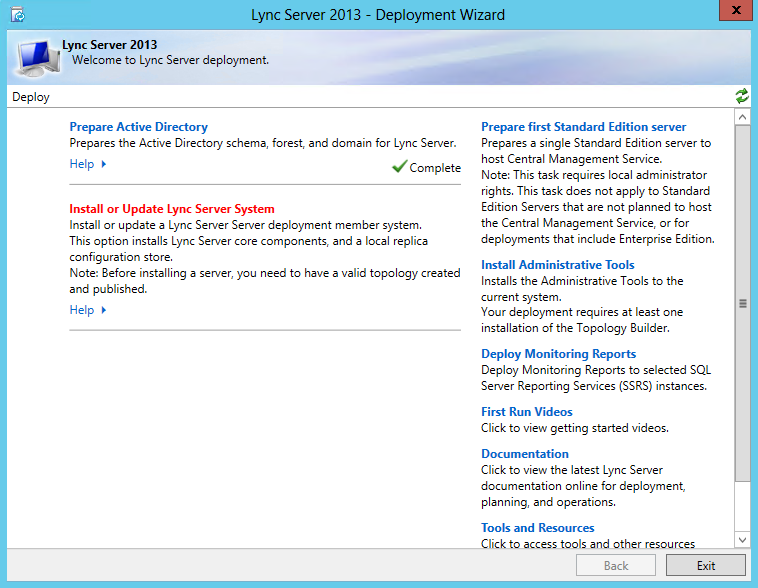
    7. Once installed, click on Install or Update Lync Server System
      Lync Server 2013 - Install or Update Lync Server System
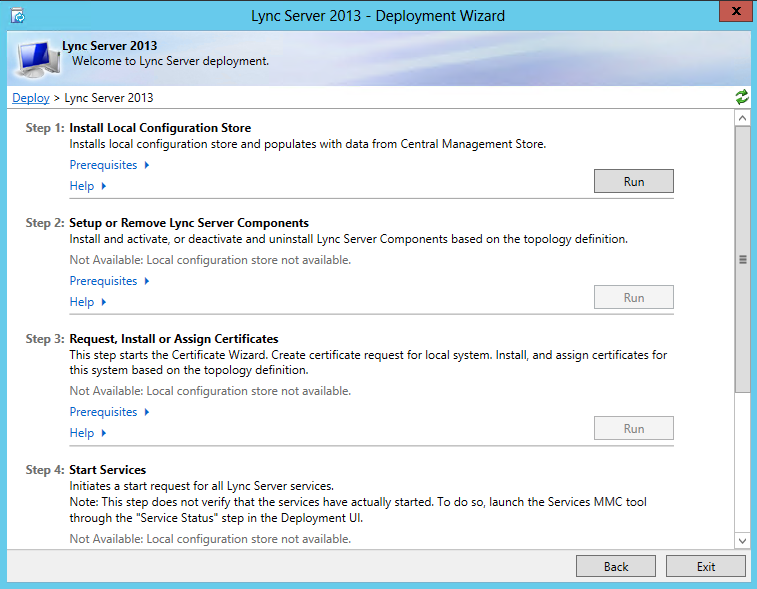
    8. Click Run next to Step 1: Install Local Configuration Store
      Lync Server 2013 - Step 1
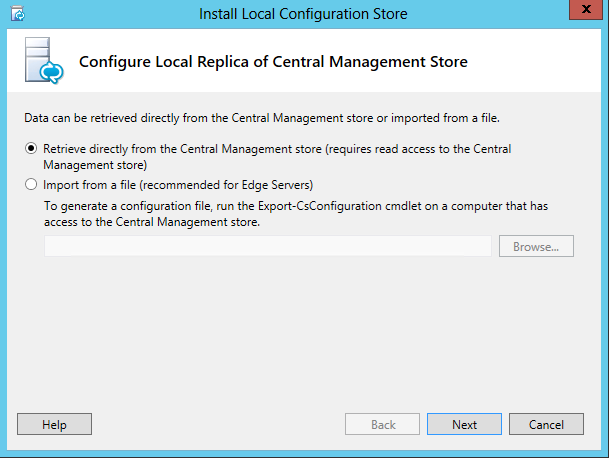
    9. Check Retrieve directly from the Central Management store and click Next
      Lync Server 2013 - Retrieve Central Management Store
    10. Click Finish once the installation has completed.
      (oops, no picture for this one :()
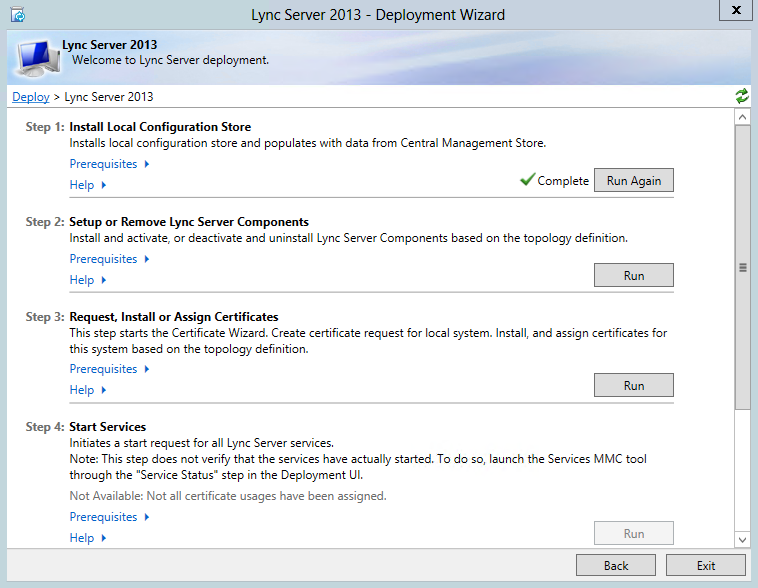
    11. Click Run next to Step 2: Setup or Remove Lync Server Components
      Run Step 2 Setup or Remove Lync Server Components
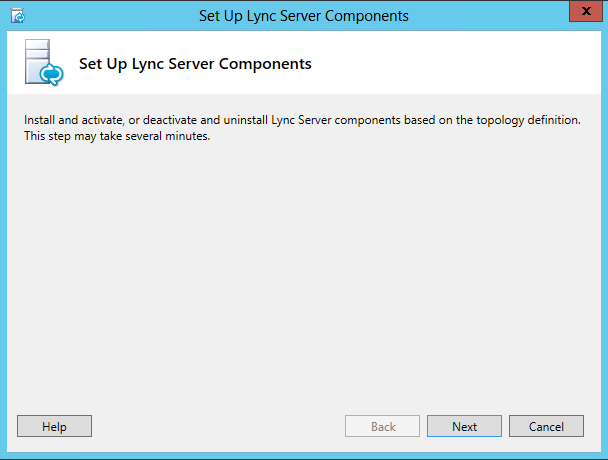
    12. Click Next
      Set up Lync Server Components
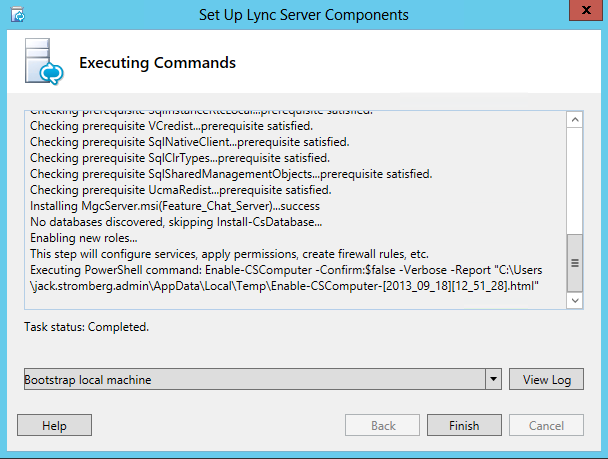
    13. Click Finish
      Set up Lync Server Components - Finish
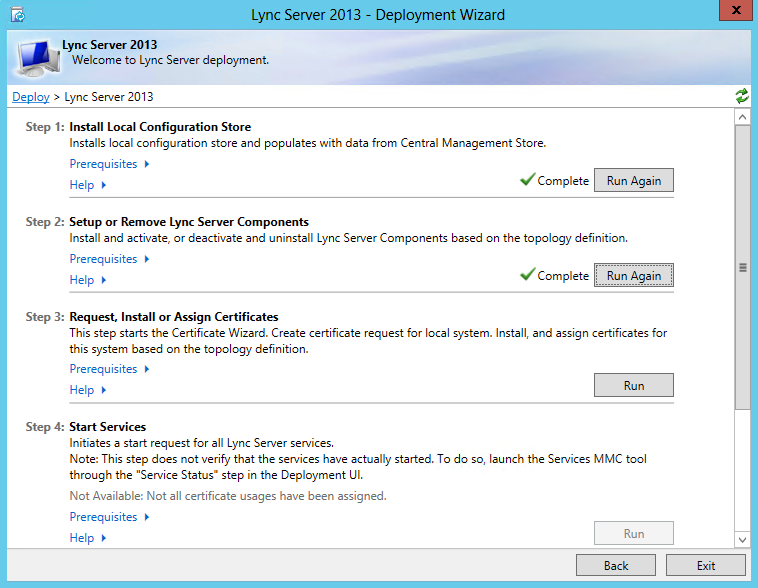
    14. Click Run next to Step 3: Request, Install or Assign Certificates
      Step 3 - Request, Install or Assign Certificates
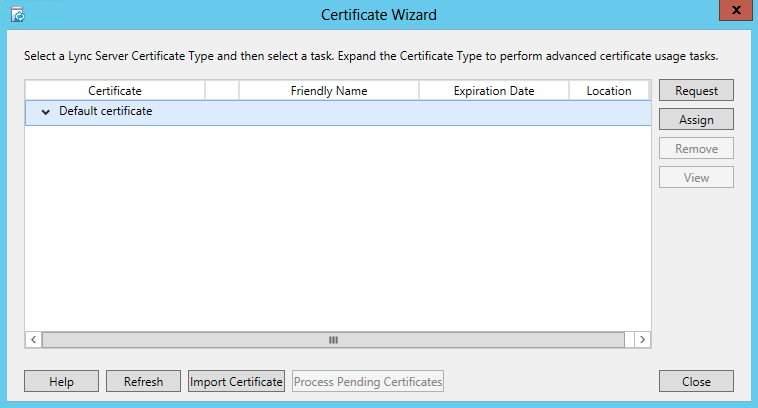
    15. Click Request on the Certificate Wizard screen
      Certificate Wizard - Request
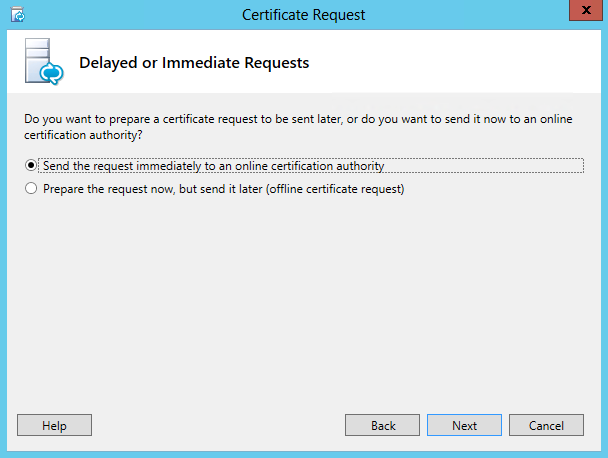
    16. Check Send the request immediately to an online certification authority and hit Next
      Certificate Request - Send the request immediately to an online certification authority
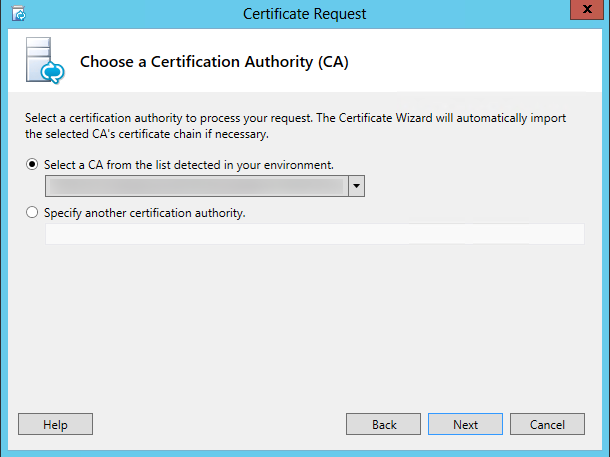
    17. Click Next on the Certification Authority (CA) page
      Certificate Request - Choose a certification authority
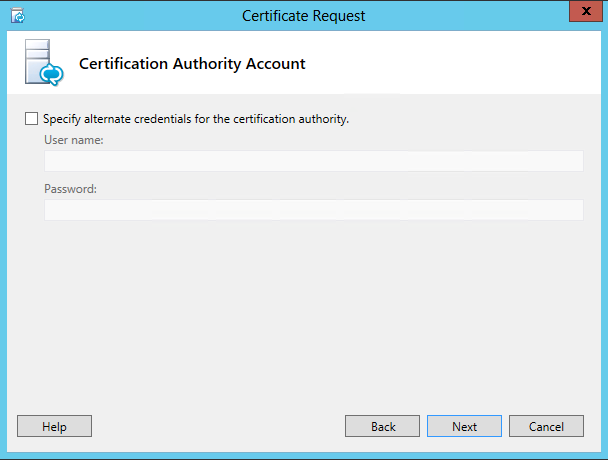
    18. Click Next on the Certification Authority Account page
      Certificate Request - Certification Authority Account
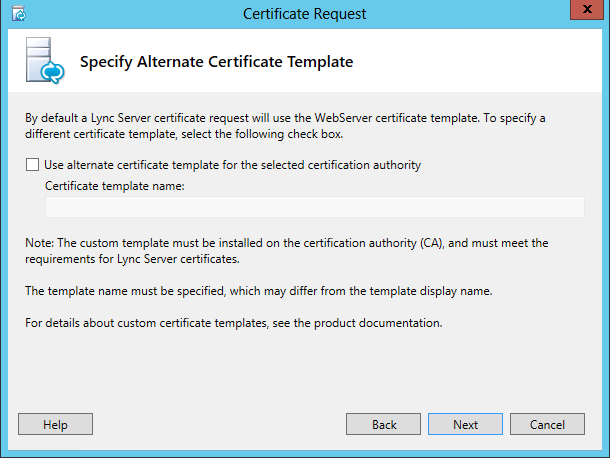
    19. Click Next on the Specify Alternate Certificate Template page
      Certificate Request - Specify Alternate Certificate Template
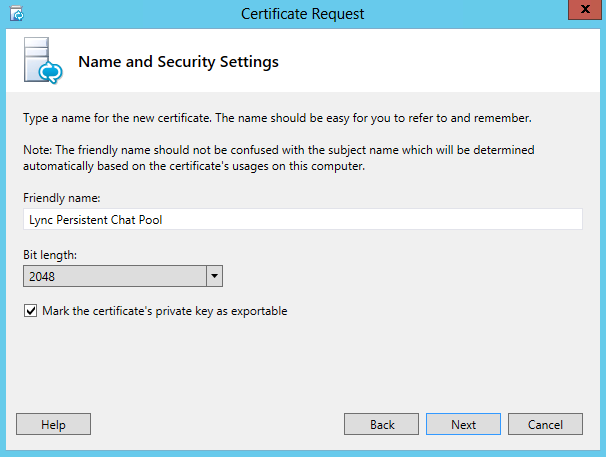
    20. Type in a Friendly name for the certificate (I would just use whatever you used for the Persistent Chat Pool Display Name) and click Next
      Certificate Request - Name and Security Settings

      1. NOTE: If you are deploying multiple servers in the Lync Persistent Chat Pool, make sure to check the Mark the certificate's private key as exportable box.
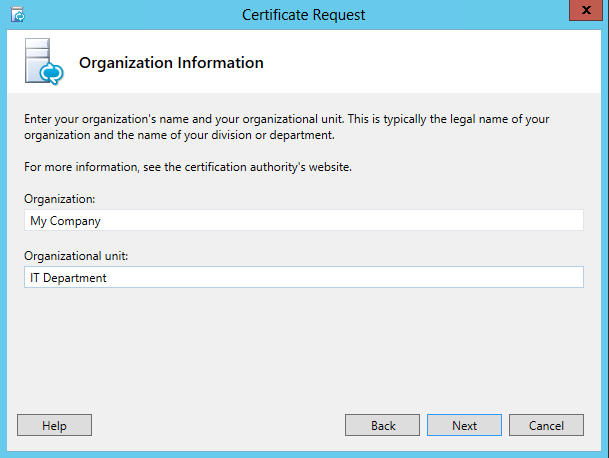
    21. Enter in your Organization and Organizational Unit and hit Next
      Certificate Request - Organization Information
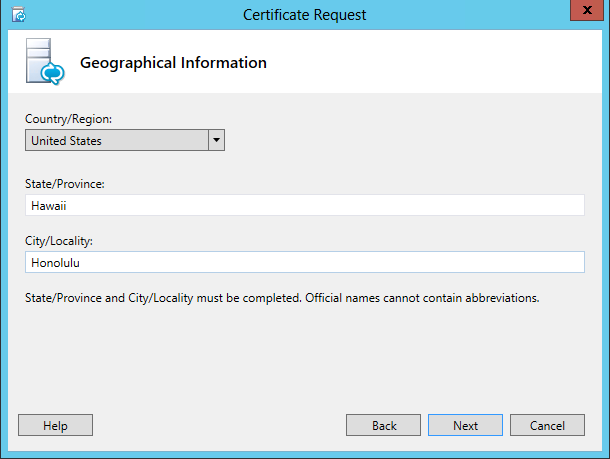
    22. Enter in your Country/Region, State/Province, City/Locality, and hit Next
      Certificate Request - Geographical Information
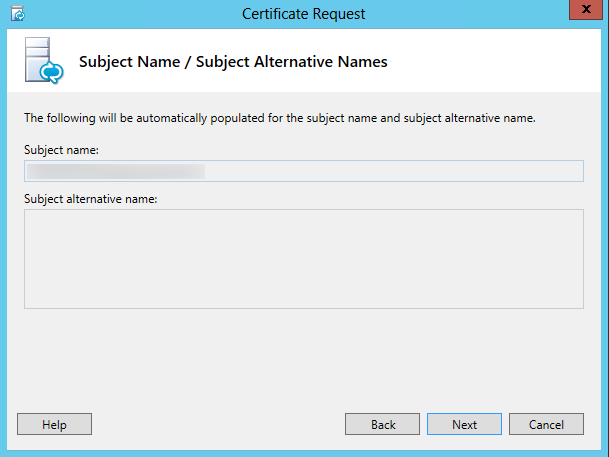
    23. Hit Next on the Subject Name / Subject Alternative Names screen
      Certificate Request - Subject Name - Subject Alternative Names
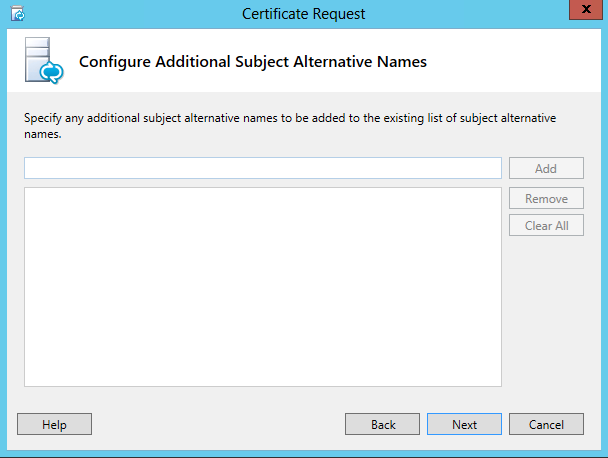
    24. Hit Next on the Configure Additional Subject Alternative Names screen
      Certificate Request - Configure Additional Subject Alternative Names
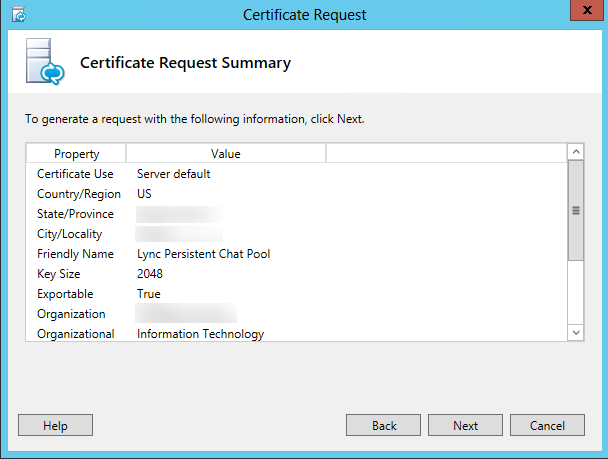
    25. Hit Next on the Certificate Request Summary page
      Certificate Request - Summary
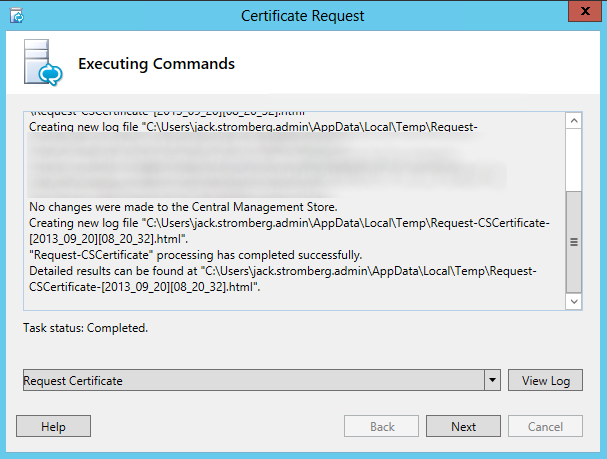
    26. Hit Next once the certificate request process has finished executing commands
      Certificate Request - Executing Commands
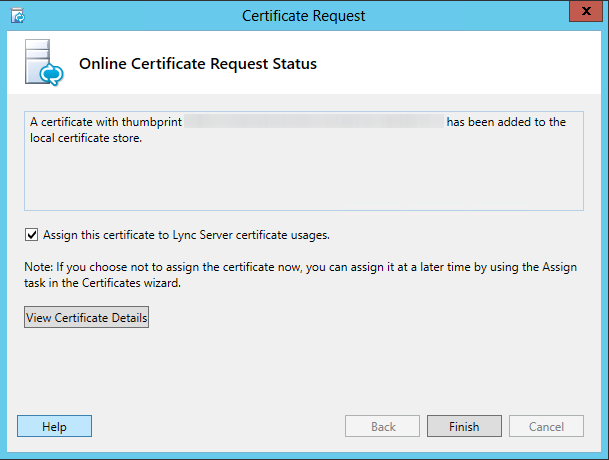
    27. Hit Finish on the Online Certificate Request Status screen
      Certificate Request - Online Certificate Request Status
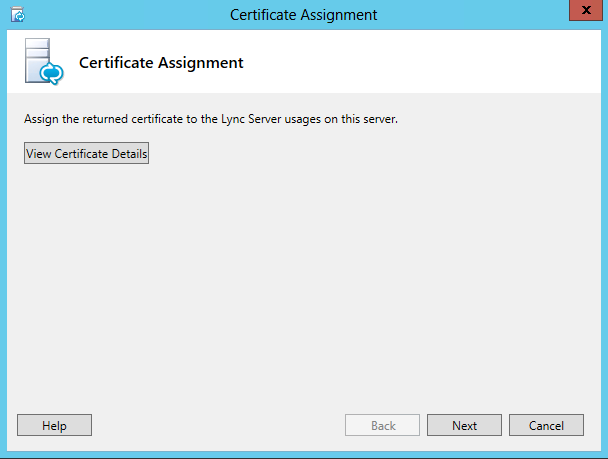
    28. Hit Next on the Certificate Assignment screen
      Certificate Assignment
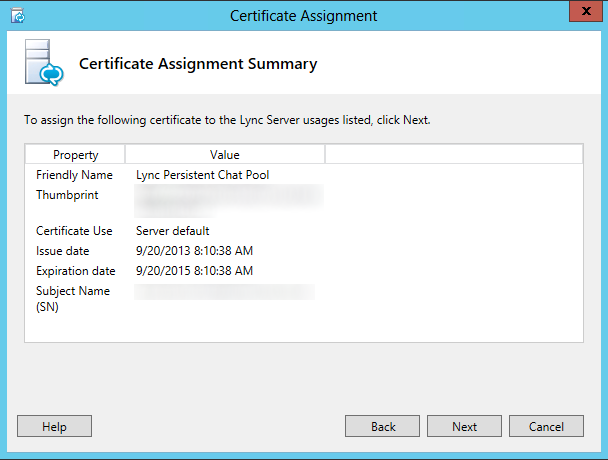
    29. Hit Next on the Certificate Assignment Summary screen
      Certificate Assignment - Summary
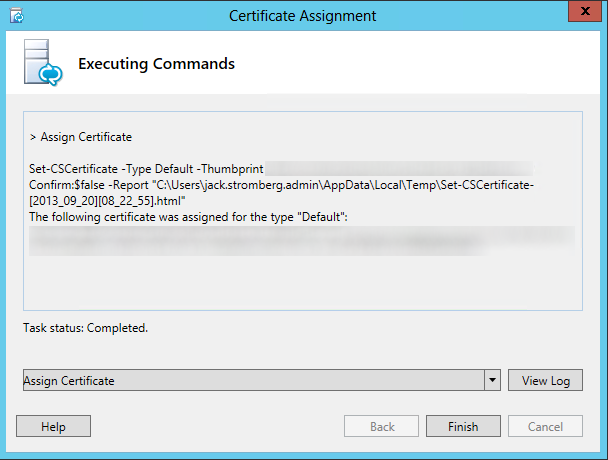
    30. Hit Finish on the Executing Commands screen
      Certificate Assignment - Executing Commands
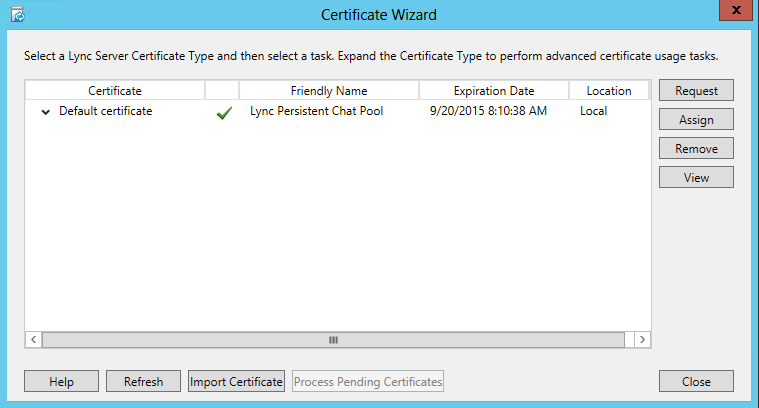
    31. Close the Certificate Wizard screen
      Certificate Wizard
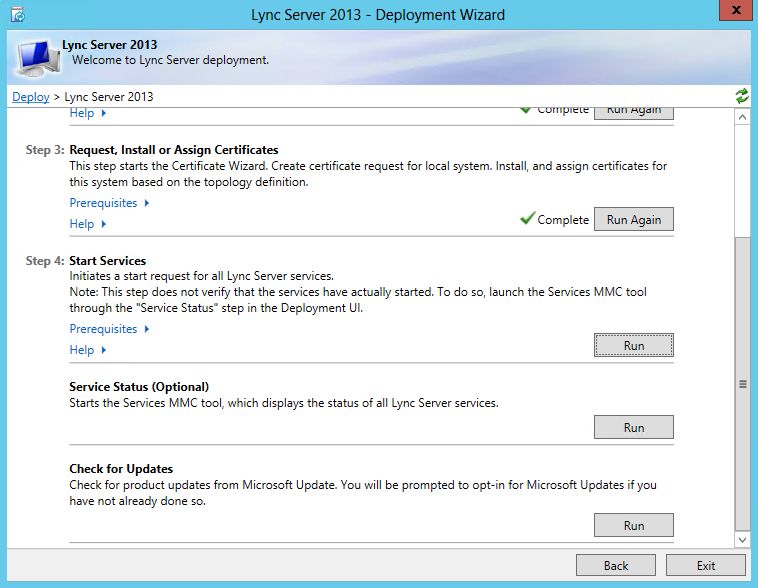
    32. Click Run next to Step 4: Start Services
      Step 4 - Start Services
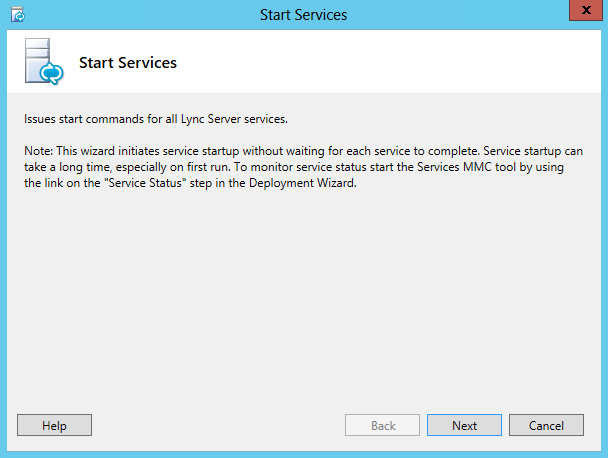
    33. Click Next on the Start Services screen
      Start Services Wizard
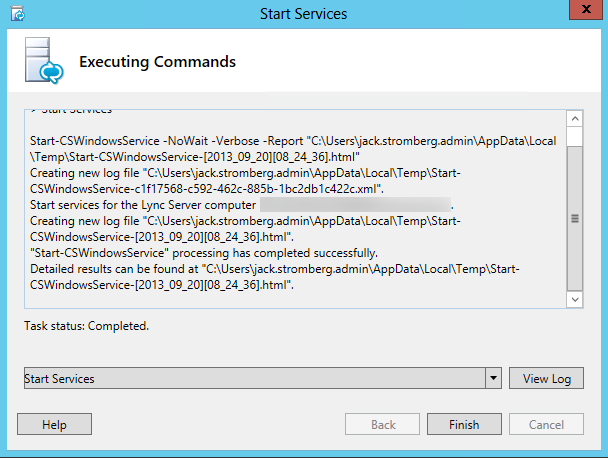
    34. Click Finish on the Executing Commands screen
      Start Services Wizard - Finish
    35. Click Run next to Service Status (Optional)
      Step 4 - Start Services
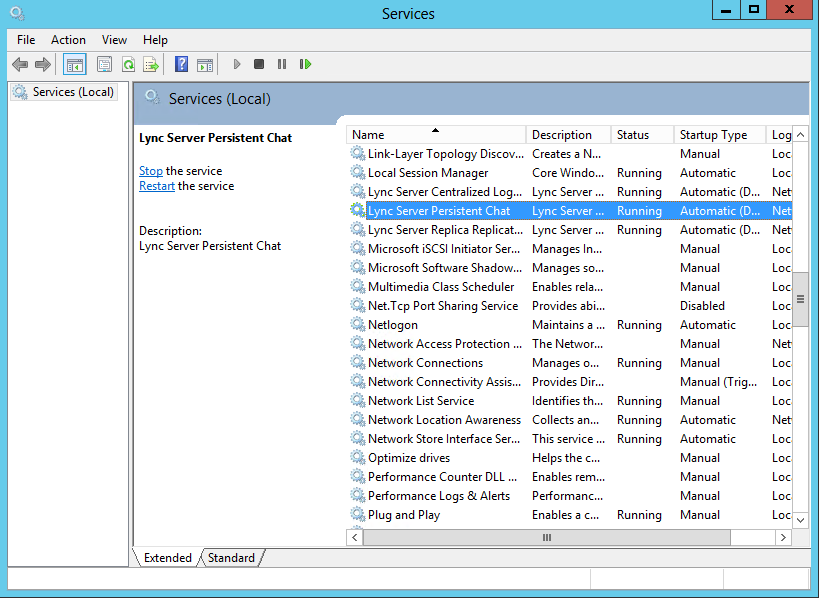
    36. Scroll through the list of services and find Lync Server Persistent Chat and verify it is Running.
      Services - Lync Server Persistent Chat
  17. At this point of the deployment, the infrastructure should be in place to actually push Persistent Chat out to your clients.  Next we will create a test group.
  18. Login to the Lync Admin Panel (Cscp)
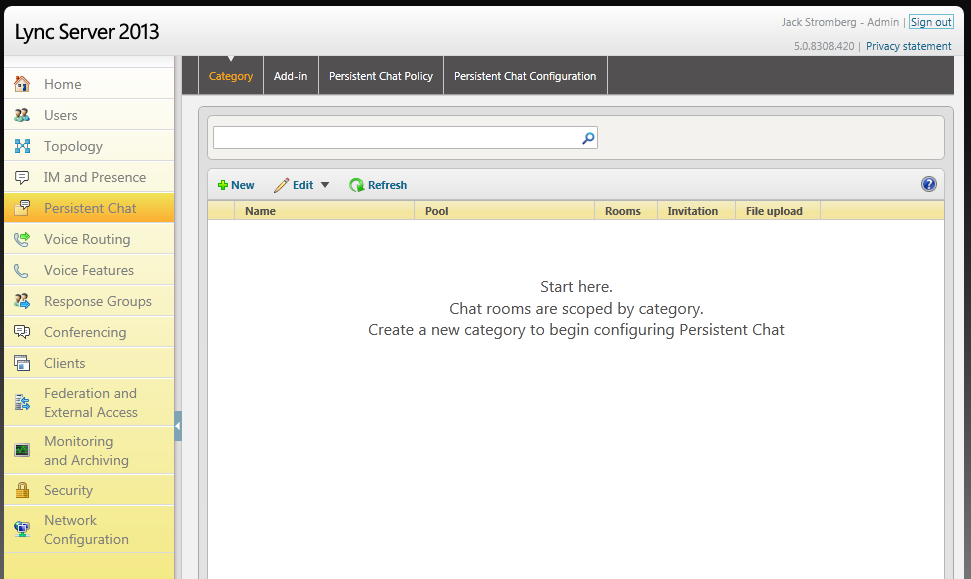
  19. Select the Persistent Chat tab
    cscp - Persistent Chat
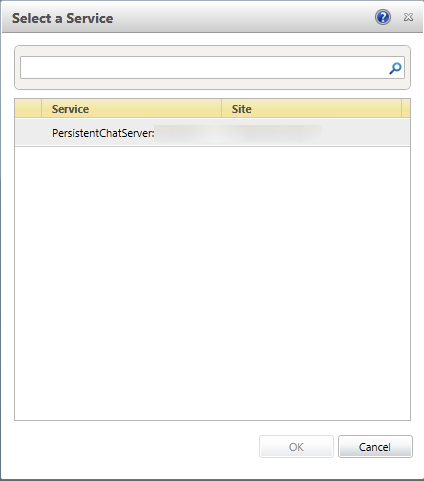
  20. Click New and select your persistent chat pool and click OK
    cscp - Persistent Chat - Select a Service
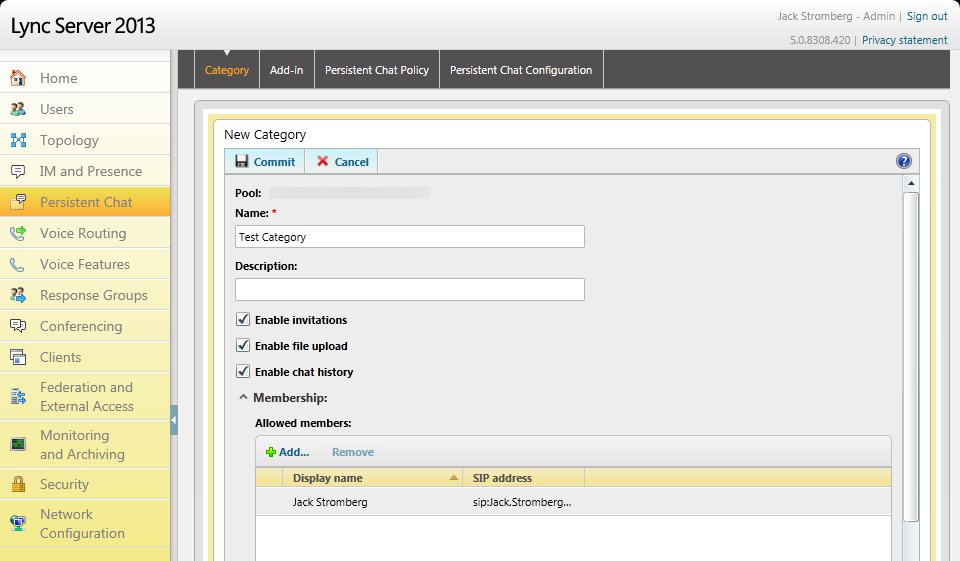
  21. Type in a Name for your persistent chat category and select who can have access to the category.  This category will be the container that holds a set of chatrooms.  Click Commit when finished.
    cscp - Persistent Chat - New Category
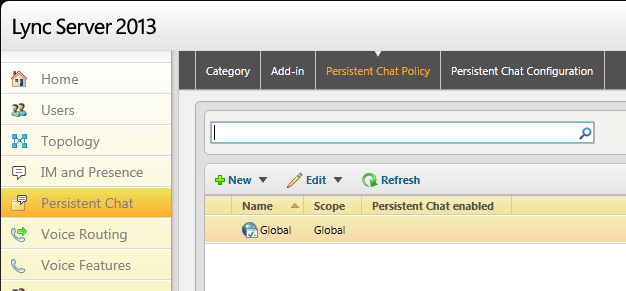
  22. Next, select the Persistent Chat Policy tab and double click on the Global policy.
    cscp - Persistent Chat - Persistent Chat Policy
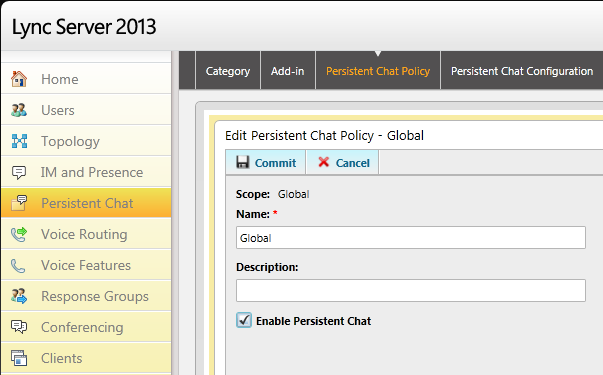
  23. Check Enable Persistent Chat and click Commit
    cscp - Persistent Chat - Edit Global Policy
  24. Next, we need to create the actual chatroom.  This step needs to be done via PowerShell, so open up the Lync Server Management Console.
    Lync Server Management Console
  25. Execute the following command
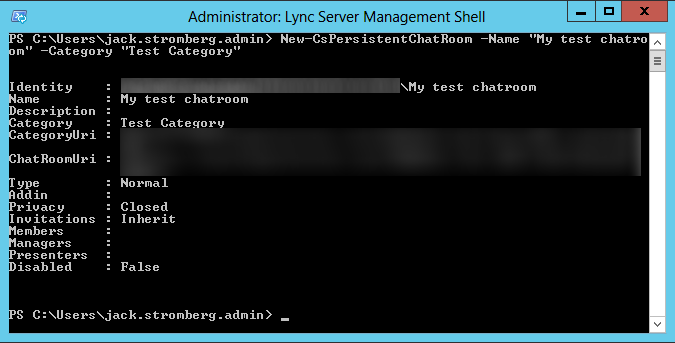
    New-CsPersistentChatRoom -Name "My test chatroom" -Category "Test Category"
    Lync Server Management Console - New-CsPersistentChatRoom
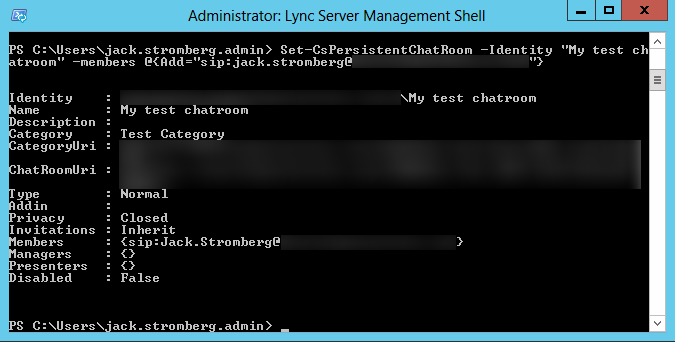
  26. Next, we will assign a user to the chatroom, so execute the following command:
    Set-CsPersistentChatRoom -Identity "My test chatroom" -members @{Add="sip:[email protected]"}
    Lync Server Management Console - Set-CsPersistentChatRoom
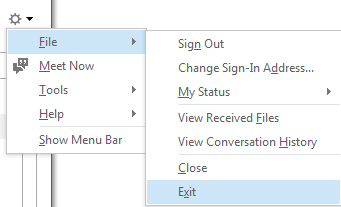
  27. Now, we are ready to join our test chatroom.  First, close your Lync client if it is already running.
    Lync 2013 Client - File - Exit
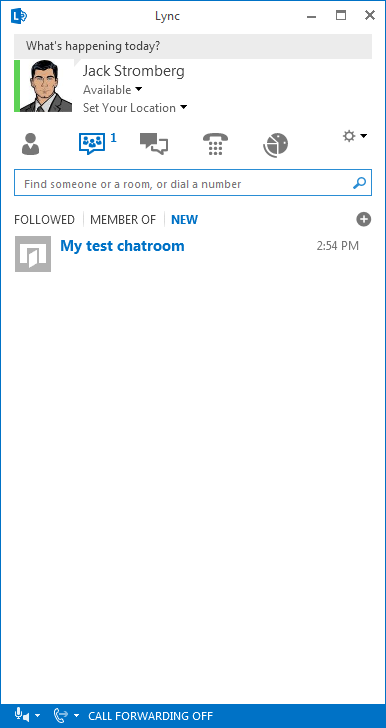
  28. Relaunch Lync, and you should see the persistent chatroom icon.
    Persistent Chat - Chatrooms
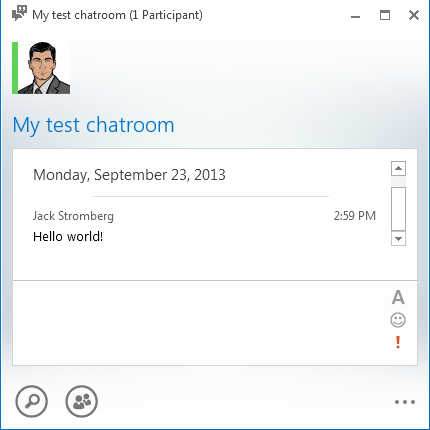
  29. Double click on the chatroom and try sending a message.
    Persistent Chat - Hello World
  30. Congrats!  If you have made it to this point, you should now be able to offer a new collaborative feature to your users at your organization! 🙂

Enabling Skype Federation - Lync Server 2010-2013

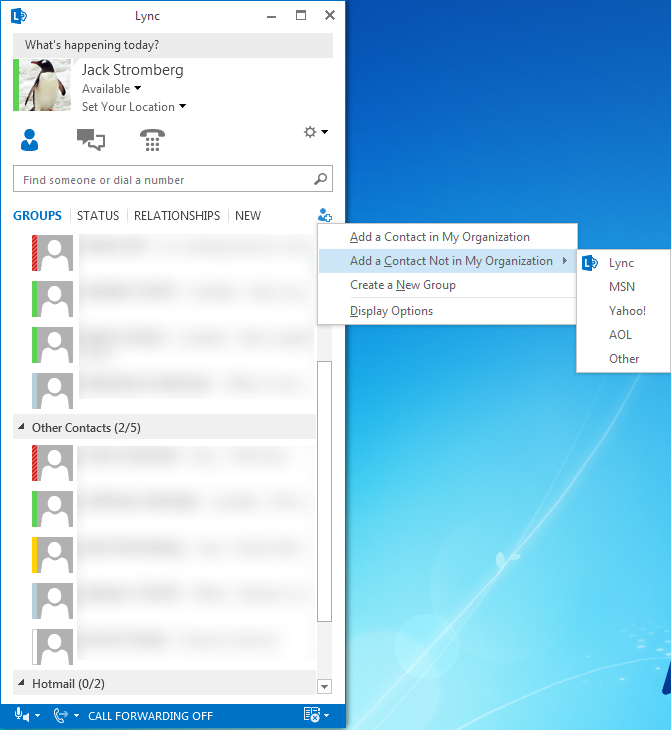
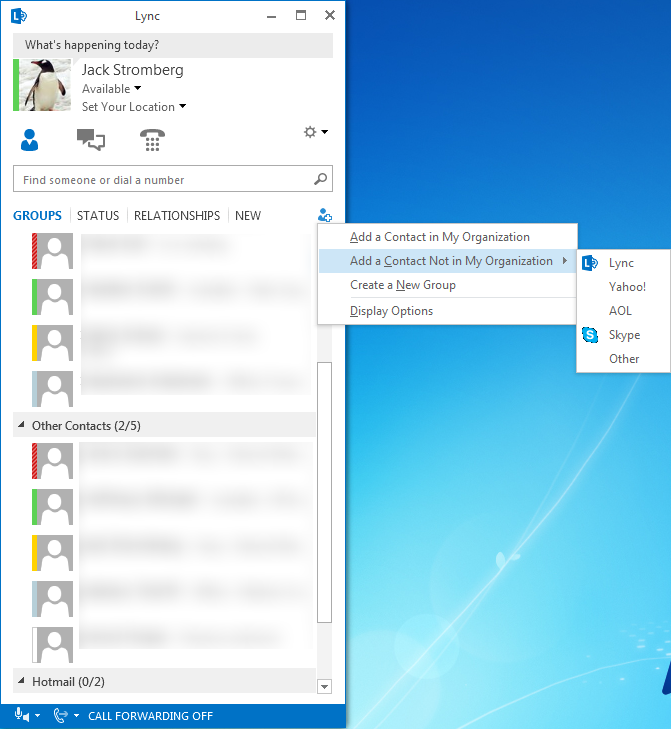
Most articles are saying that Skype federation is now available and "you're good to go with federation enabled".  The problem though is you are more than likely missing the "Skype" option when you select Add a contact not in my organization and you may need to enable PIC provisioning for Skype.  This guide will go through enabling PIC federation through Office 365 and bringing back the Skype icon to the Lync client.

NOTE: This guide assumes you have configured your edge servers and have verified federation to other partners works.

Here is what my Lync client looked like before following the instructions below:

Lync client without Skype

Enabling Federation and Public IM Connectivity (PIC)

  1. Login to your Office 365 Portal
  2. Select Lync from the Admin dropdown
    Lync Menu Office365
  3. Select External Communications
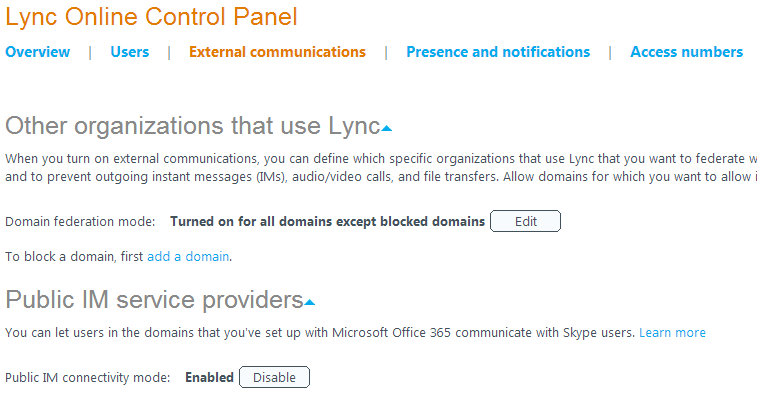
  4. Ensure the following settings:
    1. Domain federation mode: Turned on for all domains except blocked domains
    2. Public IM connectivity mode: Enabled
      Lync Online Control Panel

Adding Skype option to Lync Client

  1. Navigate to your front end server
  2. Open up the Lync 2010/2013 Management Shell
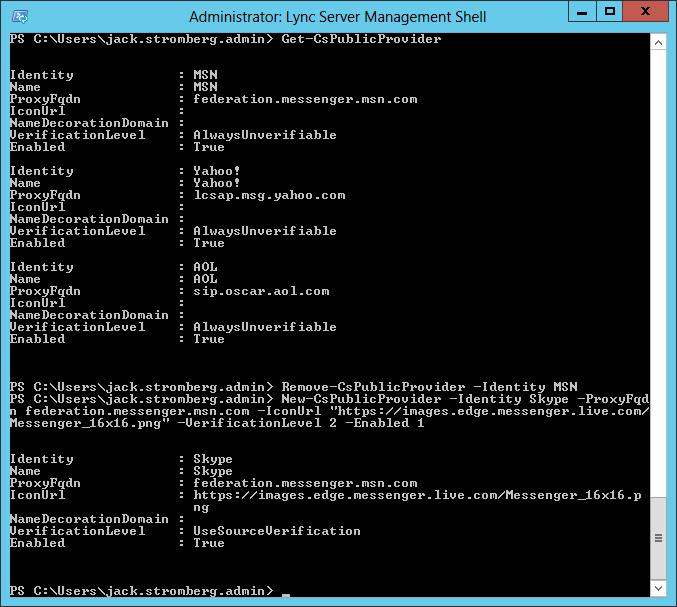
  3. Execute the following command to list what providers you federate to
    1. Get-CsPublicProvider
  4. If you have a provider that has a ProxyFqdn of federation.messenger.msn.com, execute the following command to remove it (replacing MSN with the Identity that had federation.messenger.msn.com for your environment):
    1. Remove-CsPublicProvider -Identity MSN
  5. Execute the following command to add Skype as a federated provider
    1. New-CsPublicProvider -Identity Skype -ProxyFqdn federation.messenger.msn.com -IconUrl "https://images.edge.messenger.live.com/Messenger_16x16.png" -VerificationLevel 2 -Enabled 1
  6. Close your Lync client and reopen for the option to be available

Powershell Lync Skype

Adding Skype contacts to Lync

  1. Click the Add a Contact icon
  2. Select Add a Contact Not in My Organization
  3. Select Skype.
    1. Lync client with Skype
  4. In the IM Address field, enter the Microsoft Account (MSA) of the Skype user in the format user(domain name)@msn.com.
    1. Example: If someone's email was [email protected], the entry would be bob(contoso.com)@msn.com

  5. In the Add to contact group dropdown box, select the contact group to put the user in.
  6. In the Set privacy relationship dropdown box, select the appropriate relationship.
  7. Click OK.
  8. NOTE: Once the Skype user adds your account, the federated user will appear online.  Until the user adds you to their Skype list, the contact will appear offline.

Adding Lync user to Skype

  1. Sign into Skype
  2. Click the Add User icon
    Add User Icon Skype
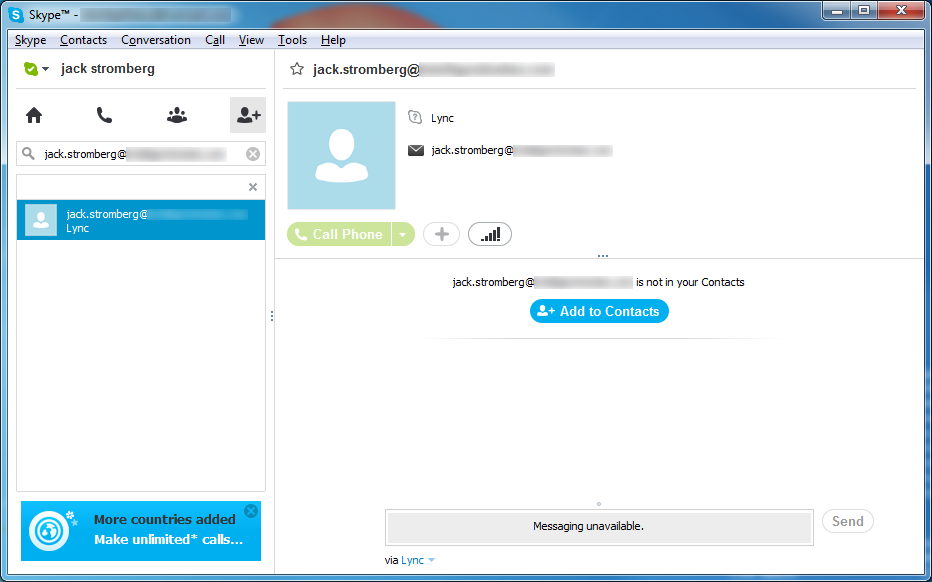
  3. Type in the user's SIP address
    1. For example: [email protected]
      1. Note: You do not need to use the MSA format when adding the contact to your list from Skype
  4. Select (single click) the name when it appears in the search list
  5. Click the Add to Contacts button
    Adding Lync Contact - Skype
  6. NOTE: If you add the user to Skype first before Lync, the user will show up with a question mark (?) icon for a status until the Lync user approves the request/adds you to their contacts list.

Awesome Tidbits

When setting up Lync-to-Skype federation for the first time, I was seeing the following symptom.  Lync users could see the Skype user Offline, the Skype user could not add the Lync user as it would not pull the directory, and IMs would not work because the users had not accepted each other.  Doing a log on the front end server, resulted with the following error message as well:

TL_INFO(TF_PROTOCOL) [0]1838.0B20::06/05/2013-14:36:41.206.00008d15 (SIPStack,SIPAdminLog::ProtocolRecord::Flush:2420.idx(196))[506561689] $$begin_record
Trace-Correlation-Id: 506561689
Instance-Id: B0B5F
Direction: incoming
Peer: myedgepool.mydomain.local:5061
Message-Type: response
SIP/2.0 480 temporary unavailable
Start-Line: SIP/2.0 480 temporary unavailable
FROM: "Jack Stromberg"<sip:[email protected]>;tag=0f6bccf745;epid=1aadaf98be
TO: <sip:person(hotmail.com)@msn.com>;tag=qwemztox
CALL-ID: a0b5bb30381640c08b30ee2bda403905
CSEQ: 1 INVITE
Via: SIP/2.0/TLS 192.168.169.221:53811;branch=z9hG4bK6DC1D74D.F39C6D8A52E04898;branched=FALSE;ms-received-port=53811;ms-received-cid=718100,SIP/2.0/TLS 192.168.170.142:50017;ms-received-port=50017;ms-received-cid=208A00
CONTENT-LENGTH: 0
ms-diagnostics: 1035;reason="Previous hop public IM provider did not report diagnostic information";Domain="msn.com";PeerServer="federation.messenger.msn.com";source="sip.mydomain.com"
ms-diagnostics-public: 1035;reason="Previous hop public IM provider did not report diagnostic information";Domain="msn.com";PeerServer="federation.messenger.msn.com"
$$end_record

Findings: Doing some research, the 480 temporary unavailable error with 1035;reason="Previous hop public IM provider did not report diagnostic information" means that there are federation issues.  Since I know I enabled PIC Federation through Office 365 and federation worked to other partners (hotmail users for example), I assumed this was an issue with the PIC configuration.

Solution: According to a technet article recently posted (http://community.office365.com/en-us/blogs/office_365_technical_blog/archive/2013/06/01/troubleshooting-lync-skype-connectivity.aspx) if you are having issues federating to Skype, you may have to toggle the Public IM Connectivity mode switch in your Office 365 Lync portal.  If you are a small business user, you are almost gaurenteed to be affected by the upgrade to Office 365 2013.  If you are an enterprise business, it appears you should be fine, but in my case, I still saw issues connecting under an underprise account.

Additionally, it turns out I needed to submit a request to the old PIC provisioning crew at Microsoft in another scenario.  Once they enabled federation to Skype, I was able to go on my merry way.  You can start the request process here (their website can be quite frustrating... I couldn't get half the pages to load and ended up sending them an email): https://pic.lync.com/provision/Logon/Logon.aspx?rret=https%3a%2f%2fpic.lync.com%2fprovision%2fAgreementNumber.aspx%2f

Tutorial: 802.1X Authentication via WiFi - Active Directory + Network Policy Server + Cisco WLAN + Group Policy

Here is how to implement 802.1X authentication in a Windows Server 2008 R2 domain environment using Protected-EAP authentication.  I have designed the tutorial to be worked on in the specific order to prevent downtime if deployed during the day.  By creating the Network Policy server first, once we switch the authentication type from whatever to 802.1X via RADIUS, our Network Policy Server will immediately start processing requests and allowing machines on the domain.  By configuring the Cisco Wireless LAN Controller or Group Policy first, clients will try connecting to a RADIUS server that doesn't exist or present invalid credentials.  If you have any suggestions on how to better the implementation I demonstrate here, please drop a comment below to improve security/stability of these types of deployments. 🙂

Active Directory

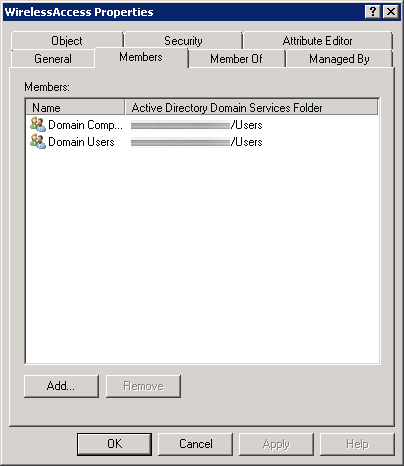
First, we need to create a security group in Active Directory to allow a list of specific users and computers to login to the domain.  In this example, we will allow any authenticated user or machine on the domain to authenticate successfully to the RADIUS sever.  In the screenshot below, we can see I have added both Domain Users and Domain Computers to a security group called WirelessAccess. Here is a screenshot with the above settings.

802.1X - AD Security Group

Network Policy Server

  1. Create a new Windows Server 2008 R2 or Windows Server 2012 machine
  2. Add the machine to the domain
  3. Give the machine a static IP: (I'll use 10.10.10.15 throughout this document as a reference to this server)
  4. Open up Server Manager, click Add Roles, click Next on the Before You Begin screen, check Network Policy and Access Services and click Next, click Next on the Introduction screen, check Network Policy Server (leave the rest unchecked) and click Next, click Install.
  5. Once Network Policy Server is installed, launch the Network Policy Server snap-in (via MMC or Administrative Tools)
  6. Inside of Network Policy Server, on NPC (Local), select RADIUS server for 802.1X Wireless or Wired Connections from the dropdown and click Configure 802.1X
    1. On the Select 802.1X Connections Type page, select Secure Wireless Connections, and enter My Company's Wireless.  Click Next.
    2. Click on the Add... button.  Enter the following settings:
      1. Friendly name: Cisco WLAN Controller
      2. Address: 10.10.10.10 (Enter your WLAN Controller's IP address)
      3. Select Generate, click the Genereate button, and then copy down the Shared Secret the wizard generated (we will use this later to get the WLAN Controller to talk to the RADIUS server).  Click OK.
    3. Click Next.
    4. On the Configure an Authentication Method, select Microsoft: Protected EAP (PEAP). Click Next.
    5. Click Next on the Specify User Groups (we will come back to this).
    6. Click Next on the Configure Traffic Controls page.
    7. Click Finish
  7. Click on NPS (Local) -> Policies -> Network Policies. Right click Secure Wireless Connections and click Properties.
  8. Click on the Conditions tab, select NAS Port Type, and click Remove.
  9. Still on the Conditions tab, click Add..., select Windows Groups and click Add..., click Add Groups..., search for WirelessAccess and click OK.  Click OK on the Windows Groups dialog box, click Apply on the Secure Wireless Connections Properties box.  You should now have something like the image below:
    802.1X - Secure Wireless Connections Conditions
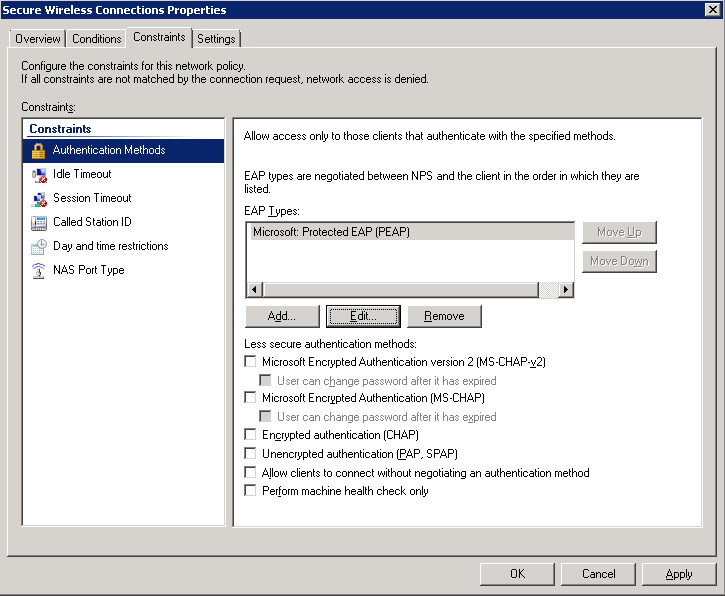
  10. Click on the Constraints tab.
    1. Uncheck all options under Less secure authentication methods like the image below:
      802.1X - Secure Wireless Connections Constraints
    2. Click Apply

Cisco WLAN

  1. Login to your Cisco Wireless Lan Controller
  2. Add a RADIUS server to your controller
    1. Click on the Security tab
    2. Select AAA -> Radius -> Authentication on the left side
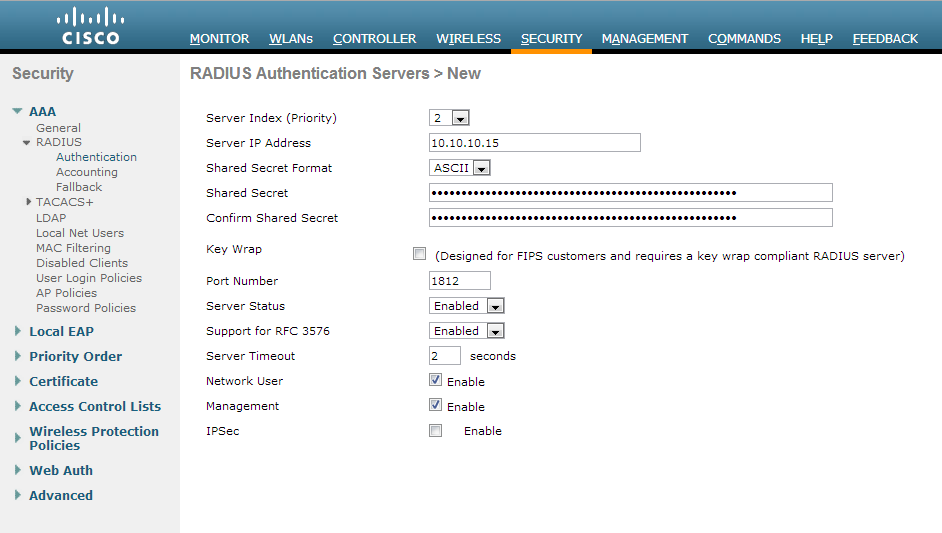
    3. Click the New... button in the top right
      1. Server IP Address: 10.10.10.15 (The IP address of your NPS server we setup earlier)
      2. Shared Secret Format: ASCII
      3. Shared Secret: The long generated password you wrote down when setting up the Network Policy Server
      4. Confirm Shared Secret: Same password in previous step
      5. Key Wrap: unchecked
      6. Port Number: 1812
      7. Server Status: Enabled
      8. Support for RFC 3576: Enabled
      9. Server Timeout: 2
      10. Network User: Checked
      11. Management: Checked
      12. IP Sec: Unchecked
      13. Here is a screenshot with the above settings
        802.1X - Cisco WLAN - RADIUS
  3. Create or modify a wireless network to use 802.1X
    1. Click on the WLANs tab
    2. Create a new wireless network or select an existing WLAN ID to edit
    3. On the "WLANs > Add/Edit 'My SSID'" page, use the following settings
      1. Security Tab
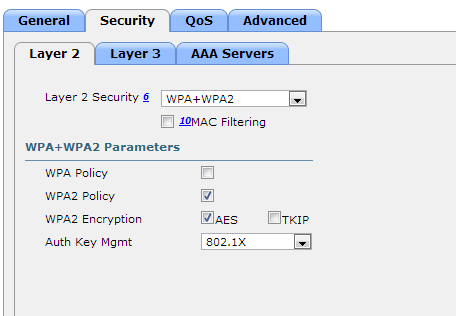
        1. Layer 2 Tab
          1. Layer 2 Security: WPA+WPA2
          2. MAC Filtering: Unchecked
          3. WPA+WPA2 Parameters
            1. WPA Policy: Unchecked
            2. WPA2 Policy: Checked
            3. WPA2 Encryption: AES checked, TKIP unchecked
            4. Auth Key Mgmt: 802.1X
          1. Here is a screenshot of the above settings
            802.1X - Cisco WLAN - Security
        2. Layer 3 Tab
          1. Layer 3 Security: none
          2. Web Policy: unchecked
        3. AAA Servers Tab
          1. Authentication Servers: checked Enabled
          2. Server 1: Select your RADIUS server from the dropdown
          3. Local EAP Authentication: Unchecked
          4. Authentication priority order for web-auth user: Move RADIUS over to the right
          5. Here is a screenshot of the above settings802.1X - Cisco WLAN - AAA Servers
        4. Click Apply

Group Policy

  1. Go to your domain controller and open up the Group Policy Management console.
  2. Right click the Organizational Unit you want to apply to policy to and select Create a GPO in this domain, and Link it here...
    1. Note, the policy must be linked to the OU containing a group of machines you want to have WiFi access to or a parent of the OU.
  3. Enter in 802.1X WiFi Policy for the Name and click OK
  4. Right click your new GPO and click Edit
  5. Navigate to Computer Configuration->Policies->Windows Settings->Security Settings->Wireless Network (IEEE 802.11) Policies
  6. Right click and select Create A New Wireless Network Policy for Windows Vista and Later Releases
  7. Ensure the following settings are set for your Windows Vista and Later Releases policy
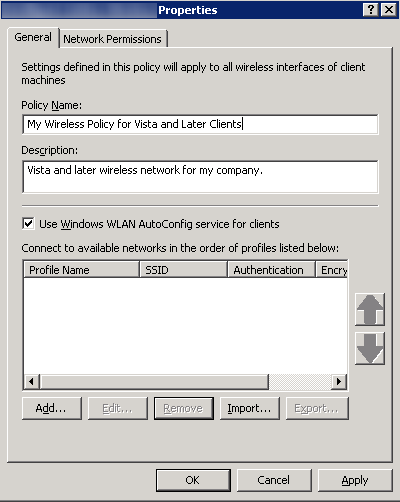
    1. General Tab
      1. Policy Name: My Wireless Policy for Vista and Later Clients
      2. Description: Vista and later wireless network for my company.
      3. Check Use Windows WLAN AutoConfig service for clients
      4. Here is a screenshot with the above settings802.1X - General
      5. Click the Add... button and select Infrastructure
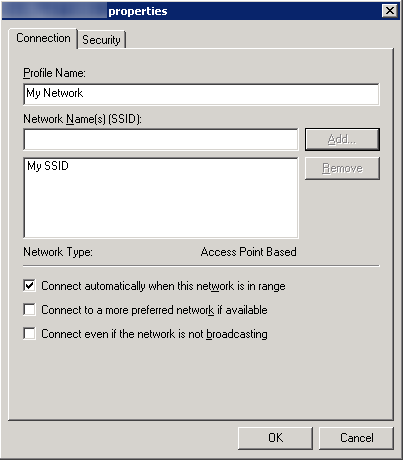
        1. Connection Tab
          1. Profile Name: My Network
          2. Enter in your SSID (Wireless network name that gets broadcasted) and click the Add... button
          3. Check Connect Automatically when this network is in range
          4. Here is a screenshot of the above settings802.1X - Properties
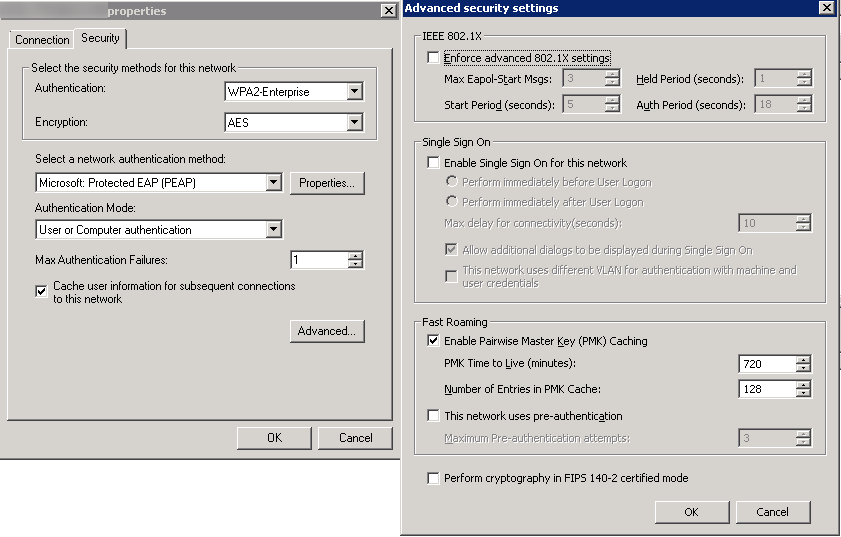
        2. Security Tab
          1. Authentication: WPA2-Enterprise
          2. Encryption: AES
          3. Select a network authentication method: Microsoft Protected EAP (PEAP)
          4. Authentication Mode: User or Computer authentication
          5. Max Authentication Failures: 1
          6. Check Cache user information for subsequent connections to this network
          7. Here is a screenshot of the above settings with the Advanced tab open as well802.1X - Security Settings
        3. Click OK
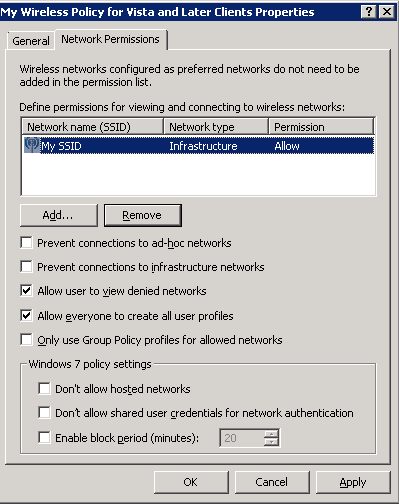
    2. Network Permissions Tab
      1. Enter your network into Define permissions for viewing and connection to wireless networks if it hasn't been added already.
      2. Uncheck Prevent connections to ad-hoc networks
      3. Uncheck Prevent connections to infrastructure networks
      4. Check Allow user to view denied networks
      5. Check Allow everyone to create all user profiles
      6. Uncheck Only use Group Policy profiles for allowed networks
      7. Leave all Windows 7 policy settings unchecked
      8. Here is a screenshot with the above settings (note, you may change the settings above to be in accordance to your policy.  Just ensure you don't check Prevent connections to infrastructure networks).
        802.1x - Network Permissions
      9. Click OK
  8. Right click and select Create A New Windows XP Policy
  9. Ensure the following settings are set for your Windows XP Policy
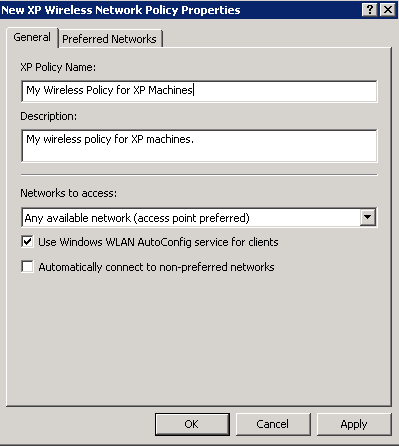
    1. General Tab
      1. XP Policy Name: My Wireless Policy for XP Machines
      2. Description: My wireless policy for XP machines.
      3. Networks to access: Any available network (access point preferred)
      4. Check Use Windows WLAN AutoConfig service for clients
      5. Uncheck Automatically connect to non-preferred networks
      6. Here is a screenshot of the above settings.
        802.1X - XP General
    2. Preferred Networks Tab
      1. Click the Add... button and select Infrastructure
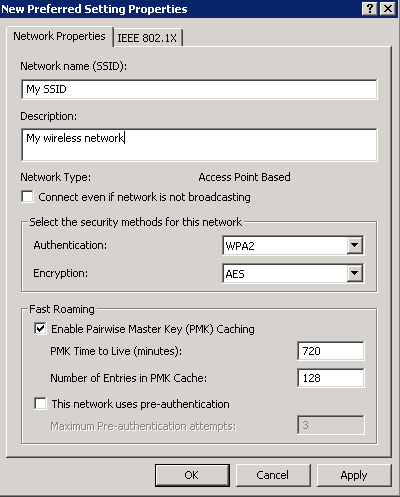
        1. Network Properties Tab
          1. Network name (SSID): My SSID
          2. Description: My wireless network
          3. Uncheck Connect even if network is not broadcasting
          4. Authentication: WPA2
          5. Encryption: AES
          6. Check Enable Pairwise Master Key (PMK) Caching
          7. Uncheck This network uses pre-authentication
          8. Here is a picture of the above settings
            802.1X - XP Network Properties
        2. IEEE 802.1X Tab
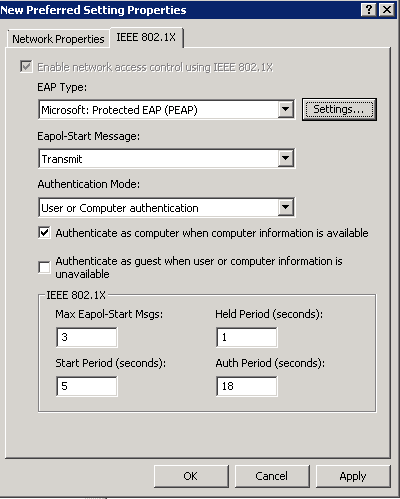
          1. EAP Type: Microsoft: Protected EAP (PEAP)
          2. Eapol-Start Message: Transmit
          3. Authentication Mode: User or Computer Authentication
          4. Check Authenticate as computer when computer information is available
          5. Uncheck Authente as guest when user or computer information is unavailable
          6. Screenshot of above settings
            802.1X - XP IEEE
        3. Click OK
    3. Click OK

Creating an installer for your application in Visual Studio 2012

In Visual Studio 2012, Microsoft removed the ability to make quick installers for your application. Now they recommend using a third party like Wix or InstallShield. This tutorial will go over using InstallSheild's free light version to make an installer for your application.

Please note, you cannot use InstallShield's product with the Express versions of Visual Studio.  If you use the express edition, you will not see the "Other Project Types" and "Setup and Deployment" folders mentioned later on.

First head over to InstallShield's website and register for the product.  It is free, but you have to register with a valid email address to receive a license key:

http://learn.flexerasoftware.com/content/IS-EVAL-InstallShield-Limited-Edition-Visual-Studio?lang=1033&ver=pro

Download and install the program.

Once installation is done, launch the program below as an Administrator:

C:\Program Files (x86)\InstallShield\2012SpringLE\System\TSConfig.exe

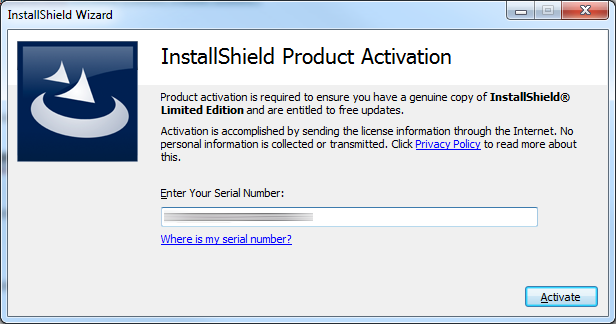
Enter your serial number from an auto-generated email they sent you when you downloaded InstallShield Limited and hit Activate.

InstallShield License

Next, open up Visual Studio 2012 (again, note we are not using express)

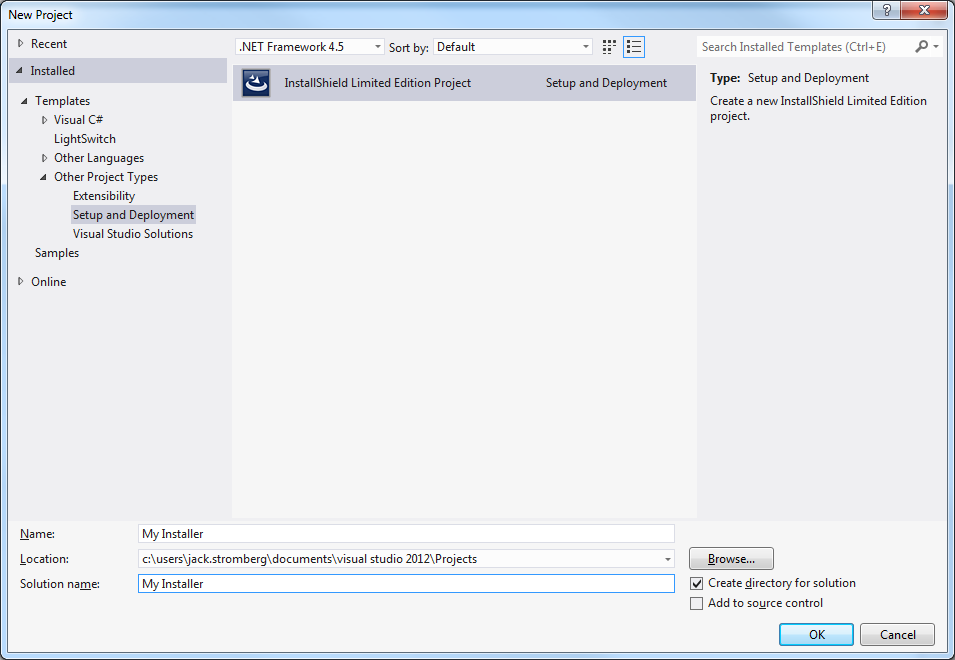
Click File->New Project.

New Project - Visual Studio

Expand Other Project Types and select Setup and Deployment.  Inside of there, you should see InstallShield Limited Edition Project (again, you won't see this in Visual Studio Express editions).  Click OK.

Other Project Types - InstallShield

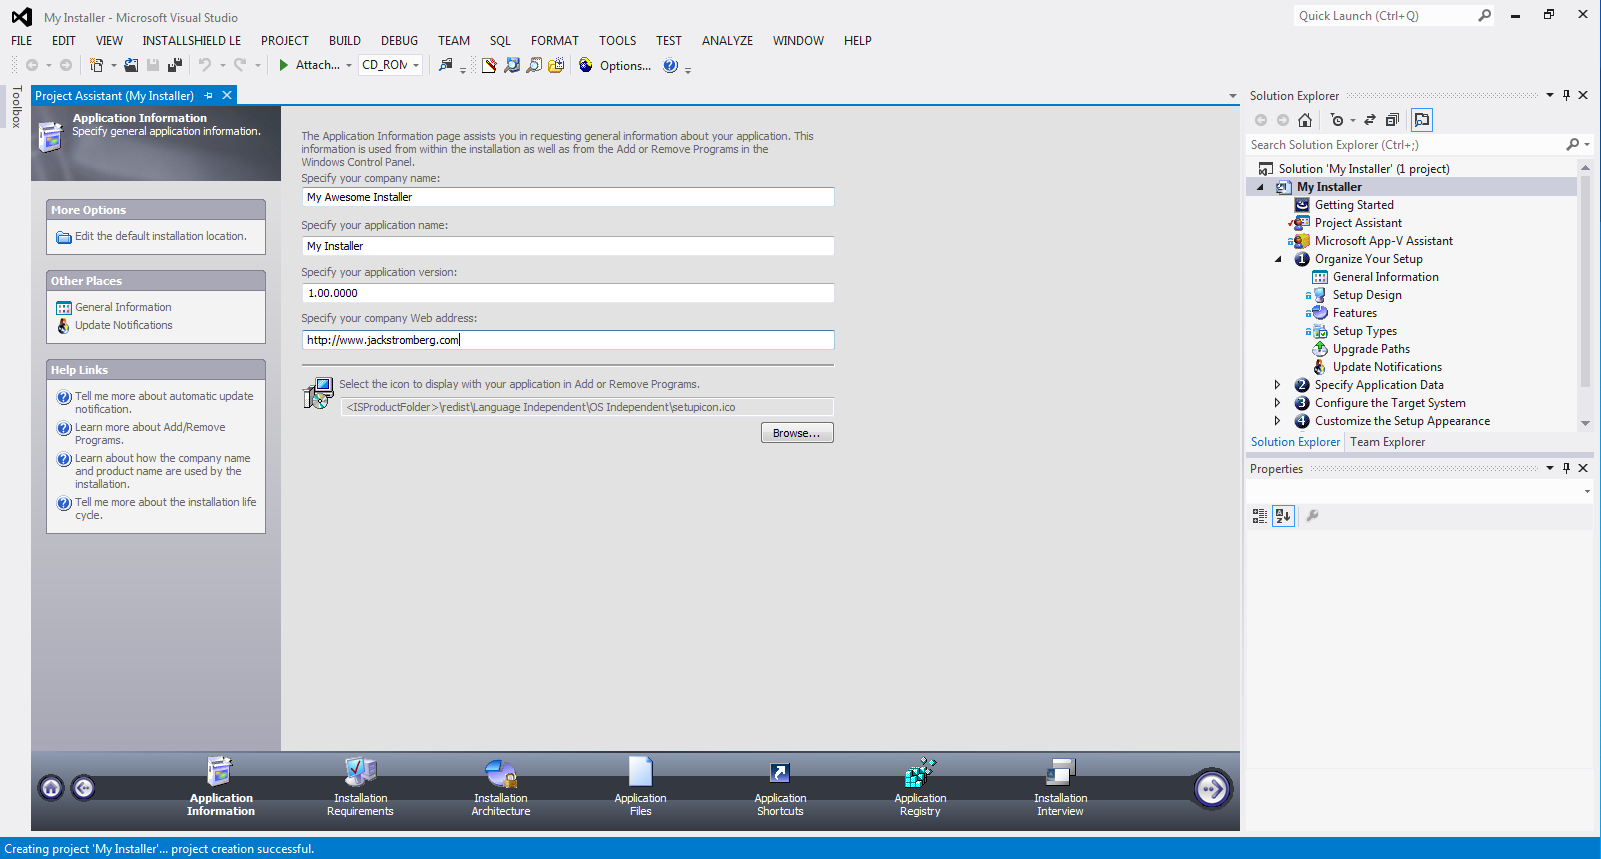
At this point, you should see a guided GUI (Project Assistant) to create your installer.  Inside of the Solution Explorer, you will see additional items you can select to configure advanced options.

Project Assistant - InstallShield

Lync 2010 - Deploying Monitoring Server Reports

I recently had the lovely experience of setting up the monitoring role for Lync 2010.  In doing so, I documented the steps I took to successfully deploy the Monitoring Server Reports Services.

Before beginning, here are a few notes:

  • Ensure you are using Microsoft SQL Server 2008 x64 Standard or greater (if you need to upgrade, see the following tutorial: SQL Server 2008 R2 – Updating a msSQL instance/server)
  • You have deployed Lync 2010 Standard or Enterprise
    • Both versions allow you to add this service

Alright, so lets begin!

  1. Our first step is to install the "Reporting Services" feature for SQL Server 2008
  2. Open up the Reporting Services Configuration Manager
  3. Enter the SQL Server Reporrting Services instance you want to connect to
  4. Click Web Service URL
  5. Enter the virtual directory name, port, and configure your SSL certificate
  6. Click Apply
    1. Note: If you had IIS on this box, you will need to choose different port numbers
  7. Open up Microsoft SQL Server Management Studio
  8. Login to your SQL server and create a new service account for your SQL server
    1. Make a sysadmin for the time being
  9. Head back over to the Reporting Services Configuration Manager
  10. Setup the Database Name and select the language.
  11. Leave Native Mode selected and click Next.
  12. Enter the same credentials on the Credentials step and click Next
  13. Click Next on the Summary pane
  14. Click Finish
  15. Go back to your SQL Server and deprivilege your account
    1. Uncheck sysadmin and Set the default database to ReportServer
  16. Click on the Report manager URL in the reporting Services Configuration Manager
  17. Click Reports if you are happy with the /Reports directory
  18. Once you have clicked Apply, verify you can view the website by clicking on the link it shows (it should bring you to a site that kind of reminds you of an old version of sharepoint :P)
  19. Go to your Lync Front End server and run the Lync Server Topology Builder program (Start->All Programs->Microsoft Lync Server 2010->Lync Server Topology Builder)
  20. Upon login, check "Download Topology from existing deployment" and click OK
  21. Save the topology to your desktop when prompted (or anywhere else, doesn't really matter)
  22. Expand your Site, and click on the Monitoring Servers folder
  23. Right click on Monitoring Servers and select New Monitoring Server...
  24. Enter in the server to install the role on
  25. Enter the SQL server name/instance to use
  26. Finish the installation
  27. Head over to the server where you are going to install the Monitoring/Archieving role
  28. Open up the Lync Server 2010 - Deployment Wizard (run as administrator)
  29. Click on Install or Update Lync Server System
  30. Click on Setup or Remove Lync Server Componenets
  31. Let it install/configure all of its stuff
  32. Click on Run next to Server Status (Optional)
  33. Verify Lync Server Call Detail Recording and Lync Server QoE Monitoring Service services have been started (start them if they aren't running)
  34. Go back to the Lync Server 2010 deployment wizard homepage and click on Deploy Monitoring Server Reports
  35. The server information should already be prefilled in. Click Next
  36. Enter in the SQL credentials needed to connect in
    1. For this step, I would recommend creating the account yourself (A good tutorial I came across on doing this can be found here, but I have summarized the steps below):
      1. Head over to Active Directory and create a new user
      2. Head over to the SQL Server
      3. Right click on Security->Logins and click New Login...
      4. Enter in your AD account you just created
      5. Click on User Mapping
        1. Check both the LcsCDR and QoEMetrics databases
      6. Click OK
        1. Do the following for both the LcsCDR and QoEMetrics databases
          1. Expand the database, expand Security, export Users
          2. Right click on the user you mapped to the database and click Properties
          3. Check ReportsReadOnlyRole and click OK
  37. Enter in the User Group you want access to run reports.
    1. This group is a list of users who have access to actually run the reports/will point and click on reports.
  38. Click Next, you should notice the following info when it starts configuring, that is normal:
    1. The following URL will be used for deployment: https://myserver.mydomain:443/ReportServer SQL Server logon credentials for "mydomain\myuser" already exist. Use the existing logon credentials. "[QoEMetrics]" role "[ReportsReadOnlyRole]" has already assigned to "mydomain\myuser". "[LcsCDR]" role "[ReportsReadOnlyRole]" has already assigned to "mydomain\myuser".
  39. Click Finish (Assuming all went OK) 🙂
  40. Head over to your Lync admin panel (web GUI)
  41. Click on Monitoring and Archiving
  42. Select Global and click on Action and select Enable CDR
  43. You can change any other settings in here to your preference at this point.
  44. Head over to your reports page. https://yourdomain/ReportServer
  45. Click on LyncServerReports
  46. Click on Reports Home Page

If you see the Monitoring Server Reports page with the Lync 2010 logo in the top left corner, get up, celebrate, and pat yourself on the back! 🙂

Other thoughts: The first time I deployed this, I ran into a ton of errors.  I have documented many of these issues and other issues that you might run into during your deployment.  Hopefully you don't run into any, but if you do, hopefully they help you get up-and-going again.

Lync 2010 – Publishing the topology error: Missing Machine

SQL Server 2008 R2 – Reporting Services Configuration Manager – Create certificate binding failed – HRESULT: 0×80040238

SQL Server 2008 R2 – Reporting Services Configuration Manager – The underlying connection was closed: Could not establish trust relationship for the SSL/TLS secure channel.

Lync 2010 – The feature: “Customizing security roles” is not supported in this edition of Reporting Services.

Lync 2010 – Cannot impersonate user for data source ‘CDRDB’. (rsErrorImpersonatingUser) error