Here is how to implement 802.1X authentication in a Windows Server 2008 R2 domain environment using Protected-EAP authentication. I have designed the tutorial to be worked on in the specific order to prevent downtime if deployed during the day. By creating the Network Policy server first, once we switch the authentication type from whatever to 802.1X via RADIUS, our Network Policy Server will immediately start processing requests and allowing machines on the domain. By configuring the Cisco Wireless LAN Controller or Group Policy first, clients will try connecting to a RADIUS server that doesn't exist or present invalid credentials. If you have any suggestions on how to better the implementation I demonstrate here, please drop a comment below to improve security/stability of these types of deployments. 🙂
Active Directory
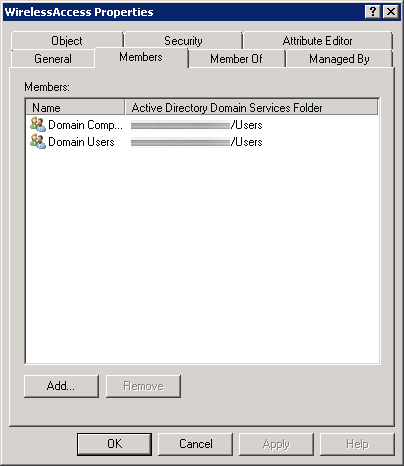
First, we need to create a security group in Active Directory to allow a list of specific users and computers to login to the domain. In this example, we will allow any authenticated user or machine on the domain to authenticate successfully to the RADIUS sever. In the screenshot below, we can see I have added both Domain Users and Domain Computers to a security group called WirelessAccess. Here is a screenshot with the above settings.
Network Policy Server
- Create a new Windows Server 2008 R2 or Windows Server 2012 machine
- Add the machine to the domain
- Give the machine a static IP: (I'll use 10.10.10.15 throughout this document as a reference to this server)
- Open up Server Manager, click Add Roles, click Next on the Before You Begin screen, check Network Policy and Access Services and click Next, click Next on the Introduction screen, check Network Policy Server (leave the rest unchecked) and click Next, click Install.
- Once Network Policy Server is installed, launch the Network Policy Server snap-in (via MMC or Administrative Tools)
- Inside of Network Policy Server, on NPC (Local), select RADIUS server for 802.1X Wireless or Wired Connections from the dropdown and click Configure 802.1X
- On the Select 802.1X Connections Type page, select Secure Wireless Connections, and enter My Company's Wireless. Click Next.
- Click on the Add... button. Enter the following settings:
- Friendly name: Cisco WLAN Controller
- Address: 10.10.10.10 (Enter your WLAN Controller's IP address)
- Select Generate, click the Genereate button, and then copy down the Shared Secret the wizard generated (we will use this later to get the WLAN Controller to talk to the RADIUS server). Click OK.
- Click Next.
- On the Configure an Authentication Method, select Microsoft: Protected EAP (PEAP). Click Next.
- Click Next on the Specify User Groups (we will come back to this).
- Click Next on the Configure Traffic Controls page.
- Click Finish
- Click on NPS (Local) -> Policies -> Network Policies. Right click Secure Wireless Connections and click Properties.
- Click on the Conditions tab, select NAS Port Type, and click Remove.
- Still on the Conditions tab, click Add..., select Windows Groups and click Add..., click Add Groups..., search for WirelessAccess and click OK. Click OK on the Windows Groups dialog box, click Apply on the Secure Wireless Connections Properties box. You should now have something like the image below:

- Click on the Constraints tab.
- Uncheck all options under Less secure authentication methods like the image below:
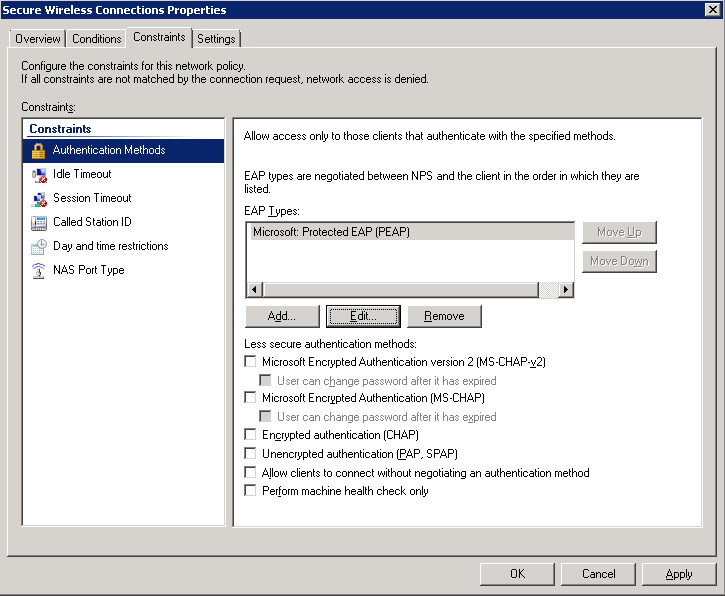
- Click Apply
- Uncheck all options under Less secure authentication methods like the image below:
Cisco WLAN
- Login to your Cisco Wireless Lan Controller
- Add a RADIUS server to your controller
- Click on the Security tab
- Select AAA -> Radius -> Authentication on the left side
- Click the New... button in the top right
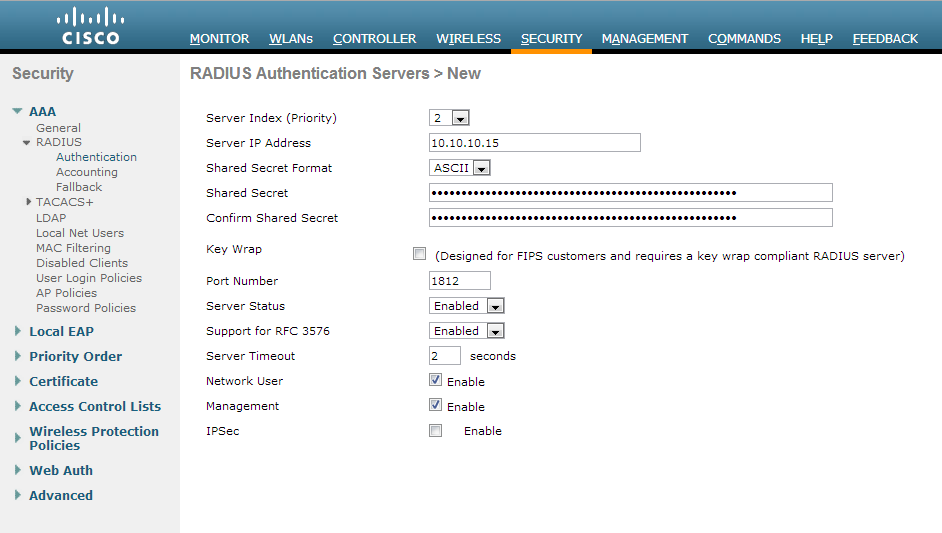
- Server IP Address: 10.10.10.15 (The IP address of your NPS server we setup earlier)
- Shared Secret Format: ASCII
- Shared Secret: The long generated password you wrote down when setting up the Network Policy Server
- Confirm Shared Secret: Same password in previous step
- Key Wrap: unchecked
- Port Number: 1812
- Server Status: Enabled
- Support for RFC 3576: Enabled
- Server Timeout: 2
- Network User: Checked
- Management: Checked
- IP Sec: Unchecked
- Here is a screenshot with the above settings
- Create or modify a wireless network to use 802.1X
- Click on the WLANs tab
- Create a new wireless network or select an existing WLAN ID to edit
- On the "WLANs > Add/Edit 'My SSID'" page, use the following settings
- Security Tab
- Layer 2 Tab
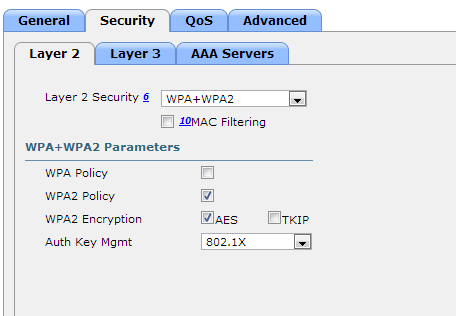
- Layer 2 Security: WPA+WPA2
- MAC Filtering: Unchecked
- WPA+WPA2 Parameters
- WPA Policy: Unchecked
- WPA2 Policy: Checked
- WPA2 Encryption: AES checked, TKIP unchecked
- Auth Key Mgmt: 802.1X
- Here is a screenshot of the above settings
- Layer 3 Tab
- Layer 3 Security: none
- Web Policy: unchecked
- AAA Servers Tab
- Authentication Servers: checked Enabled
- Server 1: Select your RADIUS server from the dropdown
- Local EAP Authentication: Unchecked
- Authentication priority order for web-auth user: Move RADIUS over to the right
- Here is a screenshot of the above settings

- Click Apply
- Layer 2 Tab
- Security Tab
Group Policy
- Go to your domain controller and open up the Group Policy Management console.
- Right click the Organizational Unit you want to apply to policy to and select Create a GPO in this domain, and Link it here...
- Note, the policy must be linked to the OU containing a group of machines you want to have WiFi access to or a parent of the OU.
- Enter in 802.1X WiFi Policy for the Name and click OK
- Right click your new GPO and click Edit
- Navigate to Computer Configuration->Policies->Windows Settings->Security Settings->Wireless Network (IEEE 802.11) Policies
- Right click and select Create A New Wireless Network Policy for Windows Vista and Later Releases
- Ensure the following settings are set for your Windows Vista and Later Releases policy
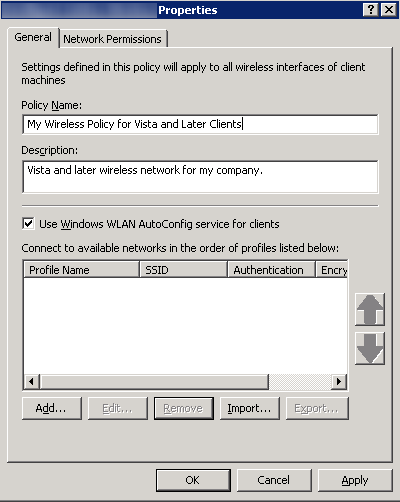
- General Tab
- Policy Name: My Wireless Policy for Vista and Later Clients
- Description: Vista and later wireless network for my company.
- Check Use Windows WLAN AutoConfig service for clients
- Here is a screenshot with the above settings
- Click the Add... button and select Infrastructure
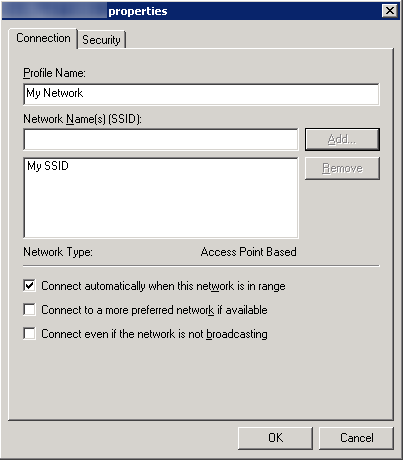
- Connection Tab
- Profile Name: My Network
- Enter in your SSID (Wireless network name that gets broadcasted) and click the Add... button
- Check Connect Automatically when this network is in range
- Here is a screenshot of the above settings
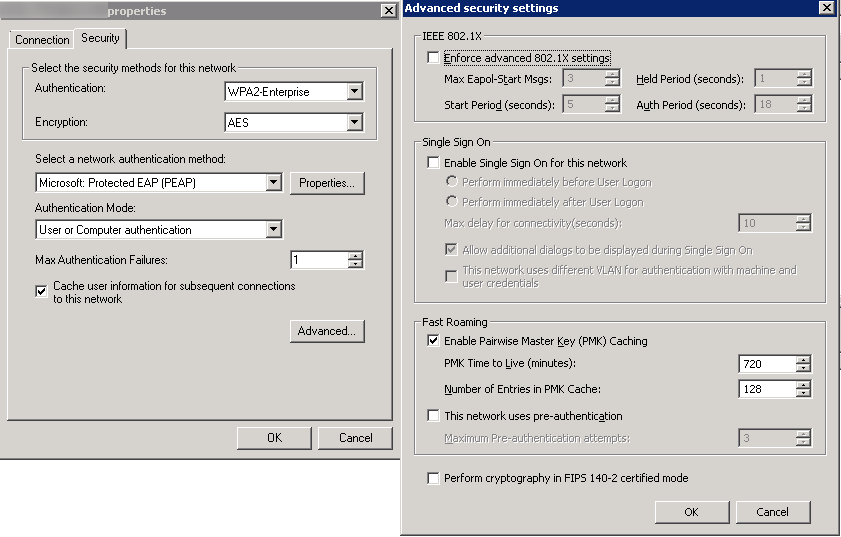
- Security Tab
- Authentication: WPA2-Enterprise
- Encryption: AES
- Select a network authentication method: Microsoft Protected EAP (PEAP)
- Authentication Mode: User or Computer authentication
- Max Authentication Failures: 1
- Check Cache user information for subsequent connections to this network
- Here is a screenshot of the above settings with the Advanced tab open as well
- Click OK
- Connection Tab
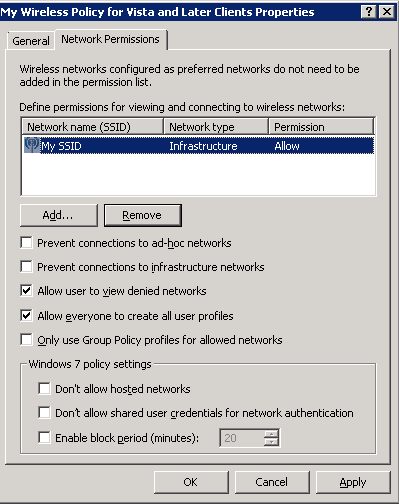
- Network Permissions Tab
- Enter your network into Define permissions for viewing and connection to wireless networks if it hasn't been added already.
- Uncheck Prevent connections to ad-hoc networks
- Uncheck Prevent connections to infrastructure networks
- Check Allow user to view denied networks
- Check Allow everyone to create all user profiles
- Uncheck Only use Group Policy profiles for allowed networks
- Leave all Windows 7 policy settings unchecked
- Here is a screenshot with the above settings (note, you may change the settings above to be in accordance to your policy. Just ensure you don't check Prevent connections to infrastructure networks).
- Click OK
- General Tab
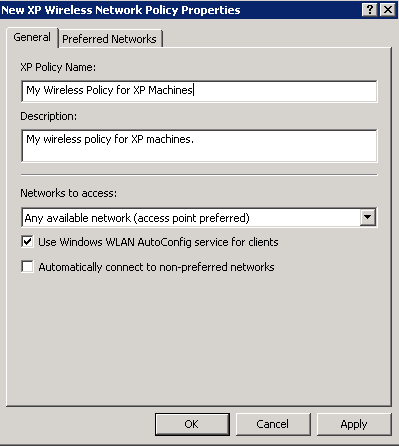
- Right click and select Create A New Windows XP Policy
- Ensure the following settings are set for your Windows XP Policy
- General Tab
- XP Policy Name: My Wireless Policy for XP Machines
- Description: My wireless policy for XP machines.
- Networks to access: Any available network (access point preferred)
- Check Use Windows WLAN AutoConfig service for clients
- Uncheck Automatically connect to non-preferred networks
- Here is a screenshot of the above settings.
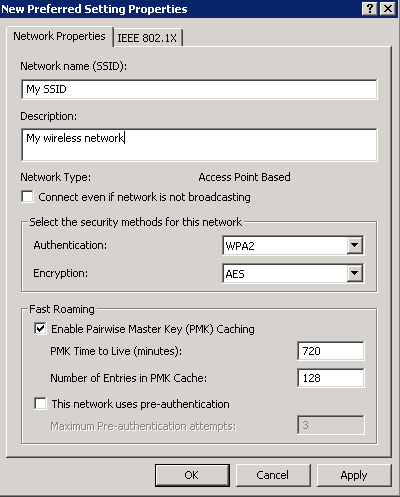
- Preferred Networks Tab
- Click the Add... button and select Infrastructure
- Network Properties Tab
- Network name (SSID): My SSID
- Description: My wireless network
- Uncheck Connect even if network is not broadcasting
- Authentication: WPA2
- Encryption: AES
- Check Enable Pairwise Master Key (PMK) Caching
- Uncheck This network uses pre-authentication
- Here is a picture of the above settings
- IEEE 802.1X Tab
- EAP Type: Microsoft: Protected EAP (PEAP)
- Eapol-Start Message: Transmit
- Authentication Mode: User or Computer Authentication
- Check Authenticate as computer when computer information is available
- Uncheck Authente as guest when user or computer information is unavailable
- Screenshot of above settings
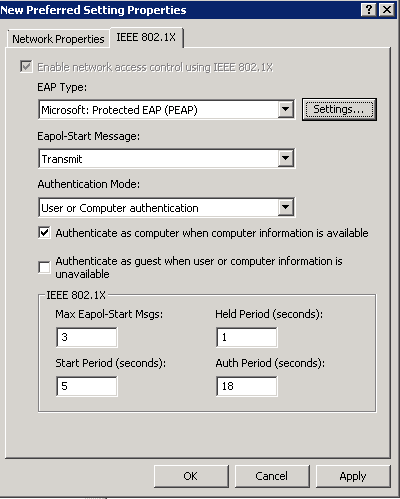
- Click OK
- Network Properties Tab
- Click the Add... button and select Infrastructure
- Click OK
- General Tab