Ford Explorer Sport 2013 - Keyless Entry Code

Recently, I purchased a Ford Explorer and for whatever reason the keyless entry code was not bundled with the owner's manual nor is it listed when you type the VIN number into Ford's website and browse the vehicle's installed accessories.

Luckily, rather than bringing the vehicle back into the dealership, there is a way to lookup the default entry code.  On the fuse box, the car has a label with a 5 digit code (sometimes followed by a single letter).

Next question is, where is the fuse box?  Interestingly, there are two on the explorer.  The first one is under the hood, on the right side inside of a "black box".  The second one is in the typical spot underneath the steering wheel on the driver side (if anyone has an explorer in Europe and it has the steering wheel on the right side of the car, you should let me know if the fuse box is on the side with the steering wheel or still on the left side by what would be the passenger :P).  Oddly enough, at a quick glance I couldn't find the fuse box as it was hidden by a piece of plastic.  Luckily, if you can grab a flashlight and stick your head underneath the steering wheel far enough, you should be able to see the sticker, otherwise you will have the pull the hex screw off and remove the plastic guard.

For whatever reason, this isn't inside the owners manual, so hopefully this helps someone else with their explorer 🙂

Enabling Skype Federation - Lync Server 2010-2013

Most articles are saying that Skype federation is now available and "you're good to go with federation enabled".  The problem though is you are more than likely missing the "Skype" option when you select Add a contact not in my organization and you may need to enable PIC provisioning for Skype.  This guide will go through enabling PIC federation through Office 365 and bringing back the Skype icon to the Lync client.

NOTE: This guide assumes you have configured your edge servers and have verified federation to other partners works.

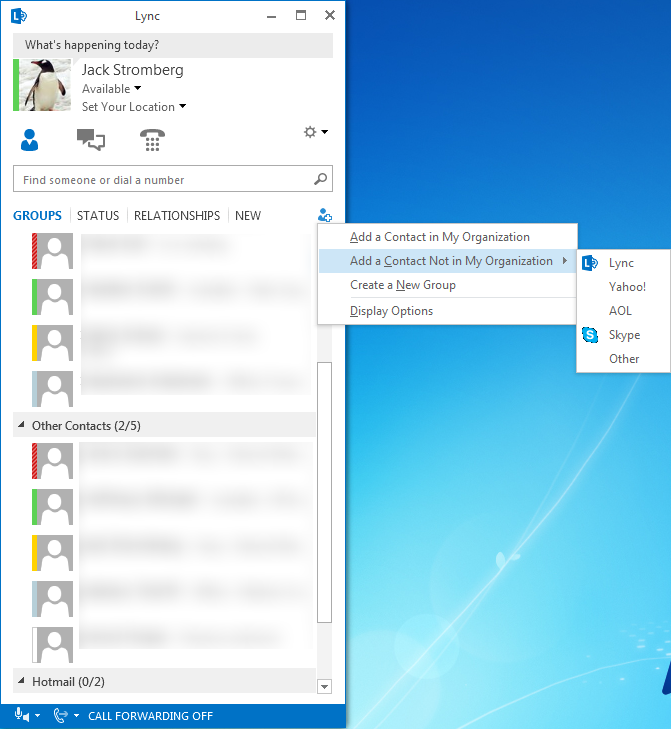
Here is what my Lync client looked like before following the instructions below:
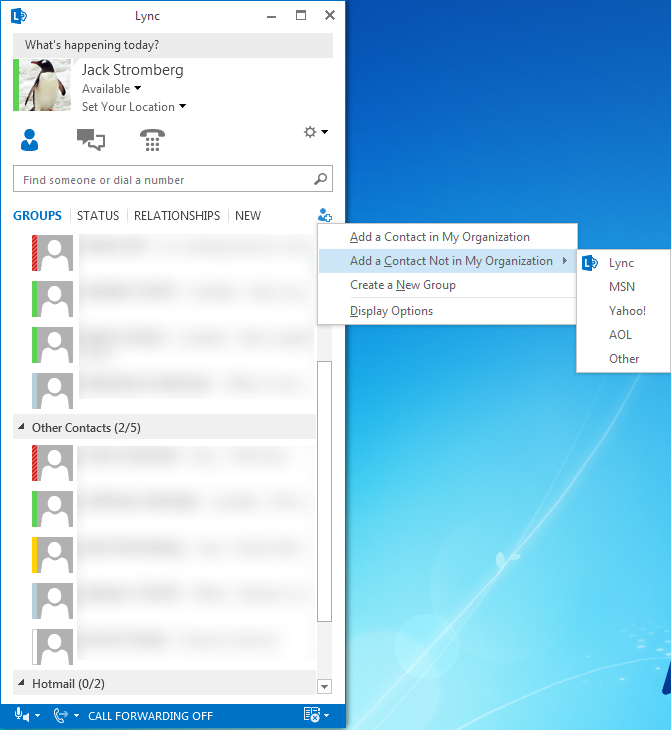
Lync client without Skype

Enabling Federation and Public IM Connectivity (PIC)

  1. Login to your Office 365 Portal
  2. Select Lync from the Admin dropdown
    Lync Menu Office365
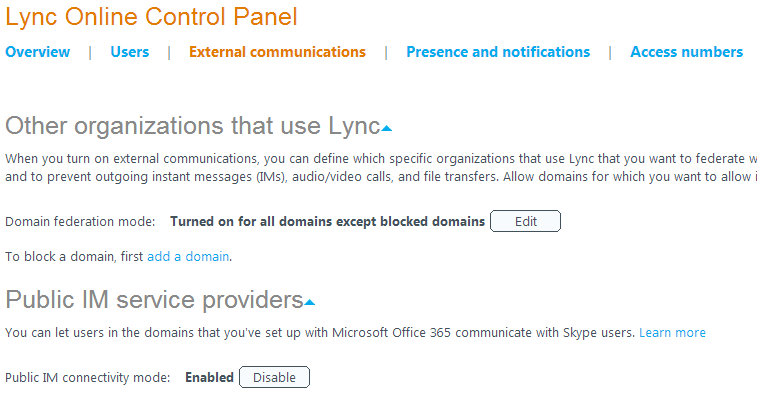
  3. Select External Communications
  4. Ensure the following settings:
    1. Domain federation mode: Turned on for all domains except blocked domains
    2. Public IM connectivity mode: Enabled
      Lync Online Control Panel

Adding Skype option to Lync Client

  1. Navigate to your front end server
  2. Open up the Lync 2010/2013 Management Shell
  3. Execute the following command to list what providers you federate to
    1. Get-CsPublicProvider
  4. If you have a provider that has a ProxyFqdn of federation.messenger.msn.com, execute the following command to remove it (replacing MSN with the Identity that had federation.messenger.msn.com for your environment):
    1. Remove-CsPublicProvider -Identity MSN
  5. Execute the following command to add Skype as a federated provider
    1. New-CsPublicProvider -Identity Skype -ProxyFqdn federation.messenger.msn.com -IconUrl "https://images.edge.messenger.live.com/Messenger_16x16.png" -VerificationLevel 2 -Enabled 1
  6. Close your Lync client and reopen for the option to be available
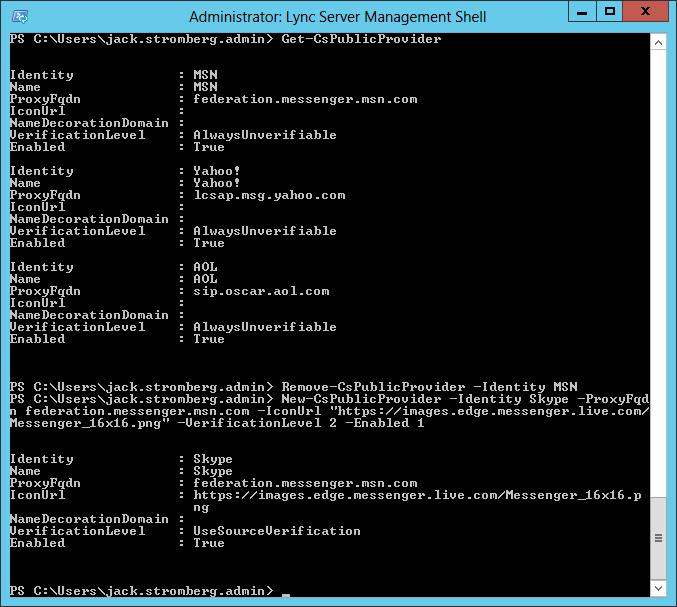
Powershell Lync Skype

Adding Skype contacts to Lync

  1. Click the Add a Contact icon
  2. Select Add a Contact Not in My Organization
  3. Select Skype.
    1. Lync client with Skype
  4. In the IM Address field, enter the Microsoft Account (MSA) of the Skype user in the format user(domain name)@msn.com.
    1. Example: If someone's email was [email protected], the entry would be bob(contoso.com)@msn.com

  5. In the Add to contact group dropdown box, select the contact group to put the user in.
  6. In the Set privacy relationship dropdown box, select the appropriate relationship.
  7. Click OK.
  8. NOTE: Once the Skype user adds your account, the federated user will appear online.  Until the user adds you to their Skype list, the contact will appear offline.

Adding Lync user to Skype

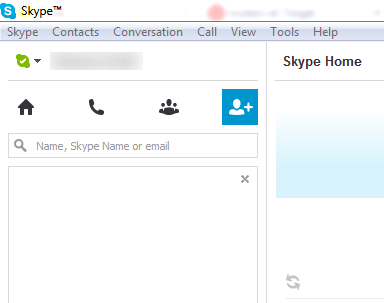
  1. Sign into Skype
  2. Click the Add User icon
    Add User Icon Skype
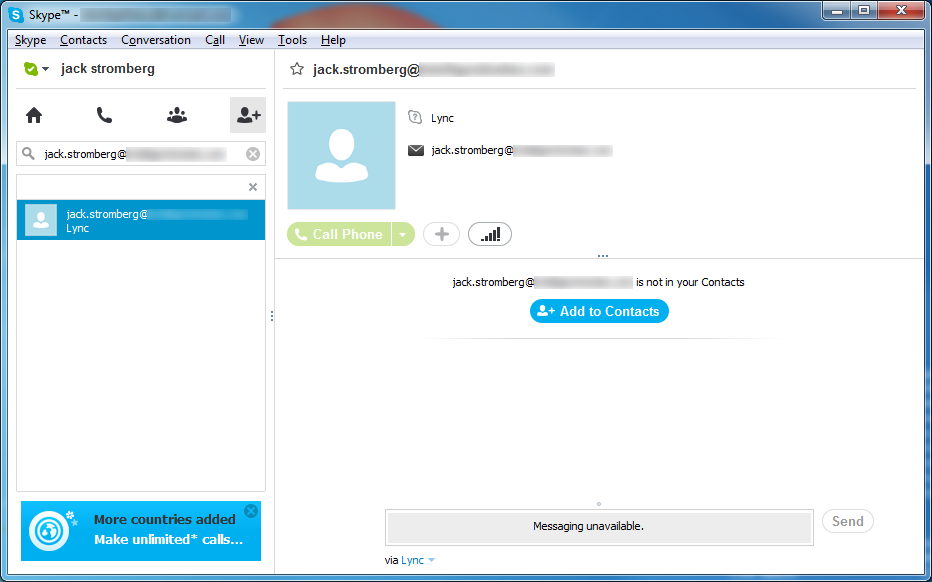
  3. Type in the user's SIP address
    1. For example: [email protected]
      1. Note: You do not need to use the MSA format when adding the contact to your list from Skype
  4. Select (single click) the name when it appears in the search list
  5. Click the Add to Contacts button
    Adding Lync Contact - Skype
  6. NOTE: If you add the user to Skype first before Lync, the user will show up with a question mark (?) icon for a status until the Lync user approves the request/adds you to their contacts list.

Awesome Tidbits

When setting up Lync-to-Skype federation for the first time, I was seeing the following symptom.  Lync users could see the Skype user Offline, the Skype user could not add the Lync user as it would not pull the directory, and IMs would not work because the users had not accepted each other.  Doing a log on the front end server, resulted with the following error message as well:

TL_INFO(TF_PROTOCOL) [0]1838.0B20::06/05/2013-14:36:41.206.00008d15 (SIPStack,SIPAdminLog::ProtocolRecord::Flush:2420.idx(196))[506561689] $$begin_record
Trace-Correlation-Id: 506561689
Instance-Id: B0B5F
Direction: incoming
Peer: myedgepool.mydomain.local:5061
Message-Type: response
SIP/2.0 480 temporary unavailable
Start-Line: SIP/2.0 480 temporary unavailable
FROM: "Jack Stromberg"<sip:[email protected]>;tag=0f6bccf745;epid=1aadaf98be
TO: <sip:person(hotmail.com)@msn.com>;tag=qwemztox
CALL-ID: a0b5bb30381640c08b30ee2bda403905
CSEQ: 1 INVITE
Via: SIP/2.0/TLS 192.168.169.221:53811;branch=z9hG4bK6DC1D74D.F39C6D8A52E04898;branched=FALSE;ms-received-port=53811;ms-received-cid=718100,SIP/2.0/TLS 192.168.170.142:50017;ms-received-port=50017;ms-received-cid=208A00
CONTENT-LENGTH: 0
ms-diagnostics: 1035;reason="Previous hop public IM provider did not report diagnostic information";Domain="msn.com";PeerServer="federation.messenger.msn.com";source="sip.mydomain.com"
ms-diagnostics-public: 1035;reason="Previous hop public IM provider did not report diagnostic information";Domain="msn.com";PeerServer="federation.messenger.msn.com"
$$end_record

Findings: Doing some research, the 480 temporary unavailable error with 1035;reason="Previous hop public IM provider did not report diagnostic information" means that there are federation issues.  Since I know I enabled PIC Federation through Office 365 and federation worked to other partners (hotmail users for example), I assumed this was an issue with the PIC configuration.

Solution: According to a technet article recently posted (http://community.office365.com/en-us/blogs/office_365_technical_blog/archive/2013/06/01/troubleshooting-lync-skype-connectivity.aspx) if you are having issues federating to Skype, you may have to toggle the Public IM Connectivity mode switch in your Office 365 Lync portal.  If you are a small business user, you are almost gaurenteed to be affected by the upgrade to Office 365 2013.  If you are an enterprise business, it appears you should be fine, but in my case, I still saw issues connecting under an underprise account.

Additionally, it turns out I needed to submit a request to the old PIC provisioning crew at Microsoft in another scenario.  Once they enabled federation to Skype, I was able to go on my merry way.  You can start the request process here (their website can be quite frustrating... I couldn't get half the pages to load and ended up sending them an email): https://pic.lync.com/provision/Logon/Logon.aspx?rret=https%3a%2f%2fpic.lync.com%2fprovision%2fAgreementNumber.aspx%2f
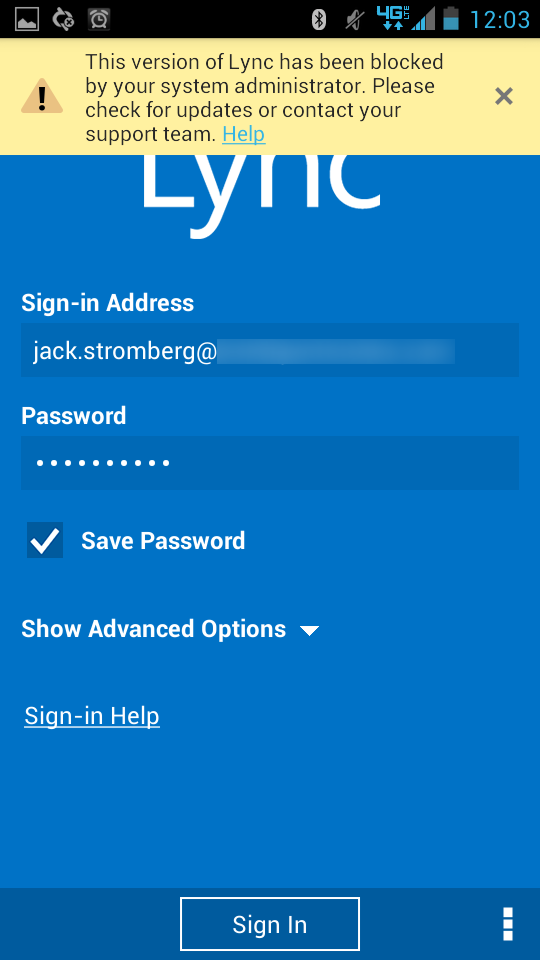
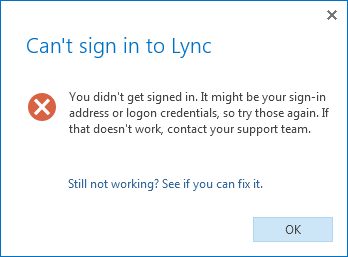
Lync Server 2013 Error after applying CU1

Symptom: You receive the following errors in Event Viewer after installing the February Cumulative Update 1 for Lync Server 2013.

The database being used by Group Pickup is not the appropriate version.

Event ID: 31059
The database is not the correct version:
Connection: Data Source=sqlserver.mydomain.local;Initial Catalog=cpsdyn;Integrated Security=True
Expected... SchemaVersion: 1, SprocVersion: 1, UpgradeVersion: 2
Actual... SchemaVersion: 0, SprocVersion: 0, UpgradeVersion: 0
Cause: The database has not been upgraded.
Resolution:
Upgrade the database to CU1.

Event ID: 31055
There was a problem communicating with the Group Pickup backend database.

There were problems accessing SQL server:
Connection: Data Source=sqlserver.mydomain.local;Initial Catalog=cpsdyn;Integrated Security=True
Message: The EXECUTE permission was denied on the object 'DbpGetVersionSchema', database 'cpsdyn', schema 'dbo'.
Error code: -2146232060
Error number: 229
Cause: This may be caused by connectivity issues with the backend database.
Resolution:
Check if SQL backend is running and accepts connections from Group Pickup.

Solution:
When installing Cumulative Update 1 for Lync Server 2013 from the following KB article http://support.microsoft.com/kb/2809243, make sure you follow the last step to update the backend database.  To finish the steps, execute the following command via the Lync Server 2013 PowerShell prompt.

Lync Server 2013 Standard Edition

Install-CsDatabase -ConfiguredDatabases -SqlServerFqdn frontendserver.fqdn -Verbose

Lync Server 2013 Enterprise Edition

If the Lync Server 2013 Enterprise Edition back end servers do not have SQL mirroring configured, run the following cmdlet to apply the changes:

Install-CsDatabase -ConfiguredDatabases -SqlServerFqdn sqlserver.fqdn -Verbose

See the following KB article if you have mirroring configured on your backend database servers.

Deploying Office 2013 Professional Plus from Office365 Offline

As you have probably found out, Microsoft no longer provides a traditional installer for Microsoft Office 2013.  Additionally, you also probably know that the installer they do provide sucks down the installation files on each PC via the internet, which takes forever to deploy and install Office in an enterprise environment.  That being said, here is the solution on how to deploy Office 2013 in an Enterprise environment! 🙂

  1. Download the Office Deployment Tool for Click-to-Run
    1. http://www.microsoft.com/en-us/download/details.aspx?id=36778
  2. Once downloaded, run officedeploymenttool.exe
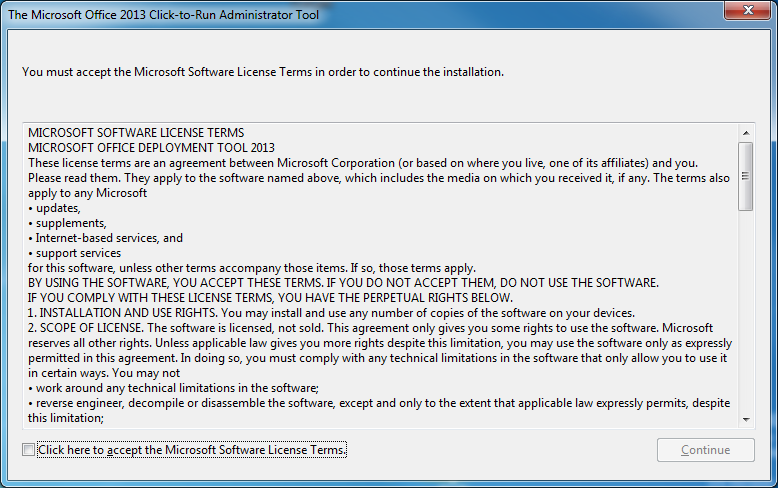
    1. Accept the EULA
      Click-to-run EULA
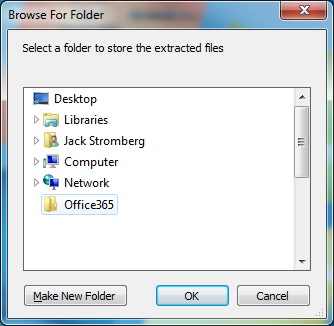
    2. Select a folder for it to extract the setup.exe file to
      Office365 Folder
  3. Navigate to the folder you made is step 2.2 via Windows Explorer and edit the configuration.xml file with your favorite text editor (notepad, notepad++, etc.)
  4. Remove any text inside the configuration.xml file and use the following code:
    1. <Configuration>
      <Add OfficeClientEdition="32" >
      <Product ID="O365ProPlusRetail">
      <Language ID="en-us" />
      </Product>
      </Add>
      <Updates Enabled="TRUE" UpdatePath="" />
      <Display Level="None" AcceptEULA="TRUE" />
      <Logging Name="OfficeSetup.txt" Path="%temp%" />
      </Configuration>

      1. Note: I used the 32-bit client installer instead of the 64-bit build.  The reasoning behind this is Microsoft advises to stay on the 32-bit build to ensure compatibility to browser plugins that have not been written for the 64-bit office build.
    2. What this code will do is deploy a 64-bit version of Office 365 Professional Plus, automatically accept the EULA when prompted, and log installation progress to a text file called OfficeSetup.txt to your temporary files folder.
      1. NOTE: If you want to download the 32-bit version of Office 365 Professional Plus, simply change the OfficeClientEdition="64" attribute above to OfficeClientEdition="32"
    3. Save configuration.xml and minimize your text editor, we will come back to this file later.
  5. Next, open up a command prompt and navigate to the folder you made in step 2.2
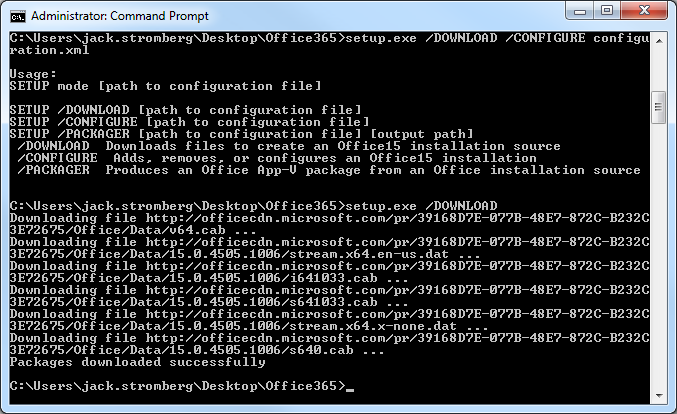
  6. Now, we will download the necessary files from Microsoft used to deploy Office internally on our network.  To do so, execute the following command:
    1. setup.exe /DOWNLOADOffice365 Download Offline Files
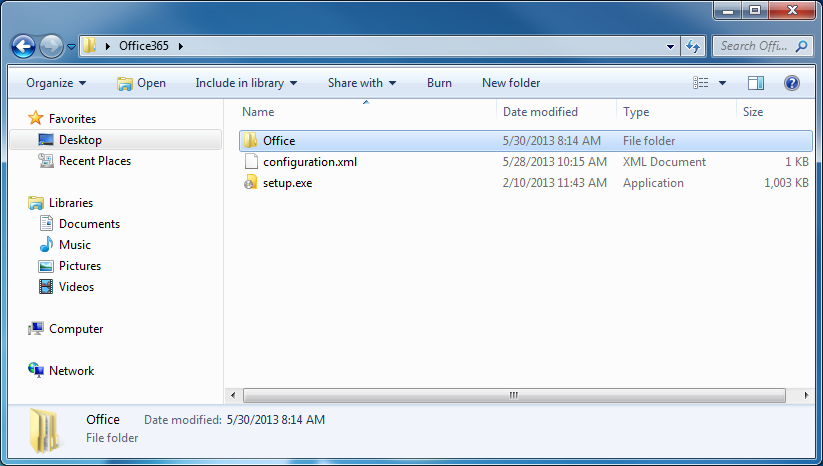
  7. You should now see a folder called "Office" once the files have successfully completed.Office365 Offline Files
  8. Create a network share where these files can be grabbed from during an installation.  Once done, open up your text editor with the configuration.xml file.
  9. Add the following attribute to your <Add OfficeClientEdition="64"> line:
    1. SourcePath="\\server\share\Office"
    2. So the entire line should look something like <Add OfficeClientEdition="32" SourcePath="\\server\share\Office">
  10. Now make a new file called deploy.bat inside of your folder we created in step 2.2
  11. Paste the following code into that file:
    1. @echo off
      pushd %~dp0
      echo /******************************************
      echo /* Installing Office 365
      echo /******************************************
      setup.exe /CONFIGURE configuration.xml
      pause
  12. Once the command has executed, Office 365 Professional Plus should automatically be deployed on the machine!  The last step is for the user to login to their profile and activate Office 365 using their Office365 credentials.

Hope this helps! If anyone finds a better solution, please let me know and I can update the guide 🙂

Notes:

Here is a link to what Product IDs are supported for deployment: http://support.microsoft.com/kb/2842297

Lync On-Premise with Office 365 Federation - error ID 403

When communicating to hosted companies in Office 365 from an On-Premise Lync environment, I had begun seeing the following symptoms:

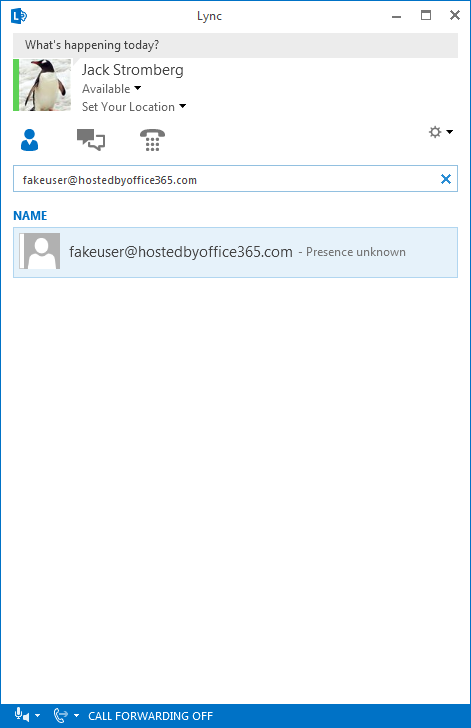
  1. Presence defaulted to Unknown for federated contacts:
    Lync Presence unknown
  2. When joining someone's meeting or sending them an IM, I would see the following:
    "When contacting your support team, reference error ID 403 (source ID 239)."
    Lync Meeting Error ID 403 (Source ID 239)
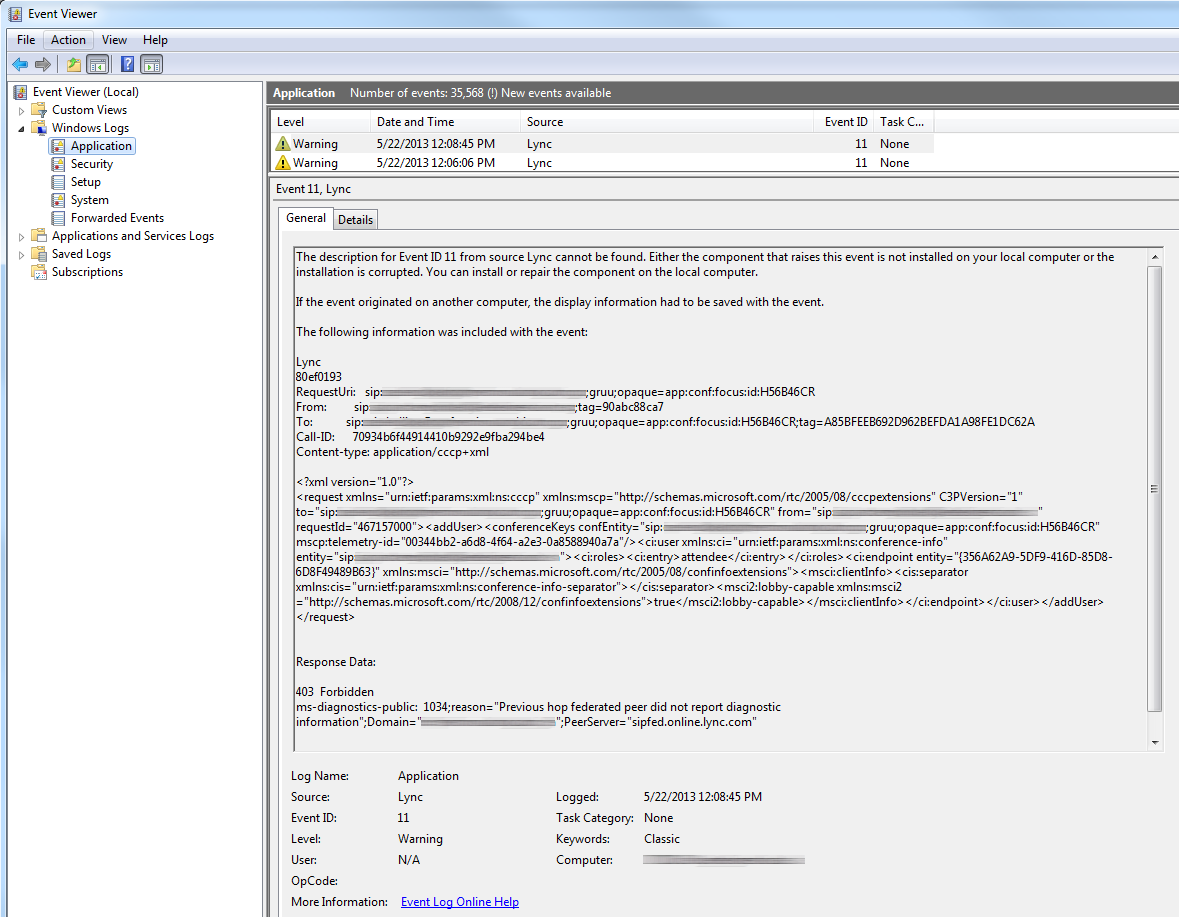
  3. Inside of event viewer, I saw:
    403 Forbidden
    ms-diagnostics-public: 1034;reason="Previous hop federated peer did not report diagnostic information";Domain="othercompanydomainon.com";PeerServer="sipfed.online.lync.com"
    Lync Office 365 Federation Error

Solution:

Interestingly enough, even though you have an On-Premise Lync environment, it appears that Office 365 will tie back to your account for some settings.  In my case, I had not enabled federation to other PIC providers on Office 365.

To resolve the issue, please follow the steps below:

  1. Login to the Office 365 Admin Portal
  2. Click on Manage Lync
    Manage Lync - Office 365
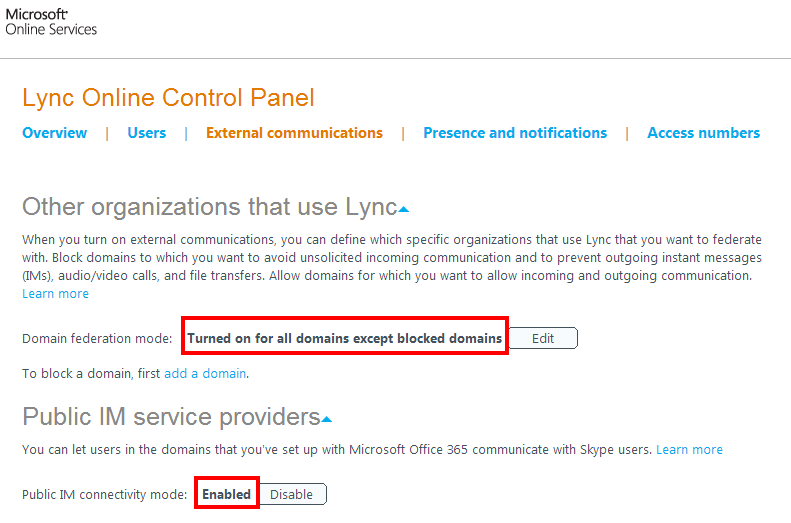
  3. Click on the External communications tab and ensure the following settings:
    1. Domain federation mode: Turned on for all domains except blocked domains (you can switch to the other mode, just keep in mind you will have to whitelist every domain you are enabling communication with)
    2. Public IM connectivity mode: Enabled
    3. Lync - Office 365 - External communications
  4. Next, head over to the Lync Online Control Panel for your on-premise Lync deployment.
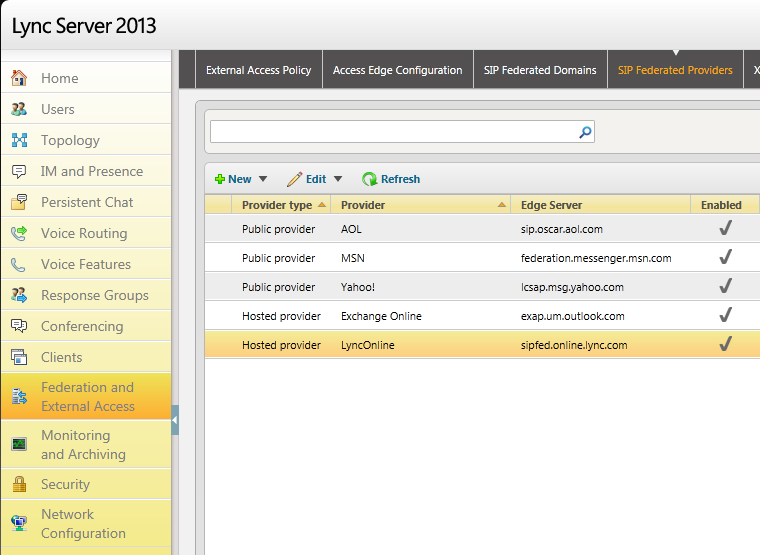
  5. Select the Federation nand External Access tab and then select SIP Federated Providers
  6. Ensure you have created a rule for the provider LyncOnline that is federated to sipfed.online.lync.com
    Lync - SIP Federated Providers

    1. To create the provider via the Lync Server 2013 Control Panel
      1. Select New... and then click Hosted Provider
        1. Enable communications with this provider: Checked
        2. Provider Name: LyncOnline
        3. Access Edge Service (FQDN): sipfed.online.lync.com
        4. Click Commit
    2. To create the provider via PowerShell, execute the following command:
      1. New-CSHostingProvider -identity LyncOnline -ProxyFqdn sipfed.online.lync.com -Enabled $True

Wait a few minutes for the changes to take effect, exit out of your Lync client on your workstation, reopen and you should now be able to communicate to your federated partner.

Importing a SSL certificate into a Java Keystore via a PKCS12 file

Here are the instructions on how to import a SSL certificate into the Java Keystore from a PKCS12 (pfx or p12) file.

  1. Create a new keystore
    1. Navigate to C:\Program Files\Java\jdk_xxxx\bin\ via command prompt
  2. Execute: keytool -genkey -alias mycertificate -keyalg RSA -keysize 2048 -keystore mykeystore
    1. Use password of: Use the same password/passphrase as the PKCS12 file
    2. What is your first and last name?  (should be the dns you're going to use) [Unknown]:  server.mydomain.com
      What is the name of your organizational unit? [Unknown]: MyCompanysITDepartment
      What is the name of your organization?  [Unknown]:  MyCompany
      What is the name of your City or Locality?  [Unknown]:  CITY
      What is the name of your State or Province?  [Unknown]:  STATE
      What is the two-letter country code for this unit?  [Unknown]:  US
      Is CN=...................................... correct?  [no]:  yes
      Enter key password for <mycertificate>
      (RETURN if same as keystore password): Hit Return/Enter
  3. Empty the keystore
    1. Execute via command prompt: keytool -delete -alias mycertificate -keystore mykeystore
    2. Ensure nothing is in the keystore by executing: keytool -v -list -keystore mykeystore
  4. Import the PKCS12 File
    1. Execute via command prompt: keytool -v -importkeystore -srckeystore whateverthefileis.p12 -srcstoretype PKCS12 -destkeystore mykeystore -deststoretype JKS
    2. Enter the PKCS12 password/passphrase for both the Source and Destination password.

OCSLogger Options Defined for Lync 2013

Here is a very incomplete list of what each option means on the Lync Server 2013 Logging Tool (OCSLogger.exe).  I am still trying to learn how this tool works and am in search of a complete list of what each Logging Options does, so if you have any information on what each option does please drop a comment below so I can add it to the table. --Thanks and hope this helps someone else!

Notes:

Here is a very thorough guide from Microsoft on Specifying Options for Logging for Communications Server 2007

Here is a guide from Microsoft on Using Lync Server 2013 Logging Tool

Component Description
ABCommon Enables logging for the Address Book service.
ABServer Enables logging for the Address Book service that provides global address list information from Active Directory to the Office Communicator client.
ABServerIISModule
ADConnect Enables logging for Active Directory connectivity.
ADminUI Enables logging information for the Lync Admin Control Panel, logging interactions and calls.
AggregationScript Enables logging for the component that determines the aggregate user state and capabilities across all endpoints.
ApiModule Enables logging for the component that exposes the Office Communications Server API to MSPL (Microsoft SIP Processing Language) and managed code applications.
ApplicationServer
AppShareOoty
ArchivingAgent Enables logging for the Archiving agent that runs on the Front End Server and writes SIP messages to Message Queuing.
ArchJournal
AsMcu
AutoDiscover
AvMcu Enables logging for the A/V Conferencing Server.
AvMP
CAAServer
CASServer
CertProvisioning
ChatCommon
ChatEndpoint
ChatRoomManagement
ChatSDK
ChatWebService
ClientVersionFilter Enables logging for the Client Version Filter, an application that can be used to allow/block access from clients that conform to certain versions.
CLSAgent
CLSCommon
CLSController
CLSControllerLib
CLSFormat
Collaboration Logs activities of the collaboration object layer pertaining to instant messaging.
CpsDiagnostics
CpsHostingFramework
DataMCU Enables logging for the Web Conferencing Server.
DataMCURunTime
Deployment
DeviceUpdate
DeviceUpdateHttpHandler
Dialin
Dlx Enables logging for the Group (DL) Expansion service.
ExumRouting Enables logging for the component that routes calls to Exchange Unified Messaging for voice mail.
HybridConfig
IIMFilter Enables logging for the Intelligent Instant Messaging (IIM) application that filters incoming IM traffic using criteria specified by administrators.
ImMcu Enables logging for the IM Conferencing Server, which enables group IM by relaying IM traffic among all participants.
InboundRouting Enables logging for the Inbound Routing component that handles incoming calls largely according to preferences that are specified by users on their Enterprise Voice clients.
IncomingFederation
Infrastrucutre
InterClusterRouting
InternalCommon
JoinLauncher
LCCertHelper Enables logging of the component used for certificates-related functionality in SipStack, MMC, WMI, and the Certificates Wizard.
LcsServer Enables logging of the RtcSrv service. On a Front End Server the RtcSrv service is the Office Communications Server Front End service. On an Access Edge Server, the RtcSrv service is the Office Communications Server Access Edge service.
LDM  Enables logging of Web Conferencing Server Connection Management which manages TLS/MTLS connections from clients and other servers such as the Web Conferencing Edge Server.
LocationInformationService
Lyss
Mach
ManagementCore
MCUFactory Enables logging for the Focus Factory which determines which conferencing server is available to service the conference scheduling request.
MCUInfra Enables logging for the component that provides communication between the Focus and the conferencing servers.
McxService
Media_MMVR
Media_PAL
MediaStack_AUDIO_AGC
MediaStack_AUDIO_DRC
MediaStack_AUDIO_ECHODT
MediaStack_AUDIO_FAXDT
MediaStack_AUDIO_HEALER
MediaStack_AUDIO_NOISEDT
MediaStack_AUDIO_VAD
MediaStack_AUDIO_VSP
MediaStack_AudioCodes
MediaStack_AudioEngine
MediaStack_COMAPI
MediaStack_COMMON
MediaStack_Crossbar
MediaStack_Crypto
MediaStack_DebugUI
MediaStack_DebugUI_AEC
MediaStack_DEVICE
MediaStack_MassConvertedTraces1
MediaStack_MediaManager
MediaStack_PerFrame
MediaStack_PerPacket
MediaStack_QualityController
MediaStack_RTCP
MediaStack_RTP
MediaStack_StreamingEngine
MediaStack_TLS
MediaStack_Transport
MediaStack_VIDEO
MediaStack_VOICEENHANCE
MediationServer Enables logging for the Mediation Server that translates between the Office Communications Servers and the media gateway.
MRAS Enables logging for the Office Communications Server Audio/Video Authentication service, which provides authentication services for the A/V Edge Server, the component that provides the functionality to share audio and video with external users.
OutboundRouting Enables logging for the Outbound Routing component that routes calls to PBX or PSTN destinations, applies call authorization rules to callers, and determines the optimal media gateway for routing each call.
OutgoingFederation
PDP
PowerShell Enables logging for most of the PowerShell interfaces from the Lync Amdin Control Panel.
QueueDLL Enables logging for the component that facilitates inter-process communication between the server and applications.
RDPApiTrace
RDPEncComTrace
ReachJoin
ReachPerf
RgsClientLib
RgsCommonLibrary
RgsDatastores
RgsDeploymentApi
RgsDeploymentLibrary
RgsDiagnostics
RgsHostingFramework
RgsMatchMakingService
Routing_data_Sync_agent
RtcDbSyncAgent
RtcHost Enables logging for the component that is the host for all server API applications.
RTCSPL Enables logging for the component that is the host for running MSPL (Microsoft SIP Processing Language) script based applications.
S4 Logs all SIP messages between the Mediation server and PSTN gateways
ServerAgent
ServerConfiguration
ServerTransportAdaptor
SIPStack Enables logging for the SipStack component that handles TLS/MTLS connection management and SIP call flows.
StoreWeb
TranslationApplication Enables logging for the Translation Service which is the server component that is responsible for translating a dialed number into E.164 format based on the normalization rules defined by the administrator.
UCMA_Workflow
UCWA
UdcAgent
UserPinService
UserServices Enables logging for the UserServices component that provides closely integrated IM, presence, and conferencing features built on top of the SIP proxy. Includes the Focus and Focus Factory.
WebInfrastructure
WebRelay
WebScheduler
WPP_OC_RDP_APPSHAPI
XDS_File_transfer_agent Enables logging of replication data, specifically file transfer aspects.
XDS_Master_replicator Enables logging for the creation of replication packges and notifications.
XDS_Replica_Replicator Enables logging for receipts of replication packages and notifications.
XmppCommonLibrary
XmppListener
XmppRouting
XmppTGW


Veeam Backup and Replication 6.5 for VMware- CHMOD mask [0] error

Symptom:
When running a backup, you receive the following message:

5/20/2013 1:43:48 PM :: Error: Client error: File does not exist. File: [E:\Backups\VMs\VM2013-05-20T010122.vib].
Failed to restore file from local backup. VFS link: [summary.xml]. Target file: [MemFs://Tar2Text]. CHMOD mask: [0].

Solution:
From what I gather, this error is generated when you do not have a full backup completed.  For example, lets say you have an external hard drive you backup to and your next scheduled backup is an incremental.  Now when your incremental backup runs, since a full backup does not exist, the incremental backup cannot be made and you result with the above error.

To allow your backup to complete successfully, you will need to manually create full backups for each of the "problem VMs", so the incremental can backup properly.  To do so, you can right click on your Veeam Backup Job and select "Active Full".  This will create a full backup and then let your scheduled incremental jobs run as intended.

Configuring Lync Server to push out latest Microsoft Lync Phone Edition firmware

I noticed today that a large shipment of Polycom phones we were going to deploy were using the RTM version of Lync Phone Edition and were outdated compared to Microsoft's latest version.  That being said, here is a guide on how to update the firmware for your phones.

At the time of this writing, it appears there are only a few different manufacturers that distribute the Microsoft Lync Phone Edition phones.  For reference, here are the Microsoft URLs for each of those phone types:

Deploying latest firmware for the Microsoft Lync Phone Edition

  1. Download the latest firmware for the Lync Phone Edition device.
    1. In my case, I want to push out the latest firmware for the Polycom CX600s, which can be found here (links to the firmware of other phones can be found above in this same article): http://www.microsoft.com/en-us/download/details.aspx?id=23866
  2. Double click on the downloaded file (UCUpdates.exe), and run through the wizard.
    1. Select your language:
      Microsoft Lync Phone Edition Wizard - Select Language
    2. Accept the EULA
      Microsoft Lync Phone Edition Wizard - Accept EULA
    3. On this step, extract the files to a folder you can recognize.  All firmware downloads are called UCUpdates.exe and ucupdates.cab, so I highly recommend you sort out each firmware to a corresponding folder.
      Microsoft Lync Phone Edition Wizard - Extract To 
    4. Click the "Click this link to open folder in Windows Explorer." and verify you see the ucupdates.cab file.
      Microsoft Lync Phone Edition Wizard - Open Extracted Contents
    5. Here we see the ucupdates.cab file.
      ucupdates - Extracted files
  3. Copy the ucupdates.cab file over to your Lync Front End Server if you didn't in the first step.
  4. Execute the following powershell command (where the WebServer is the Front End Pool or Front End Server in a standalone instance):
    1. Import-CsDeviceUpdate -Identity service:WebServer:lync.mydomain.local -FileName "C:\Polycom CX600\ucupdates.cab" -Verbose
      1. Note: I added the optional -Verbose parameter to show the output of what the PowerShell command is doing behind the scenes.  Some people have mentioned this step taking awhile to complete, this will at least give you some comfort if things are moving forward or not.
  5. Once the command has completed successfully, head over to the Lync Server Control Panel (LSCP) (Web GUI), and navigate to Clients > Device Update.  Here you should see the firmware for your device and you should notice that the version shows up under the "Pending Version" column.  This means that the firmware will NOT be pushed until we manually approve it.
    LSCP - Clients - Device Update - Polycom
  6. Now we will push out the firmware to one device to ensure the firmware actually works.  Inside of the Lync Server Control Panel, click on the Test Device tab.
    1. Click the New... button and then select Global test device
    2. For Device Name, type in something like Polycom CX600 to identify what will be pushed to it, and then enter in the MAC address of the phone in the Unique identifier field.
      1. Note: if you use the MAC address as the Unique identifier, make sure you leave out any special characters, it should be only the hex address.
    3. Here is a screenshot below of my test device:
      LSCP - Clients - Test Device
  7. At this point, all you need to do is wait until the phone reboots and applies the update automatically (you don't need to approve the firmware or anything like that, it just starts to deploy to the test device).
    1. If you want to check what is going on, if you login to your front end server and navigate to C:\inetpub\logs\LogFiles\<randomID>, you can see the process of the phone trying to pull the update files and then reconnecting with the updates.  In my case, I could see the phone boot, pull the new firmware files, and then reboot and make new requests with the latest version in the headers.
    2. 2013-05-16 15:43:13 192.168.1.21 POST /locationinformation/liservice.svc/mex - 443 - 192.168.2.2 OCPhone/4.0.7577.4066+(Microsoft+Lync+2010+Phone+Edition) - 200 0 0 114
      2013-05-16 15:43:13 192.168.1.21 POST /RequestHandler/ucdevice.upx - 443 - 192.168.2.2 Microsoft+UCPhone+Device+(lcs_se_w14_main:1077577:2012/02/18:16:44:15) - 200 0 0 219
      2013-05-16 15:43:13 192.168.1.21 GET /RequestHandler/Files/UCPhone/POLYCOM/CX600/Rev-5/ENU/4.0.7577.4387/CPE/CPE.nbt - 80 - 192.168.2.2 Microsoft+UCPhone+Device+(lcs_se_w14_main:1077577:2012/02/18:16:44:15) - 200 0 995 240
      2013-05-16 15:43:13 192.168.1.21 POST /groupexpansion/service.svc/mex - 443 - 192.168.2.2 OCPhone/4.0.7577.4066+(Microsoft+Lync+2010+Phone+Edition) - 200 0 0 30
      2013-05-16 15:43:15 192.168.1.21 POST /WebTicket/WebTicketService.svc/mex - 443 - 192.168.2.2 OCPhone/4.0.7577.4066+(Microsoft+Lync+2010+Phone+Edition) - 200 0 0 129
      2013-05-16 15:43:17 192.168.1.21 POST /WebTicket/WebTicketService.svc/cert - 443 - 192.168.2.2 OCPhone/4.0.7577.4066+(Microsoft+Lync+2010+Phone+Edition) - 200 0 0 68
      2013-05-16 15:43:17 192.168.1.21 POST /locationinformation/liservice.svc/WebTicket_Bearer - 443 - 192.168.2.2 OCPhone/4.0.7577.4066+(Microsoft+Lync+2010+Phone+Edition) - 200 0 0 197
      ..........Some random logs here..........
      2013-05-16 15:44:16 192.168.1.21 GET /RequestHandler/Files/UCPhone/POLYCOM/CX600/Rev-5/ENU/4.0.7577.4387/CPE/CPE.nbt - 80 - 192.168.2.2 Microsoft+UCPhone+Device+(lcs_se_w14_main:1077577:2012/02/18:16:44:15) - 200 0 0 61951
      2013-05-16 15:44:16 192.168.1.21 GET /RequestHandler/Files/UCPhone/POLYCOM/CX600/Rev-5/ENU/4.0.7577.4387/CPE/CPE.cat - 80 - 192.168.2.2 Microsoft+UCPhone+Device+(lcs_se_w14_main:1077577:2012/02/18:16:44:15) - 200 0 0 44
      2013-05-16 15:44:16 192.168.1.21 GET /RequestHandler/Files/UCPhone/POLYCOM/CX600/Rev-5/ENU/4.0.7577.4387/CPE/CPE.cat - 80 - 192.168.2.2 Microsoft+UCPhone+Device+(lcs_se_w14_main:1077577:2012/02/18:16:44:15) - 200 0 0 10
      ..........Some random logs here..........
      2013-05-16 15:51:55 192.168.1.21 POST /groupexpansion/service.svc/mex - 443 - 192.168.2.2 OCPhone/4.0.7577.4387+(Microsoft+Lync+Phone+Edition) - 200 0 0 11
      2013-05-16 15:51:55 192.168.1.21 POST /locationinformation/liservice.svc/mex - 443 - 192.168.2.2 OCPhone/4.0.7577.4387+(Microsoft+Lync+Phone+Edition) - 200 0 0 8
      2013-05-16 15:51:56 192.168.1.21 POST /WebTicket/WebTicketService.svc/mex - 443 - 192.168.2.2 OCPhone/4.0.7577.4387+(Microsoft+Lync+Phone+Edition) - 200 0 0 10
  8. Once the firmware has been applied to your test device and all is well, we need to approve the firmware for all phones in the organization.  To do so, follow the steps below.
    1. Navigate to Clients -> Device Update
    2. Click Edit, Select all
    3. Click Action, Approve
      LSCP - Clients - Device Update - Approve