Where did FOPE go in the Office 365 Admin Portal?

Today a coworker logged into one of our Office 365 Admin Portals and noticed that the Forefront Online Protection for Exchange (FOPE) link was removed to manage mail flow rules.  After searching the entire admin panel, turns out Microsoft removed access to FOPE and has instead integrated a new "mail flow" area to manage the Exchange rules.  While this is all good and fine, would have been nice to get an email saying the changes to the portal were going to be done.

Any who, here is where you can now begin to create/edit/delete your mailflow rules (note, all previous rules were automatically migrated from Forefront Online Protection for Exchange (FOPE) to what is now called Exchange Online Protection (EOP).

  1. Login to Office 365 Admin Portal
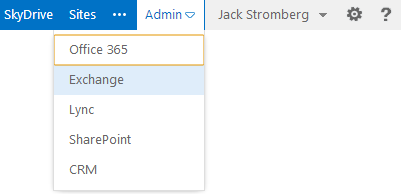
  2. Click on Admin -> Exchange
    Office 365 Admin Portal - Exchange Link
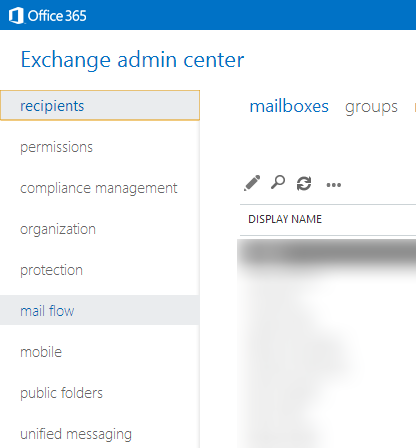
  3. Select the mail flow link on the left
    Exchange admin center - mail flow
  4. On the rules tab, you can now manage all of the mail rules as you would have done in FOPE.
    1. In the picture below, you can see some of the rules that were automatically moved from FOPE over to Microsoft's new system (Migrated FOPE Policy Rule ID: xxxxxx).
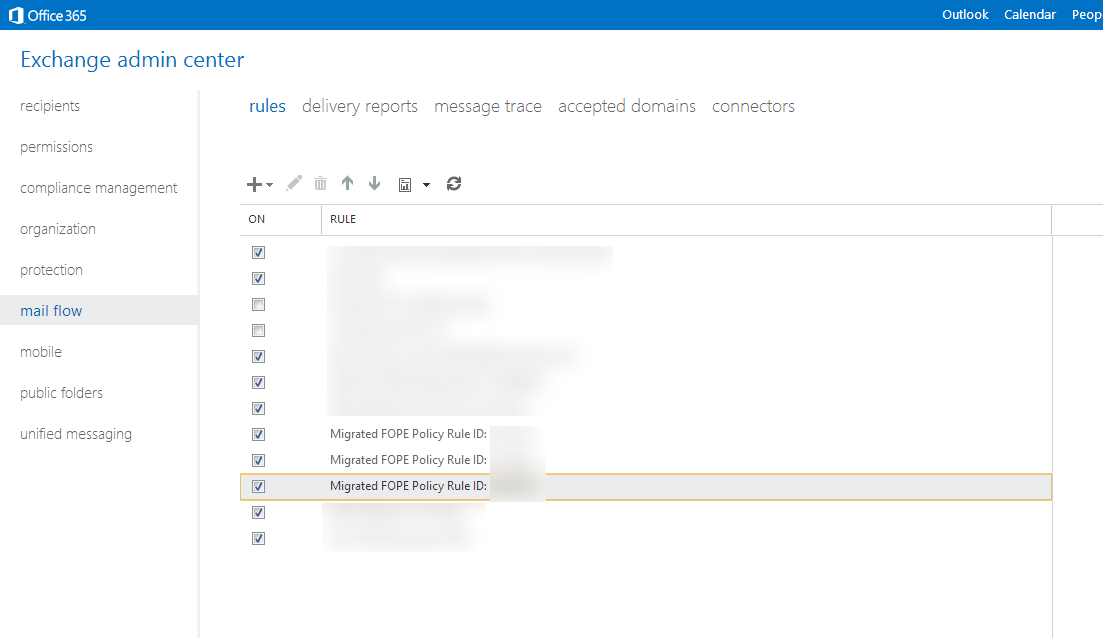
      Exchange admin center - mail flow - rules


Notes: It looks like Microsoft has released one official knowledge base article regarding this, which can be found here: http://technet.microsoft.com/en-us/library/dn308542%28v=exchg.150%29.aspx
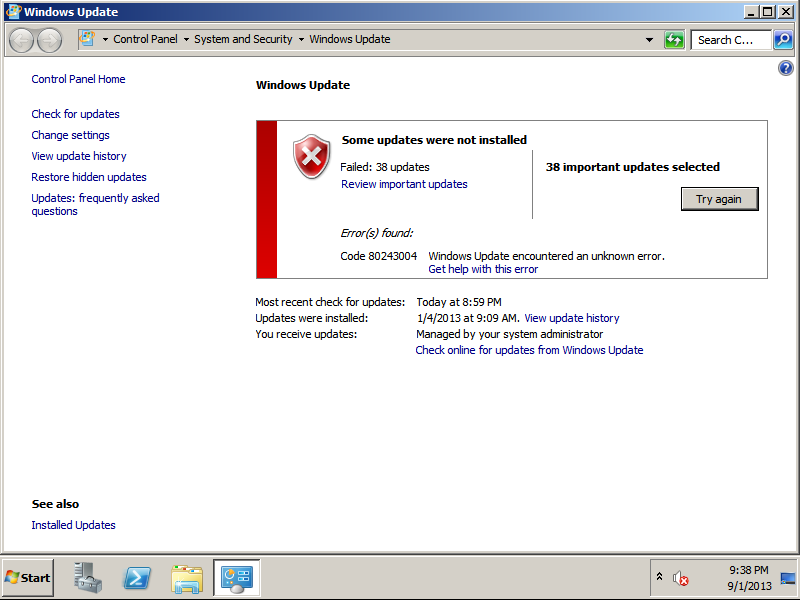
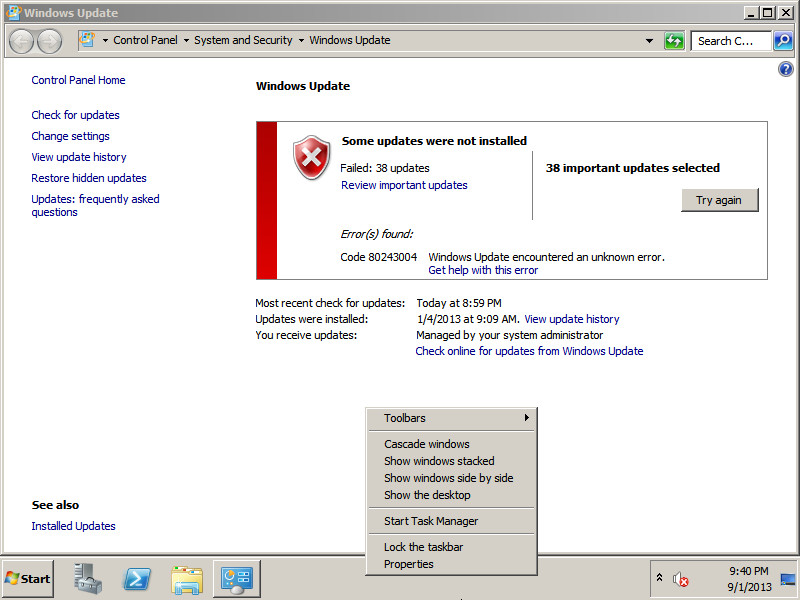
Code 80243004 - Windows Update encountered an unknown error.

When trying to install Windows Updates, you receive the following error:

Code 80243004 - Windows Update encountered an unknown error.

Code 80243004 - Windows Update encountered an unknown error

This used to be a documented issue by Microsoft prior to them replacing the page with a fixit installer.  The solution is a super weird workaround.  Please follow the steps below for updates to continue installing.

  1. Right click on the taskbar and select Properties.
    Code 80243004 - Properties
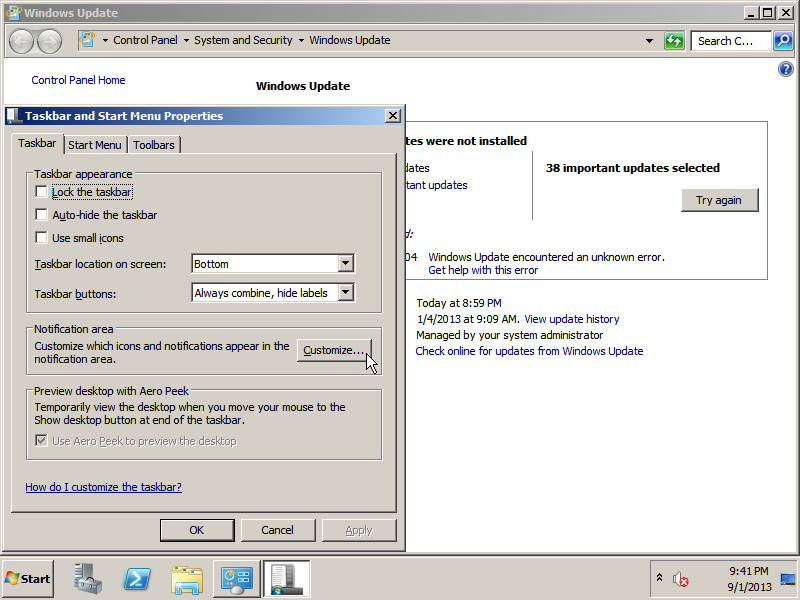
  2. Click the Customize... button on the Taskbar and Start Menu Properties window.
    Code 80243004 - Customize
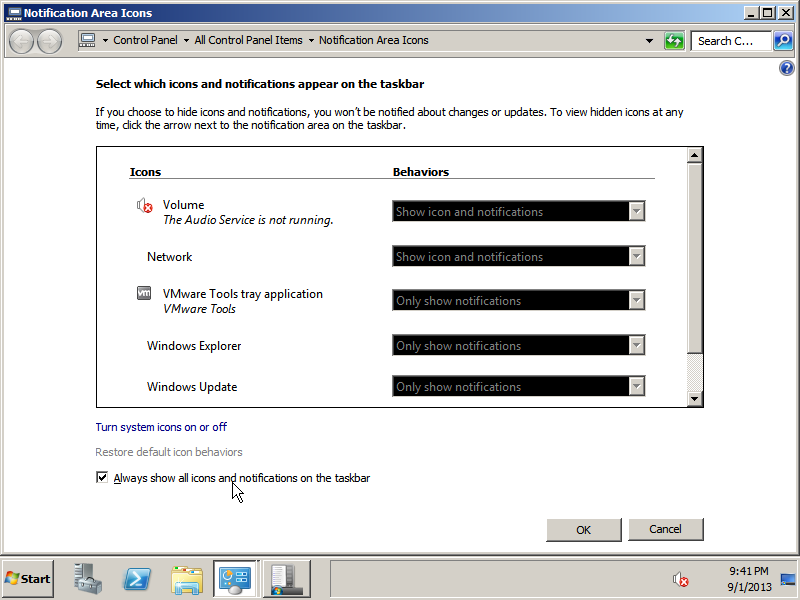
  3. On the Notification Area Icons window, make sure Always show all icons and notifications on the taskbar is checked and click OK.
    Always show all icons and notifications on the taskbar
  4. At this point, try running Windows Update again and the updates should begin to install properly.

Not sure why this fixes the issue, but it worked for me on a couple of virtual machines running in a VMware environment.  An additional thing I noticed is you can see the tray has "null icons", where they are blanks of open applications; once you hover over them, they disappear/close.  Not sure if this is a bug with Windows and VMware VMs, but just thought it was a weird coincidence.  If you have had this same issue, could you please drop a comment below stating whether or not you received the same issue in a virtual environment?

Set static IP on CentOS 6 via command line

Here is how to configure a static IP on CentOS 6 via command line.

  1. Determine which interface you want to configure--in this example, I will be using eth0
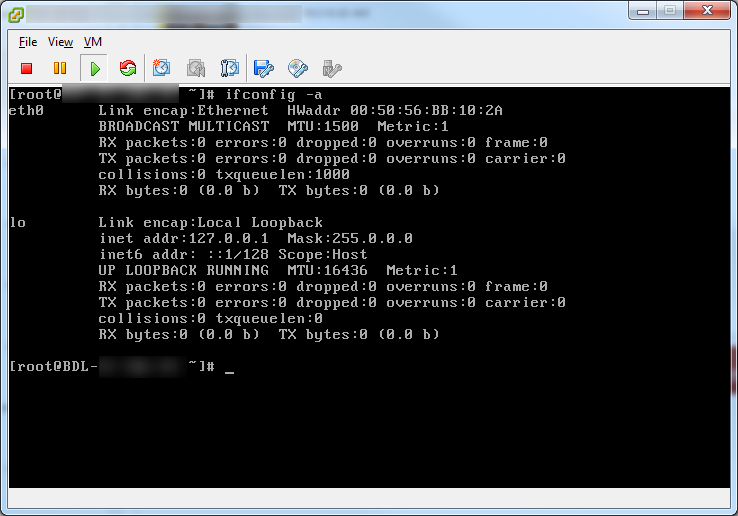
    1. ifconfig -a
    2. Show all linux interfaces
  2. Edit the interface you wish to configure (I'll use nano as vi requires some knowledge for beginner Linux users)
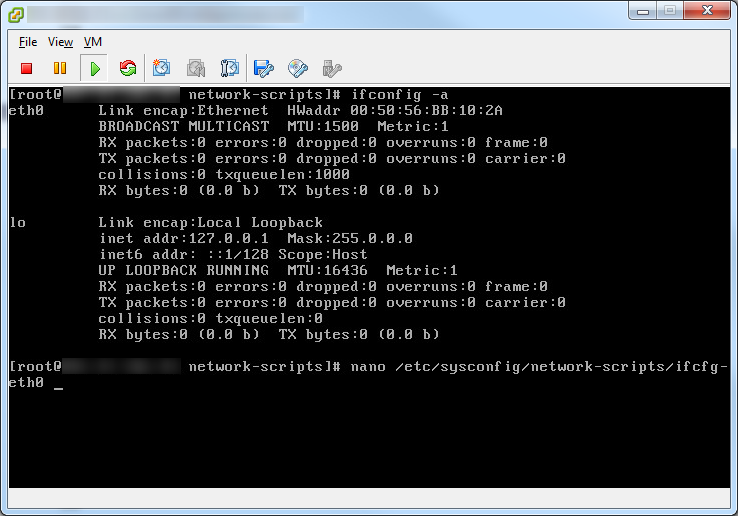
    1. nano /etc/sysconfig/network-scripts/ifcfg-eth0
    2. nano ifcfg-eth0
  3. Use the following settings and then use Control+O to Save and Control+X to Exit
    1. nano /etc/sysconfig/network-scripts/ifcfg-eth0
    2. DHCPCLASS=
      IPADDR=192.168.1.100
      NETMASK=255.255.255.0
      ONBOOT=yes
      BOOTPROTO=STATIC
    3. static IP CentOS
  4. Next, let's configure the hostname and default gateway.  We will use nano again to edit the file.
    1. nano /etc/sysconfig/network
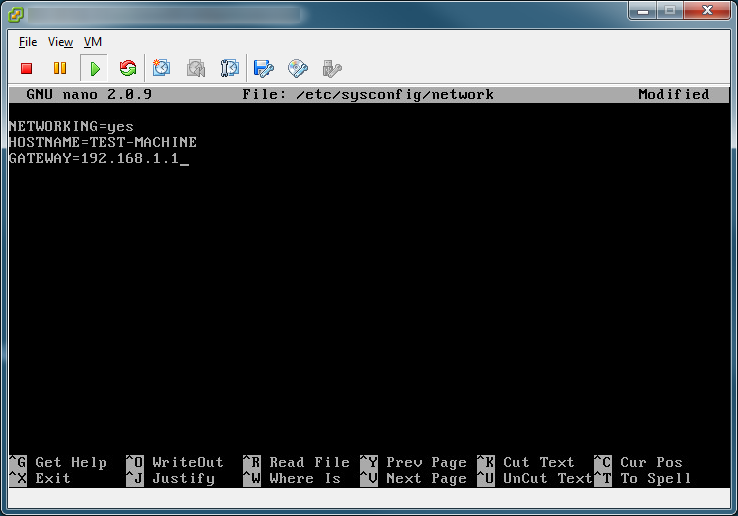
    2. Ensure GATEWAY=192.168.1.1 has been set
    3. Static Gateway
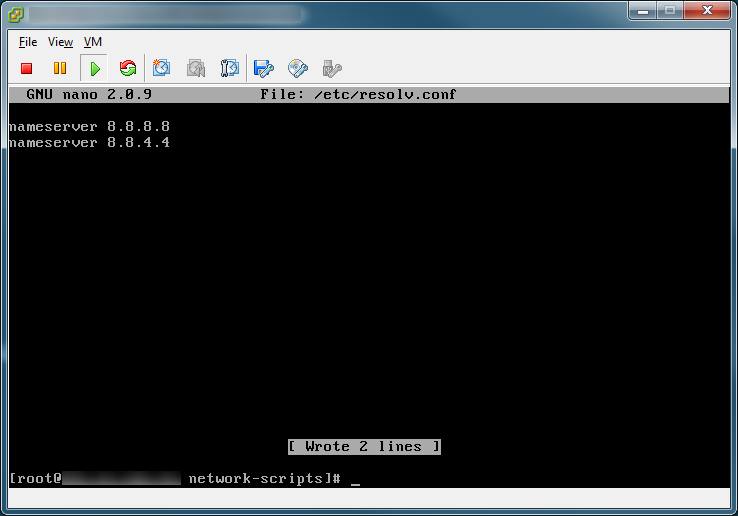
  5. Next, let's configure our DNS servers to resolve domain names (in this case, I will set mine to use Google's DNS servers)
    1. nano /etc/resolv.conf
    2. nameserver 8.8.8.8
      nameserver 8.8.4.4
    3. static nameservers
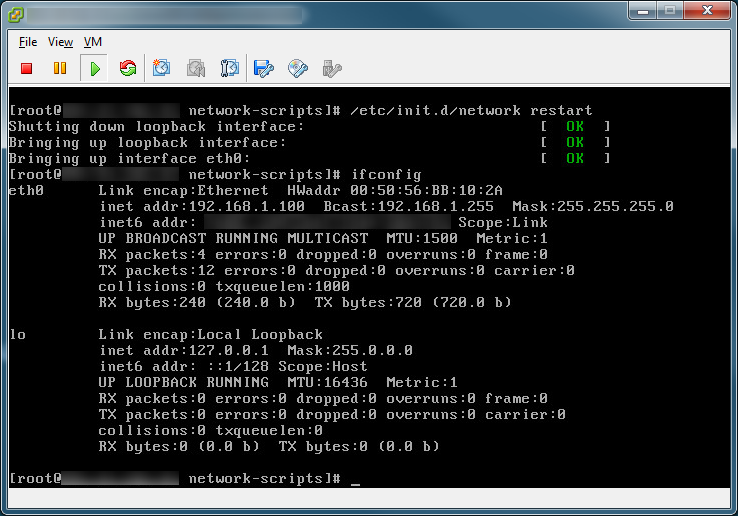
  6. Restart the networking service for the changes to take effect
    1. /etc/init.d/network restart
    2. restart interface

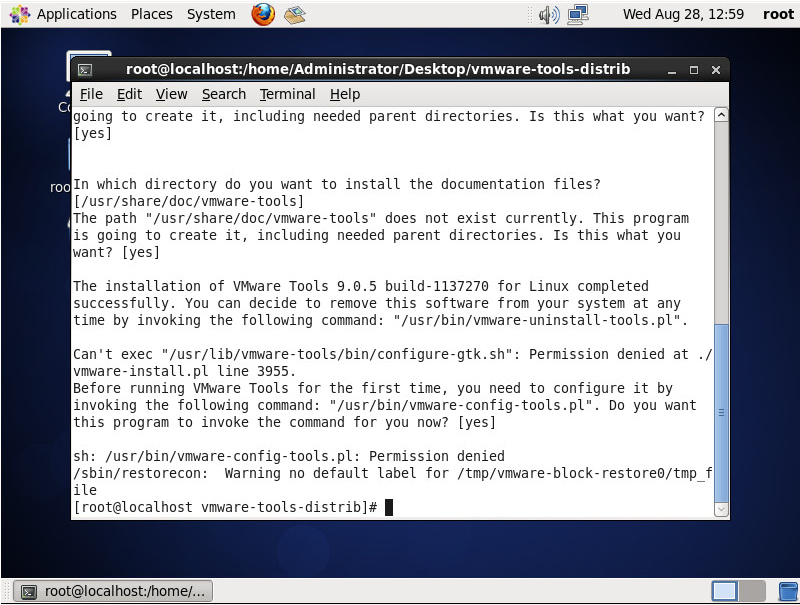
sh: /usr/bin/vmware-config-tools.pl: Permission denied VMware Tools Linux

Symptom: You see the following permissions error when trying to install VMware Tools on a Linux OS regardless if you are running as su or root:

[root@localhost vmware-tools-distrib]# ./vmware-install.pl
Creating a new VMware Tools installer database using the tar4 format.

Installing VMware Tools.

In which directory do you want to install the binary files?
[/usr/bin]

What is the directory that contains the init directories (rc0.d/ to rc6.d/)?
[/etc/rc.d]

What is the directory that contains the init scripts?
[/etc/rc.d/init.d]

In which directory do you want to install the daemon files?
[/usr/sbin]

In which directory do you want to install the library files?
[/usr/lib/vmware-tools]

The path "/usr/lib/vmware-tools" does not exist currently. This program is
going to create it, including needed parent directories. Is this what you want?
[yes]

In which directory do you want to install the documentation files?
[/usr/share/doc/vmware-tools]
The path "/usr/share/doc/vmware-tools" does not exist currently. This program
is going to create it, including needed parent directories. Is this what you
want? [yes]

The installation of VMware Tools 9.0.5 build-1137270 for Linux completed
successfully. You can decide to remove this software from your system at any
time by invoking the following command: "/usr/bin/vmware-uninstall-tools.pl".

Can't exec "/usr/lib/vmware-tools/bin/configure-gtk.sh": Permission denied at ./vmware-install.pl line 3955.
Before running VMware Tools for the first time, you need to configure it by
invoking the following command: "/usr/bin/vmware-config-tools.pl". Do you want
this program to invoke the command for you now? [yes]

sh: /usr/bin/vmware-config-tools.pl: Permission denied
/sbin/restorecon:  Warning no default label for /tmp/vmware-block-restore0/tmp_file
[root@localhost vmware-tools-distrib]#

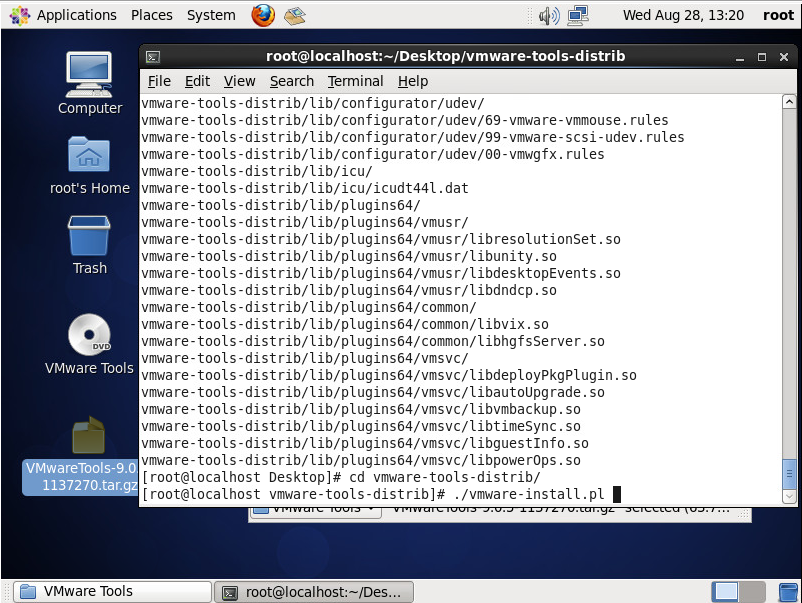
CentOS VMware Tools Permission Error

Solution: You need to extract the files from the tarball when installing the guest tools via the tar command rather than the build in Archive Manager installed with the OS.

  1. Mount the VMware Tools to the VM
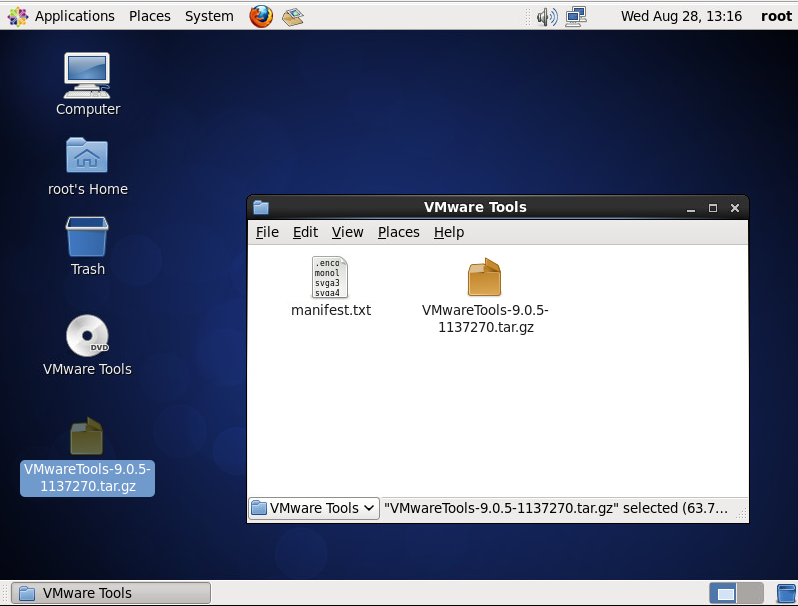
  2. Copy the VMware Tools tarball to the desktop of the Linux OS
    Copy VMwareTools
  3. Execute the following command to extract the tar's contents
    1. tar -zxvf VMwareTools-9.0.5-1137270.tar.gz
  4. Change directories to the vmware-tools-distrib that was just extracted from the tarball and execute the following commands to begin the installation
    1. cd vmware-tools-distrib
    2. ./vmware-install.pl
      vmware-install.pl

Setting up Java Runtime Environment 7 (JRE7) on Ubuntu 12.04 via Command Line

Need Java to run an application on your Linux workstation/server?  Follow the steps below via the terminal to install the latest version of Java.

  1. Head over to http://www.java.com/en/download/manual.jsp to find the latest Linux download from your client machine.
  2. Look at the link for the latest Java release for Linux.  Since we are using Ubuntu we do not need the RPM release.  In this case, I will be downloading Java 1.7.0_25-b15 for Linux x64.
    1. The download url is http://javadl.sun.com/webapps/download/AutoDL?BundleId=78697
  3. Head over to the Linux terminal on the machine you want to install Java on, and execute the following command to download the files from Java's website
    1. wget http://javadl.sun.com/webapps/download/AutoDL?BundleId=78697
  4. Extract the tarball.  Since wget cannot pull the filename like a modern webrbowser, you will have to reference the weird filename AutoDL?BundleId=78697
    1. tar -xvzf AutoDL?BundleId=78697
  5. Find out what the name of the folder is of the java files you extracted by listing the files in the current directory.  At the time of writing this, the extracted folder I had was jre1.7.0_25, so I will continue to reference that moving forward.
    1. ls
  6. Create a folder in the usr folder for Java to reside.
    1. sudo mkdir /usr/java/
  7. Move the files we extracted Java files to the java folder
    1. sudo mv jre1.7.0_25/ /usr/java/
  8. Execute the following to enable the Java Runtime Environment
    1. sudo update-alternatives --install /usr/bin/java java /usr/java/jre1.7.0_25/bin/java 1
  9. Execute the following command to set the default Java to use
    1. sudo update-alternatives --config java
  10. Execute the following command to verify that the latest version of java is installed
    1. java -version
  11. Remove the tarball we downloaded from Java's website to free up some space
    1. rm ~/AutoDL?BundleId=78697

Lync - Manually set a Lync user's PIN via powershell

If you would like to manually assign a PIN number to a user in Lync, please follow the steps below:

  1. Login to your Lync Front End Server
  2. Open up the Lync Server Management Shell
  3. Execute the following command
    1. Set-CsClientPin -Identity "DOMAIN\user" -Pin 123456

The technet article defining all the parameters of this command can be found here: http://technet.microsoft.com/en-us/library/gg398929.aspx

Find listing of open ports on Windows

Want to see what ports are currently listening for connections on your machine?

To quickly find a list of open ports listening for connections, execute the following netstat command (this will show the Protocol, Local Address (source port), Foreign Address, State, and Process ID):

netstat -ano |find /i "listening"

To quickly ifnd a list of ports with established connections, enter the following command  (this will show the Protocol, Local Address, Foreign Address, State, and Process ID):

netstat -an |find /i "established"


Here is a complete listing all of the netstat switches

Displays protocol statistics and current TCP/IP network connections.

NETSTAT [-a] [-b] [-e] [-f] [-n] [-o] [-p proto] [-r] [-s] [-t] [interval]

-a Displays all connections and listening ports.
-b Displays the executable involved in creating each connection or listening port. In some cases well-known executables host multiple independent components, and in these cases the sequence of components involved in creating the connection or listening port is displayed. In this case the executable name is in [] at the bottom, on top is the component it called, and so forth until TCP/IP was reached. Note that this option can be time-consuming and will fail unless you have sufficient permissions.
-e Displays Ethernet statistics. This may be combined with the -s option.
-f Displays Fully Qualified Domain Names (FQDN) for foreign addresses.
-n Displays addresses and port numbers in numerical form.
-o Displays the owning process ID associated with each connection.
-p proto Shows connections for the protocol specified by proto; proto may be any of: TCP, UDP, TCPv6, or UDPv6. If used with the -s option to display per-protocol statistics, proto may be any of: IP, IPv6, ICMP, ICMPv6, TCP, TCPv6, UDP, or UDPv6.
-r Displays the routing table.
-s Displays per-protocol statistics. By default, statistics are shown for IP, IPv6, ICMP, ICMPv6,  TCP, TCPv6, UDP, and UDPv6; the -p option may be used to specify a subset of the default.
-t Displays the current connection offload state.
interval Redisplays selected statistics, pausing interval seconds between each display. Press CTRL+C to stop redisplaying statistics. If omitted, netstat will print the current configuration information once.

Notes: Here is a great resource with more in-depth details on the command: http://www.petri.co.il/quickly_find_local_open_ports.htm

Lync - Filter failed to return unique result error

Symptom: You receive the following error when trying to assign an Enterprise Voice number to a new user via powershell or the Lync Admin Web GUI (CSCP):

Filter failed to return unique result, "[SipAddress : sip:[email protected]] [LineURI : tel:+15555555555] [PrivateLine : tel:+15555555555] "

Solution: Execute the following commands below to see what the number is currently assigned to.

This command will check all users for the requested number.

Get-CsUser | where {$_.LineURI -eq "tel:+15555555555" -or $_.PrivateLine -eq "tel:+15555555555"} | Sort-Object LineURI | Select-Object Displayname, LineURI, PrivateLine

This command will check all common area phones for the requested number:

Get-CsCommonAreaPhone | where {$_.LineURI -eq "tel:+15555555555"} | Sort-Object LineURI | Select-Object Identity, LineURI, DisplayNumber, DisplayName, Description

This command will check all response groups for the requested number:

Get-CsRgsWorkflow | where {$_.LineURI -eq "tel:+15555555555"} | Sort-Object LineURI | Select-Object Name, Identity, LineURI, DisplayNumber, Description

This command will check all exchange contacts for unified messaging:

Get-CsExUmContact | where {$_.LineURI -eq "tel:+15555555555"} | Sort-Object LineURI | Select-Object identity, LineURI

Notes: I stumbled across these powershell commands from "The Regular IT Guy"; please check out his site here http://onlize.wordpress.com/2013/07/01/lync-add-user-error-filter-failed-to-return-unique-result/

Lync 2013 - Failing Voicemail and Forwarded calls after replacing front end ssl certificate

Problem: While setting up my first Lync Enterprise Pool, I generated a new certificate on a new front end server, and replaced the certificate on the first front end server to match.  While Lync 2013 will accept the changes, you will begin to slowly see Lync's familiar errors such as failures in forwarding calls, contacting voicemail, etc., with services such as IM, direct internal/external calling working great.

Solution: Turns out that you must restart, at a minimum, the front-end service on all other machines in the Lync enterprise pool after you apply the new SSL certificate.  Unfortunately, this will logout your users from their Lync client for 30 seconds to a minute while the service restarts, but users should be able to remain on a call if the mediation service is still up.  Looking forward to when the new SSL certs expire, I would schedule this as maintenance in the evening where you could simply restart each of the Lync Front End services/servers to prevent unexpected behavior after applying the certificate.

Here was the error I began to see from the Lync 2013 client while trying to call my voicemail:

The description for Event ID 11 from source Lync cannot be found. Either the component that raises this event is not installed on your local computer or the installation is corrupted. You can install or repair the component on the local computer.

If the event originated on another computer, the display information had to be saved with the event.

The following information was included with the event:

Lync
80ef01f4
RequestUri: sip:[email protected];opaque=app:voicemail
From: sip:[email protected];tag=693ec81203
To: sip:[email protected];opaque=app:voicemail;tag=7CBCF099907DE2498340425795C4E09A
Call-ID: e3535707c76342fd909faaa232247182
Content-type: multipart/alternative;boundary="----=_NextPart_000_0039_01CE980F.27472B30";call-type=audiovideo

------=_NextPart_000_0039_01CE980F.27472B30
Content-Type: application/sdp
Content-Transfer-Encoding: 7bit
Content-ID: <[email protected]>
Content-Disposition: session; handling=optional; ms-proxy-2007fallback

...........

...........

..........

------=_NextPart_000_0039_01CE980F.27472B30
Content-Type: application/sdp
Content-Transfer-Encoding: 7bit
Content-ID: <[email protected]>
Content-Disposition: session; handling=optional

........

........

........

------=_NextPart_000_0039_01CE980F.27472B30--
Response Data:

183 Session Progress
500 The server encountered an unexpected internal error
ms-diagnostics: 1;reason="Service Unavailable";AppUri="http%3A%2F%2Fwww.microsoft.com%2FLCS%2FDefaultRouting";reason="Failed when constructing the outgoing request";source="lyncserver.mydomain.local";OriginalPresenceState="0";CurrentPresenceState="0";MeInsideUser="Yes";ConversationInitiatedBy="0";SourceNetwork="0";RemotePartyCanDoIM="No"


Lync 2013 GUI Error: Unfortunately, I didn't grab a screenshot, but the error I was received was "Error ID 1 Source ID 243"

Side notes: When doing a premiliary search on the Lync error (before I made it to event viewer), I stumbled accross an article by Romans Fomicevs that had the exact same issue as me as well.  He's got some additional tracing and insight on the subject as well, definitely go give him a +1 on his Google page! 🙂 http://blog.yogi-way.lv/2013/07/lync-server-2013-and-new-internal.html

Request SSL Certificate With a Subject Alternative Name (SAN) via enterprise CA with a GUI

For those that want to quickly request a new SSL certificate via your Enterprise Certificate Authority, using a GUI instead of certutil commands, here is a tutorial on how to do so.

  1. Login to the server you want the SSL cert with the SAN address.
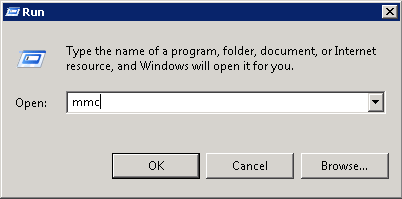
  2. Click Start->Run->MMC
    mmc
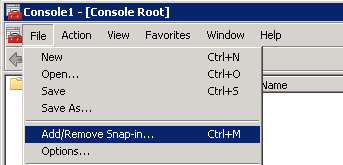
  3. Click File->Add/Remove Snap-Ins
    mmc - add-remove snap-in
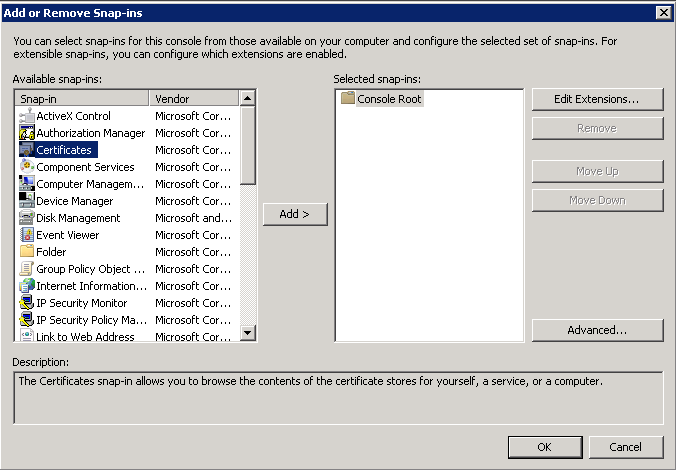
  4. Select Certificates and click Add >
    mmc - add-remove-snap-in-certificates
  5. Select Computer account and click Next >
    certificates snap-in computer account
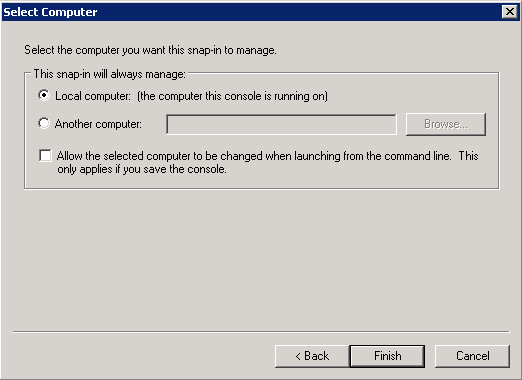
  6. Click Finish
    certificates snap-in local computer
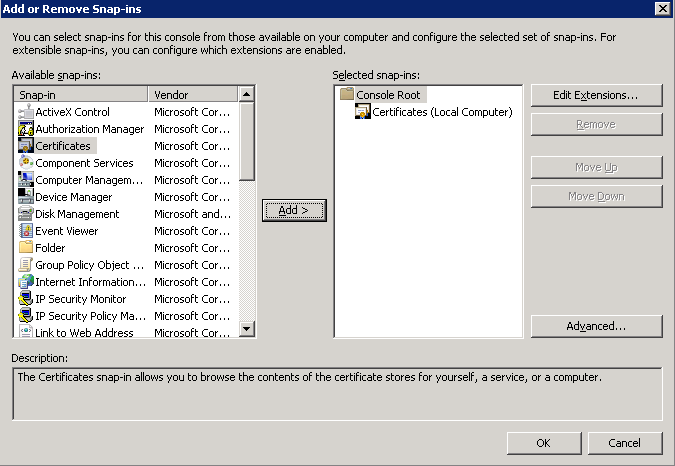
  7. Click OK
    add-remove snap-ins local certificates
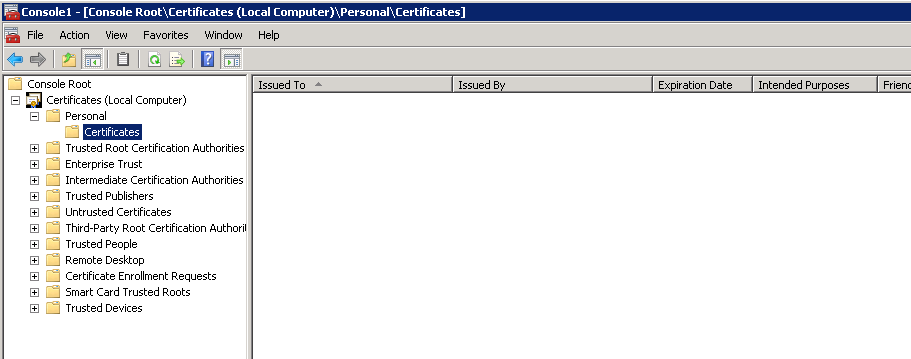
  8. Expand Certificates (Local Computer)->Personal->Certificates
    mmc - personal certificates
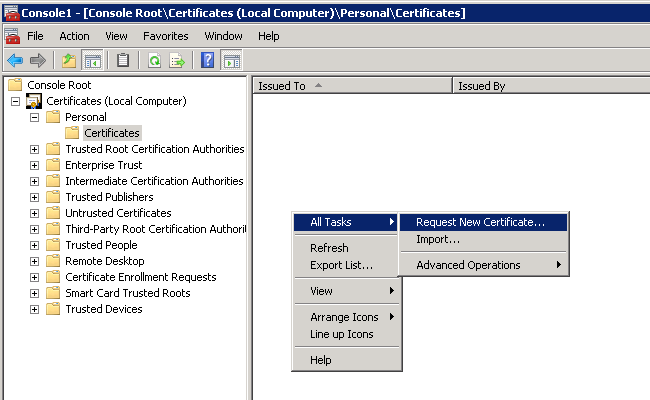
  9. Right click on the right pane and select All Tasks -> Request New Certificate...
    mmc - personal certificates request
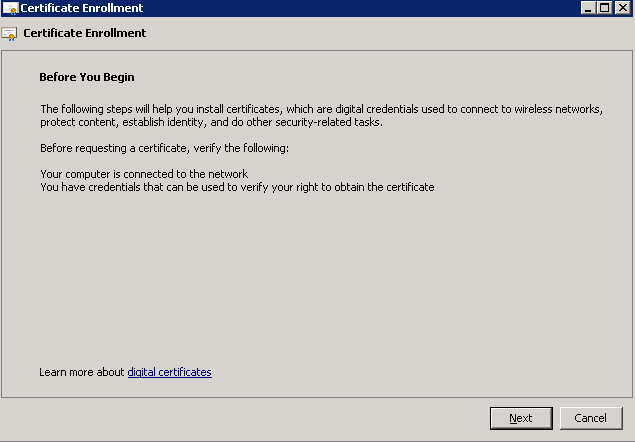
  10. Click Next on the Certificate Enrollment screen
    certificate enrollment welcome
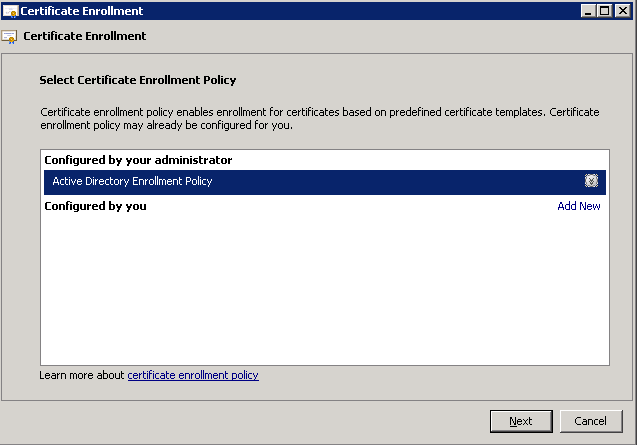
  11. Select Active Directory Enrollment Policy and click Next
    certificate enrollment policy
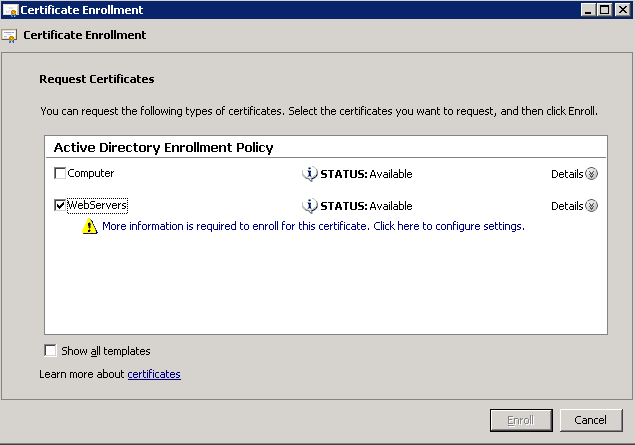
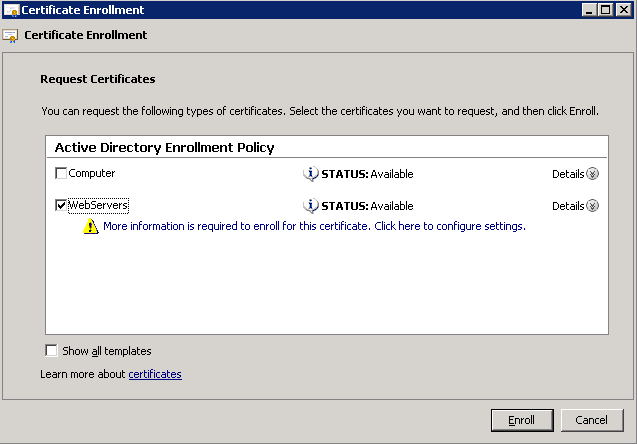
  12. Check what type of certificate you would like to request and click on the "Click here to configure settings." link
    certificate enrollment selected policy

    1. Note: you must have configured a template for this link to show up.  By default you will only see Computer, which will not allow you to request the certificate with the SAN address
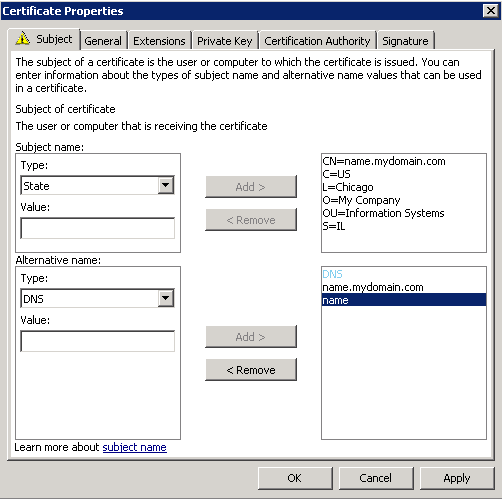
  13. On the certificate properties page, enter in the following info for the Subject name
    1. Common name
    2. Country
    3. Locality
    4. Organization
    5. Organization Unit
    6. State
  14. On the certificate properties page, enter in the following info for the Alternative Name
    1. DNS of the FQDN (common name)
    2. DNS of the SAN name (short name)
  15. You should now have something like this
    certificate request - properties
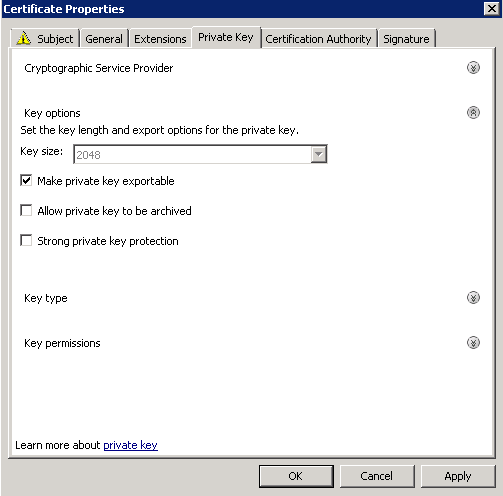
  16. Optionally, click on the Private Key tab, expand Key options, and check Make private key exportable
    certificate request - private key exportable
  17. Click OK on the Certificate Properties window
  18. Click Enroll
    certificate enrollment - enroll
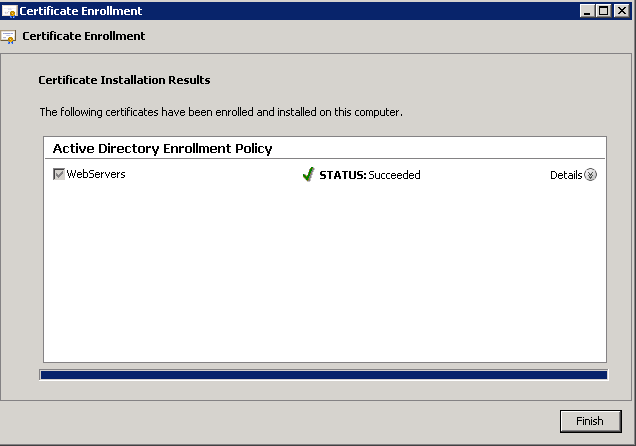
  19. Click Finish once the request has been signed
    certificate enrollment - success

At this point, you can export the certificate from the machine or have your application reference it.