Category Archives: Active Directory

Migrating Domain Controllers From Server 2008 R2 to Server 2012 R2

In this article, I have documented the steps I took to update our two domain controllers to Server 2012 R2 from Server 2008 R2.  While this can be considered a tutorial, it is more a reflection of what I did during my migration process.  This guide assumes you have already made backups of your environment, all Windows Active Directory Domain Controllers in the forest are running Server 2003 or later, and we will be recycling (reusing) the same two servers you deployed.  Last, Microsoft strongly recommends we do a clean install and not directly upgrade each server, so we will decommission a DC, reinstall windows, and then redeploy the DC until the entire environment has been upgraded.

  1. Prepare the AD Schema for Server 2012 R2
    1. Mount the Server 2012 R2 installation disk on one of your Domain Controllers
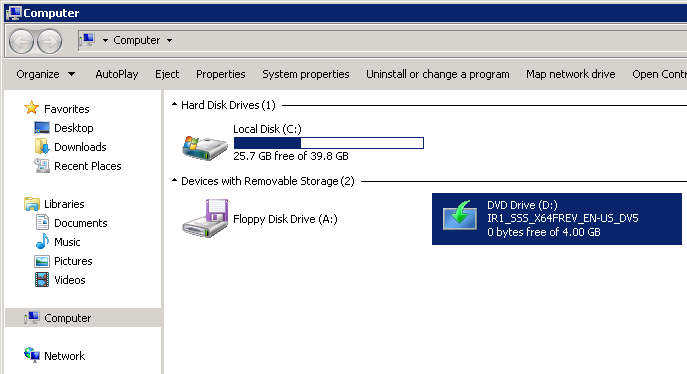
      Windows Server 2012 R2 - Mounted DVD
    2. Open up a command prompt with Administrative Privileges and navigate to the /support/adprep folder on the installation media.
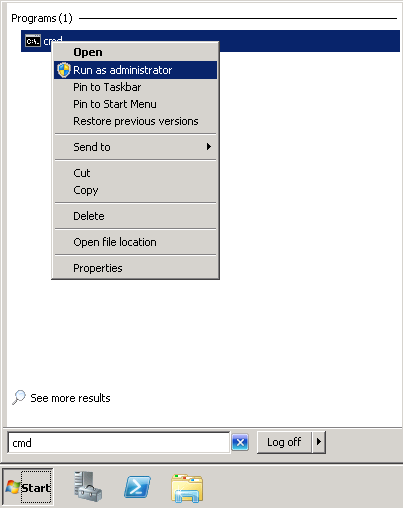
      1. Click Start, type cmd, right click select Run as administrator
        Administrative cmd prompt
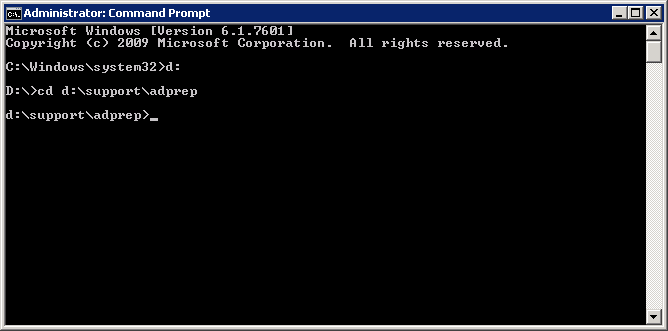
      2. Execute the command: d:
      3. Execute the command: cd d:\support\adprep
      4. Windows Server 2012 R2 - support-adprep folder
    3. Execute the following command (don't close out of this until after we verify the schema version in an upcoming step):
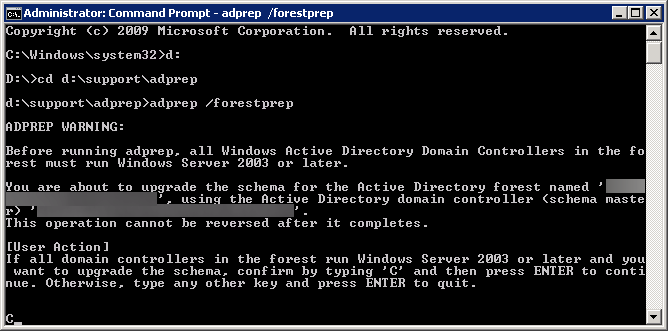
      1. adprep /forestprep
      2. Type the letter C and press the enter key to begin the process
        adprep forestprep
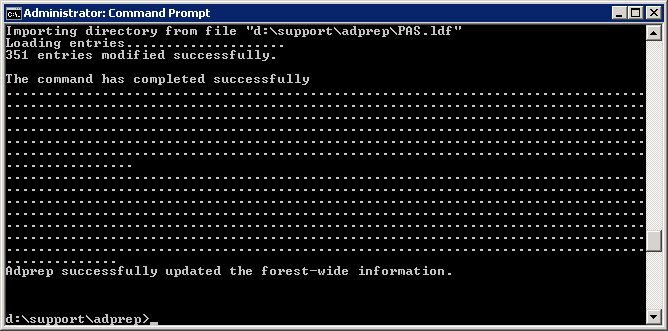
        adprep forestprep success
    4. Execute the following command:
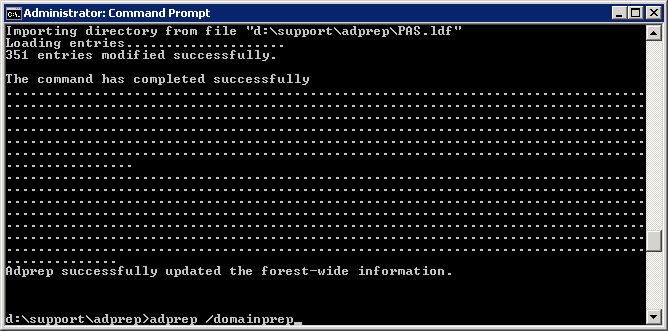
      1. adprep /domainprep
        adprep domainprep
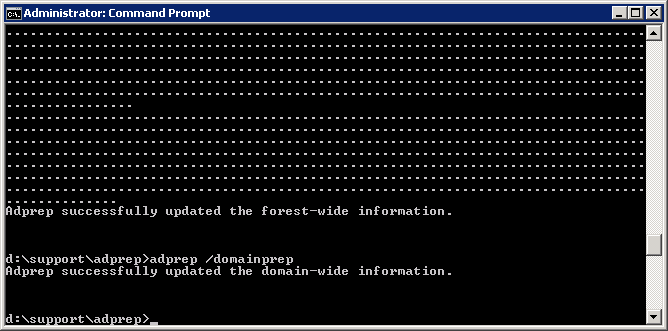
        adprep domainprep success
    5. Verify the schema version has been updated
      1. Click Start and search for regedit
        regedit
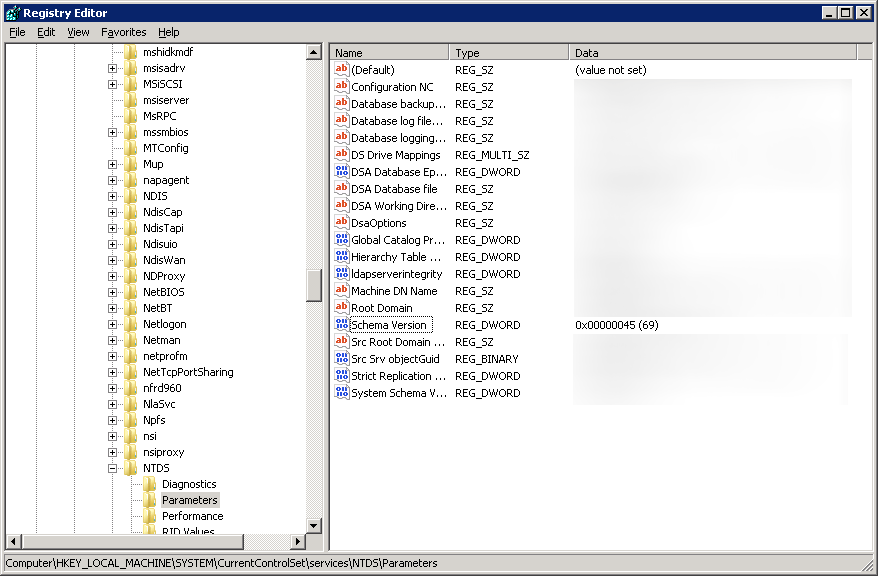
    6. Open up regedit and navigate to Computer\HKEY_LOCAL_MACHINE\SYSTEM\CurrentControlSet\services\NTDS\Parameters
    7. Verify the Schema Version value matches the last entry shown in your upgrade results.  In my case, the Schema Version should be 69.
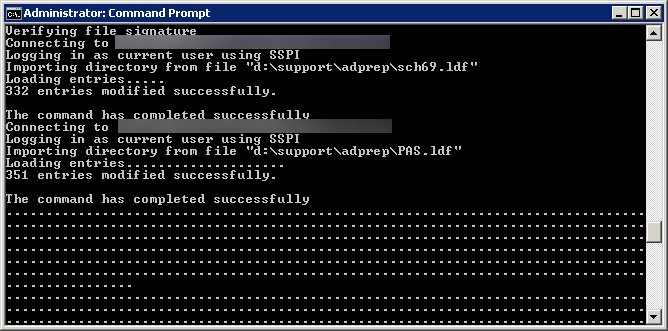
      adprep forestprep schema version
      regedit - schema version
  2. Demote and decommission secondary domain controller
    1. Click Start, Run...
      Start-Run
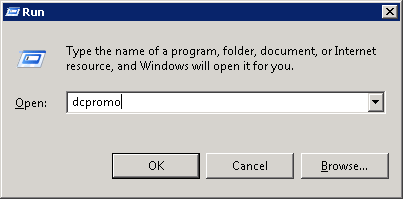
    2. Type dcpromo and click OK
      Run - dcpromo
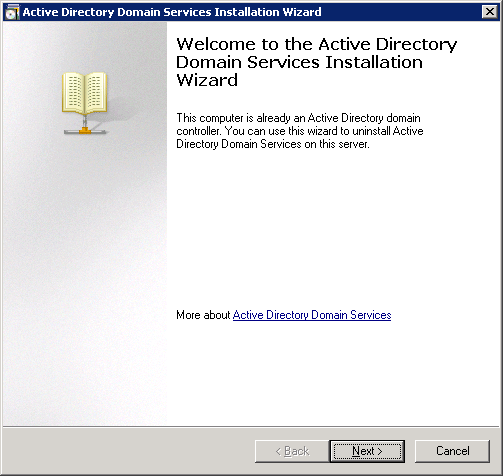
    3. Click Next > on the Welcome page
      Active Directory Domain Services Installation Wizard - Welcome to the Active Directory Domain Services Installation Wizard
    4. If the domain controller has the global catalog service, make sure your primary DC also has the service enabled and click OK.  This can be done by opening up Active Directory Sites and Services and viewing the services for each domain controller.
      Active Directory Domain Services Installation Wizard - Active Directory domain controller is a global catalog server dialog
    5. Make sure the Delete this domain because this server is the last domain controller in the domain is UNCHECKED, and click Next >
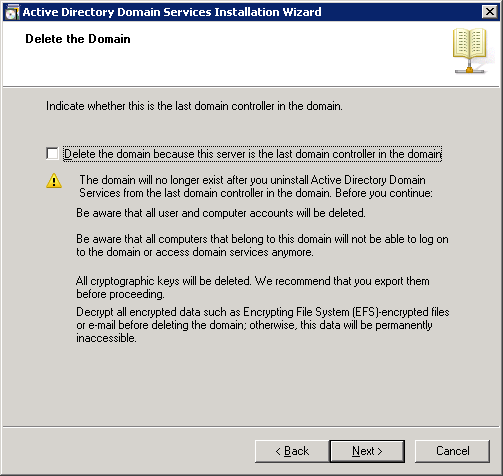
      Active Directory Domain Services Installation Wizard - Delete the domain because this server is the last domain controller in the domain
    6. Type in a new password to be used for the Local Administrator account the machine will contain after it is demoted.
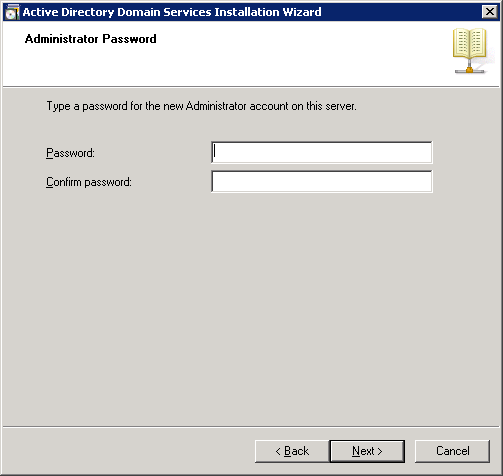
      Active Directory Domain Services Installation Wizard - Administrator Password
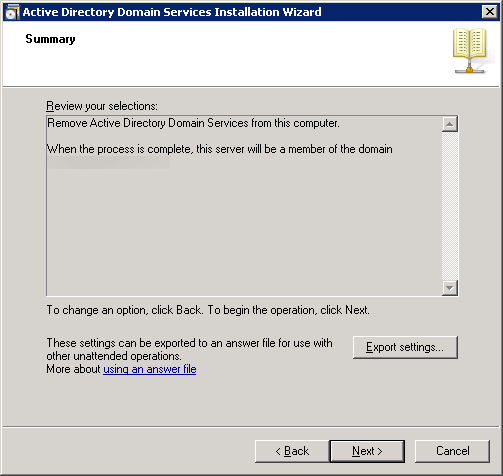
    7. Click Next > on the Summary page
      Active Directory Domain Services Installation Wizard - Summary
    8. Check the Reboot on completion box to restart the server after the service has been removed
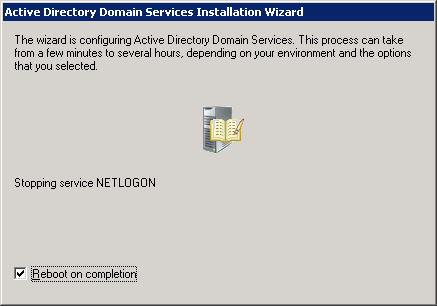
      Active Directory Domain Services Installation Wizard - Reboot on completion
    9. Log back into the DC upon reboot and open up Server Manager
      Server Manager
    10. In Roles Summary, click Remove Roles
      Server Manager - Remove Role
    11. Click Next > on the Before You Begin page
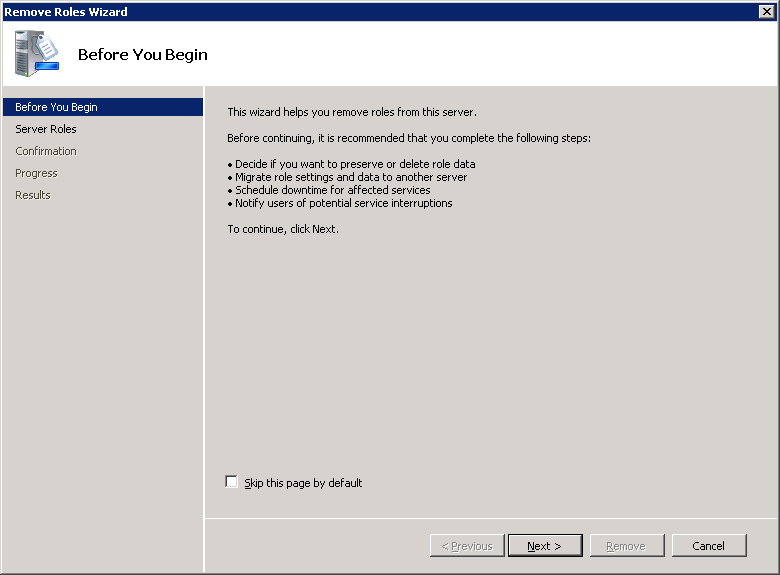
      Remove Roles Wizard - Before You Begin
    12. Uncheck Active Directory Domain Services and DNS Server (if the role is installed) and click Next >
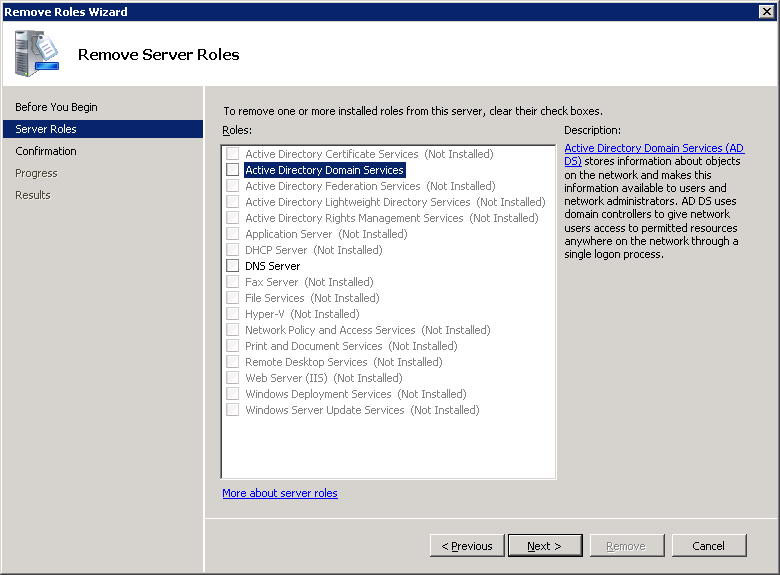
      Remove Roles Wizard - Remove Server Roles - Active Directory Domain Services - DNS
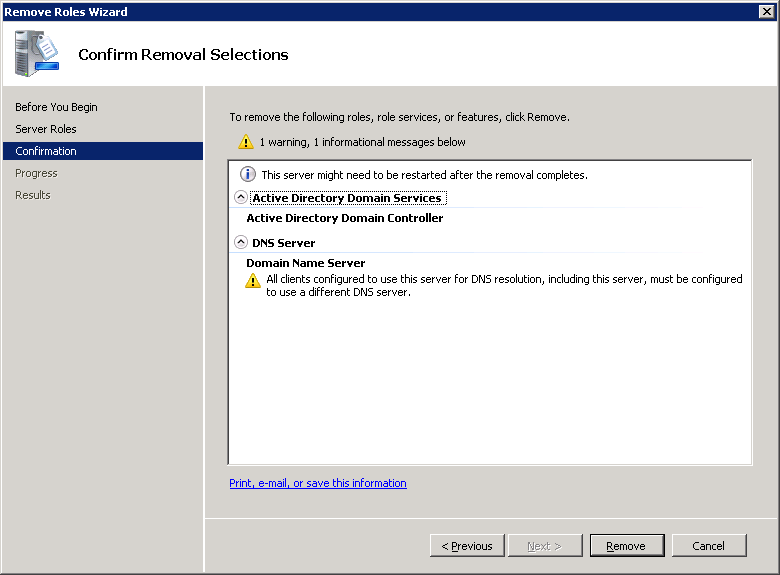
    13. Click Remove
      Remove Roles Wizard - Confirm Removal Selections
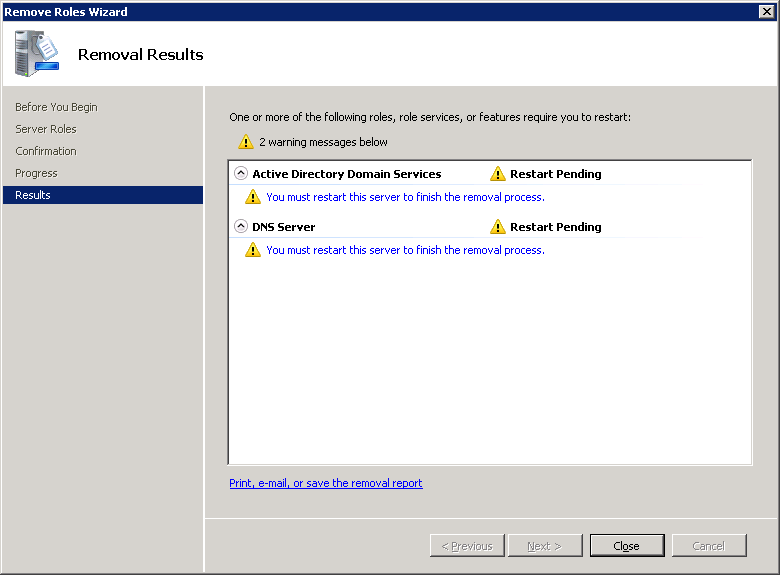
    14. Click Close
      Remove Roles Wizard - Removal Results
    15. Select Yes on the Do you want to restart now? dialog box
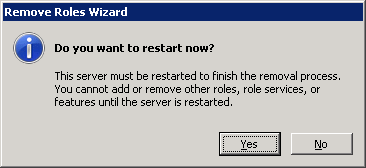
      Remove Roles Wizard - Restart Dialog
    16. Log back into the DC upon reboot and you should greeted by a Removal Results window.  Let the process finish and select Close upon removal success.
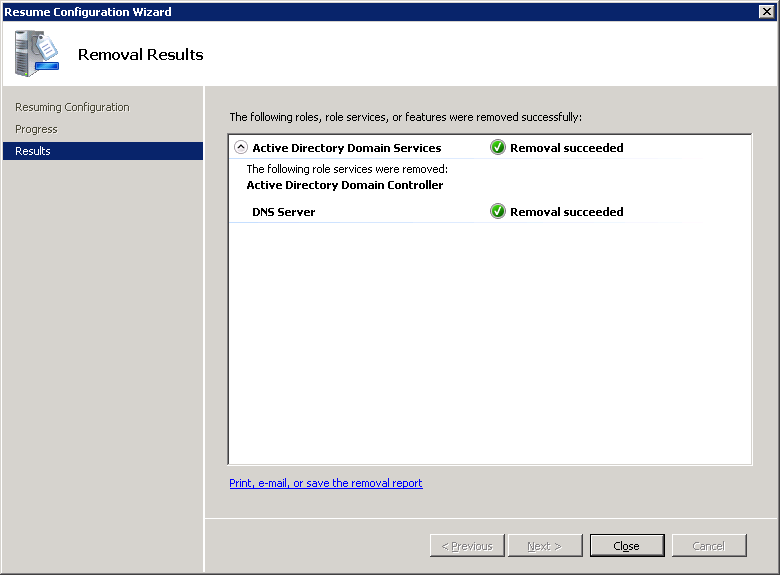
      Remove Roles Wizard - Resume Configuration Wizard
    17. Disjoin the machine from the domain
      1. Click Start, right click Computer, select Properties
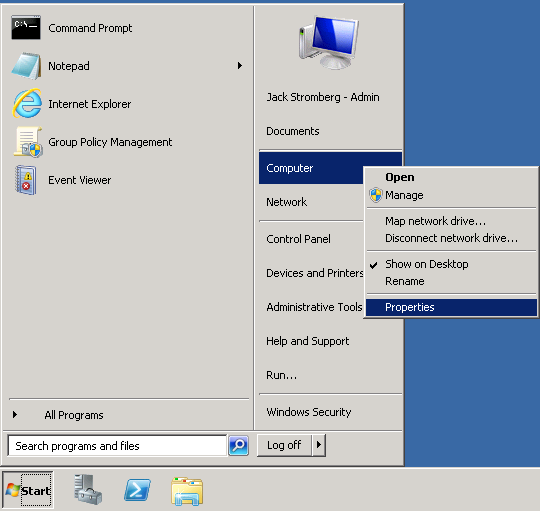
        Start - Computer - Properties
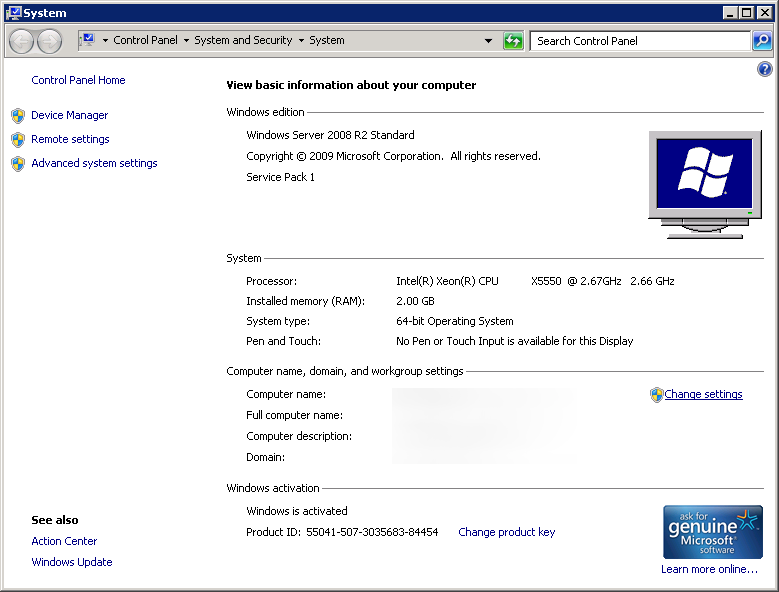
      2. Click Change settings
        Control Panel - System and Security - System - Change settings
      3. Click Change... on the System Properties page
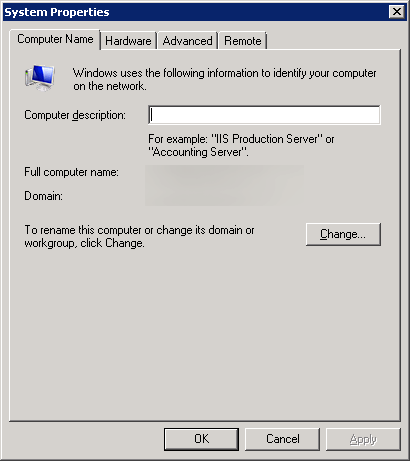
        System Properties
      4. Check Workgroup, type in a workgroup name, and click OK
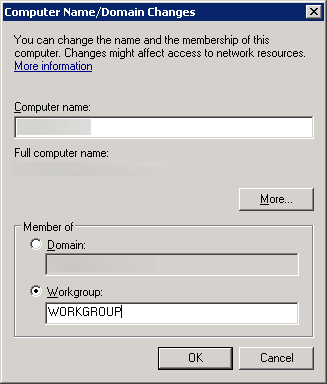
        Computer Name - Domain Changes - Workgroup
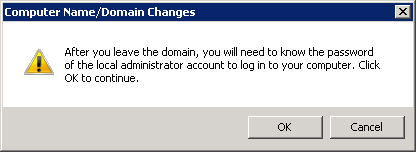
      5. Click OK on the warning dialog
        Computer Name - Domain Changes - Leave domain dialog
      6. Click OK on the Welcome to the workgroup dialog
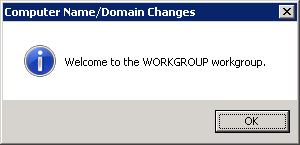
        Welcome to the workgroup dialog
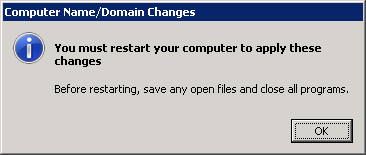
      7. Click OK on the restart dialog
        You must restart your computer to apply these changes
      8. Click Close on the System Properties window
        (oops, forgot to make a screenshot!)
      9. Click Restart Later on the Microsoft Windows dialog box
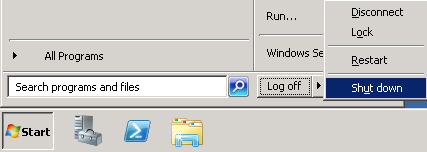
      10. Shutdown the machine
        Start - Shut down
    18. Format the decommissioned machine, reinstall a clean copy of Server 2012 R2, and join the machine to the domain.
  3. Add first Server 2012 R2 Domain Controller
    1. At this point, you should have one Server 2008 R2 Domain Controller and a blank Server 2012 R2 machine joined to the domain ready for the Active Directory services.  If you are at this point, continue on, if not, you might want to read back a couple steps and see where things ventured off course.
    2. Start Server Manager on your new Server 2012 R2 machine.
      Server 2012 R2 - Server Manager
    3. Select Manage in the top right and select Add Roles and Features
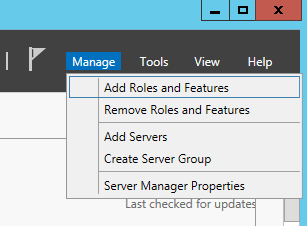
      Server 2012 - Manage - Add Roles and Features
    4. Click Next > on the Before you begin screen
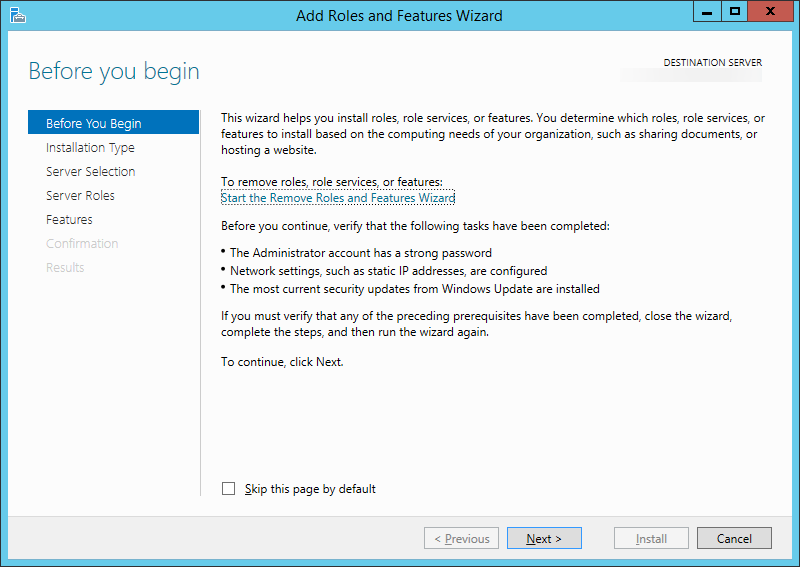
      Add Roles and Features Wizard - Before you begin
    5. Click Next > on the Select installation type screen
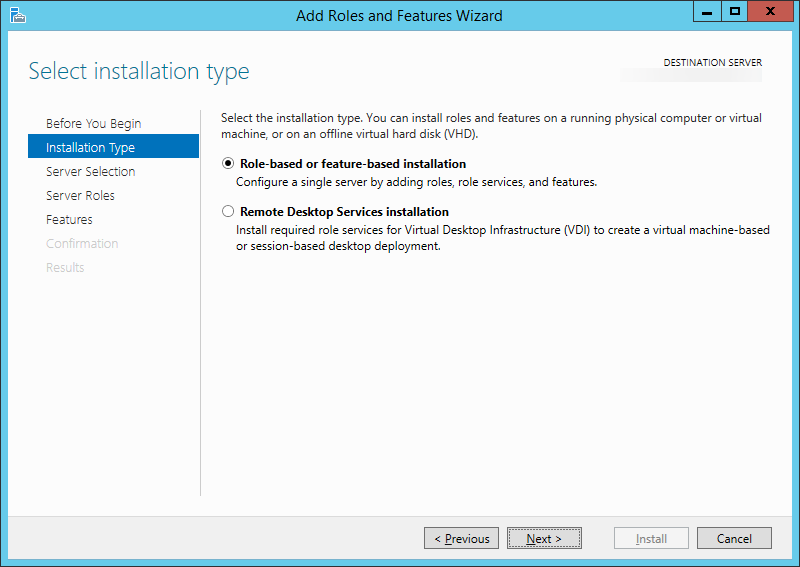
      Add Roles and Features Wizard - Select installation type
    6. Ensure your new server is selected and click Next >
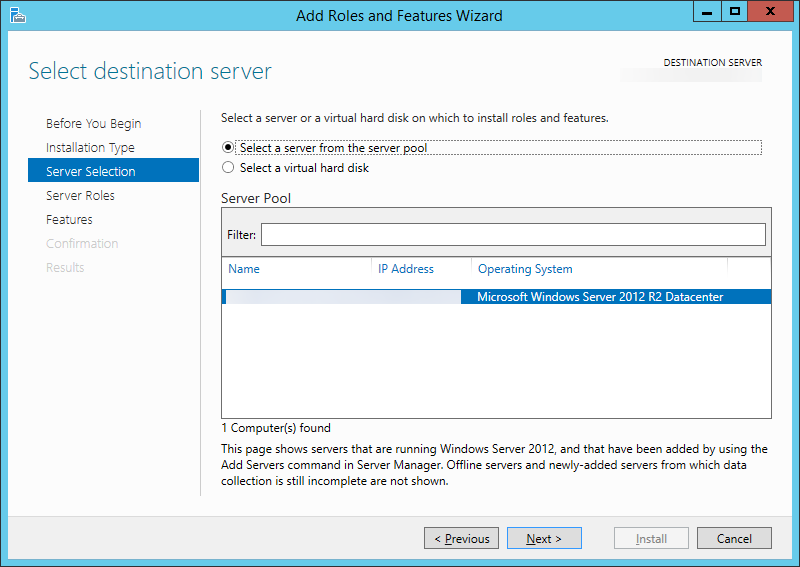
      Add Roles and Features Wizard - Select destination server
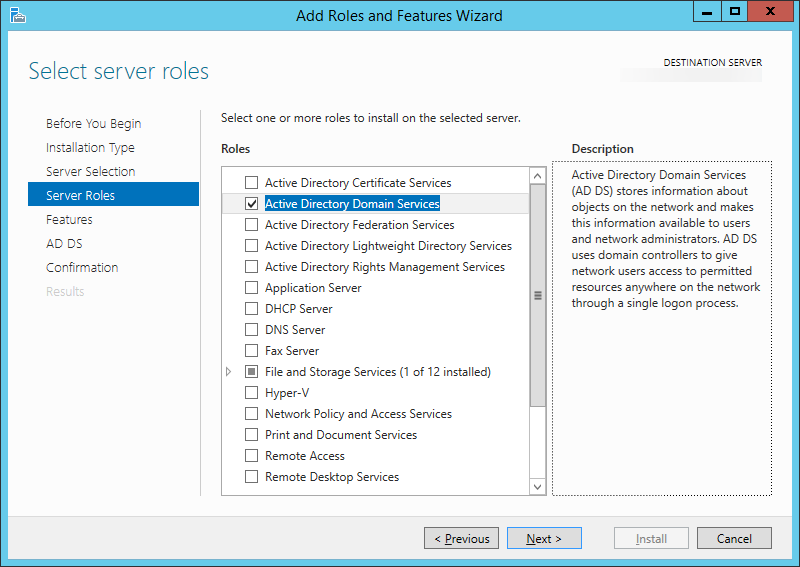
    7. Check the box next to Active Directory Domain Services
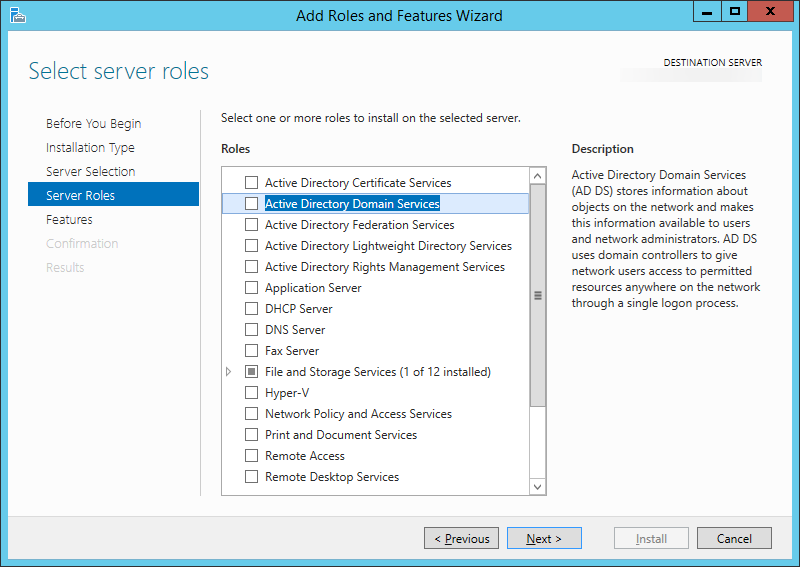
      Add Roles and Features Wizard - Select server roles
    8. On the Add features that are required for Active Directory Domain Services? dialog, click the Add Features button
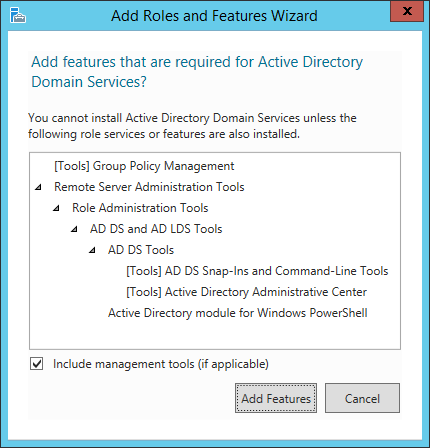
      Add Roles and Features Wizard - Add features that are required for Active Directory Domain Services Dialog
    9. Click Next >
      Add Roles and Features Wizard - Select server roles - Active Directory Domain Services Checked
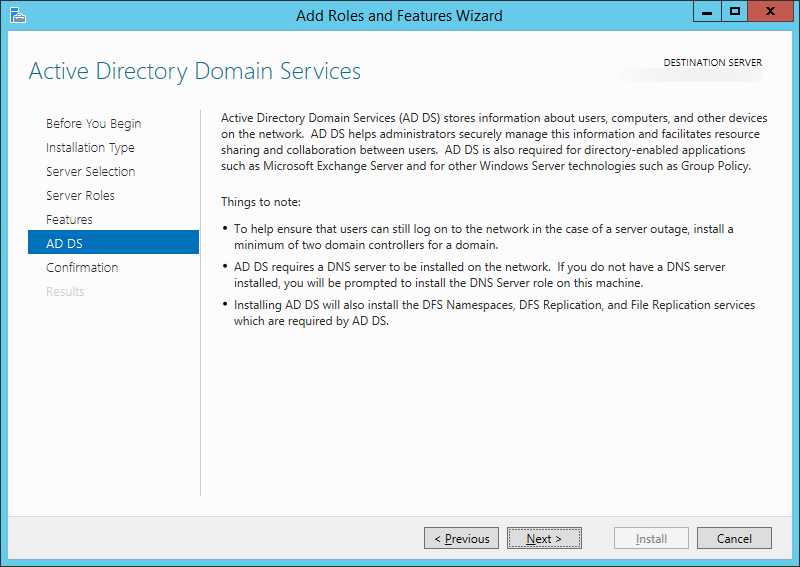
    10. Click Next >
      Add Roles and Features Wizard - Active Directory Domain Services
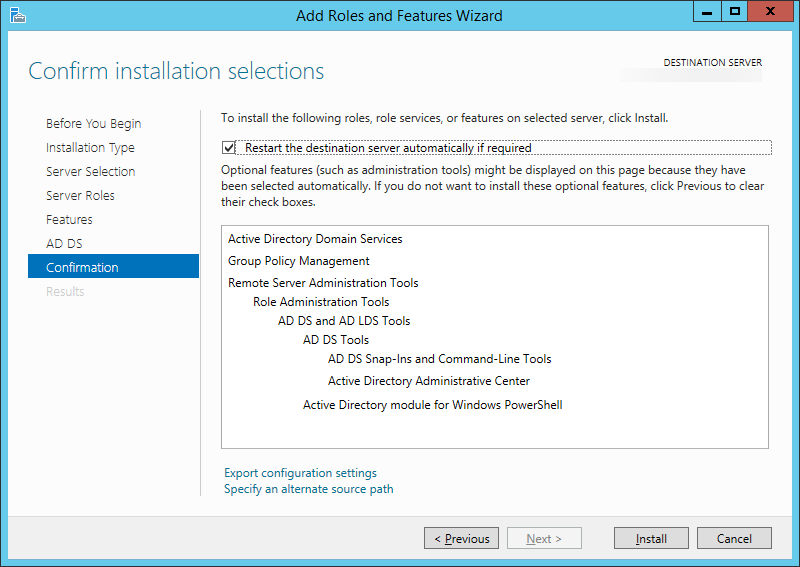
    11. Check the box that says Restart the destination server automatically if required
      (Click Yes on the restart dialog if it pops up)
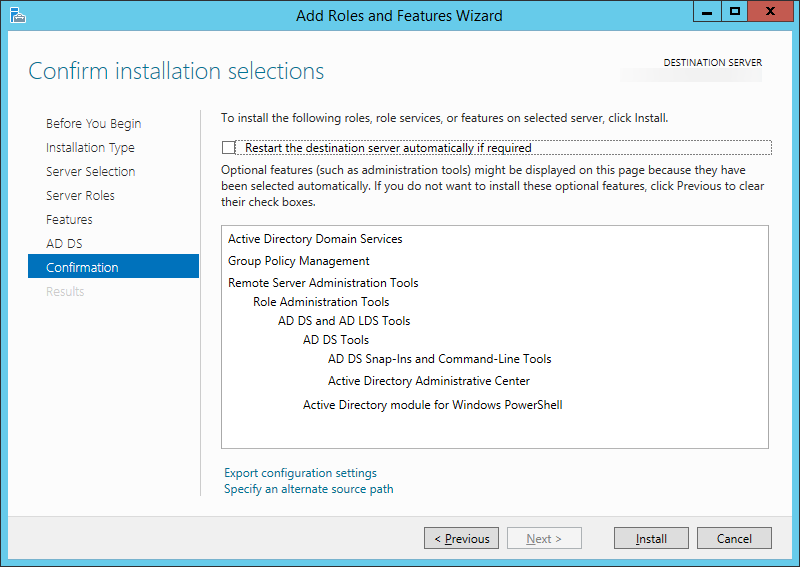
      Add Roles and Features Wizard - Confirm installation selections
    12. Click the Install button
      Add Roles and Features Wizard - Confirm installation selections - restart
    13. Once the install is done, click the Close button
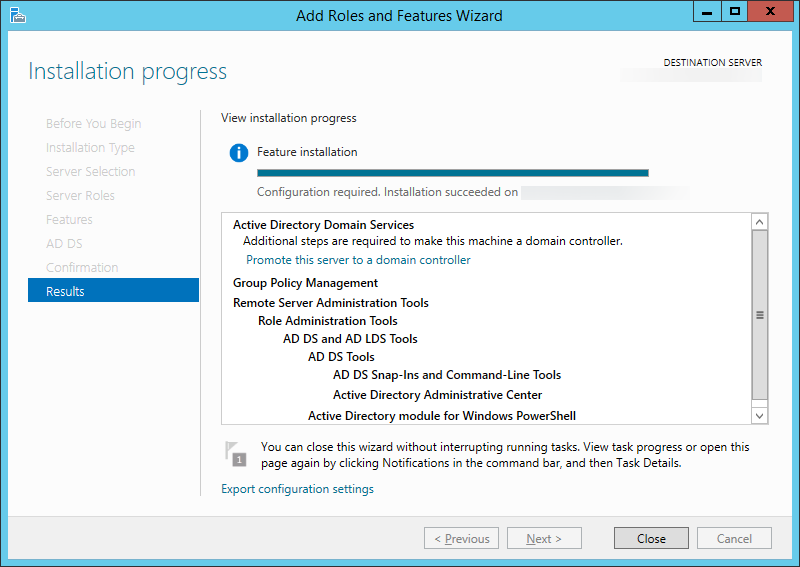
      Add Roles and Features Wizard - Installation progress
    14. Next, head back to the Server Manager screen and select the warning icon with the flag; then select Promote this server to a domain controller.
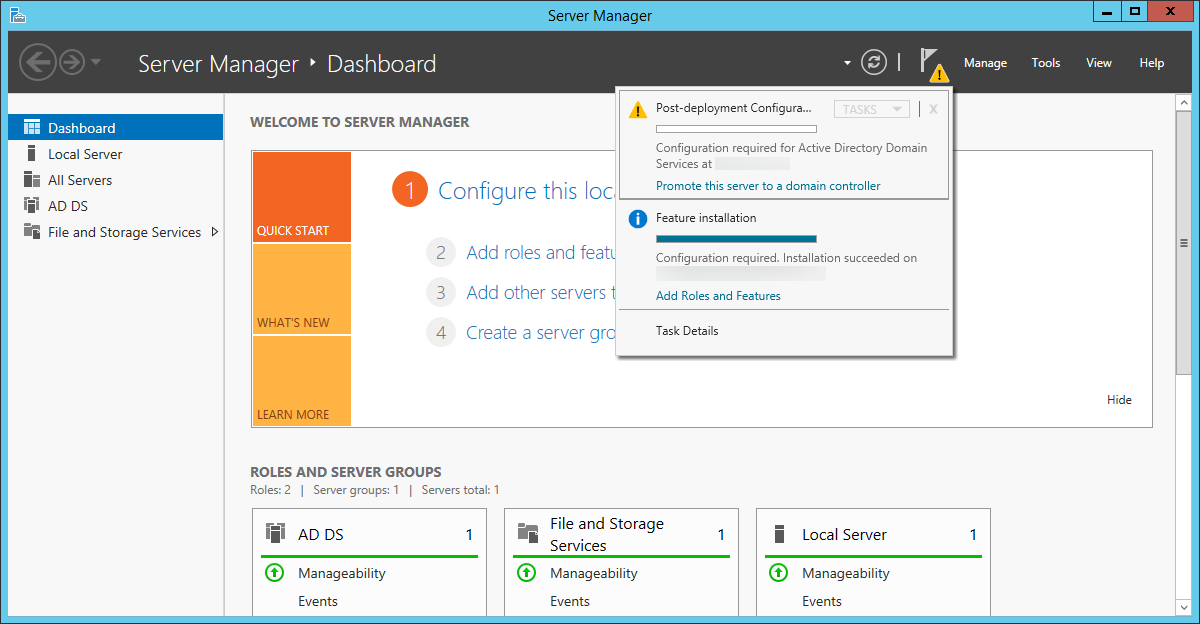
      Server Manager - Promote this server to a domain controller
    15. On the Deployment Configuration page, make sure Add a domain controller to an existing domain is checked and hit Next >
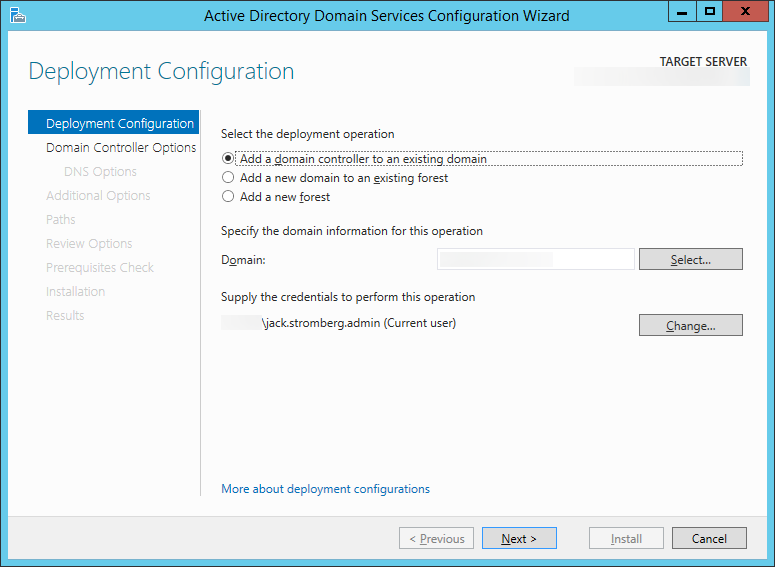
      Active Directory Domain Services Configuration Wizard - Deployment Configuration
    16. Check Domain Name System (DNS) server, Check Global Catalog (GC), and uncheck Read only domain controller (RODC).  Enter a strong password to be used to access Directory Services Restore Mode and click Next >
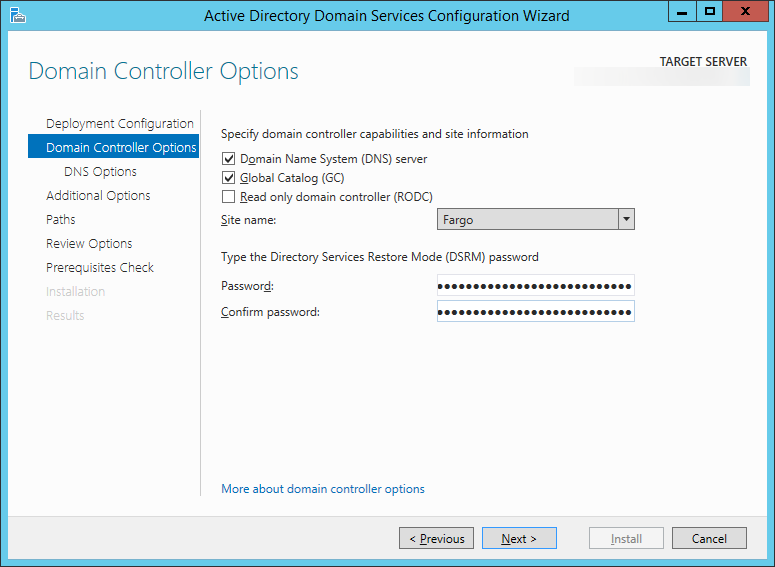
      Active Directory Domain Services Configuration Wizard - Domain Controller Options
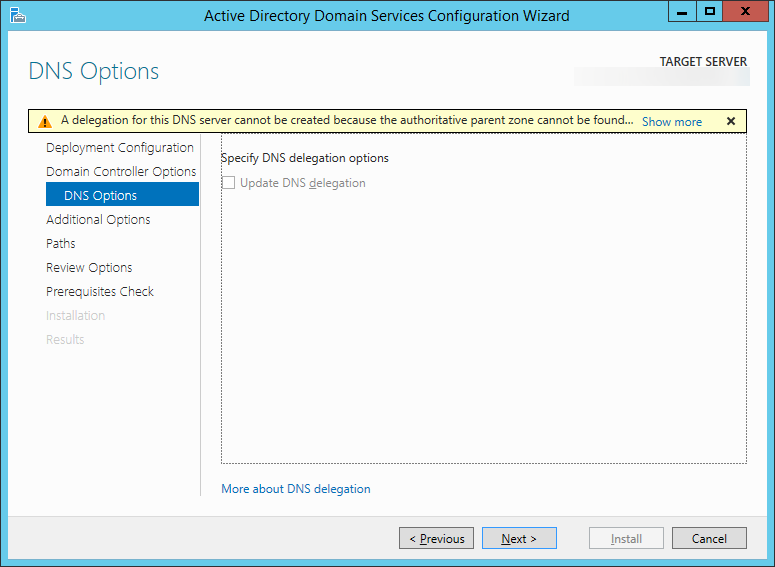
    17. Click Next > on the DNS Options page
      Active Directory Domain Services Configuration Wizard - DNS Options
    18. Click Next > on the Additional Options page, or if you would like, you can manually select a domain controller to replicate data from and then hit Next >.
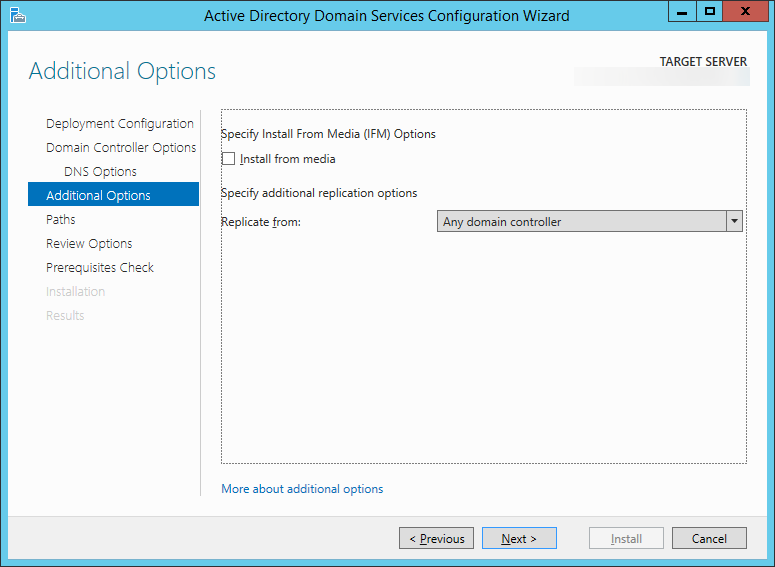
      Active Directory Domain Services Configuration Wizard - Additional Options
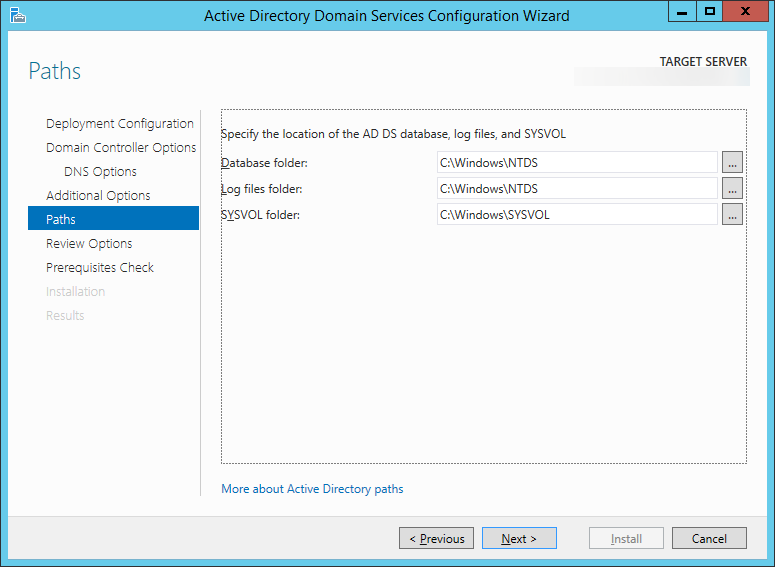
    19. Click Next > on the Paths page
      Active Directory Domain Services Configuration Wizard - Paths
    20. Click Next > on the Review Options page
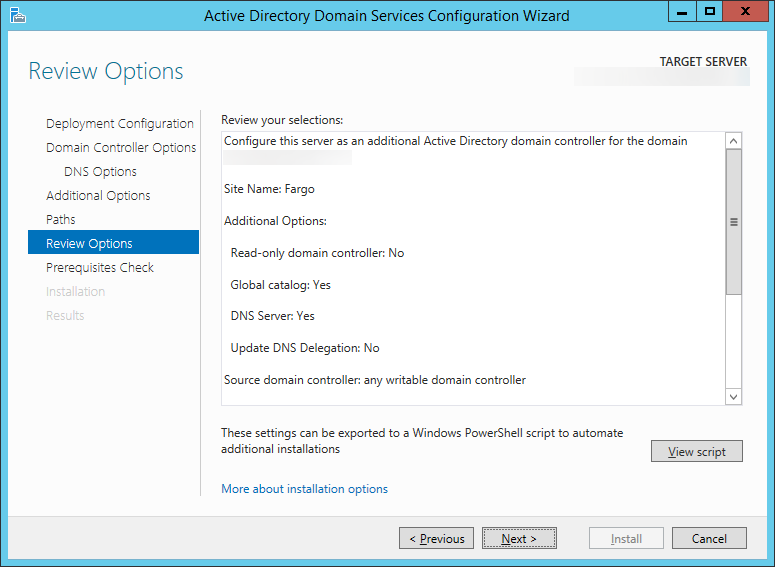
      Active Directory Domain Services Configuration Wizard - Review Options
    21. Click Install on the Prerequisites Check page
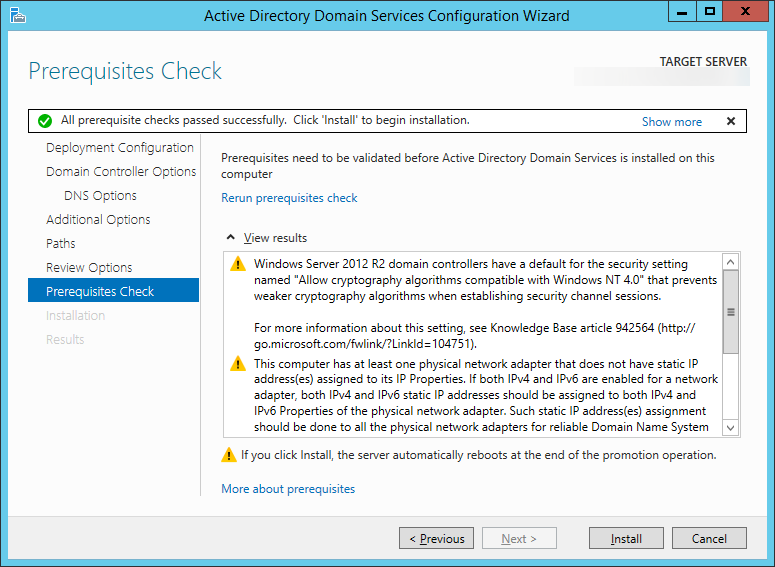
      Active Directory Domain Services Configuration Wizard - Prerequisites Check
    22. Once the domain controller reboots after installation, open up Server Manager and select Tools, Active Directory Users and Computers
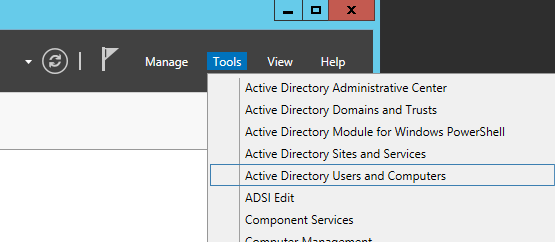
      Server Manager - Active Directory Users and Computers
    23. Expand your Domain and select Domain Controllers; ensure your new machine shows up here.
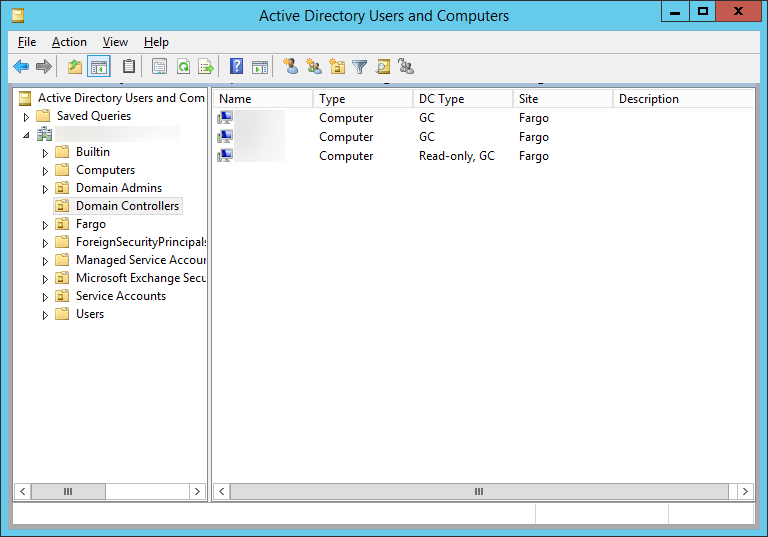
      Active Directory Users and Computers - Domain Controllers
    24. Next, verify DNS works properly
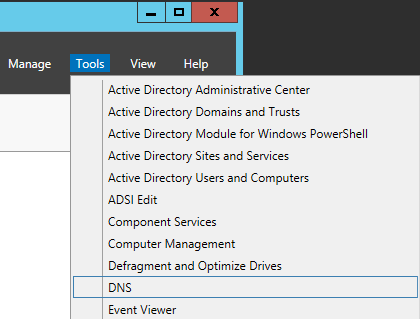
      1. Go back to Server Manager, select Tools, DNS
        Server Manager - DNS
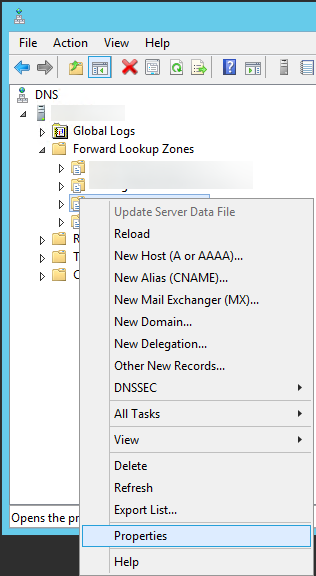
      2. Expand your server, Forward Lookup Zones, and right click on your domain name and select Properties
        DNS - Domain Name - Properties
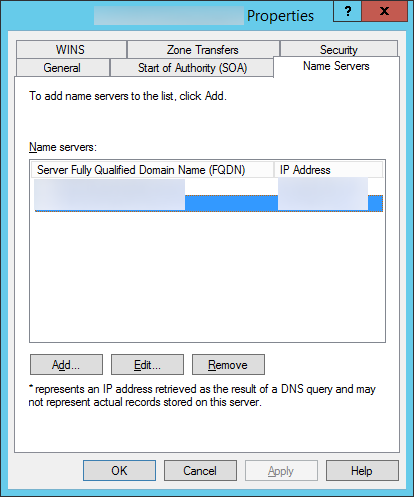
      3. Select the Name Servers tab and ensure all DCs are listed
        DNS - Properties - Name Servers
  4. Next, we need to verify the FSMO (Flexible Single Master Operations) roles are stored on our other server 2008 DC
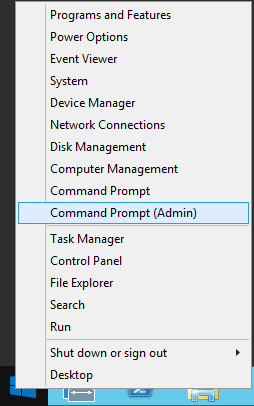
    1. On the new Server 2012 R2 DC we joined, open up a command prompt with administrative privileges.
      Server 2012 - Administrative Command Prompt
    2. Execute the following command to verify FSMO roles are on our 2008 DC:
      netdom query fsmo
      netdom query fsmo
  5. Next, we need to transfer the FSMO roles from our primary DC to our new one
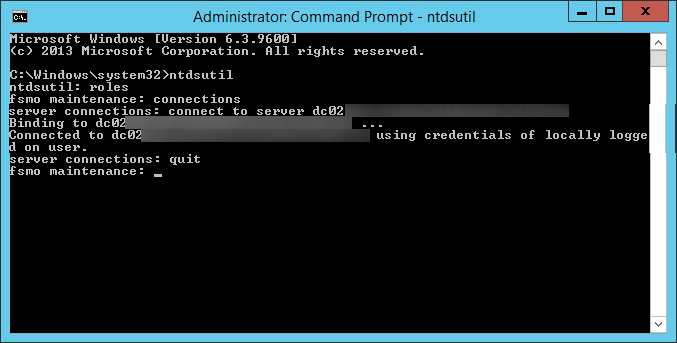
    1. Execute the following command using the same command prompt in the previous steps: ntdsutil
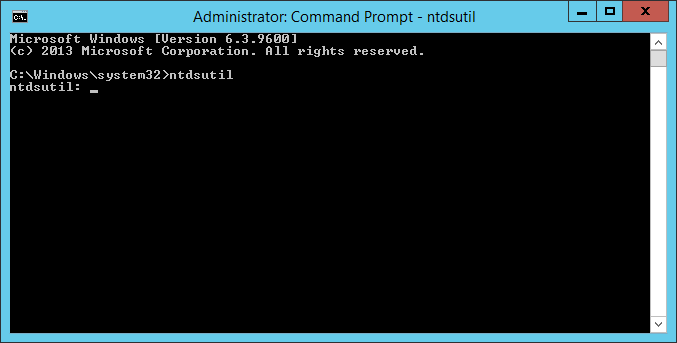
      ntdsutil
    2. Type roles when prompted and hit enter
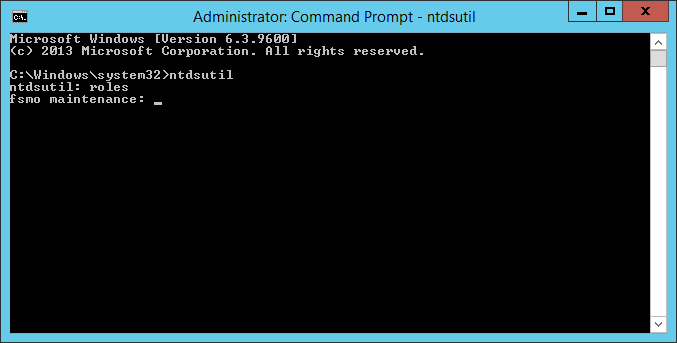
      ntdsutil - roles
    3. Type connections when prompted and hit enter
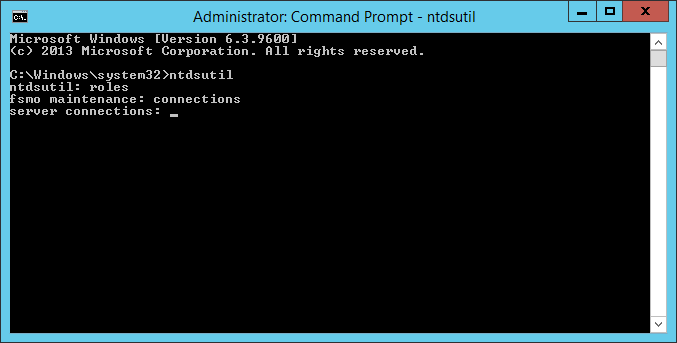
      ntdsutil - roles - connections
    4. Type connect to server server2012DC.mydomain.com, where server2012DC is the new DC we just deployed, when prompted and hit enter
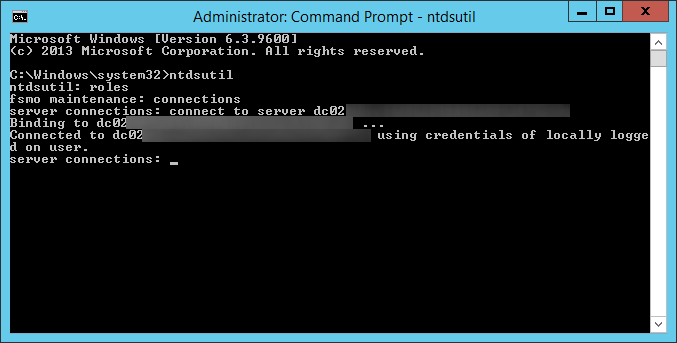
      ntdsutil - roles - connections - connect to server
    5. Type quit and hit enter
      ntdsutil - roles - connections - connect to server - quit
    6. Type transfer schema master and hit enter
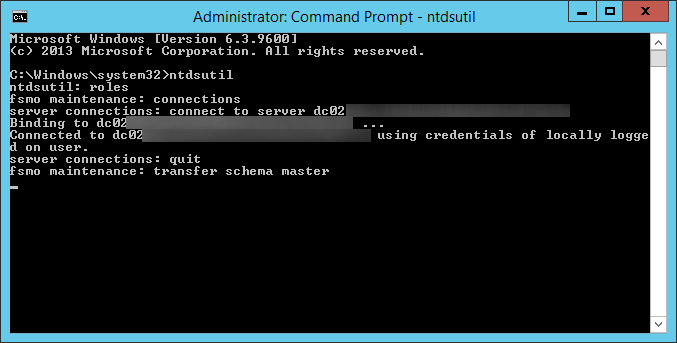
      ntdsutil - transfer schema master
    7. Click Yes on the Role Transfer Dialog for the Schema Master role
      Role Transfer Confirmation Dialog - Schema Master
    8. Type transfer naming master and hit enter
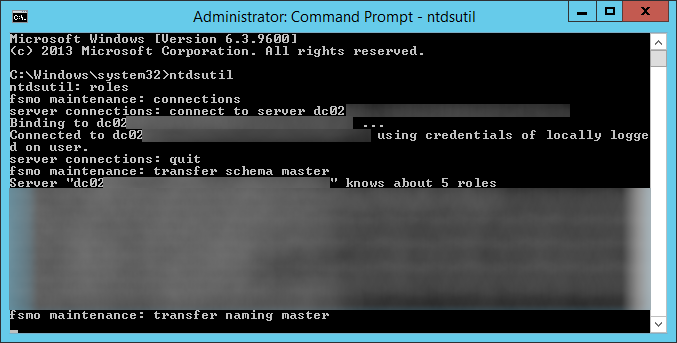
      ntdsutil - transfer naming master
    9. Click Yes on the Role Transfer Confirmation Dialog for the Naming Master role
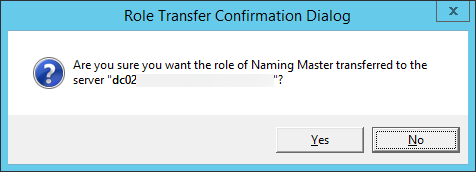
      Role Transfer Confirmation Dialog - Naming Master
    10. Type transfer PDC and hit enter
      ntdsutil - transfer PDC
    11. Click Yes on the Role Transfer Configuration Dialog for the Primary Domain Controller role
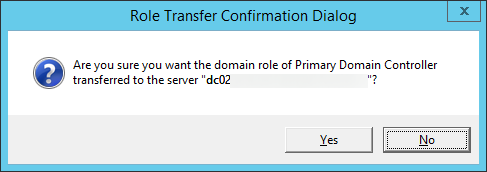
      Role Transfer Confirmation Dialog - Primary Domain Controller
    12. Type transfer RID master and hit enter
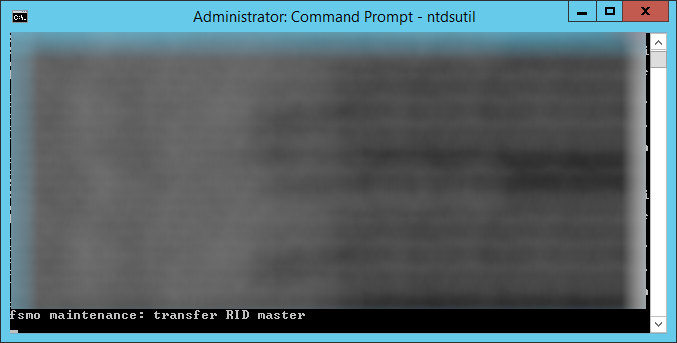
      ntdsutil - transfer RID master
    13. Click Yes on the Role Transfer Configuration Dialog for the RID master role
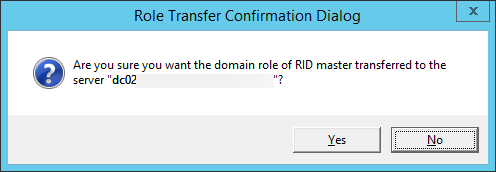
      Role Transfer Confirmation Dialog - RID master
    14. Type transfer infrastructure master and hit enter
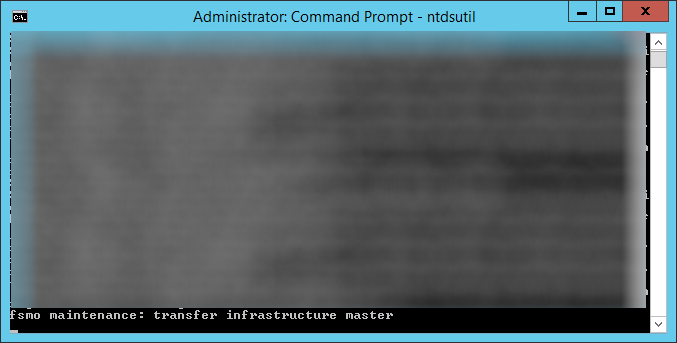
      ntdsutil - transfer infrastructure master
    15. Click Yes on the Role Transfer Configuration Dialog for the Infrastructure Master role
      Role Transfer Confirmation Dialog - Infrastructure Master
    16. Type quit and hit enter
      ntdsutil - fsmo maintenance - quit
    17. Type quit and hit enter
      ntdsutil - quit
    18. Execute the following command to ensure the FSMO services are on the new Server 2012 R2 machine: netdom query fsmo
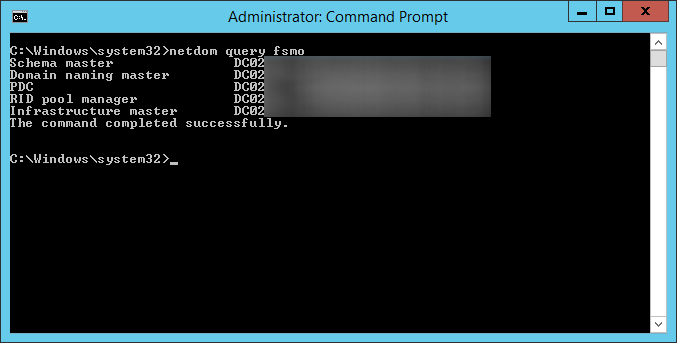
      netdom query fsmo - moved dc
  6. At this point, you should have a Server 2012 R2 DC with the FSMO roles and a secondary 2008 R2 Domain Controller.  If not, please go back and complete the steps to get to this point.
  7. Optional Step: After upgrading the first DC, you may want to reconfigure the machine to keep its time in sync with an external source.  To do this, please follow my guide here: http://jackstromberg.com/2013/10/configuring-external-time-source-on-your-primary-domain-controller/
  8. Next, decommission the last Server 2008 R2 domain controller that used to function as the primary DC.
    1. Follow the same instructions in Step 2 above called Demote and decommission secondary domain controller
  9. Next, add the machine back to the domain
    1. Follow the same instructions in Step 3 above called Add first Server 2012 R2 Domain Controller
  10. At this point, your environment should be up and running with Windows Server 2012 R2!  You can optionally transfer the FSMO roles back to your "primary" DC that you had before, or continue on with the roles left on the current DC.

Notes

Official information on removing a domain controller from the domain can be found on Microsoft's website here: http://technet.microsoft.com/en-us/library/cc771844(v=ws.10).aspx
Request SSL Certificate With a Subject Alternative Name (SAN) via enterprise CA with a GUI

For those that want to quickly request a new SSL certificate via your Enterprise Certificate Authority, using a GUI instead of certutil commands, here is a tutorial on how to do so.

  1. Login to the server you want the SSL cert with the SAN address.
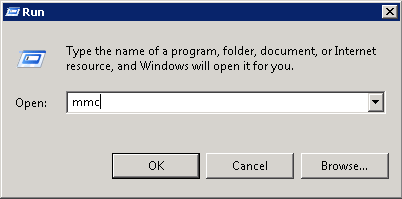
  2. Click Start->Run->MMC
    mmc
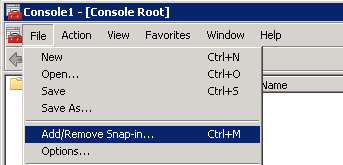
  3. Click File->Add/Remove Snap-Ins
    mmc - add-remove snap-in
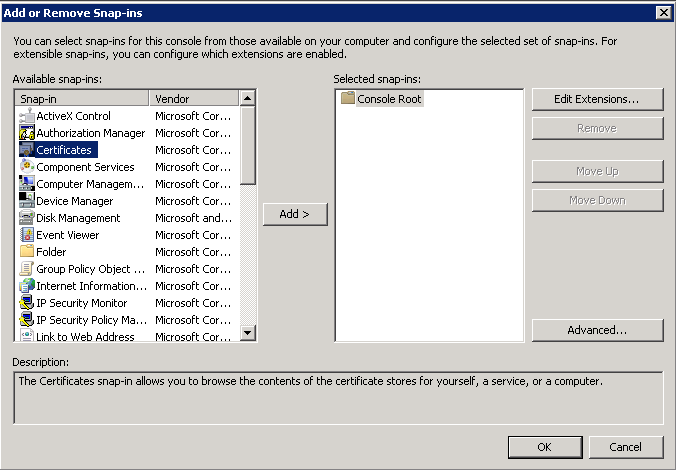
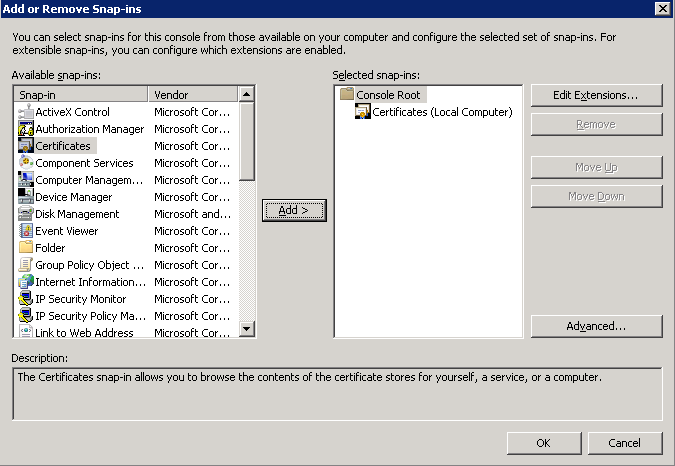
  4. Select Certificates and click Add >
    mmc - add-remove-snap-in-certificates
  5. Select Computer account and click Next >
    certificates snap-in computer account
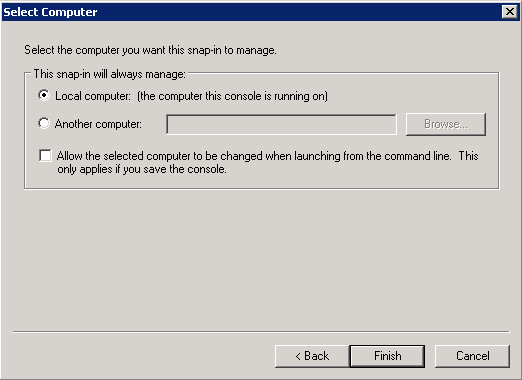
  6. Click Finish
    certificates snap-in local computer
  7. Click OK
    add-remove snap-ins local certificates
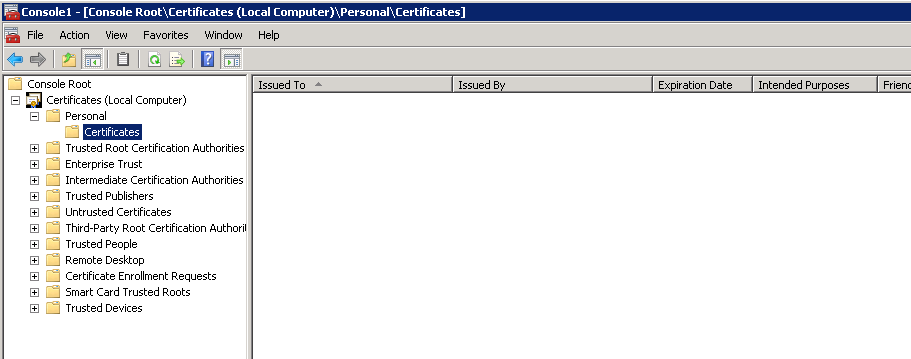
  8. Expand Certificates (Local Computer)->Personal->Certificates
    mmc - personal certificates
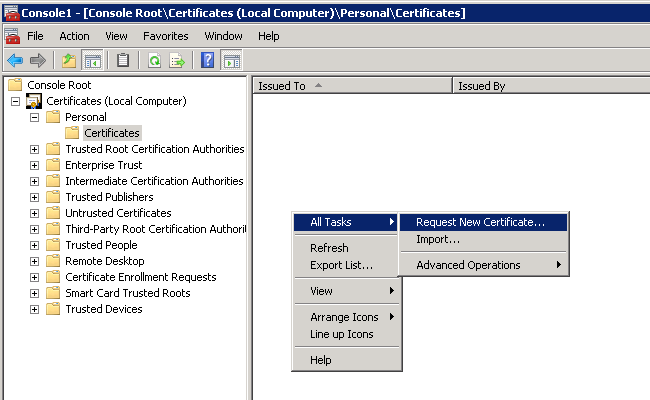
  9. Right click on the right pane and select All Tasks -> Request New Certificate...
    mmc - personal certificates request
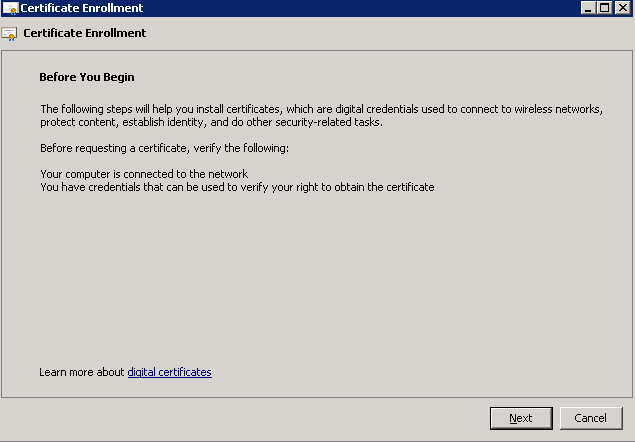
  10. Click Next on the Certificate Enrollment screen
    certificate enrollment welcome
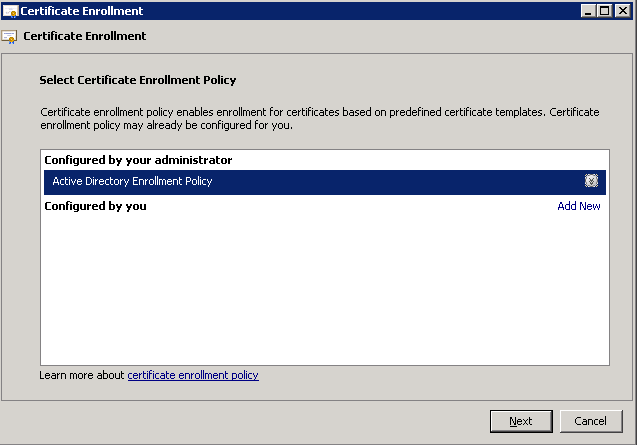
  11. Select Active Directory Enrollment Policy and click Next
    certificate enrollment policy
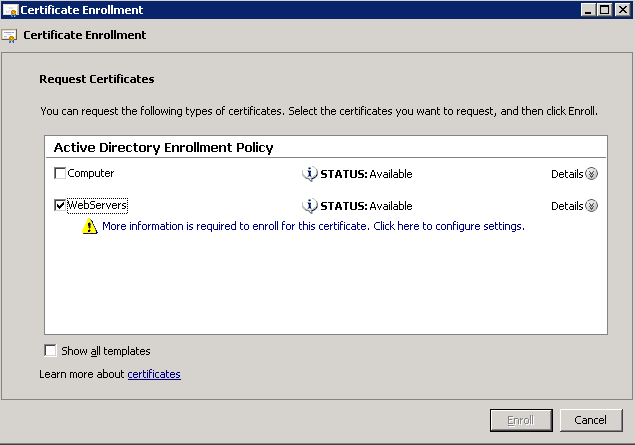
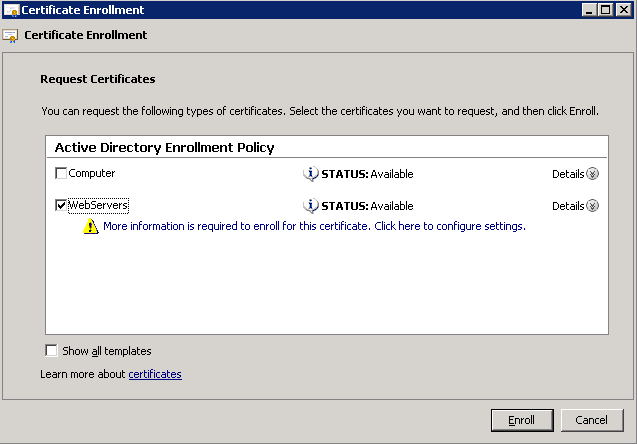
  12. Check what type of certificate you would like to request and click on the "Click here to configure settings." link
    certificate enrollment selected policy

    1. Note: you must have configured a template for this link to show up.  By default you will only see Computer, which will not allow you to request the certificate with the SAN address
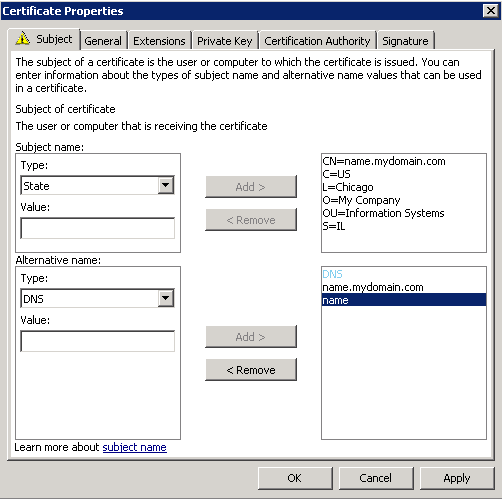
  13. On the certificate properties page, enter in the following info for the Subject name
    1. Common name
    2. Country
    3. Locality
    4. Organization
    5. Organization Unit
    6. State
  14. On the certificate properties page, enter in the following info for the Alternative Name
    1. DNS of the FQDN (common name)
    2. DNS of the SAN name (short name)
  15. You should now have something like this
    certificate request - properties
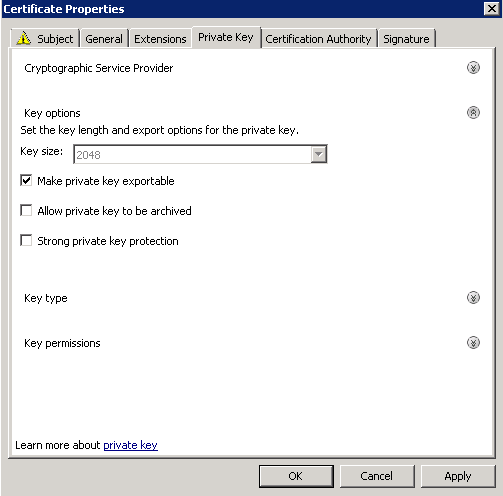
  16. Optionally, click on the Private Key tab, expand Key options, and check Make private key exportable
    certificate request - private key exportable
  17. Click OK on the Certificate Properties window
  18. Click Enroll
    certificate enrollment - enroll
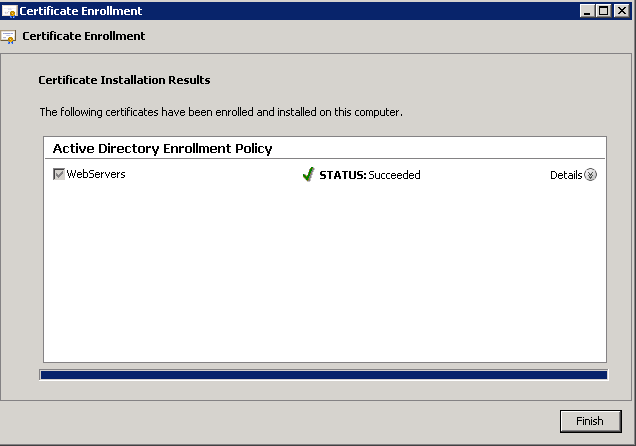
  19. Click Finish once the request has been signed
    certificate enrollment - success

At this point, you can export the certificate from the machine or have your application reference it.

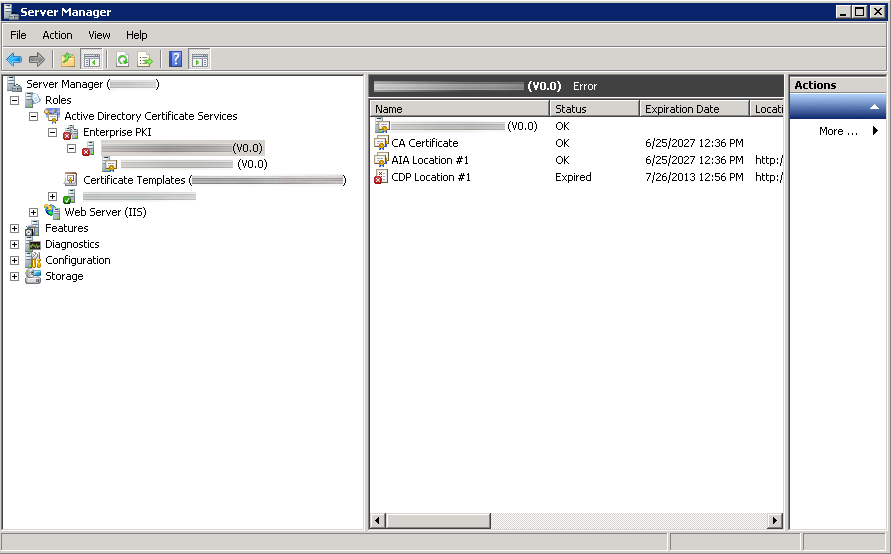
Enterprise PKI - CDP Location #1 Expired

Synopsis: After the first year of deployment of one of my two-tier Enterprise PKI environments, I noticed that certificates were generating weird errors, new certificates could not be issued automatically, nor could certificates be requested manually.

Here is an image of what the subordinate certificate authority looked like in Server Manager; showing CDP Location #1 expired.

Active Directory Certificate Services Error

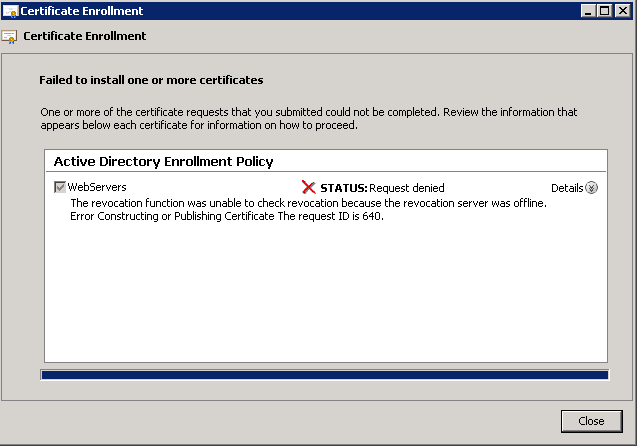
Here was an error that prompted my investigation, when requesting a certificate manually.

Status: Request denied
The revocation function was unable to check revocation because the revocation server was offline.  Error Constructing or Publishing Certificate.  The request ID is 640.

Certificate Enrollment Error

Here were some of the errors in event viewer on the subordinate CA:

Event ID: 48
Level: Warning
Revocation status for a certificate in the chain for CA certificate 0 for My CA0 could not be verified because a server is currently unavailable.  The revocation function was unable to check revocation because the revocation server was offline. 0x80092013 (-2146885613).

Event ID: 100
Level: Error
Active Directory Certificate Services did not start: Could not load or verify the current CA certificate. My CA The revocation function was unable to check revocation because the revocation server was offline. 0x80092013 (-2146885613).

Revocation status for a certificate in the chain for CA certificate 0 for My CA could not be verified because a server is currently unavailable.  The revocation function was unable to check revocation because the revocation server was offline. 0x80092013 (-2146885613).

Upon inspection, it turns out the CDP Location for the subordinate certificate authority had expired.

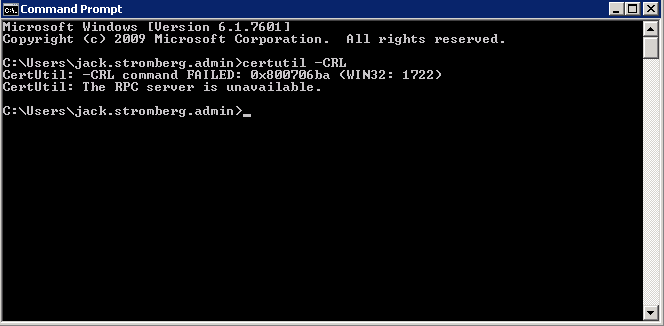
According to a couple technet article I stumbled across, if i ran certutil -CRL, it would renew the CDP location and all would be happy.  Not surprisingly, I received another error:
CertUtil: -CRL command FAILED: 0x800706ba (WIN32: 1722)
CertUtil: The RPC server is unavailable.
CertUtil Failed Command

Solution: When setting up my PKI environment, the CDP was manually published to the Subordinate CA for security reasons (the Root CA should be turned off most of the time).  That being said, manually generating a new CRL from the Root CA, coping it over to the Subordinate CA's directory that is publishing the CRL, and restarting the Active Directory Certificate Services service did the trick for me.

To manually generate the CRL from the Root CA

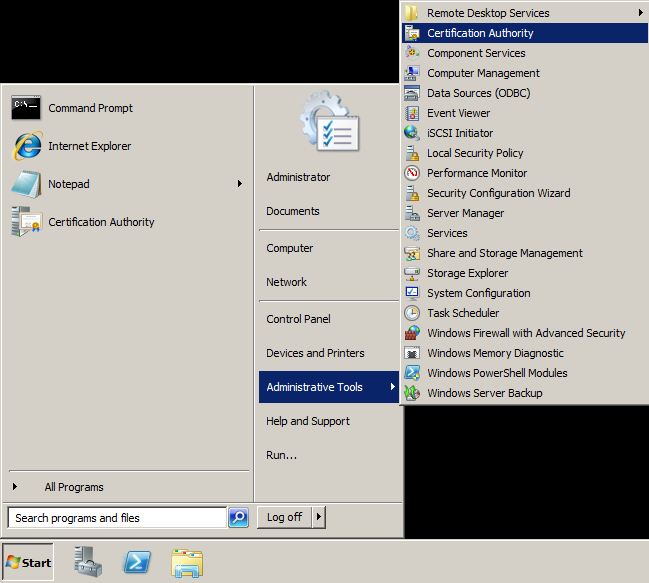
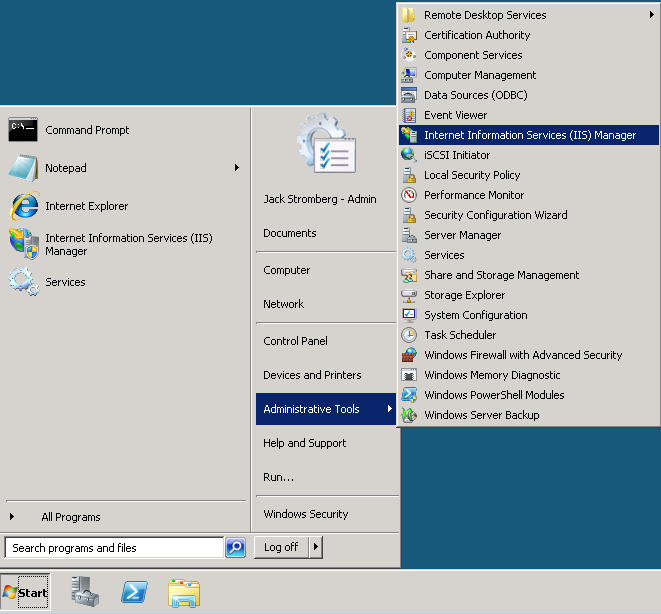
  1.  Open up Active Directory Certificate Services (Start->Administrative Tools->Certification Authority)
    Certification Authority - Start Menu
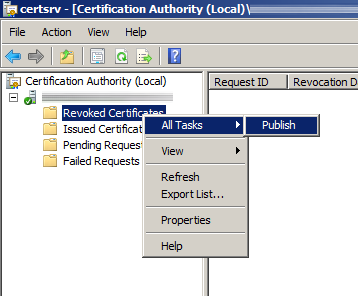
  2. Under Certificate Authority, expand your CA, right click on Revoked Certificates, and select All Tasks -> Publish.
    Certification Authority - Publish CRL
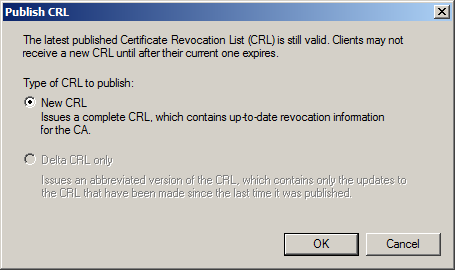
  3. Click New CRL when the Publish CRL dialog box pops up and click OK
    Publish CRL
  4. Navigate to the directory where the CDP gets published via Windows Explorer
    1. The default directory for this is usually at C:\Windows\System32\CertSrv\CertEnroll
  5. Copy the YourCAName.crl file to an external hard drive to copy over to your subordinate ca.

Importing the CRL on the subordinate CA

The latest CRL is fetched from a published website.  In this case, I needed to replace that CRL so the service could properly startup/continue processing certificate.  To do so, I logged into the server hosting the CRL file, opened up IIS, and browsed to the area hosting the CDP.  Last, I copied the CRL file we generated on the Root CA to this directory.

  1. Remote to the machine hosting the CRL file
  2. Open up IIS Manager (Start->Administrative Tools->Internet Information Services (IIS) Manager
    IIS Start Menu
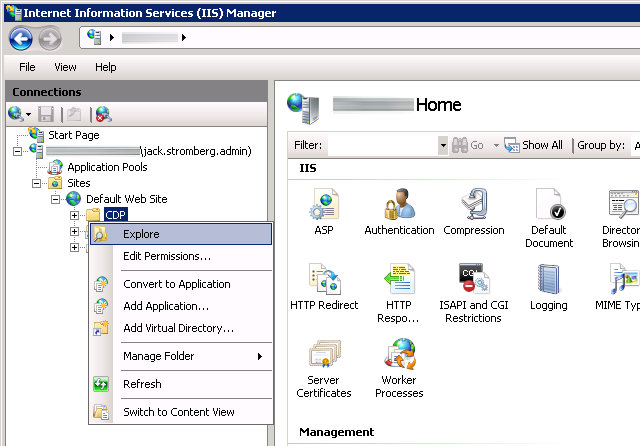
  3. Expand the server, Sites, Default Web Site, and right click on CDP, select Explore
    IIS Manager - Explore
  4. Copy the CRL we generated from the Root CA to the directory that just opened (if your certificate authority was working before, replace the old CRL with this one).

Restarting the service

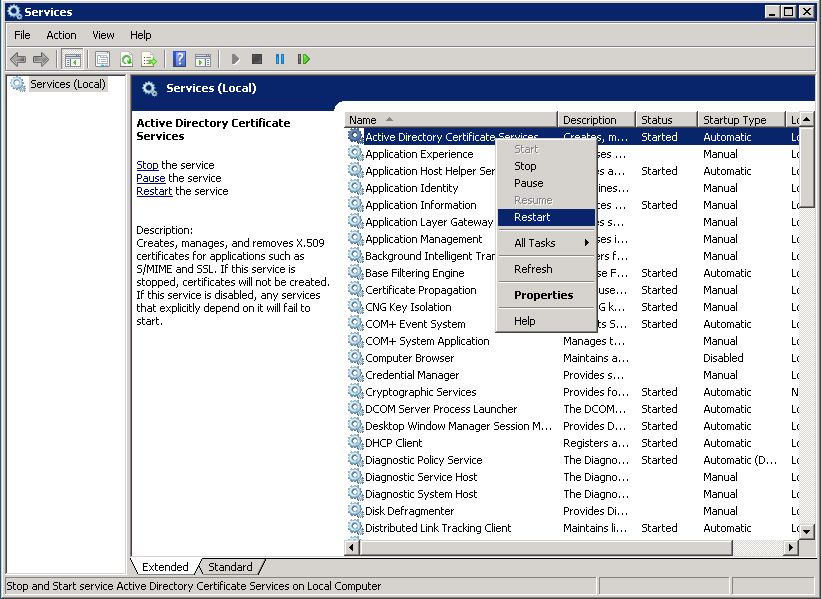
  1. Click Start->Administrative Tools->Services
    Services
  2. Right click on Active Directory Certificate Services and select Restart (or Start if the service blew up like mine)
    Active Directory Certificate Services Restart

Configuring Google Chrome via Group Policy

Synopsis: As more companies shift from Internet Explorer to Google Chrome, the ability to administer certain controls over the web browser from a centralized place becomes increasingly difficult.  As such, one of the most sought featured in administering the web browser is the ability to deploy shortcuts to the end users to frequently accessed resources on both the intranet and internet.  Luckily, Google has acknowledged the need to be centrally administered in corporate environments using Active Directory and Group Policy to easily complete this task.

Tutorial:

  1. Grab a copy of the Google Chrome ADM/ADMX templates from here: http://dl.google.com/dl/edgedl/chrome/policy/policy_templates.zip
  2. Extract the contents of the policy_templates.zip file once you have downloaded it to your local machine.
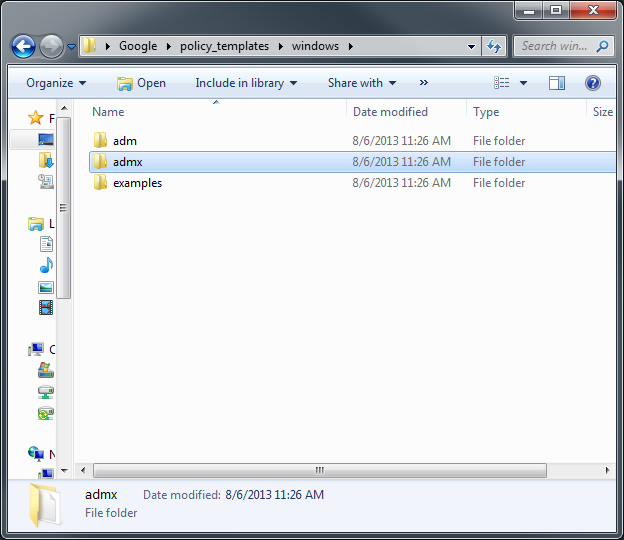
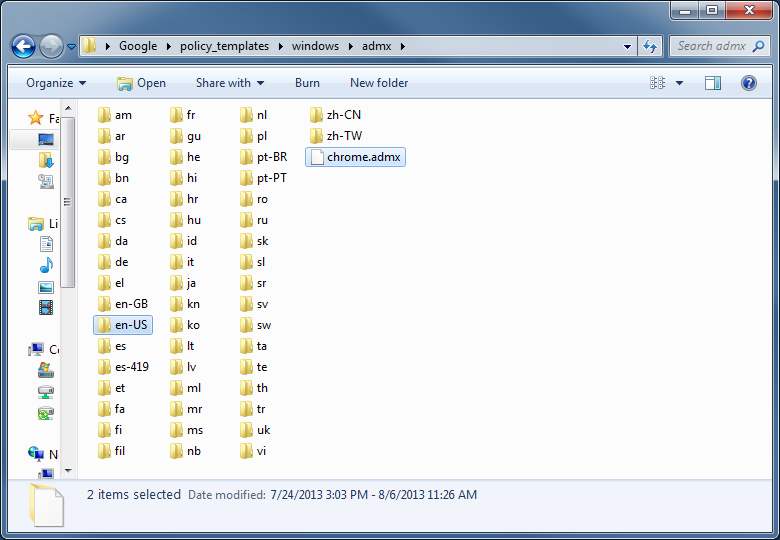
  3. Navigate to the windows folder and then navigate into the folder with the template you want to use (in this case, I will be deploying ADMX; read below on which one you should use)
    Chrome Policy Templates

    1. If you are using computers with an operating system newer than Windows Server 2003 or XP, select the ADMX folder
    2. If you are using computers with an operating system older than Windows Server 2008 and Vista, select the ADM folder
  4. If you are using Server 2003, you will use the adm file and follow step 2 below.  If you are using Server 2008 and newer, you will use the admx and adml files mentioned in step 1 below.
    Chrome ADMX and ADML

    1. If you are running Server 2008 or newer, enter the admx folde rand copy the .adml file from the language folder (en-US for example) to %systemroot%\sysvol\yourdomain\policies\PolicyDefinitions\<ll-cc> (ll-cc being the language specific folder, such as en-US) and copy the .admx file from the root of the admx folder to %systemroot%\sysvol\yourdomain\policies\PolicyDefinitions
      1. If you are from another region, copy the file to the correct language folder (if it doesn't exist, go ahead and create it).
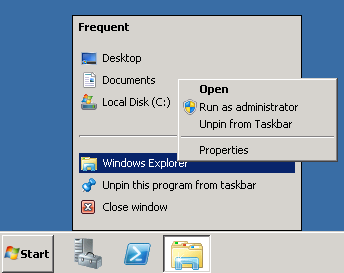
      2. If you get an Access Denied prompt, try running Windows Explorer as an Administrator
        Run explorer as administrator
    2. If you are running Server 2003 or older, copy the .adm file to your domain controller from the Google\Policy_Templates\adm\<ll-cc> Google folder and complete the following steps to import it:
      1. Open the Group Policy Object that you want to edit inside of Group Policy Management.
      2. In the console tree, navigate to Group Policy object/Computer Configuration (or User Configuration)/Administrative Templates and right click on Administrative Templates
      3. Click Add/Remove Templates.
      4. Click the Add button and navigate to the .adm file
      5. More details on this process can be found here: http://technet.microsoft.com/en-us/library/cc739134(v=ws.10).aspx
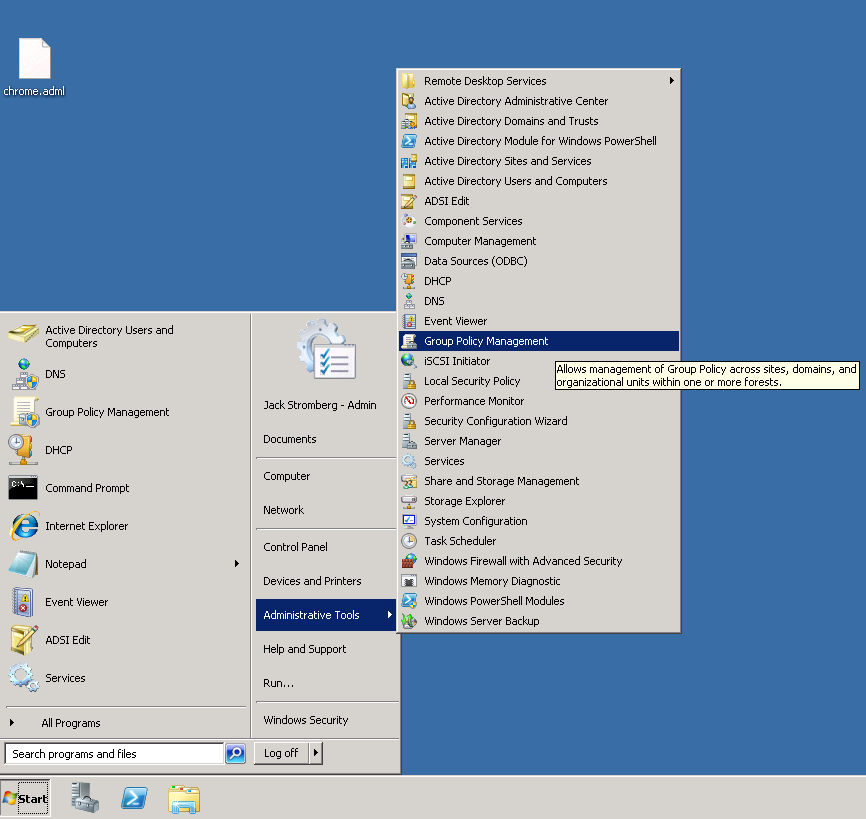
  5. Open up Group Policy Management (Start->Administrative Tools->Group Policy Management)
    Group Policy Management
  6. Right click the Group Policy Object you want, and select Edit...
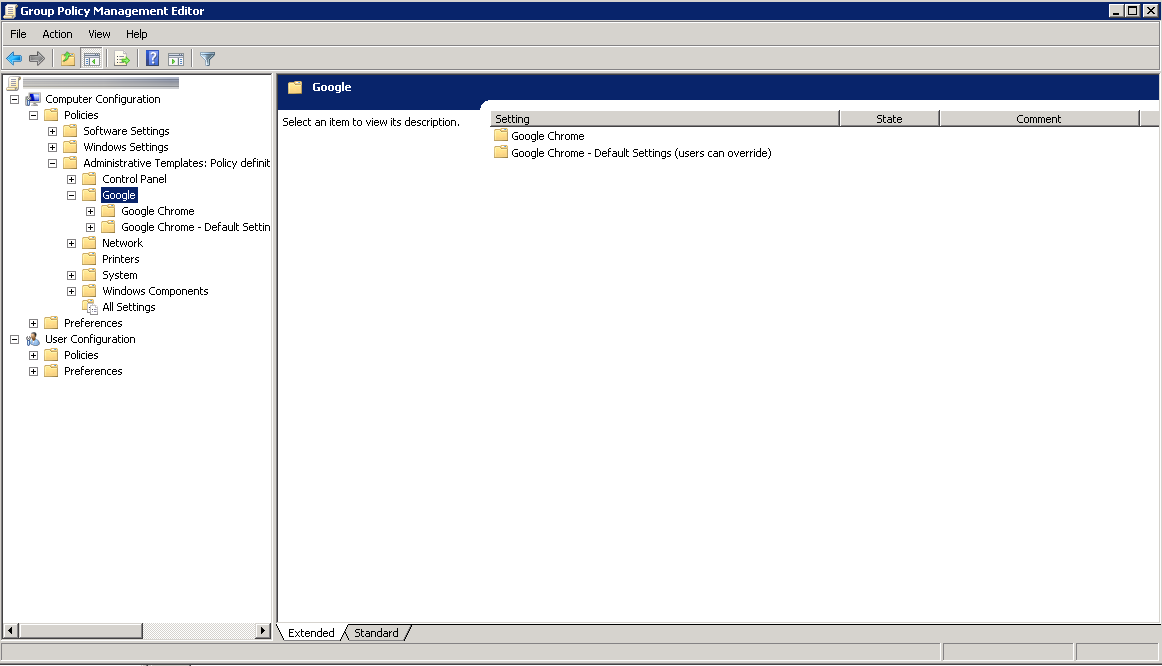
  7. Under Computer Configuration->Policies->Administrative Templates, you should now see a Google object.  Expand that to find the policies you can deploy.
    Editting Group Policy Object

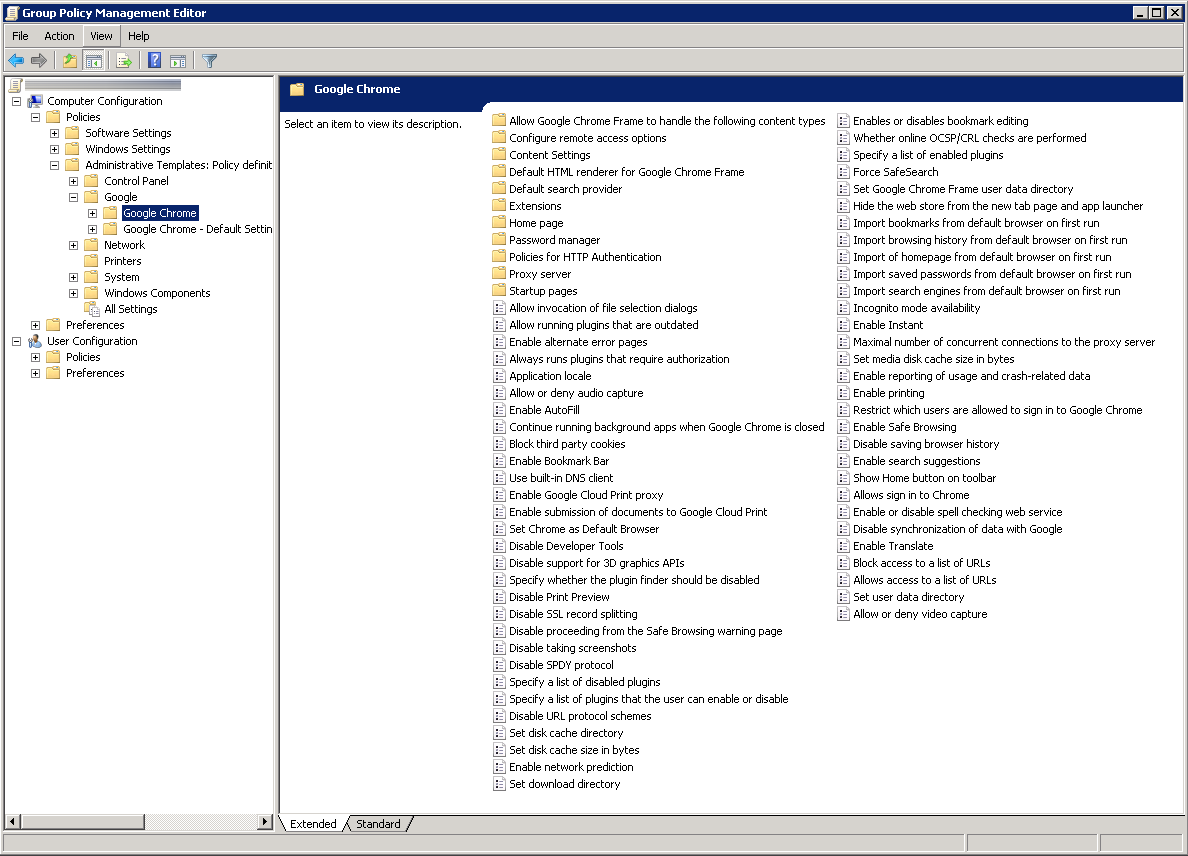
Here is a screenshot of a few of the policies Google offers (more policies can be found in each of the folders as shown in the screenshot below).

Google Policies

Happy web browsing!

Side notes: The only thing I haven't figured out how to do is successfully deploy bookmarks/favorites to Google Chrome.  It appears at this time, it is not possible to do so via Group Policy.  If anyone has any ideas on how to achieve this, please leave a comment below; it would be greatly appreciated! 🙂

Deploying a Read-Only Domain Controller with Server 2008 R2

Recently, I just configured a MPLS link to a remote office and noticed user experience isn't quite what it is at the centralized office.  In an effort to help speed up the user's experience (response time in domain authentication and DNS resolution), we will be going over setting up a Read-Only Domain Controller to allow users to authenticate to the domain in the event the connection between the remote site and the main site would go down, as well as create a cached copy of DNS at the remote site to help increase response times in DNS intensive applications (particularly, web browsing experience).

Requirements

  • Active Directory has been properly configured at a main facility
  • You have servers that are running Windows Server 2003 or greater
  • The domain functional level is set to Server 2003 or higher
  • If there is windows server 2003 environment, the Active Directory schema needs to be extended for RODC installation by running the command: adprep /rodcprep
  • PDC emulator operation master should be on Windows server 2008
    • Execute the following command to find out which machine is the PDC emulator if you are unsure:
      • dsquery server -hasfsmo pdc

Instructions

  1. Deploy a new server (I used Server 2008 R2 in this example).
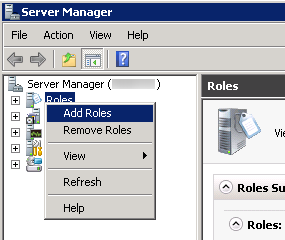
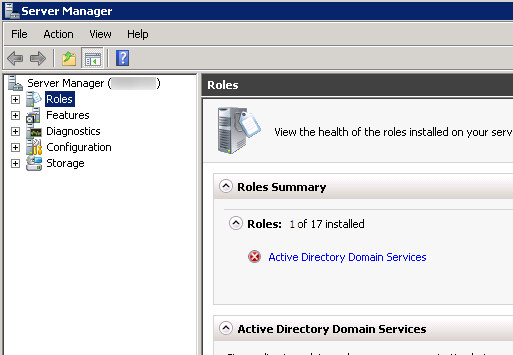
  2. Open up Server Manager, right click on Roles and select Add Roles
    1. Server Manager - Add Role
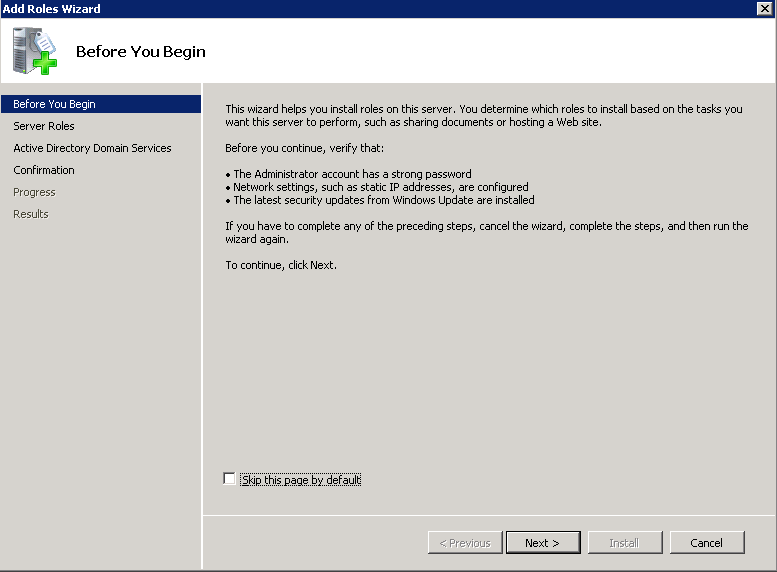
  3. Click Next on the Before You Begin screen.
    1. Before you begin
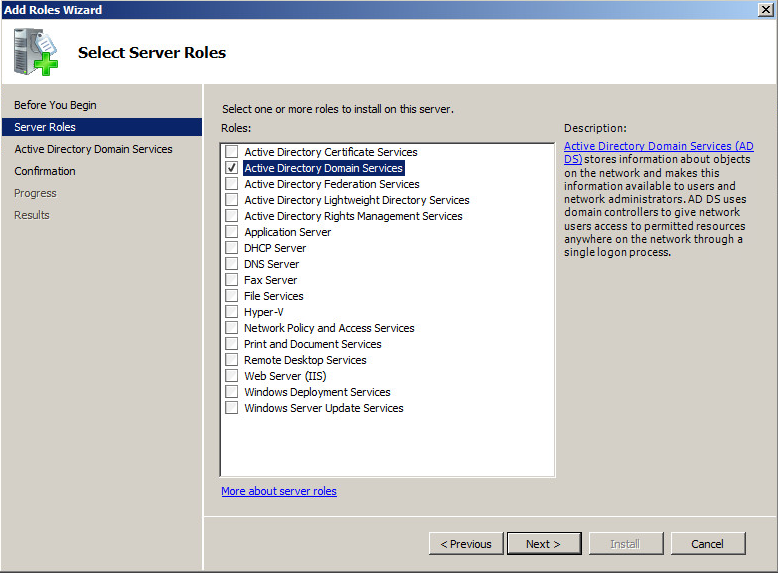
  4. Check Active Directory Domain Services on the Add Roles Wizard and click Next >
    1. Add Role - Select Server Roles
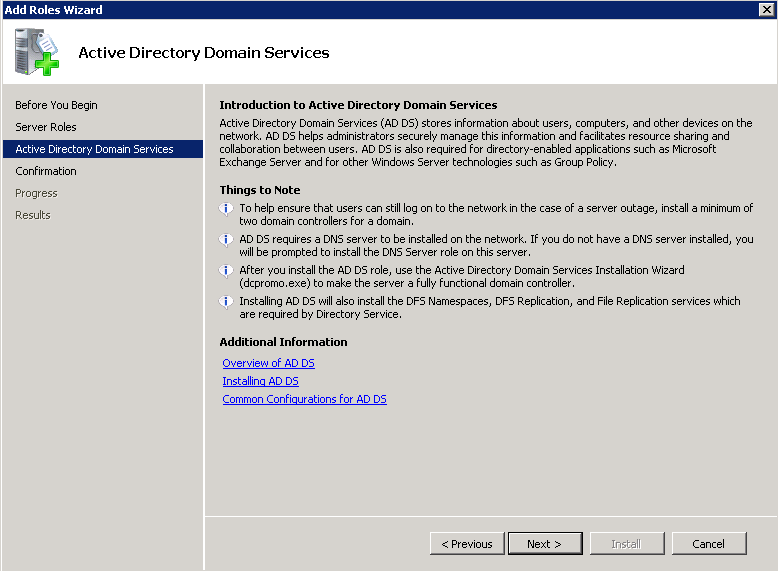
  5. Click Next > on the Active Directory Domain Services screen.
    1. Add Role - ADDS
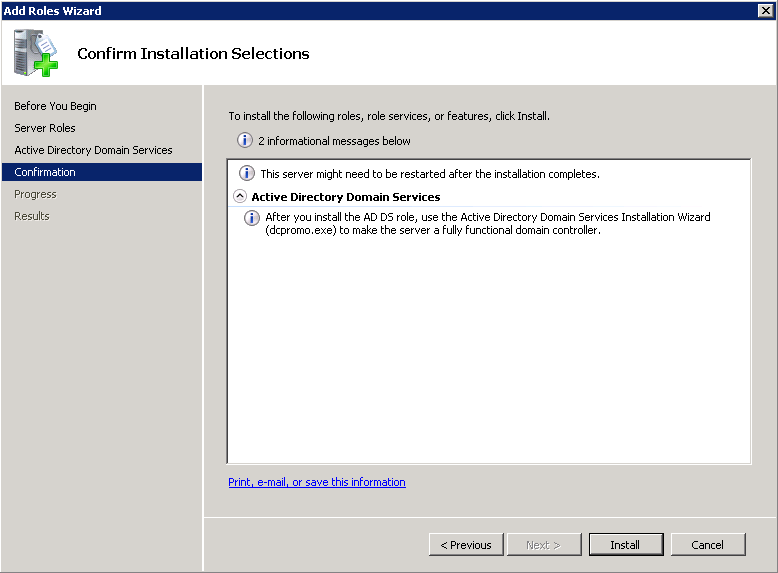
  6. Click Install on the Confirm Installation Selections screen.
    1. Add Role - Confirmation
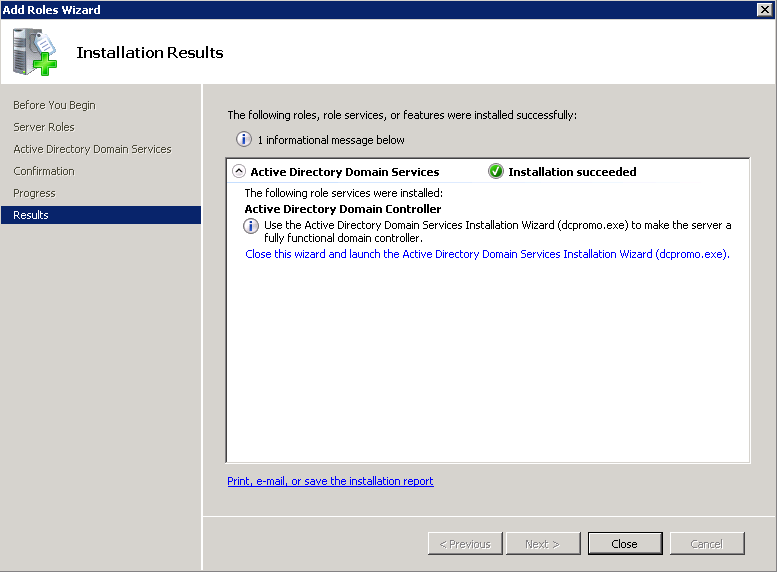
  7. Click Close when the installation is done.
    1. Add Role - Results
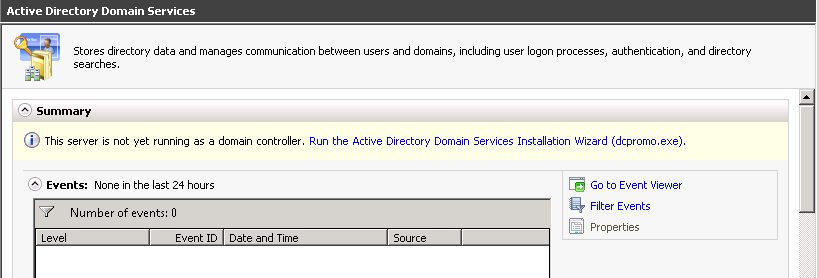
  8. Click on Active Directory Domain Services once the installation is done, back in Server Manager.
    1. Server Manager - Active Directory Domain Services
  9. Select Run the Active Directory Domain Services Installation Wizard (dcpromo.exe)
    1. Run the active directory domain services installation wizard
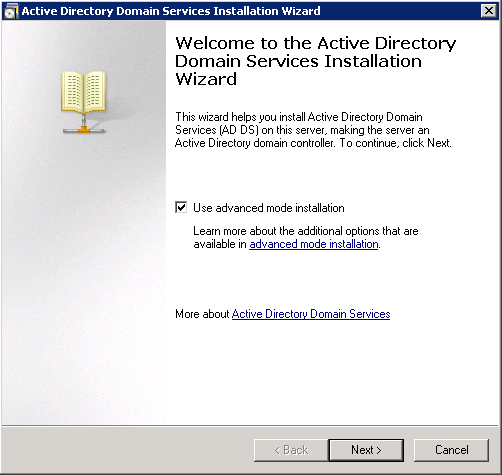
  10. Once you see the Active Directory Domain Services Installation Wizard, check the Use advanced mode installation checkbox and click Next >
    1. dcpromo - Use advanced mode installation
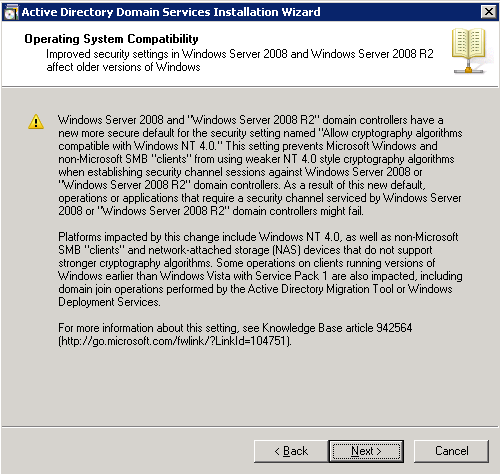
  11. Click Next > on the Operating System Compatibility step.
    1. dcpromo - Operating System Compatibility
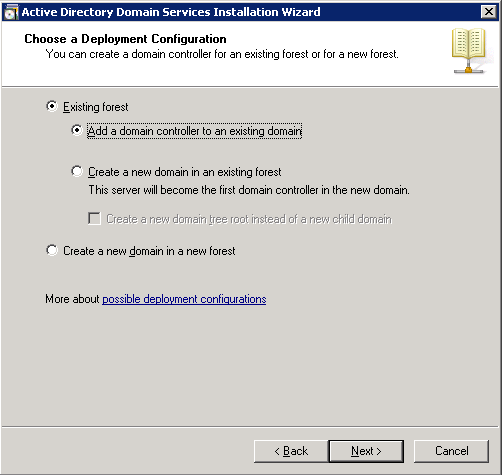
  12. Check Existing forest, and then check Add domain controller to an existing domain

    1. dcpromo - Deployment Configuration
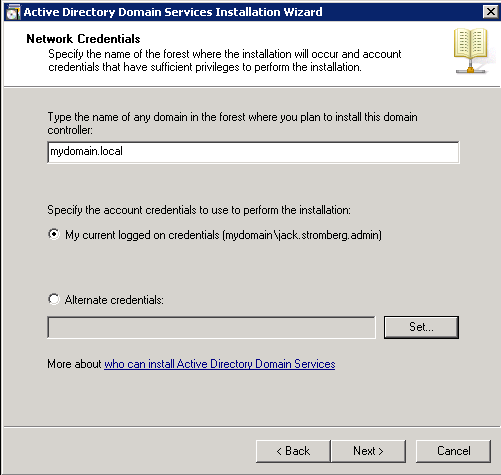
  13. On the Network Credentials page, type in the name of the domain you want to  connect to and then specify the credentials to add the machine.  These credentials must have at least domain admin privileges to join the DC to the network.
    1. dcpromo - network credentials
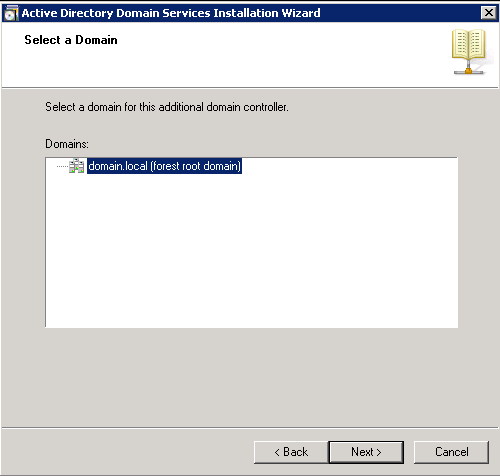
  14. On the select a domain screen, select your domain and click Next >
    1. dcpromo - Select a domain
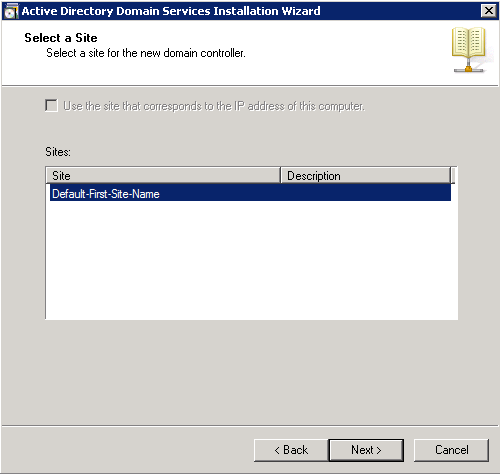
  15. Select a site and then click Next >
    1. dcpromo - Select a site
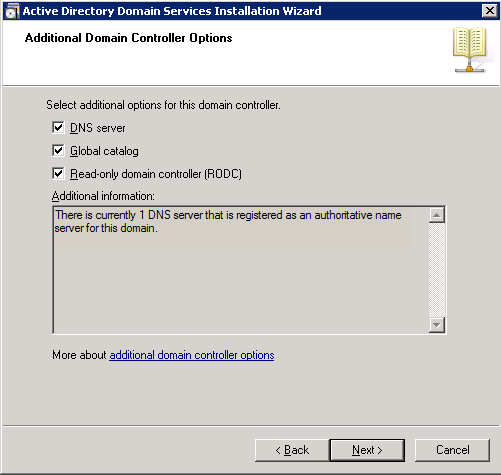
  16. On the Additional Domain Controller Options page, check DNS Server, Global catalog, and Read-only domain controller (RODC) boxes for each of the rolls and select Next >
    1. Here is some information on what each of the choices do. This is from the following KB article by Microsoft: http://technet.microsoft.com/en-us/library/cc754629(v=ws.10).aspx
      • DNS server: This option is selected by default so that your domain controller can function as a DNS server. If you do not want the domain controller to be a DNS server, clear this check box. However, if you do not install the DNS server role on the RODC and the RODC is the only domain controller in the branch office, users in the branch office will not be able to perform name resolution when the WAN to the hub site is offline.
      • Global catalog: This option is selected by default. It adds the read-only directory partitions of the global catalog to the domain controller, and it enables global catalog search functionality. If you do not want the domain controller to be a global catalog server, clear this option. However, if you do not install a global catalog server in the branch office or enable universal group membership caching for the site that includes the RODC, users in the branch office will not be able to log on to the domain when the WAN to the hub site is offline.
      • Read-only domain controller. When you create an RODC account, this option is selected by default and you cannot clear it.
    2. dcpromo - Additional Domain Controller Options
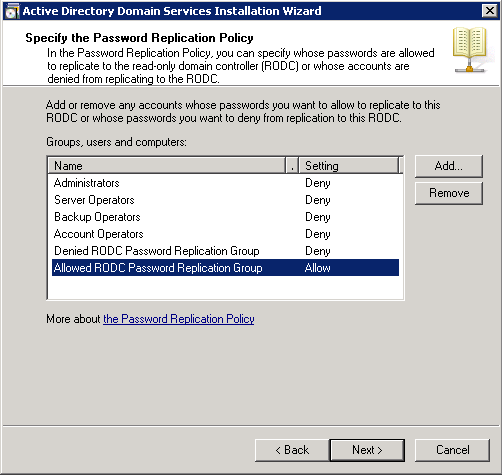
  17. On the Specify the Password Replication Policy step, adjust the settings for each group, specifying if you want to cache user credentials on the Read-Only domain controller.  In this tutorial, I left all of the options Deny except the Allowed RODC Password Replication Group, which is default per Microsoft.  Click Next > once you have determined the settings you want to use.
    1. dcpromo - Specify the Password Replication Policy
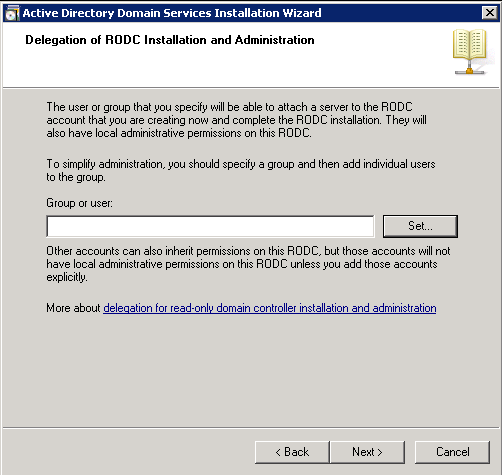
  18. On the Delegation of RODC Installation and Administration step, click the Set... button and select either a user or security group of users that you wish to have Administrative access to the read-only domain controller.  If this is a remote office where you have a designated IT member(s), you would want to create a security group on your read/write DC and then select the group.  However, if you will always know only one individual will login to the RODC, you can specify their user as the one to have local Administrative privileges.  Lastly, if you don't want anyone to be able to mess with the RODC, you can simply click Next > and that will only allow members of the Domain Admins or Enterprise Admins security groups to manage the RODC.  Click Next > once you have decided what security group or user you wish to allow local administrative access to the machine.
    1. dcpromo - Delegation of RODC Installation and Administration
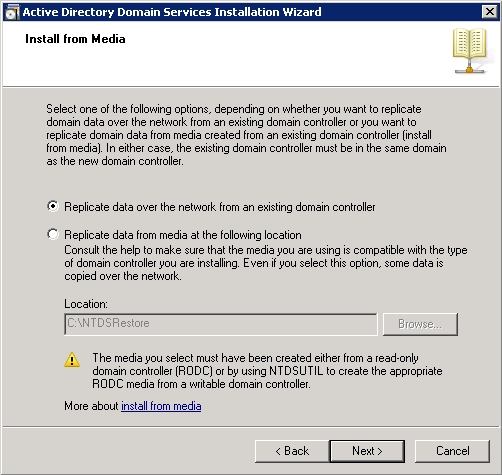
  19. Click Next > on the Install from Media screen to pull the most current information from one of your active domain controllers.
    1. dcpromo - Install from media
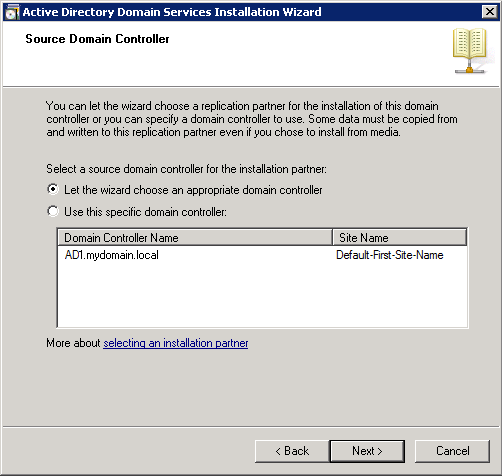
  20. Click Next > on the Source Domain Controller screen to Let the wizard choose an appropriate domain controller to replicate from.  If you prefer replication from a specific machine, you may check the Use this specific domain controller box, select the machine from the list, and then click Next >.
    1. dcpromo - Source Domain Controller
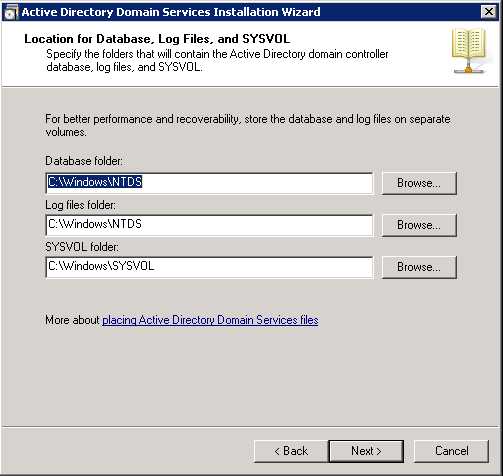
  21. Click Next > on the Location to store the Database, Log Files, and SYSVOL; unless you wish to relocate those files to a separate partition.
    1. dcpromo - Location for database - log files - sysvol
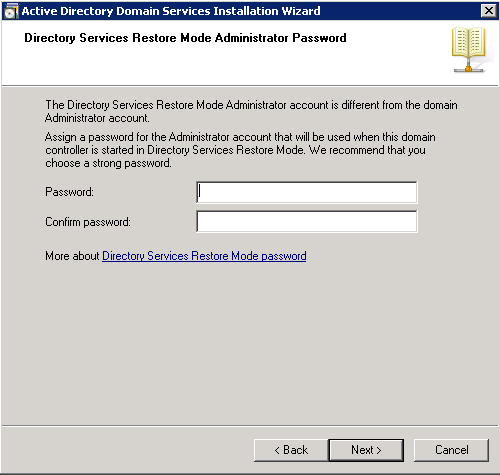
  22. On the Directory Services Restore Mode Administrator Password, enter a strong password to be used in the event you need to put the DC in restore mode.
    1. dcpromo - Directory Services Restore Mode Administrator Password
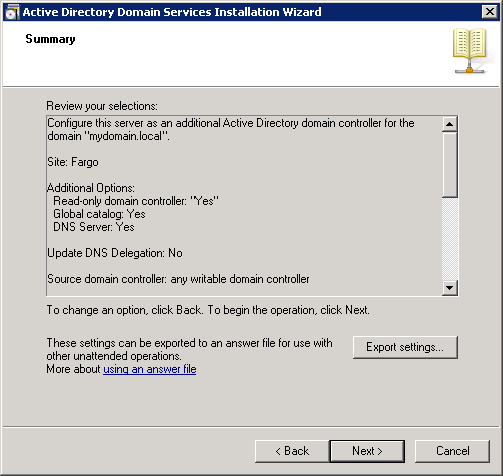
  23. At this point, you can export the settings to make an answer file or you can click Next > for the server to begin applying the configuration.
    1. dcpromo - summary
  24. Click Finish once done and Restart when prompted.

Upon restart, you should be good to go!  I would recommend running the Microsoft Best Practice analyzer and checking the Windows event logs to ensure everything is good to go.

How to list users inside a domain group

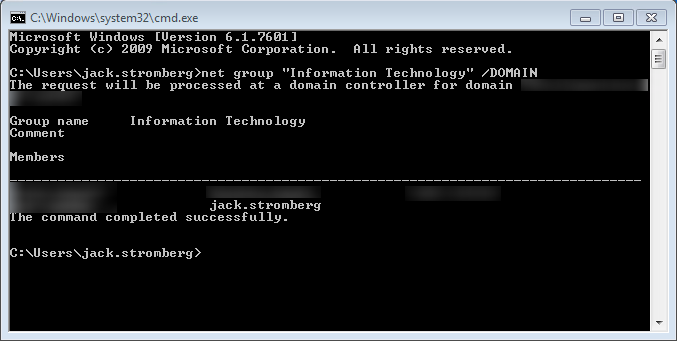
Open up a command prompt on any machine in the domain and execute the following command:

NET GROUP "GROUP NAME" /DOMAIN

At this point, you should see the list of users in correspond group.

NET GROUP Domain

Tutorial: 802.1X Authentication via WiFi - Active Directory + Network Policy Server + Cisco WLAN + Group Policy

Here is how to implement 802.1X authentication in a Windows Server 2008 R2 domain environment using Protected-EAP authentication.  I have designed the tutorial to be worked on in the specific order to prevent downtime if deployed during the day.  By creating the Network Policy server first, once we switch the authentication type from whatever to 802.1X via RADIUS, our Network Policy Server will immediately start processing requests and allowing machines on the domain.  By configuring the Cisco Wireless LAN Controller or Group Policy first, clients will try connecting to a RADIUS server that doesn't exist or present invalid credentials.  If you have any suggestions on how to better the implementation I demonstrate here, please drop a comment below to improve security/stability of these types of deployments. 🙂

Active Directory

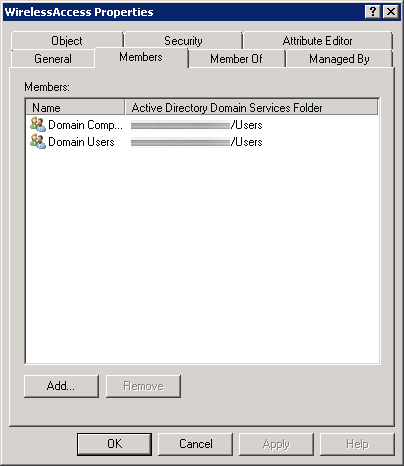
First, we need to create a security group in Active Directory to allow a list of specific users and computers to login to the domain.  In this example, we will allow any authenticated user or machine on the domain to authenticate successfully to the RADIUS sever.  In the screenshot below, we can see I have added both Domain Users and Domain Computers to a security group called WirelessAccess. Here is a screenshot with the above settings.

802.1X - AD Security Group

Network Policy Server

  1. Create a new Windows Server 2008 R2 or Windows Server 2012 machine
  2. Add the machine to the domain
  3. Give the machine a static IP: (I'll use 10.10.10.15 throughout this document as a reference to this server)
  4. Open up Server Manager, click Add Roles, click Next on the Before You Begin screen, check Network Policy and Access Services and click Next, click Next on the Introduction screen, check Network Policy Server (leave the rest unchecked) and click Next, click Install.
  5. Once Network Policy Server is installed, launch the Network Policy Server snap-in (via MMC or Administrative Tools)
  6. Inside of Network Policy Server, on NPC (Local), select RADIUS server for 802.1X Wireless or Wired Connections from the dropdown and click Configure 802.1X
    1. On the Select 802.1X Connections Type page, select Secure Wireless Connections, and enter My Company's Wireless.  Click Next.
    2. Click on the Add... button.  Enter the following settings:
      1. Friendly name: Cisco WLAN Controller
      2. Address: 10.10.10.10 (Enter your WLAN Controller's IP address)
      3. Select Generate, click the Genereate button, and then copy down the Shared Secret the wizard generated (we will use this later to get the WLAN Controller to talk to the RADIUS server).  Click OK.
    3. Click Next.
    4. On the Configure an Authentication Method, select Microsoft: Protected EAP (PEAP). Click Next.
    5. Click Next on the Specify User Groups (we will come back to this).
    6. Click Next on the Configure Traffic Controls page.
    7. Click Finish
  7. Click on NPS (Local) -> Policies -> Network Policies. Right click Secure Wireless Connections and click Properties.
  8. Click on the Conditions tab, select NAS Port Type, and click Remove.
  9. Still on the Conditions tab, click Add..., select Windows Groups and click Add..., click Add Groups..., search for WirelessAccess and click OK.  Click OK on the Windows Groups dialog box, click Apply on the Secure Wireless Connections Properties box.  You should now have something like the image below:
    802.1X - Secure Wireless Connections Conditions
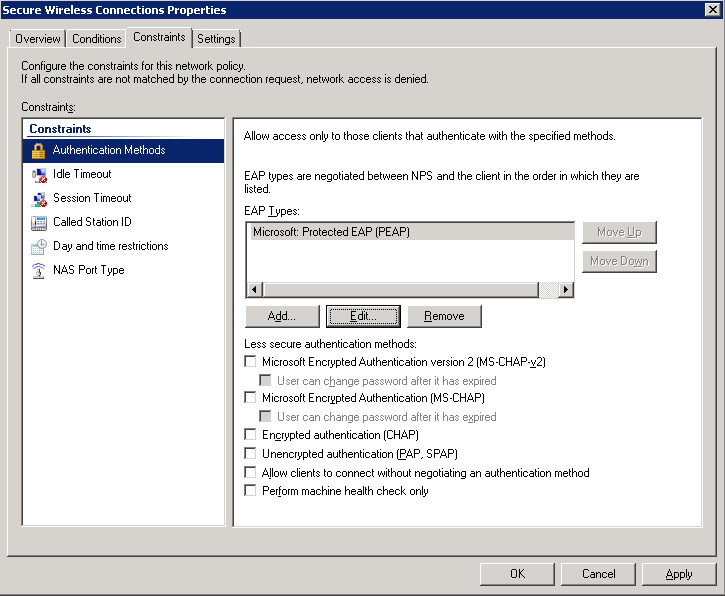
  10. Click on the Constraints tab.
    1. Uncheck all options under Less secure authentication methods like the image below:
      802.1X - Secure Wireless Connections Constraints
    2. Click Apply

Cisco WLAN

  1. Login to your Cisco Wireless Lan Controller
  2. Add a RADIUS server to your controller
    1. Click on the Security tab
    2. Select AAA -> Radius -> Authentication on the left side
    3. Click the New... button in the top right
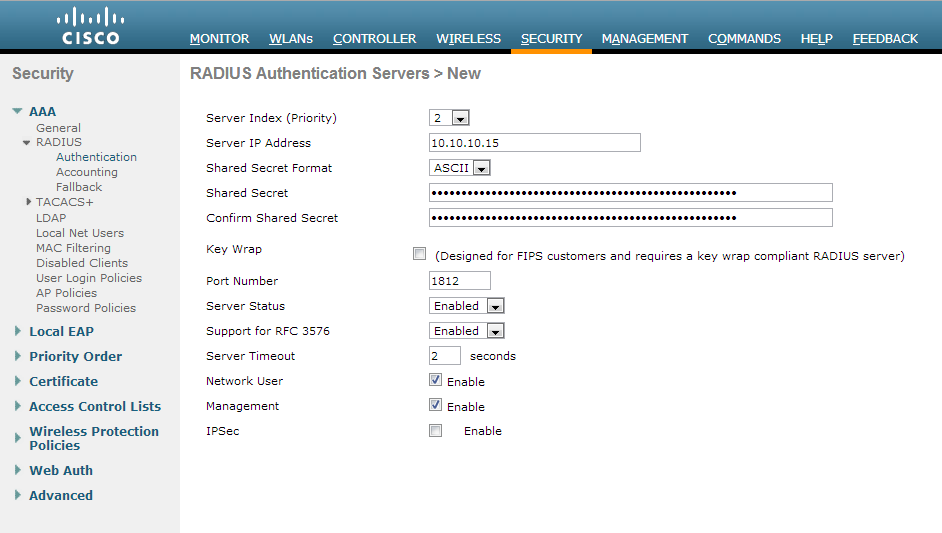
      1. Server IP Address: 10.10.10.15 (The IP address of your NPS server we setup earlier)
      2. Shared Secret Format: ASCII
      3. Shared Secret: The long generated password you wrote down when setting up the Network Policy Server
      4. Confirm Shared Secret: Same password in previous step
      5. Key Wrap: unchecked
      6. Port Number: 1812
      7. Server Status: Enabled
      8. Support for RFC 3576: Enabled
      9. Server Timeout: 2
      10. Network User: Checked
      11. Management: Checked
      12. IP Sec: Unchecked
      13. Here is a screenshot with the above settings
        802.1X - Cisco WLAN - RADIUS
  3. Create or modify a wireless network to use 802.1X
    1. Click on the WLANs tab
    2. Create a new wireless network or select an existing WLAN ID to edit
    3. On the "WLANs > Add/Edit 'My SSID'" page, use the following settings
      1. Security Tab
        1. Layer 2 Tab
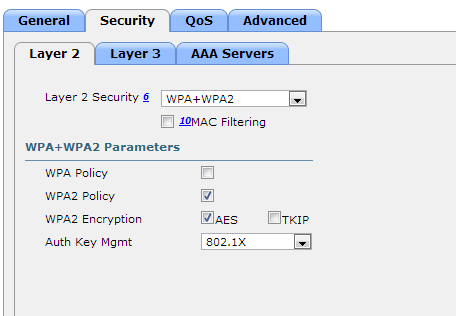
          1. Layer 2 Security: WPA+WPA2
          2. MAC Filtering: Unchecked
          3. WPA+WPA2 Parameters
            1. WPA Policy: Unchecked
            2. WPA2 Policy: Checked
            3. WPA2 Encryption: AES checked, TKIP unchecked
            4. Auth Key Mgmt: 802.1X
          1. Here is a screenshot of the above settings
            802.1X - Cisco WLAN - Security
        2. Layer 3 Tab
          1. Layer 3 Security: none
          2. Web Policy: unchecked
        3. AAA Servers Tab
          1. Authentication Servers: checked Enabled
          2. Server 1: Select your RADIUS server from the dropdown
          3. Local EAP Authentication: Unchecked
          4. Authentication priority order for web-auth user: Move RADIUS over to the right
          5. Here is a screenshot of the above settings802.1X - Cisco WLAN - AAA Servers
        4. Click Apply

Group Policy

  1. Go to your domain controller and open up the Group Policy Management console.
  2. Right click the Organizational Unit you want to apply to policy to and select Create a GPO in this domain, and Link it here...
    1. Note, the policy must be linked to the OU containing a group of machines you want to have WiFi access to or a parent of the OU.
  3. Enter in 802.1X WiFi Policy for the Name and click OK
  4. Right click your new GPO and click Edit
  5. Navigate to Computer Configuration->Policies->Windows Settings->Security Settings->Wireless Network (IEEE 802.11) Policies
  6. Right click and select Create A New Wireless Network Policy for Windows Vista and Later Releases
  7. Ensure the following settings are set for your Windows Vista and Later Releases policy
    1. General Tab
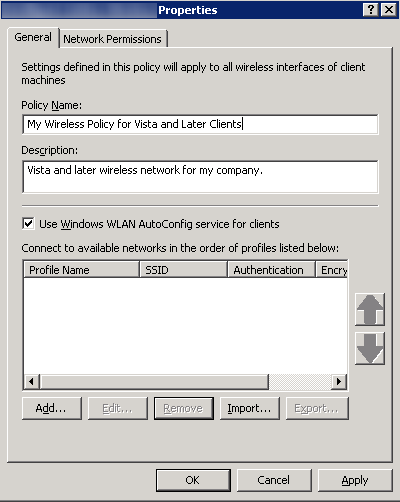
      1. Policy Name: My Wireless Policy for Vista and Later Clients
      2. Description: Vista and later wireless network for my company.
      3. Check Use Windows WLAN AutoConfig service for clients
      4. Here is a screenshot with the above settings802.1X - General
      5. Click the Add... button and select Infrastructure
        1. Connection Tab
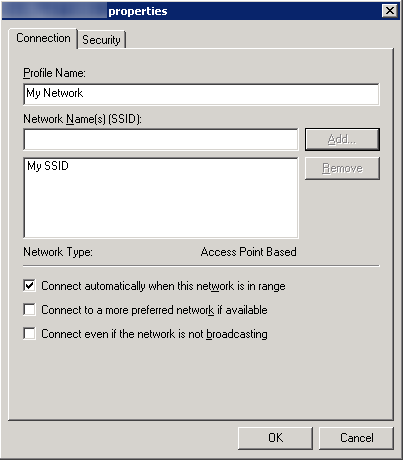
          1. Profile Name: My Network
          2. Enter in your SSID (Wireless network name that gets broadcasted) and click the Add... button
          3. Check Connect Automatically when this network is in range
          4. Here is a screenshot of the above settings802.1X - Properties
        2. Security Tab
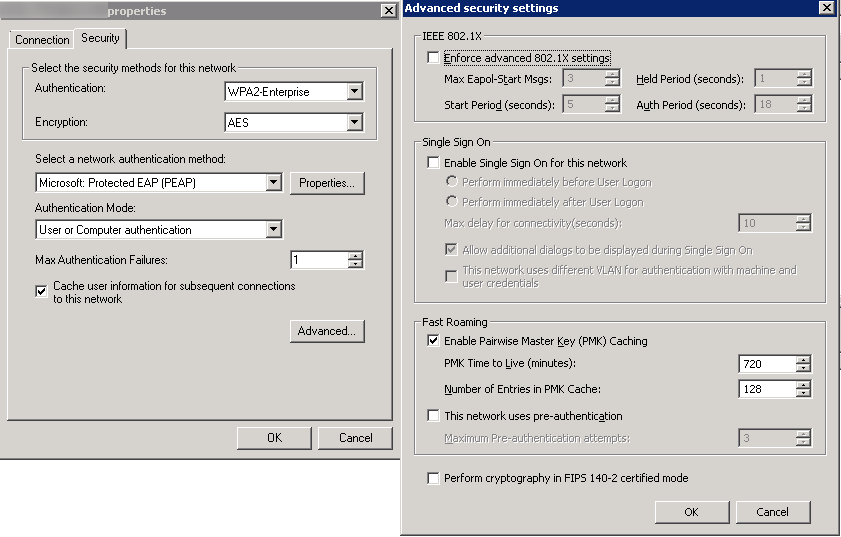
          1. Authentication: WPA2-Enterprise
          2. Encryption: AES
          3. Select a network authentication method: Microsoft Protected EAP (PEAP)
          4. Authentication Mode: User or Computer authentication
          5. Max Authentication Failures: 1
          6. Check Cache user information for subsequent connections to this network
          7. Here is a screenshot of the above settings with the Advanced tab open as well802.1X - Security Settings
        3. Click OK
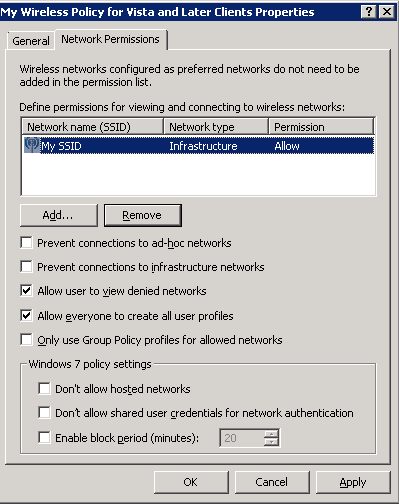
    2. Network Permissions Tab
      1. Enter your network into Define permissions for viewing and connection to wireless networks if it hasn't been added already.
      2. Uncheck Prevent connections to ad-hoc networks
      3. Uncheck Prevent connections to infrastructure networks
      4. Check Allow user to view denied networks
      5. Check Allow everyone to create all user profiles
      6. Uncheck Only use Group Policy profiles for allowed networks
      7. Leave all Windows 7 policy settings unchecked
      8. Here is a screenshot with the above settings (note, you may change the settings above to be in accordance to your policy.  Just ensure you don't check Prevent connections to infrastructure networks).
        802.1x - Network Permissions
      9. Click OK
  8. Right click and select Create A New Windows XP Policy
  9. Ensure the following settings are set for your Windows XP Policy
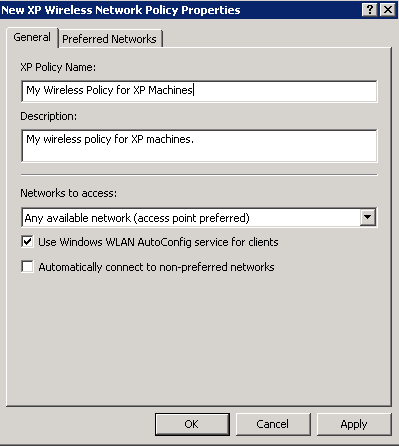
    1. General Tab
      1. XP Policy Name: My Wireless Policy for XP Machines
      2. Description: My wireless policy for XP machines.
      3. Networks to access: Any available network (access point preferred)
      4. Check Use Windows WLAN AutoConfig service for clients
      5. Uncheck Automatically connect to non-preferred networks
      6. Here is a screenshot of the above settings.
        802.1X - XP General
    2. Preferred Networks Tab
      1. Click the Add... button and select Infrastructure
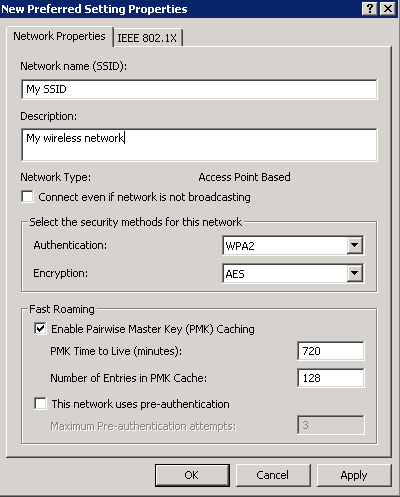
        1. Network Properties Tab
          1. Network name (SSID): My SSID
          2. Description: My wireless network
          3. Uncheck Connect even if network is not broadcasting
          4. Authentication: WPA2
          5. Encryption: AES
          6. Check Enable Pairwise Master Key (PMK) Caching
          7. Uncheck This network uses pre-authentication
          8. Here is a picture of the above settings
            802.1X - XP Network Properties
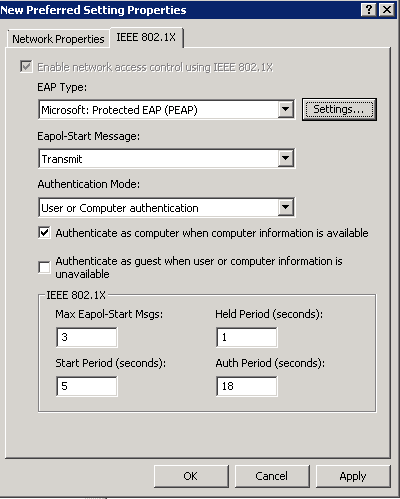
        2. IEEE 802.1X Tab
          1. EAP Type: Microsoft: Protected EAP (PEAP)
          2. Eapol-Start Message: Transmit
          3. Authentication Mode: User or Computer Authentication
          4. Check Authenticate as computer when computer information is available
          5. Uncheck Authente as guest when user or computer information is unavailable
          6. Screenshot of above settings
            802.1X - XP IEEE
        3. Click OK
    3. Click OK

How to prevent users from adding a machine from Active Directory - the domain

Interestingly enough, by default Microsoft's Active Directory ships out with the ability for all Authenticated Users to join their machine to a domain up to 10 times.  Why 10?  Who knows.  Personally, I do not want my users to be able to add machines to the domain, so the steps below can be achieved to prevent these actions.

  1. Logon to one of your domain controllers or a machine with ADSI Edit
  2. Open up ADSI Edit
    1. Start->Administrative Tools->ADSI Edit
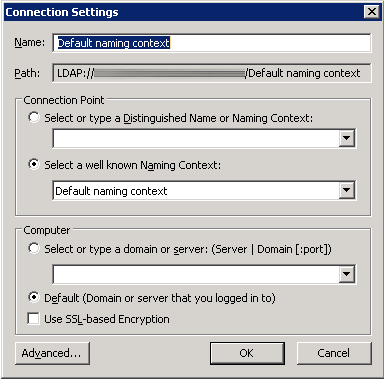
  3. If you have logged into one of your DCs, you can leave the Name, Connection Point, and Computer to default, otherwise enter in the proper information to connect to your DC and click OK.
    1. Image of default settings to connect
    2. ADSEI Edit - Connection Settings
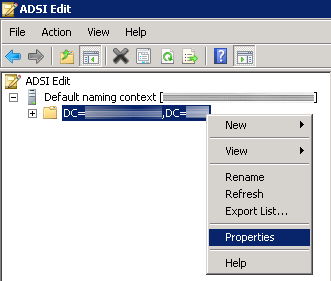
  4. Expand the context that was added and right click on DC=[domain],DC=[TLD] and click Properties.
    1. ADSI Edit - Properties
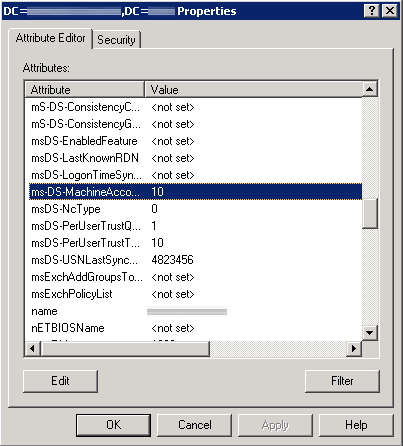
  5. Scroll down to ms-DS-MachineAccountQuota and click Edit
    1. ADSI - ms-DS-MachineAccount
  6. Change the Value of 10 to 0, click OK
    1. ADSI Edit - Integer Attribute Editor
  7. Click OK on the DC=[domain],DC=[TLD] dialog box

At this point, users inside of the Domain Admins or Enterprise Admins groups will only be able to add machines to the domain.

UserAccountControl Attribute/Flag Values

Here is a comprehensive list of UserAccountControl attribute/flag values I have come across when working on LDAP projects.

Property Flag Value In Hexadecimal Value In Decimal Not Officially Documented
SCRIPT 0x0001 1  
ACCOUNTDISABLE 0x0002 2  
HOMEDIR_REQUIRED 0x0008 8  
LOCKOUT 0x0010 16  
PASSWD_NOTREQD 0x0020 32  
PASSWD_CANT_CHANGE 0x0040 64  
ENCRYPTED_TEXT_PWD_ALLOWED 0x0080 128  
TEMP_DUPLICATE_ACCOUNT 0x0100 256  
NORMAL_ACCOUNT 0x0200 512  
Disabled Account 0x0202 514 x
Enabled, Password Not Required 0x0220 544 x
Disabled, Password Not Required 0x0222 546 x
INTERDOMAIN_TRUST_ACCOUNT 0x0800 2048  
WORKSTATION_TRUST_ACCOUNT 0x1000 4096  
SERVER_TRUST_ACCOUNT 0x2000 8192  
DONT_EXPIRE_PASSWORD 0x10000 65536  
Enabled, Password Doesn't Expire 0x10200 66048 x
Disabled, Password Doesn't Expire 0x10202 66050 x
Disabled, Password Doesn't Expire & Not Required 0x10222 66082 x
MNS_LOGON_ACCOUNT 0x20000 131072  
SMARTCARD_REQUIRED 0x40000 262144  
Enabled, Smartcard Required 0x40200 262656 x
Disabled, Smartcard Required 0x40202 262658 x
Disabled, Smartcard Required, Password Not Required 0x40222 262690 x
Disabled, Smartcard Required, Password Doesn't Expire 0x50202 328194 x
Disabled, Smartcard Required, Password Doesn't Expire & Not Required 0x50222 328226 x
TRUSTED_FOR_DELEGATION 0x80000 524288  
Domain controller 0x82000 532480  
NOT_DELEGATED 0x100000 1048576  
USE_DES_KEY_ONLY 0x200000 2097152  
DONT_REQ_PREAUTH 0x400000 4194304  
PASSWORD_EXPIRED 0x800000 8388608  
TRUSTED_TO_AUTH_FOR_DELEGATION 0x1000000 16777216  
PARTIAL_SECRETS_ACCOUNT 0x04000000 67108864  

Property flag descriptions (Copied from KB Article)

  • SCRIPT - The logon script will be run.
  • ACCOUNTDISABLE - The user account is disabled.
  • HOMEDIR_REQUIRED - The home folder is required.
  • PASSWD_NOTREQD - No password is required.
  • PASSWD_CANT_CHANGE - The user cannot change the password. This is a permission on the user's object. For information about how to programmatically set this permission, visit the following Web site:
  • ENCRYPTED_TEXT_PASSWORD_ALLOWED - The user can send an encrypted password.
  • TEMP_DUPLICATE_ACCOUNT - This is an account for users whose primary account is in another domain. This account provides user access to this domain, but not to any domain that trusts this domain. This is sometimes referred to as a local user account.
  • NORMAL_ACCOUNT - This is a default account type that represents a typical user.
  • INTERDOMAIN_TRUST_ACCOUNT - This is a permit to trust an account for a system domain that trusts other domains.
  • WORKSTATION_TRUST_ACCOUNT - This is a computer account for a computer that is running Microsoft Windows NT 4.0 Workstation, Microsoft Windows NT 4.0 Server, Microsoft Windows 2000 Professional, or Windows 2000 Server and is a member of this domain.
  • SERVER_TRUST_ACCOUNT - This is a computer account for a domain controller that is a member of this domain.
  • DONT_EXPIRE_PASSWD - Represents the password, which should never expire on the account.
  • MNS_LOGON_ACCOUNT - This is an MNS logon account.
  • SMARTCARD_REQUIRED - When this flag is set, it forces the user to log on by using a smart card.
  • TRUSTED_FOR_DELEGATION - When this flag is set, the service account (the user or computer account) under which a service runs is trusted for Kerberos delegation. Any such service can impersonate a client requesting the service. To enable a service for Kerberos delegation, you must set this flag on the userAccountControl property of the service account.
  • NOT_DELEGATED - When this flag is set, the security context of the user is not delegated to a service even if the service account is set as trusted for Kerberos delegation.
  • USE_DES_KEY_ONLY - (Windows 2000/Windows Server 2003) Restrict this principal to use only Data Encryption Standard (DES) encryption types for keys.
  • DONT_REQUIRE_PREAUTH - (Windows 2000/Windows Server 2003) This account does not require Kerberos pre-authentication for logging on.
  • PASSWORD_EXPIRED - (Windows 2000/Windows Server 2003) The user's password has expired.
  • TRUSTED_TO_AUTH_FOR_DELEGATION - (Windows 2000/Windows Server 2003) The account is enabled for delegation. This is a security-sensitive setting. Accounts that have this option enabled should be tightly controlled. This setting lets a service that runs under the account assume a client's identity and authenticate as that user to other remote servers on the network.
  • PARTIAL_SECRETS_ACCOUNT - (Windows Server 2008/Windows Server 2008 R2) The account is a read-only domain controller (RODC). This is a security-sensitive setting. Removing this setting from an RODC compromises security on that server.

UserAccountControl values

These are the default UserAccountControl values for the certain objects:

  • Typical user : 0x200 (512)
  • Domain controller : 0x82000 (532480)
  • Workstation/server: 0x1000 (4096)

Official Microsoft KB Article: http://support.microsoft.com/kb/305144