Deploying Cisco Virtual Appliances (NGFWv) on Azure

Here is a recap of some of the reflections I have with deploying Cisco NGFWv (Next Generation Firewall Virtual) on Azure. This is more of a reflection of the steps I took rather than a guide, but you can use the information below as you see fit.  At a high level, you will need to deploy the device on Azure and then configure the internal "guts" of the Cisco device to allow it to route traffic properly on your Virtual Network (VNet) in Azure. While Cisco does have decent documentation on deploying a single appliance, the primary purpose of this document is to look at HA/Scale out deployments.

First, just want to provide a quick overview of some of Cisco's offerings today for Azure:

  • Cisco CSR
  • Cisco Meraki
    • In Cisco’s words:
      • Virtual MX is a virtual instance of a Meraki security & SD-WAN appliance, dedicated specifically to providing the simple configuration benefits of site-to-site Auto VPN for customers running or migrating IT services to an Amazon Web Services or Microsoft Azure Virtual Private Cloud (VPC).
    • Source: https://meraki.cisco.com/products/appliances/vmx100
  • Cisco ASAv
    • In Cisco's words:
      • The ASAv is a virtualized network security solution that provides policy enforcement and threat inspection across heterogeneous, multisite environments.
      • ASA firewall and VPN capabilities help safeguard traffic and multitenant architectures. Available in most hypervisor environments, the Cisco ASAv can be deployed exactly where it is needed to protect users and workloads on-premises or in the cloud.
    • Source: https://github.com/cisco/asav
  • Cisco Firepower NGFW (Threat Defense Virtual)
    • In Cisco's words:
      • The Cisco Firepower® NGFW (next-generation firewall) is the industry’s first fully integrated, threat-focused next-gen firewall with unified management. It uniquely provides advanced threat protection before, during, and after attacks.
      • The Firepower Threat Defense Virtual (FTDv) is the virtualized component of the Cisco NGFW solution. Organizations employing SDN can rapidly provision and orchestrate flexible network protection with Firepower NGFWv. As well, organizations using NFV can further lower costs utilizing Firepower FTDv.
    • Source: https://github.com/cisco/firepower-ngfw

Deploy the Appliance in Azure

In deploying the Cisco appliances, you'll notice you can deploy from the Azure Marketplace: https://azuremarketplace.microsoft.com/en-us/marketplace/apps/cisco.cisco-firepower-threat-defense-appliance?tab=Overview).  Personally, I'm not a big fan of deploying the appliance this way as I don't have as much control over naming conventions, don't have the ability to deploy more than one appliance for scale, cannot specify my availability set, etc. While Cisco does offer an ARM template, it doesn't allow flexibility for more than two devices, nor configures anything from a load balancer perspective. In this case, I've written a custom ARM template that leverages managed disks, availability sets, consistent naming nomenclature, proper VM sizing, and most importantly, let you define how many virtual instances you'd like to deploy for scaling.

Note: this article doesn't cover deployment of Cisco's Firepower Management Center, which is what is used to centrally manage each of the scale-out instances in a "single pane of glass".

With the above said, this article will cover what Cisco calls their "scalable design" model. Here is an example of what this visually looks like (taken from one of their slide decks listed in the notes section at the bottom of this article):
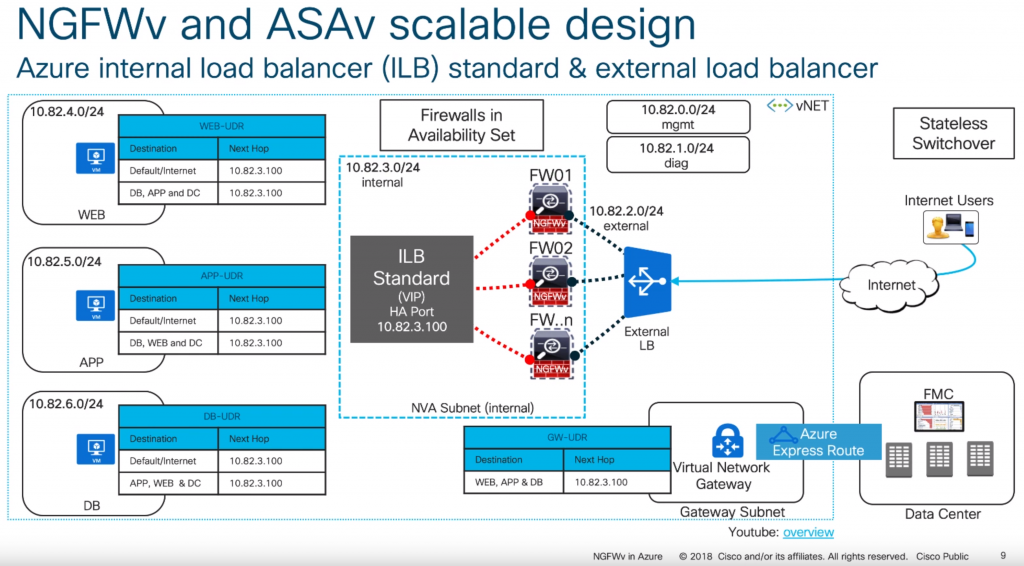
Scalable design model as per Cisco's Reference Architecture

Below is a link to the ARM template I use.

Cisco-NGFWv-HA.json

Deployment of this template can be done by navigating to the Azure Portal (portal.azure.com), select Create a resource, type Template Deployment in the Azure Marketplace, click Create,  select Build your own template in the editor, and paste the code into the editor.

Alternatively, you can click this button here:

Here are some notes on what the parameters mean in the template:

VMsize: Per Cisco, the recommend VM sizes should be D3v2, D4v2, or D5v2.  Interestingly, they don't call out the use of Premium storage anywhere, which I would highly recommend using if this was a single instance machine (to get at least some sort of SLA by Azure).

CiscoSku: Here is where you can select to use bring-your-own-license or pay-as-you-go.  Plans are should be outlined in the following link, but oddly enough the BYOL image is only available via PowerShell and their plans don't show it:  https://azuremarketplace.microsoft.com/en-us/marketplace/apps/cisco.cisco-firepower-threat-defense-appliance?tab=PlansAndPrice

CiscoVersion: The version of the Cisco appliance to deploy.

CiscoCount: This defines how many virtual instances you want deployed and placed behind load balancers.

VNetName: The name of your virtual network you have created.

VNetRG: The name of the resource group your virtual network is in.  This may be the same as the Resource Group you are placing the Cisco devices in, but this is a needed configurable option to prevent errors referencing a VNet in a different resource group.

envPrefix: All of the resources that get created (load balancer, virtual machines, public IPs, NICs, etc.) will use this naming nomenclature.

manPrivateIPPrefix, diagPrivateIPPrefix, trustPrivateIPPrefix, untrustPrivateIPPrefix: Corresponding subnet address range.  These should be the first 3 octets of the range followed by a period.  For example, 10.5.6. would be a valid value.

manPrivateIPFirst, diagPrivateIPFirst, trustPrivateIPFirst, untrustPrivateIPFirst: The first usable IP address on the subnet specified.  For example, if my subnet is 10.4.255.0/24, I would need to specify 4 as my first usable address.

Username: this is the name of the privileged account that should be used to ssh and login to the PanOS web portal.

NewStorageAccountName: this is the name of the storage account that will store boot diagnostics for the Cisco appliances. This will give you the ability to see what the serial console shows. This value should be alphanumeric and 3-24 characters.

Password: Password to the privileged account used to ssh and login to the device.

Configure the Appliance

Complete these steps for both devices.

  1. SSH to the device via it's public or private IP address of the management interface
    1. Please note, SSH may not come up for another 10+ minutes after deployment has finished, even though the VMs show running. There are several tasks within the Cisco appliance that run post-provisioning which take awhile to complete before the ability to SSH works.
  2. Login using the following credentials
    1. Note: Even though we specified credentials within our template, cisco has a default set of admin credentials "baked" into the image and they should be specified during first login (which prompts you to immediately change). Please login using the default admin credentials.
    2. Username: admin
    3. Password: Admin123
      1. The password is case sensitive, you should use a capital A on Admin123.
  3. Change your password once prompted
  4. Enter y to configure IPv4
  5. Enter n to not configure IPv6
    1. As of 6/1/2019, Azure only has preview support for IPv6, so this article won't cover any IPv6 specific items
  6. Enter dhcp to configure IPv4 with DHCP
    1. All addresses in Azure should be DHCP, static addresses are set within Azure, which essentially give the appliance a DHCP reservation
    2. Important Note: Once you configure this option, you'll get an awkward "If your networking information has changed, you will need to reconnect" message and things will appears to be stuck. Be patient, it appears a script runs in the background, you'll see it eventually prompt for the next question.
  7. Leave your SSH connection open for the next step

Configure NGFWv to use FirePower Management Center

Once you have gone through the initial configuration on both devices, you will need to register the sensor to a Firepower Management Center instance. To do this, you will need to run the configure manager command on both appliances. Please note I've listed the command below with the parameters it will accept, you will need to use the applicable values for your environment.

configure manager add {hostname | IPv4_address | IPv6_address | DONTRESOLVE} reg_key [nat_id]

Per Cisco's documentation:

  • The registration key is a user-defined one-time use key that must not exceed 37 characters. Valid characters include alphanumeric characters (A–Z, a–z, 0–9) and the hyphen (-). You will need to remember this registration key when you add the device to the Firepower Management Center.
  • If the Firepower Management Center is not directly addressable, use DONTRESOLVE.
  • The NAT ID is an optional user-defined alphanumeric string that follows the same conventions as the registration key described above. It is required if the hostname is set to DONTRESOLVE. You will need to
    remember this NAT ID when you add the device to the Firepower Management Center

Add the appliances into FirePower Management Center

Repeat the following steps for each of the appliances you deployed

  1. Login to FirePower Management Center
  2. Select the Devices tab, click Device Management, and then click the Add button
  3. Enter the following
    1. Host: ManagementIP
    2. Device Name: FriendlyDeviceNameOrHostName
    3. Registration Key: KeyYouUsedWhenRunningConfigureManagerCommandAbove
    4. Access Control Panel
      1. Specify a Name, select Network Discovery
    5. Smart Licensing
      1. Check the following you are licensed for
        1. Malware
        2. Threat
        3. URL Filtering
    6. If you used NAT, configure NAT and specify the NAT ID
    7. Click Register

Initialize the interfaces on your appliances

Repeat the following steps for each of the appliances you deployed

  1. Select the Devices tab, click Device Management, and select the edit button (Pencil Icon) for your appliance
  2. Click the edit button (Pencil Icon) for GigabitEthernet 0/0
    1. Name: Untrust
    2. Check the Enabled checkbox
    3. Security Zone: Create a new zone called Untrusted
    4. Click the IPv4 tab
      1. IP Type: Use Static
      2. IP Address: IPAddressOfYourAppliance/SubnetSize
    1. Click OK
  3. Click the edit button (Pencil Icon) for GigabitEthernet 0/1
    1. Name: Trust
    2. Check the Enabled checkbox
    3. Security Zone: Create a new zone called Trusted
    4. Click the IPv4 tab
      1. P Type: Use Static
      2. IP Address: IPAddressOfYourAppliance/SubnetSize
    5. Click OK
  4. Click the Save button

Once you have completed the steps above, click Deploy, select each of your appliances, and click Deploy to push the configuration to the device

Configure static routes on your device

In this section, we will create several routes to handle the flow of traffic to and to/from your trusted subnets, traffic destined towards the internal, traffic destined towards the management interface (we'll need this to help handle the health probes from the azure load balancer later on), and a specific route to define the Azure Health Probes themselves.

Repeat the following steps for each of the appliances you deployed.

  1. Select the Devices tab, click Device Management, and select the edit button (Pencil Icon) for your appliance
  2. Select the Routing tab and click Static Route
  3. Click the Add Route button
    1. Type: IPv4
    2. Interface: Trust
    3. Create new network objects
      1. Add network objects that represent each of the subnets you have in Azure that the device will need to return traffic to
        1. For example, you'd repeat these steps for each private subnet
          1. Name: DBServers
          2. Network: 10.3.5.0/24
          3. Click Save
      2. Add network object for the appliance's management interface
        1. Name: YourAppliance-mgmt
        2. Network: IPAddressOfManagementInterface
          1. Use the private IP of your management interface
        3. Click Save
      3. Add network object for Azure Health Probes
        1. Name: Azure-LB-Probe
        2. Network: 168.63.129.16
        3. Click Save
    4. Add the defined network objects above to Selected Network box
    5. Gateway: Use the IP address of the default gateway of your subnet the Trust interface is deployed on
      1. Note: To find this, navigate to the Azure Portal (portal.azure.com) and select All Services -> Virtual Networks -> Your Virtual Network -> Subnets and use the first IP address of your subnet the trusted interface is on.  For example, if the address range of my subnet is 10.5.15.0/24, I would use 10.5.15.1 as my IP address.  If my subnet was 10.5.15.128/25, I would use 129 10.5.15.129 as my IP address
    6. Metric: 3
    7. Click OK
  4. Click the Add Route button
    1. Type: IPv4
    2. Interface: Untrust
    3. Add the any-ipv4 object to Selected Network box
      1. This will allow us to force all internet bound traffic through our Untrust interface
    4. Add the Azure-LB-Probe object to the Selected Network box
      1. This will allow health probes from the external azure load balancer probes to flow properly
    5. Add the YourAppliance-mgmt object to the Selected Network box
    6. Gateway: Use the IP address of the default gateway of your subnet the Untrust interface is deployed on
      1. Note: To find this, navigate to the Azure Portal (portal.azure.com) and select All Services -> Virtual Networks -> Your Virtual Network -> Subnets and use the first IP address of your subnet the untrusted interface is on.  For example, is the address range of my subnet is 10.5.15.0/24, I would use 10.5.15.1 as my IP address.  If my subnet was 10.5.15.128/25, I would use 129 10.5.15.129 as my IP address
    7. Metric: 2
    8. Click OK
  5. Click the Save button

Once you have completed the steps above, click Deploy, select each of your appliances, and click Deploy to push the configuration to the device

Configure NAT Policies

First create a NAT rule that will SNAT any traffic from our trusted zone to the Untrust interface. This is needed so Azure understands to return traffic through the external interface of your device for inspection.

  1. Select the Devices tab, click NAT, and select the Threat Defense NAT Policy link (or New Policy button)
  2. Select your first appliance, click the Add to Policy button, and click Save
  3. Click the Add Rule button
    1. NAT Rule: Auto NAT Rule
    2. Type: Dynamic
    3. Interface Objects Tab
      1. Select the Trusted Interface Object and click the Add to Source button
      2. Select the Untrusted Interface object and click the Add to Destination button
    4. Translation Tab
      1. Click the green button to add a new network object under Original Packet
        1. Name: any-ipv4
        2. Network: 0.0.0.0/0
        3. Click Save
      2. Original Source: any-ipv4
      3. Translated Source: Destination Interface IP
    5. Click OK

Next, we need to create a new NAT statement to handle traffic for our load balancer probes. We will need to configure two statements since we will receive health probes from the same IP address (168.63.129.16) to both NICs. On the same appliance, continue the following steps.

  1. Click the Add Rule button
    1. NAT Rule: Manual NAT Rule
    2. Type: Static
    3. Interface Objects Tab
      1. Select the Trusted Interface Object and click the Add to Source button
      2. Select the Untrusted Interface object and click the Add to Destination button
    4. Translation Tab
      1. Original Source: Azure-LB-Probe
      2. Original Destination: Source Interface IP
      3. Original Destination Port: SSH
      4. Translated Source: Destination Interface IP
      5. Translated Destination: YourAppliance-mgmt
      6. Translated Destination Port: SSH
    5. Click OK
  2. Click the Add Rule button
    1. NAT Rule: Manual NAT Rule
    2. Type: Static
    3. Interface Objects Tab
      1. Select the Untrusted Interface Object and click the Add to Source button
      2. Select the Trusted Interface object and click the Add to Destination button
    1. Translation Tab
      1. Original Source: Azure-LB-Probe
      2. Original Destination: Source Interface IP
      3. Original Destination Port: SSH
      4. Translated Source: Destination Interface IP
      5. Translated Destination: YourAppliance-mgmt
      6. Translated Destination Port: SSH
  3. Click OK

Optional Step: If you are using the appliances to front applications to the internet, you will also need to configure a NAT rule for ingress traffic. This is an optional step, but will show you how to configure traffic to let's say a web server (which the ALB is configured to listen for per the template). If you do complete this step, make sure you add an access policy (Policies -> Access Control -> Select your policy -> click Add Rule).

  1. Click the Add Rule button
    1. NAT Rule: Manual NAT Rule
    2. Type: Static
    3. Interface Objects Tab
      1. Select the Untrusted Interface Object and click the Add to Source button
      2. Select the Trusted Interface object and click the Add to Destination button
    4. Translation Tab
      1. Original Source: any-ipv4
      2. Original Destination: Source Interface IP
      3. Original Destination Port: HTTP
      4. Translated Source: Destination Interface IP
      5. Translated Destination: webserver
        1. Click the green add button to create a new network object to define the private IP address of your web server.
      6. Translated Destination Port: HTTP
    1. Click OK

Click Save once you have finished adding the rules.

At this point, you will need to repeat the same steps above. The reason why we cannot apply the policy to both devices is when you configure the rule for the Azure Health Probes, you'll need to specify the correct Translated Destination (I.e. Appliance1 should use the network object that resolves to appliance 1; Appliance2 should use the network object that resolves to appliance 2)

Once you have completed the steps above, click Deploy, select each of your appliances, and click Deploy to push the configuration to the device

Finalize the environment

Now that the environment is configured, there are two steps you will want to check back on.

  1. Add Route Tables to each subnet to force traffic to the Cisco appliances
    1. You will need to leverage route tables with custom routes to force traffic to the Cisco appliance. I'd highly recommend giving this a read to familiarize yourself with how Route Tables work in Azure: https://docs.microsoft.com/en-us/azure/virtual-network/virtual-networks-udr-overview
  2. Ensure there is a Network Security Group (NSG) on the Untrust subnet
    1. As per Azure Load Balancer's documentation, you will need an NSG associated to the NICs or subnet to allow traffic in from the internet. https://docs.microsoft.com/en-us/azure/load-balancer/load-balancer-standard-overview#securebydefault
  3. Remove the public IP from your management interface
    1. Considering at this point you've configured the device and have private connectivity via VPN or ExpressRoute, I'd remove the public IP from your management interface to prevent the public internet from accessing this interface
  4. Adjust NSG rules
    1. Similar to above, I'd scope down who/what network segments can pass traffic to the device. Go back and modify the NSG on the management interfaces to only allow traffic from specific source addresses.

References

Azure APIs and ARM Templating

One thing that has always been a mystery when leveraging Azure Resource Manager (ARM) templates is the "apiVersion" that needs to be specified for each resource that should be created in your template.

At a high level, every item processed by ARM will reach out to its corresponding service provider. Each of these providers have their own API for handling requests: https://docs.microsoft.com/en-us/rest/api/resources/

The tricky thing is many of the template examples that are provided out on GitHub in the quickstart gallery don't align or may not be using the latest API. In this case, the question is... how do I find the latest API used by each resource provider?

Within PowerShell there's a single command that can return back the API versions supported by each Resource Provider.

(Get-AzResourceProvider -ProviderNamespace "Microsoft.Storage").ResourceTypes

You'll notice the follow result, which provides us exactly what we were looking for.

PS C:\Users\jstrom> (Get-AzResourceProvider -ProviderNamespace "Microsoft.Storage").ResourceTypes


ResourceTypeName : storageAccounts
Locations        : {East US, East US 2, West US, West Europe...}
ApiVersions      : {2019-04-01, 2018-11-01, 2018-07-01, 2018-03-01-preview...}

ResourceTypeName : operations
Locations        : {}
ApiVersions      : {2019-04-01, 2018-11-01, 2018-07-01, 2018-03-01-preview...}

ResourceTypeName : locations/asyncoperations
Locations        : {East US, East US 2, West US, West Europe...}
ApiVersions      : {2019-04-01, 2018-11-01, 2018-07-01, 2018-03-01-preview...}

ResourceTypeName : storageAccounts/listAccountSas
Locations        : {East US, East US 2, West US, West Europe...}
ApiVersions      : {2019-04-01, 2018-11-01, 2018-07-01, 2018-03-01-preview...}

ResourceTypeName : storageAccounts/listServiceSas
Locations        : {East US, East US 2, West US, West Europe...}
ApiVersions      : {2019-04-01, 2018-11-01, 2018-07-01, 2018-03-01-preview...}

ResourceTypeName : storageAccounts/blobServices
Locations        : {East US, East US 2, West US, West Europe...}
ApiVersions      : {2019-04-01, 2018-11-01, 2018-07-01, 2018-03-01-preview...}

ResourceTypeName : storageAccounts/tableServices
Locations        : {East US, East US 2, West US, West Europe...}
ApiVersions      : {2019-04-01, 2018-11-01, 2018-07-01, 2018-03-01-preview...}

ResourceTypeName : storageAccounts/queueServices
Locations        : {East US, East US 2, West US, West Europe...}
ApiVersions      : {2019-04-01, 2018-11-01, 2018-07-01, 2018-03-01-preview...}

ResourceTypeName : storageAccounts/fileServices
Locations        : {East US, East US 2, West US, West Europe...}
ApiVersions      : {2019-04-01, 2018-11-01, 2018-07-01, 2018-03-01-preview...}

ResourceTypeName : locations
Locations        : {}
ApiVersions      : {2019-04-01, 2018-11-01, 2018-07-01, 2018-03-01-preview...}

ResourceTypeName : locations/usages
Locations        : {East US, East US 2, West US, West Europe...}
ApiVersions      : {2019-04-01, 2018-11-01, 2018-07-01, 2018-03-01-preview...}

ResourceTypeName : locations/deleteVirtualNetworkOrSubnets
Locations        : {East US, East US 2, West US, West Europe...}
ApiVersions      : {2019-04-01, 2018-11-01, 2018-07-01, 2018-03-01-preview...}

ResourceTypeName : usages
Locations        : {}
ApiVersions      : {2019-04-01, 2018-11-01, 2018-07-01, 2018-03-01-preview...}

ResourceTypeName : checkNameAvailability
Locations        : {}
ApiVersions      : {2019-04-01, 2018-11-01, 2018-07-01, 2018-03-01-preview...}

ResourceTypeName : storageAccounts/services
Locations        : {East US, West US, East US 2 (Stage), West Europe...}
ApiVersions      : {2014-04-01}

ResourceTypeName : storageAccounts/services/metricDefinitions
Locations        : {East US, West US, East US 2 (Stage), West Europe...}

Happy ARM templating!

DPM 2016 - Reporting Services Server cannot connect to DPM Database

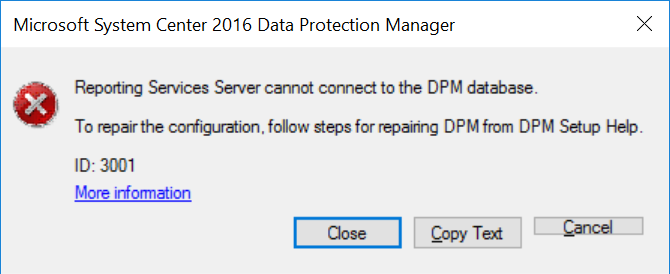
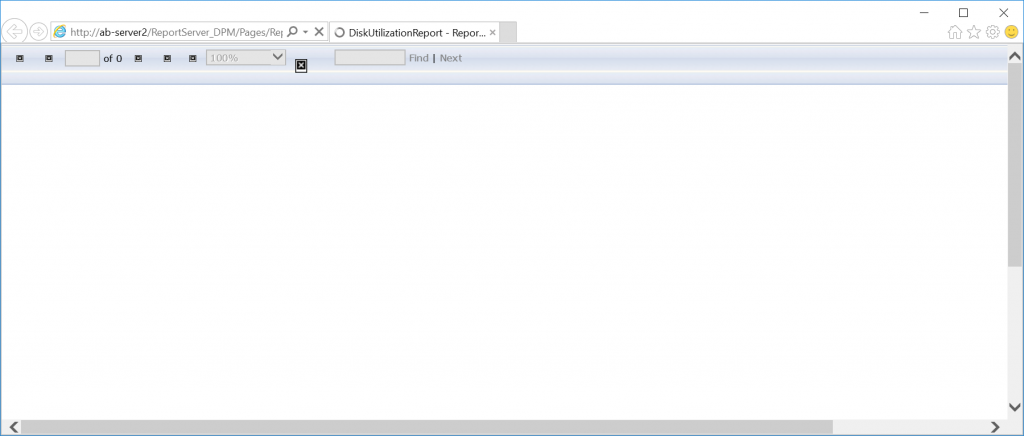
After installing System Center Data Protection Manager from scratch or after performing an upgrade from DPM 2012 R2, when you attempt to schedule a report to be mailed, you receive the following popup error or notice that when you generate a report you just receive a white page in your browser that continues to load indefinitely:


Reporting Services Server cannot connect to the DPM database.
To repair the configuration, follow steps for repairing DPM from DPM Setup Help.
ID: 3001
More Information
Just an endless loading page presented in your browser.

Unfortunately, following the repair steps suggested in the More Information link does not resolve the problem.

Resolution for SQL Server 2016 and later

  1. On the DPM server, open Computer Management, expand Local Users and Groups, click Groups, and create a new local group with the following information (replace items in red with the actual server name/hostname of your machine):
    1. Group name: DPMDBReaders$DPMSERVERNAME
    2. Description: This group is internally used by Microsoft System Center 2016 Data Protection Manager.
  2. On the DPM server, open Computer Management, expand Local Users and Groups, click Users, and create a new local user with the following information (replace items in red with the actual server name/hostname of your machine):
    1. User name: DPMR$DPMSERVERNAME
    2. Full name: DPMR$DPMSERVERNAME
    3. Description: This account is used for SQL reporting to generate reports for DPM 2016.
    4. Enter a strong password
    5. Check Password never expires
  3. Select your recently created DPMR$DPMSERVERNAME account and click on the Membership of tab
    1. Add the DPMDBReaders$DPMSERVERNAME group we created in step 1
    2. Click OK
  4. Start Microsoft SQL Server Management Studio and connect to the SQL instance used by DPM.
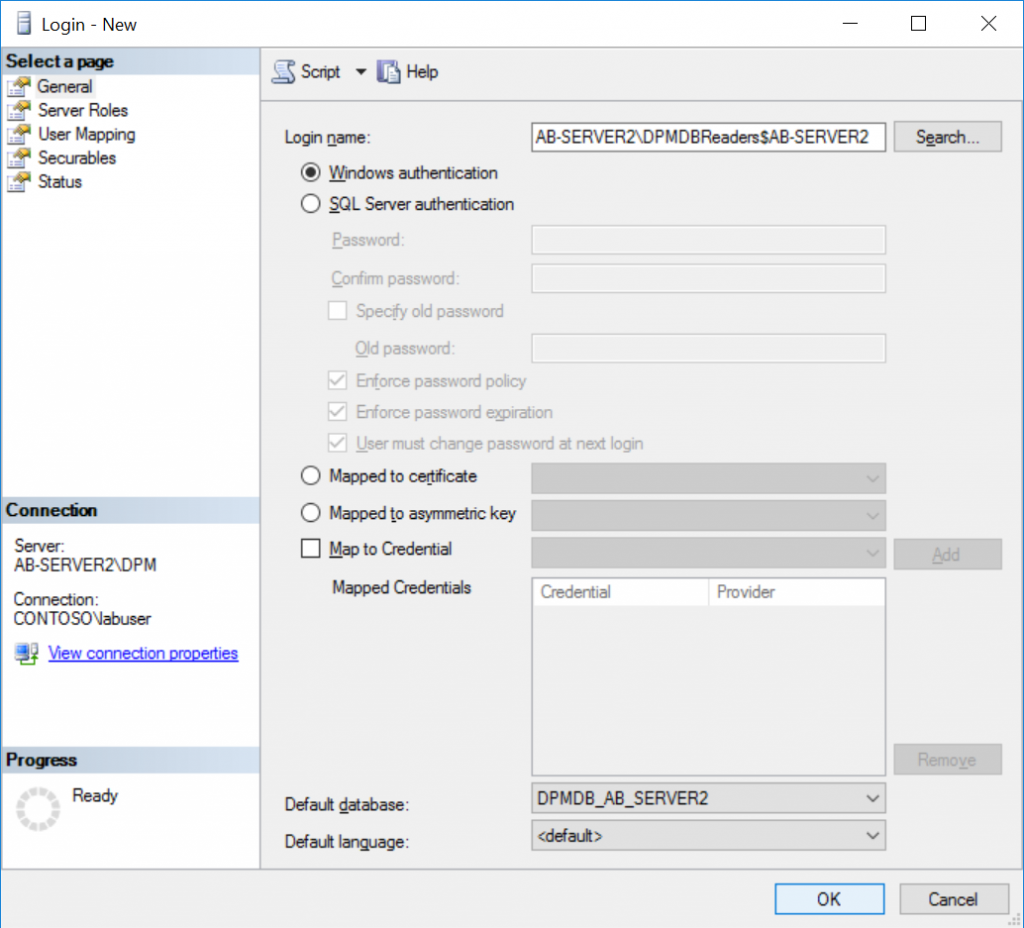
    1. Expand Security, right-click on the Logins, select New login
      1. Click on the Search... button and add the local group DPMDBReaders$DPMSERVERNAME
      2. Set the Default database to YourDPMDatabase

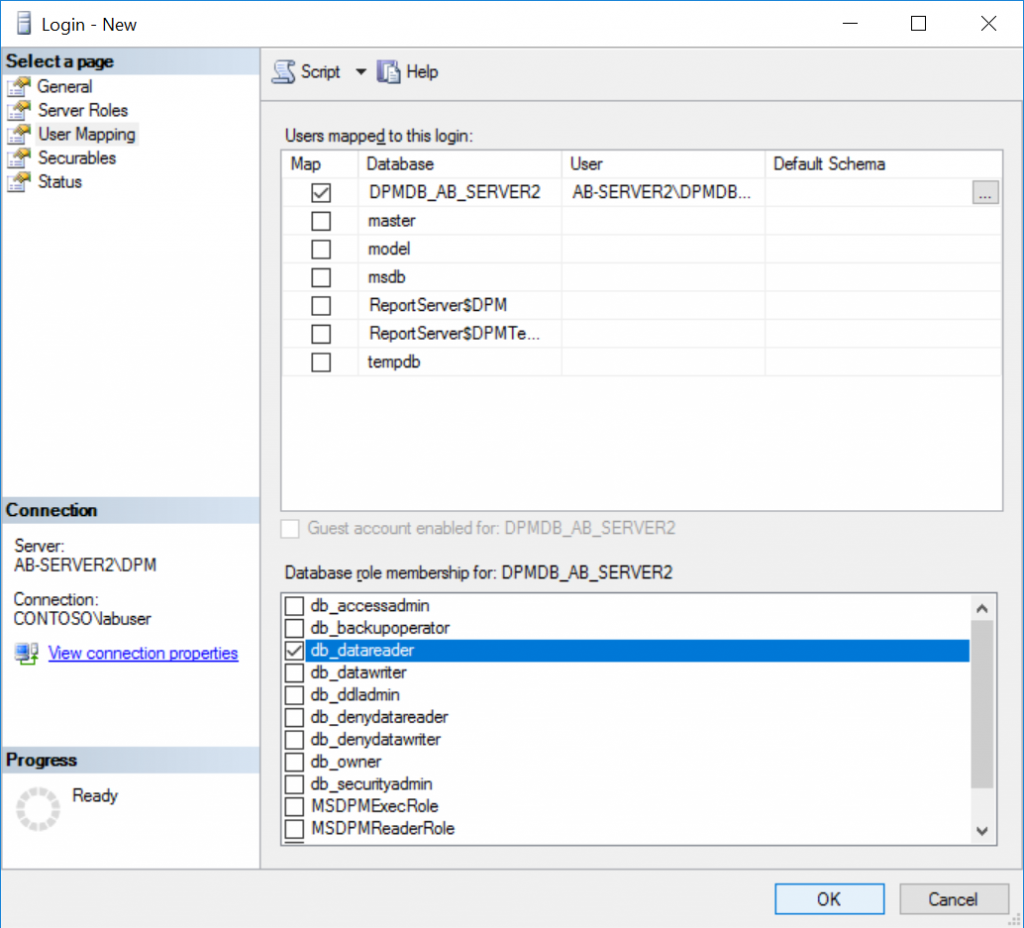
      3. Click on the User Mapping section, check the checkbox for YourDPMDatabase, and check the checkbox for the db_datareader role.
      4. Click OK
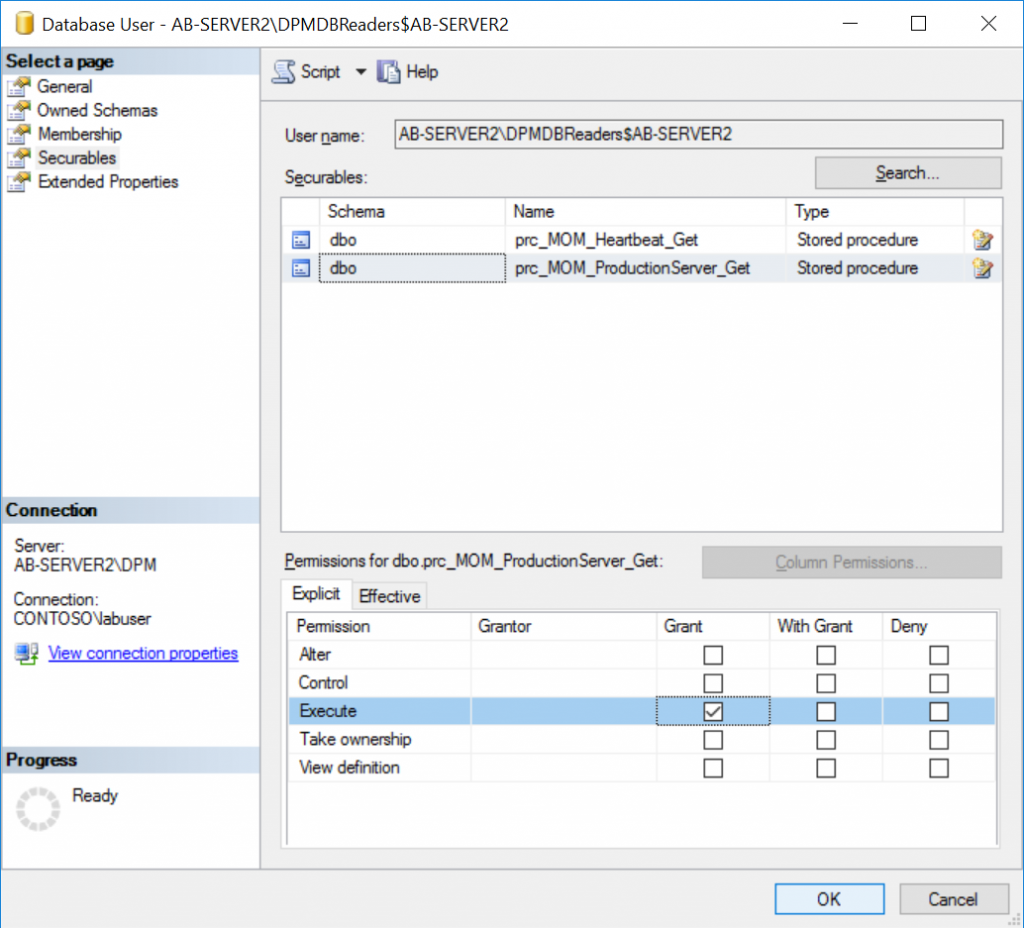
  5. In Microsoft SQL Server Management Studio, expand Databases, expand YourDPMDatabase, expand Security, expand Users, and right click Properties on the DPMDBReaders$DPMSERVERNAME group you granted access to in step 4.
    1. Click on Securables
    2. Click the Search... button
    3. Select Specific objects... and click OK
    4. Click the Object Types... button
    5. Check Stored precedures and click OK
    6. Click the Browse... button
    7. Check [dbo].[prc_MOM_Heartbeat_Get] and [dbo].[prc_MOM_ProductionServerGet] and click OK
    8. Click OK on the Select objects dialog box
    9. Place a checkbox in the Grant column for the Execute row.
      1. Make sure you do this step for both [dbo].[prc_MOM_Heartbeat_Get] and [dbo].[prc_MOM_ProductionServerGet], checking the box once will only update one of the storage procedures.
    10. Click OK
  6. Exit Microsoft SQL Server Management Studio.
  7. Open Reporting Services Configuration Manager and connect to the SqlServer and Instance hosting the DPM reports (as you go through this, replace the items in Red with your applicable values).
    1. Click on the Web Portal URL menu item and click on the listed URL for DPM.
    2. Click on the DPMReports_GUID folder to open the DPM reports page.
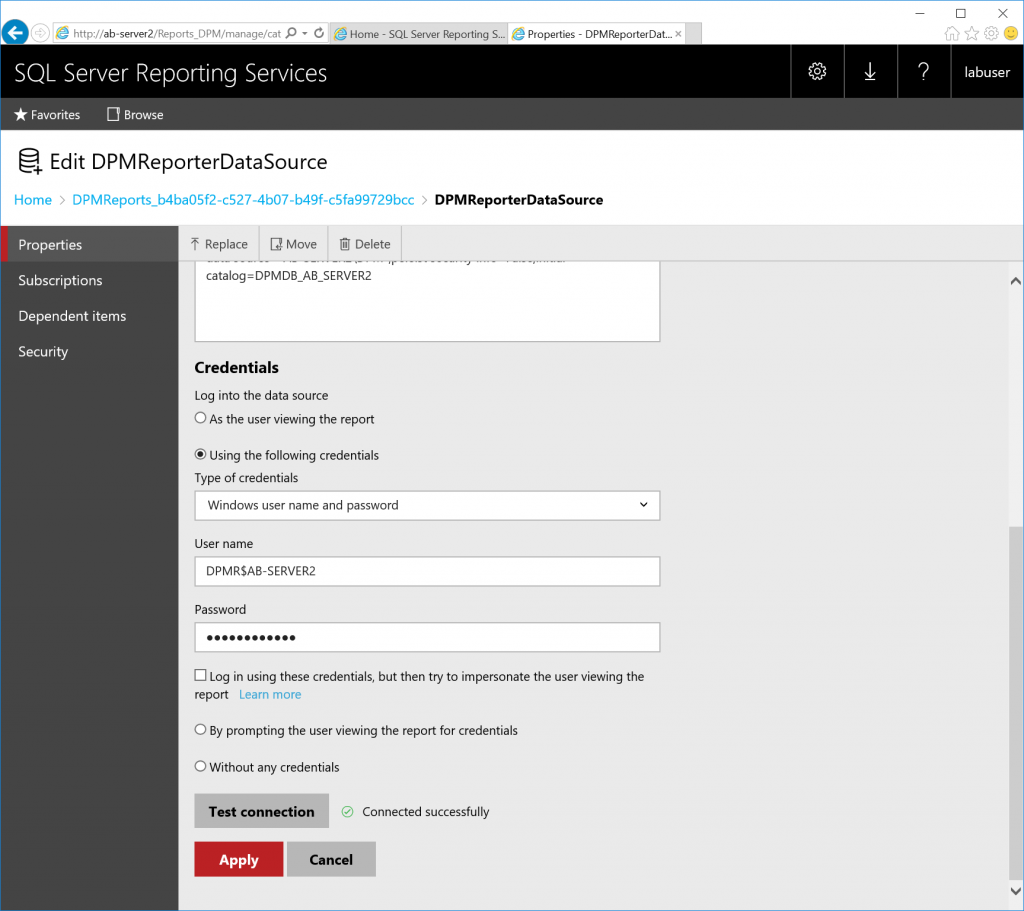
    3. Click on the DPMReporterDataSource Data Source to open its properties.
    4. Under Credentials, use the following configuration:
      1. Select the Using the following credentials radio button
      2. Type of credentials: Windows user name and password
      3. User name: DPMR$DPMSERVERNAME
      4. Password: EnterYourPasswordToTheAccount
      5. Ensure Log in using these credentials, but then try to impersonate the user viewing the report is unchecked
      6. Click the Test connection button
        1. Ensure it says Connected successfully

      7. Click Apply
    5. Close out of your web browser
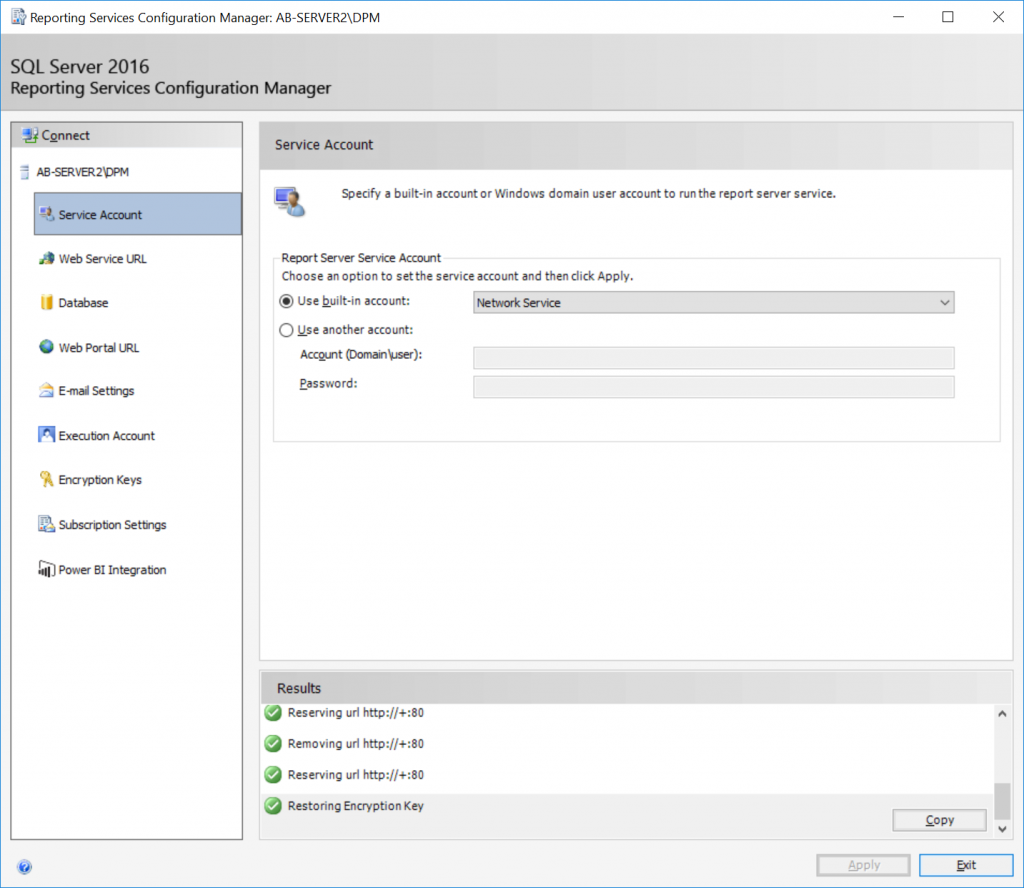
  8. Back in the Reporting Services Configuration Manager window, complete the following steps
    1. Select the Service Account menu item
    2. Ensure Use built-in account is set to Network Service
      1. Check the Use built-in account radio button
      2. Set the account to Network Service
      3. Click Apply
      4. You will be prompted to save an encryption key. Save the key to location of your choosing, and type a password to be used to encrypt the file. Click OK
      5. You will then be prompted to specify an account with administrator privileges. Click OK to use your current account.
  9. Reboot the DPM Server

At this point, you should now be able to schedule e-mail reports without experiencing the original error and your reports should load properly!

DPM 2016 - Anonymous / Open Relay for SMTP Notifications

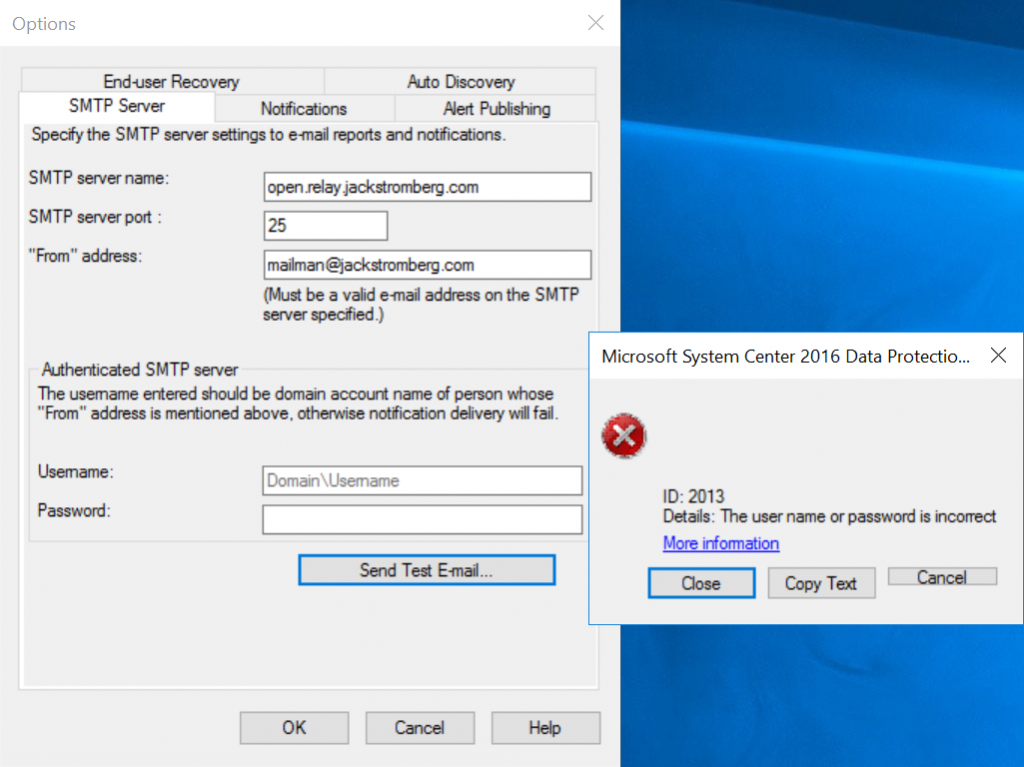
DPM 2016 is primarily geared towards using mail servers that require authentication (rightfully so, that's a best security practice). However, many IT organizations have local mail relay servers with anonymous authentication that are used for several IT services in the organization. Unfortunately, DPM 2016 gets a bit wonky using unauthenticated mail servers and will likely give you a generic error that says:

Error ID: 2013
Details: The user name or password is incorrect

And if you ignore the error and head over to the notifications tab to configure a notification, you will be presented with another generic error:

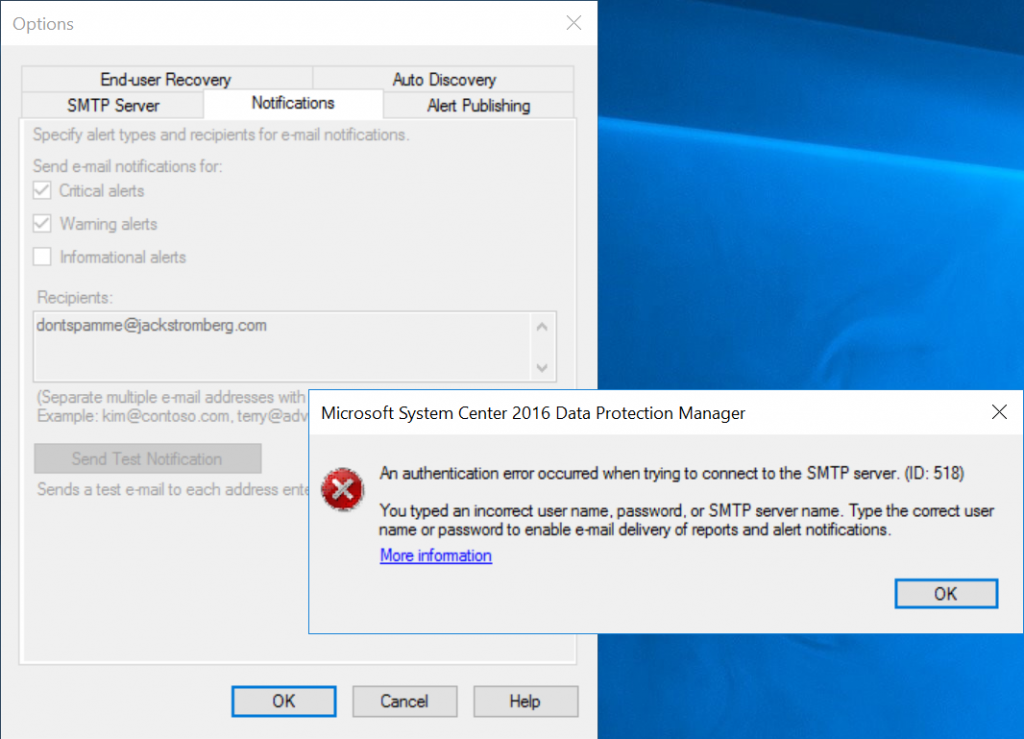
An authentication error occured when trying to connect to the SMTP serve. (ID: 518)

You typed an incorrect user name, password, or SMTP server name. Type the correct user name or password to enable e-mail delivery of reports and alert notifications.

And if you are trying to configure scheduled emails you may receive an error about reporting services:

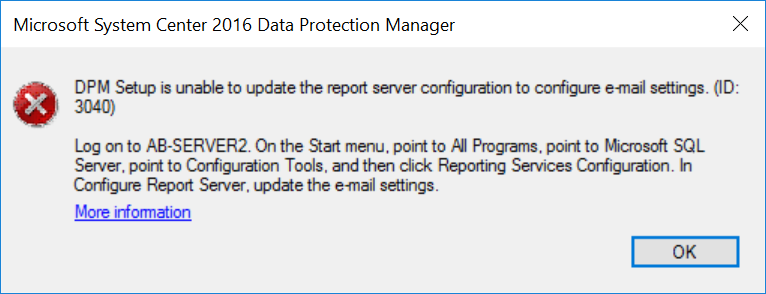
DPM Setup is unable to update the report server configuration to configure e-mail settings. (ID: 3040).

One thing I may do before getting too far ahead though is validate you can send an email from the DPM server. This can easily be done via PowerShell by executing the following command:

Send-MailMessage -SMTPServer localhost -To [email protected] -From [email protected] -Subject "Test Email from DPM Server" -Body "Howdy!  This is a test from the DPM Sever.  If you see this, mail relay is working!"

When executing the PowerShell command, it won't return anything, but you should hopefully see a message in your mailbox. If you do, you've at least ruled out network/mail issues.

Once you've ruled out connectivity/the mail server, we will complete the following steps below to configure DPM.

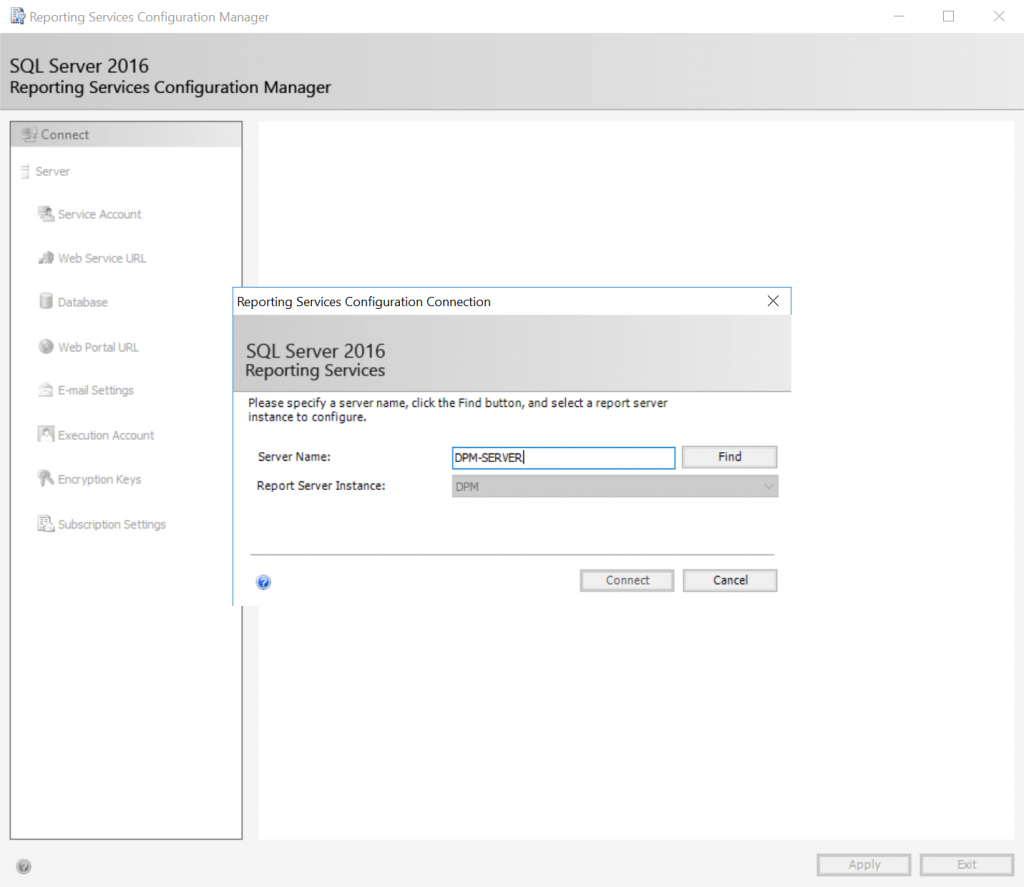
  1. Configure E-mail for SQL Server Reporting Services
  2. Create a Local User Account
  3. Remove any artifacts left in the registry
  4. Update the SMTP settings in DPM.

Configuration

  1. Configure SQL Server Reporting Services
    1. Open Reporting Services Configuration Manager
    2. Sign into your DPM instance
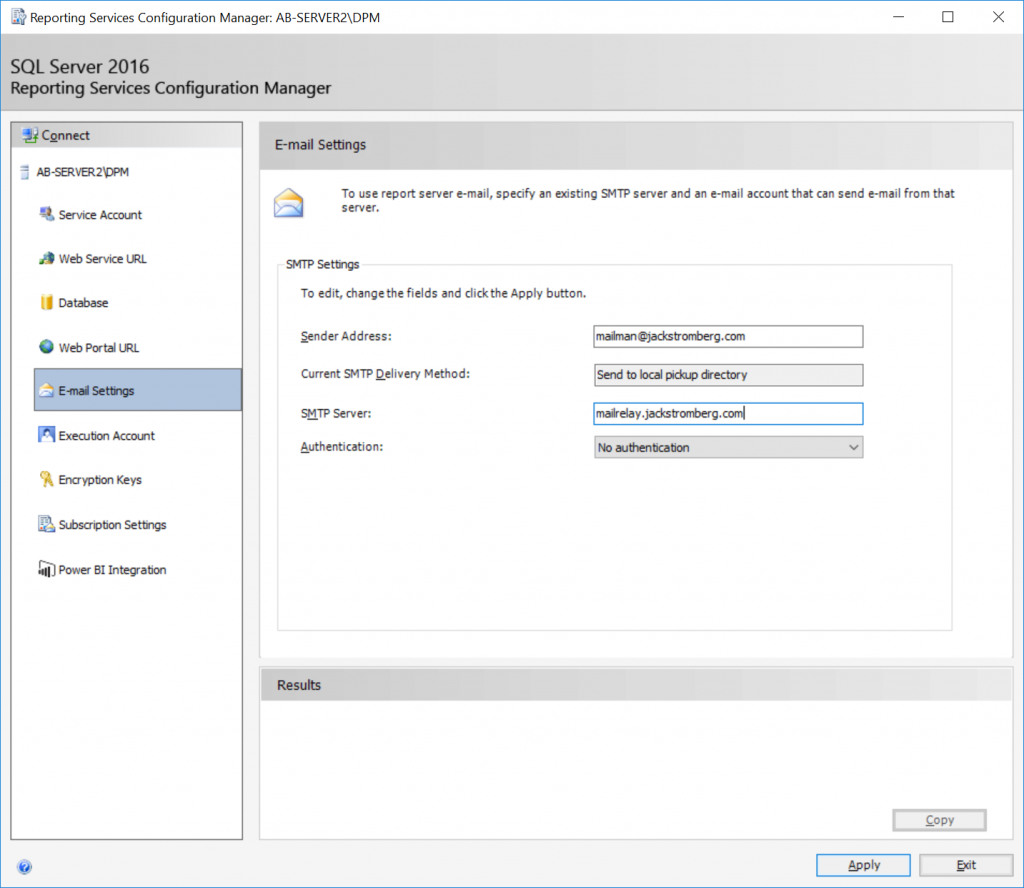
    3. Select E-mail Settings and leverage the following configuration
      1. Sender Address: [email protected]
      2. SMTP Server: emailserver.yourdomain.com
      3. Authentication: No authentication

    4. Click Apply
  2. Create a local user account
    1. Open Computer Management, expand Local Users and Groups, select Users, and Create a new local user on the machine
      1. Create the user (I used anonemail as the account name, but anything can be specified)
      2. Remove all group membership
        1. This account doesn't need to be a part of any group, including the Users group
        2. This account should not be a part of administrators (I've seen other blog posts mention you must use administrator, that is 100% not necessary and can be considered a security risk)
      3. Ensure the account is enabled
        1. A disabled account will not work
  3. Cleanup the registry
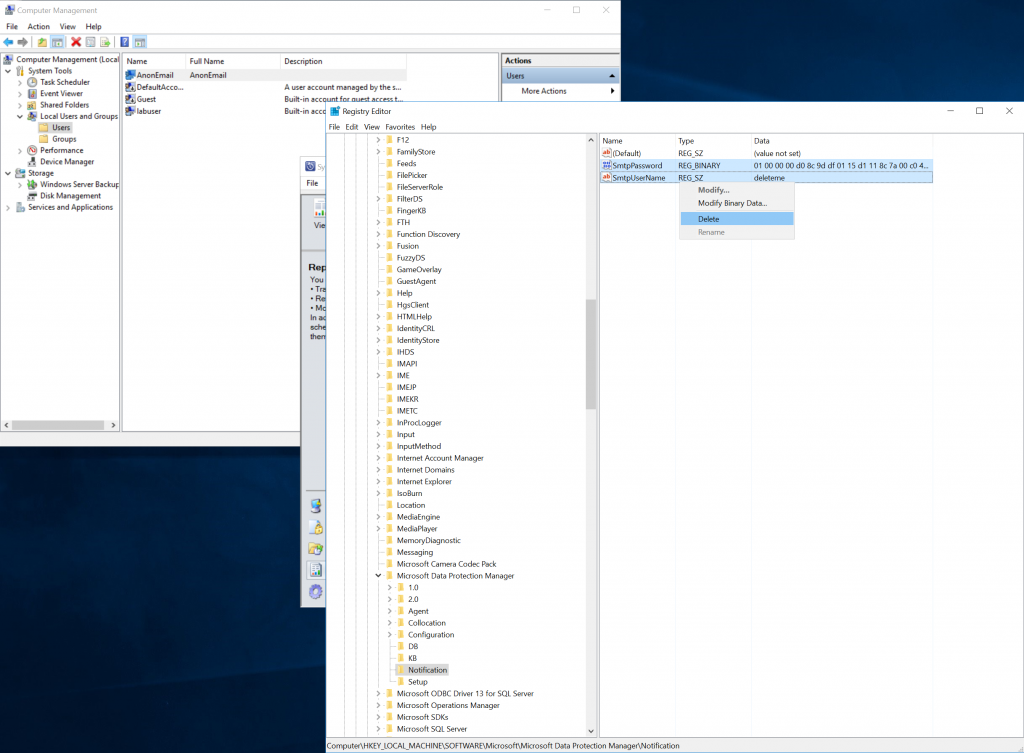
    1. Open registry editor (regedit.msc)
    2. Navigate to HKEY_LOCAL_MACHINE\Software\Microsoft\Microsoft Data Protection Manager\Notification
    3. Delete the following keys (if they exist):
      1. SmtpUserName
      2. SmtpPassword
  4. Reboot the DPM Server
    1. Technically, you could restart two services:
      SQL Server Reporting Services instance for DPM and the DPM service, but a reboot never hurts 😉
  5. Configure DPM to use SMTP relay
    1. Close out of the DPM and reopen
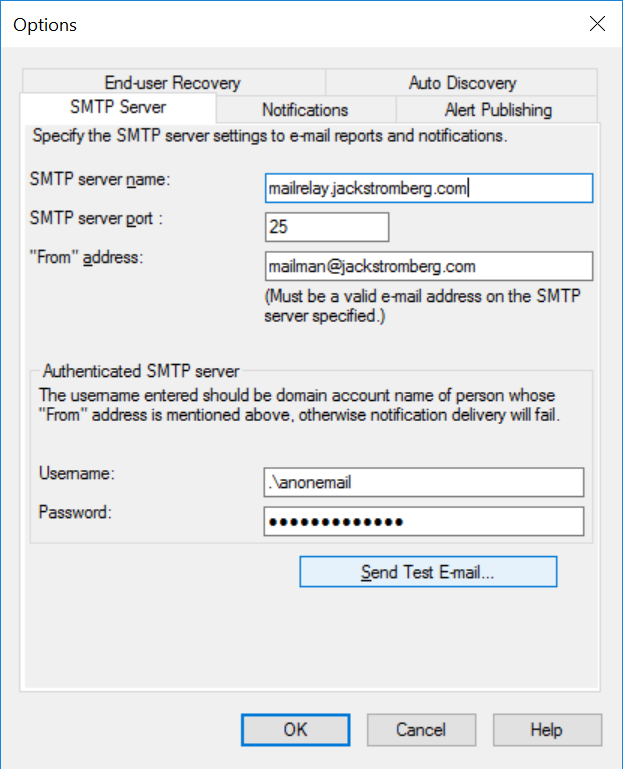
    2. Select Reporting, waiting for the screen to finish loading, and then select Action, Options
    3. Select the SMTP Server tab and enter
      1. SMTP sever name: relayserver.mydomain.com
      2. SMTP server port: 25
      3. "From" Address: [email protected]
      4. Username: .\localuserwecreatedearlier
        1. Ensure you have .\ to designate the user is local
      5. Password: LocalUserAccountPassword

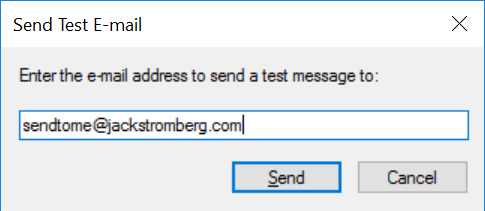
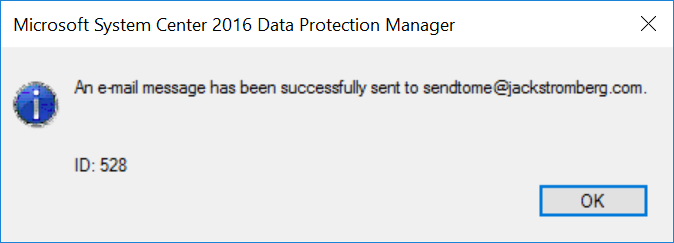
    4. Click the Send Test E-Mail button and specify an email address to send a test email to validate all is well
    5. Success!
    6. Click OK on the Options window to save your settings

At this point, you should be able to relay emails through your open relay as well as schedule emails for reports without error.

DPM 2016 Installation - Error ID: 4387

When installing DPM 2016, you may get a really generic error during the "Prerequisites check" during installation. Looking online, there's a ton of individuals that have this issue, but no one correlates the log files to specifically what is needed to solve each problem (yep, "each" problem, Error 4387 is a generic catch all for several issues during the prerequisits check).

Before I get into the article, the too long didn't read (TLDR) version is make sure you are using both SQL Server 2016 (no service pack) and SSMS 16.5 or earlier to successfully install DPM 2016.

To get a bit more technical and find out what's going on, open up the DPM Installation logs after you receive the error. The installation log files can be found by browsing to %ProgramFiles%\Microsoft System Center 2016\DPM\DPMLogs.  Documentation on where log files are stored by DPM can be found here: https://docs.microsoft.com/en-us/system-center/dpm/set-up-dpm-logging?view=sc-dpm-2016

Here's a copy of my DpmSetup.log file, in which when looking through it, there isn't a clear cut answer, just this generic line at the bottom ([3/1/2019 6:22:54 AM] *** Error : CurrentDomain_UnhandledException).

[3/1/2019 6:21:16 AM] Information : Microsoft System Center 2016 Data Protection Manager setup started.
[3/1/2019 6:21:16 AM] Data : Mode of setup = User interface
[3/1/2019 6:21:16 AM] Data : OSVersion = Microsoft Windows NT 10.0.14393.0
[3/1/2019 6:21:16 AM] Information : Check if the media is removable
[3/1/2019 6:21:16 AM] Data : Folder Path = C:\Program Files\Microsoft System Center 2016\DPM
[3/1/2019 6:21:16 AM] Data : Drive Name = C:\
[3/1/2019 6:21:16 AM] Data : Drive Type = 3
[3/1/2019 6:21:16 AM] Information : Check attributes of the directory
[3/1/2019 6:21:16 AM] Data : Folder Path = C:\Program Files\Microsoft System Center 2016\DPM
[3/1/2019 6:21:16 AM] Data : File Attributes = Directory
[3/1/2019 6:21:16 AM] Information : Check if the media is removable
[3/1/2019 6:21:16 AM] Data : Folder Path = C:\Program Files\Microsoft Data Protection Manager
[3/1/2019 6:21:16 AM] Data : Drive Name = C:\
[3/1/2019 6:21:16 AM] Data : Drive Type = 3
[3/1/2019 6:21:16 AM] Information : Check attributes of the directory
[3/1/2019 6:21:16 AM] Data : Folder Path = C:\Program Files\Microsoft Data Protection Manager
[3/1/2019 6:21:16 AM] * Exception : Ignoring the following exception intentionally => System.IO.FileNotFoundException: Could not find file 'C:\Program Files\Microsoft Data Protection Manager'.
File name: 'C:\Program Files\Microsoft Data Protection Manager'
   at System.IO.__Error.WinIOError(Int32 errorCode, String maybeFullPath)
   at System.IO.File.GetAttributes(String path)
   at Microsoft.Internal.EnterpriseStorage.Dls.Setup.Wizard.InstallLocationValidation.CheckForDirectoryAttributes(String path)
[3/1/2019 6:21:16 AM] Information : Check if the media is removable
[3/1/2019 6:21:16 AM] Data : Folder Path = C:\Program Files\Microsoft System Center 2016\DPM\DPM\DPMDB
[3/1/2019 6:21:16 AM] Data : Drive Name = C:\
[3/1/2019 6:21:16 AM] Data : Drive Type = 3
[3/1/2019 6:21:16 AM] Information : Check attributes of the directory
[3/1/2019 6:21:16 AM] Data : Folder Path = C:\Program Files\Microsoft System Center 2016\DPM\DPM\DPMDB
[3/1/2019 6:21:16 AM] * Exception : Ignoring the following exception intentionally => System.IO.DirectoryNotFoundException: Could not find a part of the path 'C:\Program Files\Microsoft System Center 2016\DPM\DPM\DPMDB'.
   at System.IO.__Error.WinIOError(Int32 errorCode, String maybeFullPath)
   at System.IO.File.GetAttributes(String path)
   at Microsoft.Internal.EnterpriseStorage.Dls.Setup.Wizard.InstallLocationValidation.CheckForDirectoryAttributes(String path)
[3/1/2019 6:21:17 AM] Information : The setup wizard is initialized.
[3/1/2019 6:21:17 AM] Information : Starting the setup wizard.
[3/1/2019 6:21:17 AM] Information : <<< Dialog >>> Welcome Page : Entering
[3/1/2019 6:22:33 AM] Information : <<< Dialog >>> Welcome Page : Leaving
[3/1/2019 6:22:33 AM] Information : <<< Dialog >>> Inspect Page : Entering
[3/1/2019 6:22:41 AM] Information : Query WMI provider for path of configuration file for SQL Server 2008 Reporting Services.
[3/1/2019 6:22:41 AM] Information : Querying WMI Namespace: \\DPM-SERVER\root\Microsoft\SqlServer\ReportServer\RS_DPM\V13\admin for query: SELECT * FROM MSReportServer_ConfigurationSetting WHERE InstanceName='DPM'
[3/1/2019 6:22:42 AM] Data : Path of configuration file for SQL Server 2008 Reporting Services = C:\Program Files\Microsoft SQL Server\MSRS13.DPM\Reporting Services\ReportServer\RSReportServer.config
[3/1/2019 6:22:42 AM] * Exception :  => System.IO.FileNotFoundException: Could not load file or assembly 'Microsoft.SqlServer.Smo, Version=10.0.0.0, Culture=neutral, PublicKeyToken=89845dcd8080cc91' or one of its dependencies. The system cannot find the file specified.
File name: 'Microsoft.SqlServer.Smo, Version=10.0.0.0, Culture=neutral, PublicKeyToken=89845dcd8080cc91'
   at Microsoft.Internal.EnterpriseStorage.Dls.Setup.Helpers.MiscHelper.IsSqlClustered(String sqlMachineName, String sqlInstanceName)
   at Microsoft.Internal.EnterpriseStorage.Dls.Setup.Helpers.MiscHelper.IsMachineClustered(String sqlMachineName, String sqlInstanceName)

WRN: Assembly binding logging is turned OFF.
To enable assembly bind failure logging, set the registry value [HKLM\Software\Microsoft\Fusion!EnableLog] (DWORD) to 1.
Note: There is some performance penalty associated with assembly bind failure logging.
To turn this feature off, remove the registry value [HKLM\Software\Microsoft\Fusion!EnableLog].

[3/1/2019 6:22:42 AM] * Exception :  => System.Management.ManagementException: Invalid namespace 
   at System.Management.ManagementException.ThrowWithExtendedInfo(ManagementStatus errorCode)
   at System.Management.ManagementScope.InitializeGuts(Object o)
   at System.Management.ManagementScope.Initialize()
   at System.Management.ManagementObjectSearcher.Initialize()
   at System.Management.ManagementObjectSearcher.Get()
   at Microsoft.Internal.EnterpriseStorage.Dls.Setup.Helpers.WmiHelper.IsMachineClustered(String machineName, String instanceName)
[3/1/2019 6:22:42 AM] Information : OS >= win 8 , enable Dedupe role
[3/1/2019 6:22:53 AM] Information : output : True
.. 
 error : 
[3/1/2019 6:22:53 AM] Data : Path of inspection output xml = C:\Program Files\Microsoft System Center 2016\DPM\DPMLogs\InspectReport.xml
[3/1/2019 6:22:53 AM] Information : Instantiating inspect component.
[3/1/2019 6:22:53 AM] Data : Path of output xml = C:\Program Files\Microsoft System Center 2016\DPM\DPMLogs\InspectReport.xml
[3/1/2019 6:22:53 AM] Information : Deserializing the check XML from path : C:\Users\labuser.CONTOSO\AppData\Local\Temp\DPM8AFA.tmp\DPM2012\Setup\checks.xml
[3/1/2019 6:22:53 AM] Information : Loading the check XML from path : C:\Users\labuser.CONTOSO\AppData\Local\Temp\DPM8AFA.tmp\DPM2012\Setup\checks.xml
[3/1/2019 6:22:54 AM] Information : Deserialising the scenario XML from path : C:\Users\labuser.CONTOSO\AppData\Local\Temp\DPM8AFA.tmp\DPM2012\Setup\scenarios.xml
[3/1/2019 6:22:54 AM] Information : Loading the check XML from path : C:\Users\labuser.CONTOSO\AppData\Local\Temp\DPM8AFA.tmp\DPM2012\Setup\scenarios.xml
[3/1/2019 6:22:54 AM] Information : Getting scenarios for the product: DPM
[3/1/2019 6:22:54 AM] Information : Getting scenarios for DPM
[3/1/2019 6:22:54 AM] Information : Getting scenario for Mode:Install, DbLocation:Remote, SKU:Retail and CCMode:NotApplicable
[3/1/2019 6:22:54 AM] *** Error : Initialize the SQLSetUpHelper Object
[3/1/2019 6:22:54 AM] Information : [SQLSetupHelper.GetWMIReportingNamespace]. Reporting Namespace found. Reporting Namespace : V13
[3/1/2019 6:22:54 AM] Information : [SQLSetupHelper.GetWMISqlServerNamespace]. SQL Namespace found. SQL Namespace : \\DPM-SERVER\root\Microsoft\SqlServer\ComputerManagement13
[3/1/2019 6:22:54 AM] Information : Query WMI provider for SQL Server 2008.
[3/1/2019 6:22:54 AM] Information : Querying WMI Namespace: \\DPM-SERVER\root\Microsoft\SqlServer\ComputerManagement13 for query: Select * from SqlServiceAdvancedProperty where ServiceName='MSSQL$DPM' and PropertyName='Version'
[3/1/2019 6:22:54 AM] Information : SQL Server 2008 R2 SP2 instance DPM is present on this system.
[3/1/2019 6:22:54 AM] Information : Query WMI provider for SQL Server 2008.
[3/1/2019 6:22:54 AM] Information : Querying WMI Namespace: \\DPM-SERVER\root\Microsoft\SqlServer\ComputerManagement13 for query: Select * from SqlServiceAdvancedProperty where ServiceName='MSSQL$DPM' and PropertyName='Version'
[3/1/2019 6:22:54 AM] Information : [SQLSetupHelper.GetSQLDepedency]. Reporting Namespace and SQL namespace for installed SQL server which will be used as DPM DB. Reporting Namespace : \\DPM-SERVER\root\Microsoft\SqlServer\ReportServer\RS_DPM\V13\admin SQL Namespace : \\DPM-SERVER\root\Microsoft\SqlServer\ComputerManagement13
[3/1/2019 6:22:54 AM] Information : Check if SQL Server 2012 Service Pack 1 Tools is installed.
[3/1/2019 6:22:54 AM] Information : [SQLSetupHelper.GetSqlSetupRegKeyPath]. Registry Key path that contains SQL tools location: Software\Microsoft\Microsoft SQL Server\140\Tools\Setup\
[3/1/2019 6:22:54 AM] Information : Inspect.CheckSqlServerTools : MsiQueryProductState returned : INSTALLSTATE_DEFAULT
[3/1/2019 6:22:54 AM] *** Error : CurrentDomain_UnhandledException

Digging some more, I found that DPM seems to also place logs within the %temp% folder. Within this folder, I found that a tmpXXX.xml file was being created each time I ran through the installer and triggered an error. Upon opening the file, I see the following:

<?xml version="1.0" encoding="utf-16"?>
<WatsonInfo xmlns:xsd="http://www.w3.org/2001/XMLSchema" xmlns:xsi="http://www.w3.org/2001/XMLSchema-instance">
  <ExceptionList>
    <ExceptionEntry>
      <Exception_x0020_Type_x000D__x000A_>System.ArgumentNullException</Exception_x0020_Type_x000D__x000A_>
      <StackTrace_x000D__x000A_>   at System.Version.Parse(String input)
   at System.Version..ctor(String version)
   at Microsoft.Internal.EnterpriseStorage.Dls.Setup.Inspect.InspectPrerequisites.CheckSqlServerTools(InspectContext context)
   at Microsoft.Internal.EnterpriseStorage.Dls.Setup.Inspect.Inspect.InitializeContext(String sqlMachineName, String sqlInstanceName, String reportingMachineName, String reportingInstanceName, ConnectionOptions wmiSqlConnectionOptions, ConnectionOptions wmiReportingConnectionOptions, Boolean isRemoteDb, Boolean isSqlClustered, List`1 sqlClusterNodes, Boolean isRemoteReporting, String oldSqlMachineName, String oldSqlInstanceName, ProductNameEnum productName, InspectModeEnum inspectMode, Boolean remoteTriggerJob)
   at Microsoft.Internal.EnterpriseStorage.Dls.Setup.Inspect.Inspect..ctor(String reportFilePath, String sqlMachineName, String sqlInstanceName, String reportingMachineName, String reportingInstanceName, ConnectionOptions wmiSqlConnectionOptions, ConnectionOptions wmiReportingConnectionOptions, Boolean isRemoteDb, Boolean isSqlClustered, List`1 sqlClusterNodes, Boolean isRemoteReporting, String oldSqlMachineName, String oldSqlInstanceName, InspectModeEnum inspectMode, InspectSkuEnum inspectSku, ProductNameEnum productName, InspectCCModeEnum ccMode, Boolean remoteTriggerJob)
   at Microsoft.Internal.EnterpriseStorage.Dls.Setup.Wizard.BackEnd.InstantiateInspect(String inspectFile, String sqlMachineName, String sqlInstanceName, String reportingMachineName, String reportingInstanceName, ConnectionOptions wmiSqlConnectionOptions, ConnectionOptions wmiReportingConnectionOptions)
   at Microsoft.Internal.EnterpriseStorage.Dls.Setup.Wizard.InspectPage.RunInspect()
   at Microsoft.Internal.EnterpriseStorage.Dls.Setup.Wizard.InspectPage.InspectThreadEntry()
   at System.Threading.ExecutionContext.RunInternal(ExecutionContext executionContext, ContextCallback callback, Object state, Boolean preserveSyncCtx)
   at System.Threading.ExecutionContext.Run(ExecutionContext executionContext, ContextCallback callback, Object state, Boolean preserveSyncCtx)
   at System.Threading.ExecutionContext.Run(ExecutionContext executionContext, ContextCallback callback, Object state)
   at System.Threading.ThreadHelper.ThreadStart()</StackTrace_x000D__x000A_>
      <message>Value cannot be null.
Parameter name: input</message>
      <targetSite>System.Version Parse(System.String)</targetSite>
    </ExceptionEntry>
  </ExceptionList>
  <UICulture>en-US</UICulture>
  <Culture>en-US</Culture>
  <CLRVersion>4.0.30319.42000</CLRVersion>
  <OSVersion>Microsoft Windows NT 10.0.14393.0</OSVersion>
  <BucketingParametersValue>
    <Other>BC81BBF7</Other>
    <ExceptionPoint>System.Version.Parse</ExceptionPoint>
    <ExceptionName>System.ArgumentNullException</ExceptionName>
    <ModuleVersion>5.0.158.0</ModuleVersion>
    <ModuleName>SetupDpm.exe</ModuleName>
    <ApplicationVersion>5.0.158.0</ApplicationVersion>
    <ApplicationName>SetupDpm</ApplicationName>
  </BucketingParametersValue>
  <Info>Microsoft Data Protection Manager Exception Record</Info>
</WatsonInfo>

Looking through the above stack trace, I see hints that this is to SQL Server and in this case I'm receiving a null value for what looks like a version. So after reading other posts online, everyone said to downgrade to SQL Server 2016 RTM.

SQL Server 2016 version numbers: https://support.microsoft.com/en-us/help/3177312/sql-server-2016-build-versions

After downgrading to SQL Server 2016 RTM, I noticed I still received Error ID: 4387. This time I don't see any files within the %temp% directory, but I did find in the DPMSetup.log file (within the DPMLogs directory) the following log:

[3/8/2019 5:13:09 AM] Information : Microsoft System Center 2016 Data Protection Manager setup started.
[3/8/2019 5:13:09 AM] Data : Mode of setup = User interface
[3/8/2019 5:13:09 AM] Data : OSVersion = Microsoft Windows NT 10.0.14393.0
[3/8/2019 5:13:09 AM] Information : Check if the media is removable
[3/8/2019 5:13:09 AM] Data : Folder Path = C:\Program Files\Microsoft System Center 2016\DPM
[3/8/2019 5:13:09 AM] Data : Drive Name = C:\
[3/8/2019 5:13:09 AM] Data : Drive Type = 3
[3/8/2019 5:13:09 AM] Information : Check attributes of the directory
[3/8/2019 5:13:09 AM] Data : Folder Path = C:\Program Files\Microsoft System Center 2016\DPM
[3/8/2019 5:13:09 AM] Data : File Attributes = Directory
[3/8/2019 5:13:09 AM] Information : Check if the media is removable
[3/8/2019 5:13:09 AM] Data : Folder Path = C:\Program Files\Microsoft Data Protection Manager
[3/8/2019 5:13:09 AM] Data : Drive Name = C:\
[3/8/2019 5:13:09 AM] Data : Drive Type = 3
[3/8/2019 5:13:09 AM] Information : Check attributes of the directory
[3/8/2019 5:13:09 AM] Data : Folder Path = C:\Program Files\Microsoft Data Protection Manager
[3/8/2019 5:13:09 AM] * Exception : Ignoring the following exception intentionally => System.IO.FileNotFoundException: Could not find file 'C:\Program Files\Microsoft Data Protection Manager'.
File name: 'C:\Program Files\Microsoft Data Protection Manager'
   at System.IO.__Error.WinIOError(Int32 errorCode, String maybeFullPath)
   at System.IO.File.GetAttributes(String path)
   at Microsoft.Internal.EnterpriseStorage.Dls.Setup.Wizard.InstallLocationValidation.CheckForDirectoryAttributes(String path)
[3/8/2019 5:13:09 AM] Information : Check if the media is removable
[3/8/2019 5:13:09 AM] Data : Folder Path = C:\Program Files\Microsoft System Center 2016\DPM\DPM\DPMDB
[3/8/2019 5:13:09 AM] Data : Drive Name = C:\
[3/8/2019 5:13:09 AM] Data : Drive Type = 3
[3/8/2019 5:13:09 AM] Information : Check attributes of the directory
[3/8/2019 5:13:09 AM] Data : Folder Path = C:\Program Files\Microsoft System Center 2016\DPM\DPM\DPMDB
[3/8/2019 5:13:09 AM] * Exception : Ignoring the following exception intentionally => System.IO.DirectoryNotFoundException: Could not find a part of the path 'C:\Program Files\Microsoft System Center 2016\DPM\DPM\DPMDB'.
   at System.IO.__Error.WinIOError(Int32 errorCode, String maybeFullPath)
   at System.IO.File.GetAttributes(String path)
   at Microsoft.Internal.EnterpriseStorage.Dls.Setup.Wizard.InstallLocationValidation.CheckForDirectoryAttributes(String path)
[3/8/2019 5:13:10 AM] Information : The setup wizard is initialized.
[3/8/2019 5:13:10 AM] Information : Starting the setup wizard.
[3/8/2019 5:13:10 AM] Information : <<< Dialog >>> Welcome Page : Entering
[3/8/2019 5:13:55 AM] Information : <<< Dialog >>> Welcome Page : Leaving
[3/8/2019 5:13:55 AM] Information : <<< Dialog >>> Inspect Page : Entering
[3/8/2019 5:14:06 AM] Information : Query WMI provider for path of configuration file for SQL Server 2008 Reporting Services.
[3/8/2019 5:14:06 AM] Information : Querying WMI Namespace: \\DPM-SERVER\root\Microsoft\SqlServer\ReportServer\RS_DPM\V13\admin for query: SELECT * FROM MSReportServer_ConfigurationSetting WHERE InstanceName='DPM'
[3/8/2019 5:14:06 AM] Data : Path of configuration file for SQL Server 2008 Reporting Services = C:\Program Files\Microsoft SQL Server\MSRS13.DPM\Reporting Services\ReportServer\RSReportServer.config
[3/8/2019 5:14:06 AM] * Exception :  => System.IO.FileNotFoundException: Could not load file or assembly 'Microsoft.SqlServer.Smo, Version=10.0.0.0, Culture=neutral, PublicKeyToken=89845dcd8080cc91' or one of its dependencies. The system cannot find the file specified.
File name: 'Microsoft.SqlServer.Smo, Version=10.0.0.0, Culture=neutral, PublicKeyToken=89845dcd8080cc91'
   at Microsoft.Internal.EnterpriseStorage.Dls.Setup.Helpers.MiscHelper.IsSqlClustered(String sqlMachineName, String sqlInstanceName)
   at Microsoft.Internal.EnterpriseStorage.Dls.Setup.Helpers.MiscHelper.IsMachineClustered(String sqlMachineName, String sqlInstanceName)

WRN: Assembly binding logging is turned OFF.
To enable assembly bind failure logging, set the registry value [HKLM\Software\Microsoft\Fusion!EnableLog] (DWORD) to 1.
Note: There is some performance penalty associated with assembly bind failure logging.
To turn this feature off, remove the registry value [HKLM\Software\Microsoft\Fusion!EnableLog].

[3/8/2019 5:14:06 AM] * Exception :  => System.Management.ManagementException: Invalid namespace 
   at System.Management.ManagementException.ThrowWithExtendedInfo(ManagementStatus errorCode)
   at System.Management.ManagementScope.InitializeGuts(Object o)
   at System.Management.ManagementScope.Initialize()
   at System.Management.ManagementObjectSearcher.Initialize()
   at System.Management.ManagementObjectSearcher.Get()
   at Microsoft.Internal.EnterpriseStorage.Dls.Setup.Helpers.WmiHelper.IsMachineClustered(String machineName, String instanceName)
[3/8/2019 5:14:06 AM] Information : OS >= win 8 , enable Dedupe role
[3/8/2019 5:14:07 AM] Information : output : True
.. 
 error : 
[3/8/2019 5:14:08 AM] Data : Path of inspection output xml = C:\Program Files\Microsoft System Center 2016\DPM\DPMLogs\InspectReport.xml
[3/8/2019 5:14:08 AM] Information : Instantiating inspect component.
[3/8/2019 5:14:08 AM] Data : Path of output xml = C:\Program Files\Microsoft System Center 2016\DPM\DPMLogs\InspectReport.xml
[3/8/2019 5:14:08 AM] Information : Deserializing the check XML from path : C:\Users\labuser.CONTOSO\AppData\Local\Temp\DPM6EC.tmp\DPM2012\Setup\checks.xml
[3/8/2019 5:14:08 AM] Information : Loading the check XML from path : C:\Users\labuser.CONTOSO\AppData\Local\Temp\DPM6EC.tmp\DPM2012\Setup\checks.xml
[3/8/2019 5:14:08 AM] Information : Deserialising the scenario XML from path : C:\Users\labuser.CONTOSO\AppData\Local\Temp\DPM6EC.tmp\DPM2012\Setup\scenarios.xml
[3/8/2019 5:14:08 AM] Information : Loading the check XML from path : C:\Users\labuser.CONTOSO\AppData\Local\Temp\DPM6EC.tmp\DPM2012\Setup\scenarios.xml
[3/8/2019 5:14:08 AM] Information : Getting scenarios for the product: DPM
[3/8/2019 5:14:08 AM] Information : Getting scenarios for DPM
[3/8/2019 5:14:08 AM] Information : Getting scenario for Mode:Install, DbLocation:Remote, SKU:Retail and CCMode:NotApplicable
[3/8/2019 5:14:08 AM] *** Error : Initialize the SQLSetUpHelper Object
[3/8/2019 5:14:08 AM] Information : [SQLSetupHelper.GetWMIReportingNamespace]. Reporting Namespace found. Reporting Namespace : V13
[3/8/2019 5:14:08 AM] Information : [SQLSetupHelper.GetWMISqlServerNamespace]. SQL Namespace found. SQL Namespace : \\DPM-SERVER\root\Microsoft\SqlServer\ComputerManagement13
[3/8/2019 5:14:08 AM] Information : Query WMI provider for SQL Server 2008.
[3/8/2019 5:14:08 AM] Information : Querying WMI Namespace: \\DPM-SERVER\root\Microsoft\SqlServer\ComputerManagement13 for query: Select * from SqlServiceAdvancedProperty where ServiceName='MSSQL$DPM' and PropertyName='Version'
[3/8/2019 5:14:08 AM] Information : SQL Server 2008 R2 SP2 instance DPM is present on this system.
[3/8/2019 5:14:08 AM] Information : Query WMI provider for SQL Server 2008.
[3/8/2019 5:14:08 AM] Information : Querying WMI Namespace: \\DPM-SERVER\root\Microsoft\SqlServer\ComputerManagement13 for query: Select * from SqlServiceAdvancedProperty where ServiceName='MSSQL$DPM' and PropertyName='Version'
[3/8/2019 5:14:08 AM] Information : [SQLSetupHelper.GetSQLDepedency]. Reporting Namespace and SQL namespace for installed SQL server which will be used as DPM DB. Reporting Namespace : \\DPM-SERVER\root\Microsoft\SqlServer\ReportServer\RS_DPM\V13\admin SQL Namespace : \\DPM-SERVER\root\Microsoft\SqlServer\ComputerManagement13
[3/8/2019 5:14:08 AM] Information : Check if SQL Server 2012 Service Pack 1 Tools is installed.
[3/8/2019 5:14:08 AM] Information : [SQLSetupHelper.GetSqlSetupRegKeyPath]. Registry Key path that contains SQL tools location: Software\Microsoft\Microsoft SQL Server\140\Tools\Setup\
[3/8/2019 5:14:08 AM] Information : Inspect.CheckSqlServerTools : MsiQueryProductState returned : INSTALLSTATE_DEFAULT
[3/8/2019 5:14:08 AM] *** Error : CurrentDomain_UnhandledException

Looking at the above log, the last line hints we are looking for SQL Server Tools (in this case, what looks like some crazy old hints to depencies on SQL Server 2012). Unfortunately, installation of SQL Server 2016 will provide you the recommendation to grab SQL Server Management Studio 17.X, however DPM 2016 will only install with SQL Server Management Studio 16.5.X. You will need to uninstall the 17.X version of SSMS and install the 16.5.X build from the link below:
https://docs.microsoft.com/en-us/sql/ssms/sql-server-management-studio-changelog-ssms?view=sql-server-2017#download-ssms-1653

Alas! Upon installation and run through the DPM installation, no more Error 4387! Once DPM is installed, you can safely upgrade your SQL Server instance to 2017 if needed.

Hope this helps someone else! DPM can be picky and unforgiving in nature, but if you abide by exactly what their documentation calls out to a T and not venture anything outside of those parameters, you should be golden 🙂

https://docs.microsoft.com/en-us/system-center/dpm/install-dpm?view=sc-dpm-2016#setup-prerequisites

Closing notes, if the above items didn't solve your problem. Please post your logs and let's troubleshoot to document all solutions needed for all error logs. Thank you!

Deploying Palo Alto VM-Series on Azure

Here is a recap of some of the reflections I have with deploying Palo Alto's VM-Series Virtual Appliance on Azure. This is more of a reflection of the steps I took rather than a guide, but you can use the information below as you see fit.  At a high level, you will need to deploy the device on Azure and then configure the internal "guts" of the Palo Alto to allow it to route traffic properly on your Virtual Network (VNet) in Azure.  The steps outlined should work for both the 8.0 and 8.1 versions of the Palo Alto VM-Series appliance.

Please note, this tutorial also assumes you are looking to deploy a scale-out architecture.  This can help ensure a single instance doesn't get overwhelmed with the amount of bandwidth you are trying to push through it.  If you are looking for a single instance, you can still follow along.

Deploy the Appliance in Azure

In deploying the Virtual Palo Altos, the documentation recommends to create them via the Azure Marketplace (which can be found here: https://azuremarketplace.microsoft.com/en-us/marketplace/apps/paloaltonetworks.vmseries-ngfw?tab=Overview).  Personally, I'm not a big fan of deploying the appliance this way as I don't have as much control over naming conventions, don't have the ability to deploy more than one appliance for scale, cannot specify my availability set, cannot leverage managed disks, etc.  In addition, I noticed a really strange error that if you specify a password greater than 31 characters, the Palo Alto devices flat out won't deploy on Azure.  In this case, I've written a custom ARM template that leverages managed disks, availability sets, consistent naming nomenclature, proper VM sizing, and most importantly, let you define how many virtual instances you'd like to deploy for scaling.

Note: this article doesn't cover the concept of using Panorama, but that would centrally manage each of the scale-out instances in a "single pane of glass".  Below, we will cover setting up a node manually to get it working.  It is possible to create a base-line configuration file that joins Panorama post-deployment to bootstrap the nodes upon deployment of the ARM template.  The bootstrap file is not something I've incorporated into this template, but the template could easily be modified to do so.

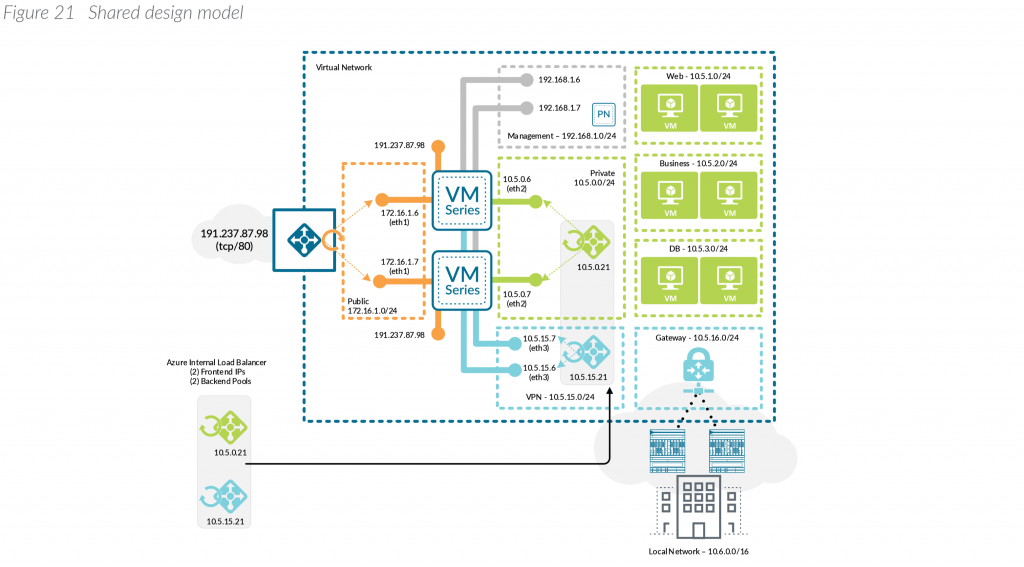
With the above said, this article will cover what Palo Alto considers their Shared design model. Here is an example of what this visually looks like (taken from Palo Alto's Reference Architecture document listed in the notes section at the bottom of this article):

Shared design model as per Palo Alto's Reference Architecture

Microsoft also has a reference architecture document that talks through the deployment of virtual appliances, which can be found here: https://docs.microsoft.com/en-us/azure/architecture/reference-architectures/dmz/nva-ha

Below is a link to the ARM template I use.

PaloAlto-HA.json

Deployment of this template can be done by navigating to the Azure Portal (portal.azure.com), select Create a resource, type Template Deployment in the Azure Marketplace, click Create,  select Build your own template in the editor, and paste the code into the editor.

Alternatively, you can click this button here:

Here are some notes on what the parameters mean in the template:

VMsize: Per Palo Alto, the recommend VM sizes should be DS3, DS4, or DS5.  Documentation on this can be found here.

PASku: Here is where you can select to use bring-your-own-license or pay-as-you-go.  Plans are outlined here: https://azuremarketplace.microsoft.com/en-us/marketplace/apps/paloaltonetworks.vmseries-ngfw?tab=PlansAndPrice

PAVersion: The version of PanOS to deploy.
PACount: This defines how many virtual instances you want deployed and placed behind load balancers.

VNetName: The name of your virtual network you have created.

VNetRG: The name of the resource group your virtual network is in.  This may be the same as the Resource Group you are placing the Palos in, but this is a needed configurable option to prevent errors referencing a VNet in a different resource group.

envPrefix: All of the resources that get created (load balancer, virtual machines, public IPs, NICs, etc.) will use this naming nomenclature.

manPrivateIPPrefix, trustPrivateIPPrefix, untrustPrivateIPPrefix: Corresponding subnet address range.  These should be the first 3 octets of the range followed by a period.  For example, 10.5.6. would be a valid value.

manPrivateIPFirst, trustPrivateIPFirst, untrustPrivateIPFirst: The first usable IP address on the subnet specified.  For example, if my subnet is 10.4.255.0/24, I would need to specify 4 as my first usable address.

Username: this is the name of the privileged account that should be used to ssh and login to the PanOS web portal.

Password: Password to the privileged account used to ssh and login to the PanOS web portal.  Must be 31 characters or less due to Pan OS limitation.


Configure the Appliance

Once the virtual appliance has been deployed, we need to configure the Palo Alto device itself to enable connectivity on our Trust/Untrust interfaces.

Activate the licenses on the VM-Series firewall.

Follow these steps if using the BYOL version

  1. Create a Support Account.
  2. Register the VM-Series Firewall
    (with auth code)
    .
  3. On the firewall web interface, select Device tab -> Licenses
    and select Activate feature using authentication code.
  4. Enter the capacity auth-code that you registered on the support
    portal. The firewall will connect to the update server (updates.paloaltonetworks.com), and download
    the license and reboot automatically.  If this doesn't work, please continue below to configuring the interfaces of the device.
  5. Log back in to the web interface after reboot and confirm the following on the Dashboard:
    1. A valid serial number displays in Serial#.
      If the term Unknown displays, it means the device is not licensed. To view
      traffic logs on the firewall, you must install a valid capacity license.
    2. The VM Mode displays as Microsoft Azure.

Follow these steps if using the PAYG (Pay as you go) version

  1. Create a Support Account.
  2. Register the Usage-Based Model of
    the VM-Series Firewall in AWS and Azure (no auth code)
    .

Configure the Untrust/Trust interfaces

Configure the Untrust interface

  1. Select Network-> Interfaces ->Ethernet-> select the link for ethernet1/1 and configure as follows:
    1. Interface Type: Layer3 (default).
    2. On the Config tab, assign the interface to the Untrust-VR router.
    3. On the Config tab, expand the Security Zone drop-down and select New Zone. Define a new zone called Untrust, and then click OK.
  2. On the IPv4 tab, select DHCP Client if you plan to assign only one IP address on the interface. If you plan to assign more than one IP address select Static and manually enter the primary and secondary IP addresses assigned to the interface on the Azure portal.  The private IP address of the interface can be found by navigating to Virtual Machines -> YOURPALOMACHINE -> Networking and using the Private IP address specified on each tab.
    1. Note: Do not use the Public IP address to the Virtual Machine.  Azure automatically DNATs traffic to your private address so you will need to use the Private IP Address for your UnTrust interface.
  3. Clear the Automatically create default route to default gateway provided by server check box.
    1. Note: Disabling this option ensures that traffic handled by this interface does not flow directly to the default gateway in the VNet.
  4. Click OK

Note: For the untrust interface, within your Azure environment ensure you have a NSG associated to the untrust subnet or individual firewall interfaces as the template doesn't deploy this for you (I could add this in, but if you already had an NSG I don't want to overwrite it). As per Azure Load Balancer's documentation, you will need an NSG associated to the NICs or subnet to allow traffic in from the internet.

Configure the Trust Interface

  1. Select Network-> Interfaces ->Ethernet-> select the link for ethernet1/2 and configure as follows:
    1. Interface Type: Layer3 (default).
    2. On the Config tab, assign the interface to the Trust-VR router.
    3. On the Config tab, expand the Security Zone drop-down and select New Zone. Define a new zone called Trust, and then click OK.
  2. On the IPv4 tab, select DHCP Client if you plan to assign only one IP address on the interface. If you plan to assign more than one IP address select Static and manually enter the primary and secondary IP addresses assigned to the interface on the Azure portal. The private IP address of the interface can be found by navigating to Virtual Machines -> YOURPALOMACHINE -> Networking and using the Private IP address specified on each tab.
    1. Clear the Automatically create default route to default gateway provided by server check box.
      1. Note: Disabling this option ensures that traffic handled by this interface does not flow directly to the default gateway in the VNet.
  3. Click OK

Click Commit in the top right.  Verify that the link state for the interfaces is up (the interfaces should turn green in the Palo Alto user interface).

Define Static Routes

The Palo Alto will need to understand how to route traffic to the internet and how to route traffic to your subnets.  As you will see in this section, we will need two separate virtual routers to help handle the processing of health probes submitted from each of the Azure Load Balancers.

Create a new Virtual Router and  Static Route to the internet

  1. Select Network -> Virtual Router
  2. Click Add at the bottom
  3. Set the Name to Untrust-VR
  4. Select Static Routes -> IPv4 -> Add
  5. Create a Static Route to egress internet traffic
    1. Name: Internet
    2. Destination: 0.0.0.0/0
    3. Interface: ethernet 1/1
    4. Next Hop: IP Address
    5. IP Address: Use the IP address of the default gateway of your subnet the Untrust interface is deployed on
      1. Note: To find this, navigate to the Azure Portal (portal.azure.com) and select All Services -> Virtual Networks -> Your Virtual Network -> Subnets and use the first IP address of your subnet the untrust interface is on.  For example, is the address range of my subnet is 10.5.15.0/24, I would use 10.5.15.1 as my IP address.  If my subnet was 10.5.15.128/25, I would use 129 10.5.15.129 as my IP address
  6. Create a Static Route to move traffic from the internet to your trusted VR
    1. Name: Internal Routes
    2. Destination: your vnet address space
    3. Interface: None
    4. Next Hop: Next VR
      1. Trust-VR
  7. Click OK

Create a new Virtual Router and Static Route to your Azure Subnets

  1. Select Network -> Virtual Router
  2. Click Add at the bottom
  3. Set the Name to Trust-VR
  4. Select Static Routes -> IPv4 -> Add
  5. Create a Static Route to send traffic to Azure from your Trusted interface
    1. Name: AzureVNet
    2. Destination: your vnet address space
    3. Interface: ethernet 1/2
    4. Next Hop: IP Address
    5. IP Address: Use the IP address of the default gateway of your subnet the Trust interface is deployed on
      1. Note: To find this, navigate to the Azure Portal (portal.azure.com) and select All Services -> Virtual Networks -> Your Virtual Network -> Subnets and use the first IP address of your subnet the trust interface is on.  For example, if the address range of my subnet is 10.5.15.0/24, I would use 10.5.15.1 as my IP address.  If my subnet was 10.5.15.128/25, I would use 129 10.5.15.129 as my IP address
  6. Create a Static Route to move internet traffic received on Trust to your Untrust Virtual Router
    1. Name: Internet
    2. Destination: 0.0.0.0/0
    3. Interface: None
    4. Next Hop: Next VR
      1. Untrust-VR
  7. Click OK

Click Commit in the top right.

Configure Health Probes for Azure Load Balancers

If deploying the Scale-Out scenario, you will need to approve TCP probes from 168.63.129.16, which is the IP address of the Azure Load Balancer.  Azure health probes come from a specific IP address (168.63.129.16).  In this case, we need a static route to allow the response back to the load balancer.   For the purpose of this article, we will configure SSH on the Trust interface strictly for the Azure Load Balancer to contact to validate the Palo Alto instances are healthy.

Configure Palo Alto SSH Service for the interfaces

First we need to create an Interface Management Profile

  1. Select Network -> Network Profiles -> Interface Mgmt
  2. Click Add in the button left
  3. Use the following configuration
    1. Name: SSH-MP
    2. Administrative Management Services: SSH
    3. Permitted IP Addresses: 168.63.129.16/32
  4. Click OK

Next, we need to assign the profile to the Trust interface

  1. Select Network -> Interfaces ->select the link for ethernet1/2
  2. Select the Advanced tab
  3. Set the Management Profile to SSH-MP
  4. Click OK

Next, we need to assign the profile to the Untrust interface

  1. Select Network -> Interfaces ->select the link for ethernet1/1
  2. Select the Advanced tab
  3. Set the Management Profile to SSH-MP
  4. Click OK

Create a Static Route for the Azure Load Balancer Health Probes on the Untrust Interface

Next we need to tell the health probes to flow out of the Untrust interface due to our 0.0.0.0/0 rule.

  1. Select Network -> Virtual Router -> Untrust-VR
  2. Select Static Routes -> IPv4 -> Add
  3. Use the following configuration
    1. Name: AzureLBHealthProbe
    2. Destination: 168.63.129.16/32
    3. Interface: ethernet 1/1
    4. Next Hop: IP Address
    5. IP Address: Use the IP address of the default gateway of your subnet the Trust interface is deployed on
      1. Note: To find this, navigate to the Azure Portal (portal.azure.com) and select All Services -> Virtual Networks -> Your Virtual Network -> Subnets and use the first IP address of your subnet the trust interface is on.  For example, if the address range of my subnet is 10.5.15.0/24, I would use 10.5.15.1 as my IP address.  If my subnet was 10.5.15.128/25, I would use 129 10.5.15.129 as my IP address
  4. Click OK

Create a Static Route for the Azure Load Balancer Health Probes on the Trust Interface

Next we need to tell the health probes to flow out of the Trust interface due to our 0.0.0.0/0 rule.

  1. Select Network -> Virtual Router -> Trust-VR
  2. Select Static Routes -> IPv4 -> Add
  3. Use the following configuration
    1. Name: AzureLBHealthProbe
    2. Destination: 168.63.129.16/32
    3. Interface: ethernet 1/2
    4. Next Hop: IP Address
    5. IP Address: Use the IP address of the default gateway of your subnet the Trust interface is deployed on
      1. Note: To find this, navigate to the Azure Portal (portal.azure.com) and select All Services -> Virtual Networks -> Your Virtual Network -> Subnets and use the first IP address of your subnet the trust interface is on.  For example, if the address range of my subnet is 10.5.15.0/24, I would use 10.5.15.1 as my IP address.  If my subnet was 10.5.15.128/25, I would use 129 10.5.15.129 as my IP address
  4. Click OK

Click Commit in the top right.

Create a NAT rule for internal traffic destined to the internet

You will need to NAT all egress traffic destined to the internet via the address of the Untrust interface, so return traffic from the Internet comes back through the Untrust interface of the device.

  1. Navigate to Policies -> NAT
  2. Click Add
  3. On the General tab use the following configuration
    1. Name: UntrustToInternet
    2. Description: Rule to NAT all trusted traffic destined to the Internet to the Untrust interface
  4. On the Original Packet tab use the following configuration
    1. Source Zone: Click Add and select Trust
    2. Destination Zone: Untrust
    3. Destination Interface: ethernet 1/1
    4. Service: Check Any
    5. Source Address: Click Add, use the Internal Address space of your Trust zones
    6. Destination address: Check Any
  5. On the Translated Packet tab use the following configuration
    1. Translation Type: Dynamic IP and Port
    2. Address Type: Interface Address
    3. Interface: ethernet 1/1
    4.  IP Address: None
    5. Destination Address Translation Translation Type: None
  6. Click OK

Click Commit in the top right.

Update your Palo Alto appliance

By default, Palo Alto deploys 8.0.0 for the 8.0.X series and 8.1.0 for the 8.1.X series.  In this case, Palo Alto will strongly recommend you upgrade the appliance to the latest version of that series before helping you with support cases.

To do this, go to Device -> Dynamic Updates -> click Check Now in the bottom left and download the latest build from the list of available updates.

Please note: the update process will require a reboot of the device and can take 20 minutes or so.

Summary

At this point you should have a working scaled out Palo Alto deployment.  If all went well, I would recommend removing the public IP to the management interface or at least scoping it down to the single public IP address you are coming from.  You can find your public IP address by navigating here: https://jackstromberg.com/whats-my-ip-address/

References

Official documentation from Palo Alto on deploying the VM-Series on Azure (took me forever to find this and doesn't cover setting up the static routes or updating the appliance): https://docs.paloaltonetworks.com/vm-series/8-1/vm-series-deployment/set-up-the-vm-series-firewall-on-azure/deploy-the-vm-series-firewall-on-azure-solution-template.html

Official documentation from Palo Alto on Azure VM Sizing: https://knowledgebase.paloaltonetworks.com/KCSArticleDetail?id=kA10g000000ClD7CAK

Documentation on architecture for the VM-Series on Azure (click the little download button towards the top of the page to grab a copy of the PDF):  https://www.paloaltonetworks.com/resources/guides/azure-architecture-guide

Palo Alto Networks Visio & OmniGraffle Stencils: https://knowledgebase.paloaltonetworks.com/KCSArticleDetail?id=kA10g000000CmAJCA0

Neat video created by Palo Alto outlining the architecture of a scale-out VM-Series deployment: https://www.paloaltonetworks.com/resources/videos/vm-series-in-azure

Upcoming VMSS version of Palo Alto deployment: PaloAltoNetworks/azure-autoscaling: Azure autoscaling solution using VMSS (github.com)

Using Terraform with Azure VM Extensions

TLDR: There are two sections of this article; feel free to scroll down to the titles for the applicable section.

Using VM Extensions with Terraform to Domain Join Virtual Machines

VM Extensions are a fantastic way to yield post deployment configurations via template as code in Azure.  One of Azure's most common VM Extensions is the JoinADDomainExtension, which will join your Azure VM to an Active Directory machine after the machine has successfully been provisioned.  For the purposes of this artcicle, we will assume you have a VM called testvm in the East US region.

Typically, VM extensions can be configured via the following block of ARM Template code (a fully working example building the virtual and running the extension can be found here).

{
    "apiVersion": "2015-06-15",
    "type": "Microsoft.Compute/virtualMachines/extensions",
    "name": "testvm/joindomain",
    "location": "EastUS",
    "properties": {
        "publisher": "Microsoft.Compute",
        "type": "JsonADDomainExtension",
        "typeHandlerVersion": "1.3.2",
        "autoUpgradeMinorVersion": true,
        "settings": {
            "Name": "JACKSTROMBERG.COM",
            "OUPath": "OU=Users,OU=CustomOU,DC=jackstromberg,DC=com",
            "User": "JACKSTROMBERG.COM\\jack",
            "Restart": "true",
            "Options": "3"
        },
        "protectedSettings": {
            "Password": "SecretPassword!"
        }
    }
}

When looking at Terraform, the syntax is a bit different and there isn't much documentation on how to handle the settings and most importantly, the password/secret used when joining the machine to the domain.  In this case, here is working translation of the ARM template to Terraform.

resource "azurerm_virtual_machine_extension" "MYADJOINEDVMADDE" {
  name                 = "MYADJOINEDVMADDE"
  virtual_machine_id   = azurerm_virtual_machine.testvm.id
  publisher            = "Microsoft.Compute"
  type                 = "JsonADDomainExtension"
  type_handler_version = "1.3.2"

  # What the settings mean: https://docs.microsoft.com/en-us/windows/desktop/api/lmjoin/nf-lmjoin-netjoindomain

  settings = <<SETTINGS
    {
        "Name": "JACKSTROMBERG.COM",
        "OUPath": "OU=Users,OU=CustomOU,DC=jackstromberg,DC=com",
        "User": "JACKSTROMBERG.COM\\jack",
        "Restart": "true",
        "Options": "3"
    }
SETTINGS
  protected_settings = <<PROTECTED_SETTINGS
    {
      "Password": "SecretPassword!"
    }
  PROTECTED_SETTINGS
  depends_on = ["azurerm_virtual_machine.MYADJOINEDVM"]
}

The key pieces here are the SETTINGS and PROTECTED_SETTINGS blocks that allow you to pass the traditional JSON attributes as you would in the ARM template.  Luckily, terraform does a somewhat decent job documentation this on their public docs here, so if you have any additional questions on any of the attributes you can find them all here: https://www.terraform.io/docs/providers/azurerm/r/virtual_machine_extension.html

The last block of code I have specified at the very end is a depends_on statement.  This simpy ensures that this resource is not created until the Virtual Machine itself has successfully been provisioned and can be very beneficial if you have other scripts that may need to run prior to domain join.

Using VM Extensions with Terraform to customize a machine post deployment

Continuing along the lines of customizing a virtual machine post deployment, Azure has a handy dandy extension called CustomScriptExtension.  What this extension does is allow you to arbitrarily download and execute files (typically PowerShell) after a virtual machine has been deployed.  Unlike the domain join example above, Azure has extensive documentation on this extension and provides support for both Windows and Linux (click the links for Windows or Linux to see the Azure docs on this).

Following similar suite as the above Domain Join example, within the ARM world, we can leverage the following template to execute code post deployment:

{
    "apiVersion": "2018-06-01",
    "type": "Microsoft.Compute/virtualMachines/extensions",
    "name": "testvm",
    "location": "EastUS",
    "properties": {
        "publisher": "Microsoft.Azure.Extensions",
        "type": "CustomScript",
        "typeHandlerVersion": "2.1.3",
        "autoUpgradeMinorVersion": true,
        "settings": {
            "fileUris": [
                "script location"
            ]
        },
        "protectedSettings": {
            "commandToExecute": "myExecutionCommand",
            "storageAccountName": "mystorageaccountname",
            "storageAccountKey": "myStorageAccountKey"
        }
    }
}

When we look at the translation over to Terraform, for the most part the structure is the exact same.  Similar to our Active Directory Domain Join script above, the tricky piece is knowing to use the PROTECTED_SETTINGS to encapsulate our block of code that in this case authenticates to the Azure Storage Account to pull down our post-deployment script.  Now per the Azure documentation, those variables are optional; if the scripts you have don't contain sensitive information, you are more than welcome to simply specify the fileUri and specify the commandToExecute via the regular SETTINGS block.

resource "azurerm_virtual_machine_extension" "MYADJOINEDVMCSE" {
  name                 = "MYADJOINEDVMCSE"
  virtual_machine_id   = azurerm_virtual_machine.testvm.id
  publisher            = "Microsoft.Azure.Extensions"
  type                 = "CustomScript"
  type_handler_version = "2.1.3"

  # CustomVMExtension Documetnation: https://docs.microsoft.com/en-us/azure/virtual-machines/extensions/custom-script-windows

  settings = <<SETTINGS
    {
        "fileUris": ["https://mystorageaccountname.blob.core.windows.net/postdeploystuff/post-deploy.ps1"]
    }
SETTINGS
  protected_settings = <<PROTECTED_SETTINGS
    {
      "commandToExecute": "powershell -ExecutionPolicy Unrestricted -File post-deploy.ps1",
      "storageAccountName": "mystorageaccountname",
      "storageAccountKey": "myStorageAccountKey"
    }
  PROTECTED_SETTINGS
  depends_on = ["azurerm_virtual_machine_extension.MYADJOINEDVMADDE"]
}

At this point you should be able to leverage both extensions to join a machine to the domain and then customize virtually any aspect of the machine thereafter.

The only thing I'll leave you with is typically it is recommended to not leave clear-text passwords scattered through your templates.  In either case, I highly recommend looking at leveraging Azure Key Vault or an alternative solution that can ensure proper security in handling those secrets.

Notes

Aside from Terraform, one question I've received is what happens if the extension runs against a machine that is already domain joined?
A: The VM extension will still install against the Azure Virtual Machine, but will immediately return back the following response: "Join completed for Domain 'yourdomain.com'"

Specifically, the following is returned back to Azure: [{"version":"1","timestampUTC":"2019-03-27T16:30:57.9274393Z","status":{"name":"ADDomainExtension","operation":"Join Domain/Workgroup","status":"success","code":0,"formattedMessage":{"lang":"en-US","message":"Join completed for Domain 'yourdomain.com'"},"substatus":null}}]

What does Options mean for domain join?

A: Copied from here: The options are a set of bit flags that define the join options. Default value of 3 is a combination of NETSETUP_JOIN_DOMAIN (0x00000001) & NETSETUP_ACCT_CREATE (0x00000002) i.e. will join the domain and create the account on the domain. For more information see https://msdn.microsoft.com/en-us/library/aa392154(v=vs.85).aspx

Uninstall all Azure PowerShell Modules

With Azure PowerShell modules changing all the time and the recent introduction of the PowerShell modules being renamed from AzureRm to Az, you may want to totally uninstall all modules and reinstall to make sure you are using the latest and greatest modules.

To do so, StackOverflow user BlueSky, wrote a handy dandy script that will go through and cleanup all the Azure(RM)(AD) modules.  Simply open up PowerShell as an Administrator and execute the following PowerShell workflow/commands:

workflow Uninstall-AzureModules
{
    $Modules = @()
    $Modules += (Get-Module -ListAvailable Azure*).Name
    $Modules += (Get-Module -ListAvailable Az.*).Name
    Foreach -parallel ($Module in ($Modules | Get-Unique))
    { 
        Write-Output ("Uninstalling: $Module")
        Uninstall-Module $Module -Force
    }
}
Uninstall-AzureModules
Uninstall-AzureModules   #second invocation to truly remove everything

The thing about the PowerShell script above being a workflow is this allows you to remove all the modules in parallel vs one-by-one.  Here's a screenshot of the script in action.

Hope this helps!

Deploying Drupal on an Azure App Service Linux Docker Container

From a performance perspective, PHP applications running on Azure App Services tend to perform better on Linux than Windows.  While Azure provides a Drupal template in their Marketplace, it deploys to a regular Windows based App Service and installs version 8.3.3 (where as of the time of writing this article; 9/10/2018, the latest Drupal version is 8.6.1)

In this case, Microsoft has published a set of templates that provide flexibility to choose the Drupal version, deploy nginx, install PHP, and allow flexibility in installing any modules.  The templates are currently deployed and maintenace on GitHub, which can be found here: https://github.com/Azure/app-service-quickstart-docker-images/tree/master/drupal-nginx-fpm

So let's get started!

Download and install prerequisites:

  1. Download and install Git
  2. Download and install Docker
    1. Note: The above link is for Windows, here are the links to the other distributions for Docker: https://store.docker.com/search?offering=community&type=edition
    2. Note: On windows I recommend running the command git config core.autocrlf true to prevent issues with weird character returns.  Check out this awesome blog article by Tim Clem on why this is recommended: https://adaptivepatchwork.com/2012/03/01/mind-the-end-of-your-line/
  3. Download and install Visual Studio Code (free lightweight code editor for Windows, Linux, and Mac)

Note: I'm using a Windows 10 machine while writing this tutorial.  There will be some steps, like running Git Bash on Windows vs running Git natively on Linux.  Likely, you can just run Git from a regular terminal session and you'll be fine on the Linux/Mac side.

Clone the GitHub template

  1. Open up Git Bash
  2. Create a new directory for our project
    1. mkdir Drupal-Azure
    2. cd Drupal-Azure
  3. Clone the GitHub templat
    1. git clone https://github.com/Azure/app-service-quickstart-docker-images.git --config core.autocrlf=input
      1. Note: Unfortunately, we cannot just clone a specific directory easily, we have to download all the files.  This particular GitHub project contains several projects, so it'll be about a 50MB download as a heads up 
      2. Note: The --config core.autocrlf=input is used to prevent windows from using crlf vs lf's for line returns.  If you don't specify this, you might receive the following error if you tried running your docker container after being built:
        1. standard_init_linux.go:190: exec user process caused "no such file or directory"
  4. Navigate into the Drupal directory
    1. cd app-service-quickstart-docker-images/drupal-nginx-fpm/0.45

Modify the scripts to your desire

I personally prefer not to have PHPMyAdmin or MariaDB installed as I will leverage Azure MySQL PaaS services for the database.  In this case, I went ahead and modified the Dockerfile document accordingly.

Build the Docker container

Execute the following command to build your container:

docker build -t jackdrupalregistry.azurecr.io/azuredrupal:test .

Note: The . at the end is needed

Note: When building docker images, the repository name must be lowercase

Create Azure Container Registries

Select All Services -> Azure Container Registries.  Select Add and create a new container registry

Push the Docker container to your Azure Container Registry

  1. Navigate to  All Services -> Azure Container Registries -> Your Registry -> Access Keys
  2. Check Enable for Admin user
  3. Go back to Git Bash and execute the following commands
  4. Login to docker
    1. Execute the command:
      1. docker login jackdrupalregistry.azurecr.io -u yourusername -p yourpassword
  5. Push the image up to Azure Container Registry
    1. Execute the command:
      1. docker push jackdrupalregistry.azurecr.io/azuredrupal:test

Deploy the web app

Navigate to Create a resource -> Web App.  Select Docker as the OS type, select Configure container, and leverage the following settings:

  • Image Source: Azure Container Registry
  • Registry: jackdrupalregistry
  • Image: azuredrupal
  • Tag: 0.45

Navigate to All Services -> App Services -> Your App Service -> Application settings and set WEBSITES_ENABLE_APP_SERVICE_STORAGE to true, and click Save to help ensure data persists.  Essentially, anything you write to /home will persist.  Anything else will be reset when the container gets rebuilt.

Create a MySQL Database

Navigate to All Services -> App Services -> Your App Service -> Properties and write down the Outbound IP Addresses; we will use these later.

Select Create a Service -> Azure Database for MySQL -> Create -> create a blank database

Select Connection security and enter the Outbound IP Addresses from your App Service and click Save

Note: I haven't found a way to get Drupal to allow SSL Connections, which would certainly be a best practice.  In this case, on the same Connection security blade, go ahead and set Enforce SSL Connection to Disabled.  If someone knows how to do this, please put a comment below, so I can update this guide.

Go back to the Overview section and write down the Server admin login name and Server name; we will use these during the Drupal setup

Configure Drupal

At this point, go ahead and browse out to your App Service.  You should have all the necessary details to complete the installation setup.  Once completed, you should see the Welcome to Drupal Side splash page.

Notes:

Email:

Upon installation of Drupal you'll receive an error that Drupal cannot send email.  Azure Web Apps don't allow open relay, so you will need to use a 3rd party mail service like SendGrid or Mailchimp to relay emails.

Helpful docker commands:

docker images

docker run -it azuredrupal:test

docker ps -a

docker rm containeridea

docker rmi image

Other deployment strategies:

In addition to deploying through the portal, you could easily deploy via PowerShell, Azure CLI, or ARM template.  Here's an Azure CLI 2.0 example of how to deploy (note: the script below uses PowerShell variables for demonstration, please substitute those as needed):

$resourceGroupName = "Drupal-Test"
$planName = $resourceGroupName
$appName = $planName
$containerName = "appsvcorg/drupal-nginx-fpm:0.45"
$location = "West US"

az group create -l $location -n $resourceGroupName

az appservice plan create `
    -n $planName `
    -g $resourceGroupName `
    --sku S3 --is-linux 

az webapp create `
    --resource-group $resourceGroupName `
    --plan $planName `
    --name $appName `
    --deployment-container-image-name $containerName

az webapp config appsettings set `
    --resource-group $resourceGroupName `
    --name $appName `
    --settings WEBSITES_ENABLE_APP_SERVICE_STORAGE="true"

az webapp config appsettings set `
    --resource-group $resourceGroupName `
    --name $appName `
    --settings WEBSITES_CONTAINER_START_TIME_LIMIT="600"

# please modify DB settings according to current condition
az webapp config appsettings set `
        --resource-group $resourceGroupName `
        --name $appName `
        --settings DATABASE_HOST="drupaldb.mysql.database.azure.com" `
            DATABASE_NAME="drupaldb" `
            DATABASE_USERNAME="user@drupaldb" `
            DATABASE_PASSWORD="abcdefghijklmnopqrstuvwxyz"

How to hide users from the GAL in Office 365 synchronized from on-premises

Hiding users from the Global Address List (GAL) is a fairly straight forward when the user is a cloud account. Simply "Hide from address list" from the Exchange Online console or run some quick powershell:

$LiveCred = Get-Credential
$Session = New-PSSession -ConfigurationName Microsoft.Exchange -ConnectionUri https://ps.outlook.com/powershell/ -Credential $LiveCred -Authentication Basic -AllowRedirection
Import-PSSession $Session 
Set-Mailbox -Identity [email protected] -HiddenFromAddressListsEnabled $true

Hiding users from the GAL is fairly straight forward when the user is synchronized from on-premises as well.  Simply edit the attribute of the user object, set msExchHideFromAddressLists  to True, and do a sync.  The problem though is what happens if you don't have the msExchHideFromAddressLists attribute in Active Directory?

Well, you can either extend your Active Directory Schema for Exchange, which is not something that you can easily roll back if something goes wrong and arguably adds a ton of attributes that likely will be never used.  Or, you can simply create a custom sync rule within Azure AD Connect that flows the value from a different attribute.

This article will go over how to sync a custom attribute from on-premises to Azure AD to hide a user from the GAL, without the need of extending your Active Directory schema.  In this case, we are going to use an attribute called msDS-cloudExtensionAttributeX (where X is the number of the attribute that is free/not being used within your directory).  The msDS-cloudExtensionAttribute(s) were introduced in Windows Server 2012 and has 20 different numbers to allow flexibility for these types of scenarios.  Now some customers may gravitate towards using a different attribute like showInAddressBook.  The problem with the showInAddressBook is this attribute is referenced by very old versions of Exchange (which I'm sure people would never be running 😉 ) and is looking for the format of the common name of an object (not what we want).  In this case, easiest way to move forward is to simply use the msDS-cloudExtensionAttributes.

Step 1: Scope in the msDS-cloudExtensionAttribute for Azure AD Connect

Open the Azure AD Connect Synchronization Service

Navigate to the Connectors tab, select your Active Directory (not the domain.onmicrosoft.com entry), and select Properties

In the top right, click on Show All, scroll down and find msDS-CloudExtensionAttribute1 (you can use any of the numbers 1-20, just make sure to check the box you are using), and select OK

Step 2: Create a custom sync rule

Open up the Azure AD Connect Synchronization Rules Editor

Click on the Add new rule button (make sure direction in the top left shows Inbound)

Enter the following for the description:

Name: Hide user from GAL
Description: If msDS-CloudExtensionAttribute1 attribute is set to HideFromGAL, hide from Exchange Online GAL
Connected System: Your Active Directory Domain Name
Connected System Object Type: user
Metaverse Object Type: person
Link Type: Join
Precedence: 50 (this can be any number less than 100.  Just make sure you don't duplicate numbers if you have other custom rules or you'll receive a dead-lock error from SQL Server)

Click Next > on Scoping filter and Join rules, those can remain blank

Enter the following Transformation page, click the Add transformation button, fill out the form with the values below, and then click Add
FlowType: Expression
Target Attribute: msExchHideFromAddressLists
Source:

IIF(IsPresent([msDS-cloudExtensionAttribute1]),IIF([msDS-cloudExtensionAttribute1]="HideFromGAL",True,False),NULL)


Step 3: Perform an initial sync

Open up Windows PowerShell on the Azure AD Connect Server

Execute the following command: Start-ADSyncSyncCycle -PolicyType Initial

Step 4: Hide a user from Active Directory

Open Active Directory Users and Computers, find the user you want to hide from the GAL, right click select Properties

Select the Attributes Editor tab, find msDS-cloudExtensionAttribute1, and enter the value HideFromGAL (note, this is case sensitive), click OK and OK to close out of the editor. 

Note: if you don't see the Attribute Editor tab in the previous step, within Active Directory Users and Computers, click on View in the top menu and select Advanced Features

Step 5: Validation

Open the Azure AD Connect Synchronization Service

On the Operations tab, if you haven't seen a Delta Synchronization, manually trigger the Delta sync to pick up the change you made in Active Directory


Select the Export for the domain.onmicrosoft.com connecter and you should see 1 Updates

Select the user account that is listed and click Properties.  On the Connector Space Object Properties, you should see Azure AD Connect triggered an add to Azure AD to set msExchHideFromAddressLists set to true

There ya have it!  An easy way to hide users from the GAL with minimal risk to ongoing operations.  Due to the way Azure AD Connect upgrades, our sync rule will persist fine during regular updates/patches released.