Here is a recap of some of the reflections I have with deploying Palo Alto's VM-Series Virtual Appliance on Azure. This is more of a reflection of the steps I took rather than a guide, but you can use the information below as you see fit. At a high level, you will need to deploy the device on Azure and then configure the internal "guts" of the Palo Alto to allow it to route traffic properly on your Virtual Network (VNet) in Azure. The steps outlined should work for both the 8.0 and 8.1 versions of the Palo Alto VM-Series appliance.
Please note, this tutorial also assumes you are looking to deploy a scale-out architecture. This can help ensure a single instance doesn't get overwhelmed with the amount of bandwidth you are trying to push through it. If you are looking for a single instance, you can still follow along.
Deploy the Appliance in Azure
In deploying the Virtual Palo Altos, the documentation recommends to create them via the Azure Marketplace (which can be found here: https://azuremarketplace.microsoft.com/en-us/marketplace/apps/paloaltonetworks.vmseries-ngfw?tab=Overview). Personally, I'm not a big fan of deploying the appliance this way as I don't have as much control over naming conventions, don't have the ability to deploy more than one appliance for scale, cannot specify my availability set, cannot leverage managed disks, etc. In addition, I noticed a really strange error that if you specify a password greater than 31 characters, the Palo Alto devices flat out won't deploy on Azure. In this case, I've written a custom ARM template that leverages managed disks, availability sets, consistent naming nomenclature, proper VM sizing, and most importantly, let you define how many virtual instances you'd like to deploy for scaling.
Note: this article doesn't cover the concept of using Panorama, but that would centrally manage each of the scale-out instances in a "single pane of glass". Below, we will cover setting up a node manually to get it working. It is possible to create a base-line configuration file that joins Panorama post-deployment to bootstrap the nodes upon deployment of the ARM template. The bootstrap file is not something I've incorporated into this template, but the template could easily be modified to do so.
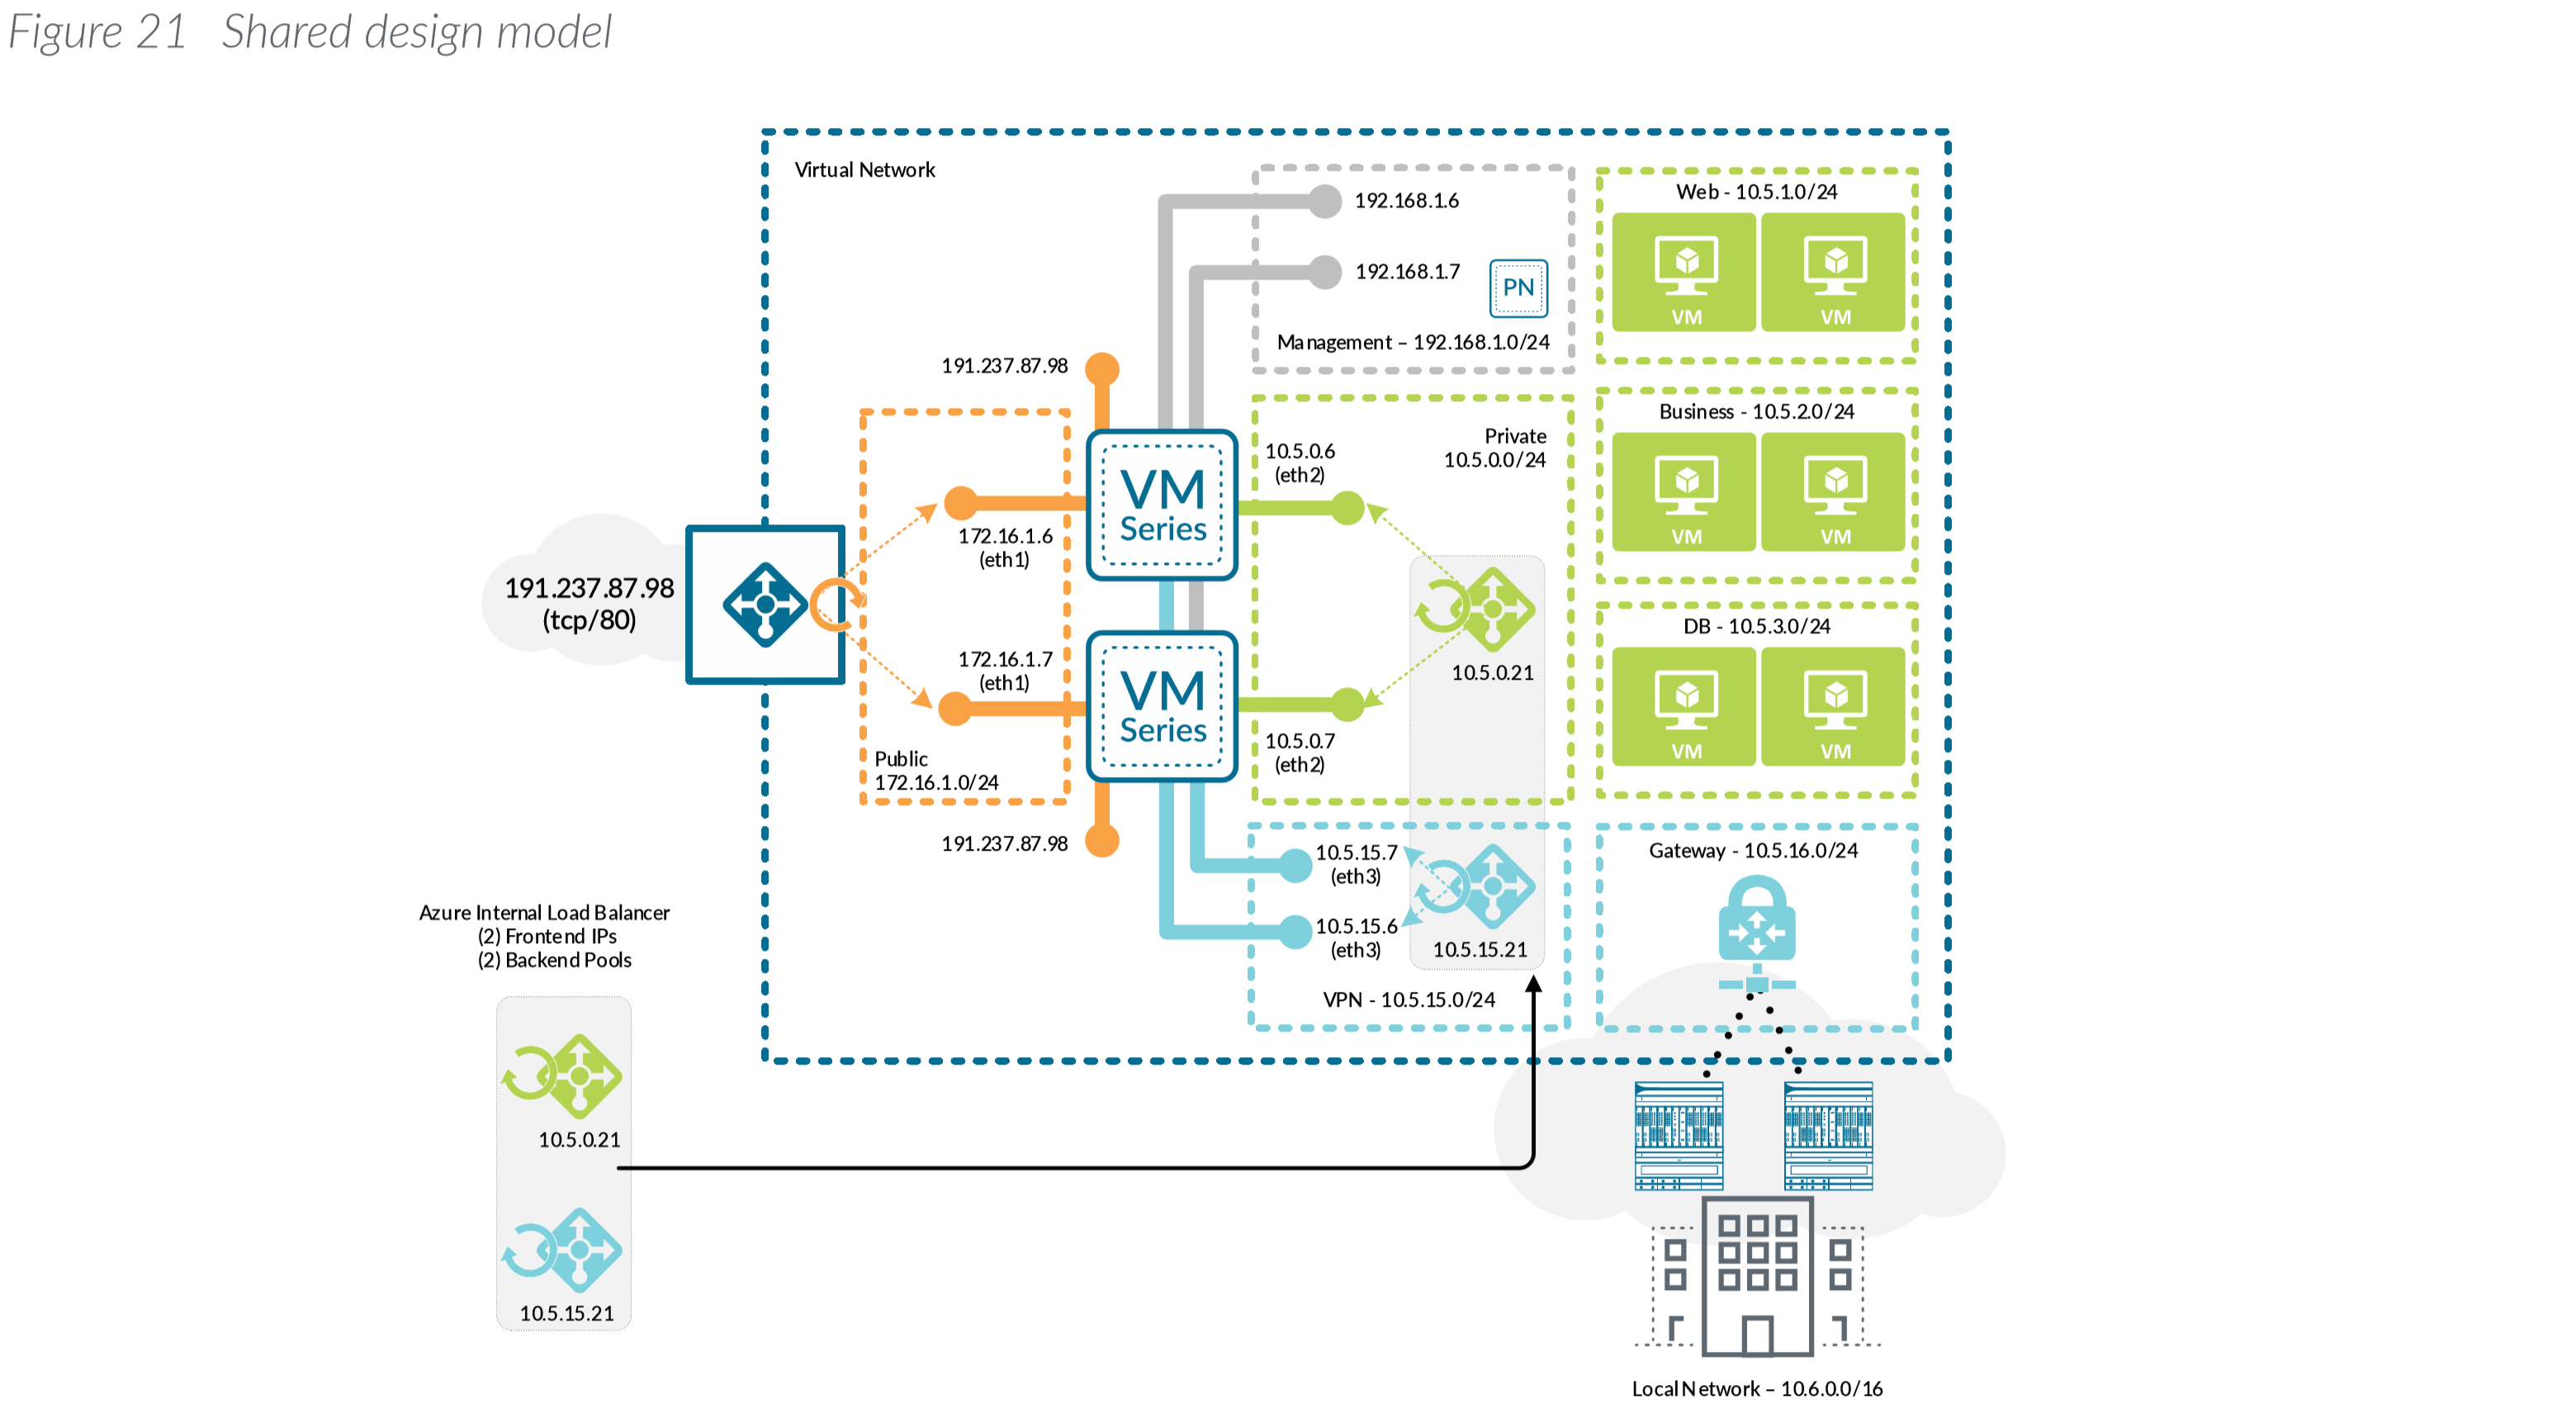
With the above said, this article will cover what Palo Alto considers their Shared design model. Here is an example of what this visually looks like (taken from Palo Alto's Reference Architecture document listed in the notes section at the bottom of this article):
Microsoft also has a reference architecture document that talks through the deployment of virtual appliances, which can be found here: https://docs.microsoft.com/en-us/azure/architecture/reference-architectures/dmz/nva-ha
Below is a link to the ARM template I use.
Deployment of this template can be done by navigating to the Azure Portal (portal.azure.com), select Create a resource, type Template Deployment in the Azure Marketplace, click Create, select Build your own template in the editor, and paste the code into the editor.
Alternatively, you can click this button here:


Here are some notes on what the parameters mean in the template:
VMsize: Per Palo Alto, the recommend VM sizes should be DS3, DS4, or DS5. Documentation on this can be found here.
PASku: Here is where you can select to use bring-your-own-license or pay-as-you-go. Plans are outlined here: https://azuremarketplace.microsoft.com/en-us/marketplace/apps/paloaltonetworks.vmseries-ngfw?tab=PlansAndPrice
PAVersion: The version of PanOS to deploy.
PACount: This defines how many virtual instances you want deployed and placed behind load balancers.
VNetName: The name of your virtual network you have created.
VNetRG: The name of the resource group your virtual network is in. This may be the same as the Resource Group you are placing the Palos in, but this is a needed configurable option to prevent errors referencing a VNet in a different resource group.
envPrefix: All of the resources that get created (load balancer, virtual machines, public IPs, NICs, etc.) will use this naming nomenclature.
manPrivateIPPrefix, trustPrivateIPPrefix, untrustPrivateIPPrefix: Corresponding subnet address range. These should be the first 3 octets of the range followed by a period. For example, 10.5.6. would be a valid value.
manPrivateIPFirst, trustPrivateIPFirst, untrustPrivateIPFirst: The first usable IP address on the subnet specified. For example, if my subnet is 10.4.255.0/24, I would need to specify 4 as my first usable address.
Username: this is the name of the privileged account that should be used to ssh and login to the PanOS web portal.
Password: Password to the privileged account used to ssh and login to the PanOS web portal. Must be 31 characters or less due to Pan OS limitation.
Configure the Appliance
Once the virtual appliance has been deployed, we need to configure the Palo Alto device itself to enable connectivity on our Trust/Untrust interfaces.
Activate the licenses on the VM-Series firewall.
Follow these steps if using the BYOL version
- Create a Support Account.
- Register the VM-Series Firewall
(with auth code). - On the firewall web interface, select Device tab -> Licenses
and select Activate feature using authentication code. - Enter the capacity auth-code that you registered on the support
portal. The firewall will connect to the update server (updates.paloaltonetworks.com), and download
the license and reboot automatically. If this doesn't work, please continue below to configuring the interfaces of the device. - Log back in to the web interface after reboot and confirm the following on the Dashboard:
- A valid serial number displays in Serial#.
If the term Unknown displays, it means the device is not licensed. To view
traffic logs on the firewall, you must install a valid capacity license. - The VM Mode displays as Microsoft Azure.
- A valid serial number displays in Serial#.
Follow these steps if using the PAYG (Pay as you go) version
- Create a Support Account.
- Register the Usage-Based Model of
the VM-Series Firewall in AWS and Azure (no auth code).
Configure the Untrust/Trust interfaces
Configure the Untrust interface
- Select Network-> Interfaces ->Ethernet-> select the link for ethernet1/1 and configure as follows:
- Interface Type: Layer3 (default).
- On the Config tab, assign the interface to the Untrust-VR router.
- On the Config tab, expand the Security Zone drop-down and select New Zone. Define a new zone called Untrust, and then click OK.
- On the IPv4 tab, select DHCP Client if you plan to assign only one IP address on the interface. If you plan to assign more than one IP address select Static and manually enter the primary and secondary IP addresses assigned to the interface on the Azure portal. The private IP address of the interface can be found by navigating to Virtual Machines -> YOURPALOMACHINE -> Networking and using the Private IP address specified on each tab.
- Note: Do not use the Public IP address to the Virtual Machine. Azure automatically DNATs traffic to your private address so you will need to use the Private IP Address for your UnTrust interface.
- Clear the Automatically create default route to default gateway provided by server check box.
- Note: Disabling this option ensures that traffic handled by this interface does not flow directly to the default gateway in the VNet.
- Click OK
Note: For the untrust interface, within your Azure environment ensure you have a NSG associated to the untrust subnet or individual firewall interfaces as the template doesn't deploy this for you (I could add this in, but if you already had an NSG I don't want to overwrite it). As per Azure Load Balancer's documentation, you will need an NSG associated to the NICs or subnet to allow traffic in from the internet.
Configure the Trust Interface
- Select Network-> Interfaces ->Ethernet-> select the link for ethernet1/2 and configure as follows:
- Interface Type: Layer3 (default).
- On the Config tab, assign the interface to the Trust-VR router.
- On the Config tab, expand the Security Zone drop-down and select New Zone. Define a new zone called Trust, and then click OK.
- On the IPv4 tab, select DHCP Client if you plan to assign only one IP address on the interface. If you plan to assign more than one IP address select Static and manually enter the primary and secondary IP addresses assigned to the interface on the Azure portal. The private IP address of the interface can be found by navigating to Virtual Machines -> YOURPALOMACHINE -> Networking and using the Private IP address specified on each tab.
- Clear the Automatically create default route to default gateway provided by server check box.
- Note: Disabling this option ensures that traffic handled by this interface does not flow directly to the default gateway in the VNet.
- Clear the Automatically create default route to default gateway provided by server check box.
- Click OK
Click Commit in the top right. Verify that the link state for the interfaces is up (the interfaces should turn green in the Palo Alto user interface).
Define Static Routes
The Palo Alto will need to understand how to route traffic to the internet and how to route traffic to your subnets. As you will see in this section, we will need two separate virtual routers to help handle the processing of health probes submitted from each of the Azure Load Balancers.
Create a new Virtual Router and Static Route to the internet
- Select Network -> Virtual Router
- Click Add at the bottom
- Set the Name to Untrust-VR
- Select Static Routes -> IPv4 -> Add
- Create a Static Route to egress internet traffic
- Name: Internet
- Destination: 0.0.0.0/0
- Interface: ethernet 1/1
- Next Hop: IP Address
- IP Address: Use the IP address of the default gateway of your subnet the Untrust interface is deployed on
- Note: To find this, navigate to the Azure Portal (portal.azure.com) and select All Services -> Virtual Networks -> Your Virtual Network -> Subnets and use the first IP address of your subnet the untrust interface is on. For example, is the address range of my subnet is 10.5.15.0/24, I would use 10.5.15.1 as my IP address. If my subnet was 10.5.15.128/25, I would use 129 10.5.15.129 as my IP address
- Create a Static Route to move traffic from the internet to your trusted VR
- Name: Internal Routes
- Destination: your vnet address space
- Interface: None
- Next Hop: Next VR
- Trust-VR
- Click OK
Create a new Virtual Router and Static Route to your Azure Subnets
- Select Network -> Virtual Router
- Click Add at the bottom
- Set the Name to Trust-VR
- Select Static Routes -> IPv4 -> Add
- Create a Static Route to send traffic to Azure from your Trusted interface
- Name: AzureVNet
- Destination: your vnet address space
- Interface: ethernet 1/2
- Next Hop: IP Address
- IP Address: Use the IP address of the default gateway of your subnet the Trust interface is deployed on
- Note: To find this, navigate to the Azure Portal (portal.azure.com) and select All Services -> Virtual Networks -> Your Virtual Network -> Subnets and use the first IP address of your subnet the trust interface is on. For example, if the address range of my subnet is 10.5.15.0/24, I would use 10.5.15.1 as my IP address. If my subnet was 10.5.15.128/25, I would use 129 10.5.15.129 as my IP address
- Create a Static Route to move internet traffic received on Trust to your Untrust Virtual Router
- Name: Internet
- Destination: 0.0.0.0/0
- Interface: None
- Next Hop: Next VR
- Untrust-VR
- Click OK
Click Commit in the top right.
Configure Health Probes for Azure Load Balancers
If deploying the Scale-Out scenario, you will need to approve TCP probes from 168.63.129.16, which is the IP address of the Azure Load Balancer. Azure health probes come from a specific IP address (168.63.129.16). In this case, we need a static route to allow the response back to the load balancer. For the purpose of this article, we will configure SSH on the Trust interface strictly for the Azure Load Balancer to contact to validate the Palo Alto instances are healthy.
Configure Palo Alto SSH Service for the interfaces
First we need to create an Interface Management Profile
- Select Network -> Network Profiles -> Interface Mgmt
- Click Add in the button left
- Use the following configuration
- Name: SSH-MP
- Administrative Management Services: SSH
- Permitted IP Addresses: 168.63.129.16/32
- Click OK
Next, we need to assign the profile to the Trust interface
- Select Network -> Interfaces ->select the link for ethernet1/2
- Select the Advanced tab
- Set the Management Profile to SSH-MP
- Click OK
Next, we need to assign the profile to the Untrust interface
- Select Network -> Interfaces ->select the link for ethernet1/1
- Select the Advanced tab
- Set the Management Profile to SSH-MP
- Click OK
Create a Static Route for the Azure Load Balancer Health Probes on the Untrust Interface
Next we need to tell the health probes to flow out of the Untrust interface due to our 0.0.0.0/0 rule.
- Select Network -> Virtual Router -> Untrust-VR
- Select Static Routes -> IPv4 -> Add
- Use the following configuration
- Name: AzureLBHealthProbe
- Destination: 168.63.129.16/32
- Interface: ethernet 1/1
- Next Hop: IP Address
- IP Address: Use the IP address of the default gateway of your subnet the Trust interface is deployed on
- Note: To find this, navigate to the Azure Portal (portal.azure.com) and select All Services -> Virtual Networks -> Your Virtual Network -> Subnets and use the first IP address of your subnet the trust interface is on. For example, if the address range of my subnet is 10.5.15.0/24, I would use 10.5.15.1 as my IP address. If my subnet was 10.5.15.128/25, I would use 129 10.5.15.129 as my IP address
- Click OK
Create a Static Route for the Azure Load Balancer Health Probes on the Trust Interface
Next we need to tell the health probes to flow out of the Trust interface due to our 0.0.0.0/0 rule.
- Select Network -> Virtual Router -> Trust-VR
- Select Static Routes -> IPv4 -> Add
- Use the following configuration
- Name: AzureLBHealthProbe
- Destination: 168.63.129.16/32
- Interface: ethernet 1/2
- Next Hop: IP Address
- IP Address: Use the IP address of the default gateway of your subnet the Trust interface is deployed on
- Note: To find this, navigate to the Azure Portal (portal.azure.com) and select All Services -> Virtual Networks -> Your Virtual Network -> Subnets and use the first IP address of your subnet the trust interface is on. For example, if the address range of my subnet is 10.5.15.0/24, I would use 10.5.15.1 as my IP address. If my subnet was 10.5.15.128/25, I would use 129 10.5.15.129 as my IP address
- Click OK
Click Commit in the top right.
Create a NAT rule for internal traffic destined to the internet
You will need to NAT all egress traffic destined to the internet via the address of the Untrust interface, so return traffic from the Internet comes back through the Untrust interface of the device.
- Navigate to Policies -> NAT
- Click Add
- On the General tab use the following configuration
- Name: UntrustToInternet
- Description: Rule to NAT all trusted traffic destined to the Internet to the Untrust interface
- On the Original Packet tab use the following configuration
- Source Zone: Click Add and select Trust
- Destination Zone: Untrust
- Destination Interface: ethernet 1/1
- Service: Check Any
- Source Address: Click Add, use the Internal Address space of your Trust zones
- Destination address: Check Any
- On the Translated Packet tab use the following configuration
- Translation Type: Dynamic IP and Port
- Address Type: Interface Address
- Interface: ethernet 1/1
- IP Address: None
- Destination Address Translation Translation Type: None
- Click OK
Click Commit in the top right.
Update your Palo Alto appliance
By default, Palo Alto deploys 8.0.0 for the 8.0.X series and 8.1.0 for the 8.1.X series. In this case, Palo Alto will strongly recommend you upgrade the appliance to the latest version of that series before helping you with support cases.
To do this, go to Device -> Dynamic Updates -> click Check Now in the bottom left and download the latest build from the list of available updates.
Please note: the update process will require a reboot of the device and can take 20 minutes or so.
Summary
At this point you should have a working scaled out Palo Alto deployment. If all went well, I would recommend removing the public IP to the management interface or at least scoping it down to the single public IP address you are coming from. You can find your public IP address by navigating here: https://jackstromberg.com/whats-my-ip-address/
References
Official documentation from Palo Alto on deploying the VM-Series on Azure (took me forever to find this and doesn't cover setting up the static routes or updating the appliance): https://docs.paloaltonetworks.com/vm-series/8-1/vm-series-deployment/set-up-the-vm-series-firewall-on-azure/deploy-the-vm-series-firewall-on-azure-solution-template.html
Official documentation from Palo Alto on Azure VM Sizing: https://knowledgebase.paloaltonetworks.com/KCSArticleDetail?id=kA10g000000ClD7CAK
Documentation on architecture for the VM-Series on Azure (click the little download button towards the top of the page to grab a copy of the PDF): https://www.paloaltonetworks.com/resources/guides/azure-architecture-guide
Palo Alto Networks Visio & OmniGraffle Stencils: https://knowledgebase.paloaltonetworks.com/KCSArticleDetail?id=kA10g000000CmAJCA0
Neat video created by Palo Alto outlining the architecture of a scale-out VM-Series deployment: https://www.paloaltonetworks.com/resources/videos/vm-series-in-azure
Upcoming VMSS version of Palo Alto deployment: PaloAltoNetworks/azure-autoscaling: Azure autoscaling solution using VMSS (github.com)