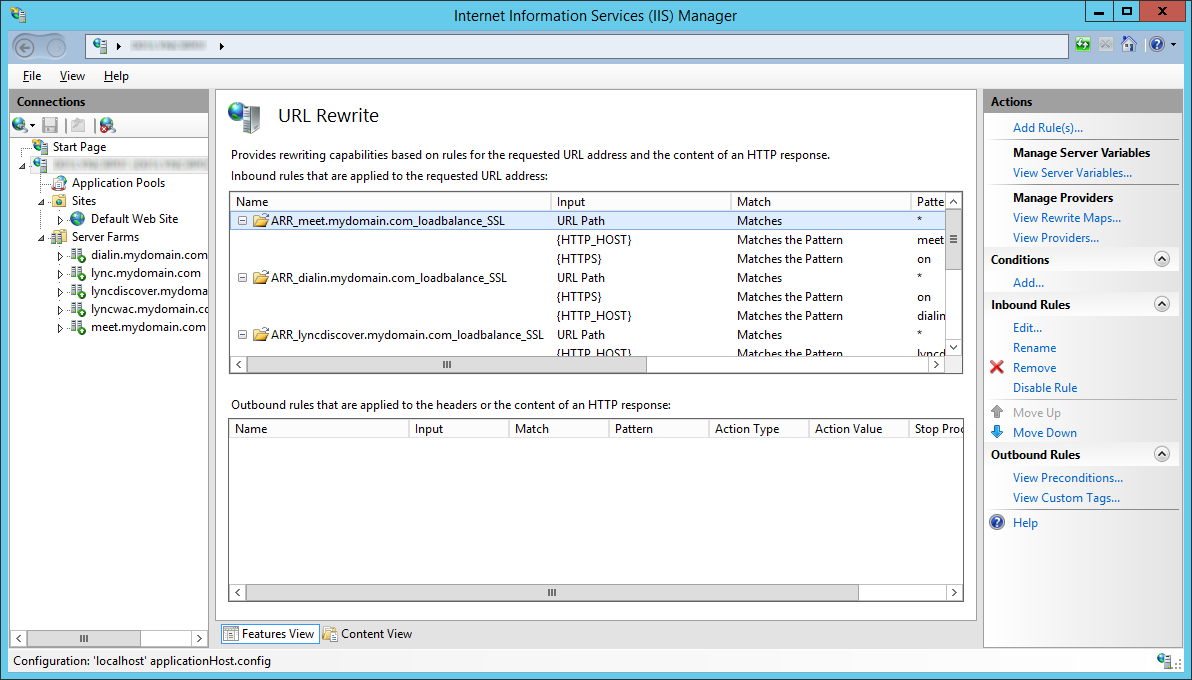
Author Archives: Jack

Exporting TPM Owner Key and BitLocker Recovery Password from Active Directory via PowerShell

Synopsis: When looking up a BitLocker Recovery Password or TPM Owner Key, the process can be quite laborious.  This post contains a PowerShell script to help automate the process of manually looking at attributes in Active Directory to pull such information.

Download a copy of the script here (make sure to remove the .txt at the end): Get-TPMandBitlockerInfo.ps1.txt

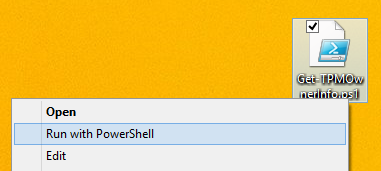
Run the script with PowerShell

Get-TPMOwnerInfo - Run with PowerShell

Here are the results it should return
Get-TPMOwnerInfo - PowerShell


Here is a copy of the script in Plain Text

<#
.SYNOPSIS
    Automates the process on gathering BitLocker recovery password and TPM owner password.

.DESCRIPTION
    This script will lookup multiple attribute in Active Directory and display the correlating
    values that hold sensitive BitLocker information.  Additionally, the TPM Owner Password
    can be exported to a .tpm file, which can be used to make changes to the correlating machine.

.NOTES
    File Name      : Get-TPMandBitlockerInfo.ps1
    Author         : Jack Stromberg (jackstromberg.com)
    Prerequisite   : PowerShell V2 over Vista and upper
    Version History: 2/5/2015 (original release)

.LINK
    Script posted over at:
    http://jackstromberg.com/2015/02/exporting-tpm-owner-key-and-bitlocker-recovery-password-from-active-directory-via-powershell/
#>

clear
Write-Host "~Enter in the correct credentials to access the BitLocker and TPM Owner attributes~"
$UserName = Read-Host "Enter User Name" 
$Password = Read-Host -AsSecureString "Enter Your Password" 
$credential = New-Object -TypeName System.Management.Automation.PSCredential -ArgumentList $UserName , $Password 

# Get input on which machine to lookup
$computer = Read-Host 'Enter in machine name'

# Import our Active Directory PowerShell commands
Import-Module ActiveDirectory

# Check if the Computer Object exists in AD
$computerObject = Get-ADComputer -Filter {cn -eq $computer} -Property msTPM-OwnerInformation, msTPM-TpmInformationForComputer -Credential $credential
if($computerObject -eq $null){
    Write-Host "Computer object not found.  Exiting the script..."
    Cmd /c pause
	Exit
}

# Windows Vista and 7 stores the TPM owner password in the msTPM-OwnerInformation attribute, check that first.
# If the key hasn't been stored there, check the msTPM-TpmInformationForComputer object to see if it was backed up on a Win 8 or greater machine
if($computerObject.'msTPM-OwnerInformation' -eq $null){
    #Check if the computer object has had the TPM info backed up to AD
    if($computerObject.'msTPM-TpmInformationForComputer' -ne $null){
        # Grab the TPM Owner Password from the msTPM-InformationObject
        $TPMObject = Get-ADObject -Identity $computerObject.'msTPM-TpmInformationForComputer' -Properties msTPM-OwnerInformation  -Credential $credential
        $TPMRecoveryKey = $TPMObject.'msTPM-OwnerInformation'
    }else{
        $TPMRecoveryKey = '<not set>'
    }
}else{
    # Windows 7 and older OS TPM Owner Password
    $TPMRecoveryKey = $computerObject.'msTPM-OwnerInformation'
}

# Check if the computer object has had a BitLocker Recovery Password backed up to AD
$BitLockerObject = Get-ADObject -Filter {objectclass -eq 'msFVE-RecoveryInformation'} -SearchBase $computerObject.DistinguishedName -Properties 'msFVE-RecoveryPassword' -Credential $credential | Select-Object -Last 1
if($BitLockerObject.'msFVE-RecoveryPassword'){
    $BitLockerRecoveryKey = $BitLockerObject.'msFVE-RecoveryPassword'
}else{
    $BitLockerRecoveryKey = '<not set>'
}

#Print out our findings
Write-Host 'TPM Owner Recovery Key:' $TPMRecoveryKey
Write-Host 'BitLocker Recovery Password:' $BitLockerRecoveryKey

# Export TPM Owner Password File
if($computerObject.'msTPM-TpmInformationForComputer' -ne $null){
    $exportToFile = Read-Host 'Would you like to export the recovery key [y or n]'
    if($exportToFile -ne 'y'){
        Exit
    }

    $TPMOwnerFile = '<?xml version="1.0" encoding="UTF-8"?><ownerAuth>' + $TPMRecoveryKey + '</ownerAuth>'
    $TPMOwnerFile | Out-File "TPMOwnerPasswordFile.tpm"
}else{
    Cmd /c pause
}

[Tutorial] Configuring BitLocker to store recovery keys in Active Directory

This guide is more of a reflection on the steps I took to publish the BitLocker recovery keys of machines deployed on an Active Directory domain.  Microsoft has gobs and gobs of information on this subject which can be a tad overwhelming, so I have tried to consolidate this article down as much as possible, citing Microsoft sources where found.  If you have any questions, comments, feedback, please feel free to leave a message below.

Prerequisites

  • Domain Controllers are running Windows Server 2003 SP1 or greater
  • Schema Admin or an Enterprise Admin user account privileges

Step 1: Verify your schema is ready (and extend it if applicable)

Based on what I have read, if your DCs were introduced with Server 2008 Beta 3 or later, your schema will be ready, if you started with anything older, your AD environment will more than likely will not have the schema objects/attributes.

Verify you have the schema changes if running Server 2003 R2 or older:

If you are on Server 2003 you will need to open up ADSI edit and verify you have the schema changes (here you can see we are missing the five schema changes for BitLocker)
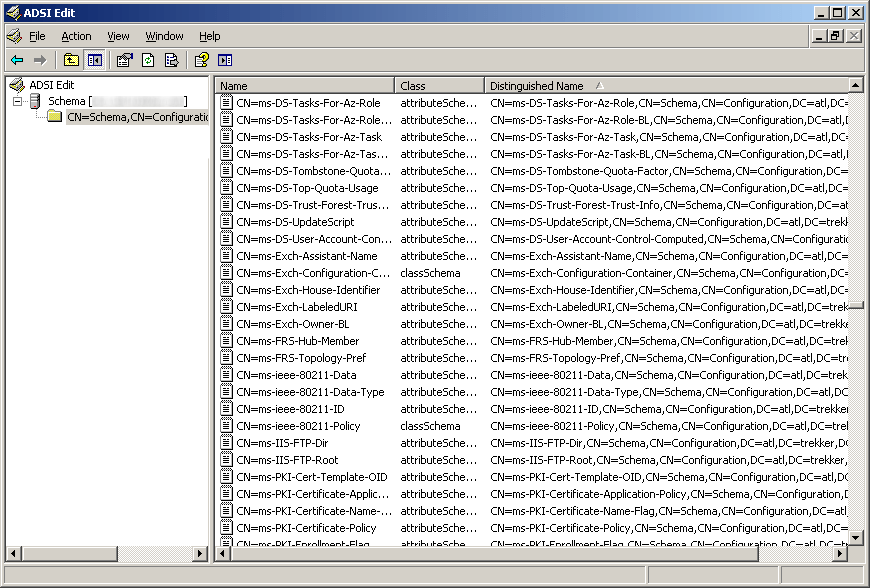
ADSI Edit - Server 2003 R2 - BitLocker

Verify you have the schema changes if running Server 2008 or newer:

If you are on Server 2008 or greater and have powershell, you can execute the following command (here you can see we have the necessary schema changes to proceed, if you receive 0 results, you will need to extend your schema):

Get-ADObject -SearchBase ((GET-ADRootDSE).SchemaNamingContext) -Filter {Name -like "ms-FVE-*"}

AD-Schema objects for BitLocker

Extending your schema if you don't have the schema changes above

If you need the schema update (you are missing the five schema objects listed in the above powershell command), you can execute the following command via Command Prompt on your Domain Controller:

Note: If you are on Server 2008 r2, it is recommended you extend your schema to Server 2012 or if you just want the BitLocker attributes, use these two ldf files: https://technet.microsoft.com/en-us/library/jj635854.aspx

ldifde -i -v -f BitLockerTPMSchemaExtension.ldf -c "DC=X" "DC=mydomain,DC=local" -k -j .

Yes, you do want the trailing period (.) at the end of the command.  It is literally apart of the command, so ensure you execute the command exactly like above (changing your domain of course).   You can see the official technet article here for more information on the command: https://technet.microsoft.com/en-us/library/cc766015(v=ws.10).aspx

If you would like to verify everything went well, Microsoft has posted some output on what the command should write: https://technet.microsoft.com/en-us/library/cc722060(v=ws.10).aspx

Step 2: Set the required permissions for backing up TPM password information

Next, we need to add an access control entry (ACE) so that backing up TPM recovery information is possible.

Head over to the following Microsoft document and download each of the VBS scripts they have displayed: Save the following VBS scripts from the following website: https://technet.microsoft.com/en-us/library/dn466534.aspx#Sample scripts

  1. Ensure you are on one of your domain controllers
  2. Open up a command prompt as an administrator
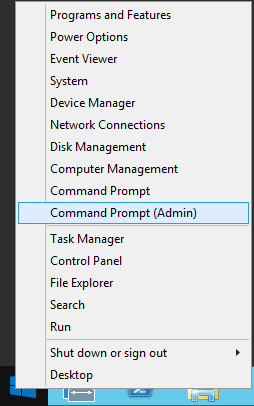
    Server 2012 - Administrative Command Prompt
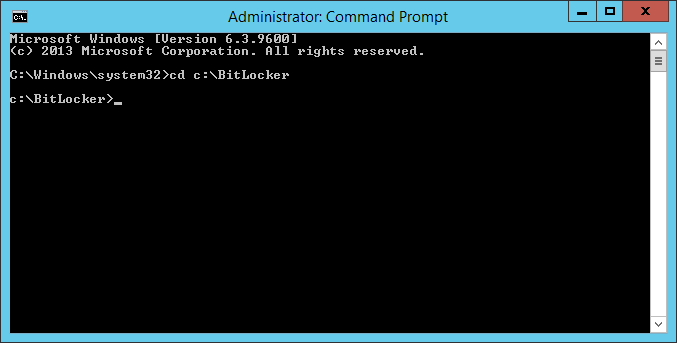
  3. Navigate to your BitLocker folder
    BitLocker Folder C Drive
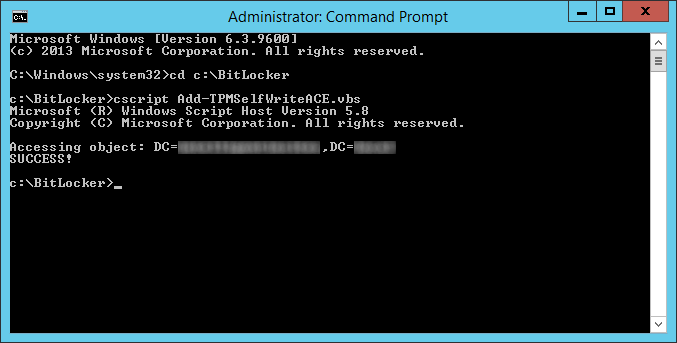
  4. Execute the following command on your domain controller
    1. cscript Add-TPMSelfWriteACE.vbs
      cscript add-tpmselfwriteace for bitlocker
  5. Delegate msTPM-OwnerInformation
    1. Open up Active Directory Users and Computers
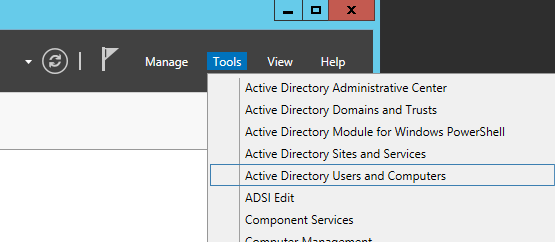
      Server Manager - Active Directory Users and Computers
    2. Navigate to the OU that stores your computers, right click, and select Delegate Control...
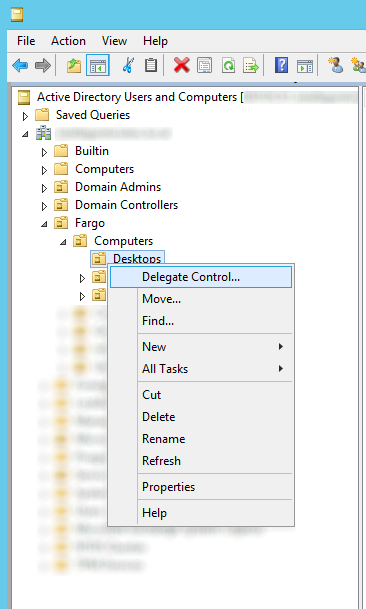
      Active Directory Users and Computers - Computers - Delegate Control
    3. Click Next > button on the welcome screen
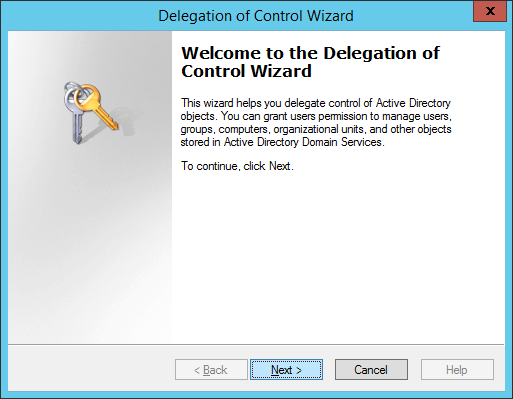
      Delegation of Control Wizard - Welcome
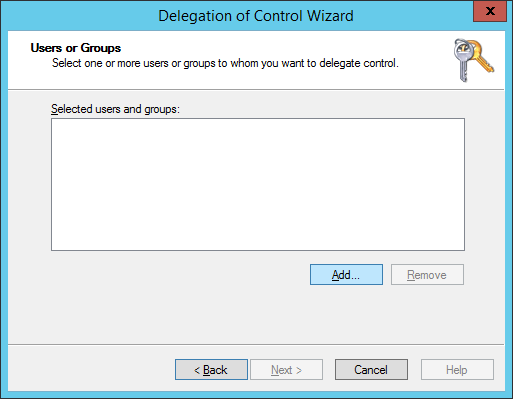
    4. Click the Add... button
      Delegation of Control Wizard - Users or Groups - Add
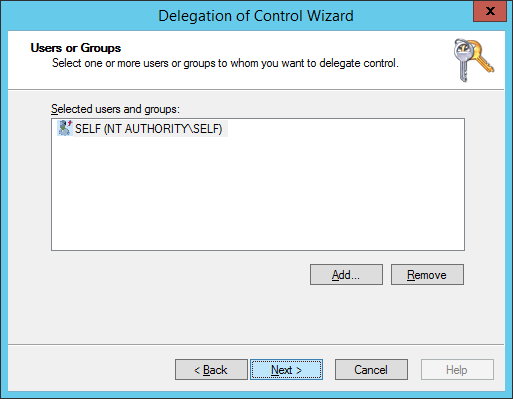
    5. Type in SELF, hit the Check Names button, and click OK
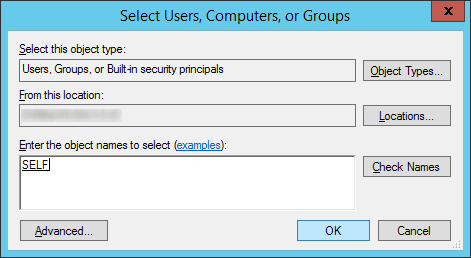
      Delegation of Control Wizard - Users or Groups - Add - SELF
    6. Click Next >
      Delegation of Control Wizard - Users or Groups - Add - SELF - Next
    7. Select Create a custom task to delegate and click Next >
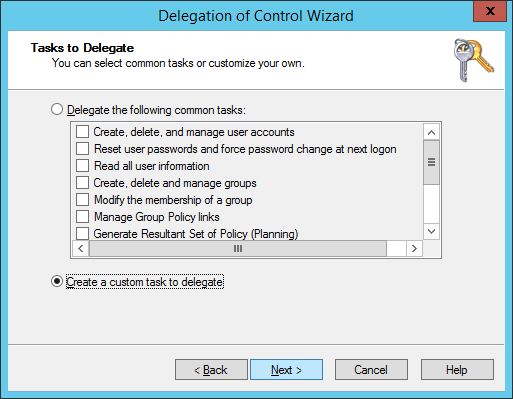
      Delegation of Control Wizard - Tasks to Delegate - Create a custom task to delegate
    8. Check Only the following objects in the folder, check Computer objects, click Next >
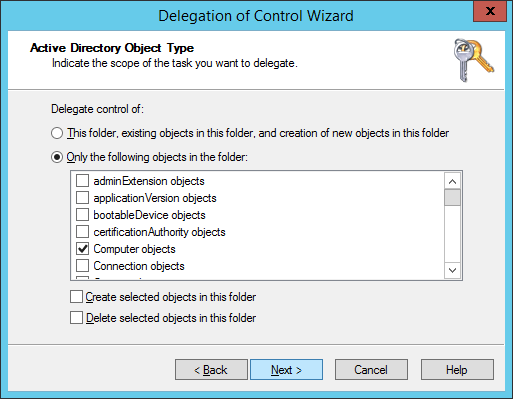
      Delegation of Control Wizard - Active Directory Object Type - Only the following objects in the folder - Computer Objects
    9. Check Property-specific, scroll down and find Write msTPM-OwnerInformation and click Next >
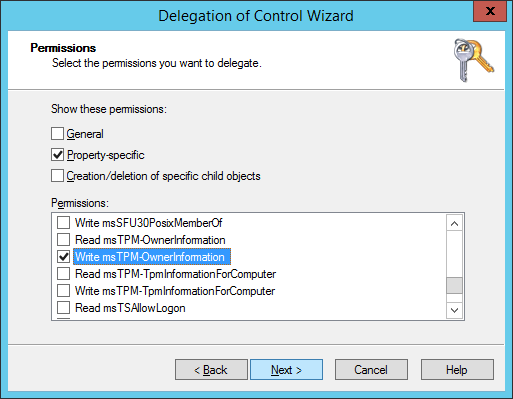
      Delegation of Control Wizard - Permissions - Property-specific - Write msTPM-OwnerInformation
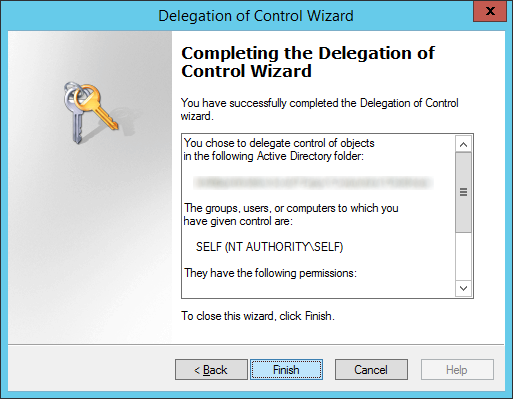
    10. Click Finish
      Delegation of Control Wizard - SELF - Finish

Step 3: Configure group policy to back up BitLocker and TPM recovery information to Active Directory

In this step, we will push out the actual policy that tells the machine to push BitLocker and TPM recovery info to Active Directory.  We will try to follow some of Microsoft's best practices on deploying the group policy here: https://technet.microsoft.com/en-us/library/dd875532(WS.10).aspx

  1. Login to your domain controller
  2. In Server Manager, open up Group Policy Management
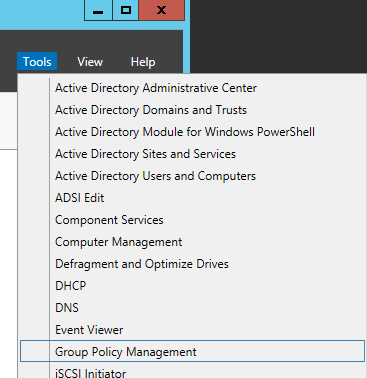
    Server Manager - Tools - Group Policy Management
  3. Select the policy you want to edit/deploy for this and hit Edit...
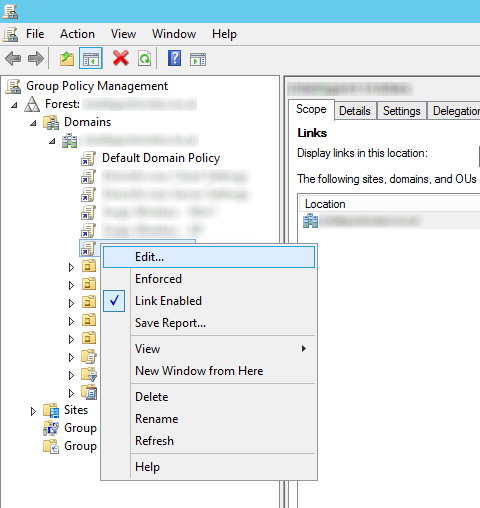
    Group Policy Management - Edit
  4. Expand Computer Configuration, expand Policies, expand Administrative Templates, open Windows Components, and then select BitLocker Drive Encryption
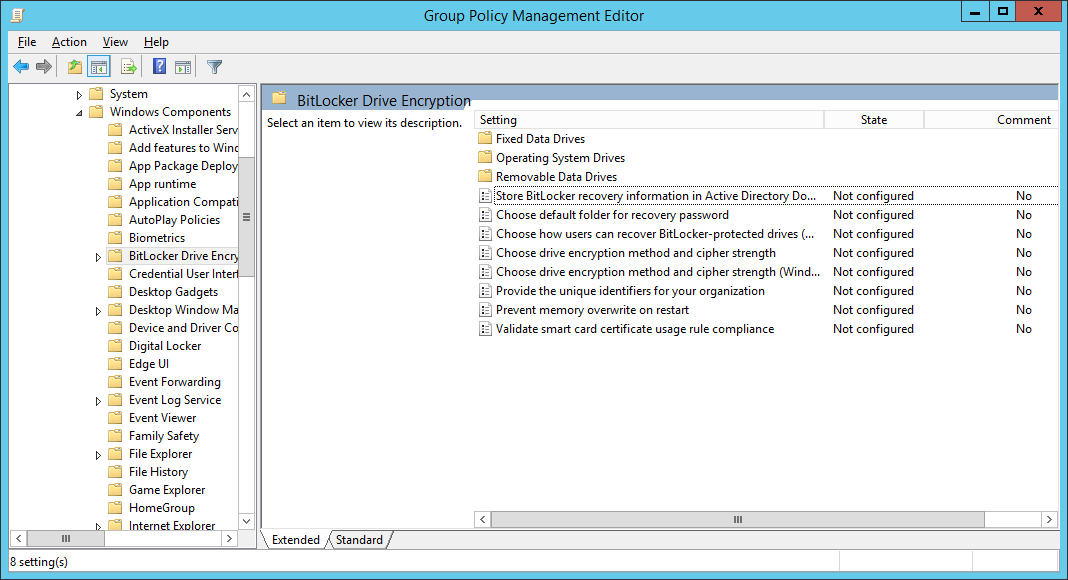
    Group Policy Management Editor - Computer - Configuration - Administrative Templates - Windows Components - BitLocker Drive Encryption
  5. Follow the below configuration for each policy (most of these are Microsoft's best practices with a few notes I have made in the Settings)
    CATEGORY SETTING NAME SETTING
    Global Store BitLocker recovery information in Active Directory Domain Services  Set to enabled, check Require BitLocker backup to AD DS, ensure Recovery passwords and key packages is selected
    Global Choose drive encryption method and cipher strength Set to not configured.
    Global Prevent memory overwrite on restart Set to not configured.
    Global Provide the unique identifiers for your organization Set to enabled, and enter an identifier in the BitLocker identification field (based on what I can tell, you can enter your organization name here).
    Operating system drives Choose how BitLocker-protected operating system drives can be recovered Set to enabled, Allow 48-digit recovery password, Allow 256-bit recovery key, omit recovery options from the BitLocker setup wizard, Store recovery passwords and key packages, Do not enable BitLocker until recovery information is stored to AD DS for operating system drives.For more information about storing BitLocker recovery information in AD DS, see Backing Up BitLocker and TPM Recovery Information to AD DS.
    Operating system drives Configure minimum PIN length for startup Set to enabled, and require a personal identification number (PIN) of at least seven numerals.
    Operating system drives Require additional authentication at startup Set to enabled, and require the use of a startup PIN with a Trusted Platform Module (TPM).
    Fixed data drives Choose how BitLocker-protected fixed drives can be recovered Set to enabled, Allow 48-digit recovery password, Allow 256-bit recovery key, omit recovery options from the BitLocker setup wizard, Store recovery passwords and key packages, Do not enable BitLocker until recovery information is stored to AD DS for operating system drives.
    Fixed data drives Configure use of passwords for fixed data drives If your organization does not have a public key infrastructure (PKI), set to enabled, require password complexity, and set a minimum password length of at least 12 characters.
    Fixed data drives Configure use of smart cards on fixed data drives If your organization has a PKI, set to enabled, and require the use of smart cards with fixed data drives.
    Removable data drives Choose how BitLocker-protected removable drives can be recovered Set to enabled, Allow 48-digit recovery password, Allow 256-bit recovery key, omit recovery options from the BitLocker setup wizard, Store recovery passwords and key packages, Do not enable BitLocker until recovery information is stored to AD DS for operating system drives.
    Removable data drives Configure use of passwords for removable data drives Set to enabled, set a minimum password length of at least 12 characters, and require password complexity if your organization does not have a PKI or if there is a need to access BitLocker-protected drives from computers running Windows XP or Windows Vista.
    Removable data drives Configure use of smart cards on removable data drives Set to enabled, and require the use of smart cards with removable data drives if your organization has a PKI.
    Removable data drives Control use of BitLocker on removable drives Set to enabled, Allow users to apply BitLocker protection on removable data drives, and uncheck Allow users to suspend and decrypt BitLocker protection on removable data drives.
    Removable data drives Deny write access to removable data drives not protected by BitLocker Set to enabled, and Do not allow write access to devices configured in another organization.

    noteNOTE
    This policy cannot be enabled if your organization uses recovery keys or startup keys. Recovery keys and startup keys must be stored on unencrypted USB drives.
  6. Next, configure Group Policy to backup the TPM owner information; open Computer Configuration, open Administrative Templates, open System, and then open Trusted Platform Module Services
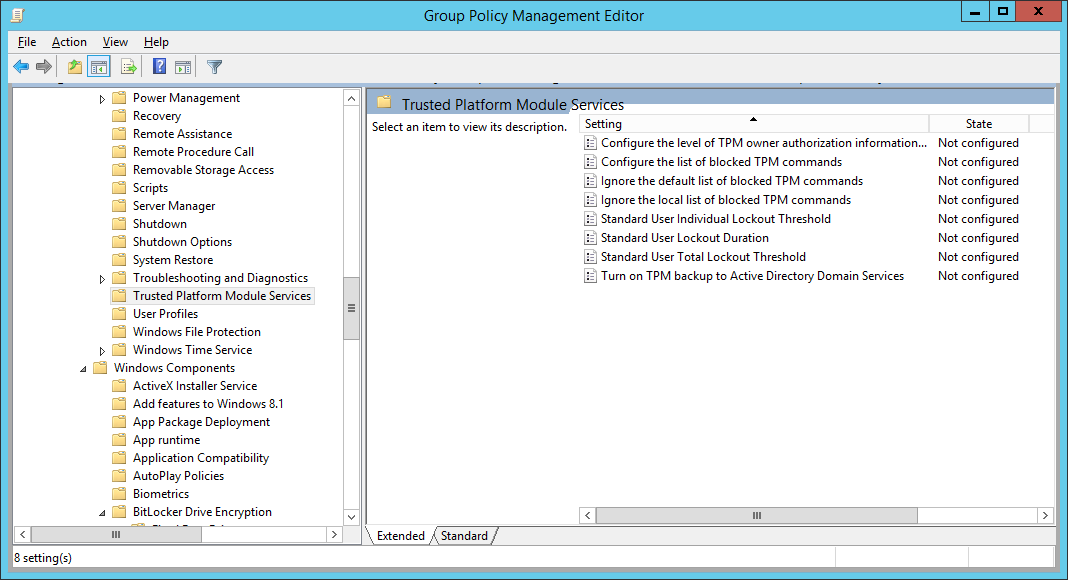
    Group Policy Management Editor - Computer - Configuration - Administrative Templates - System - Trusted Platform Module Services
  7. Double-click Turn on TPM backup to Active Directory, check Enabled, and click OK
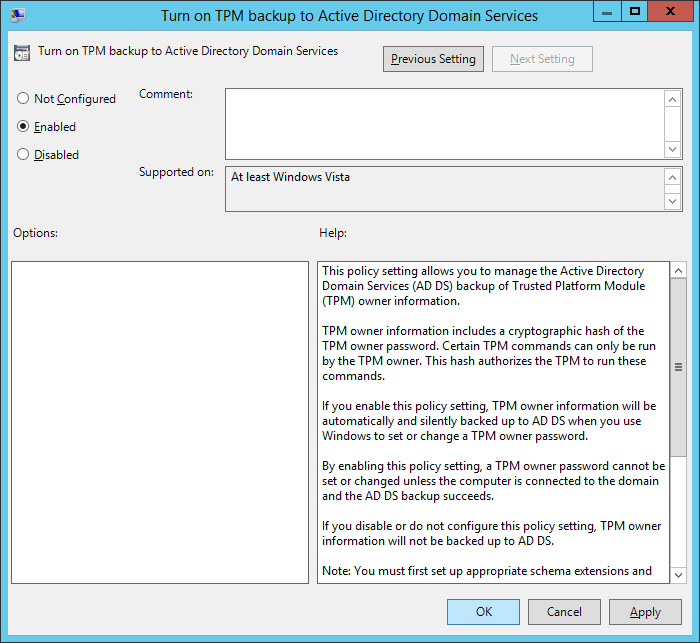
    Group Policy Management Editor - Computer - Configuration - Administrative Templates - System - Trusted Platform Module Services - Turn on TPM backup to ADDS - Enabled

    1. Note: If you are on Server 2008 R2, make sure you select Require TPM backup to AD DS.  Based on what I can find, if you are on Server 2012 R2, this option has been removed.
  8. Define a BitLocker Drive Encryption Data Recovery Agent
    1. Open Computer Configuration, open Policies, open Windows Settings, open Security Settings, open Public Key Policies, and right click on BitLocker Drive Encryption and select Add Data Recovery Agent...
    2. Click Next > on the Add Recovery Agent Wizard
    3. Select a Recovery agent and click Next >
      1. If you are using PKI, select the Browse Directory... button and select a user that has been configured with an EFS certificate.  I found this guide the most helpful on setting this process up (if anyone has a guide to an official Microsoft document explaining the best practices on configuring this, please drop a comment below: http://technetlibrary.com/use-data-recovery-agent-dra-decrypt-encrypted-files-domain/163)
        1. Here is the only official Microsoft article that I could find that explains the configuration of the Data Recovery Agent: https://technet.microsoft.com/en-us/library/dd875560%28v=ws.10%29.aspx#BKMK_proc_dra
      2. If you don't have a PKI environment setup, you can use a self signed certificate by opening up a command prompt and executing the following command: cipher /r:administrator
        1. Copied from the cipher command: This command generates an EFS recovery key and certificate, then writes them to a .PFX file (containing certificate and private key) and a .CER file (containing only the certificate). An administrator may add the contents of the .CER to the EFS recovery policy to create the recovery key for users, and import the .PFX to recover individual files. If SMARTCARD is specified, then writes the recovery key and certificate to a smart card. A .CER file is generated (containing only the certificate). No .PFX file is generated.
    4. Click Finish on the Add Recovery Agent Wizard

Step 4: Install the BitLocker Password Recovery Viewer

  1. On your domain controller, open up Server Manager
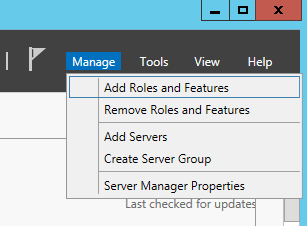
  2. Select Manage, Add Roles and Features
    Server 2012 - Manage - Add Roles and Features
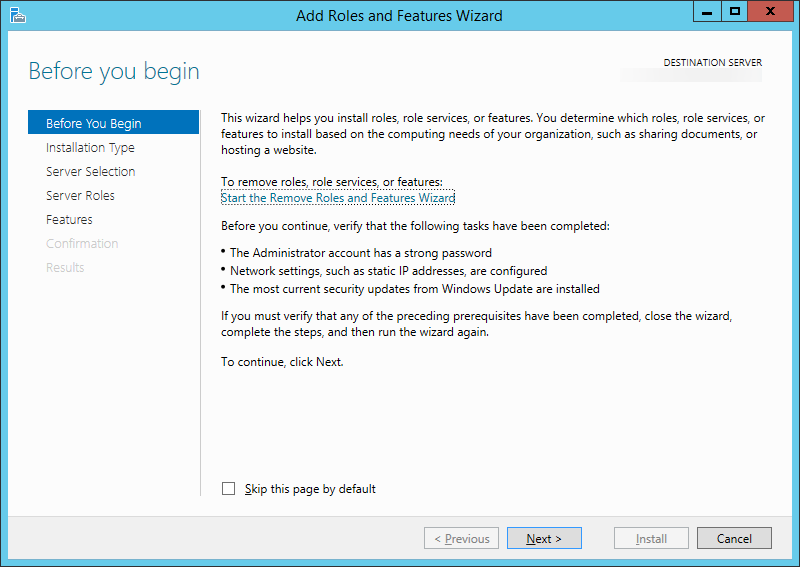
  3. Click Next >
    Add Roles and Features Wizard - Before you begin
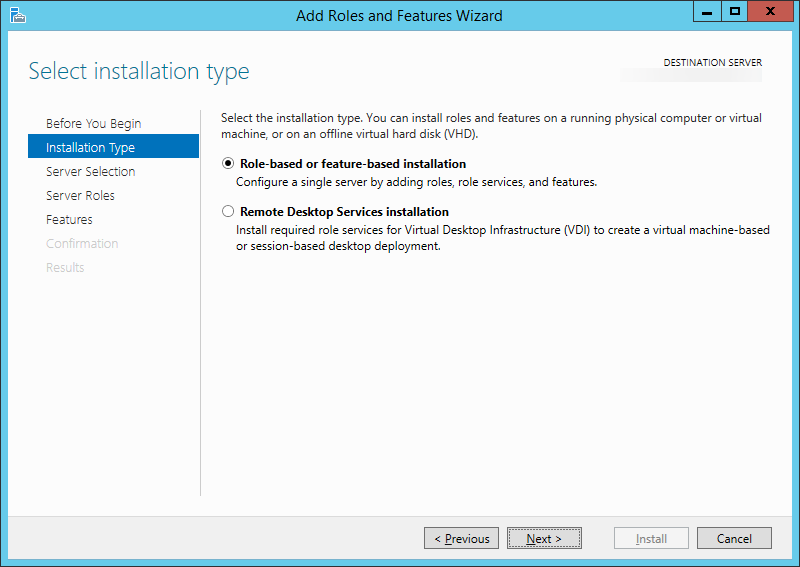
  4. Click Next >
    Add Roles and Features Wizard - Select installation type
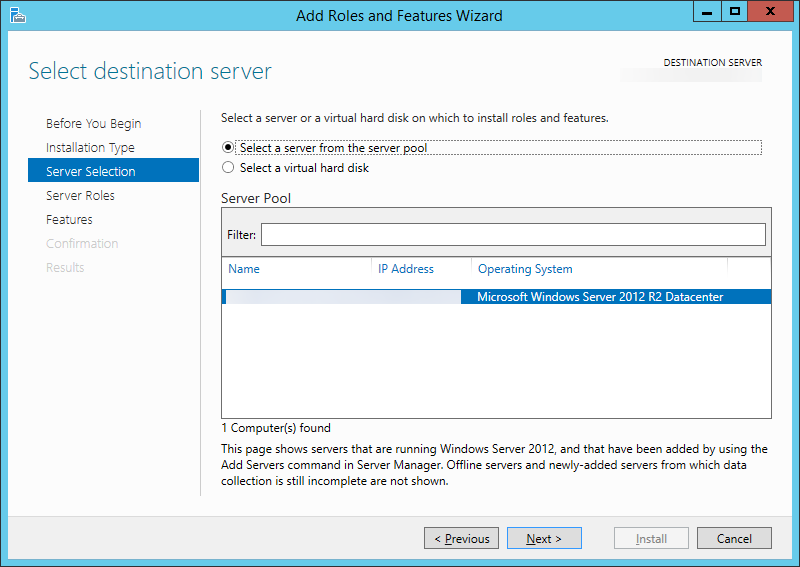
  5. Click Next >
    Add Roles and Features Wizard - Select destination server
  6. Click Next > (You don't need to add any additional roles)
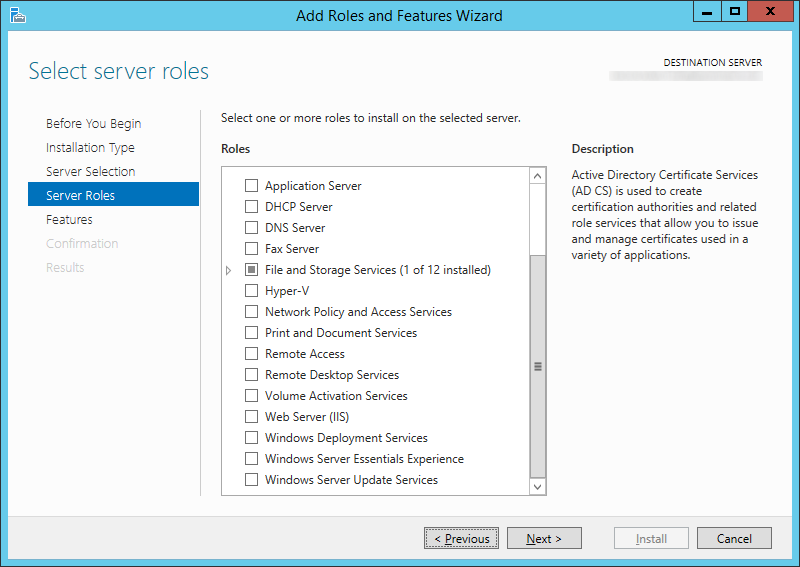
    Add Roles and Features Wizard - Server Roles - Default
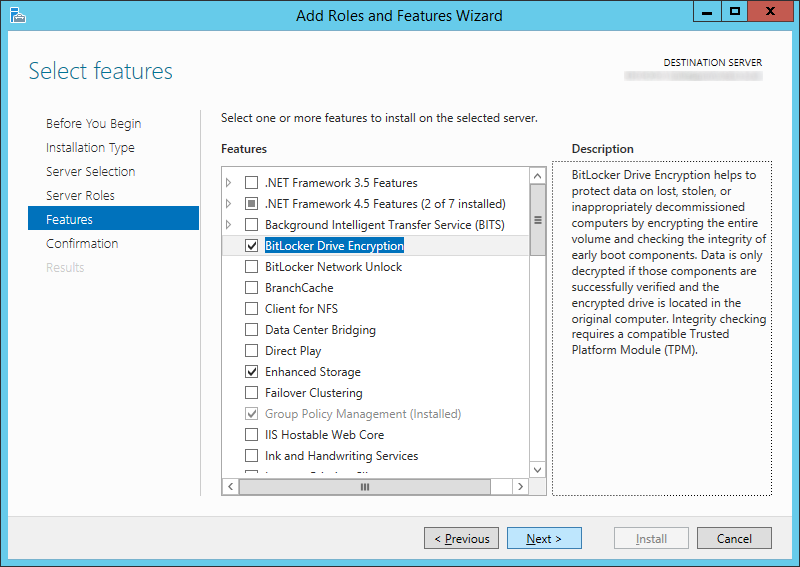
  7. Check BitLocker Drive Encryption (click Add Features when prompted) and click Next >
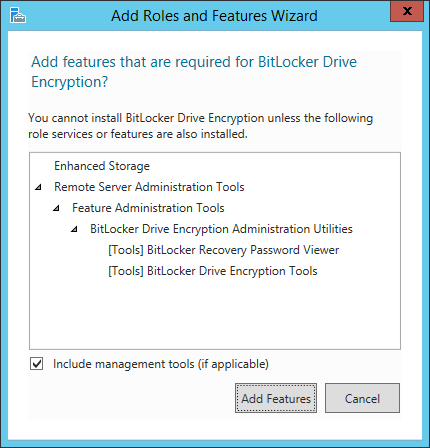
    Add Roles and Features Wizard - Features - BitLocker Drive Encryption - Add features dialog
    Add Roles and Features Wizard - Features - BitLocker Drive Encryption
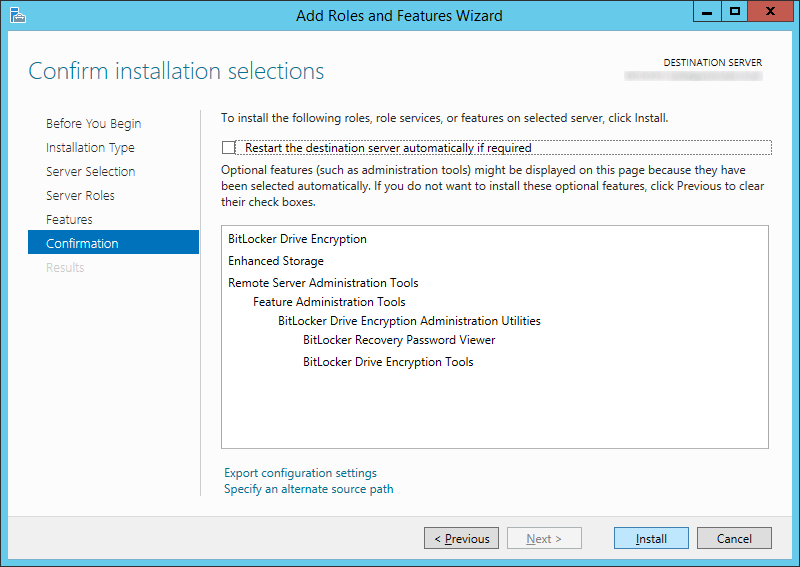
  8. Click Install
    Add Roles and Features Wizard - Features - BitLocker Drive Encryption - Install
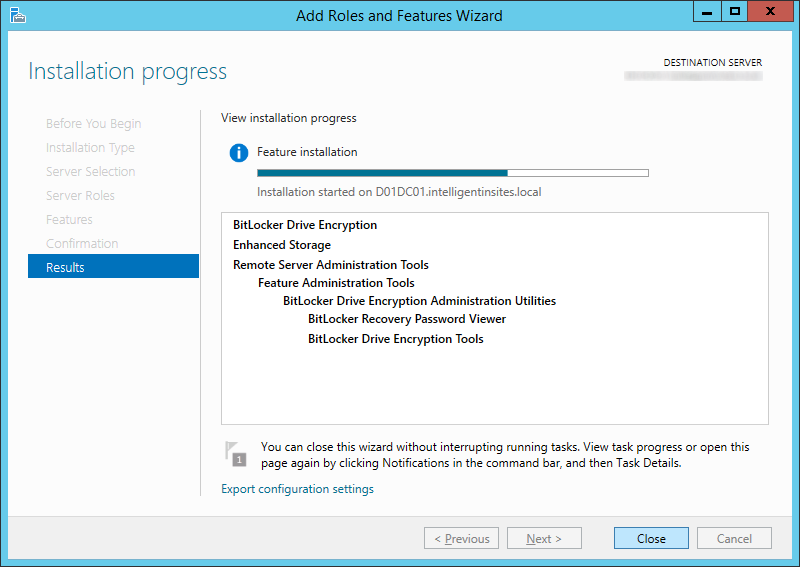
  9. Click Close
    Add Roles and Features Wizard - Features - BitLocker Drive Encryption - Install - Close
  10. Repeat these steps for each domain controller you want to manage BitLocker on

Step 5: Push existing BitLocker protected machines to Active Directory (optional step)

  1. Open an Administrative Command prompt on the client machine that has a BitLocker enabled drive
    Server 2012 - Administrative Command Prompt
  2. Execute the following command to get your current BitLocker information
    manage-bde -protectors -get c:
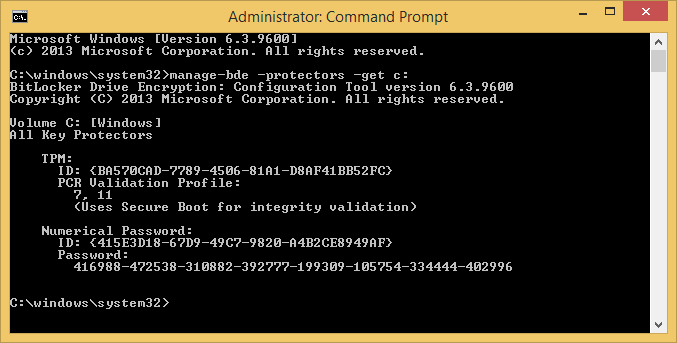
    command prompt - manage-bde -protectors -get c
  3. Execute the following command to publish this information to AD
    manage-bde -protectors -adbackup c: -id {yourNumericalPasswordID}
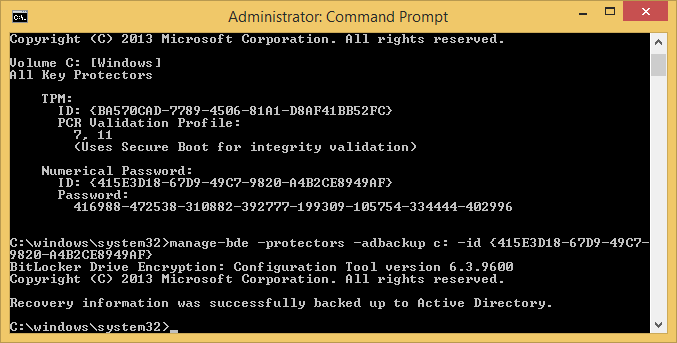
    command prompt - manage-bde -protectors -adbackup c-id
  4. Login to one of the domain controllers you installed the BitLocker Recovery Viewer feature and open up Active Directory Users and Computers
    Server Manager - Active Directory Users and Computers
  5. Find your computer object and right click Properties on it
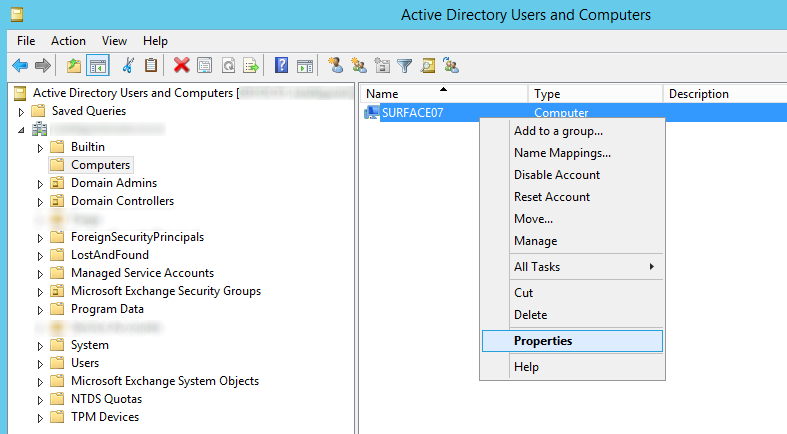
    Active Directory Users and Computers - Computers - Computer - Properties
  6. Select the BitLocker Recovery tab and verify the recovery passwords have been published
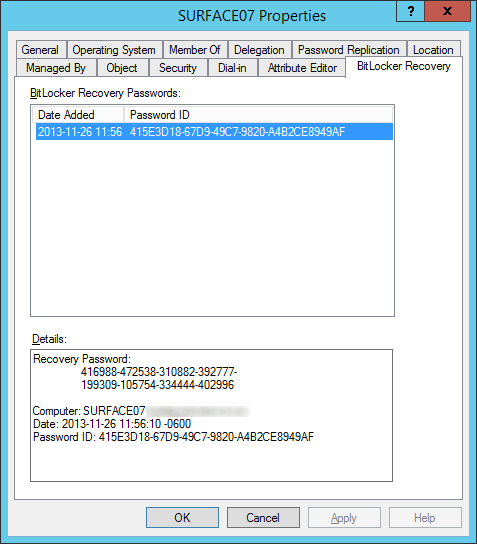
    Active Directory Users and Computers - Computers - Computer - Properties - BitLocker Recovery Tab


Notes: By default, Windows Vista and greater clients running BitLocker will backup the owner the owner password to the msTPM-OwnerInformation attribute.  If you notice this field is <Not Set> for your Windows 8 and greater machines, ensure you check the TPM Devices container in Active Directory Users and Computers for the recovery information.

To automate the process of looking up the Bitlocker Recovery Password and Owner TPM Recovery Key, I have written a powershell script which can be found here: http://jackstromberg.com/2015/02/exporting-tpm-owner-key-and-bitlocker-recovery-password-from-active-directory-via-powershell/

[Tutorial] Configuring Lync Server 2013 to block calls based on Caller ID

Synopsis: Out of the box, Lync Server 2013 does not have any way to block specific calls destined to any user or specific user inside of an organization.  However, Microsoft added in the ability for users/partners/etc. to write custom scripts to help allow flexibility in Lync.  That being said, this tutorial will go over deploying a custom script to allow Lync Server to block calls based on caller ID.

Before we begin, I would like to give credit to a few individuals.  This guide will make use of David Paulino's guide/script for Lync Server 2013 (http://uclobby.com/2014/07/31/calleridblock/), which was a converted script from VoIP Norm's original Lync Server 2010 script (http://voipnorm.blogspot.co.uk/2011/06/blocking-calls-in-lync-based-on-caller.html).  The only changes in this article is a more step-by-step deployment guide as well as the ability to control blocking of numbers at a user level and the ability to optionally leave comments on why a rule was added.

Tutorial

  1. Download a copy of the CallerIDBlock.am.txt script (or copy and paste this script into a file called CallerIDBlock.am) (if you downloaded this file, make sure you remove the .txt at the end)
    1. <?xml version="1.0" ?>
      <lc:applicationManifest
      lc:appUri="http://jackstromberg.com/2015/02/CallerIDBlock"
      xmlns:lc="http://schemas.microsoft.com/lcs/2006/05">
      <lc:requestFilter methodNames="ALL" strictRoute="true"/>
      <lc:responseFilter reasonCodes="NONE"/>
      <lc:scriptOnly/>
      <lc:file name="BlockedTelephoneNumbers"
      path="\\<Lync Share Path>\CallerIDBlock\BlockedTelephoneNumbers.txt"
      delimitedBy="comma"
      keyColumnName="FromSIP"
      static="false">
      <lc:column name="FromSIP" />
      <lc:column name="ToSIP" />
      <lc:column name="Action" />
      <lc:column name="Comments" />
      </lc:file>
      <lc:splScript><![CDATA[
      /*
      Module Name: CallerIDBlock.am
      */if(sipRequest.Method == "INVITE"){
      fromSIPUser = GetUserName(GetUri(sipRequest.From));
      toSIPUser = GetUserName(GetUri(sipRequest.To));
      sep = IndexOfString(fromSIPUser, ";");Log ("Debugr", false, "CallerIDBlock processing request:");
      Log ("Debugr", false, "From - ", fromSIPUser);
      Log ("Debugr", false, "To - ", toSIPUser);
      if(sep != -1) {
      fromSIPUser = SubString(fromSIPUser, 0, sep);
      }

      action = BlockedTelephoneNumbers[fromSIPUser].Action;
      if(action == "block") {
      if(BlockedTelephoneNumbers[fromSIPUser].ToSIP == "*" || BlockedTelephoneNumbers[fromSIPUser].ToSIP == toSIPUser){
      Log ("Debugr", false, "Rejected by CallerIDBlock");
      Respond(403, "Forbidden");
      }
      } else {
      Log ("Debugr", false, "Allowed by CallerIDBlock");
      }
      }
      return;
      ]]></lc:splScript>
      </lc:applicationManifest>

  2. Download a copy of the BlockedTelephoneNumbers.txt file (or copy and paste the code below into a file called BlockedTelephoneNumbers.txt)
    1. FromSIP,ToSIP,Action,Comments
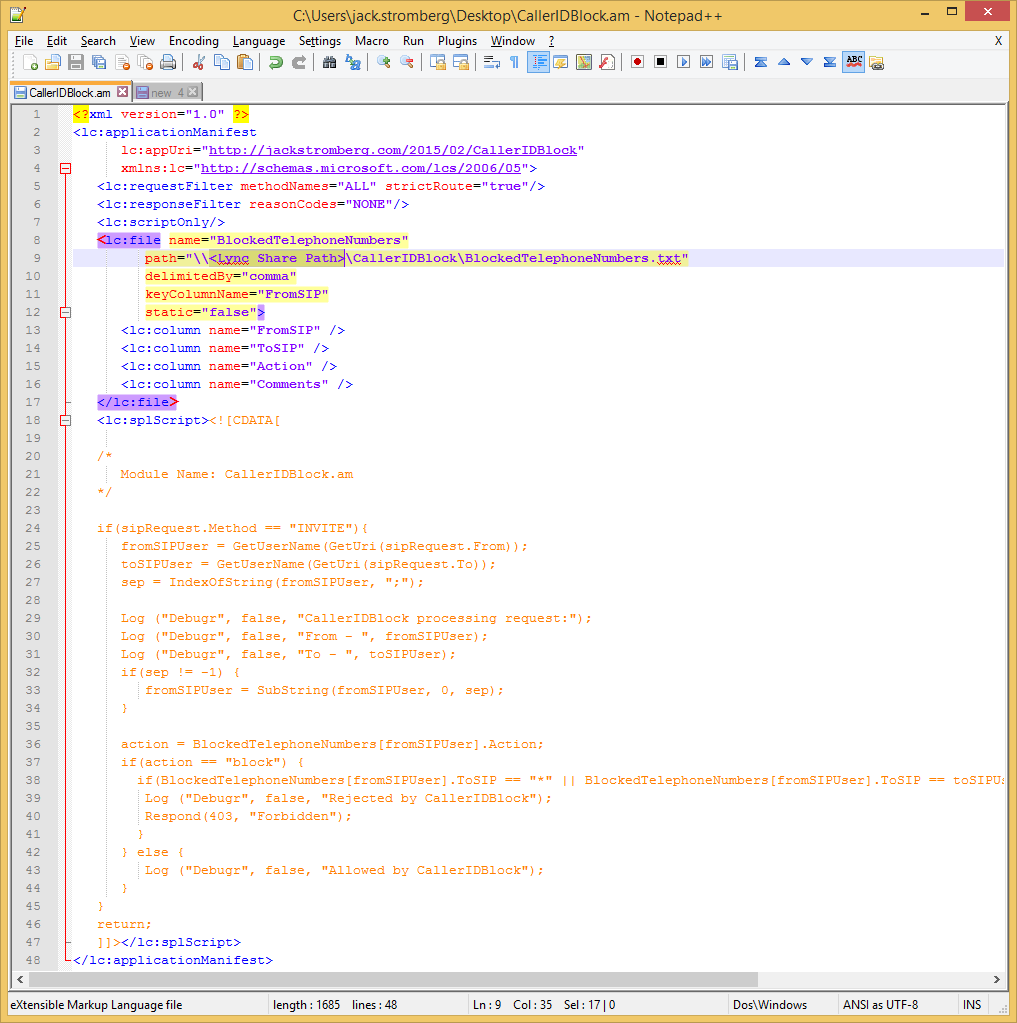
  3. Edit the CallerIDBlock.am file and change the BlockedTelephoneNumbers path to be your fileshare
    CallerIDBlock - LyncPath - Notepad
  4. Edit the list of blocked numbers inside the BlockedTelephoneNumbers.txt file
    1. Notes: The FromSIP address is the Caller ID of the incoming call; the ToSIP is the individual that is trying to be reached (side-note, in this particular script, if you set this field so an asterisk (*), this will be a wildcard for any/every user; the Action should be set to "block" to block the call; the Comments field is an optional field to document when/why the number was added to be blocked
      BlockedTelephoneNumbers Example
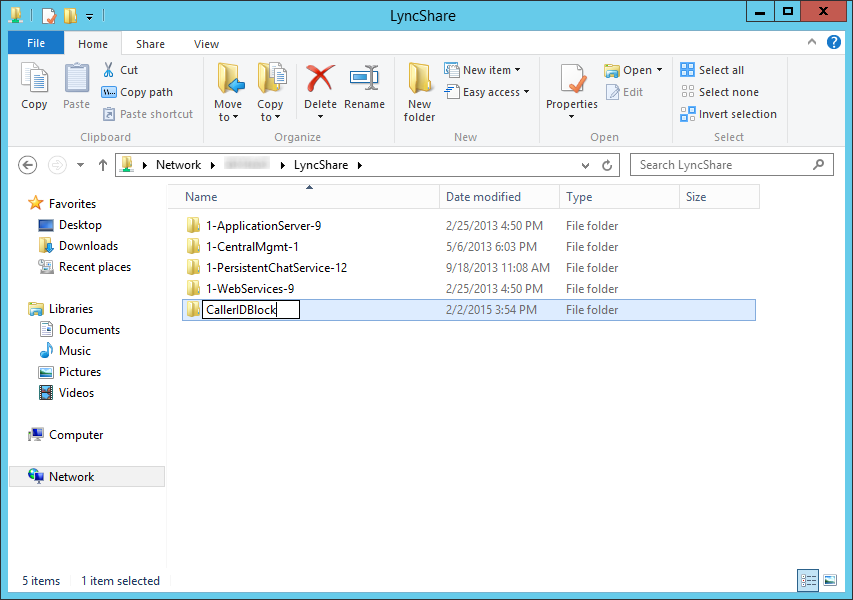
  5. Create a new folder where your Lync share is
    LyncShare - CallerIDBlock
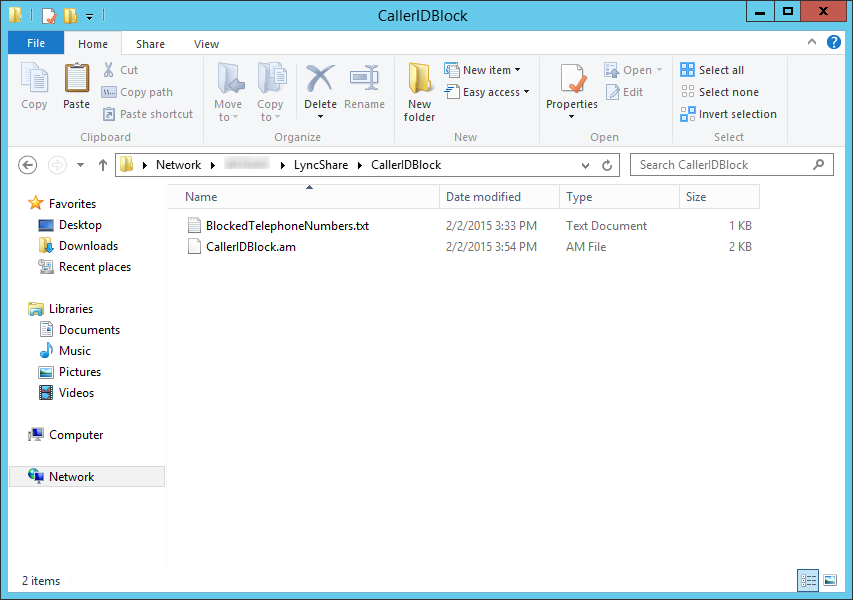
  6. Copy the CallerIDBlock.am and BlcokedTelephoneNumbers.txt files to your Lync Share where your new CallerIDBlock folder is
    LyncShare - CallerIDBlock - Script and Numbers
  7. Add the CallerIDBlock script as a Lync Server Application
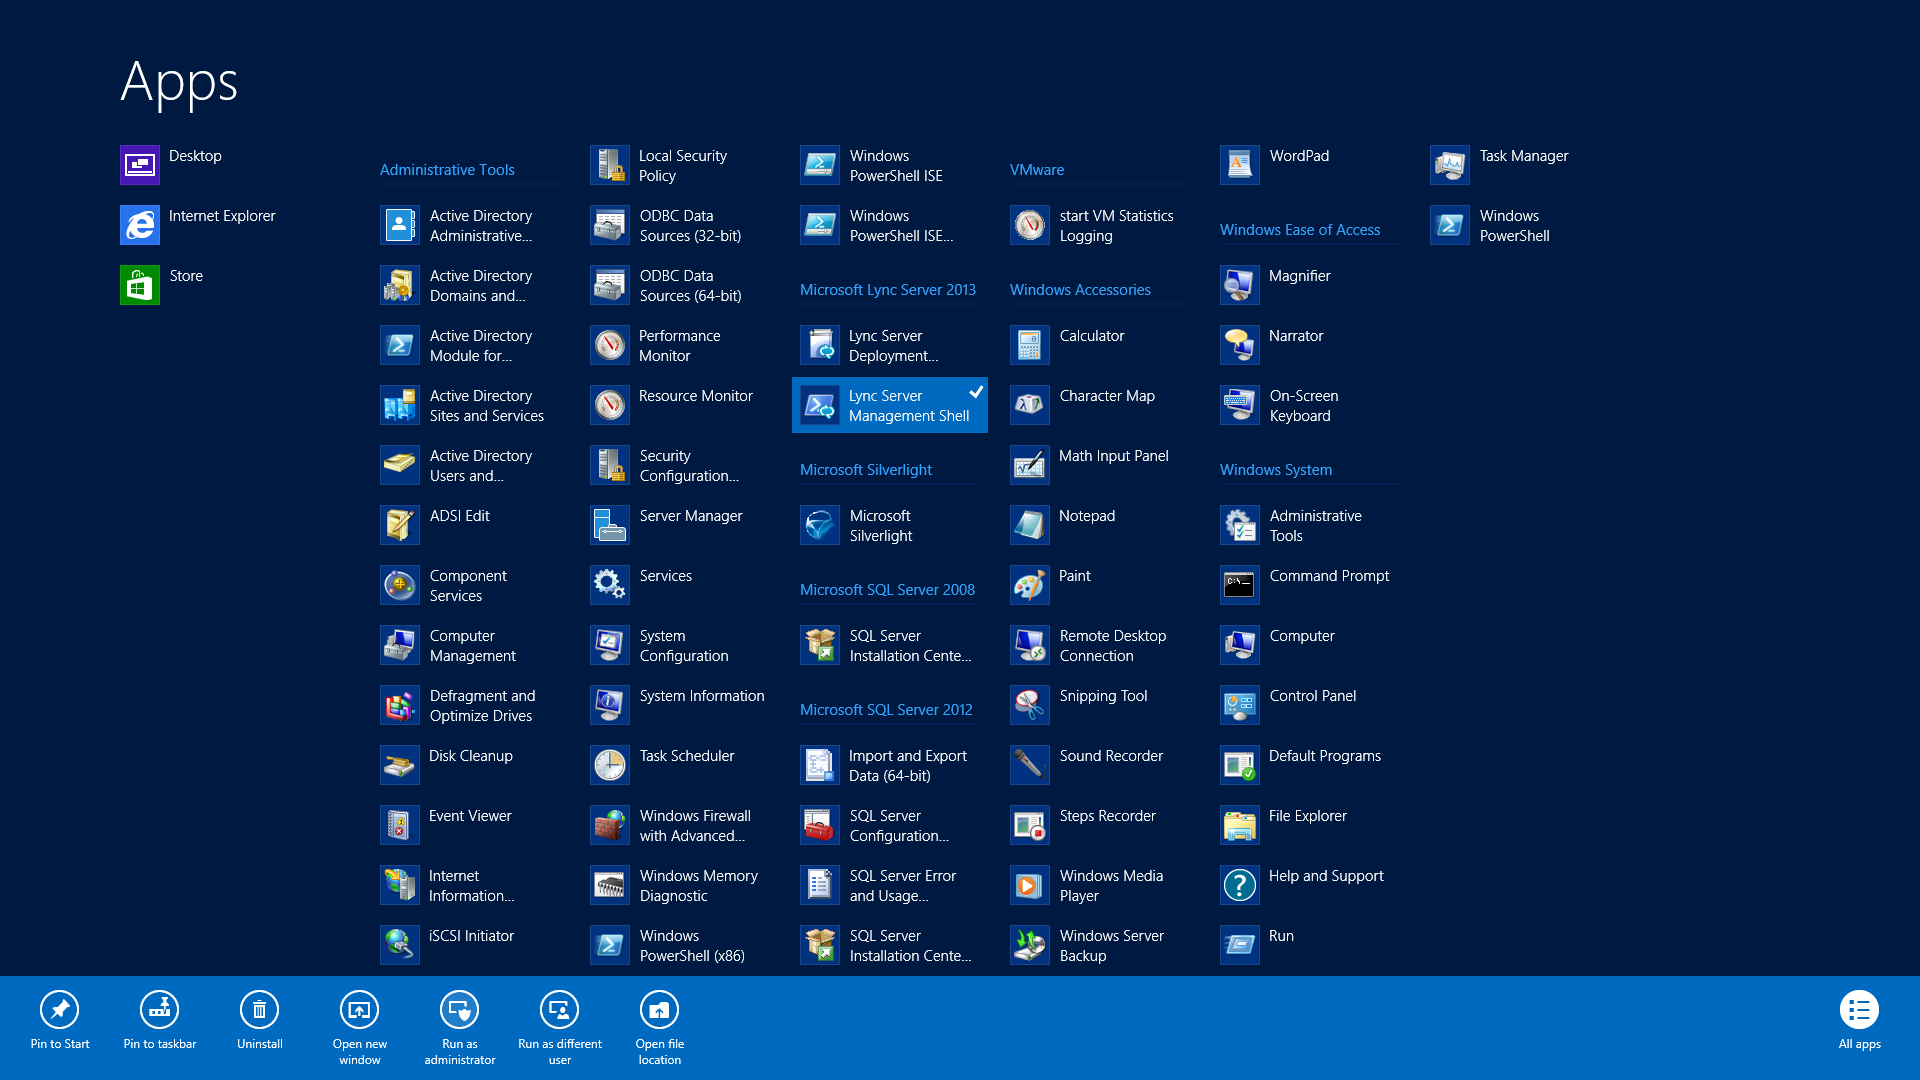
    1. Open up the Lync Server Manage Shell as an Administrator
      Lync Server Management Shell - Run as administrator
    2. New-CsServerApplication -Identity "Service:Registrar:<Lync Front End Pool>/CallerIDBlock" -Uri http://jackstromberg.com/2015/02/CallerIDBlock -Critical $false -ScriptName "\\<Lync Share Path>\CallerIDBlock\CallerIDBlock.am"
      New-CsServerApplication -Identity CallerIDBlock
  8. Enable the CallerIDBlockLync Server Application
    1. Set-CsServerApplication -Identity "Service:Registrar:<Lync Front End Pool>/CallerIDBlock" -Enabled $true
      Set-CsServerApplication -Identity CallerIDBlock
  9. Verify the script is actively listening for calls
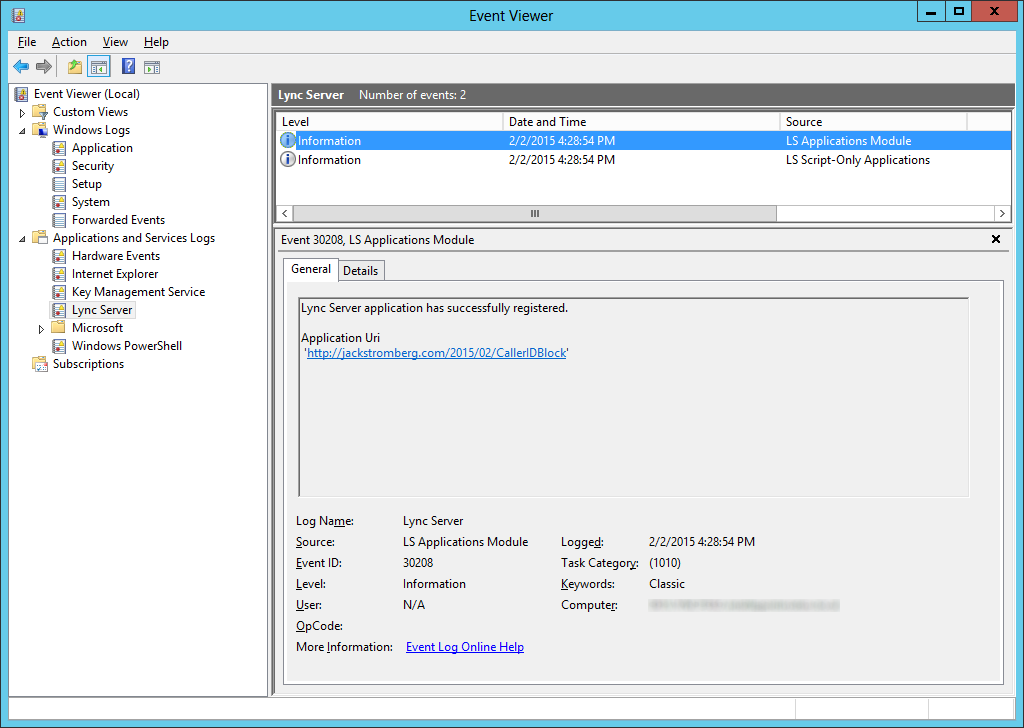
    1. Open up Event Viewer, navigate to Applications and Services Logs, Lync Server, and verify you see Event ID 30208
      Event Viewer - Applications and Services Logs - Lync Server - Event ID 30208

Upgrading DirSync to AADSync for Office 365 and Azure environments

As of 11/11/2014, Microsoft has released their next generation tool for providing synchronization between an on-premise Active Directory environment and Microsoft based cloud service (Azure, Office 365 Suite (Lync Online, CRM, SharePoint, Exchange, etc.)).  The utility is now referenced as Microsoft Azure Active Directory Sync Services (AADSync).

In this tutorial, we will go over the process to ensure you are on the new generation of their synchronization tool.  The process is fairly straight forward, uninstall the old DirSync utility, install the new AADSync utility.  If you wish to install the utility on a new server, stop the DirSync service, install the AADSync utility on the new server, and then uinstall DirSync after you have verified synchronization is successful on the new machine.

Here is the uninstall DirSync and install AADSync process

  1. Download a copy of the AADSync utility from Microsoft's website: http://www.microsoft.com/en-us/download/details.aspx?id=44225
  2. Login to the server currently running DirSync
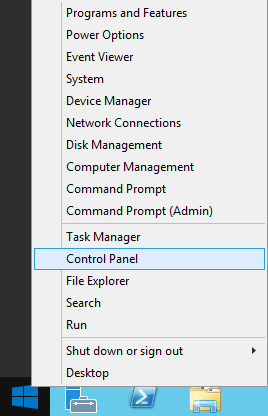
  3. Open up Control Panel
    Server - Start Menu - Control Panel
  4. Select Programs and Features (notice I am in the View By Small icons view)
    Control Panel - Small Icons - Programs and Features
  5. Uninstall the Windows Azure Active Directory Sync tool
  6. Select Yes to uninstall when prompted
    Windows Azure Active Directory Sync - Another instance dialog - Uninstall
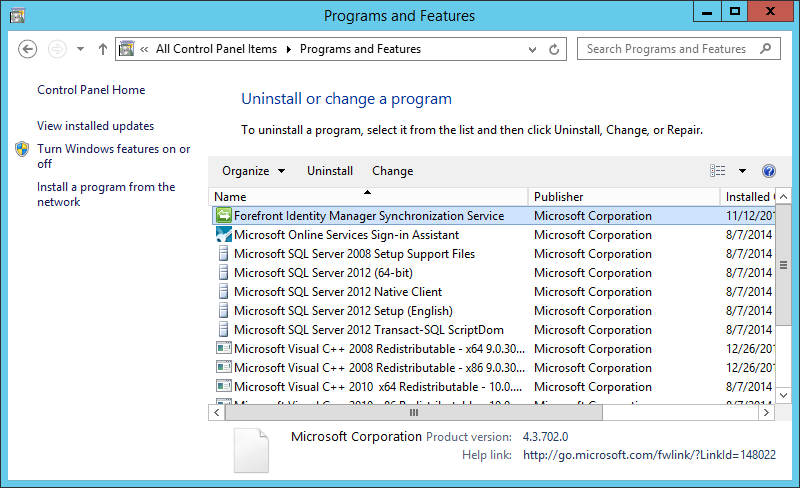
  7. Uninstall Forefront Identity Manager Synchronization Service if it wasn't uninstalled already
    Uninstall - Forefront identity Manager Synchronization Service
  8. Run the MicrosoftAzureADConnectionTool.exe application you downloaded from Microsoft
    MicrosoftAzureADConnectionTool Installer
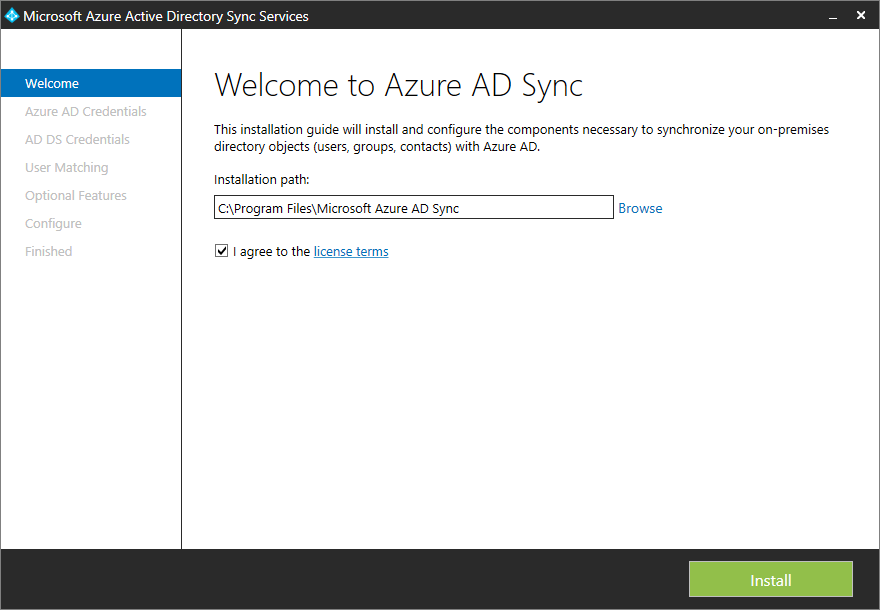
  9. Check I agree to the license terms and click Install
    Microsoft Azure Active Directory Sync Services - Install
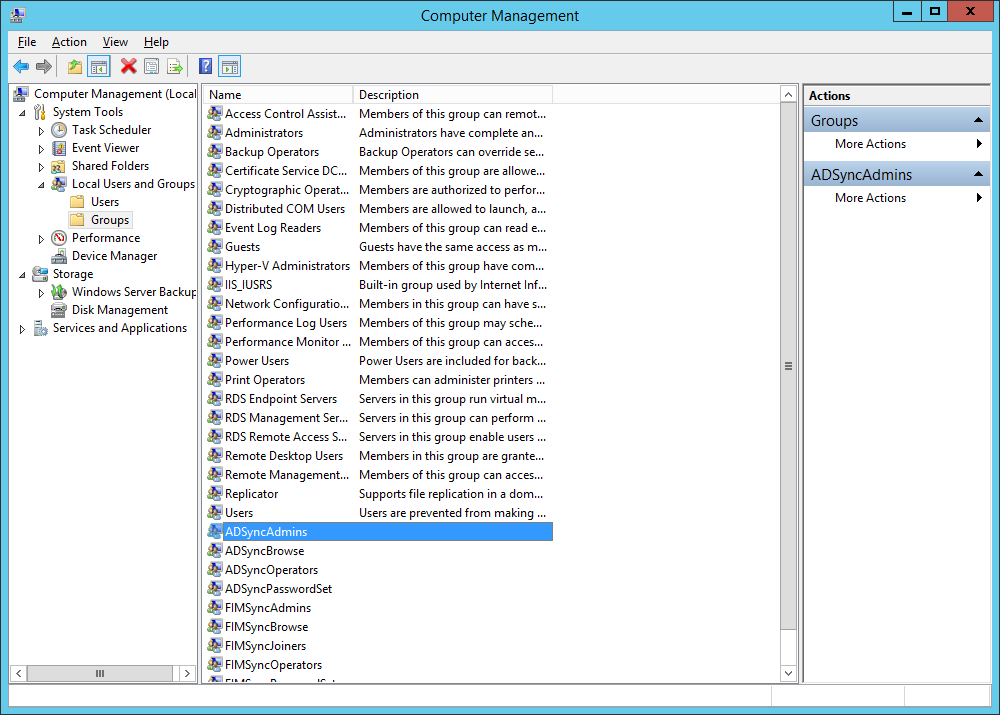
  10. Once the install has finished, open up Computer Management and navigate to System Tools -> Local Users and Groups, Groups, and double click on ADSyncAdmins
    Computer Management - Local Users and groups - Groups - ADSyncAdmins
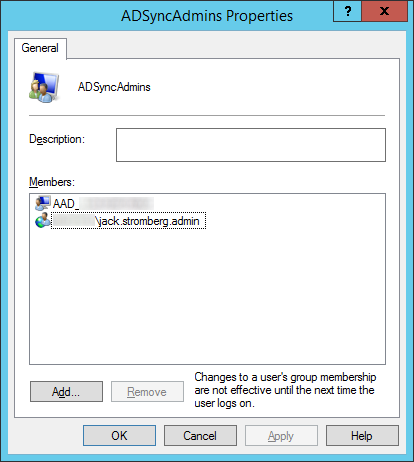
  11. Ensure your user account, user group, or local machine has been added to the security group
    ADSyncAdmins - Group Membership
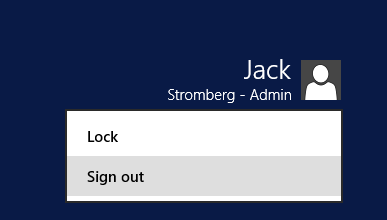
  12. Log out of Windows
    Windows 8-Server 2012 - Sign Out

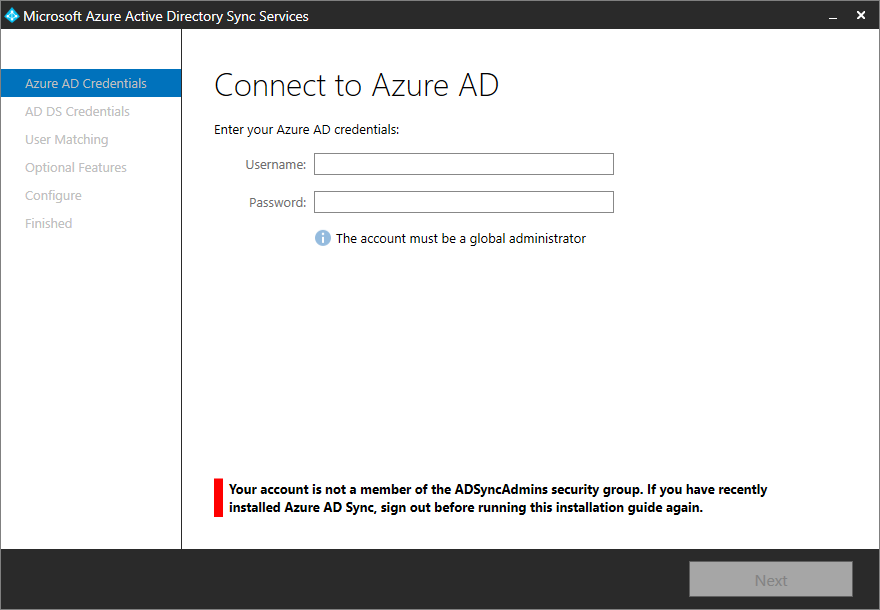
    1. Note: This step is needed to ensure you have proper user privileges when running the sync tool.  When running through the sync tool's installer, your user account will automatically be placed in a local security group called ADSyncAdmins.  A logout is needed to update your session otherwise you may receive the following error message:
      Your account is not a member of the ADSyncAdmins security group.  If you have recently installed Azure AD Sync, sign out before running this installation guide again.
      Microsoft Azure Active Directory Sync Services - Your account is not a member of the ADSyncAdmins security group
  13. Upon login, open up the DirectorySyncTool application
    DirectorySyncTool
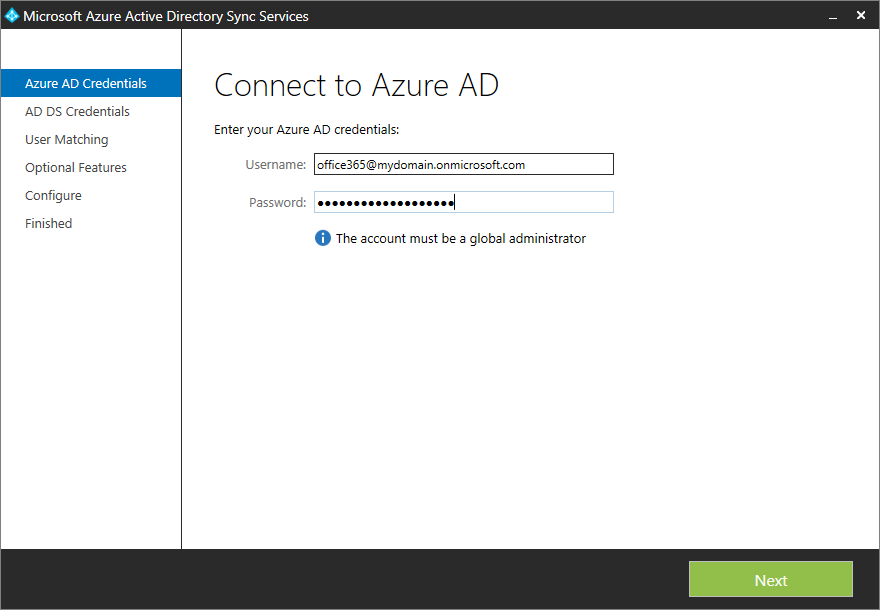
  14. Enter your Azure or Office 365 admin credentials and click Next
    Microsoft Azure Active Directory Sync Services - Azure AD Credentials
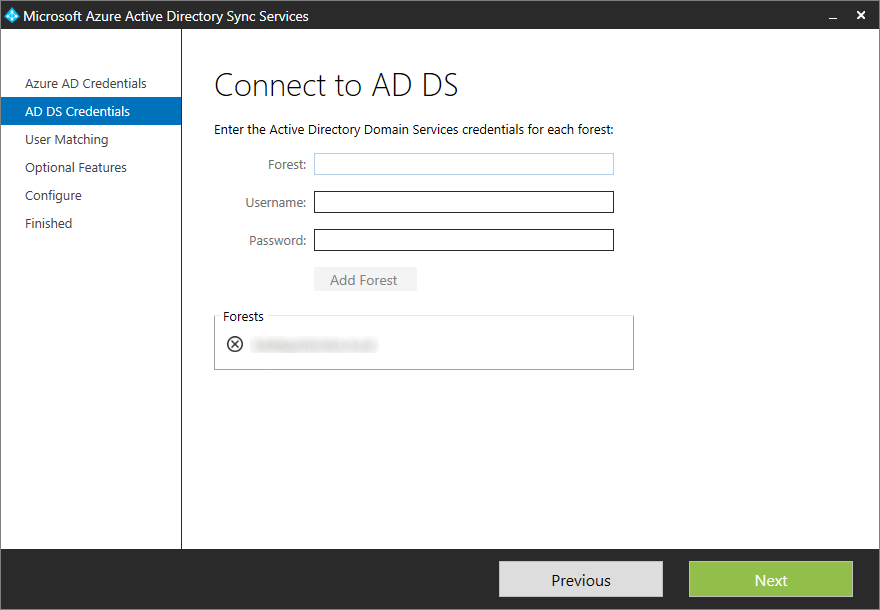
  15. Enter in your forest name, username (must be in domain\username format), and password (Active Directory on-premise credentials) and click Add Forest
    Microsoft Azure Active Directory Sync Services - AD DS Credentials

    1. Note: If you are unsure what your forest name is, login to your domain controller and execute the following powershell command to list all forests in your deployment:
       Get-AdForest | FT Name
  16. Click Next once your forest has been validated
    Microsoft Azure Active Directory Sync Services - AD DS Credentials - Forests Validated
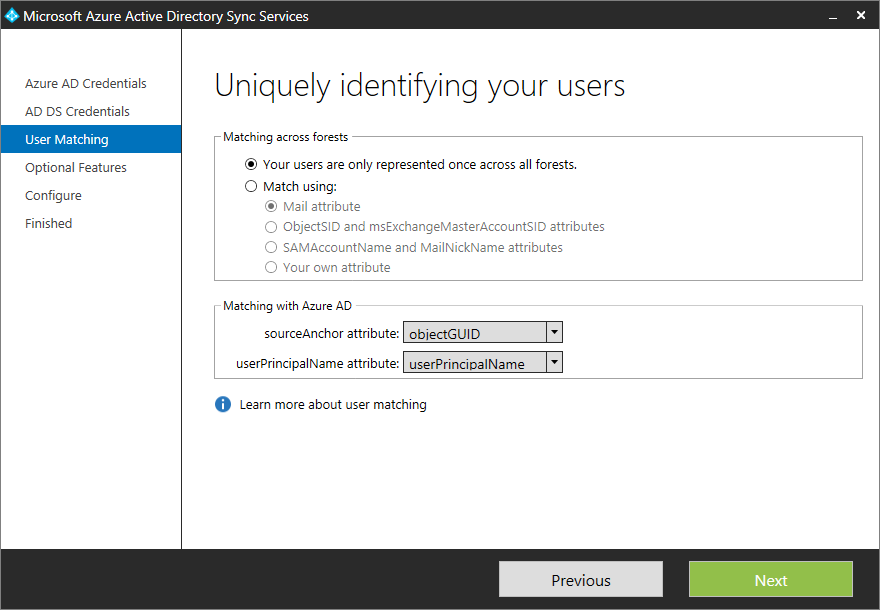
  17. Click Next on User Matching
    Microsoft Azure Active Directory Sync Services - User Matching
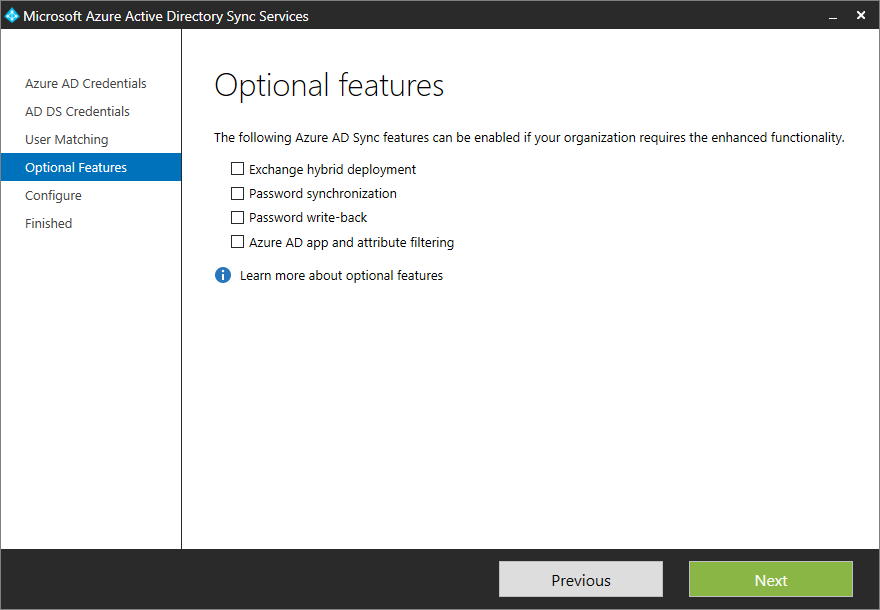
  18. Check the boxes that are applicable to your deployment and click Next
    Microsoft Azure Active Directory Sync Services - Optional Features
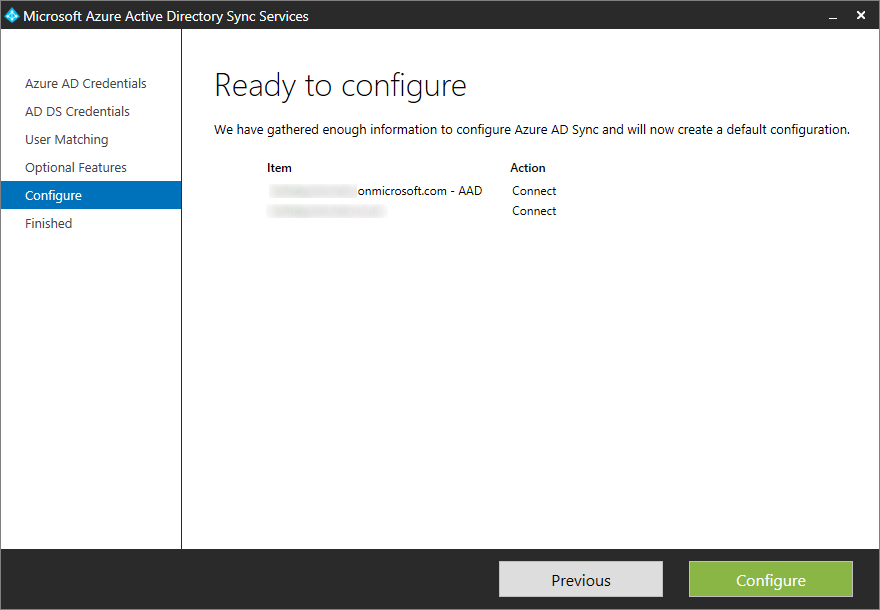
  19. Click Configure
    Microsoft Azure Active Directory Sync Services - Configure
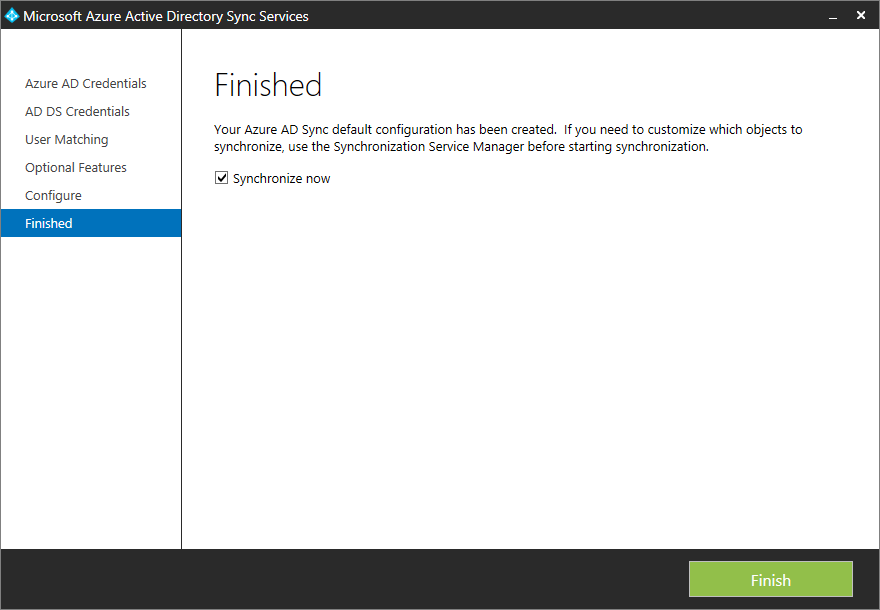
  20. Click Finish
    Microsoft Azure Active Directory Sync Services - Finish


How to administratively forward Lync calls or numbers

Scenario: A user leaves the organization and you would like to forward their number/calls to a manager.

Solution: Microsoft has a Lync Server 2013 (and 2010) Resource Kit that contains a command-line tool called SEFAUtil (secondary extension feature activation) which can be used to achieve this task.  Before beginning, I would recommend taking a look at the official TechNet article/documentation on the utility itself: http://technet.microsoft.com/en-us/library/jj945604.aspx  In this tutorial, we will download the tool and execute the proper commands to configure call forwarding for a specified user.

  1. Download a copy of the Lync Server 2013 Resource Kit from Microsoft's website here: http://go.microsoft.com/fwlink/p/?LinkID=330429
  2. Run the installer from your Front End Server/Pool
    OCSReskit_msi
    Lync Server 2013 - Resource Kit - Welcome
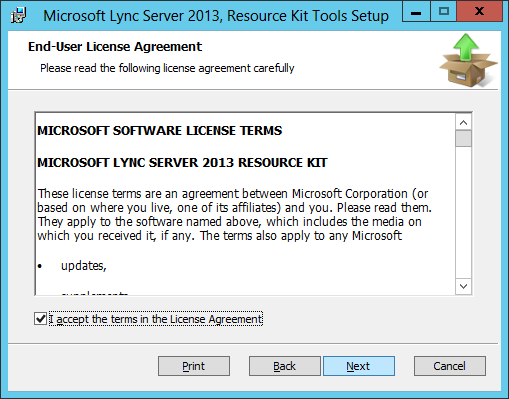
    Lync Server 2013 - Resource Kit - EULA
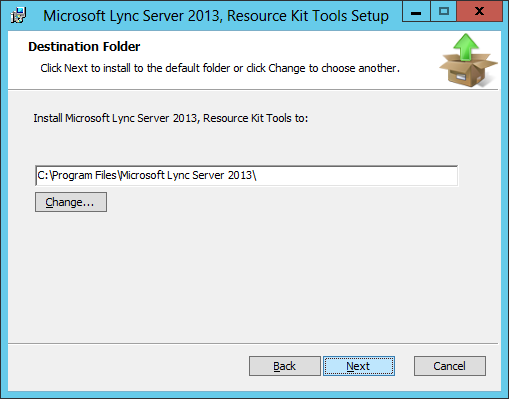
    Lync Server 2013 - Resource Kit - Destination Folder
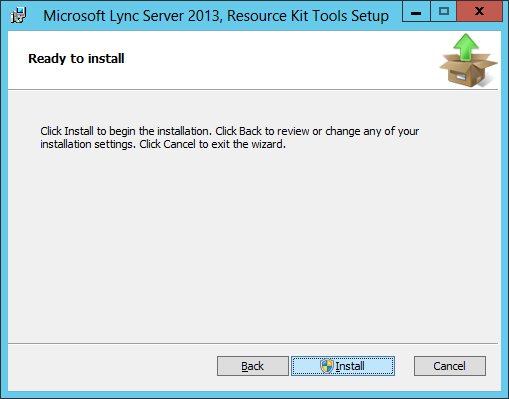
    Lync Server 2013 - Resource Kit - Install
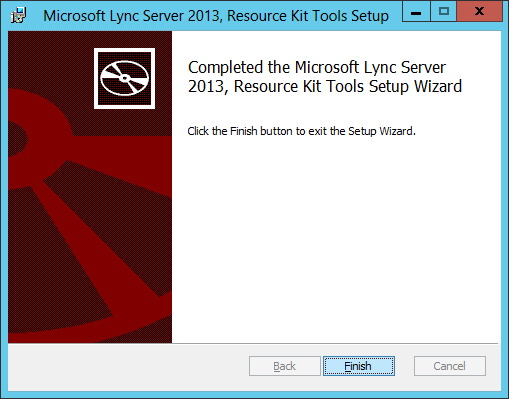
    Lync Server 2013 - Resource Kit - Finish
  3. Create a trusted application pool
    1. Execute the following command
      1. $Site=Get-CsSite -Identity "My Site"
        Lync Server 2013 - Get-CsSite - Variable

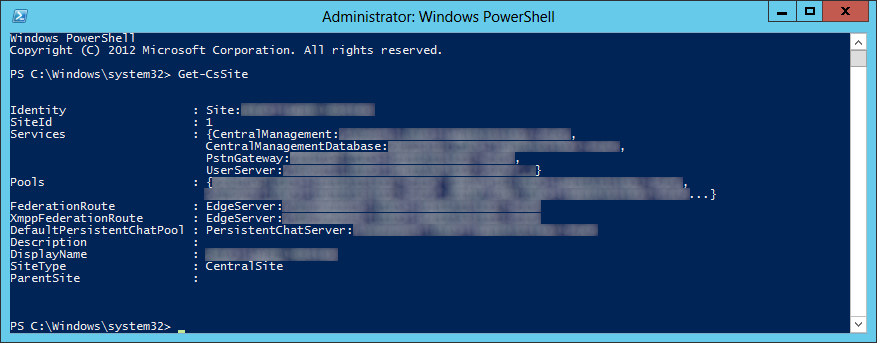
        1. Note: If you don't know what to substitute for My Site, execute the following command to see what sites you have available and then use the Identity value.
          1. Get-CsSite
            Lync Server 2013 - Get-CsSite
      2. Execute the following command
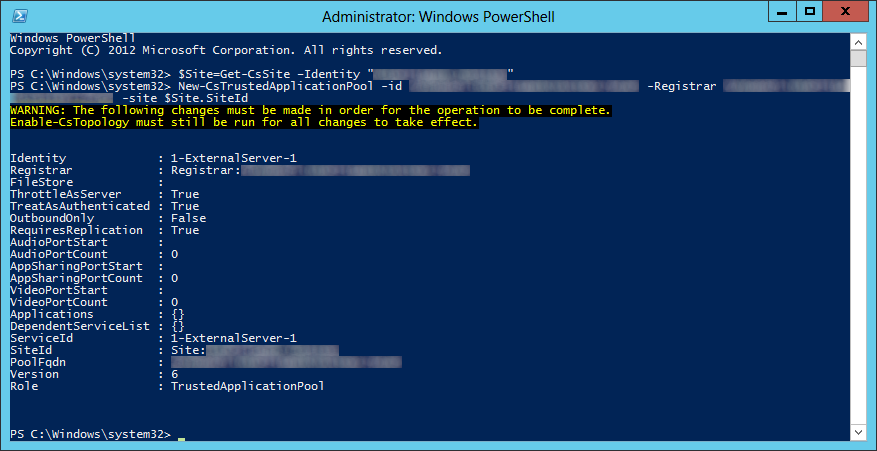
        1. New-CsTrustedApplicationPool -id <Pool FQDN> -Registrar <Pool Registrar FQDN> -site $Site.SiteID
          Lync Server 2013 - New-CsTrustedApplicationPool

          1. Note: Technically we didn't need to run the 1st command, however this can help cut-down on user error.  Additionally, if you have multiple sites and you knew what site you wanted to use but not the ID, this helps skip a step.
  4. Define SEFAUtil as a trusted application in the Lync topology
    1. Execute the following command
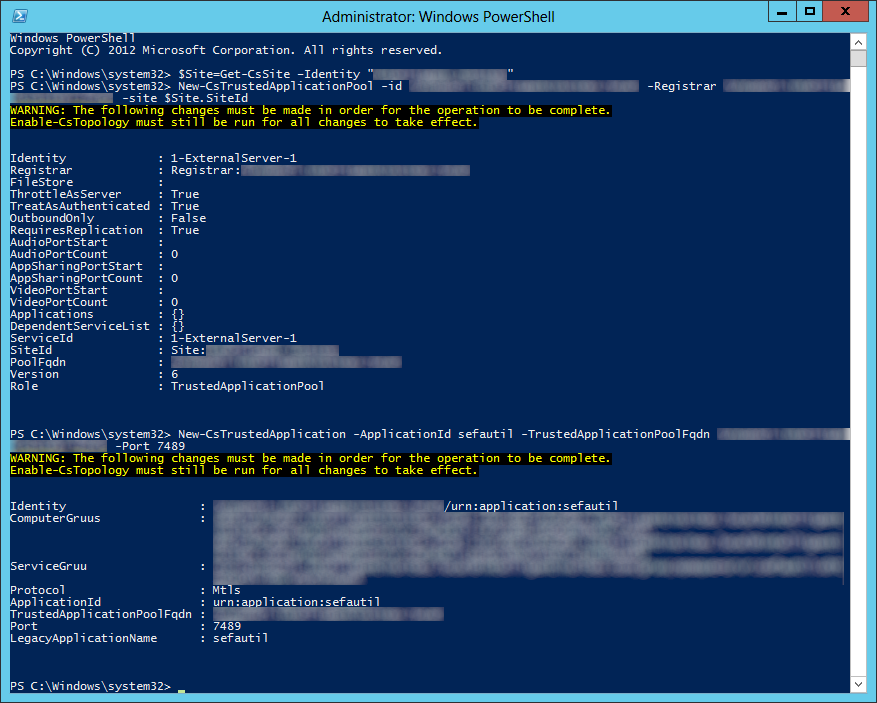
      1. New-CsTrustedApplication -ApplicationId sefautil -TrustedApplicationPoolFqdn <Pool FQDN> -Port 7489
        Lync Server 2013 - New-CsTrustedApplication sefautil
  5. Enable the Lync topology to commit the changes
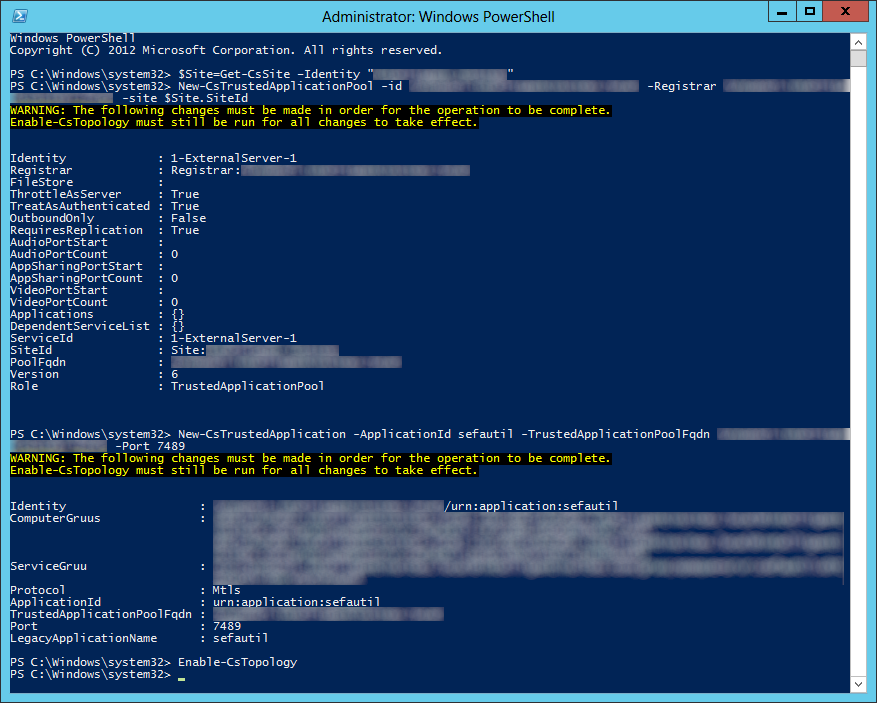
    1. Enable-CsTopology
      Lync Server 2013 - New-CsTrustedApplication sefautil - Enable-CsTopology
  6. Forward a user's number
    1. Navigate to %ProgramFiles%\Microsoft Lync Server 2013\ResKit
      Lync Server 2013 - Navigate ResKit
    2. Execute the following command
      1. SEFAUtil.exe /Server:<Pool FQDN> [email protected] /enablefwdimmediate /setfwddestination:[email protected]
        SEFAUtil enablefwdimmediate setfwddestination

That should be it!

Note: If you are more comfortable using a GUI or don't wish to type in multiple powershell commands, I would highly recommend checking out Johan Veldhuis's SefaUtil GUI PowerShell script.  Once you are done following steps 1-5 above, you you can grab a copy of the script here: http://johanveldhuis.nl/sefautil-gui/sefautil-gui/

[How-To] Import large .sql file into MSSQL (Microsoft SQL) Server

Objective: You have a .sql file you wish to import in Microsoft SQL Server (MSSQL)

Solution: Microsoft has a command line utility called Sqlcmd that can be used to import very large datasets into SQL server without having to open the file.  More information on this utility can be found here: http://msdn.microsoft.com/en-us/library/ms162773.aspx

Here is a snippit of the utility and its available switches before beginning:

C:\Users\Administrator>sqlcmd /?

usage: Sqlcmd            [-U login id]          [-P password]
  [-S server]            [-H hostname]          [-E trusted connection]
  [-N Encrypt Connection][-C Trust Server Certificate]
  [-d use database name] [-l login timeout]     [-t query timeout]
  [-h headers]           [-s colseparator]      [-w screen width]
  [-a packetsize]        [-e echo input]        [-I Enable Quoted Identifiers]
  [-c cmdend]            [-L[c] list servers[clean output]]
  [-q "cmdline query"]   [-Q "cmdline query" and exit]
  [-m errorlevel]        [-V severitylevel]     [-W remove trailing spaces]
  [-u unicode output]    [-r[0|1] msgs to stderr]
  [-i inputfile]         [-o outputfile]        [-z new password]
  [-f  | i:[,o:]] [-Z new password and exit]
  [-k[1|2] remove[replace] control characters]
  [-y variable length type display width]
  [-Y fixed length type display width]
  [-p[1] print statistics[colon format]]
  [-R use client regional setting]
  [-K application intent]
  [-M multisubnet failover]
  [-b On error batch abort]
  [-v var = "value"...]  [-A dedicated admin connection]
  [-X[1] disable commands, startup script, environment variables [and exit]]
  [-x disable variable substitution]
  [-? show syntax summary]

Here is an example of how to use the utility:

  1. Open up a command prompt
    1. Note: Administrative privileges are optional depending on how you have your security settings configured.
      Server 2012 - Administrative Command Prompt
  2. Execute the following command
    1. sqlcmd -S SERVERNAME\INSTANCE_NAME -i C:\path\mysqlfile.sql
      1. Here are some notes/tricks you might want to use:
        • If you are using the default instance when you installed MSSQL server, you don't have to specify \INSTANCE_NAME
        • You can log results to a text file by appending the following switch: -o C:\path\results.txt
        • You can specify a database to import to by appending the following switch: -d MYDATABASE
        • You can specify username and password by appending the following switch: -u USERNAME -p PASSWORD
          --Note: You can wait to be prompted for credentials by optionally leaving out the -p switch, however if you are piping the results out to notepad, the command will not fully execute.


[How-To] Upgrade the firmware on a Dell PowerConnect N2000/3000 series switch

  1. Download the latest firmware from Dell's website
    1. Navigate to http://www.dell.com/support/ and enter in your service tag.  You should see downloads for this product, grab the latest firmware that is in a zipped folder.
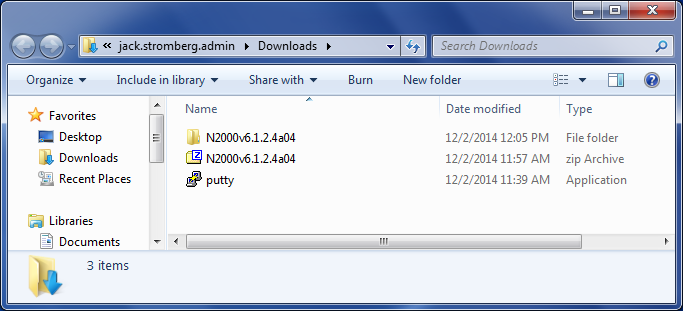
  2. Extract the .zip folder of the firmware
    N2000 Firmware
  3. Console into the switch via SSH or direct console
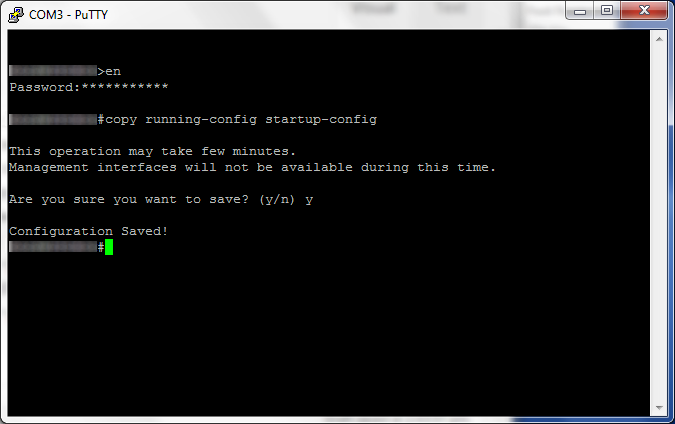
  4. Copy the current configuration to startup
    1. console#> copy running-config startup-config
      N2000-3000 - copy running-config startup-config
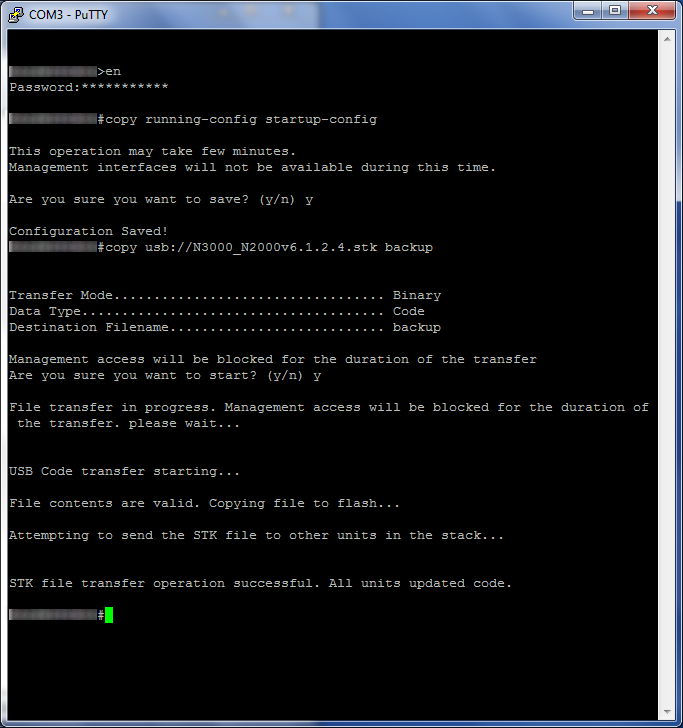
  5. Transfer the firmware to the switch
    1. TFTP Method
      1. console#> tftp://N3000_2000v6.1.2.4.stk backup
    2. USB Method (Directly attached to switch)
      1. console#> usb://N3000_2000v6.1.2.4.stk backup
        N2000-3000 - usb transfer - backup
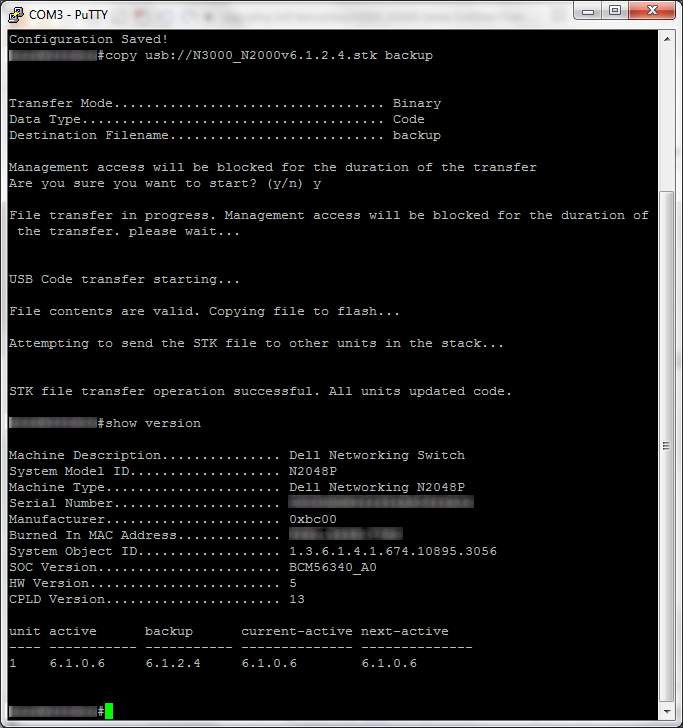
  6. Verify the backup version is the new build
    1. console#> show version
      N2000-3000 - backup - version
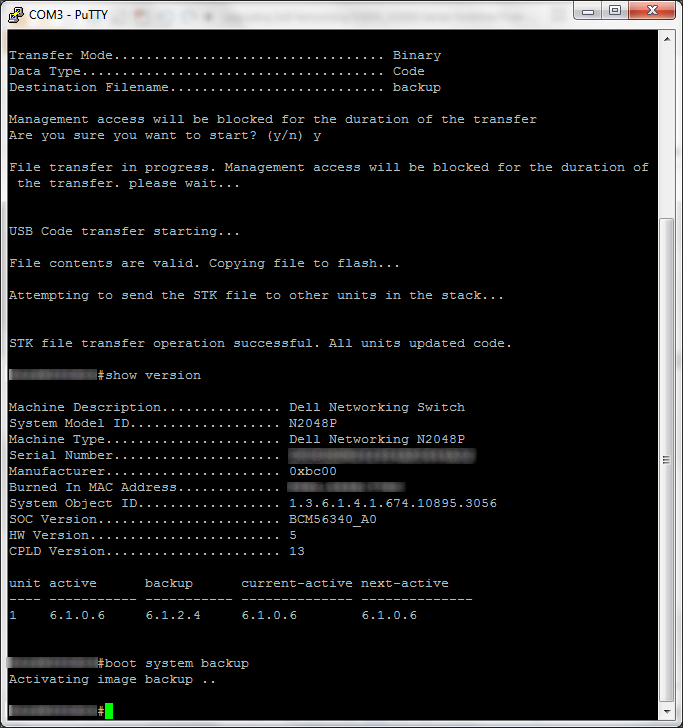
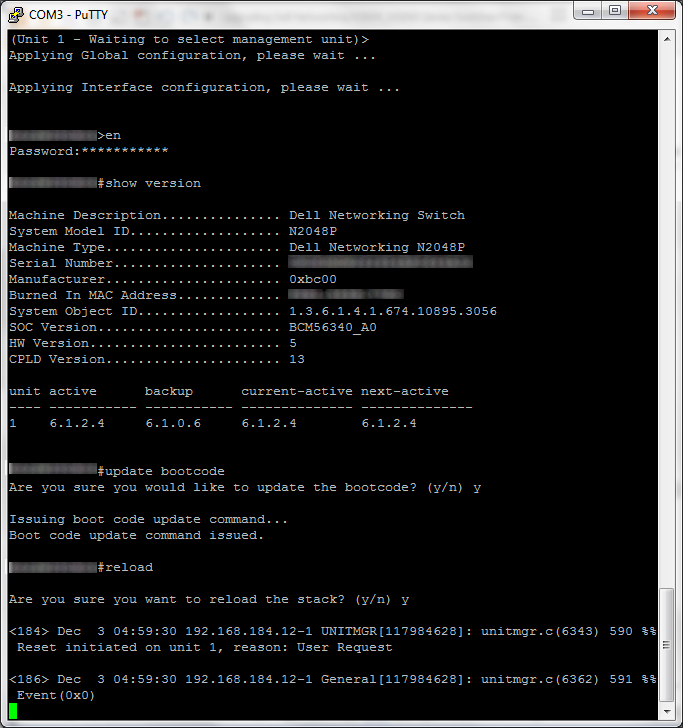
  7. Activate the new firmware
    1. console#> boot system backup
      N2000-3000 - backup - boot system backup
  8. Reboot the switch
    1. console#> reload
      N2000-3000 - update bootcode - reload
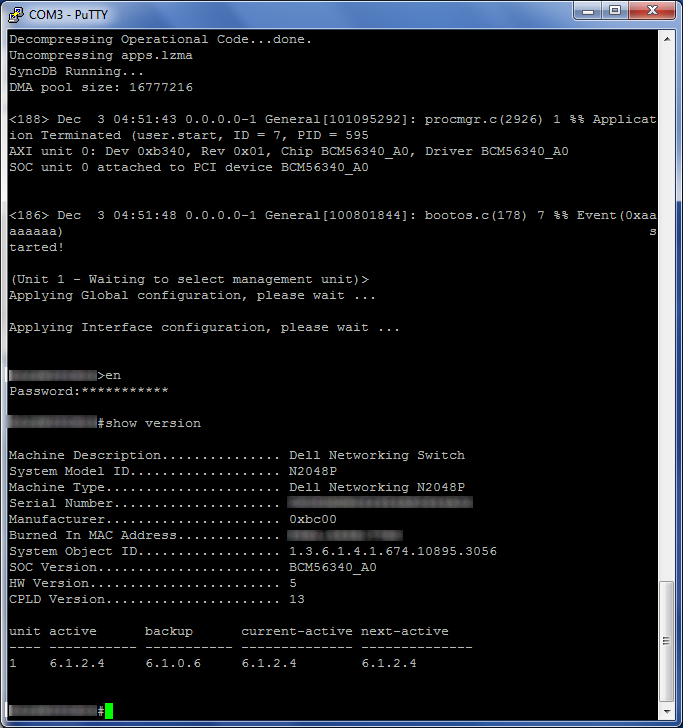
  9. Verify the build is now up-to-date
    1. console#> show version
      N2000-3000 - show version - active - 6_1_2_4
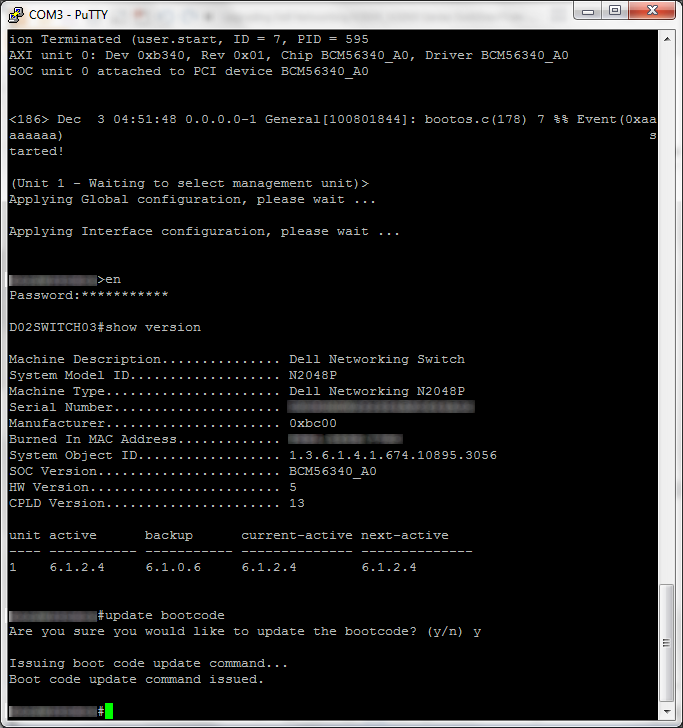
  10. Update the boot code
    1. console#> update bootcode
      N2000-3000 - show version - active - 6_1_2_4 - update bootcode
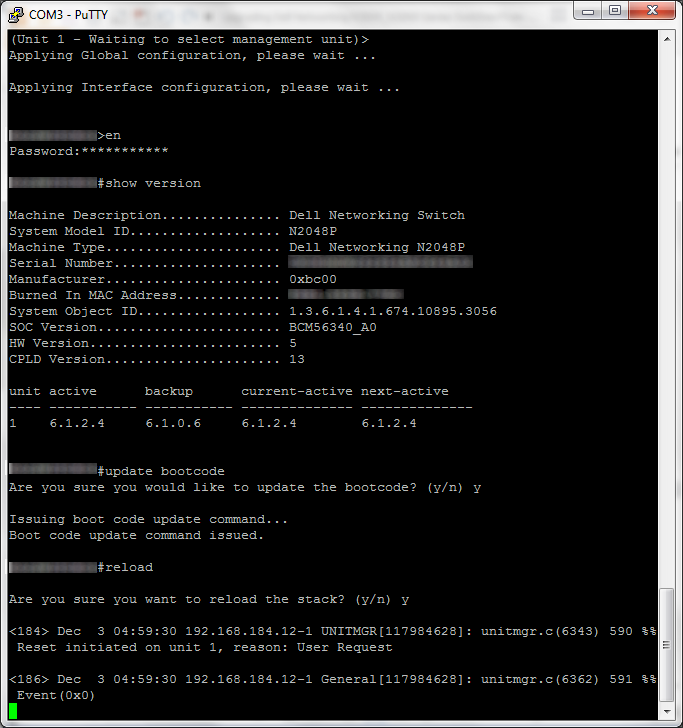
  11. Reboot the switch
    1. console#> reload
      N2000-3000 - update bootcode - reload

That should do it!

Office 365 - Renew your certificates (on-premise ADFS) alert

Symptom: After you replace your SSL certificates on your ADFS servers you continue to receive the following alert inside of the Office 365 portal.

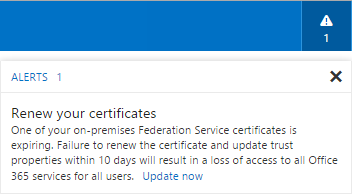
Renew your certificates
One of your on-premises Federation Service certificates is expiring.  Failure to renew the certificate and update trust properties within XX days will result in a loss of access to all Office 365 services for all users.  Update now

Office 365 - Alert - Renew your certificates

Solution: This error can be caused if any of the three primary SSL Certificates that are required to federate to an external identity are nearing their experation date (Service Communications, Token-decrpting, and Token-signing).

Verify which SSL certificate is about to expire

  1. Login to your primary ADFS server
  2. Open up Server Manager
    Server 2012 R2 - Server Manager
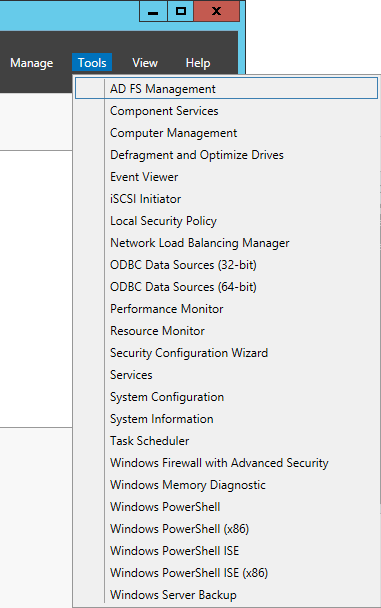
  3. Select Tools -> AD FS Management
    Server Manager - Tools - AD FS Management
  4. Under AD FS expand Service and select Certificates
    AD FS Management Console - AD FS - Service - Certificates
  5. Verify if any certificates are set to expire
    1. Note: In this case, you can see the Token-decrypting and Token-signing certificates are set to expire soon

Replace the expir(ed)(ing) certificates

Unfortunately, I don't currently have a tutorial on the processes behind replacing each certificate.  The process for replacing each certificate is a tad different.  Here are a few articles that might help you:

Replacing the Service Communication certificate: http://blogs.technet.com/b/tune_in_to_windows_intune/archive/2013/11/13/replace-certificates-on-adfs-3-0.aspx

Replacing the token-signing and token-decrypting certificates can be found here: http://social.technet.microsoft.com/wiki/contents/articles/2554.ad-fs-2-0-how-to-replace-the-ssl-service-communications-token-signing-and-token-decrypting-certificates.aspx#Replacing_the_Token-Signing_certificate

Update the federated trust with Office 365

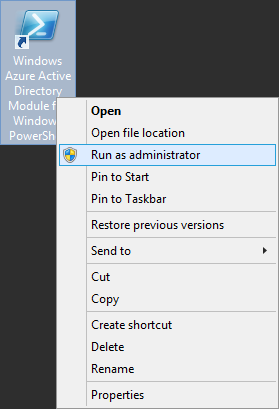
  1. Once your certificates are not nearing their experation date, open up the Windows Azure Active Direcotry Module for Windows PowerShell as an administrator
    1. Note: Installation instructions and the download for this can be found here: http://technet.microsoft.com/en-us/library/jj151815.aspx
      Windows Azure Active Directory Module for Windows PowerShell
  2. Execute the following command
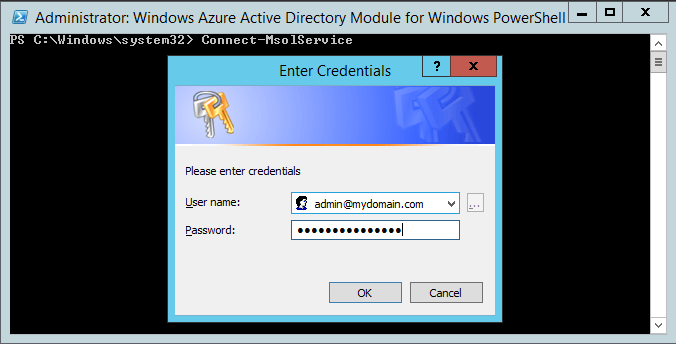
    1.  Connect-MsolService
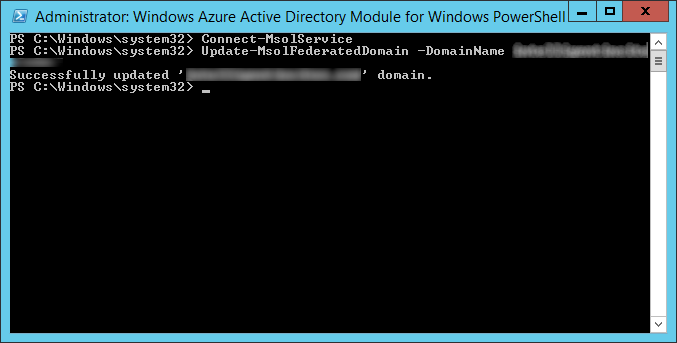
      Windows Azure Active Directory Module for Windows PowerShell - Connect-MsolService

      1. Note: Enter in your Office 365 administrator credentials on this step
  3. Execute the following command
    1. Update-MsolFederatedDomain -DomainName mydomain.com -SupportMultiDomain
      Windows Azure Active Directory Module for Windows PowerShell - Connect-msolservice - update-msolfederateddomain

      1. Note: Replace mydomain.com with your federated domain.  If you have multiple domains you are federating with Office 365, add the optional -SupportMultiDomain paramter as well

[Tutorial] Deploying a reverse proxy for Lync Server 2013

In this tutorial we will go over deploying a reverse proxy for Lync Server 2013.  The original method for deploying a reverse proxy was to use Microsoft's product ForeFront TMG (Threat Management Gateway), however shortly after the release of Lync Server 2013, TMG was discontinued.  In turn, a few tutorials have popped up on how to achieve this using Apache and IIS, but there wasn't an official recommendation on what to use until Server 2012 was released.

Per Microsoft's documentation, we can use IIS with an additional extension called Application Request Routing to achieve this task: http://technet.microsoft.com/en-us/library/gg398069.aspx

Details on the IIS Application and Request Routing extension can be found here: http://www.iis.net/downloads/microsoft/application-request-routing

Side note, much of this guide is largely based on an older technet article published here, which has some additional fine details on how exactly IIS is working to proxy the requests: http://blogs.technet.com/b/nexthop/archive/2013/02/19/using-iis-arr-as-a-reverse-proxy-for-lync-server-2013.aspx

This tutorial will go over installation instructions from start to finish for Server 2012 and Server 2012 R2.  I have attached the links on how to get Server 2008 and Server 2008 R2 prepped, so you can continue the tutorial once the IIS Application Request Routing extension has been installed.

Download Prerequisite Software

  1. Windows Server 2012 R2
    1. Download IIS Application Request Routing (ARR): http://www.microsoft.com/web/gallery/install.aspx?appid=ARRv3_0
  2. Windows Server 2012
    1. Download (don't install yet) Hotfix for Microsoft Application Request Routing Version 2.5 for IIS7 (KB 2732764) (x64)
    2. Download IIS Application Request Routing (ARR): http://www.microsoft.com/web/gallery/install.aspx?appid=ARRv2_5
  3. Windows Server 2008 and 2008 R2
    1. Ensure you have IIS v7.X installed; instructions on how to do this can be found here: http://www.iis.net/learn/install/installing-iis-7/installing-iis-7-and-above-on-windows-server-2008-or-windows-server-2008-r2
    2. Install Application Request Routing version 2
      1. Instructions can be found here: http://www.iis.net/learn/extensions/installing-application-request-routing-(arr)/install-application-request-routing-version-2

Install IIS for Server 2012 and Server 2012 R2

  1. Please follow my tutorial here: http://jackstromberg.com/2014/11/tutorial-how-to-install-iis-on-server-2012-and-server-2012-r2/

Installing IIS Application Request Routing (ARR) 3

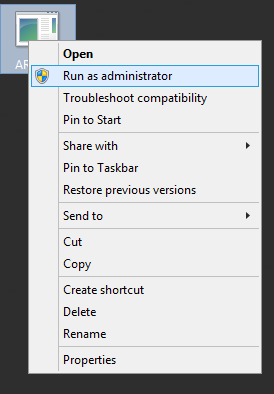
  1. Run the ARRv3_0.exe application as an administrator
    ARRv3_0 - Run as administrator
  2. Click Install
    Web Platform Installer 5.0 - Aplication Request Routing 3.0 - Cart

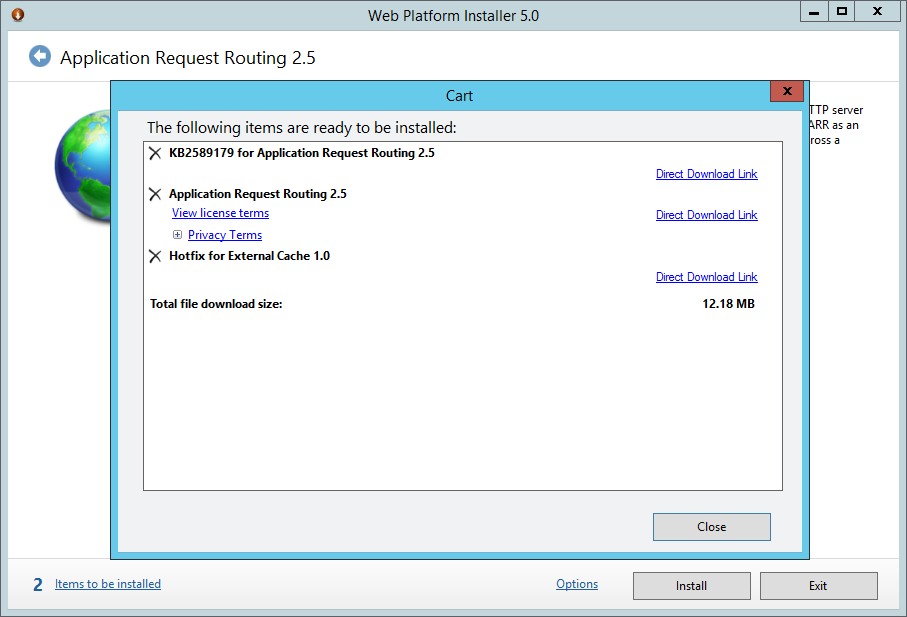
    1. Note:  The cart for the v3.0 installer is shown above.  If you are running version 2.5, you will see 2 items needed for install.  Version 3, only needs one.  This is okay.
      Web Platform Installer 5.0 - Aplication Request Routing 2.5 - Cart
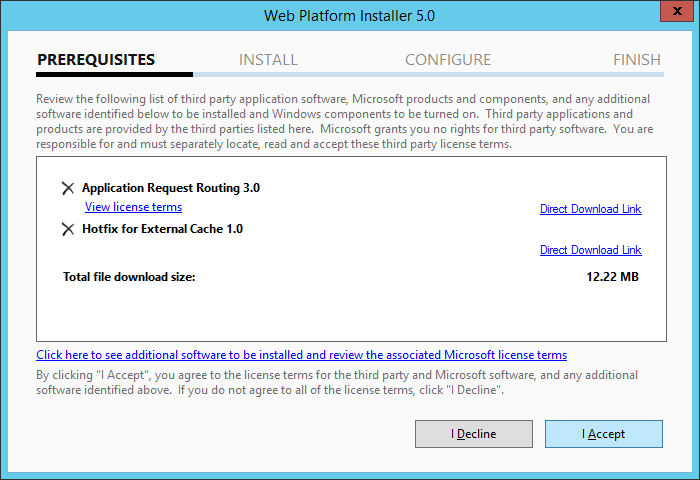
  3. Click I Accept
    Web Platform Installer 5.0 - Aplication Request Routing 3.0 - I Accept
  4. Click Finish
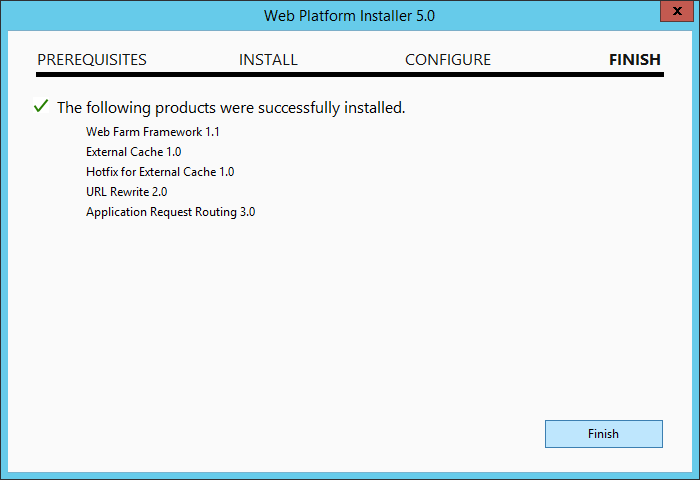
    Web Platform Installer 5.0 - Aplication Request Routing 3.0 - Finish
  5. Click Exit
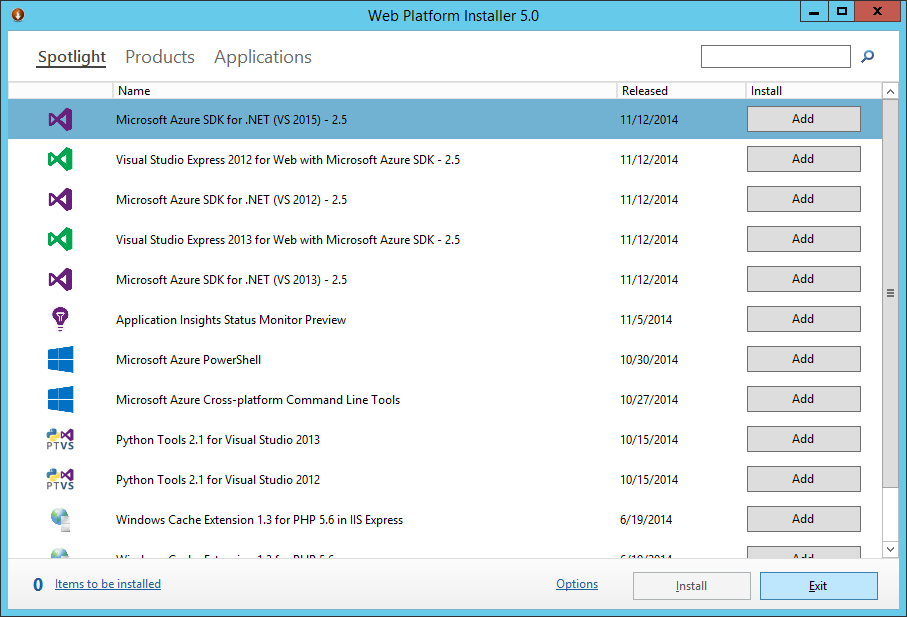
    Web Platform Installer 5.0 - Aplication Request Routing 3.0 - Exit

Configuring IIS for SSL

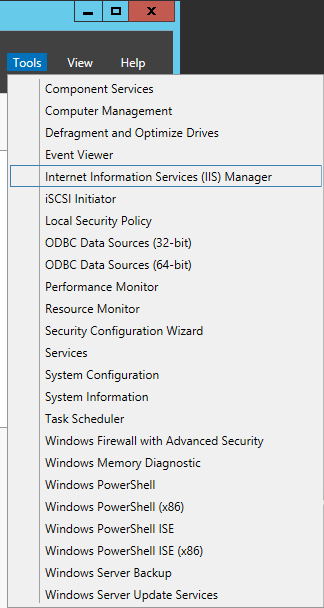
  1. Open up Internet Information Services (IIS) Manager
    Server Manager - Tools - Internet Information Services IIS Manager
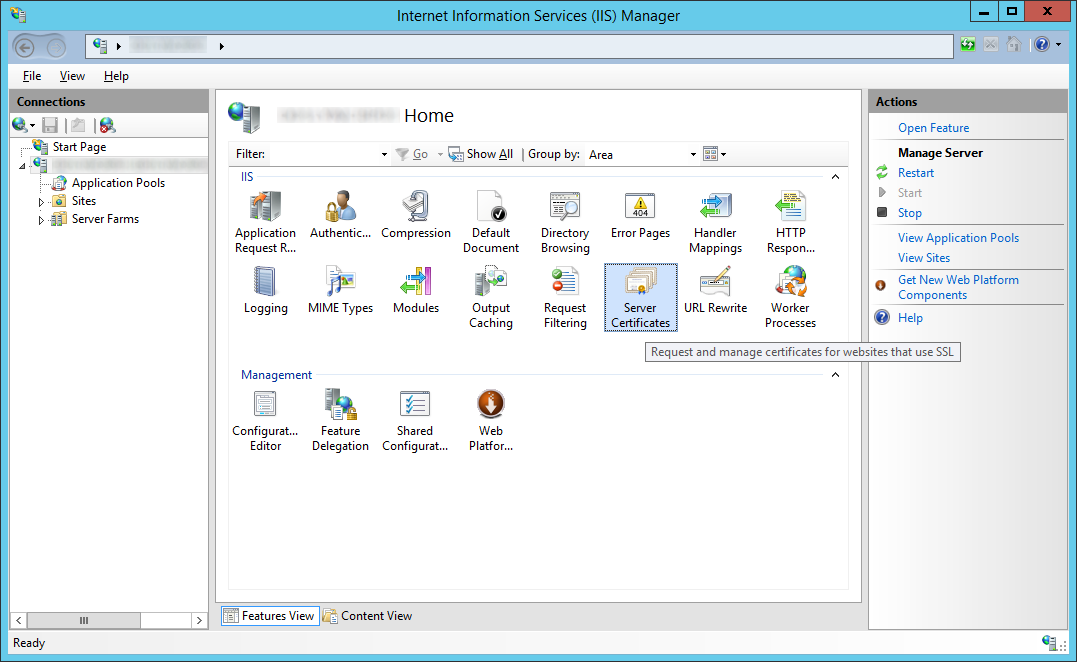
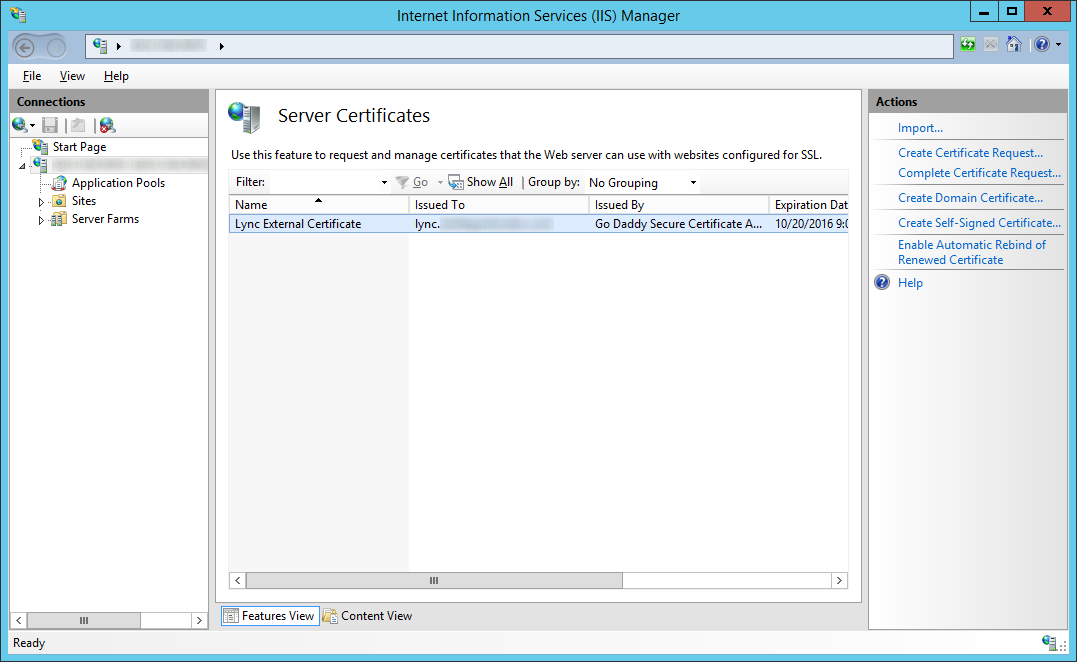
  2. Select your server and double click on Server Certificates
    LyncRP - Internet Information Services IIS Manager - Home - Server Certificates
  3. Generate or Import your SSL Certificate trusted by a public CA (VeriSign, GoDaddy, etc.)
    1. Note: Generation of this certificate is outside the scope of this tutorial.  This SSL certificate should be the UCC certificate that allows for SAN addresses such aslync, meet, dialin, lyncdiscover, etc.
      LyncRP - Internet Information Services IIS Manager - Server Certificates
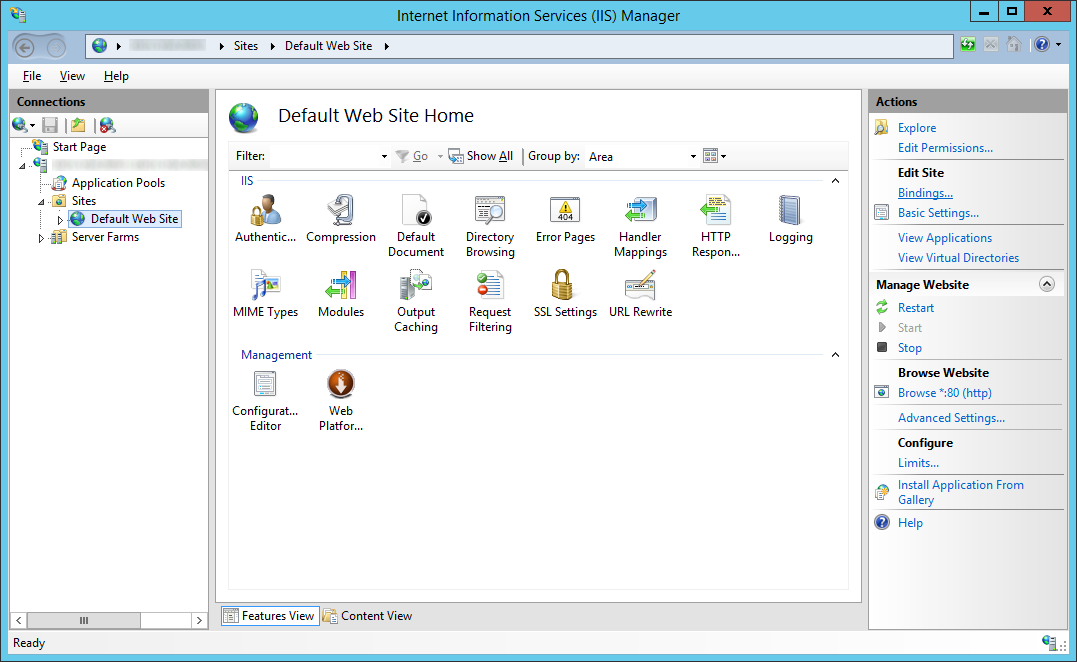
  4. Expand your server, expand Sites, select Default Web Site, select Bindings...
    LyncRP - Internet Information Services IIS Manager - Sites - Default Web Site - Bindings
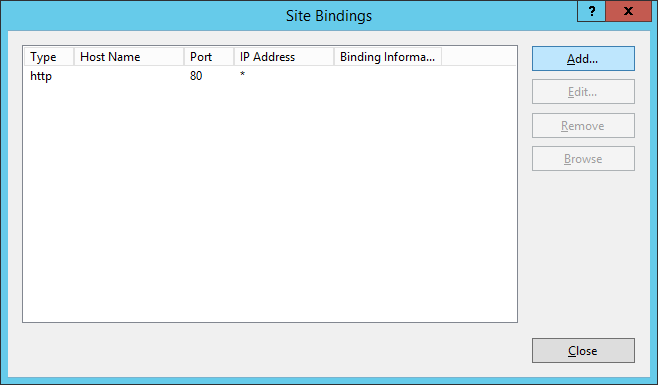
  5. Click on Add...
    LyncRP - Internet Information Services IIS Manager - Sites - Default Web Site - Bindings - Add
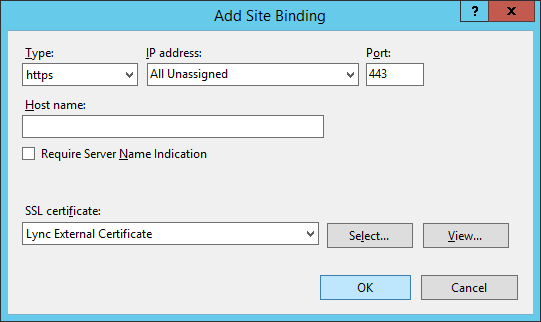
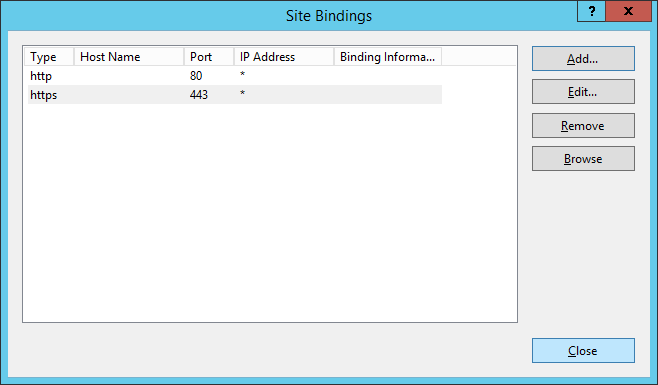
  6. Select https, and choose your SSL certificate you imported in the previous step, click OK
    LyncRP - Internet Information Services IIS Manager - Sites - Default Web Site - Bindings - Add - https
  7. Click Close
    LyncRP - Internet Information Services IIS Manager - Sites - Default Web Site - Bindings - Add - Close

Create Server Farms

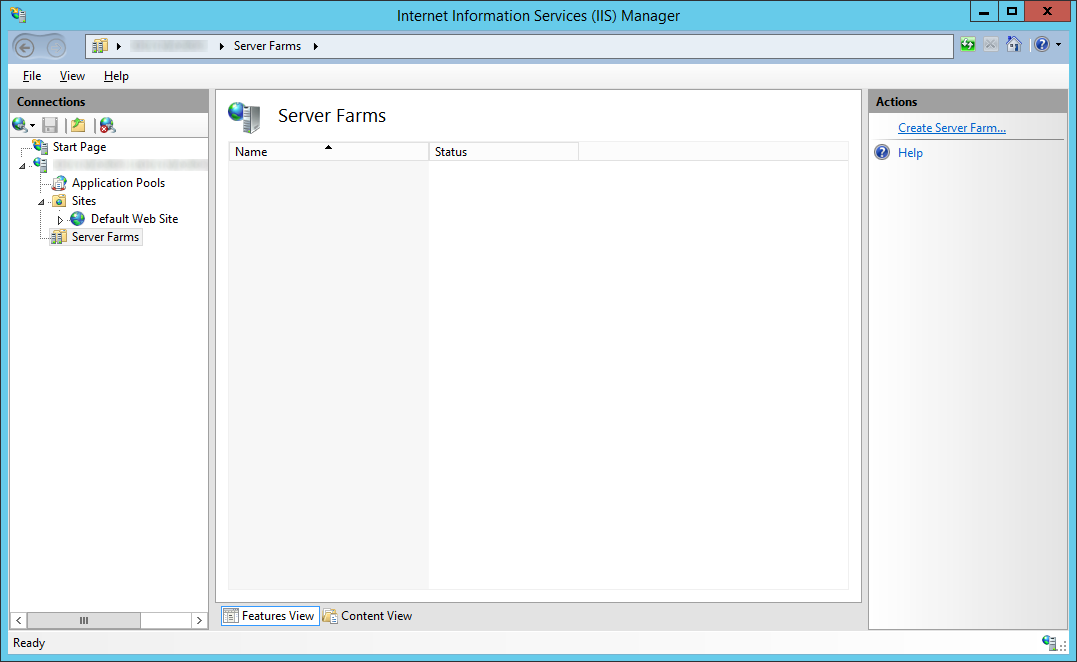
  1. Select Server Farms and then click on Create Server Farm...
    LyncRP - Internet Information Services IIS Manager - Server Farms - Create Server Farm
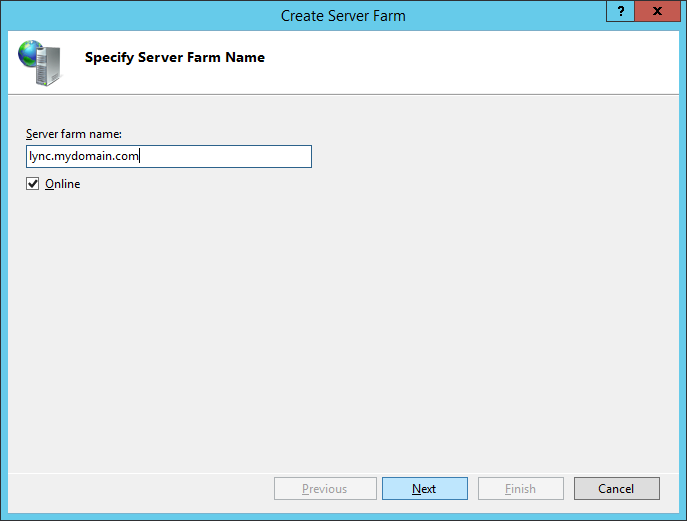
  2. Enter in the Server farm name and click Next
    1. Note: We will end up creating farm names for each externally published URL.  This can be lync, dialin, meet, etc, order will not matter. For the sake of this tutorial, I am going to use lync first.
      LyncRP - Internet Information Services IIS Manager - Server Farms - Create Server Farm - Server Farm Name
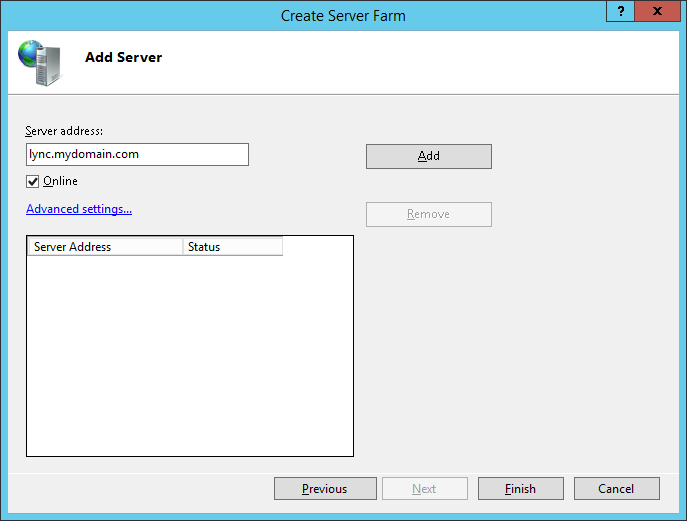
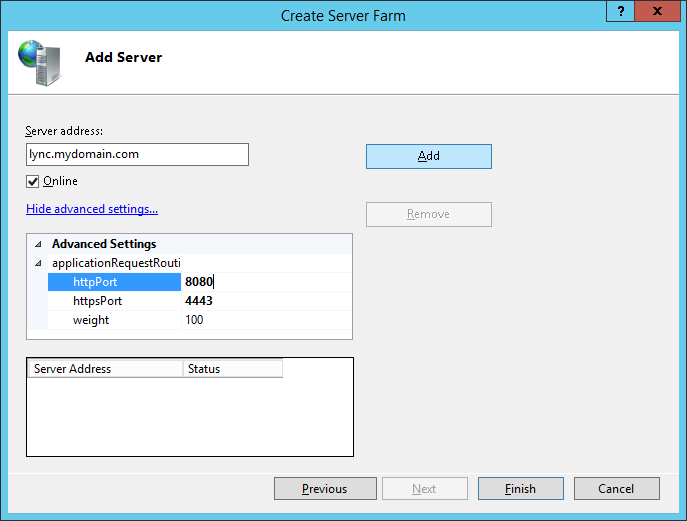
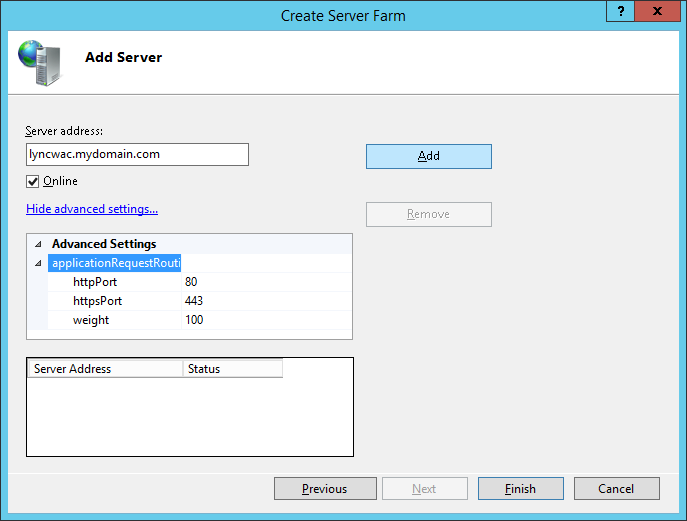
  3. Enter the Server address (same as farm name before), click Advanced Settings..., expand applicationRequestRouting
    LyncRP - Internet Information Services IIS Manager - Server Farms - Create Server Farm - Add Server
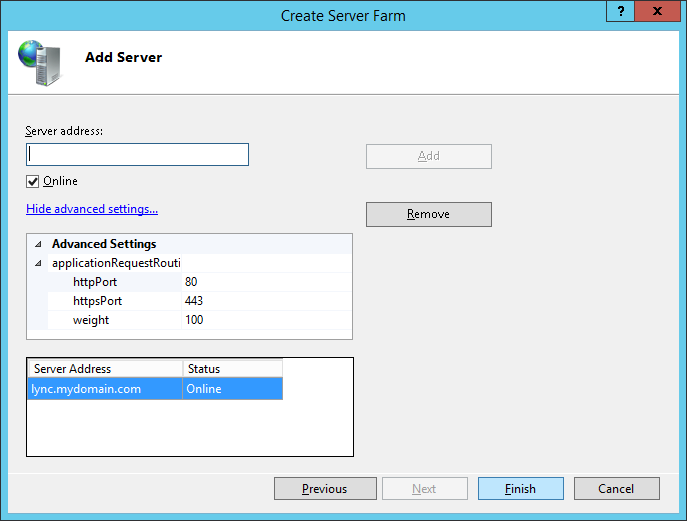
  4. Change the httpPort to 8080 and httpsPort to 4443 and click Add
    LyncRP - Internet Information Services IIS Manager - Server Farms - Create Server Farm - Add Server - applicationRequestRouting Ports
  5. Click Finish
    LyncRP - Internet Information Services IIS Manager - Server Farms - Create Server Farm - Add Server - applicationRequestRouting Ports - Finish
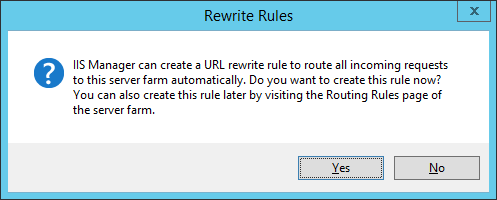
  6. Click Yes on the Rewrite Rules dialog
    LyncRP - Internet Information Services IIS Manager - Server Farms - Create Server Farm - Add Server - applicationRequestRouting Ports - Finish - Rewrite Rules Dialog
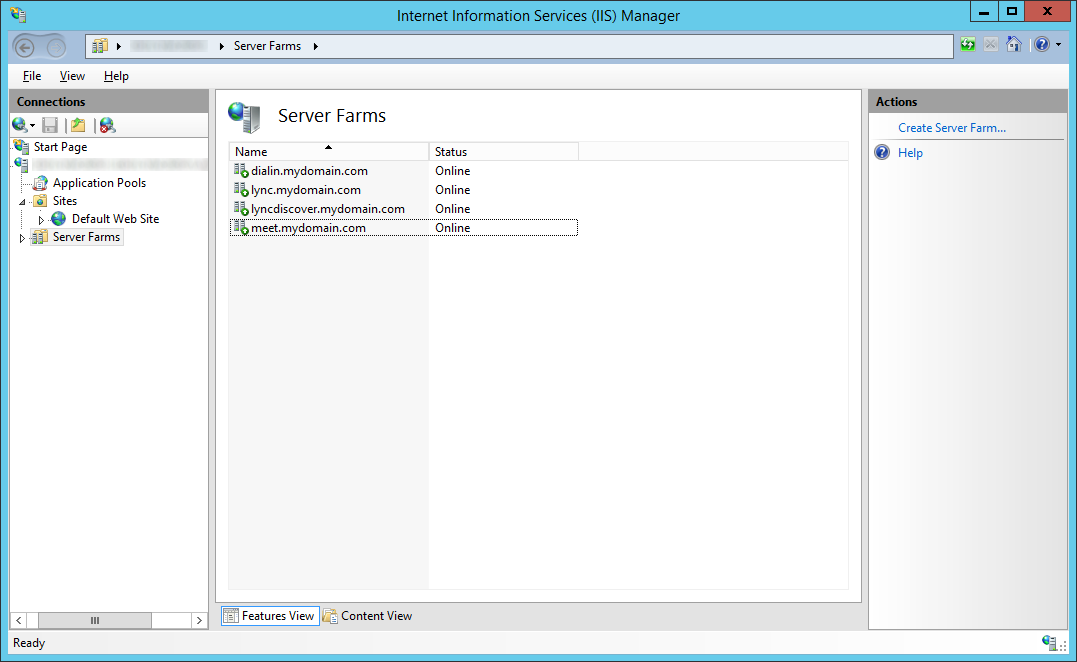
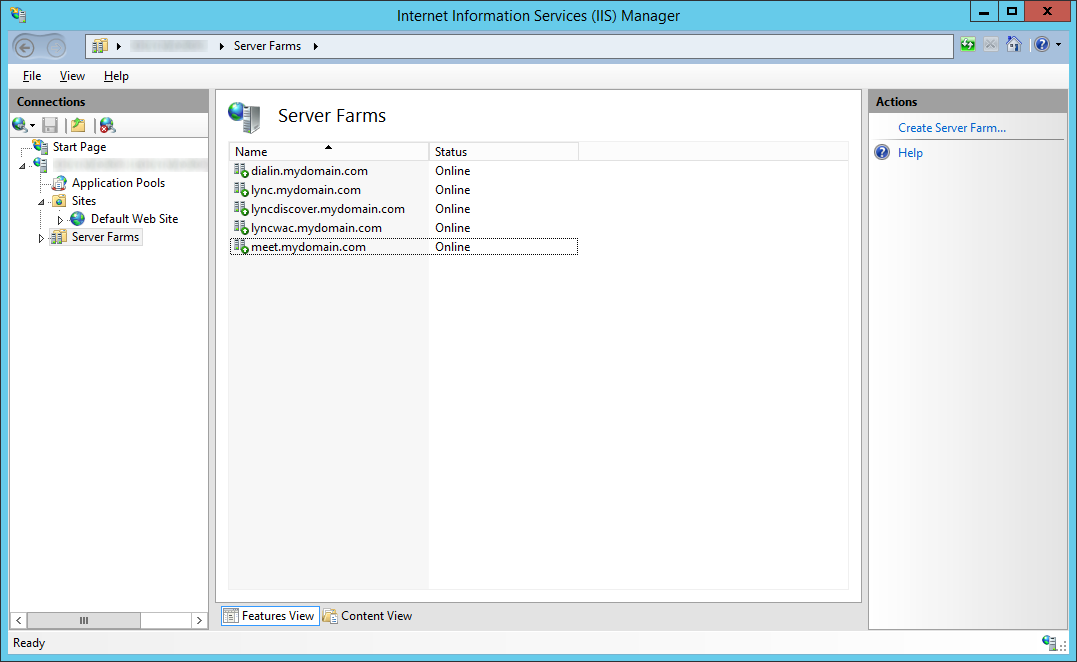
  7. Repeat steps 1-6 for dialin, meet, and lyncdiscover
    LyncRP - Internet Information Services IIS Manager - Server Farms - meet-dialin-lyncdiscver
  8. For your Lync Web Apps server (lyncwac), continue repeat steps 1-6, however ensure you use ports 80 and 443 instead of 8080 and 4443.  This is needed to communicate properly with the WAC server.
    LyncRP - Internet Information Services IIS Manager - Server Farms - Create Server Farm - Add Server - lyncwacLyncRP - Internet Information Services IIS Manager - Server Farms - meet-dialin-lyncdiscver-lyncwac

Configure IIS Caching, Proxy Timeouts, and Routing Rules

For each of the server farms we created, repeat the following steps:

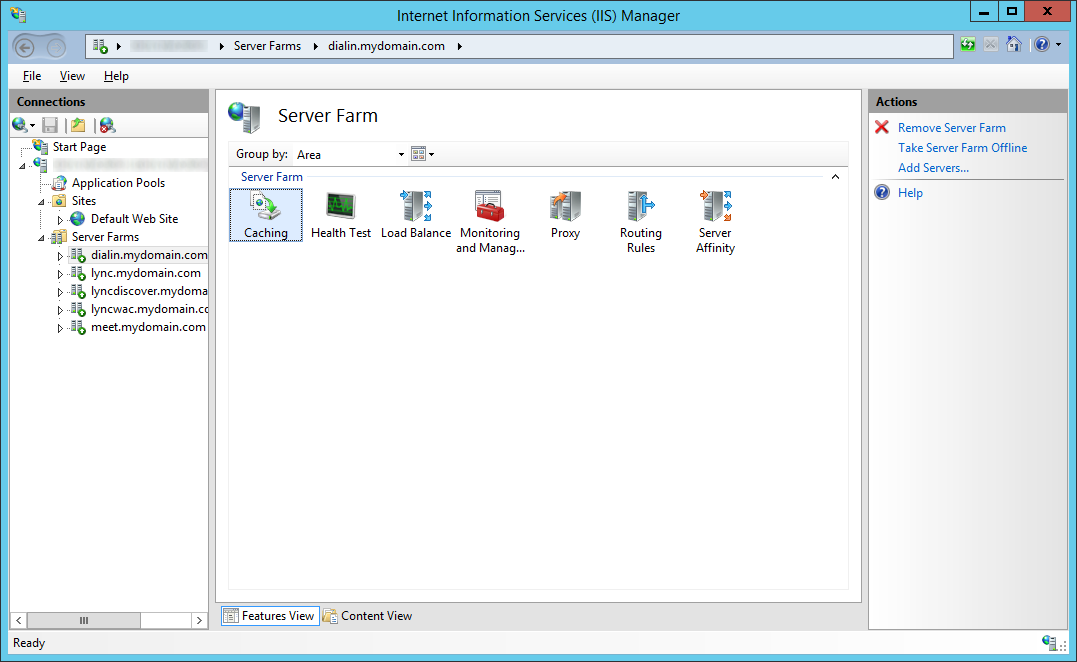
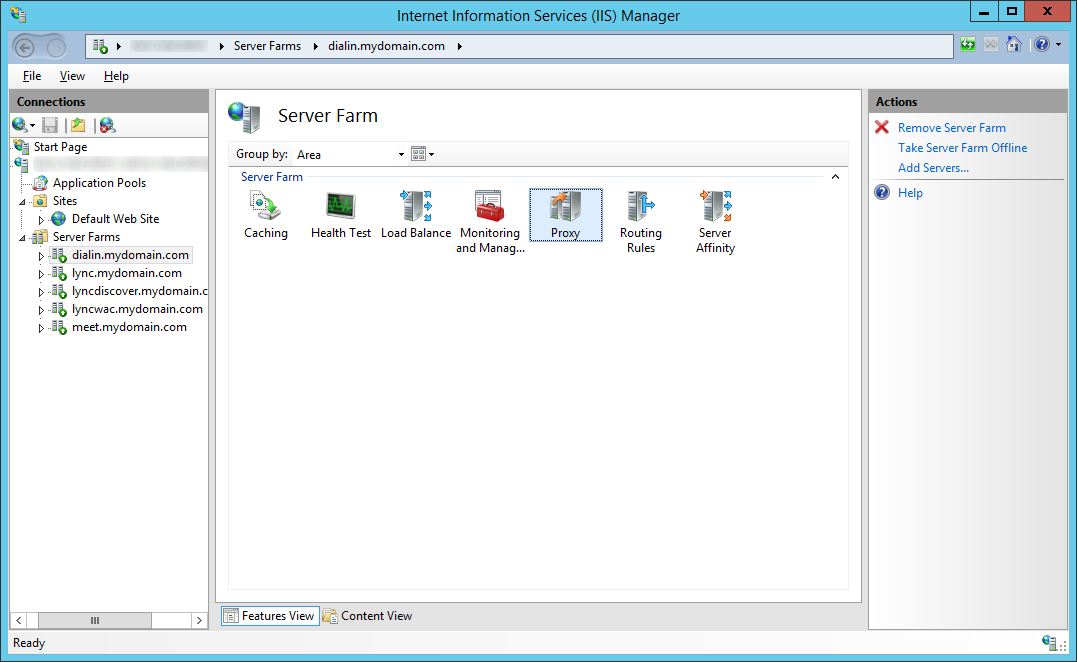
  1. Select a Server Farm and double click on Caching
    LyncRP - Internet Information Services IIS Manager - Server Farms - Caching
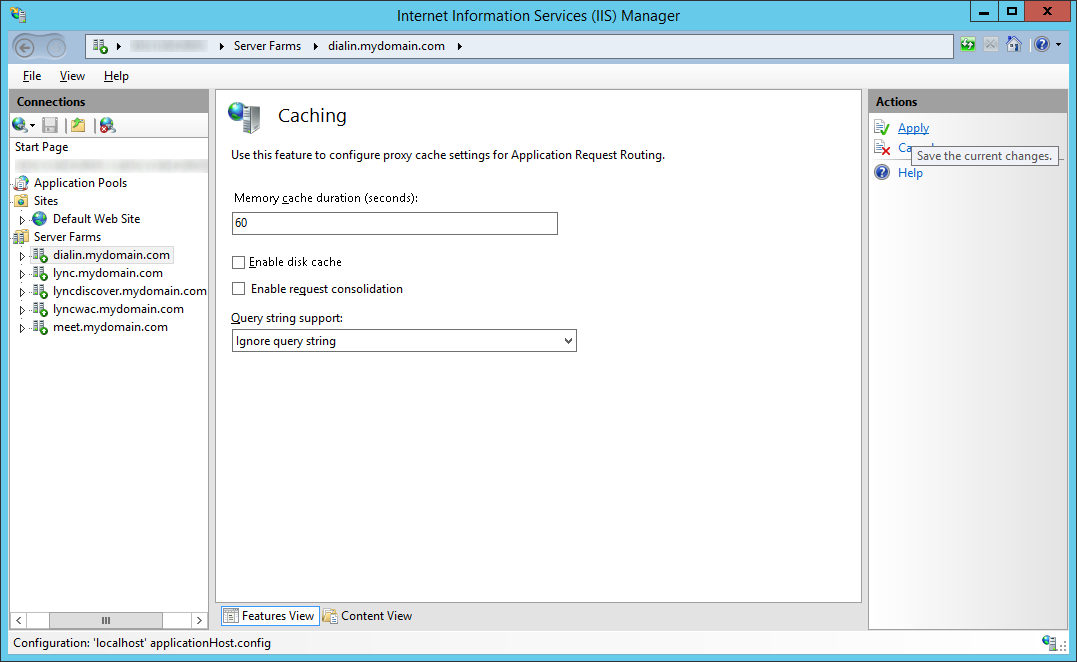
  2. Uncheck Enable disk cache and click Apply
    LyncRP - Internet Information Services IIS Manager - Server Farms - Caching - Uncheck Enable disk cache
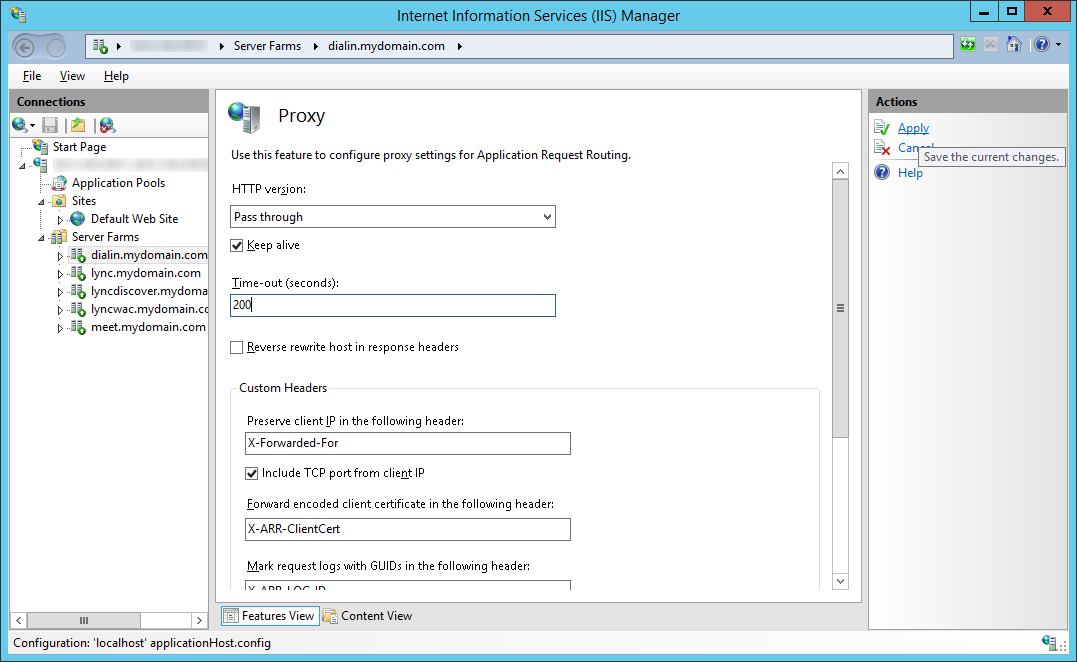
  3. Select the same Server Farm object and double click on Proxy
    LyncRP - Internet Information Services IIS Manager - Server Farms - Proxy
  4. Change the Time-out (seconds) from 30 seconds to 600 and click Apply
    1. Note: This is needed to prevent the Lync Web Apps server from timing out unexpectedly.  Microsoft recommends this setting to be 200, but this isn't long enough for iOS clients.  Increasing this to 600 will fix the issue where iOS clients prompt with the following error message "Your server configuration has changed. Please restart Lync.".LyncRP - Internet Information Services IIS Manager - Server Farms - Proxy - Time-out 200
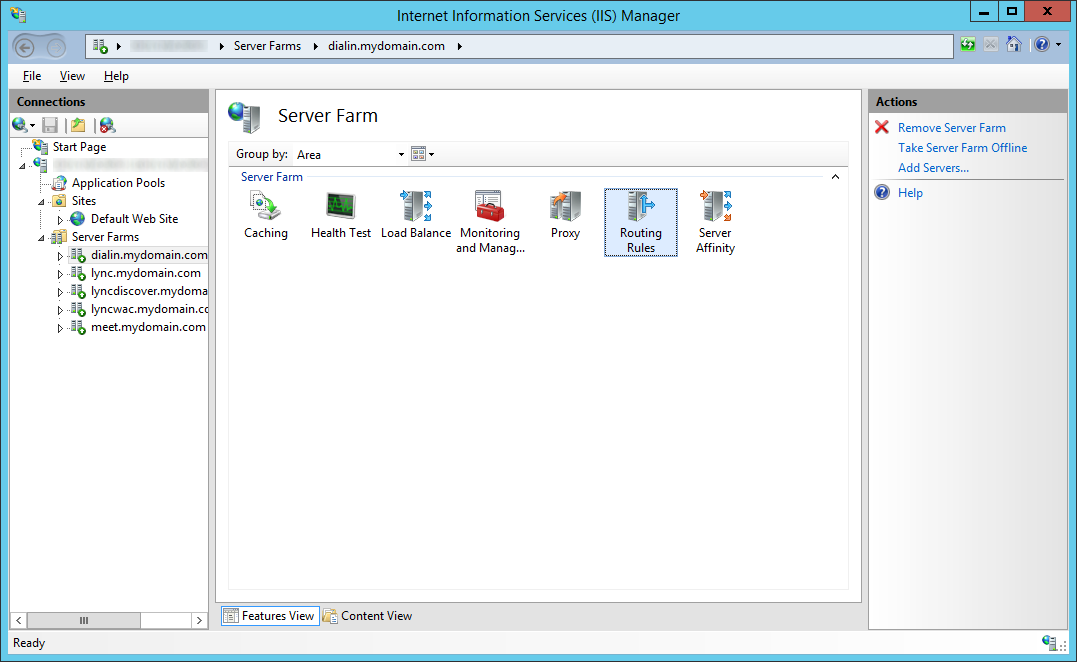
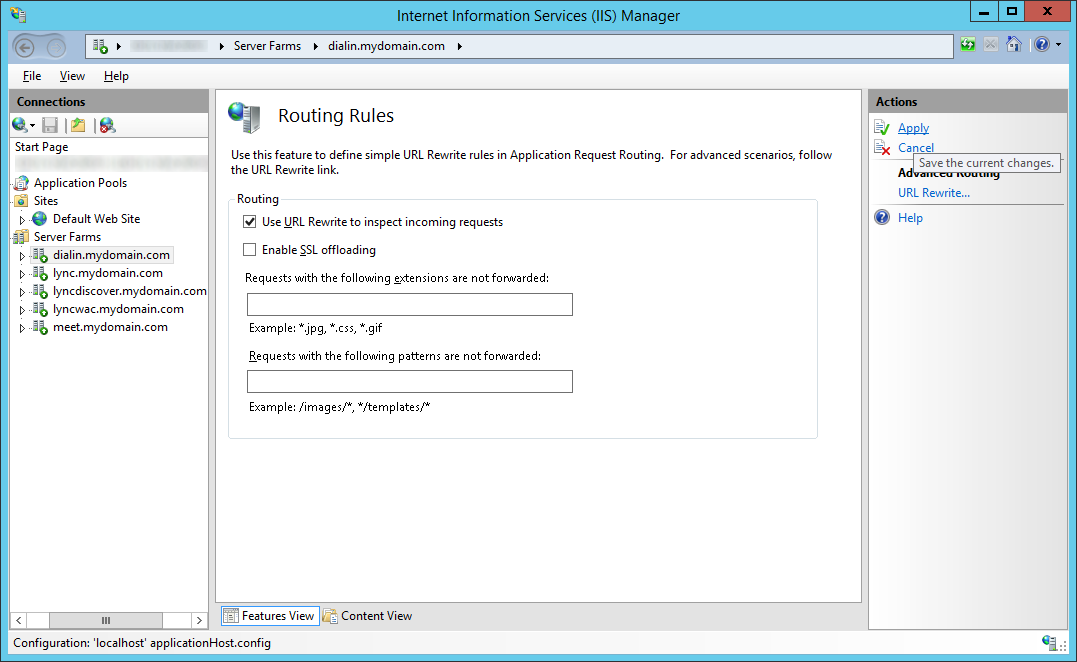
  5. Select the same Server Farm object and double click on Routing Rules
    LyncRP - Internet Information Services IIS Manager - Server Farms - Routing Rules
  6. Uncheck Enable SSL offloading and click Apply
    LyncRP - Internet Information Services IIS Manager - Server Farms - Routing Rules - Uncheck Enable SSL offloading

Configure IIS URL Rewrites

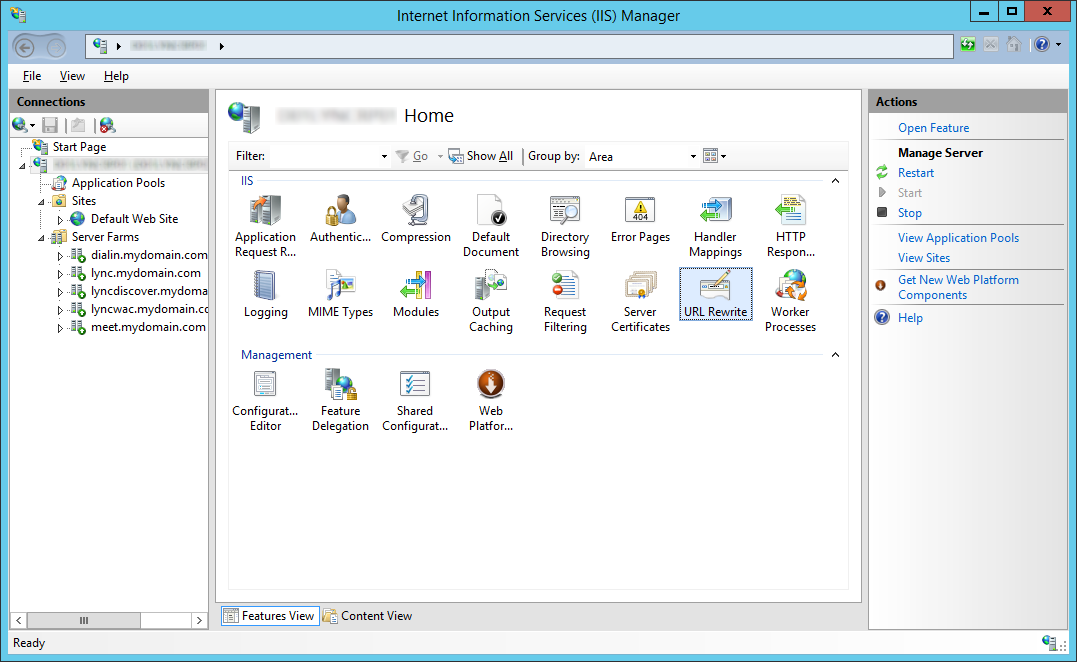
  1.  Select your IIS Server and double click on URL Rewrite
    LyncRP - Internet Information Services IIS Manager - URL Rewrite
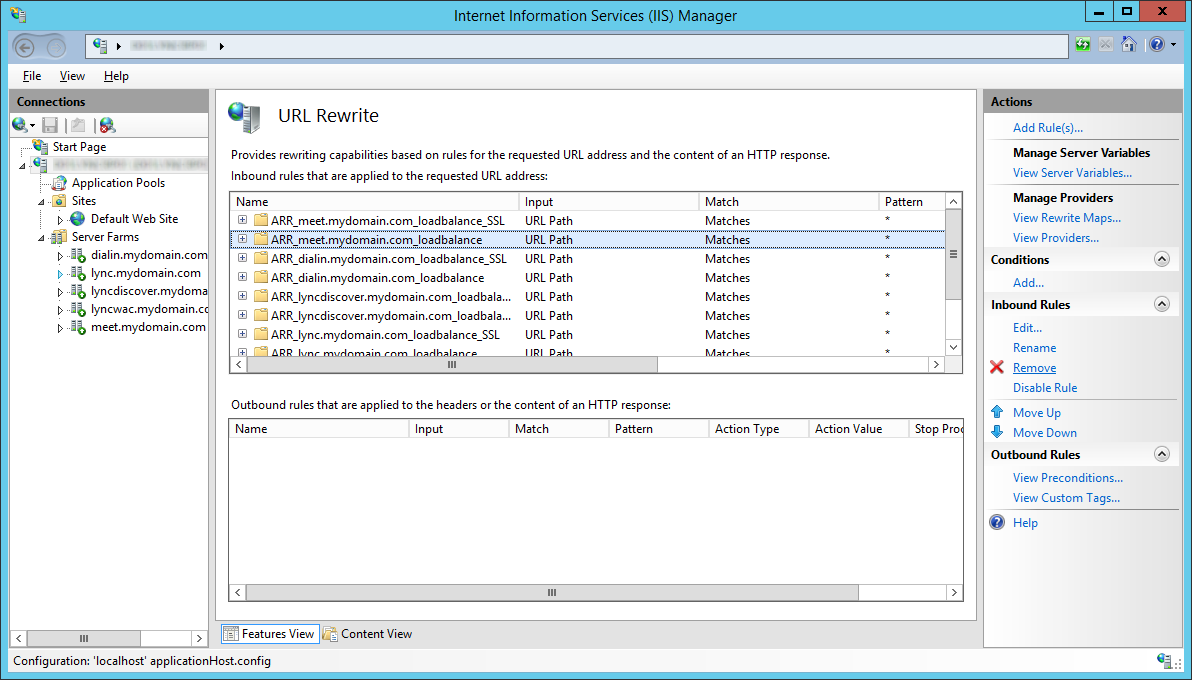
  2. Go through and Remove all of the non _SSL Inbound Rules
    LyncRP - Internet Information Services IIS Manager - URL Rewrite - Remove - Non-SSL
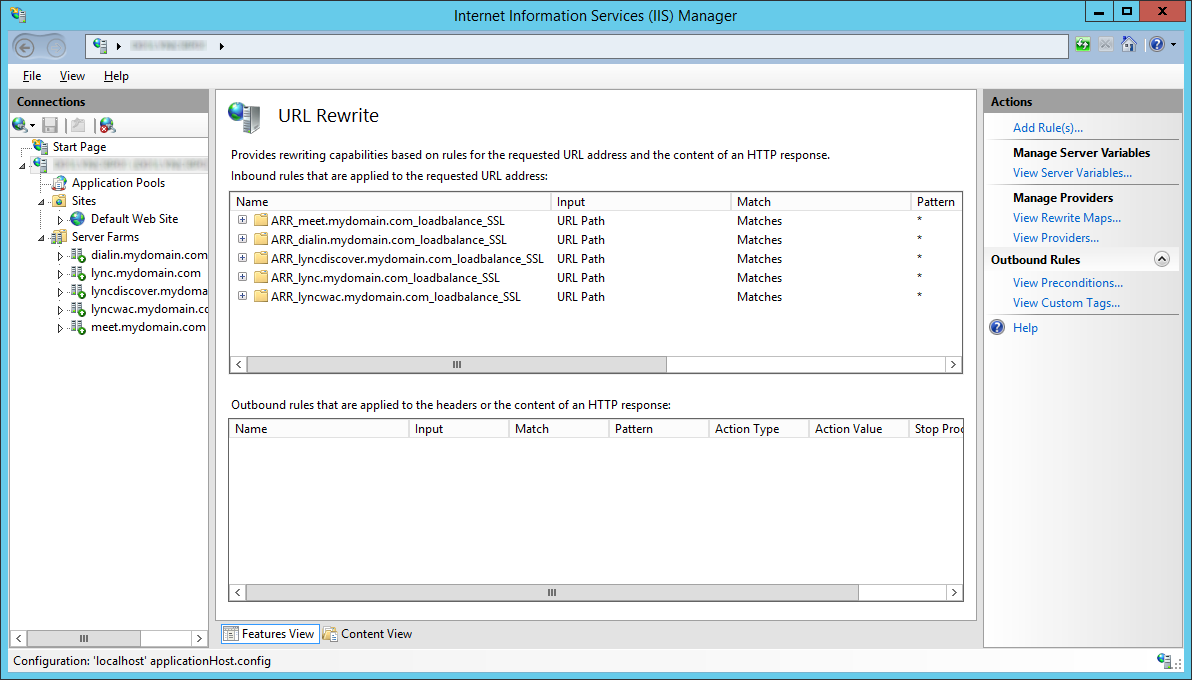
    The result should look like this:
    LyncRP - Internet Information Services IIS Manager - URL Rewrite - Remove - Non-SSL - Removed
  3. Select a rule and click on Add... underneath the Conditions actions pane
    LyncRP - Internet Information Services IIS Manager - URL Rewrite - Add
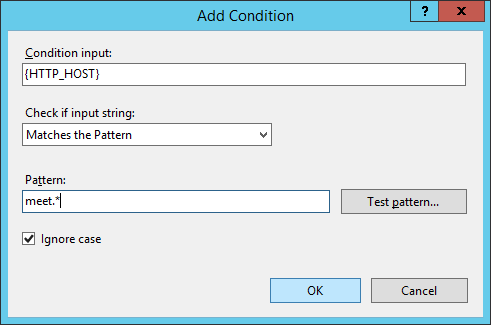
  4. Enter {HTTP_HOST} for the Condition input and enter role.* for your Pattern
    1. Where role is meet, dialin, lyncdiscover, etc.
      LyncRP - Internet Information Services IIS Manager - URL Rewrite - Add - HTTP_HOST
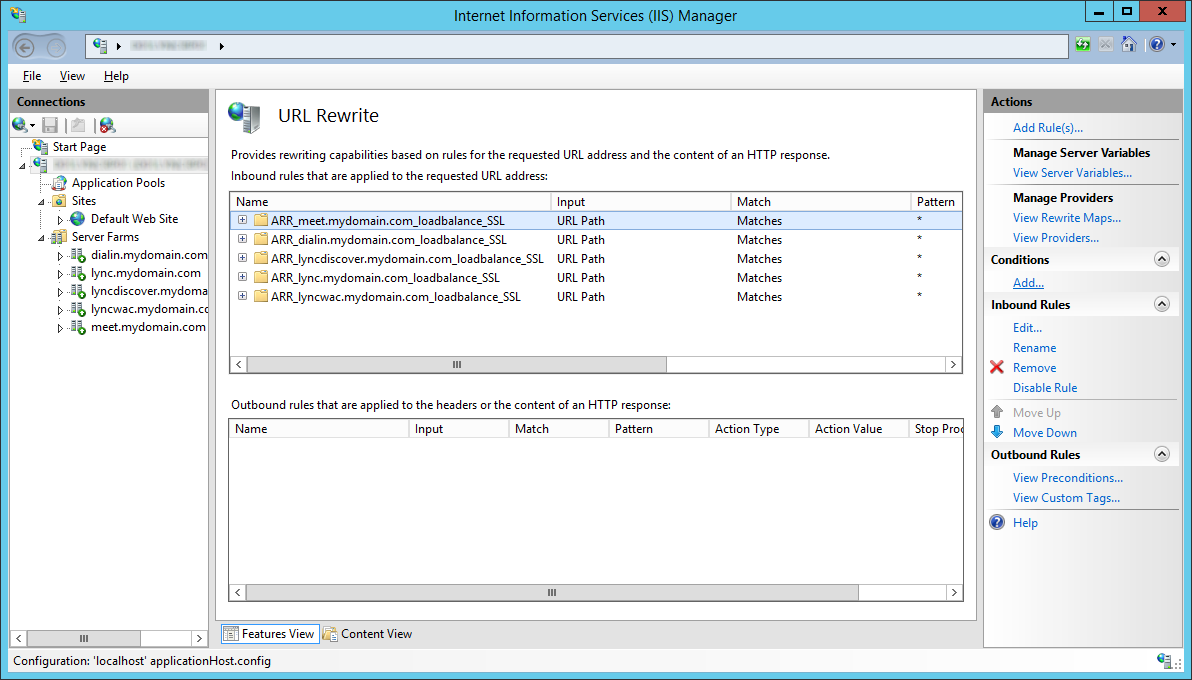
  5. Repeat steps 3-4 for each SSL rule for a result like this
    LyncRP - Internet Information Services IIS Manager - URL Rewrite - Rules

That should be it! 🙂

[Tutorial] How to install IIS on Server 2012 and Server 2012 R2

Here is a tutorial on how to install IIS on Server 2012 and Server 2012 R2.  The installation process for this is very straight forward and does not differ much from Server 2008 R2.  This guide will only go over the basic install, additional configuration of IIS is outside the scope of this tutorial.  Before beginning, you can choose to install IIS via PowerShell or the GUI.  Either option will result with the exact same configuration.

PowerShell

  1. Open an elevated PowerShell console
    Server 2012 - PowerShell - Run as Administrator
  2. Execute the following command
    1. Install-WindowsFeature -Name Web-Server, Web-Mgmt-Tools
      PowerShell - Install-WindowsFeature -Name Web-Server Web-Mgmt-Tools

      1. Note: Web-Mgmt-Tools is optional, but in most instances added to get the Internet Information Services (IIS) Manager GUI snap-in to manage IIS

GUI

  1. Open Server Manager
    Server Manager
  2. Click on Manage - Add Roles and Features
    Server 2012 - Manage - Add Roles and Features
  3. Click Next > on the Before You Begin screen
    Add Roles and Features Wizard - Before you begin
  4. Click Next > on the Installation Type screen
    Add Roles and Features Wizard - Select installation type
  5. Click Next > on the Server Selection screen
    Add Roles and Features Wizard - Confirm installation selections - Restart the destination server automatically if required
  6. Select Web Server (IIS) from the list on Server Roles and click on the Add Features button once prompted.  Click Next >
    Add Roles and Features Wizard - Add features that are required for web server iis
    Add Roles and Features Wizard - Server Roles - Web Server IIS
  7. Click Next > on the Features screen
    Add Roles and Features Wizard - Features - Default
  8. Click Next > on the Web Server Role (IIS) screen
    Add Roles and Features Wizard - Web Server Role IIS
  9. Click Next > on the Role Services screen
    Add Roles and Features Wizard - Web Server Role IIS - Role Services
  10. Click Install on the Confirmation screen
    Add Roles and Features Wizard - Web Sever Role - Confirmation