Yearly Archives: 2013

Office 365 - Sorry, but we're having trouble signing you in: error 80041034

Symptom: After changing the samAccountName (User Principal Name (UPN)) of a user in your on-premise Active Directory environment, run the DirSync tool to update the user on Office 365 (or wait 3 hours) [and have verified the user's new UPN synchronized in the Office 365 admin portal], the user is presented with the following error when trying to sign into Outlook, SharePoint, CRM, etc. on Office 365.

Sorry, but we're having trouble signing you in  Please try again in a few minutes.  If this doesn't work, you might want to contact your admin and report the following error: 80041034.

Office 365 - Error 80041034


Solution: This turns out to be an issue with ADFS (Active Directory Federated Services), caching user account attributes, which prevents a successful login.  Here are a couple of solutions to solve this issue:

  1. Try reupdating/repairing party trust with Office 365.
    1. Login to one of your ADFS servers.
    2. Click Start, All Programs, Windows Azure Active Directory, and then select Windows Azure Active Directory Module for Windows PowerShell.
    3. Execute the following command to connect to Microsoft's online services (when prompted, type in your Office 365 Administrator credentials)
      1. Connect-MSOLService
    4. Execute the following command to update federated trust
    5. Update-MSOLFederatedDomain –DomainName:<Federated Domain Name>
  2. Try temporarily disabling Local Security Authority (LSA) credential caching on your AD FS servers (note this can increase the load on your ADFS and AD DS servers)
    1. Login to each of your ADFS servers and complete the following steps
      1. Click Start -> Run -> regedit to open up the registry editor
      2. run - regedit
      3. Navigate to the following registry key
        1. HKEY_LOCAL_MACHINE\SYSTEM\CurrentControlSet\Control\Lsa
          HKEY_LOCAL_MACHINE-SYSTEM-CurrentControlSet-Control-Lsa
      4. Right click on Lsa, select New -> DWORD (32-bit) Value
        HKEY_LOCAL_MACHINE-SYSTEM-CurrentControlSet-Control-Lsa - new DWORD
      5. Enter LsaLookupCacheMaxSize as the value name and press Enter
        LsaLookupCacheMaxSize
      6. Right click on LsaLookupCacheMaxSize and select Modify
        Modify LsaLookupCacheMaxSize
      7. Ensure the value data is set to 0 and select OK
        LsaLookupCacheMaxSize - Edit DWORD
    2. Verify the user can successfully login.  Once they can, continue on to delete the key we created
    3. Right click on the LsaLookupCacheMaxSize value we created and select Delete
      Delete LsaLookupCacheMaxSize
  3. Reboot all ADFS and ADFS proxy servers in your environment

Microsoft has released an official KB article referencing this issue, you can find it here: http://support.microsoft.com/kb/2535191

AD RMS (Rights Management Services) for Office 365

Note: This guide is deprecated.  AD RMS is now supersceeded by Azure Information Protection.  If you have previously used this guide, review the following guide on Migrating from AD RMS to Azure Information Protection.

https://docs.microsoft.com/en-us/azure/information-protection/migrate-from-ad-rms-to-azure-rms


Those that have the following tiers of Office 365 are entitled to use Microsoft's AD Rights Management Service to help secure their documents:

  • SharePoint Online Enterprise (E1),
  • SharePoint Online Enterprise (E3 & E4),
  • SharePoint Online Midsized Business

Here is a list of compiled questions I wanted to know when trying AD RMS for Office 365.

What is AD Rights Management Services?

Active Directory Rights Management Services (AD RMS) is an information protection technology that works with AD RMS-enabled applications to help safeguard digital information from unauthorized use. Content owners can define who can open, modify, print, forward, or take other actions with the information.
http://technet.microsoft.com/en-us/library/cc771234(v=ws.10).aspx

Are their any examples of using AD Rights Management Services?

Office 365 did a pretty good job covering the concept of using AD RMS as well as how to use AD RMS.  You can find the full tutorial here, however their official YouTube video covering this has been embedded below:

How do I deploy or enable AD Rights Management Services for Office 365?

  1. Login to your Office 365 Administration Portal
    1. https://portal.microsoftonline.com/
  2. Select service settings on the left side navigation
    Office 365 Admin Portal - Service Settings
  3. Select the rights management tab and click on the Manage link
    Office 365 Admin Portal - Service Settings - rights management
  4. The Manage link should redirect you over to activedirectory.windowsazure.com and present you a big activate button.  Click the activate button.
    Activate Office 365 RMS
  5. Click activate on the Do you want to activate Rights Management? prompt
    Do you want to activate Rights Management
  6. After clicking the activate button, you should now see Rights management is activated on the windowsazure.com page
    Rights management is activated

How do I create more policy templates for AD RMS using Office 365 or Windows Azure?

As pointed out in the following Office 365 forum article: http://community.office365.com/en-us/forums/148/t/177332.aspx

By default, in a pure Office 365 environment, we can get 3 RMS Templates in Windows Azure Rights Management. If we have an on-premises server running Active Directory Rights Management Services (AD RMS), we can get more via import a trusted publishing domain (TPD). So, without on premise server, we just can get default 3 Templates.

I enabled AD RMS for Office 365, but I don't see any options in Office 2010.  How do I get Office 2010 to use AD RMS?

Since you are more than likely on the E4 tier, I would highly recommend downloading Office 2013 from your Office 365 portal and installing that.  Office 2013 from the Office 365 portal comes preconfigured to work more fluidly with AD RMS.  However, if you need to use Office 2010, you can complete the following steps as documented on the following technet article: http://technet.microsoft.com/en-us/library/jj585031.aspx#sectionSection1

Can people outside my organization open protected documents with AD RMS (not apart of my domain)?

Short answer, Yes.  Long answer, they are required to create a Microsoft account using their email address (Gmail, AOL, Yahoo, etc) to authenticate themselves.  Below are some screenshots of the registration process; I have copied them from the following technet article for archival purposes: http://blogs.technet.com/b/rms/archive/2013/08/29/the-new-microsoft-rms-is-live-in-preview.aspx

RMS Login


RMS Login 2

RMS Login 3

How can an Office 365 customer purchase Microsoft Rights Management Services (RMS)?

Active Directory RMS is already included in the Office 365 Enterprise E3, and E4 plans and the Education A3 and A4 plans. RMS is also available as an add-on in the E1 and A2 plans. Consumption of rights-protected content is free. A license is required to protect content.

Windows Update Services - Multiple Errors in Event Viewer - Event ID 12052,12042, 12022, 12032, 12012, 12002,13042

Symptom: When browsing through the event viewer logs on your Windows Update Services server, you notice the following Event IDs with a Level of Error in the following order: 12052, 12042, 12022, 12032, 12012, 12002, 13042.

Event Viewer - WSUS Errors

Log Name: Application
Source: Windows Server Update Services
Event ID: 12052
Task Category: 9
Level: Error
Description: The DSS Authentication Web Service is not working.

Log Name: Application
Source: Windows Server Update Services
Date: 10/3/2013 4:53:26 AM
Event ID: 12042
Task Category: 9
Level: Error
Description: The SimpleAuth Web Service is not working.

Log Name: Application
Source: Windows Server Update Services
Date: 10/3/2013 4:53:26 AM
Event ID: 12022
Task Category: 9
Level: Error
Description: The Client Web Service is not working.

Log Name: Application
Source: Windows Server Update Services
Date: 10/3/2013 4:53:26 AM
Event ID: 12032
Task Category: 9
Level: Error
Description: The Server Synchronization Web Service is not working.

Log Name: Application
Source: Windows Server Update Services
Date: 10/3/2013 4:53:26 AM
Event ID: 12012
Task Category: 9
Level: Error
Description: The API Remoting Web Service is not working.

Log Name: Application
Source: Windows Server Update Services
Date: 10/3/2013 4:53:26 AM
Event ID: 12002
Task Category: 9
Level: Error
Description: The Reporting Web Service is not working.

Log Name: Application
Source: Windows Server Update Services
Date: 10/3/2013 4:53:26 AM
Event ID: 13042
Task Category: 6
Level: Error
Description: Self-update is not working.

Additionally, you can recreate these events by running the following command: wsusutil.exe checkhealth

Solution: Reconfigure the WSUS server via the wsusutil.exe command.

  1. Login to the WSUS server
  2. Open up a command prompt with Administrative rights
    cmd as Administrator
  3. Navigate to the Update Services\Tools directory.
    1. By default you can find it on your C drive by executing the following command
      1. cd "c:\Program Files\Update Services\Tools"
        cmd Update Services - Tools
  4. Execute one of the following commands
    1. If updates are configured for port 80 execute this command
      1. wsusutil.exe usecustomwebsite false
    2. If updates are configured for port 8530 execute this command
      1. wsusutil.exe usecustomwebsite true
    3. wsusutil usecustomwebsite
  5. Execute the following command to verify the WSUS service is running correctly
    1. wsusutil.exe checkhealth
      wsusutil checkhealth
  6. You should see Event ID 10000 in event viewer confirming all is wellWSUS is working correctly

How to federate with AOL via Lync

Since Microsoft announced they would be retiring their PIC (Public IM Connectivity) service, the ability to federate with AOL will soon cease to exist.  Interestingly though, AOL has made a public statement saying they will now support direct federation with Lync customers.

AOL is pleased to offer Microsoft Lync customers the opportunity to continue their current federation with AIM and establish new federations if needed. For the first time, we are enabling companies with the ability to establish a direct relationship with AOL to provision and manage their connectivity to the AIM network. This will also allow you to have direct and immediate access to AIM technical support engineers who can quickly identify and resolve any AIM-related issues, thus making the transition to AOL is seamless with no disruption to your company and users.

More details can be found on their website as well as an application to enable direct federation here: http://aimenterprise.aol.com/pic.php


Tutorial - How to setup a KMS server for a Windows Domain

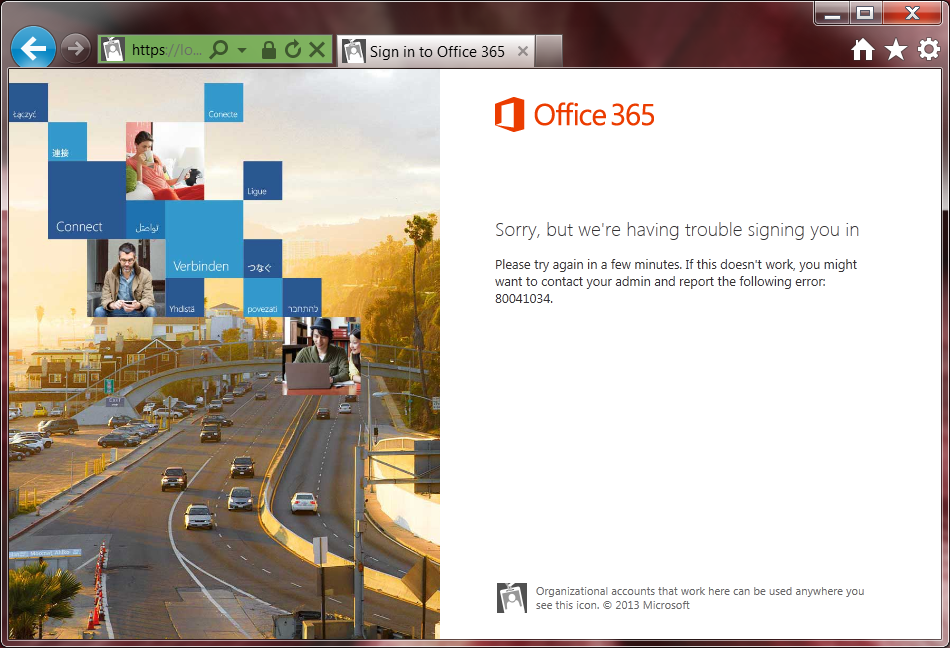
Copied from Microsoft, here is what we can achieve by configuring a KMS server on our local network for a windows domain: http://technet.microsoft.com/en-us/library/ff793434.aspx

KMS activates computers on a local network, eliminating the need for individual computers to connect to Microsoft. To do this, KMS uses a client–server topology. KMS client computers can locate KMS host computers by using Domain Name System (DNS) or a static configuration. KMS clients contact the KMS host by using remote procedure call (RPC). KMS can be hosted on computers that are running the Windows Vista, Windows 7, Windows Server 2003, Windows Server 2008, or Windows Server 2008 R2 operating systems.

  1. Go to the volume licensing center and grab a copy of the KMS key for your server OS
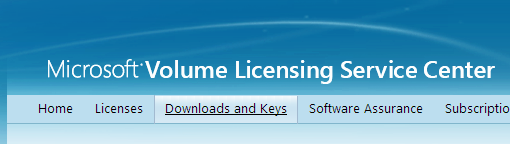
    1. Navigate to https://www.microsoft.com/Licensing/servicecenter/home.aspx
    2. Login
    3. Select Downloads and Keys
      Volume Licensing Service Center - Downloads and Keys
    4. Select Windows Server
      Volume Licensing Service Center - Windows Server
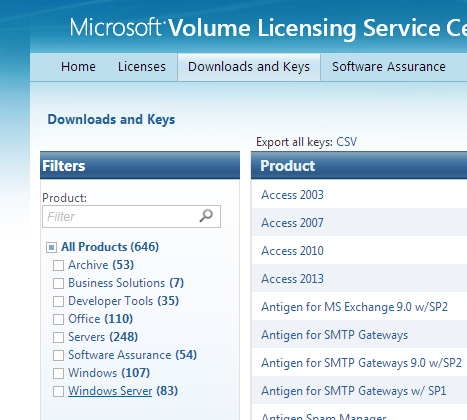
    5. Finder your server version and click Key
      Volume Licensing Service Center - Windows Server - Key
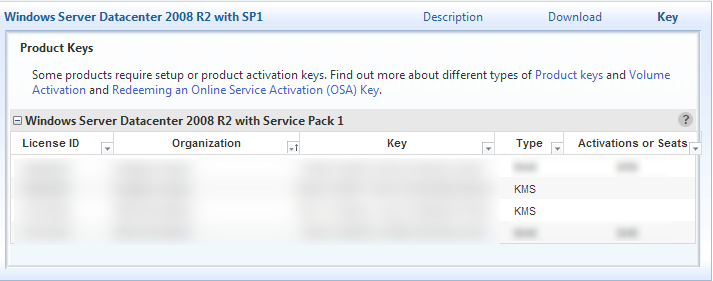
    6. Copy the KMS type key
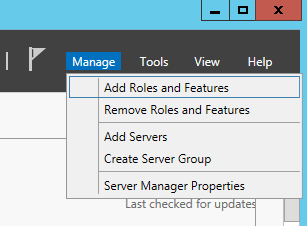
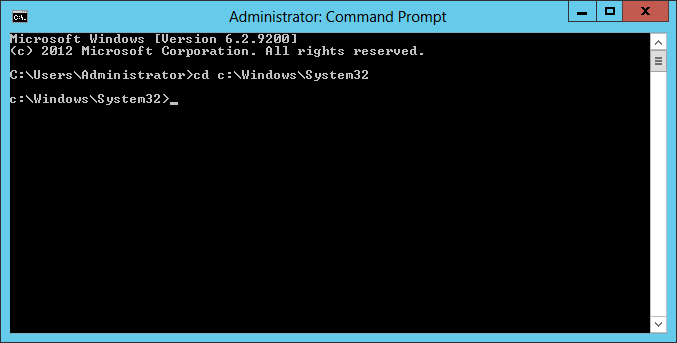
  2. Login to the server you want to setup as the KMS server.
  3. Open up a command prompt as an administrator.
  4. Ensure you are in the system32 folder of Windows
    1. cd c:\Windows\System32
      windows - System 32
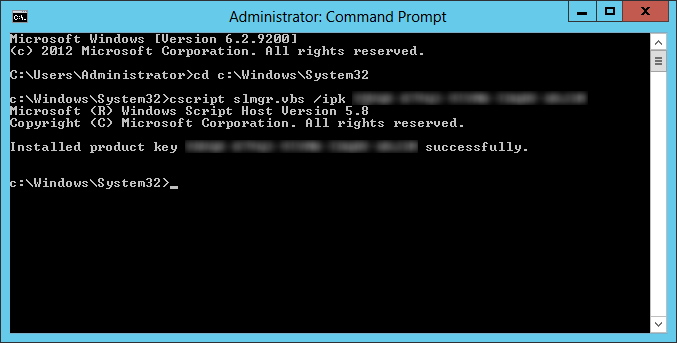
  5. Execute the following command to setup your license key
    1. cscript slmgr.vbs /ipk WINDOWS-KMS-LICENSE-KEY-HERE
      cscript slmgr ipk
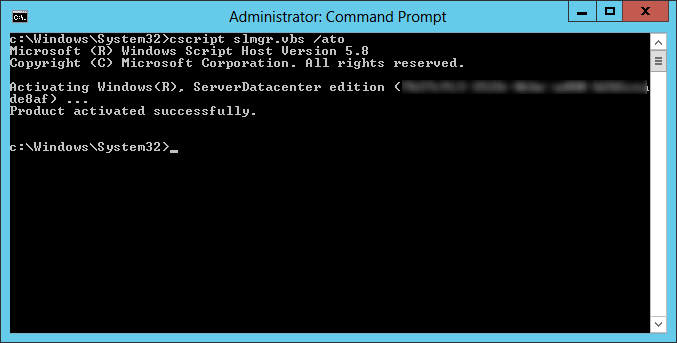
  6. Execute the following command to activate the host
    1. cscript slmgr.vbs /ato
      Activating Windows
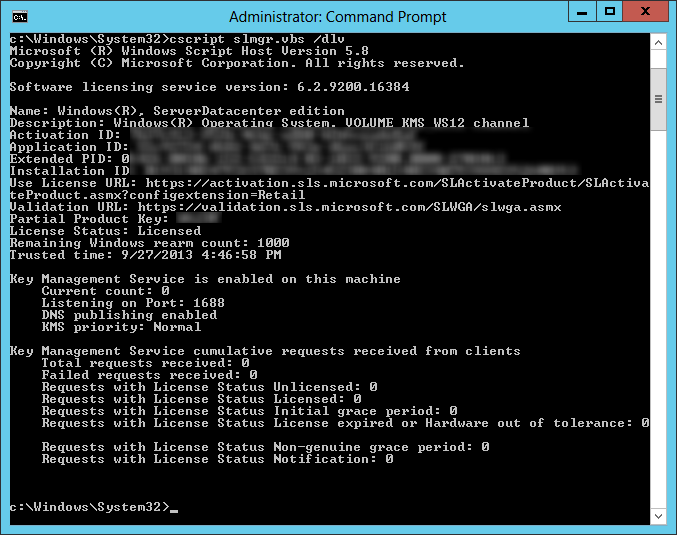
  7. Execute the following command to verify the host has the Key Management Service enabled
    1. cscript slmgr.vbs /dlv
      cscript slmgr dlv
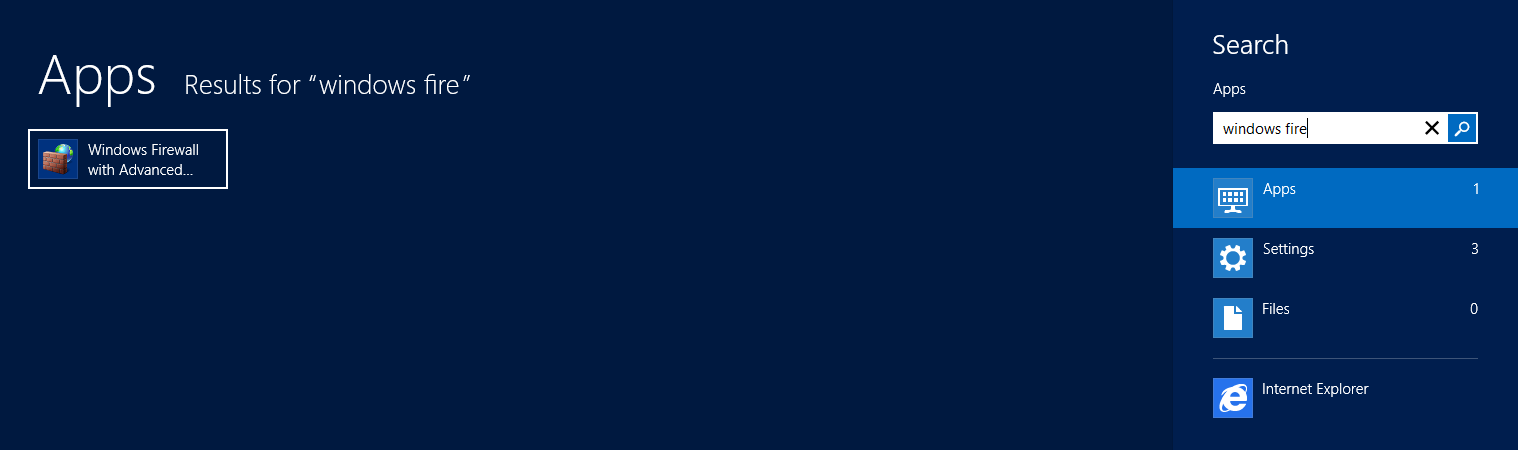
  8. Next, we need to open the firewall for the server to accept activation requests
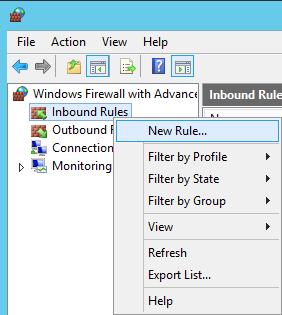
    1. Open up Windows Firewall with Advanced Security
      Windows 8 - Windows Firewall with Advanced Security
    2. Right click on Inbound Rules and select New Rule...
      Windows Firewall with Advanced Security - New Rule
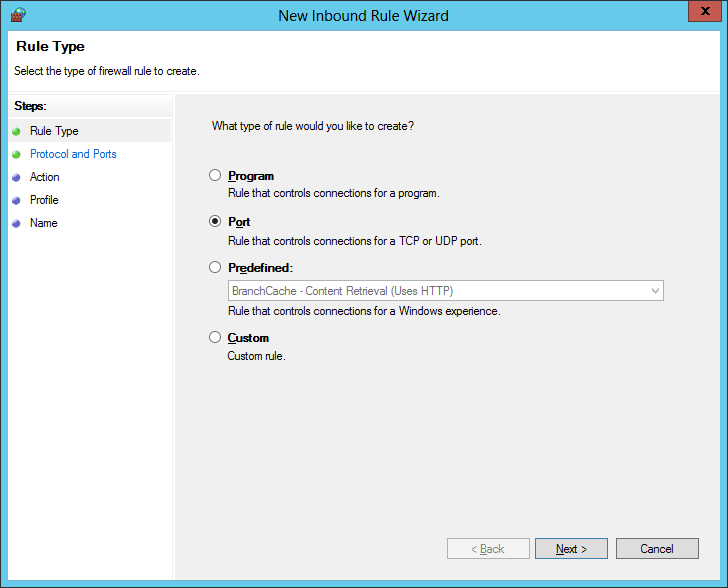
    3. Select Port and click Next >
      New Inboud Rule Wizard - Port
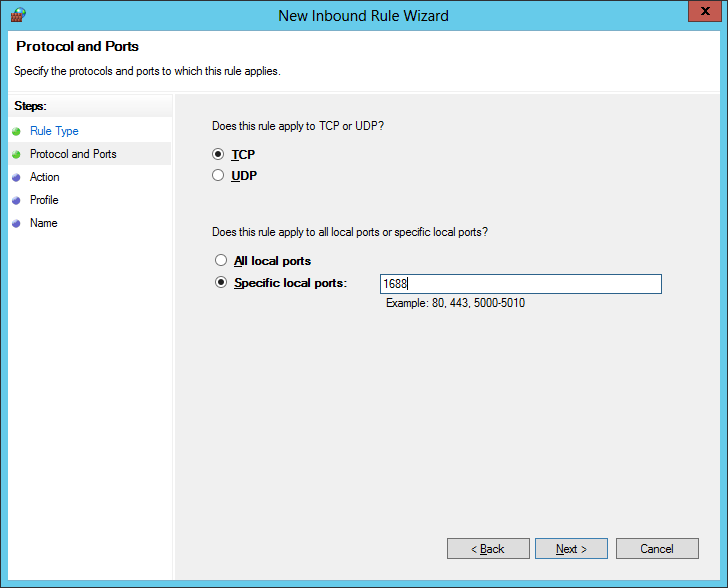
    4. Check TCP, check Specific Local Ports and enter port 1688, click Next >
      New Inboud Rule Wizard - Specific local ports
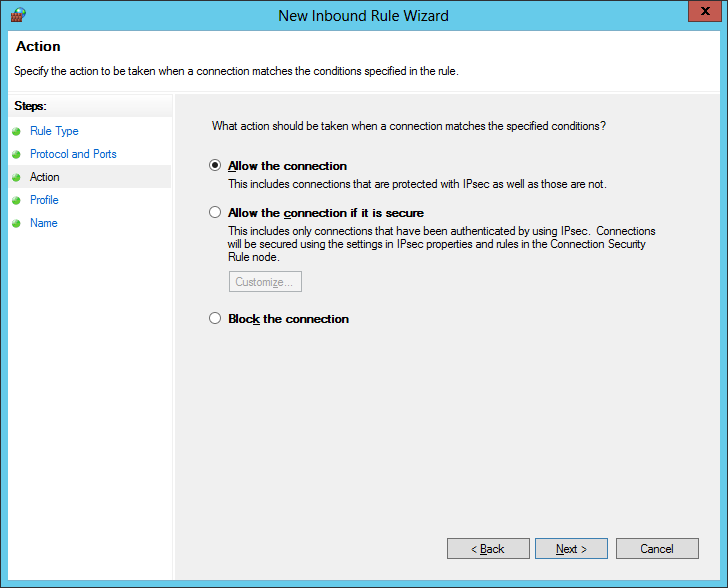
    5. Check Allow the connection and click Next >
      New Inboud Rule Wizard - Allow the connection
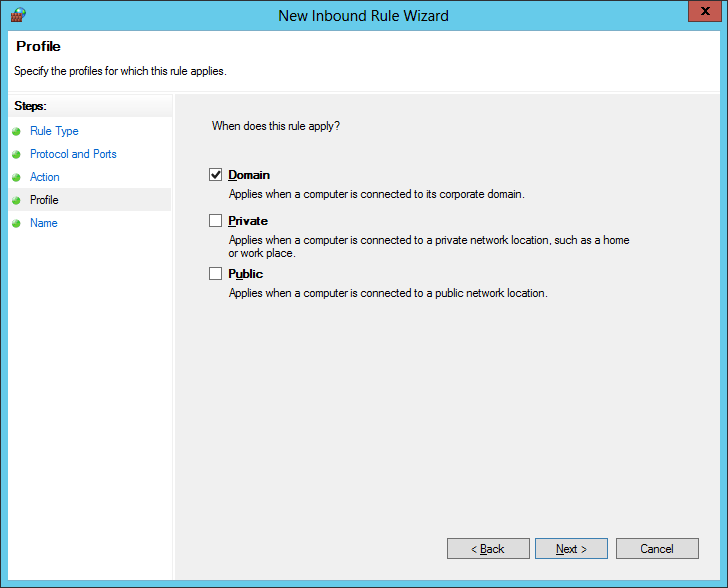
    6. Check Domain and click Next >
      New Inboud Rule Wizard - Domain
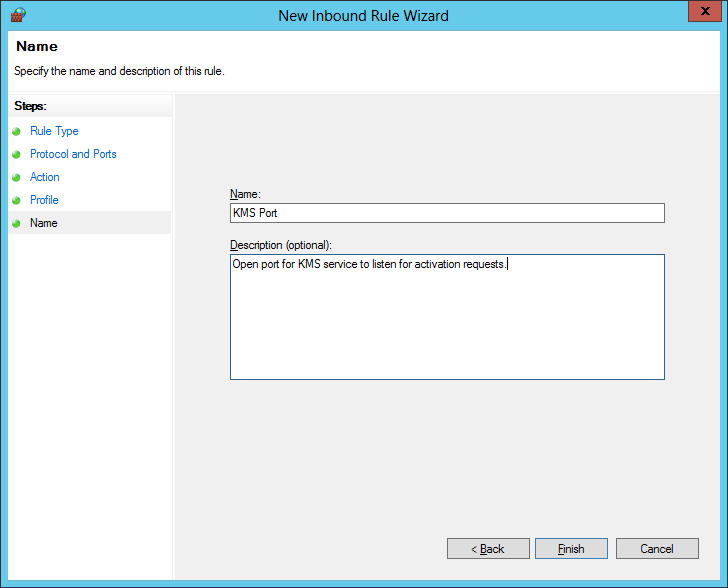
    7. Enter a name for the rule and click Finish
      New Inboud Rule Wizard - Rule Name

Congrats!  Your KMS server should now be ready to accept activation requests!

Notes: Here is a full listing of the commands/switches you can execute using the Software Licensing Management Tool.

C:\Windows\System32>cscript slmgr.vbs
Microsoft (R) Windows Script Host Version 5.8
Copyright (C) Microsoft Corporation. All rights reserved.

Invalid combination of command parameters.

Windows Software Licensing Management Tool
Usage: slmgr.vbs [MachineName [User Password]] [<Option>]
MachineName: Name of remote machine (default is local machine)
User: Account with required privilege on remote machine
Password: password for the previous account

Global Options:
/ipk <Product Key>
Install product key (replaces existing key)
/ato [Activation ID]
Activate Windows
/dli [Activation ID | All]
Display license information (default: current license)
/dlv [Activation ID | All]
Display detailed license information (default: current license)
/xpr [Activation ID]
Expiration date for current license state

Advanced Options:
/cpky
Clear product key from the registry (prevents disclosure attacks)
/ilc <License file>
Install license
/rilc
Re-install system license files
/rearm
Reset the licensing status of the machine
/upk [Activation ID]
Uninstall product key

/dti [Activation ID]
Display Installation ID for offline activation
/atp <Confirmation ID> [Activation ID]
Activate product with user-provided Confirmation ID

Volume Licensing: Key Management Service (KMS) Client Options:
/skms <Name[:Port] | : port> [Activation ID]
Set the name and/or the port for the KMS computer this machine will use. IPv6 address must be specified in the format [hostname]:port
/ckms [Activation ID]
Clear name of KMS computer used (sets the port to the default)
/skms-domain <FQDN> [Activation ID]
Set the specific DNS domain in which all KMS SRV records can be found. This setting has no effect if the specific single KMS host is set via /skms option.
/ckms-domain [Activation ID]
Clear the specific DNS domain in which all KMS SRV records can be found. The specific KMS host will be used if set via /skms. Otherwise default KMS auto-discovery will be used.
/skhc
Enable KMS host caching
/ckhc
Disable KMS host caching

Volume Licensing: Token-based Activation Options:
/lil
List installed Token-based Activation Issuance Licenses
/ril <ILID> <ILvID>
Remove installed Token-based Activation Issuance License
/ltc
List Token-based Activation Certificates
/fta <Certificate Thumbprint> [<PIN>]
Force Token-based Activation

Volume Licensing: Key Management Service (KMS) Options:
/sprt <Port>
Set TCP port KMS will use to communicate with clients
/sai <Activation Interval>
Set interval (minutes) for unactivated clients to attempt KMS connection. The activation interval must be between 15 minutes (min) and 30 days (max) although the default (2 hours) is recommended.
/sri <Renewal Interval>
Set renewal interval (minutes) for activated clients to attempt KMS connection. The renewal interval must be between 15 minutes (min) and 30 days (max) although the default (7 days) is recommended.
/sdns
Enable DNS publishing by KMS (default)
/cdns
Disable DNS publishing by KMS
/spri
Set KMS priority to normal (default)
/cpri
Set KMS priority to low
/act-type [Activation-Type] [Activation ID]
Set activation type to 1 (for AD) or 2 (for KMS) or 3 (for Token) or 0 (for all).

Volume Licensing: Active Directory (AD) Activation Options:
/ad-activation-online <Product Key> [Activation Object name]
Activate AD (Active Directory) forest with user-provided product key
/ad-activation-get-iid <Product Key>
Display Installation ID for AD (Active Directory) forest
/ad-activation-apply-cid <Product Key> <Confirmation ID> [Activation Object name]
Activate AD (Active Directory) forest with user-provided product key and Confirmation ID
/ao-list
Display Activation Objects in AD (Active Directory)
/del-ao <Activation Object DN | Activation Object RDN>
Delete Activation Objects in AD (Active Directory) for user-provided Activation Object

Lync Persistent Chat Error - User is not sip-enabled

Symptom: When you try to create a new chatroom from the Lync 2010/2013 client, you are redirected to a webpage that shows the following error:

User is not sip-enabled.

User is not sip-enabled


Solution: Turns out this is an issue with cross-compatibility between Single-sign on and 3rd party browsers.  Make sure you are using Internet Explorer and you should be able to login and manage your persistent chatroooms.

[Tutorial] Setting up and installing persistent chat for Lync Server 2013

Here is how to configure persistent chat for your Lync 2013 deployment.

  1. Login to your Lync Front End Server and start the Lync Server Topology Builder
  2. When the Topology Builder window opens, select Download Topology from existing deployment and select OK
    Download Topology from existing deployment
  3. Save the file to your desktop
    Save current topology
  4. Expand Lync Server -> Your Site -> Lync Server 2013 -> Persistent Chat pools
  5. Right click Persistent Chat pools and select New Persistent Chat Pool...
    Create new persistent chat pool
  6. On the Define the fully qualified domain name (FQDN) page, enter the FQDN your standard front end server and check Single computer pool.  If you want to deploy a highly available environment for persistent chat, you will need to deploy 2 new machines to put into a persistent chat pool and check Multiple computer pool.  It is not supported by Microsoft at this time to collocate the persistent chat service on the same machines in an enterprise front end pool.  Once done, click Next.
    Define New Persistent Chat Pool

    1. In this tutorial, I am going to go over deploying persistent chat in a highly available environment.
  7. If you clicked on Multiple computer pool, enter in the machine names where the persistent chat service will be installed, and click Next.
    Define computers in persistent chat pool
  8. On the Define properties of the Persistent Chat pool page, enter in the Display name of the Persistent Chat pool (you can name this whatever you would like to) and click Next
    Define properties of the persistent chat pool
  9. Select the SQL Server store you wish to use and select Next
    Define SQL Server Store for the persistent chat pool
  10. Select or create a new file store and click Next
    Define the file store for the persistent chat pool
  11. Select the Front End pool/server as the next hop pool and click Finish
    Define the next hop server for the persistent chat pool
  12. Once done with the Persistent Chat wizard, right click on Lync Server in the Topology Builder and select Publish Topology...
    Publish the Topology
  13. Click Next on the Publish the topology window
    Publish the Topology Wizard
  14. Click Next on the Create databases screen
    Publish the Topology Wizard - Create databases
  15. Click Finish once the topology has been published
    Publish the Topology - complete
  16. Complete the following steps on each of the Persistent Chat servers you created
    1. Login to the server that will be running the persistent chat service
    2. Copy/mount the Lync Server 2013 installation media
    3. Run the setup.exe program from the Lync Server 2013 installation media
      Lync Server 2013 Installation Media - Setup
    4. Click Yes on the "In order to run the software on this CD, the Microsoft Visual C++ 2012 x64 Minimum Runtime - 11.0.50727 Package must be installed." Dialog box.
      Lync Server 2013 Visual C++ Library
    5. Click Install on the Microsoft Lync Server 2013 dialog box
      Lync Server 2013 Installation Path
    6. Check I accept the terms in the license agreement and click OK
      Lync Server 2013 Installation EULA
    7. Once installed, click on Install or Update Lync Server System
      Lync Server 2013 - Install or Update Lync Server System
    8. Click Run next to Step 1: Install Local Configuration Store
      Lync Server 2013 - Step 1
    9. Check Retrieve directly from the Central Management store and click Next
      Lync Server 2013 - Retrieve Central Management Store
    10. Click Finish once the installation has completed.
      (oops, no picture for this one :()
    11. Click Run next to Step 2: Setup or Remove Lync Server Components
      Run Step 2 Setup or Remove Lync Server Components
    12. Click Next
      Set up Lync Server Components
    13. Click Finish
      Set up Lync Server Components - Finish
    14. Click Run next to Step 3: Request, Install or Assign Certificates
      Step 3 - Request, Install or Assign Certificates
    15. Click Request on the Certificate Wizard screen
      Certificate Wizard - Request
    16. Check Send the request immediately to an online certification authority and hit Next
      Certificate Request - Send the request immediately to an online certification authority
    17. Click Next on the Certification Authority (CA) page
      Certificate Request - Choose a certification authority
    18. Click Next on the Certification Authority Account page
      Certificate Request - Certification Authority Account
    19. Click Next on the Specify Alternate Certificate Template page
      Certificate Request - Specify Alternate Certificate Template
    20. Type in a Friendly name for the certificate (I would just use whatever you used for the Persistent Chat Pool Display Name) and click Next
      Certificate Request - Name and Security Settings

      1. NOTE: If you are deploying multiple servers in the Lync Persistent Chat Pool, make sure to check the Mark the certificate's private key as exportable box.
    21. Enter in your Organization and Organizational Unit and hit Next
      Certificate Request - Organization Information
    22. Enter in your Country/Region, State/Province, City/Locality, and hit Next
      Certificate Request - Geographical Information
    23. Hit Next on the Subject Name / Subject Alternative Names screen
      Certificate Request - Subject Name - Subject Alternative Names
    24. Hit Next on the Configure Additional Subject Alternative Names screen
      Certificate Request - Configure Additional Subject Alternative Names
    25. Hit Next on the Certificate Request Summary page
      Certificate Request - Summary
    26. Hit Next once the certificate request process has finished executing commands
      Certificate Request - Executing Commands
    27. Hit Finish on the Online Certificate Request Status screen
      Certificate Request - Online Certificate Request Status
    28. Hit Next on the Certificate Assignment screen
      Certificate Assignment
    29. Hit Next on the Certificate Assignment Summary screen
      Certificate Assignment - Summary
    30. Hit Finish on the Executing Commands screen
      Certificate Assignment - Executing Commands
    31. Close the Certificate Wizard screen
      Certificate Wizard
    32. Click Run next to Step 4: Start Services
      Step 4 - Start Services
    33. Click Next on the Start Services screen
      Start Services Wizard
    34. Click Finish on the Executing Commands screen
      Start Services Wizard - Finish
    35. Click Run next to Service Status (Optional)
      Step 4 - Start Services
    36. Scroll through the list of services and find Lync Server Persistent Chat and verify it is Running.
      Services - Lync Server Persistent Chat
  17. At this point of the deployment, the infrastructure should be in place to actually push Persistent Chat out to your clients.  Next we will create a test group.
  18. Login to the Lync Admin Panel (Cscp)
  19. Select the Persistent Chat tab
    cscp - Persistent Chat
  20. Click New and select your persistent chat pool and click OK
    cscp - Persistent Chat - Select a Service
  21. Type in a Name for your persistent chat category and select who can have access to the category.  This category will be the container that holds a set of chatrooms.  Click Commit when finished.
    cscp - Persistent Chat - New Category
  22. Next, select the Persistent Chat Policy tab and double click on the Global policy.
    cscp - Persistent Chat - Persistent Chat Policy
  23. Check Enable Persistent Chat and click Commit
    cscp - Persistent Chat - Edit Global Policy
  24. Next, we need to create the actual chatroom.  This step needs to be done via PowerShell, so open up the Lync Server Management Console.
    Lync Server Management Console
  25. Execute the following command
    New-CsPersistentChatRoom -Name "My test chatroom" -Category "Test Category"
    Lync Server Management Console - New-CsPersistentChatRoom
  26. Next, we will assign a user to the chatroom, so execute the following command:
    Set-CsPersistentChatRoom -Identity "My test chatroom" -members @{Add="sip:[email protected]"}
    Lync Server Management Console - Set-CsPersistentChatRoom
  27. Now, we are ready to join our test chatroom.  First, close your Lync client if it is already running.
    Lync 2013 Client - File - Exit
  28. Relaunch Lync, and you should see the persistent chatroom icon.
    Persistent Chat - Chatrooms
  29. Double click on the chatroom and try sending a message.
    Persistent Chat - Hello World
  30. Congrats!  If you have made it to this point, you should now be able to offer a new collaborative feature to your users at your organization! 🙂

Lync Server 2013 - All the channel servers are down

Symptom: After installing the Persistent Chat module for Lync Server 2013, you receive the following error when trying to manage Persistent Chat from the Lync Admin Web GUI (CSCP).

1 Warning(s) All the channel servers are down. All the channel servers are down.

Solution: Unfortunately, there are a few issues that could cause this.  Here are a few that I tried to get things working.

Solution #1: Ensure Cumulative Update 2 is installed.

  1. Download a copy of the Lync Update on the persistent chat server
    1. http://www.microsoft.com/en-us/download/details.aspx?id=36820
  2. Double click LyncServerUpdateInstaller.exe
  3. Click the Install Updates button
    Microsoft Lync Server 2013 Cumulative Update Installer for Persistent Chat
  4. Once all the updates have finished installing, click Close
    Microsoft Lync Server 2013 Cumulative Update Installer for Persistent Chat Updated

Solution #2: Add only 1 server to the pool, then add the rest

  1. Login to one of your front end servers and open up the Lync Server 2013 Topology Builder
  2. Delete the persistent chat pool you currently have deployed
    Delete Lync Persistent Chat Pool - Topology Builder
  3. Publish your topology
    Publish the Topology
  4. Recreate your persistent chat pool, but only add 1 server during the setup wizard.
    Create new persistent chat pool
  5. Once done running through the wizard, right click on your persistent chat pool and select New Server...
    New Server - Persistent Chat - Lync Topology Builder

    1. Repeat this until all the servers you wanted to deploy are part of the topology
  6. Publish the topology
    Publish the Topology

Notes: I couldn't get event viewer to log anything referencing this error, which I thought was weird.   Additionally, I noticed that when originally deploying my topology, the topology wizard was complaining saying that "At least one machine must be active." in order to successfully deploy the persistent chat pool.  I believe this is a bug in the topology builder and the only way I could get the topology builder to deploy properly, was by following Solution #2.  This ensured at least one server in the pool had a machine state marked as "Active".

Here is a screenshot showing the persistent chat servers in an enterprise pool marked as inactive and topology builder complaining with the error "At least one machine must be active."

At least one machine must be active - Lync Persistent Chat - Topology Builder


[Tutorial] Rooting and Installing Cyanogenmod 10.2 w/ Google Apps on the Droid RAZR Maxx

Check out my new tutorial for upgrading to Cyanogenmod 11! http://jackstromberg.com/2013/12/tutorial-rooting-and-installing-cyanogenmod-11-android-4-4-kitkat-w-google-apps-on-the-droid-razr-maxx/

Here are my notes on rooting and installing Cyanogenmod 10.2 on my Motorola RAZR Maxx.

By reading this, you are agreeing that I take no responsibility for what you do with your phone, nor will send me angry emails saying I janked your phone.

  1. Enable USB debugging
    1. Settings->Developer Options->Enable Developer options at the top-> (Hit ok on the notification asking for Allow development settings)->Check USB debugging (Click OK on the Allow USB debugging? dialog).
  2. Download a copy of latest build of Cyanogenmod
    1. http://wiki.cyanogenmod.org/w/Spyder_Info
    2. I am going to live on the edge and install a nightly to get to 10.2.  If you don't want bugs, use a stable version.
    3. Notes: I found a pretty sweet page that lists the nightly changes to the rom.  If you are curious, you can view the nightly changes here: http://10.2.cmxlog.com/?device=xt907
  3. Download a copy of Google Apps
    1. http://wiki.cyanogenmod.org/w/Gapps
    2. By default, Cyanogenmod cannot ship with Google Apps by default, so these will need to be installed manually.  Without these, you will not have Google Play, Music, Maps, etc.  In this case, grab a copy of gApps for 10.2.
  4. Download a copy of RazrBlade, which we will use to exploit the phone and gain root access:
    1. http://cmw.cmfs.me/razrblade/razr_blade_win.zip
  5. Extract the files of the razr_blade_win.zip archieve.
  6. If you are running windows, download a copy of the Motorola drivers to connect your phone.
    1. Motorola x86 drivers: http://goo.im/devs/Hashcode/moto_root/Motorola_End_User_Driver_Installation_5.9.0_32bit.msi
      Motorola x64 drivers: http://goo.im/devs/Hashcode/moto_root/Motorola_End_User_Driver_Installation_5.9.0_64bit.msi
  7. Run through the Motorola driver installation if you are running windows.
  8. Plug your phone in to your machine
  9. Navigate back to the files you extracted, right click Run.bat, run as Administrator
    1. If you are on Linux, execute RootLinux.sh and if you are on Mac OS, execute RootMac.sh
  10. Press any key to continue
    Razr Blade - Phase 1
  11. Once your phone has completed phase one (which ends up with a reboot of the phone), complete the following tasks on your phone
    1. Click Apps->SmartActions->Get Started->Next->Battery Saver->Save->Home button
  12. Press any key to continue with "Phase two"
    Razr Blade - Phase 2

    1. Your phone will reboot again
    2. Phase four will start
    3. Your phone will reboot again
  13. After phase four completes, you should be notified the phone has been rooted.
    1. Phase 3 & 4
      Notes: I received some permission errors the first time I ran through this (as shown in the picture above).  I ended up rebooting the phone, making sure I had the latest version of SmartActions and then reran the batch file.  After that, I was able to successfully get the Superuser program (which we talk about next) to run.
  14. Next, grab a copy of Superuser.apk (included inside the razr_blade zip file) and copy it over to the SD card.
  15. At this time, copy over the cyanogenmod zipped file you downloaded earlier.  Throw it on the root of your SD card.
  16. Copy over the gApps zip file we downloaded earlier and throw that on the root of your SD card as well.
  17. Disconnect the phone from the computer and install the SuperUser application.  Apps->Files->SD Card->Superuser.apk, Install, Open.  If it asks to update, go ahead and allow it to update the binaries.
  18. Next, grab a copy of SafeStrap.  We will use this as the bootstrap to flash your phone to Cyanogenmod as well as provide an easy way to switch between different ROMs.
    1. http://goo.im/devs/Hashcode/spyder/safestrap//Safestrap-Spyder-3.63.apk
  19. Copy the file over to your phone
  20. Apps->Files->SD card->Safestrap-RAZR-D4-BIO-3.11.apk->Package installer->Install->Open
  21. Hit Ok when prompted for superuser privileges, and then select Agree.
  22. Once inside the Safestrap application, click Install Recovery.
    1. Once installed, you should see the Recovery State say Installed
  23. Reboot your phone
  24. When you see the Safestrap splash screen, hit the Menu button on your phone.
  25. Once you have hit the Menu button, there will be a brief delay where you screen goes black and then redirects you to one with a couple of big buttons.  Push the button labeled Boot Options.
  26. Push the ROM-Slot-1 button.
  27. Select the size of your data store (I used 3GB, couldn't find any documentation on what that actually does), and then hit Activate.
  28. Once it is done doing its shindig, hit the back button twice to get to the screen that shows Boot Options, Install, Backup, Restore, Mount, Wipe, Advanced, and Reboot.
  29. Push the Install button.
    1. Note, if the Install button is Red, you are going to override your stock ROM.  Make sure that you have activated ROM-Slot-1 before proceeding.
  30. Scroll down and select the Cyanogenmod zip file you copied to the SD card earlier.
  31. Swipe the "Swipe to Confirm Flash" area to begin flashing your phone with Cyanogenmod.
  32. Once done, it should say Successful in blue text.  Hit the Wipe cache/dalvik button.
    1. Swipe the Swipe to Wipe area (lol)
  33. Hit the Back button.
  34. Hit the Reboot System button.
  35. At this point, you should be greeted by the Cyanogenmod welcome screen upon boot.  I opted out of the Cyangenmod account and decided to continue on.
  36. Next, we need to install Google Apps on the phone.  To do this, reboot the phone and press the Menu button when you see the SafeStrap splash screen.
    1. Note, Google Apps are totally optional.  If you want to roll with Stock Cyanogenmod and manually install apps via their APK files for ultra security, that is totally cool.
  37. Hit the Install button.
  38. Select the gApps zip file from your SD card
  39. Swipe the Swipe to Confirm Flash area
  40. Once the apps have been successfully installed, hit the Wipe cache/dalvik button.
  41. Swipe the Swipe to Wipe area
  42. Hit the Back button
  43. Hit the Reboot System button
  44. Once you are greeted by a "Allow Google's location service to collect anonymous location data." prompt, you will know you have successfully installed the Google apps! 😛

That should do it!  Enjoy Cyanogenmod 10.2! 🙂

P.S. Here is the official Cyanogenmod info page for the Motorola Droid RAZR/RAZR MAXX (CDMA)
http://wiki.cyanogenmod.org/w/Spyder_Info

Lync Server 2013 - Installation error: Prerequisite not satisfied: Windows Identity Foundation is required.

Symptom:
You receive the following error when running Step 1: Install Local Configuration Store in the Lync Server 2013 - Deployment Wizard.

Prerequisite not satisfied: Windows Identity Foundation is required.

Prerequisite not satisfied - Windows Identity Foundation is required.

Solution:
Complete the steps below to install the Windows Identity Foundation.

  1. Start Server Manager
    Server Manager
  2. Click Manage -> Add Roles and Features
    Server 2012 - Manage - Add Roles and Features
  3. Click on Features on the left side, and then scroll down and check Windows Identity Foundation 3.5.  Click Next >
    Server 2012 - Add Roles and Featuers Wizard - Windows Identity Foundation 3.5
  4. Click Install
    Server 2012 - Add Roles and Featuers Wizard - Windows Identity Foundation 3.5.png - Install
  5. Click Close once the installation has completed.
    Server 2012 - Add Roles and Featuers Wizard - Windows Identity Foundation 3.5.png - Install Finish
  6. Rerun Step 1: Install Local Configuration Store in the Lync 2013 - Deployment Wizard and you should notice the prerequisite is now satisfied.
    Install Local Configuration Store - WindowsIdentityFoundation prerequisite satisfied