Tag Archives: lync 2013

Removing last Lync 2010 Front End - Conference Error

Symptom:
You receive the following error when trying to publish your new Lync Topology, after removing the last Lync 2010 Front End Server.

ConferencingPoolInUse: The new topology XML removes services that will orphan existing conference directories.

Error: Cannot publish topology changes. Conference directories still exist on a pool that would be deleted. Remove the conference directories before continuing.
▼ Details
└ Type: InvalidOperationException
└ ▼ Stack Trace
└ at Microsoft.Rtc.Management.Deployment.Tasks.PublishTopologyTask.VerifyOrphanedDirectories()
at Microsoft.Rtc.Management.Internal.Utilities.LogWriter.InvokeAndLog(Action action)

Error: An error occurred: "System.InvalidOperationException" "Cannot publish topology changes. Conference directories still exist on a pool that would be deleted. Remove the conference directories before continuing."

Solution:
On one of your front end lync servers, open up the Lync Server Management Shell as an Administrator.  Once open, execute the following command:

Get-CsConferenceDirectory

For each of the items that have a ServiceID referencing the Front End server you are trying to retire, execute the following command (replacing the appropriate values with the output found from the previous command):

Move-CsConferenceDirectory -Identity X -TargetPool poolorfrontendserver.mydomain.local

After all conferences have been moved off of your Lync 2010 Front End server, you should be able to successfully publish the topology.

Lync meetings drop dial-in (PSTN) calls after 30 seconds to a minute

Symptom: Upon using Lync 2013 meetings, I noticed that PSTN callers were being dropped from dial-in meetings.  This drop was approximately after 30 seconds or a minute.  After finally pulling the plug and calling Microsoft for support on why this was happening, we found that our Session Boarder Controller was not sending responses back to Lync telling Lync that a person was still apart of the call.

Solution: Execute Get-CsTrunkConfiguration and look for the RTCPActiveCalls and RTCPCallsOnHold values. If both of these values are true, try setting them to false via the following command:

Set-CsTrunkConfiguration -RTCPActiveCalls $false -RTCPCallsOnHold $false

This should tell Lync to not drop the user's call even if it doesn't receive any media packets from the SBC.  If this does work, then I highly recommend you enable the Session Timer to ensure dropped calls do not continue forever in your Lync meeting.  To enable that option, execute the following command:

Set-CsTrunkConfiguration -EnableSessionTimer $true

Just for reference, here are some more in-depth notes on what the RTCPActiveCalls, RTCPCallsOnHold, and EnableSessionTimer variables do.

RTCPActiveCalls -This parameter determines whether RTCP packets are sent from the PSTN gateway, IP-PBX, or SBC at the service provider for active calls. An active call in this context is a call where media is allowed to flow in at least one direction. If RTCPActiveCalls is set to True, the Mediation Server or Lync Server client can terminate a call if it does not receive RTCP packets for a period exceeding 30 seconds. Note that disabling the checks for received RTCP media for active calls in Lync Server elements removes an important safeguard for detecting a dropped peer and should be done only if necessary.

RTCPCallsOnHold - This parameter determines whether RTCP packets continue to be sent across the trunk for calls that have been placed on hold and no media packets are expected to flow in either direction. If Music on Hold is enabled at either the Lync Server client or the trunk, the call will be considered to be active and this property will be ignored. In these circumstances use the RTCPActiveCalls parameter. Note that disabling the checks for received RTCP media for active calls in Lync Server elements removes an important safeguard for detecting a dropped peer and should be done only if necessary.

EnableSessionTimer - This parameter specifies whether the session timer is enabled. Session timers are used to determine whether a particular session is still active. Note that even if this parameter is set to False, session timers can be applicable if the remote connection has session timer enabled. In such a case, the Mediation Server will reply to session timer probes from the remote entity. The default is False.

Lync 2013 Logging Tool

After installing Lync 2013 RTM, I noticed that the Lync Logging Tool doesn't exist.  As you can see below, when you search for the tool under Server 2012, it is missing from the list of Apps.

Lync Logging

Solution:

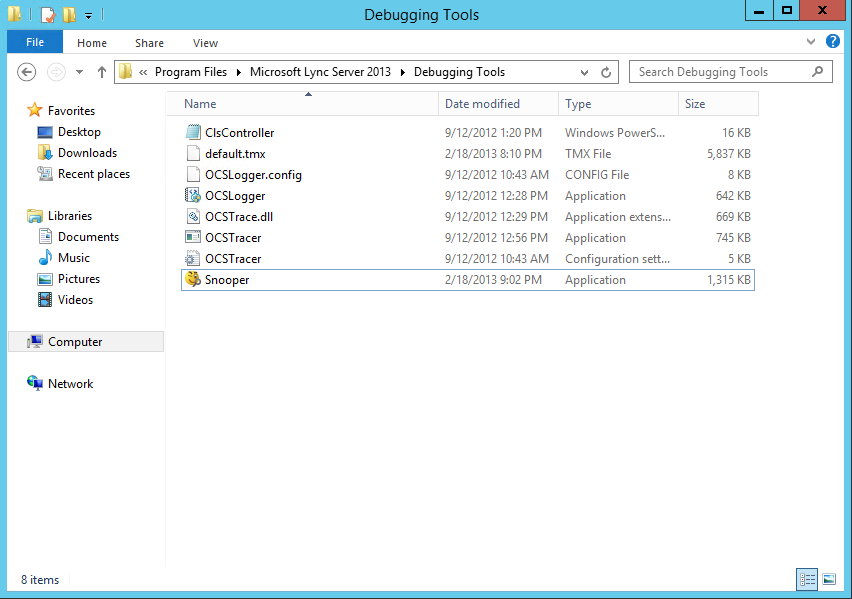
You can manually grab a copy of the Microsoft Lync Server 2013 Debugging Tools (this includes both OCSLogger.exe and Snooper.exe) from here: http://www.microsoft.com/en-us/download/details.aspx?id=35453

Once installed, you can access the tool by browsing to: C:\Program Files\Microsoft Lync Server 2013\Debugging Tools\OCSLogger.exe

Lync Debugging Tools 2013

Configuring Common Area Phones for Lync 2010-2013

This guide will go over configuring phones for Lync 2010/2013.  Particularly, this is going to go over configuring phones for conference rooms or any other public area that you would like a phone, but the same steps can be used to force users to login/authenticate to a phone with their number/extension and pin.  That being said, purchasing some Polycom CX3000 phones prompted me to write this guide, so if all goes well, your Polycom phones should work like a charm (Aastra phones should follow this guide as well) 😛

Making sure DHCP and DNS can dish out configurations to phones

The first thing to do is make sure you have your DHCP server setup to get your phones working (we will push settings out to the clients/phones so they can find your Lync server, pull down certificates, etc).  In order to do this, you will have to complete the following tasks on your DHCP, DNS, and Lync Front End servers.

  1. Create a DNS record to point to your NTP servers (if you haven't already)
      • Service: _ntp
      • Protocol: _udp
      • Port Number: 123
      • Host: xxx.xxx.xxx (your time server (probably your DC))
  2. Copy the DHCPUtil.exe and DHCPConfigScript.bat from the paths below to the Desktop on your DHCP Server
    1. %ProgramFiles%\Common Files\Microsoft Lync Server 2010 or 
      1. %ProgramFiles%\Common Files\Microsoft Lync Server 2013
  3. Open up a command prompt as Administrator on your DHCP server
  4. Execute the following commands on your DHCP Server
    1. DHCPUtil.exe -SipServer mylyncpoolorserver.mydomain.local –RunConfigScript
      1. If you receive the following
        1. The program can't start because MSVCR110.dll is missing from your computer. Try reinstalling the program to fix this problem.
      2. You can find MSVCR110.dll in the Lync 2013 media (D:\Setup\amd64 for example)
  5. To see if everything ran smoothly, open up the DHCP role and verify the entries were made in the IPv4 section
    1. Phone DHCP
  6. Execute the following from your Lync Server to verify the DHCP settings are correct (Note, if you run this from your DHCP server, it will always come back with a failed result).
    1. DHCPUtil.exe -EmulateClient
  7. Next, you will need to set a PIN policy for any users who will want to login.  Open the Lync Control Panel and click on Security.  Select the PIN Policy tab and double click on the Global policy.  Change the PIN Length to at least 4 you want.  Now click on Commit.

Creating the Common Area Phones Lync Policies

First, create a policy that will Enable Hotdesking.  This will log out a user that may have signed in to the phone and revert the phone back to a Common Area phone after 10 minutes of timeout.

New-CsClientPolicy -Identity CommonAreaClient -EnableHotdesking $True -HotdeskingTimeout 00:10:00

Next, we create a new voice policy to lockdown what the phone can do.  This will prevent users from  setting the phone to do call forwarding, delegation, call transfer, etc.  Alternatively, if you don't want to run the PowerShell command, you can browse use the Lync Server Control Panel web GUI to create a new Voice Policy.  Go to the Lync Control Panel, click on Voice Routing, and then the Voice Policy tab.  The command below will add the Internal policy, you can add others if you desire.

New-CsVoicePolicy -Identity CommonAreaVoice -PstnUsages @{add="Internal"} -AllowSimulRing $FALSE -AllowCallForwarding $FALSE -Name CommonAreaVoice -EnableDelegation $FALSE -EnableTeamCall $FALSE -EnableCallTransfer $FALSE -AllowPSTNReRouting $FALSE -Description "Feature-Restricted Common Area Phone Policy"

Next, we create a policy to restrict what the Common Area phone can do in conferences.  Execute the following command to create a new Conferencing Policy.  Alternatively, we could create this using the Lync Server Control Panel web GUI by clicking on Conferencing and then selecting the Conferencing Policy tab.

New-CsConferencingPolicy -Identity CommonAreaConf -AllowIPAudio $FALSE -AllowIPVideo $FALSE -EnableFileTransfer $FALSE -EnableP2PFileTransfer $FALSE -EnableDataCollaboration $FALSE

Last, we need to create a PIN policy for these guys to login.  I suppose you could use the global one for this step, but we could set this rule to be stricter for just these phones.  This will require all CommonArea phones to use a 4 digit pin to login.

New-CsPINPolicy -Identity CommonAreaPIN -Description "Common Area Phone 
Authentication PIN Policy" -MinPasswordLength 6 -AllowCommonPatterns $TRUE

Creating the Common Area Phones With Our policies

Next, create the commonarea phone:

New-CsCommonAreaPhone -LineUri "tel:+15555555555" -RegistrarPool "lync.mydomain.local" -OU "OU=CommonAreaPhones,DC=mydomain,DC=local" -Description "Batline 1" -DisplayName "Conference Room Batline" -DisplayNumber "1 (555) 555-5555"

Next, we need to set the new account we created with a PIN policy.  To do so, execute the following command (keeping in mind you need this to be at least 4 digits or longer depending on your policy you created earlier).

Set-CsClientPin –Identity “Batline 1” -Pin 123123

Lastly, we need to assign all of the polices we created earlier to this Common Area Phone account. To do so, execute the following commands:

Grant-CsClientPolicy -PolicyName CommonAreaClient -Identity "Batline 1
Grant-CsConferencingPolicy -PolicyName CommonAreaConf -Identity "Batline 1
Grant-CsPINPolicy -PolicyName CommonAreaPIN -Identity "Batline 1

Grant-CsVoicePolicy -PolicyName CommonAreaVoice -Identity "Batline 1

Last, you can execute the following powershell command on your Lync Front End server to try and emulate logging in to the phone.  This is great for debugging where the Lync Phone login would fail:

Test-CsPhoneBootstrap -PhoneOrExt 5555 -Pin 12345 -Verbose


Notes: If you have a polycom phone and you receive the following error "Certificate web service cannot be found. Please contact your support team." -- You need to configure the DHCP options as noted above in the "Making sure DHCP and DNS can dish out configurations to phones" section.

When executing the New-CsCommonAreaPhone command above, you receive the following powershell error "New-CsCommonAreaPhone : Management object not found for identity." I saw this error being an issue with your distinguishedName attribute.  Make sure you spelled your OU correctly, and that you are not using an OU that is built into AD like Users.

Good resources that explain exactly what is going on in greater detail.

http://blog.schertz.name/2010/12/configuring-lync-server-for-phone-edition-devices/

http://blog.schertz.name/2011/04/common-area-phone-configuration-in-lync/

http://www.graham-walsh.com/blog/?p=593

Enabling XMPP Federation to Google Talk on Lync 2013

Execute the following PowerShell command:

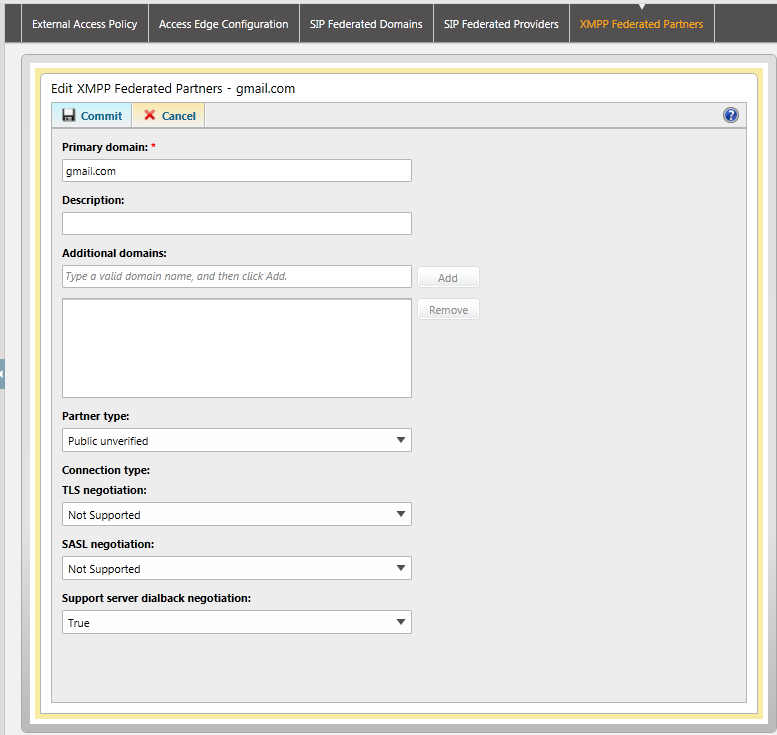
New-CsXmppAllowedPartner gmail.com -TlsNegotiation NotSupported -SaslNegotiation NotSupported -EnableKeepAlive $false -SupportDialbackNegotiation $true

If you don't want to use PowerShell, you can setup the federated partner through CSCP with the following settings:

Gmail XMPP Federated Partners


Error:

The XMPP Translating Gateway Proxy failed to send a stanza to a remote server.

Remote domain: gmail.com
Detail: MS diagnostic code: 32019

--------------------------------------Another Event--------------------------------------

The XMPP Translating Gateway Proxy encountered an error communicating with a remote server.

Remote domain: gmail.com
Direction: Outbound
State: STREAM_WaitingForStreamFeatures
Category: Stream
Detail: NotAuthorized
Diagnostic code:32019
Exception:-

Solution:

Both events above have to do with issues hinting at split-dns.  Make sure each of your Lync DNS records are pointing to the correct servers.  Here are the records I used below (each point to the internal servers as we are configuring a split-dns environment (nothing should have changed on DNS from 2010 to 2013 other than adding the service record _xmpp-server._tcp.mydomain.com to your public and private DNS servers)):

lyncdiscover.mydomain.com (this should point to your lync proxy's address)
sip.mydomain.com (this may be different depending on how you configured it, I have seen a lot of guides use this though -- this should point to your front end servers/pool)
_xmpp-server._tcp.mydomain.com (point to the domain above: sip.mydomain.com) (port 5269, priority 0, weight 0)
_sipfederationtls._tcp.mydomain.com (point to sip.mydomain.com, port 5061, weight 0, priority 0)

How to activate Lync Evaluation to Licensed Version

Have Lync 2010 Standard, Enterprise or Lync 2013 in evaluation mode and want to activate it with your licensed version? Here are the steps to do it!

  1. Download the Lync Server version from the Microsoft Licensing portal (or where ever else you obtain your licensed software).
  2. Extract the ISO to a folder/burn it to a disk and pop it into the Lync server.
  3. Open up the Lync Server Management Shell as an Administrator
    1. Start->All Programs->Microsoft Lync Server 2010 (or 2013)->Lync Server Management Shell
  4. Navigate to the installation media
    1. cd PATHTOYOURLYNCSERVERINSTALLER\Setup\amd64\Setup
  5. Execute the following command
    1. msiexec.exe /fvomus server.msi EVALTOFULL=1 /qb
  6. Use the following command to update the services
    1. Enable-CsComputer
  7. Use the following command to verify your copy of Lync is now licensed
    1. Get-CsServerVersion