Tag Archives: federation

Enable SSO (Single Sign On) to On-Premises Exchange OWA (Outlook Web Access) via Azure AD Application Proxy

Edit: This scenario is unofrtunately no longer supported by Microsoft.  More details can be found here: https://learn.microsoft.com/microsoft-365/enterprise/configure-exchange-server-for-hybrid-modern-authentication

Wouldn't it be awesome to be able to do the following with Outlook Web Access being published in your on-premises environment today?

  • Cheap proxy solution to prevent direct internet access to your servers
  • Mask the IPs of your on-premises infrastructure
  • Enable Azure MFA (Multi-Factor Authentication) for OWA?
  • Have a Single-Sign on experience into Outlook Web Application via federation?
  • Have the application be selectable from your "My Apps" page (myapps.microsoft.com)
  • Have the application be selectable from the "Waffle Menu" of Office 365

If you are looking for any of the above, you are in-luck and we can enable this easily through Azure AD Application Proxy.  If you organization is using Office 365 or Azure AD already and have licensing for Azure AD Premium or Basic, you are good to go.  If you have the Enterprise Mobility Suite, this will grant you to Azure AD Premium licensing which should make you good to go as well.

Configuration

  1. Prerequisite: Enable Kerberos Authentication for Outlook Web Access On-Premises
    1. Login to one of your domain controllers and open up Active Directory Users and Computers
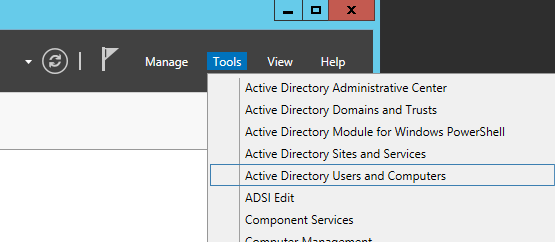
      Server Manager - Active Directory Users and Computers
    2. Find the Computer object within your organization we will run the Azure AD Connector on later in the tutorial and right click Properties on it
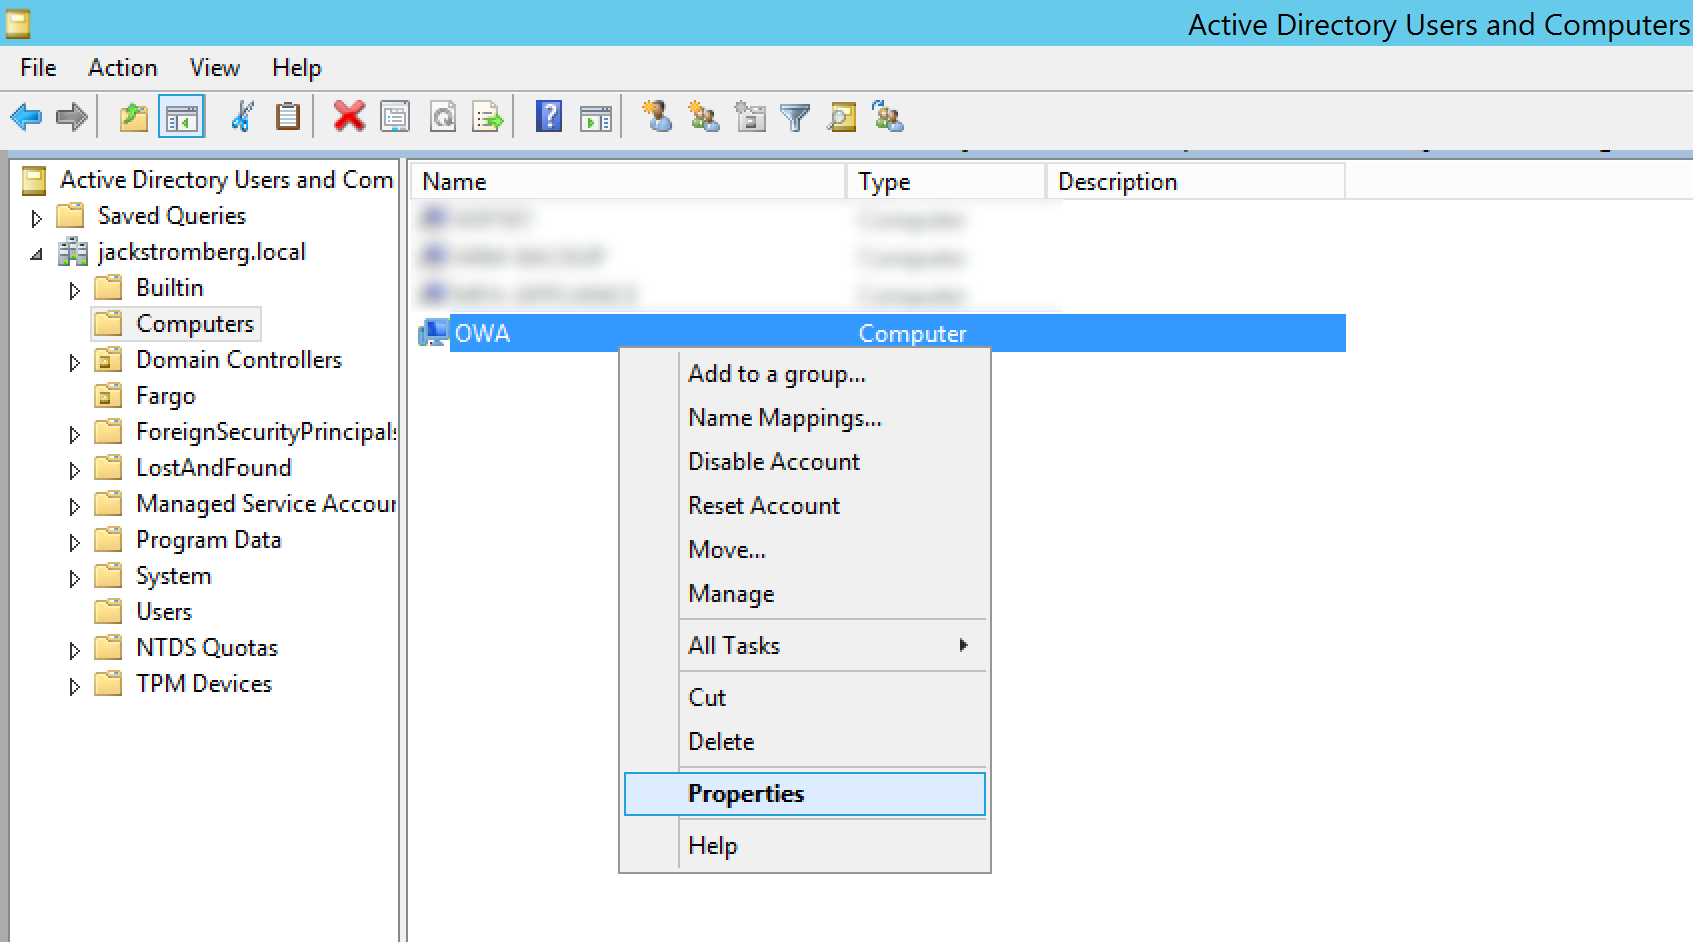
      Active Directory Users and Computers - Computers - OWA - Properties
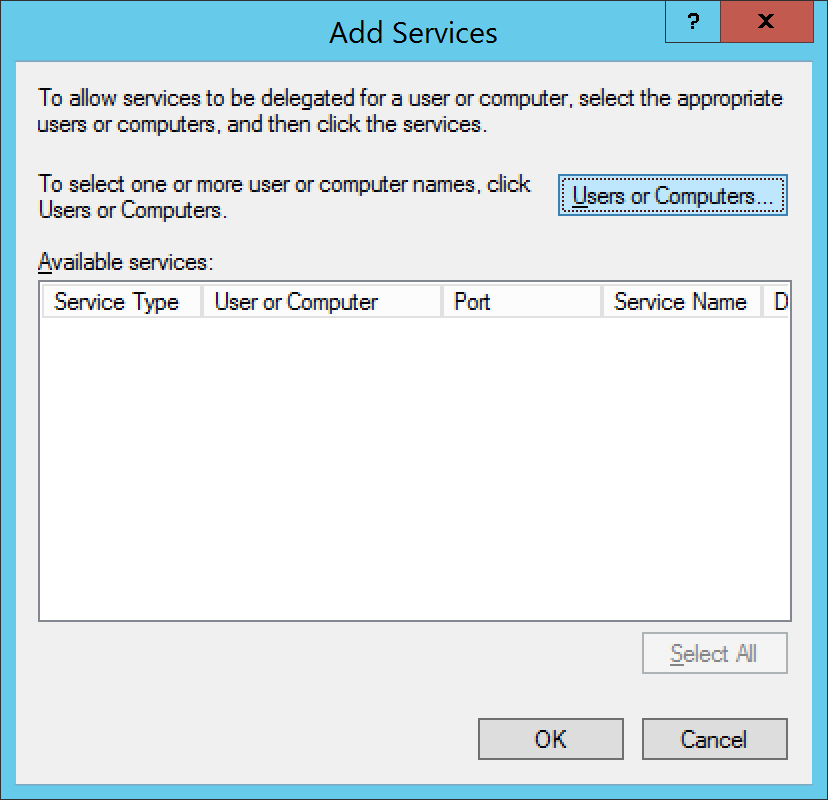
    3. Select the Delegation tab, select Trust this computer for delegation to specified services only, check Use any authentication protocol, and click on Add...
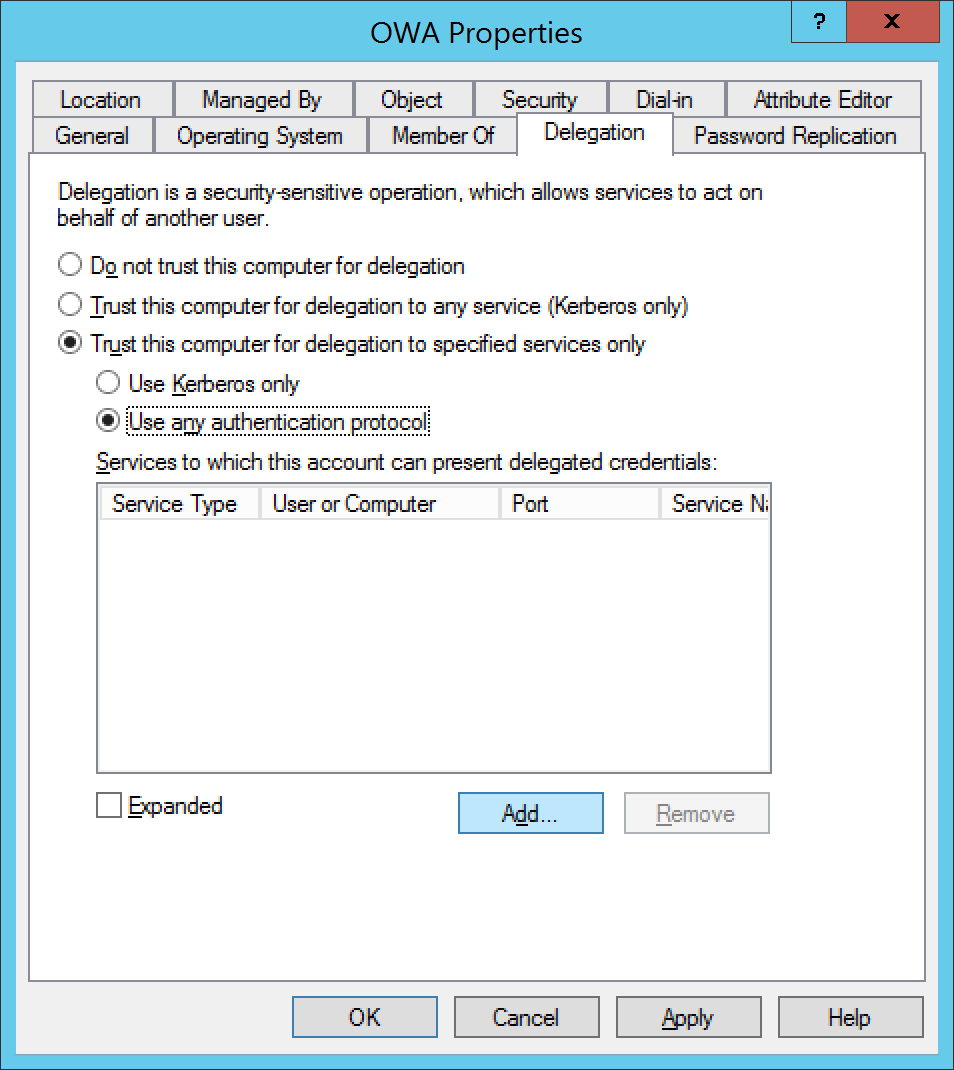
      Active Directory Users and Computers - Computers - OWA - Properties - Delegation - Add
    4. Select Users or Computers...
      Active Directory Users and Computers - Computers - OWA - Properties - Delegation - Add - users or Computers
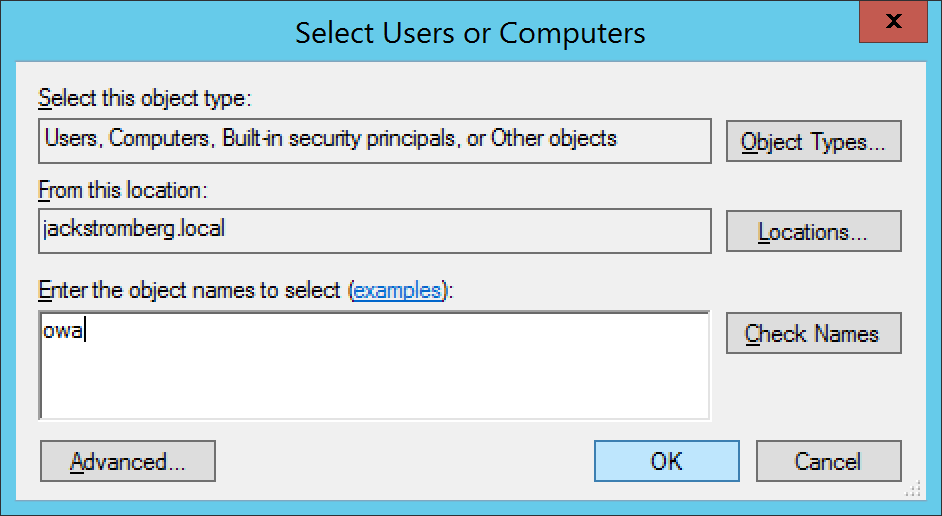
    5. Type in the machine name and click OK
      Active Directory Users and Computers - Computers - OWA - Properties - Delegation - Add - users or Computers - Select Users or Computers
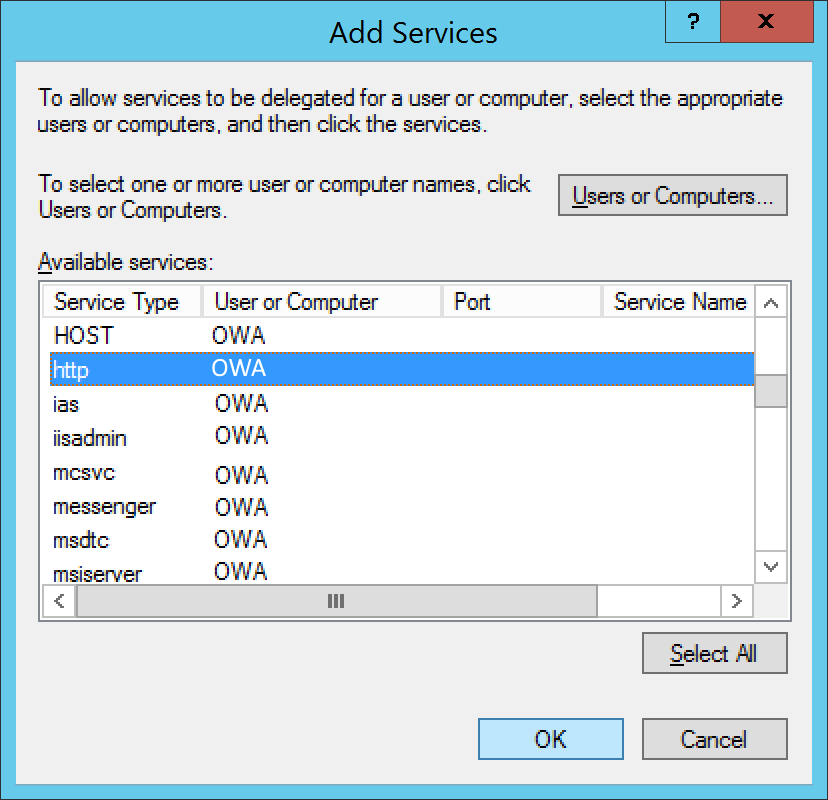
    6. Select http and click OK
      Active Directory Users and Computers - Computers - OWA - Properties - Delegation - Add - users or Computers - http
    7. Click OK on the Add Services page
  2. Pre-Requisite: Enable Exchange On-Premises to use Integrated Windows Authentication (instructions for Exchange 2010 or 2013 can be found below)
    1. Exchange 2010
      1. Open the Exchange Management Console for your Exchange server
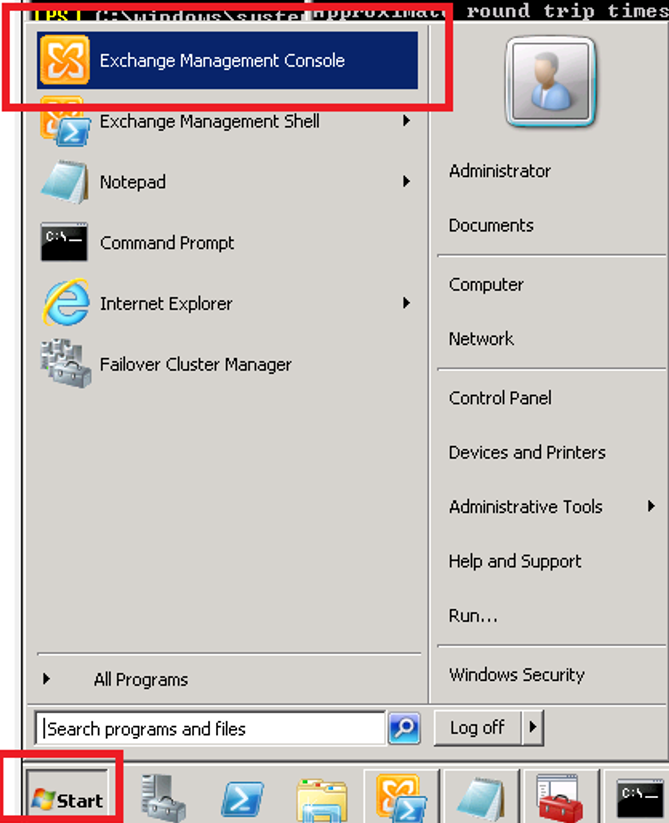
        Exchange Management Console (2010)
      2. Expand Server Configuration, select Client Access, under Outlook Web App, right click on your web app and select Properties
        Exchange Management Console (2010) - Outlook Web App
      3. Select the Authentication tab and check Use one or more standard authentication methods.  Once checked, check Integrated Windows authentication and click the Apply and OK buttons.
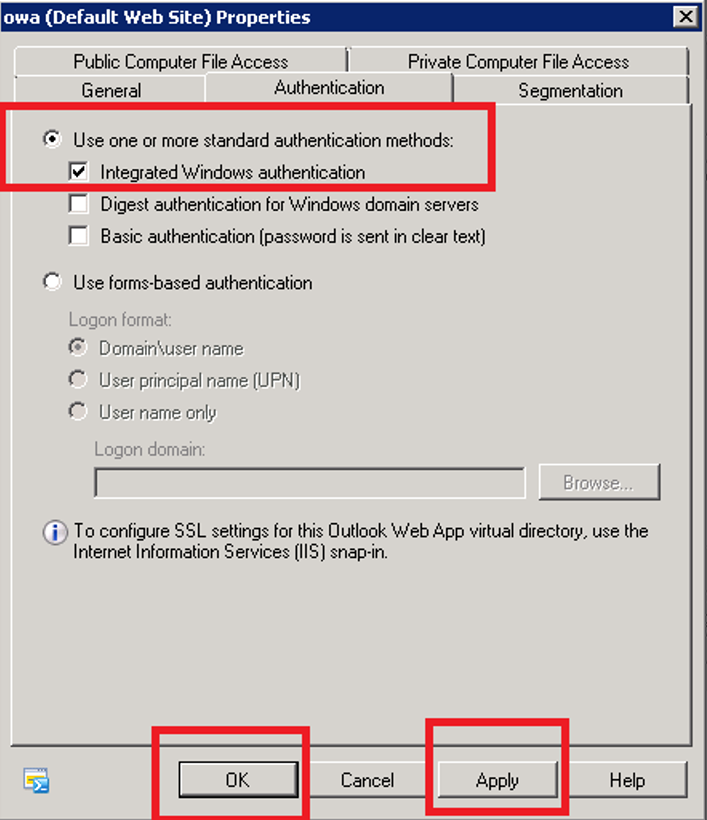
        Exchange Management Console (2010) - Outlook Web App Properties - Authentication - Integrated Windows Authentication
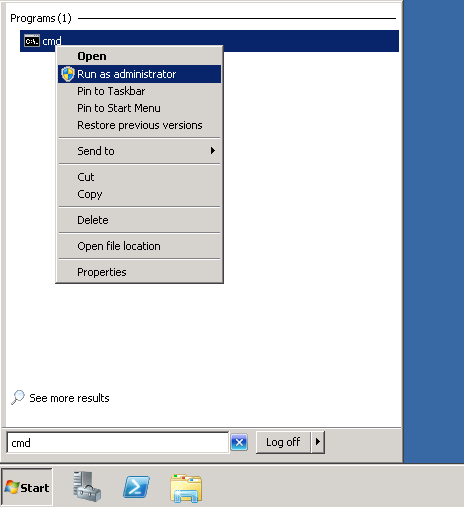
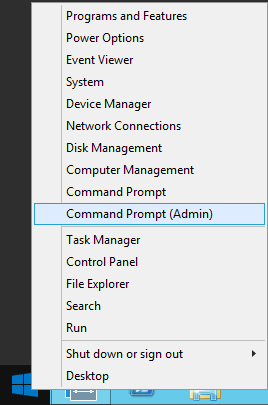
      4. Open a command prompt
        cmd as Administrator
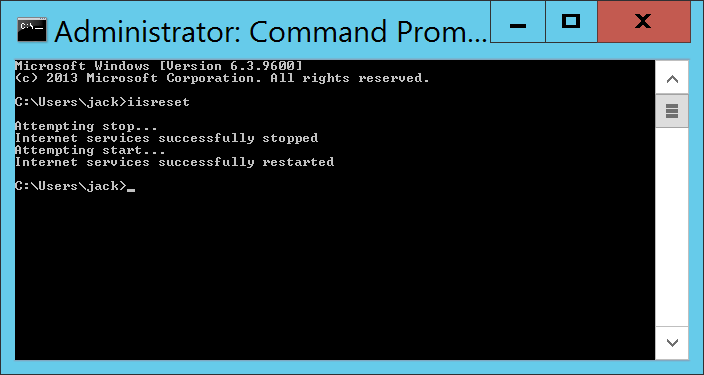
      5. Execute the iisreset command
        cmd - iisreset
    2. Exchange 2013
      1. Open the Exchange Administrative Center
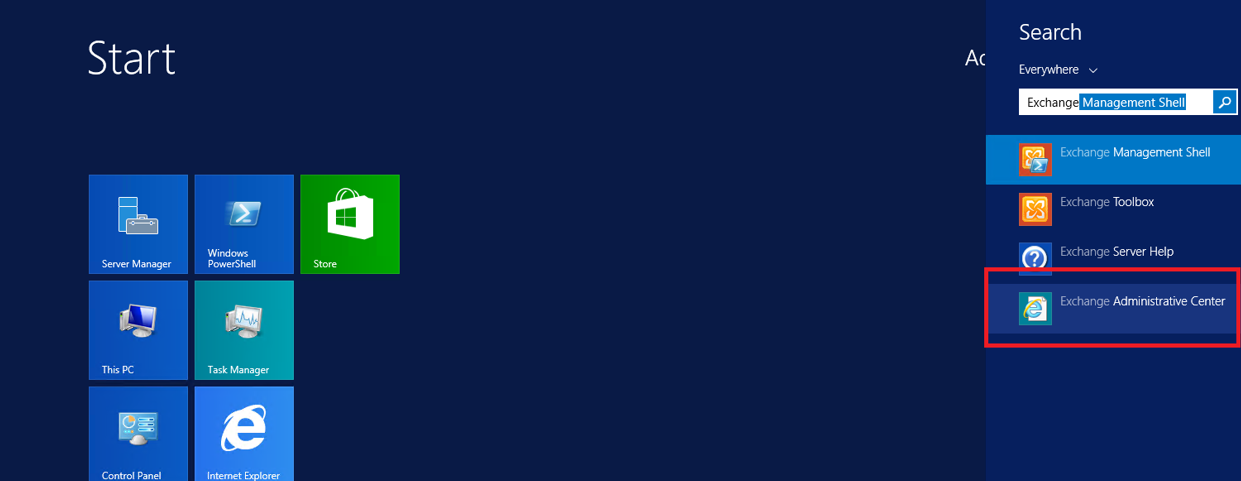
        Exchange Administrative Center (2013)
      2. Login to the admin center, click on Servers and select the Virtual Directories tab
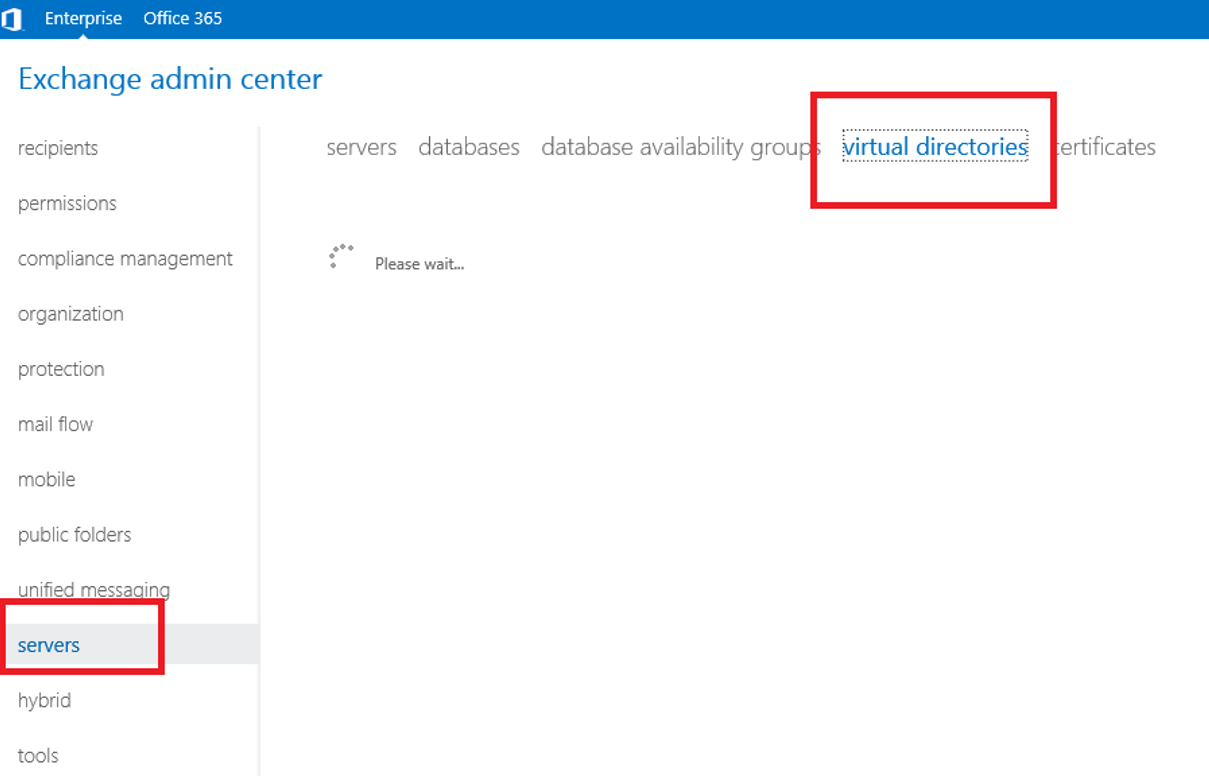
        Exchange Administrative Center (2013) - admin center - servers -virtual directories
      3. Select server and then double click on the OWA Virtual Directory and select the applications tab
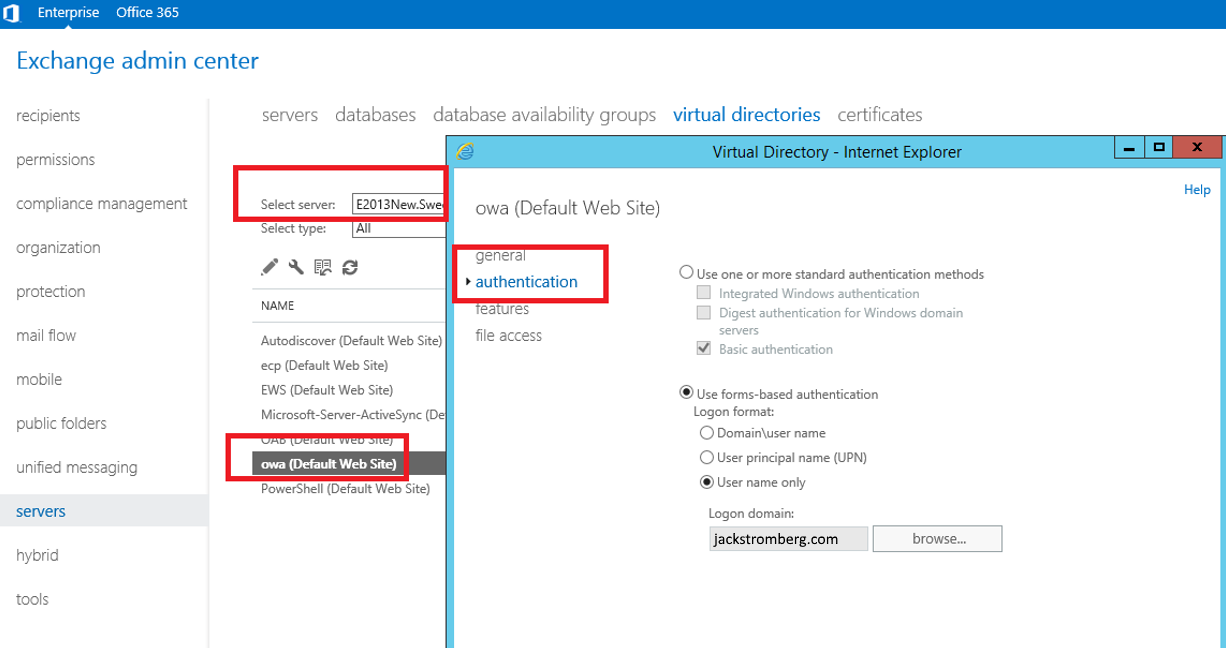
        Exchange Administrative Center (2013) - admin center - servers -virtual directories - owa - authentication
      4. On the authentication tab, select Use one or more standard authentication methods, select Integrated Windows authentication, and click save
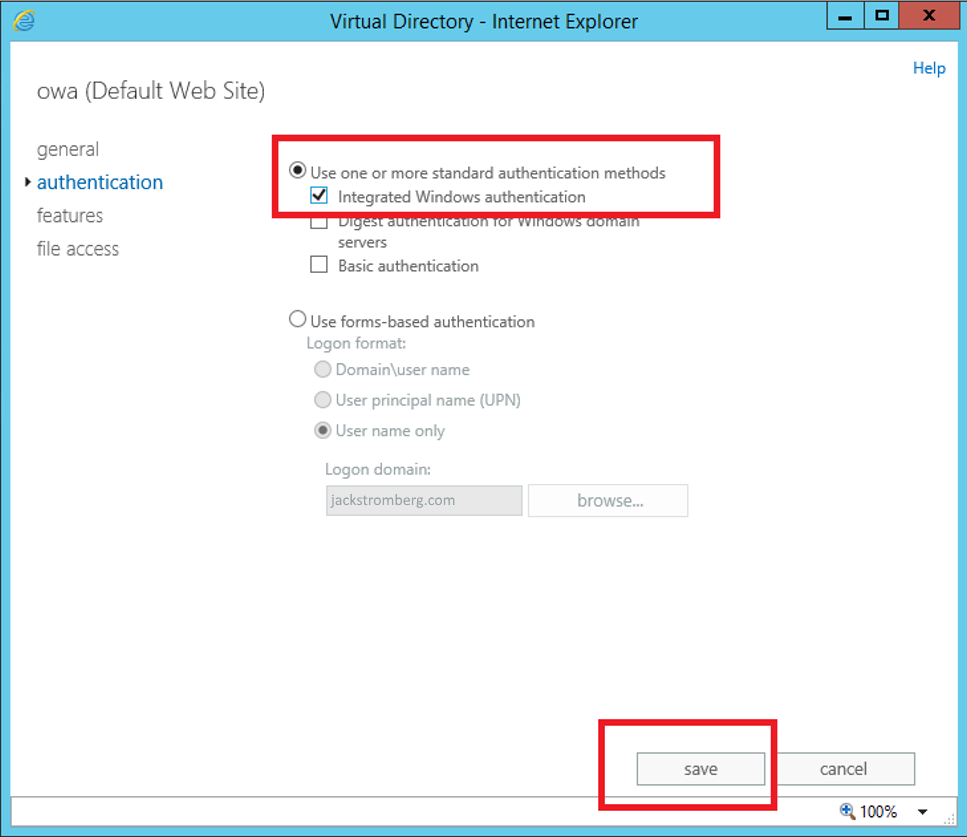
        Exchange Administrative Center (2013) - admin center - servers -virtual directories - owa - authentication - integrated windows authentication
      5. Open a command prompt
        Elevated Command Prompt
      6. Execute the iisrest command
        cmd - iisreset
  3. Login to the Azure Portal
    1. https://portal.azure.com
  4. Select All services -> Azure Active Directory on the left side
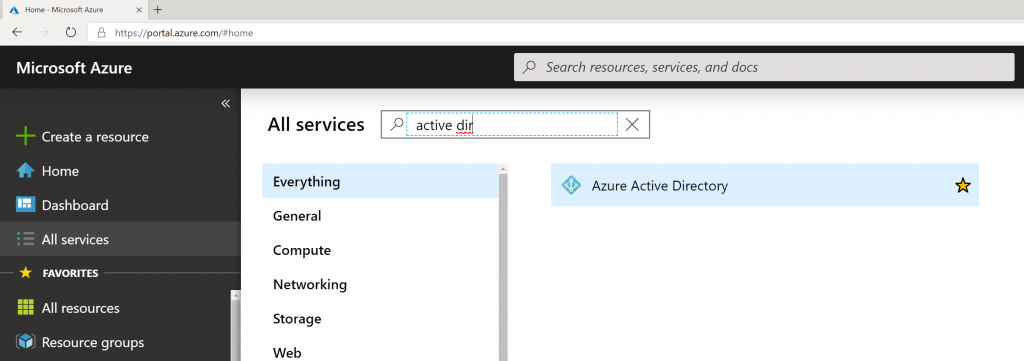
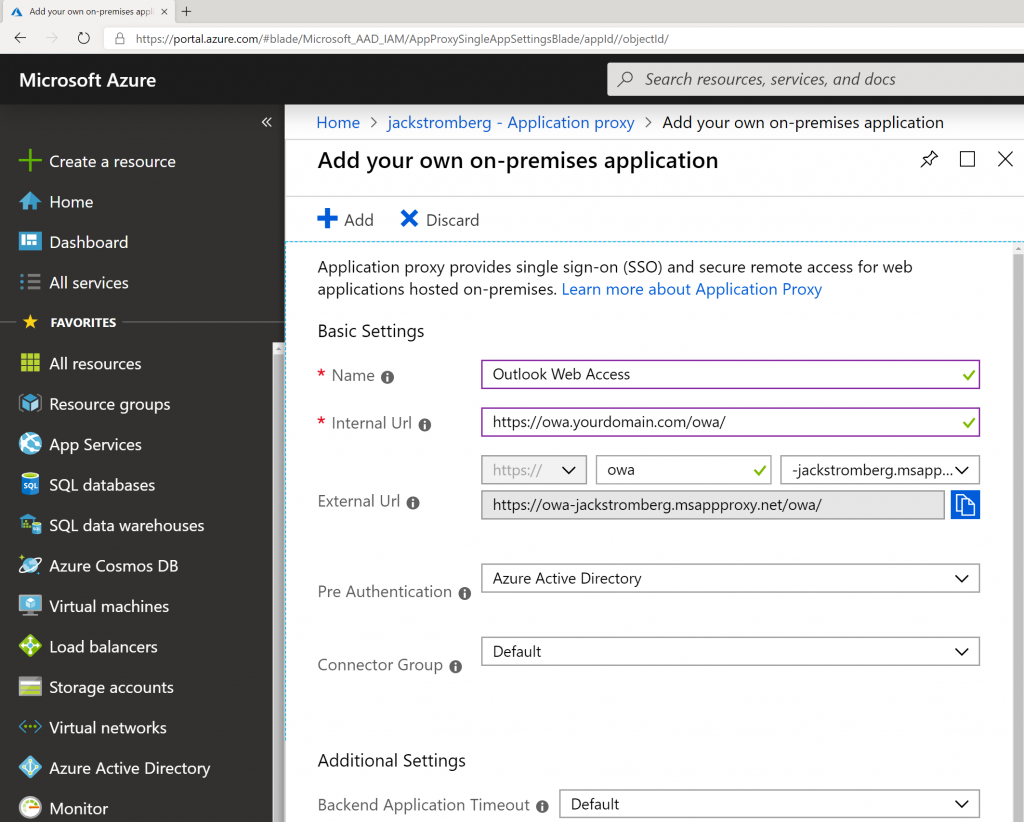
  5. Select Application proxy in the sub blade and select + Configure app
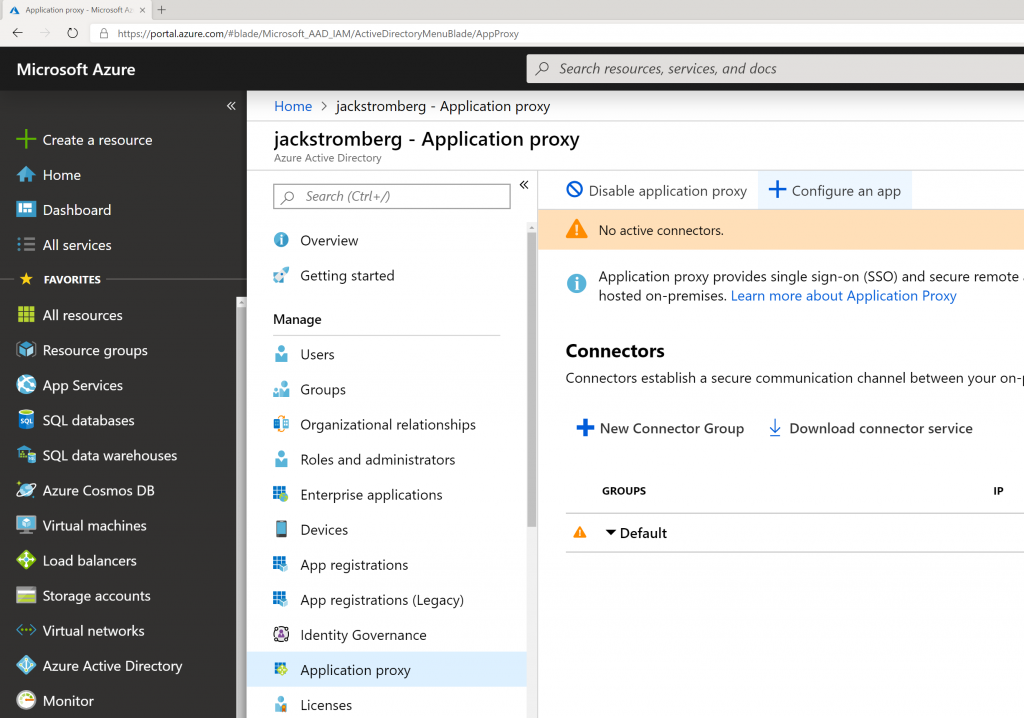
  6. Enter in the following information for the application:
    1. Name: Outlook Web Access
    2. Internal URL: https://owa.yourdomain.com/owa/ (this is the internal URL to owa)
    3. Pre-Authentication: Azure Active Directory
    4. Connector Group: Default
    5. Click + Add

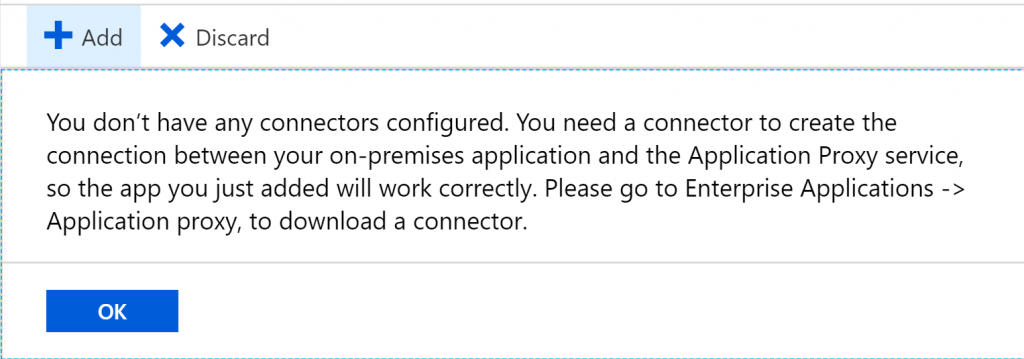
    6. Select OK if not prompted about having a connector
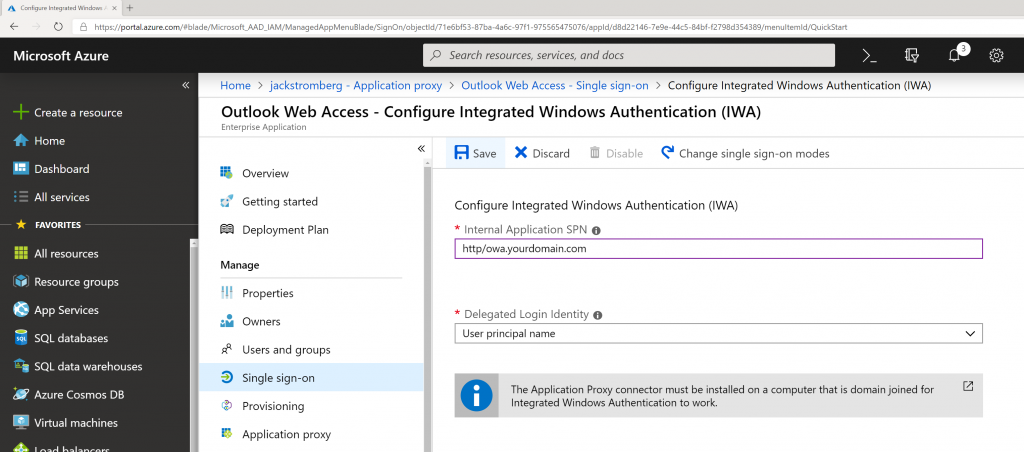
  7. Once your application is created, you should be redirected to Azure Active Directory -> Enterprise Applications -> Outlook Web Access.  On this blade, select Single sign-on and then select the Windows Integrated Authentication button
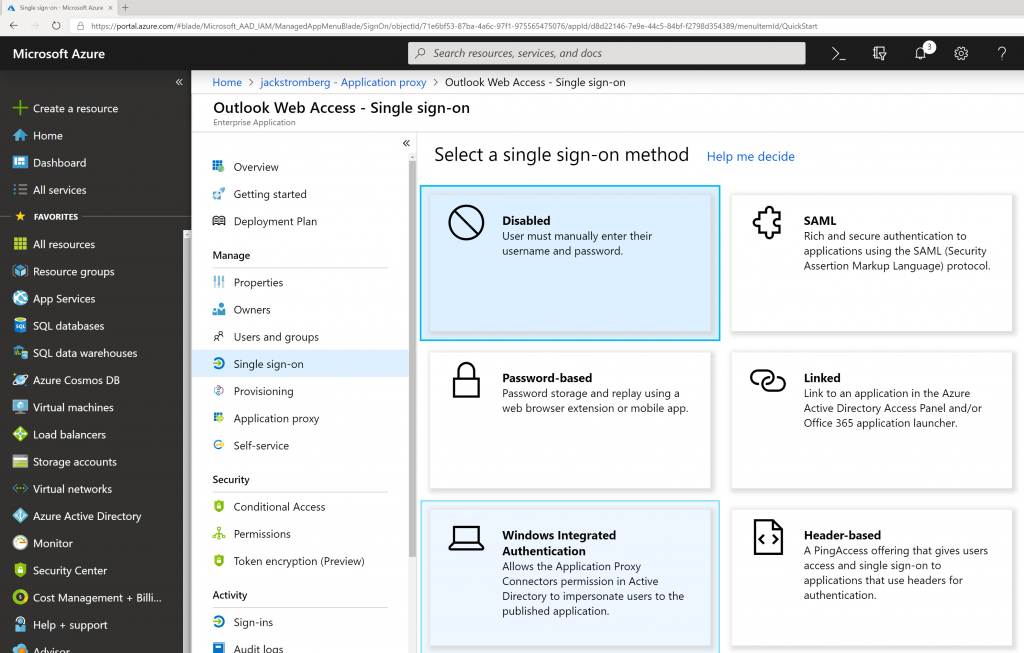
  8. Use the following configuration
    1. Internal Application SPN: http/owa.yourdomain.com
      1. This is the Service Principal Name to the Exchange Server.  The value for this was provided earlier in this tutorial.
    2. Delegated Login Identity: User Principal Name
    3. Click Save
    4. Note: If you cannot do Kerberos based authentication (Integrated Windows Authentication) in your environment, you can Discard the changes continue to use Azure AD Application proxy, however the end user will be prompted for credentials just as if they browsed directly to OWA.
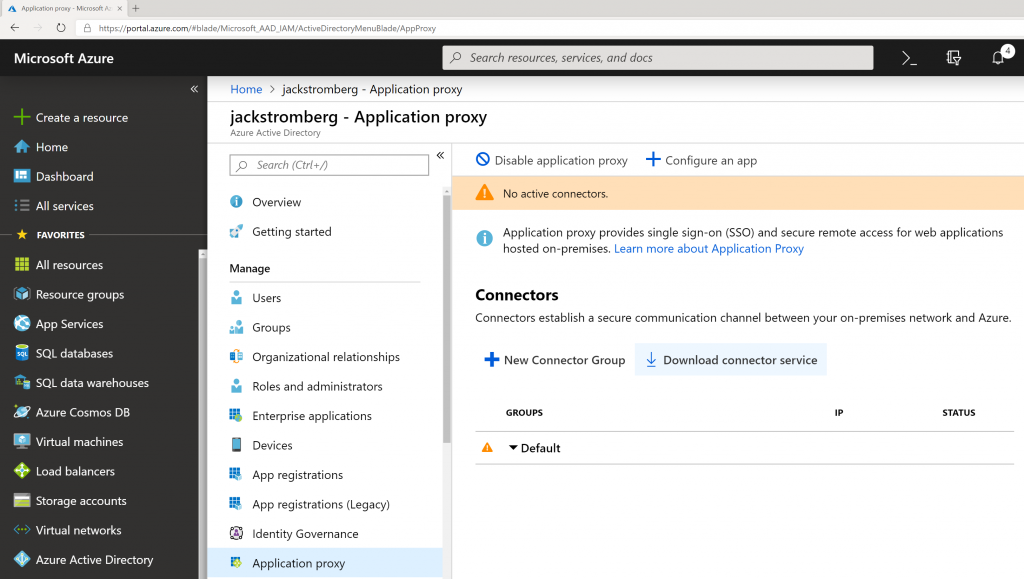
  9. Go back to All Services -> Azure Active Directory -> Application Proxy and click the Download connector service button
      

    1. Click the Accept terms & Download button
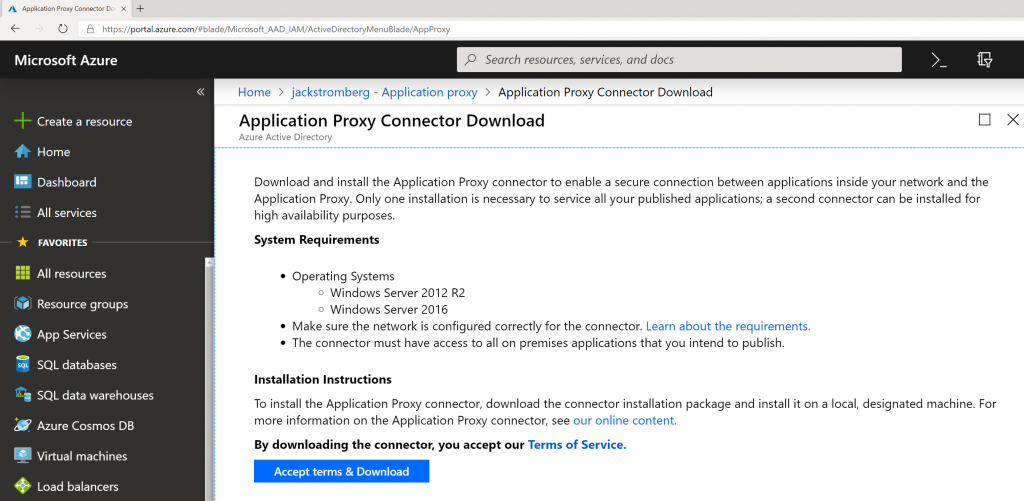
    2. Note: Although the download has a generic name, the download is customized specifically for your application (Outlook Web Access in this case).  If you create other applications within your Azure AD tenant, make sure you always use the Download button inside of each application so it generates the correct installer.
  10. Copy the AADApplicationProxyConnectorInstaller.exe connector to any server in your environment that can access your OWA instance internally and run the installer
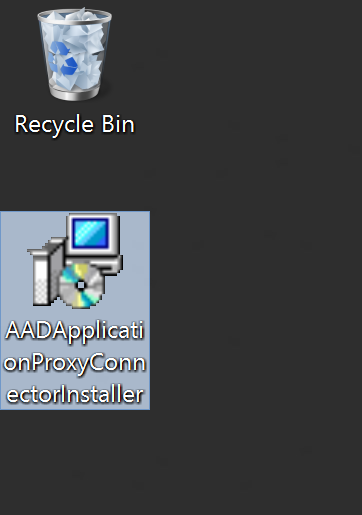
    AADApplicationProxyConnectorInstaller Downloaded
  11. Check I agree to the license terms and conditions and click Install
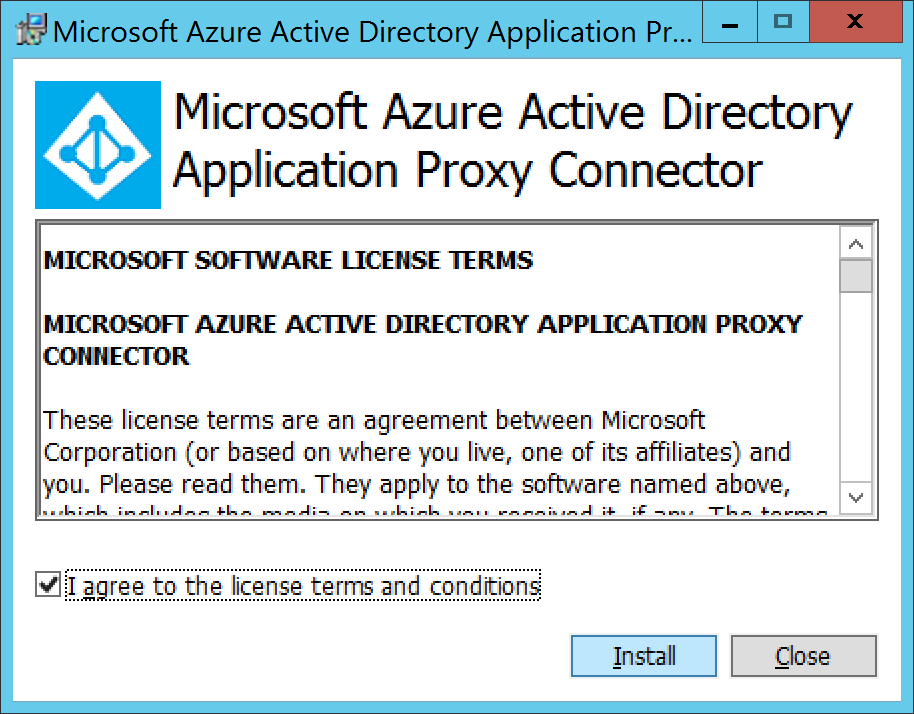
    Microsoft Azure Active Directory Application Proxy Connector - I agree
  12. Type in your Global Administrator credentials to register the agent to your Azure AD tenant and click Sign in
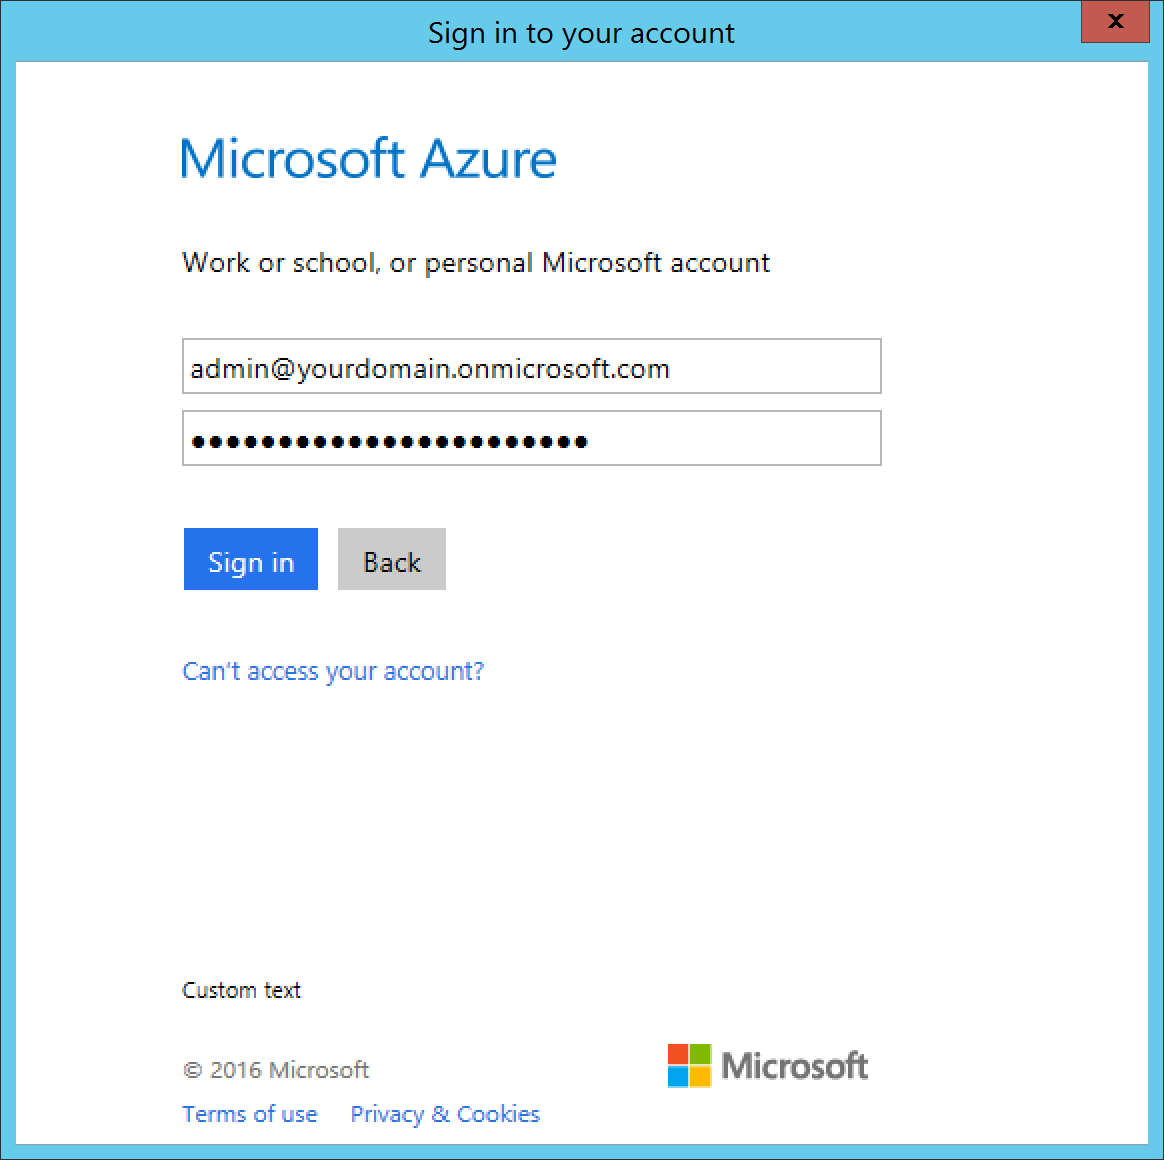
    Microsoft Azure Active Directory Application Proxy Connector - Credential Prompt
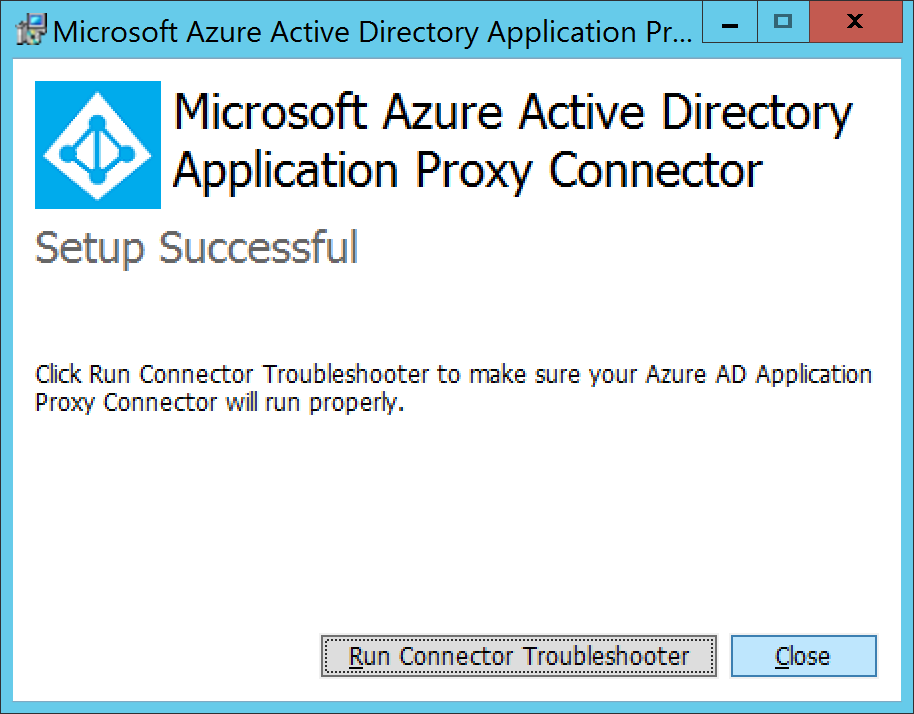
  13. Click Close if it shows Setup Success
    Microsoft Azure Active Directory Application Proxy Connector - SuccessOptional: You can run the Connector Troubleshooter if you would like.  It will install a quick application that will show you the results of the test in your web browser once it has completed.
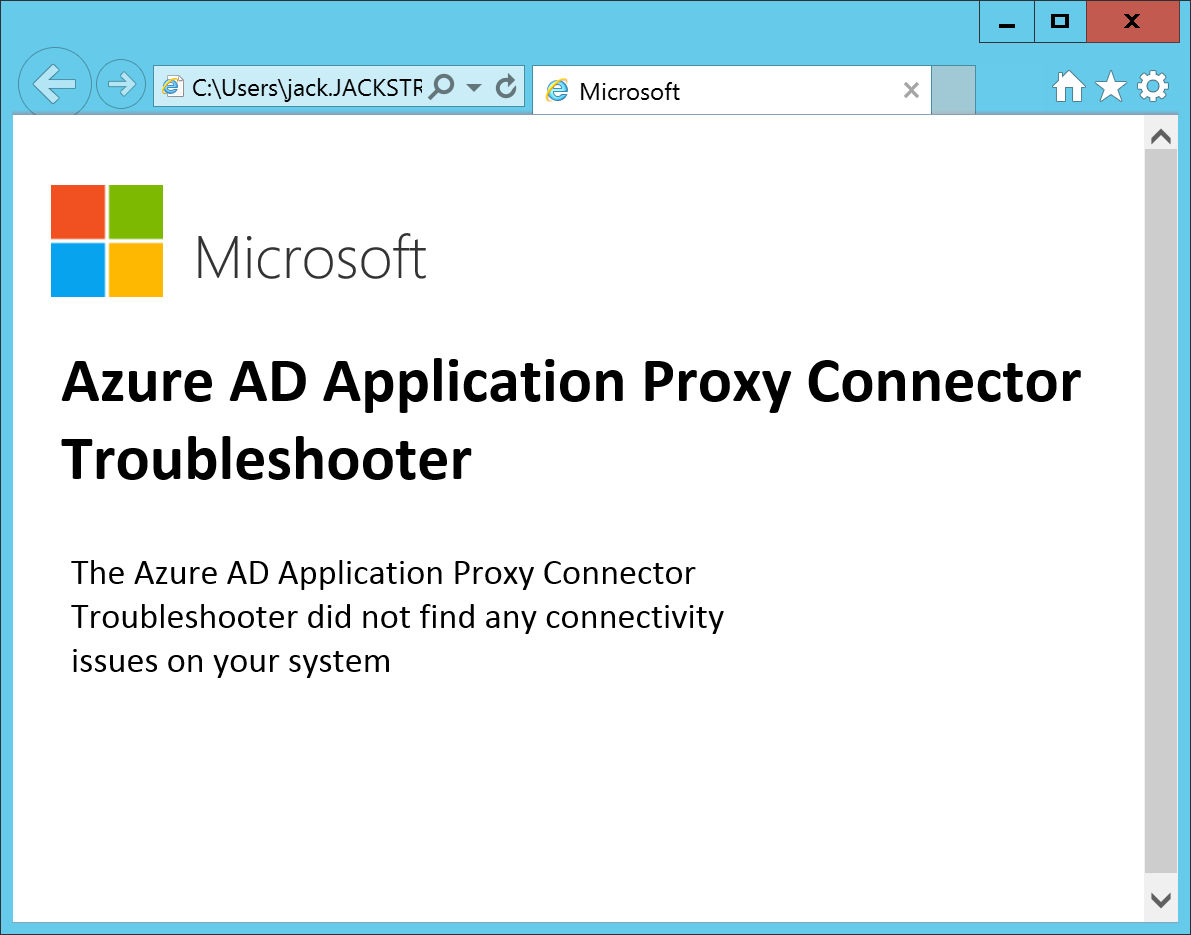
    Azure AD Application Proxy Connector Troubleshooter
  14. Go back to the Azure Portal and navigate to Azure Active Directory -> Enterprise Applications -> Outlook Web Access.  Select Users and groups and click the +Add user button to assign the group or users that should use the application.
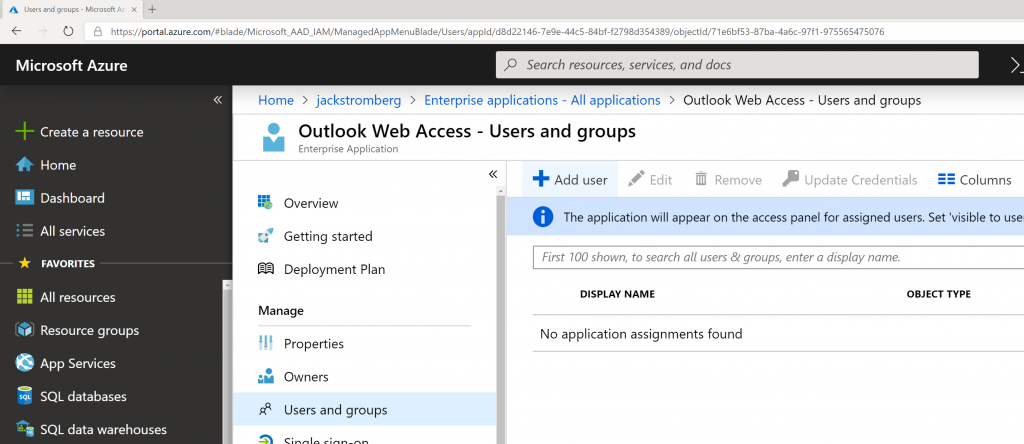
      

    1. Note: This group could be synchronized from on-premises to Azure AD or created in the cloud
    2. Note: Assigning a user or group to this application will automatically make the application show up in the My Apps portal
    3. Note: Users or Groups must be defined to use the application or they will receive an error upon logging in

Test

  1. Login to https://myapps.microsoft.com as one of the assigned users to the Outlook Web Access application
  2. Select the Outlook Web Access application

If all went well, you should be logged into Outlook Web Access on-premises and see your corresponding mailbox.  At this point, I would proceed with adding a vanity domain name that matches your organization as well as corresponding SSL certificate for the domain name instead of leveraging the default msapprpoxy.net domain name.  Additionally, you can always find a nice little icon for the application to make it look like OWA as well 🙂
DirSync (Directory Synchronization) (Windows Azure Active Directory Sync Tool) attributes federated to Office 365

Here is a complete listing of the attributes that are federated to Office 365 by your on-premise Active Directory environment.

An official listing of these attributes can be found on the following technet article: http://social.technet.microsoft.com/wiki/contents/articles/19901.dirsync-list-of-attributes-that-are-synced-by-the-windows-azure-active-directory-sync-tool.aspx

Synced Object Attribute User Group Contact (Src) Description
assistant Read - Read The name of the assistant for an account.
authOrig Read Read Read Relationship that indicates that the mailbox for the target object is authorized to send mail to the source object.
C - - Read Two-letter ISO 3166 [ISO3166] country code.
cn Read Read Read The common name of the object.
co Read - Read The country/region in which the person (user or contact) or company is located.
company Read - Read The person's (user or contact) company name.
countryCode Read - Read The country code for person's (user or contact) language of choice.
department Read - Read The name of the person's (user or contact) department.
description Read Read Read Human-readable descriptive phrases about the object.
displayName Read Read Read The display name for an object, usually the combination of the person's first name, middle initial, and last name.
dLMemRejectPerms Read Read Read Relationship that indicates that members of the target object are not authorized to send mail to the source object.
dLMemSubmitPerms Read Read Read Relationship that indicates that members of the target object are authorized to send mail to the source object.
ExtensionAttribute1 Read Read Read Custom attribute that is defined in the customer on-premises directory.
ExtensionAttribute10 Read Read Read Custom attribute that is defined in the customer on-premises directory.
ExtensionAttribute11 Read Read Read Custom attribute that is defined in the customer on-premises directory.
ExtensionAttribute12 Read Read Read Custom attribute that is defined in the customer on-premises directory.
ExtensionAttribute13 Read Read Read Custom attribute that is defined in the customer on-premises directory.
ExtensionAttribute14 Read Read Read Custom attribute that is defined in the customer on-premises directory.
ExtensionAttribute15 Read Read Read Custom attribute that is defined in the customer on-premises directory.
ExtensionAttribute2 Read Read Read Custom attribute that is defined in the customer on-premises directory.
ExtensionAttribute3 Read Read Read Custom attribute that is defined in the customer on-premises directory.
ExtensionAttribute4 Read Read Read Custom attribute that is defined in the customer on-premises directory.
ExtensionAttribute5 Read Read Read Custom attribute that is defined in the customer on-premises directory.
ExtensionAttribute6 Read Read Read Custom attribute that is defined in the customer on-premises directory.
ExtensionAttribute7 Read Read Read Custom attribute that is defined in the customer on-premises directory.
ExtensionAttribute8 Read Read Read Custom attribute that is defined in the customer on-premises directory.
ExtensionAttribute9 Read Read Read Custom attribute that is defined in the customer on-premises directory.
facsimiletelephonenumber Read - Read Telephone numbers (and, optionally, the parameters) for facsimile terminals.
givenName Read - Read Name strings that are the part of a person's (user or contact) name that is not their surname.
GroupType - Read - Flag attribute indicating the type of group (security, global, etc.)
hideDLMembership - Read - Hide the membership list on a distribution list from senders.
homephone Read - Read The person's (user or contact) main home telephone number.
info Read Read Read "Notes" field on "Telephone" tab of ADUC.
Initials Read - Read Strings of initials of some or all of an individual's names, except the surname(s).
ipPhone Read - Read The TCP/IP address for the telephone.
l Read - Read Names of a locality or place, such as a city, county, or other geographic region.
legacyExchangeDN Read Read Read
mail Read Read Read The list of email addresses for a person (user or contact).
mailnickname Read Read Read
managedBy - Read - Resource/owner relationship, where the source object (a group) is the resource, and the target object is the owner.
manager Read - Read Manager/direct report relationship between two individuals, where the source object is the direct report, and the target object is the manager.
member - Read - Membership of the target object (of class User, Contact, or Group) in the group that is identified as the source object.
middleName Read - Read Additional names for a person (user or contact), for example, middle name, patronymic, matronymic, or other names.
mobile Read - Read The primary mobile phone number for a person (user or contact).
msDS-HABSeniorityIndex Read Read Read
msDS-PhoneticDisplayName Read Read Read
MsExchArchiveGUID Read - -
MsExchArchiveName Read - -
msExchArchiveStatus Read/Write - - Created in the Exchange cloud for "write back" to on-premises when the customer has a cloud archive.
msExchAssistantName Read - Read The name of the assistant for an account.
msExchAuditAdmin Read - -
msExchAuditDelegate Read - -
msExchAuditDelegateAdmin Read - -
msExchAuditOwner Read - -
MsExchBlockedSendersHash Read/Write - Read Populated through an upgrade from Business Productivity Online Standard Suite. Not synced from on-premises.
msExchBypassAudit Read - -
MsExchBypassModerationFromDLMembersLink Read Read Read
MsExchBypassModerationLink Read Read Read
msExchCoManagedByLink - Read -
msExchDelegateListLink Read - -
msExchELCExpirySuspensionEnd Read - -
msExchELCExpirySuspensionStart Read - -
msExchELCMailboxFlags Read - -
MsExchEnableModeration Read Read -
msExchExtensionCustomAttribute1 Read Read Read
msExchExtensionCustomAttribute2 Read Read Read
msExchExtensionCustomAttribute3 Read Read Read
msExchExtensionCustomAttribute4 Read Read Read
msExchExtensionCustomAttribute5 Read Read Read
MsExchGroupDepartRestriction - Read -
MsExchGroupJoinRestriction - Read -
msExchHideFromAddressLists Read Read Read Indicator to control the visibility of a mail recipient for name resolution.
MsExchImmutableID Read - -
msExchLitigationHoldDate Read Read Read
msExchLitigationHoldOwner Read Read Read
MsExchMailboxGuid Read - - The GUID of the user’s mailbox.
msExchMailboxAuditEnable Read - -
msExchMailboxAuditLogAgeLimit Read - -
MsExchModeratedByLink Read Read Read
MsExchModerationFlags Read Read Read
MsExchRecipientDisplayType Read Read Read
msExchRecipientTypeDetails Read Read Read
MsExchRemoteRecipientType Read - -
msExchRequireAuthToSendTo Read Read Read When enabled for a distribution list (DL), unauthenticated users are rejected.
MsExchResourceCapacity Read - -
MsExchResourceDisplay Read - -
MsExchResourceMetaData Read - -
MsExchResourceSearchProperties Read - -
msExchRetentionComment Read Read Read
msExchRetentionURL Read Read Read
MsExchSafeRecipientsHash Read/Write - Read Populated through an upgrade from Business Productivity Online Standard Suite. Not synced from on-premises.
MsExchSafeSendersHash Read/Write - Read Populated through an upgrade from Business Productivity Online Standard Suite. Not synced from on premises.
MsExchSenderHintTranslations Read Read Read
msExchTeamMailboxExpiration Read - -
msExchTeamMailboxOwners Read - -
msExchTeamMailboxSharePointLinkedBy Read - -
msExchTeamMailboxSharePointUrl Read - -
msExchUCVoiceMailSettings Read/Write - -
msExchUsageLocation Read - -
msExchUserHoldPolicies Read/Write - - Litigation Hold allows cloud services to determine which users are under Litigation Hold
msOrg-IsOrganizational - Read -
msRTCSIP-ApplicationOptions Read - -
msRTCSIP-DeploymentLocator Read - Read Fully qualified DNS name of the Microsoft Lync Server 2010 deployment, as specified in the authoritative (customer, on-premises) directory.
msRTCSIP-Line Read - Read The device ID (either the Session Initiation Protocol (SIP) uniform resource identifier (URI) or the TEL URI) of the telephone that the user controls.
msRTCSIP-OwnerUrn Read - -
msRTCSIP-PrimaryUserAddress Read - Read SIP URI for instant messaging, as specified in the authoritative (customer, on-premise) directory.
msRTCSIP-UserEnabled Read - Read Indicates whether the user is currently enabled for SIP instant messaging, as specified in the authoritative (customer, on-premises) directory.
msRTCSIP-OptionFlags Read - Read
objectGUID Read Read Read Key for the object: this key is immutable, even if the object moves from one context to another, for example, as a result of a company merge or split.
oOFReplyToOriginator - Read - Governs whether out-of-office notifications should be sent to a sender of a message to this distribution list (DL).
otherFacsimileTelephone Read - Read A list of alternative facsimile numbers.
otherHomePhone Read - Read A list of alternative home telephone numbers.
otherIpPhone Read - Read A list of alternative TCP/IP addresses for the telephone.
otherMobile Read - Read A list of alternative mobile phone numbers.
otherPager Read - Read A list of alternative pager numbers.
otherTelephone Read - Read A list of alternative office telephone numbers.
pager Read - Read The primary pager number.
photo Read - -
physicalDeliveryOfficeName Read - Read Names that a postal service uses to identify a post office.
postalCode Read - Read Codes that a postal service uses to identify postal service zones.
postOfficeBox Read - Read Postal box identifiers that a postal service uses when a customer arranges to receive mail at a box on the premises of the postal service.
PreferredLanguage Read - - The preferred written or spoken language for a user.
proxyAddresses Read/Write Read/Write Read/Write The address by which a Microsoft Exchange Server recipient object is recognized in a foreign mail system.
PublicDelegates Read/Write Read Read Cross-premises public delegation: allows users to specify delegates for their mailbox.
reportToOriginator - Read - Governs whether to send delivery reports to the message originator when a message that is sent to a group is not delivered. The delivery report lets the group owner know that the message was not delivered.
ReportToOwner - Read -
samAccountName Read - -
sn Read - Read Name strings for the family names of a person (user or contact).
st Read - Read The full names of states or provinces.
streetAddress Read - Read The person's (user or contact) address.
targetAddress Read - Read The destination address for the person (user or contact).
TelephoneAssistant Read - Read
telephoneNumber Read - Read Telephone numbers that comply with the ITU Recommendation E.123.
thumbnailphoto Read - Read Persons Photo - 10kb maximum size limit
title Read - Read The title of a person (user or contact) in the person's organizational context.
unauthOrig Read Read Read Relationship that indicates that the mailbox for the target object is not authorized to send mail to the source object.
url Read - Read The list of alternative web pages.
userAccountControl Read - - Flag attribute to indicate settings.
userCertificate Read Read - Contains certificates used as part of the Exchange SMIME feature set.
UserPrincipalName Read - - The user principal name (UPN) that is an Internet-style logon name for a user, as specified in RFC 822.
userSMIMECertificate Read Read - Contains certificates used as part of the Exchange SMIME feature set.
wWWHomePage Read - Read The primary web page.

Office 365 - Change the Alias attribute of an Exchange mailbox for a federated user

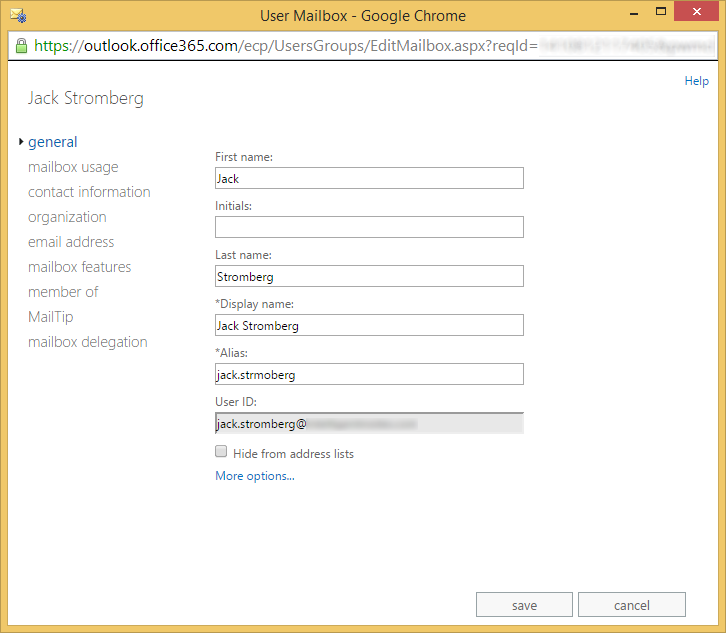
Scenario: A federated Office 365 user's Alias is incorrect.  You wish to change it, but changing the proxyAddress or Mail attribute in Active Directory does not update the Alias.

Before this tutorial, you can see the Alias has a typo in it (the m and o are out of place)

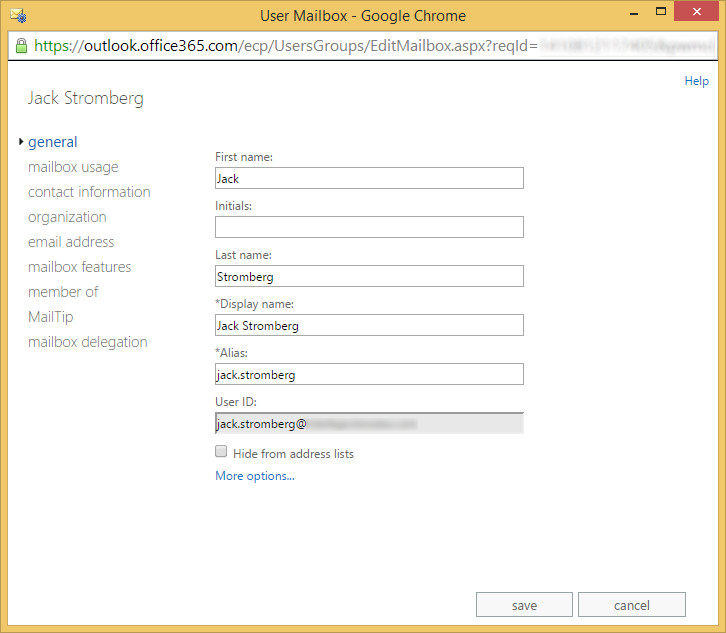
Office 365 - User Mailbox - Alias - TypoAfter completing this tutorial, we will update the Alias to look correct

Office 365 - User Mailbox - Alias - Typo Fixed

Solution: Complete the following steps below to update the Alias

  1. Login to one of your Domain Controllers and open up Active Directory Users and Computers
    Server Manager - Active Directory Users and Computers
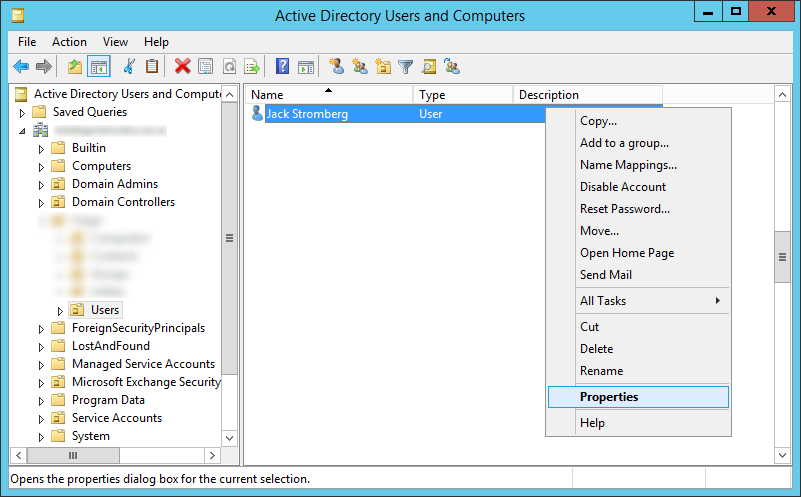
  2. Find the user that owns the mailbox, right click on them, and select Properties
    Active Directory Users and Computers - User - Properties
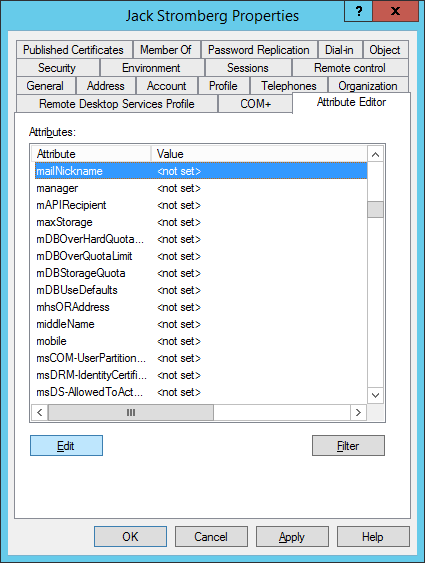
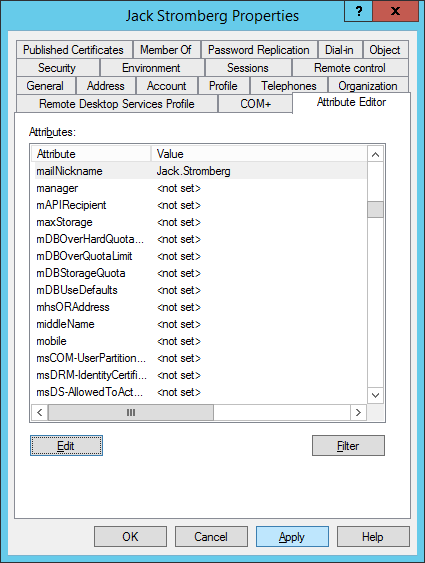
  3. Select the Attribute Editor Tab and find the mailNickname attribute
    Active Directory Users and Computers - User - Properties - Attribute Editor - mailNickname

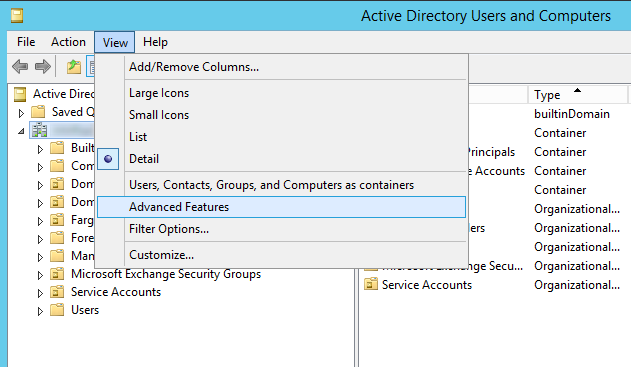
    1. Note: You will need to Enable Advanced Features on Active Directory Users and Computers to see this tab
      Active Directory Users and Computers - View - Advanced Features
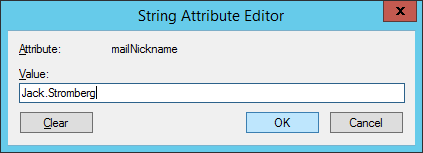
  4. Type in the desired value you wish to show up in the Alias field on the Office 365 Exchange Portal and click OK
    Active Directory Users and Computers - User - Properties - Attribute Editor - mailNickname - String Attribute Editor
  5. Click Apply on the Active Directory Users and Computers dialog
    Active Directory Users and Computers - User - Properties - Attribute Editor - mailNickname - Apply
  6. Wait for the Office 365 Directory Synchronization tool runs and updates the users online
    1. Note: Tutorial on how to do this can be found here: http://jackstromberg.com/2012/08/force-directory-synchronization-with-office-365/
  7. Ensure that the Alias field has updated in the Exchange Administrative portal
    Office 365 - User Mailbox - Alias - Typo Fixed


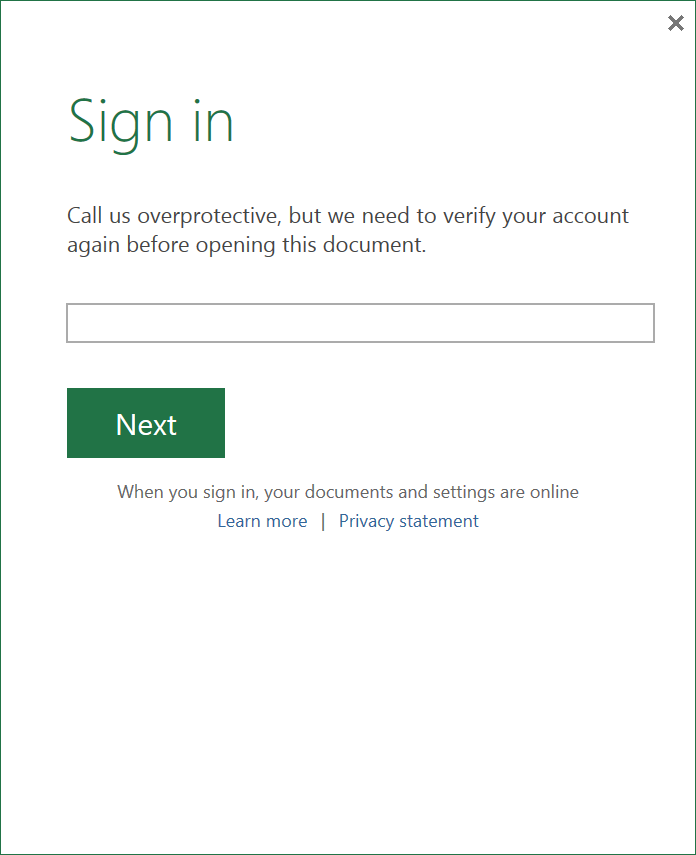
Office 365 - Call us overprotective, but we need to verify your account again before opening this document.

Symptom:

When trying to open a document in Office 2013 ProPlus from Office 365's SharePoint environment, you are periodically prompted for credentials to SharePoint Online, OneDrive, and Lync Onlinet (using your email address and password).  Additionally, the affected users are those that have been synchronized from an on-premise Active Directory environment via ADFS.

Side Note: Not sure if this is relevent or not, but we noticed this started to happen after upgrading our ADFS Proxy Servers to Server 2012 R2 (ADFS v3).

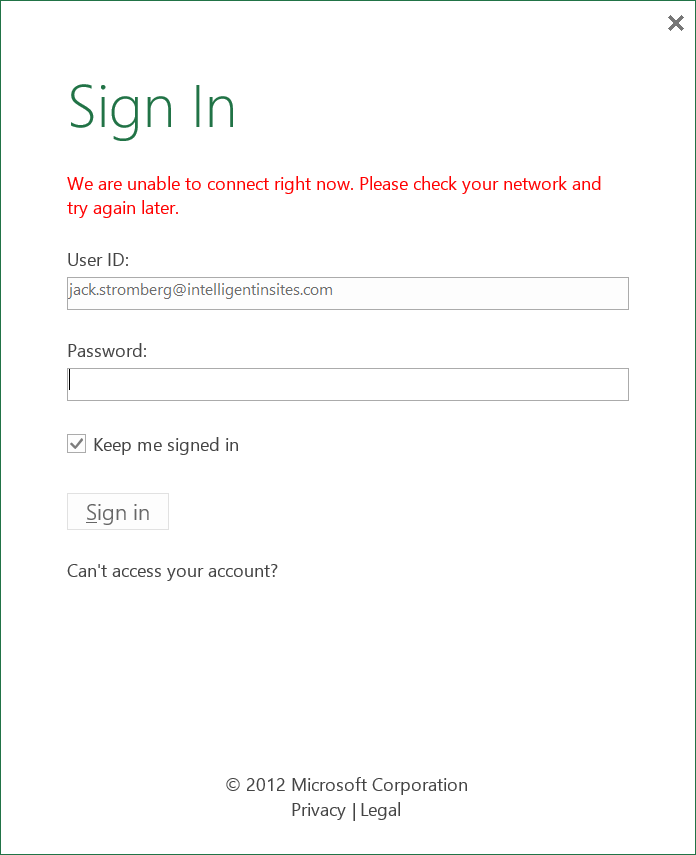
You are prompted with the following Sign In box:

Call us overprotective, but we need to verify your account again before opening this document.
Sign In

Once you try signing in, you receive the following error:

We are unable to connect right now. Please check your network and try again later.

Sign In 2

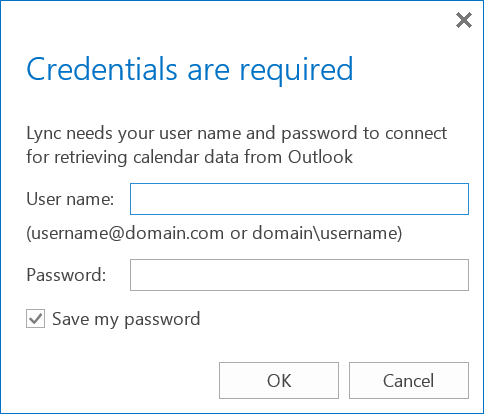
Inside of the Lync 2013 client, you might see the following dialog as well:

Credentials are required

Lync needs your user name and password to connect for retrieving calendar data from Outlook

Sign In 3

Solution:

This error is caused by a variety of different issues.  Please try all of the following below.

If you have a single client having issues

  • Clearing cache of Internet Explorer
  • Running an online repair of Office 365 ProPlus
  • Switching Accounts inside of Outlook (File->Office Account->Switch Account)
  • Deactiving office from Office 365 settings and reactivating

If this is a widespread issue on multiple machines in your environment

  • Verify all proxy servers are functioning
    • If you have multiple proxy servers, ensure your Network Load Balancer is functioning correctly
  • You might be hitting a known bug with the Office 2013 Suite.  See the following KB article on how to try a workaround (this was the fix for an environment I worked on using ADFS and Server 2012): http://support.microsoft.com/kb/2913639

[Tutorial] Upgrading from ADFS 2.0 (Server 2008 R2) to ADFS 3 (Server 2012 R2)

Scenario: You want to upgrade your ADFS 2.0 or 2.1 farm using WID (Windows Internal Database) from Server 2008 R2 to Server 2012 R2.  In this scenario, I have 2 ADFS servers (one as the primary and a second for failover purposes), and 2 ADFS Proxy servers (for load balancing/failover purposes).

NOTE: Prior to writing this article I had only found limited documentation provided by Microsoft on a proper upgrade path for this.  Since then, it apperas that tools had been included with the Server 2012 installation media which will greatly cutdown on the number of steps needed as well as provide as little downtime as possible.  I would highly recommend giving this article a read before proceeding with my article: http://blogs.technet.com/b/askpfeplat/archive/2014/03/31/how-to-build-your-adfs-lab-part4-upgrading-to-server-2012-r2.aspx

My article should still work, but it is definitely not the most efficient way to do an upgrade as pointed out in the technet article above.  My guide essentially goes over cutting over to a completely new ADFS deployment "an upgrade", side-by-side to your production environment. As pointed out below, you cannot add a Server 2012 R2 machine to a Server 2008 R2 ADFS farm as documented in their earlier help articles.

Tutorial

  1. Login to one of your slave ADFS nodes (secondary server) running Server 2008 R2
  2. Remove the node from your load balancer
  3. Stop the AD FS 2.0 Windows Service
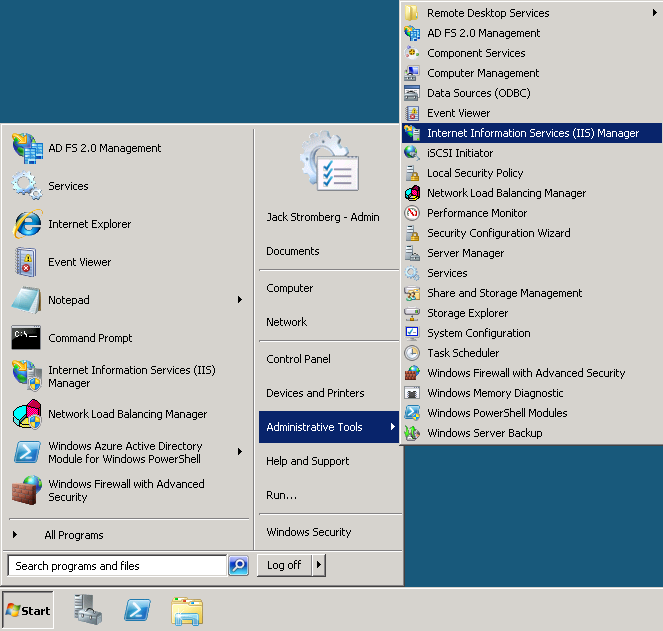
  4. Click Start -> Administrative Tools -> Internet Information Services (IIS) Manager Server 2008 R2 - Start - Administrative Tools - Internet Information Services IIS Manager
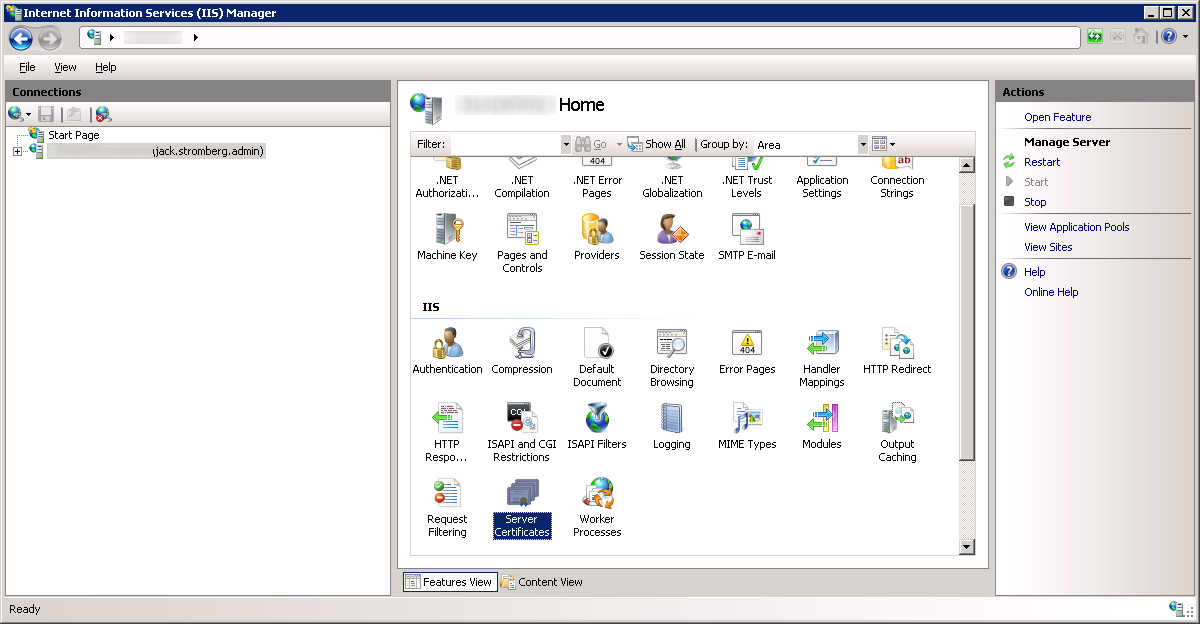
  5. Select your server and double click on Server Certificates Internet Information Services IIS Manager - Server Home
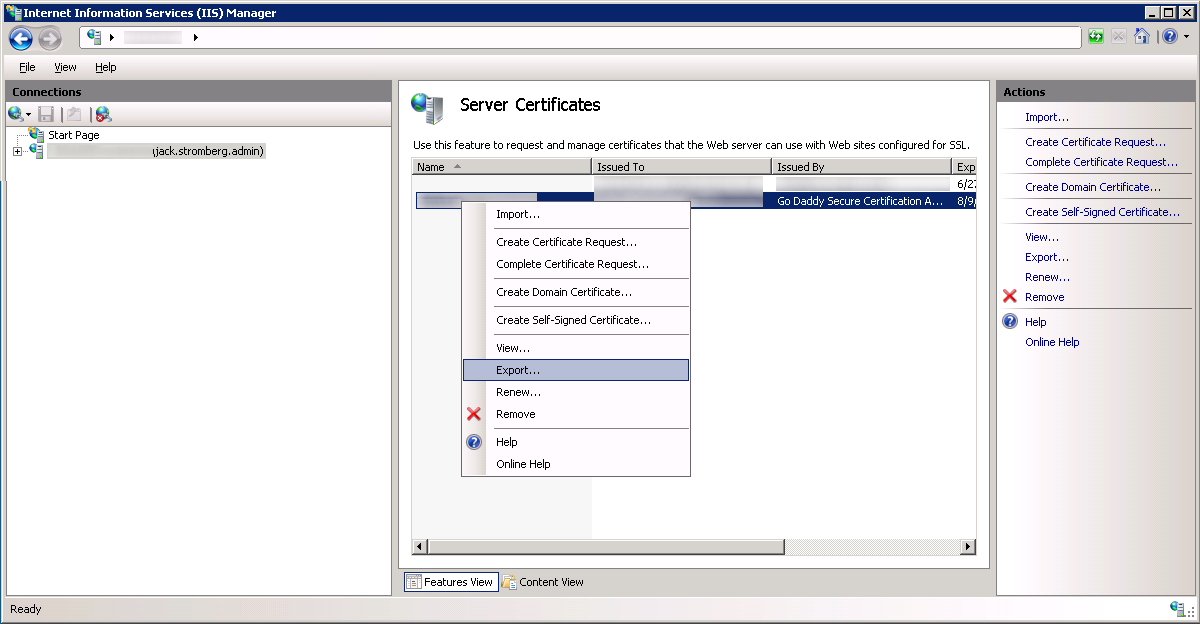
  6. Right click on your certificate and select Export... Internet Information Services IIS Manager - Export Certificate
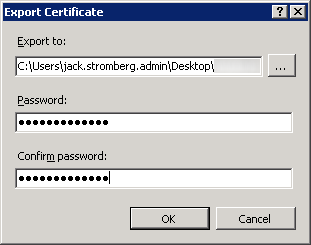
  7. Export the certificate to your desktop, type in a password to protect the exported certificate/private key, and select OK
    Export Certificate Properties
  8. Copy the pfx (exported certificate/private key) to your local machine; we will import this on our new server later.
  9. Disjoin the ADFS machine from the domain
  10. Turn the ADFS machine off and retire it
  11. Create a new Server 2012 R2 machine with the same name and IP as your Server 2008 R2 ADFS machine
  12. While the new ADFS machine is being created, login to one of your ADFS proxy servers
  13. Remove the proxy from your load balancer
  14. Stop the AD FS 2.0 Windows Service
  15. Turn the machine off and retire it
  16. Create a new Server 2012 R2 machine with the same name and IP as your Server 2008 R2 ADFS Proxy machine
  17. While the new ADFS proxy machine is being created, login to your new ADFS Server 2012 R2 machine.
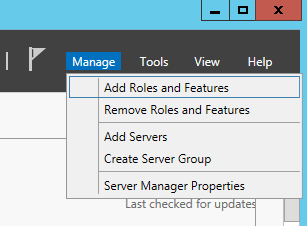
  18. Open up Server Manage and select Manage -> Add Roles and Features Server 2012 - Manage - Add Roles and Features
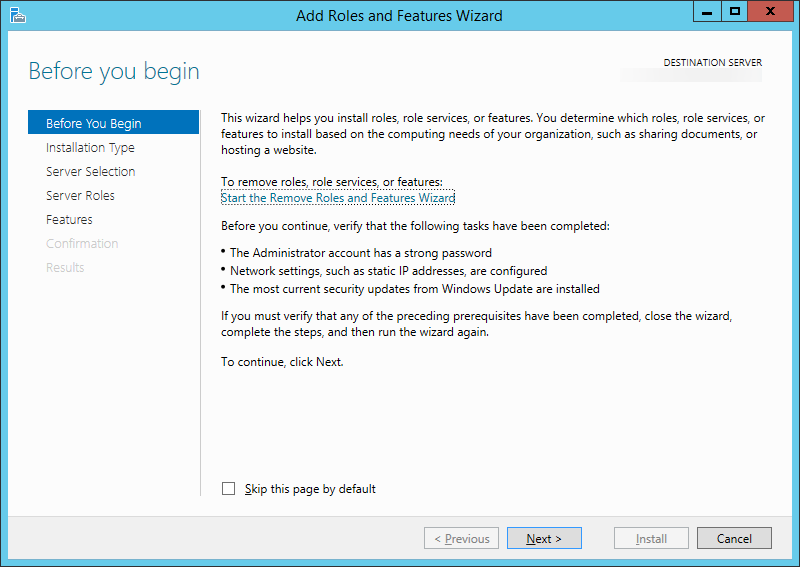
  19. On the Before You Begin screen, click Next > Add Roles and Features Wizard - Before you begin
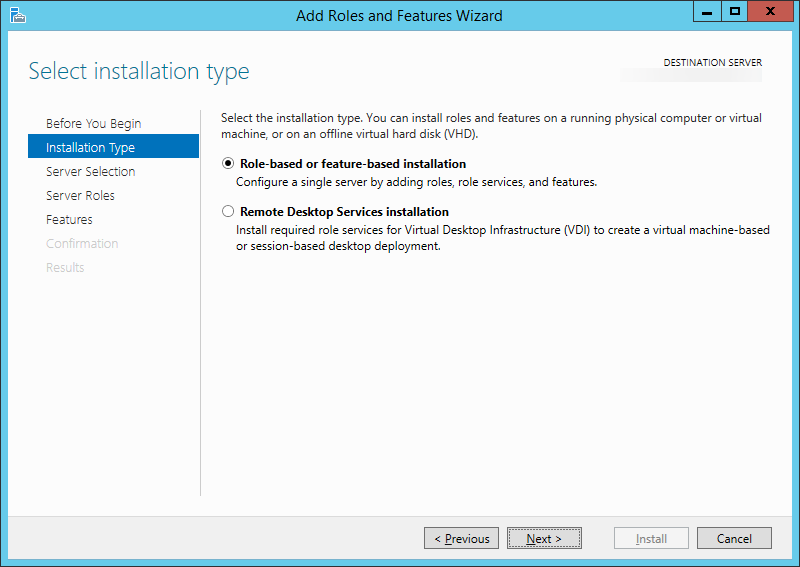
  20. Select Role-based or feature-based installation and click Next > Add Roles and Features Wizard - Select installation type
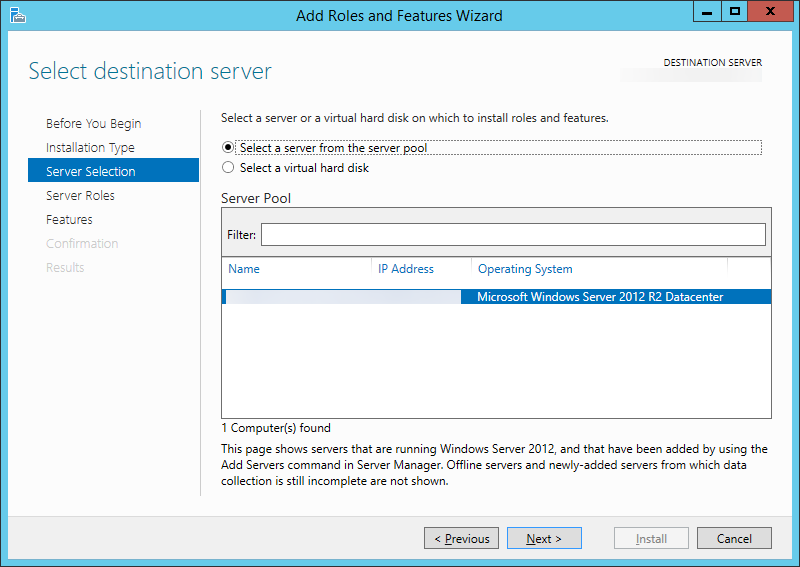
  21. Select your server and click Next > Add Roles and Features Wizard - Select destination server
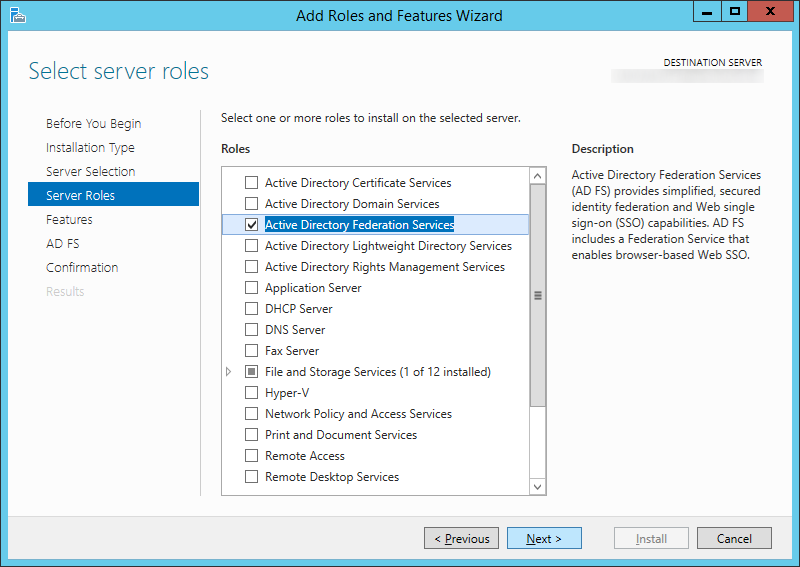
  22. Check Active Directory Federation Services and click Next > Add Roles and Features Wizard - Server Roles - Active Directory Federation Services
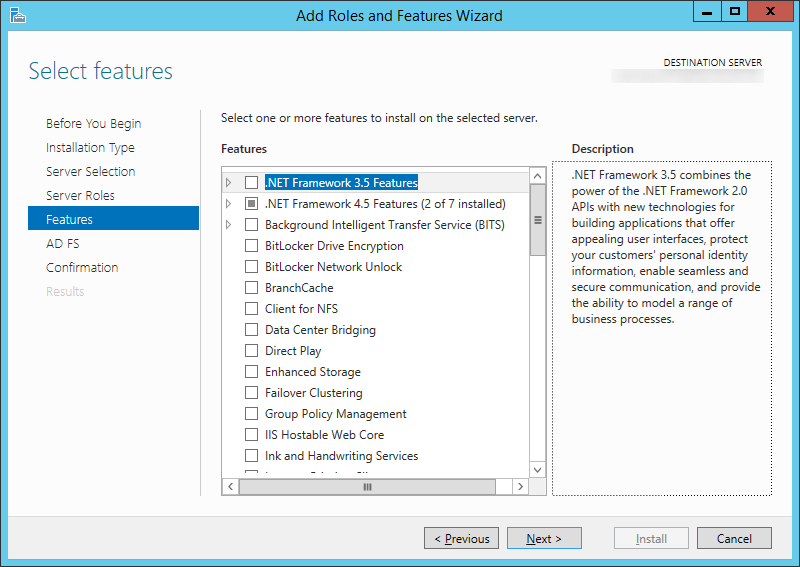
  23. Click Next > on Features Add Roles and Features Wizard - Features - Default
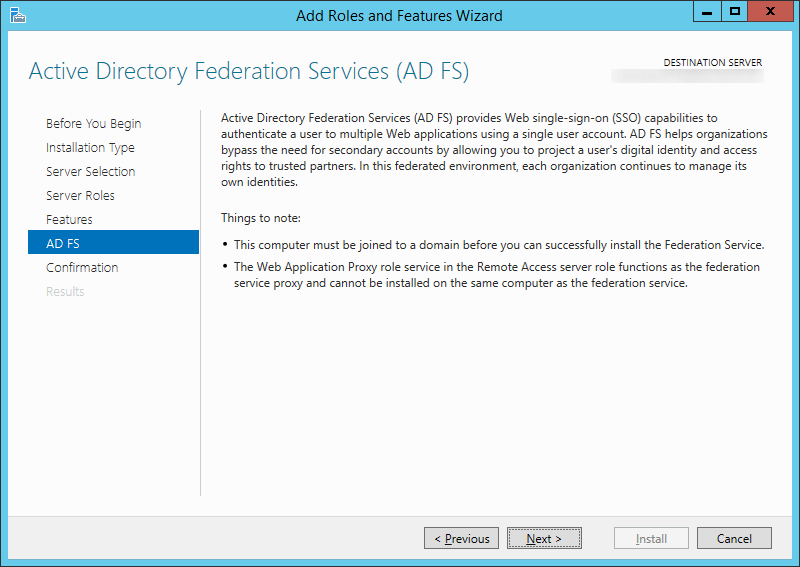
  24. Click Next > on AD FS Add Roles and Features Wizard - AD FS
  25. Click Install Add Roles and Features Wizard - Confirmation - Active Directory Federation Services
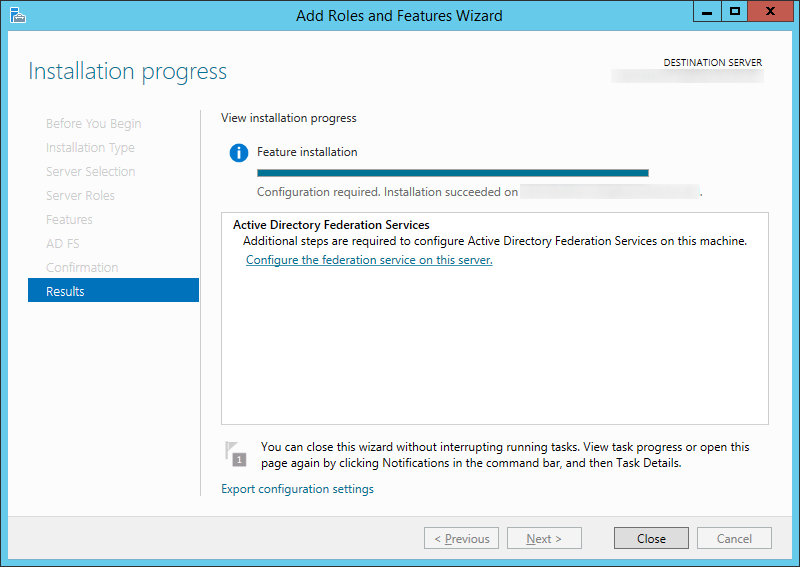
  26. Click on the Configure the federation service on this server. link once the installation has completed successfully. Add Roles and Features Wizard - Results - Configure the federation service on this server
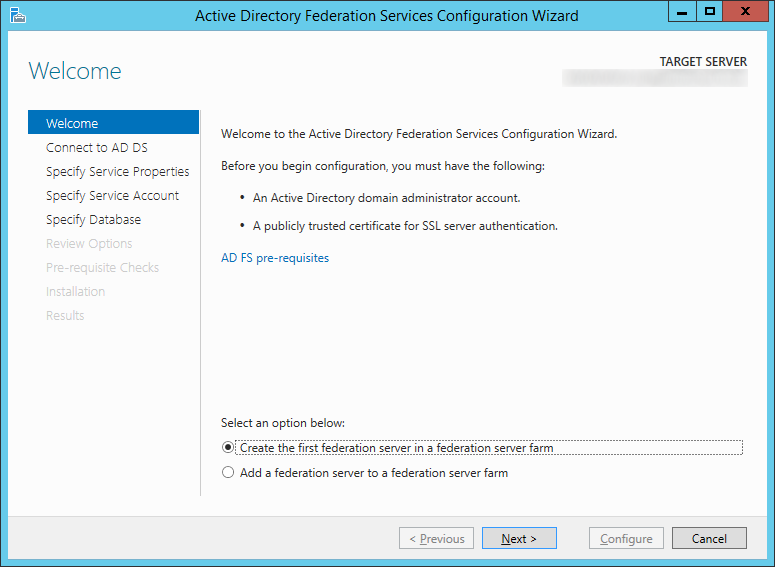
  27. Check Create the first federation server in a federation server farm on the Welcome screen for the Active Directory Federation Services Configuration Wizard and then click Next > Active Directory Federation Services Configuration Wizard - Welcome
    1. Please see my notes below on why we did not check Create the first federation server in a federation server farm.
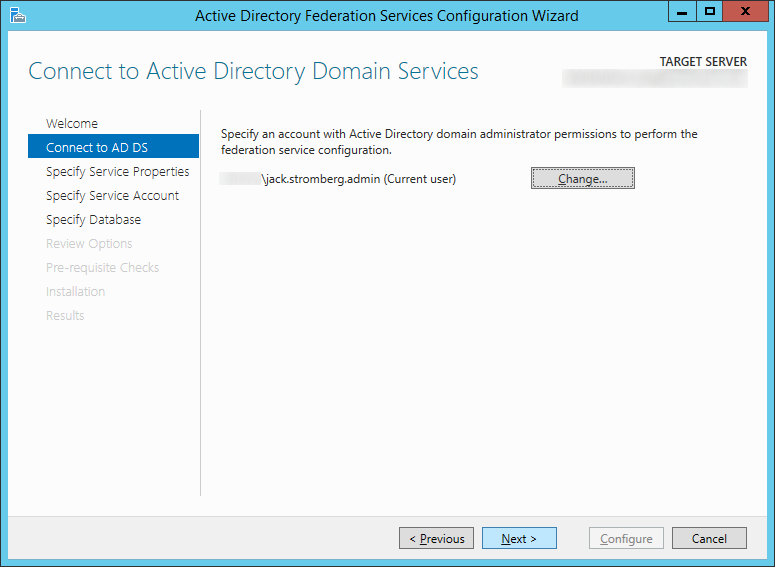
  28. Click Next > on the Connect to AD DS step
    Active-Directory-Federation-Services-Configuration-Wizard-Connect-to-AD-DS
  29. Copy the .pfx file we exported from the ADFS server earlier to the new ADFS server
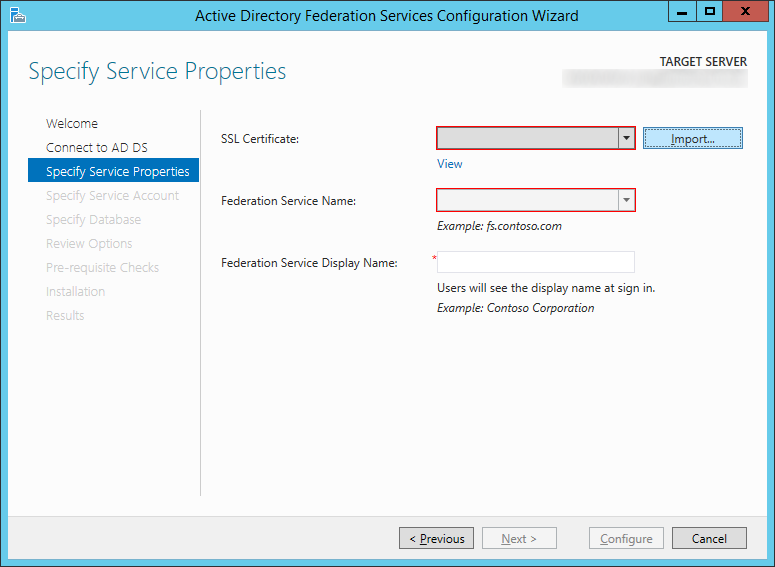
  30. On the Specify Service Properties screen, click on the Import... button Active Directory Federation Services Configuration Wizard - Specify Service Properties - Import
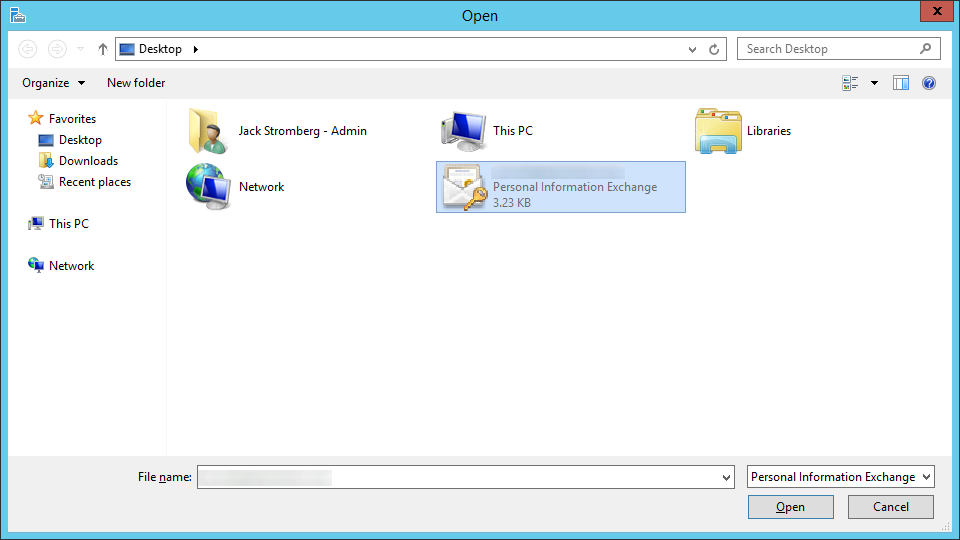
  31. Select your certificate and click Open Select Certificate
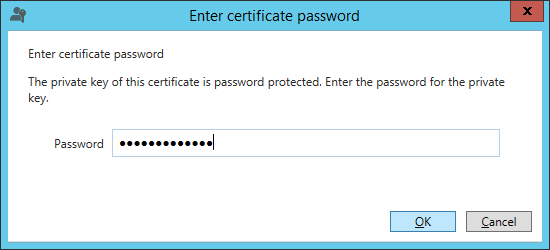
  32. Type in the password to the exported certificate and click OK Enter certificate password
  33. Type in a Federation Service Display Name that will be shown to your users when they login to the ADFS service (this can be anything), and click Next > Active Directory Federation Services Configuration Wizard - Specify Service Properties - Federation Service Display Name
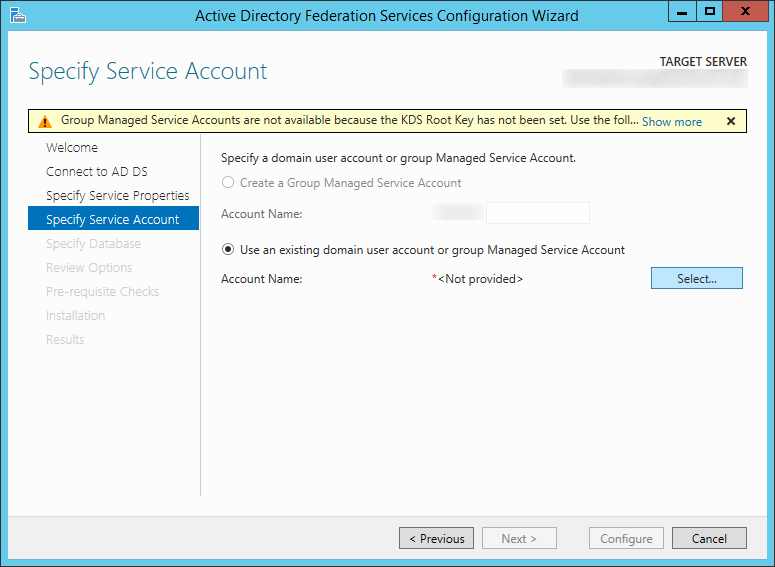
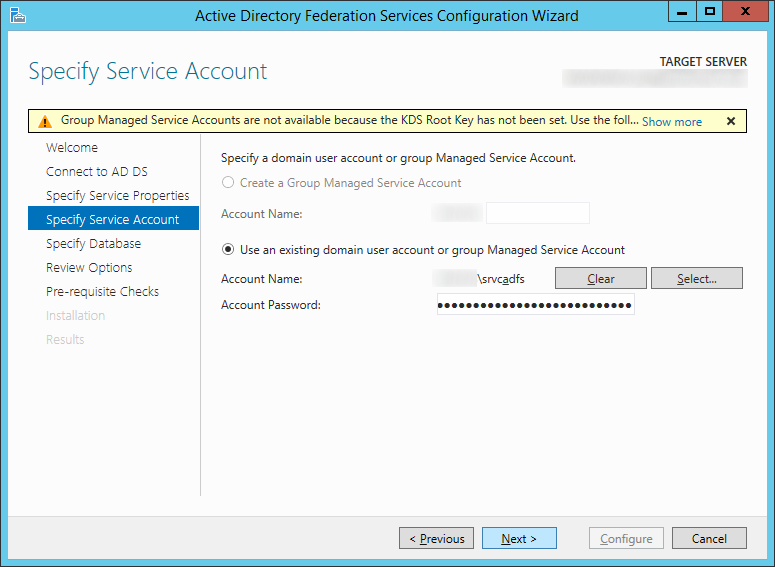
  34. On the Specify Service Account screen, click the Select... button Active Directory Federation Services Configuration Wizard - Specify Service Properties - Use an existing domain user account or group Management Service Account
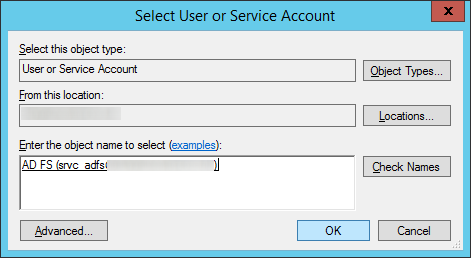
  35. Type in the name of your service account you wish to use for ADFS, click the Check Names button to verify you don't have any typos, and click OK Active Directory Federation Services Configuration Wizard - Specify Service Properties - Select User or Service Account
  36. Type in the password for the ADFS service account and click Next > Active Directory Federation Services Configuration Wizard - Specify Service Properties - Use an existing domain user account or group Management Service Account - Username password
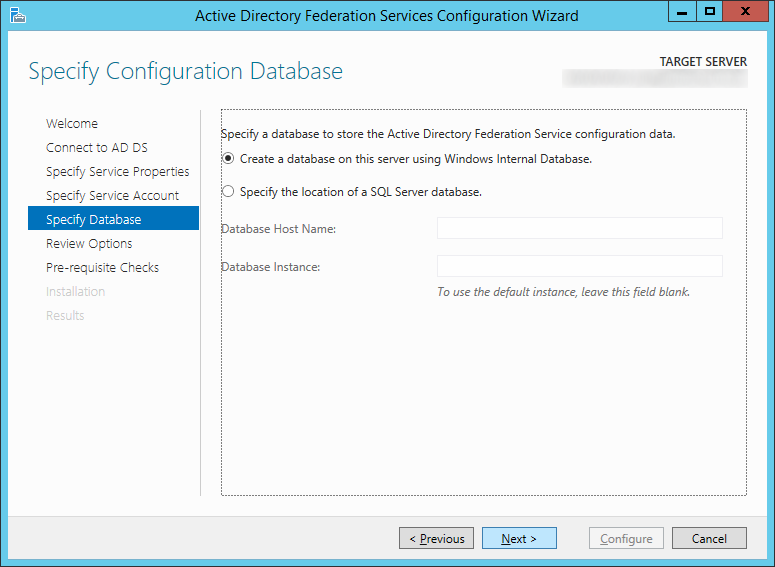
  37. Click Next > on the Specify Configuration Database Active Directory Federation Services Configuration Wizard - Specify Database - Create a database on this server using Windows Internal Database
    1. Note: I choose to continue to use WID, you can switch to SQL if you would like now, however that is outside of the scope of this document.
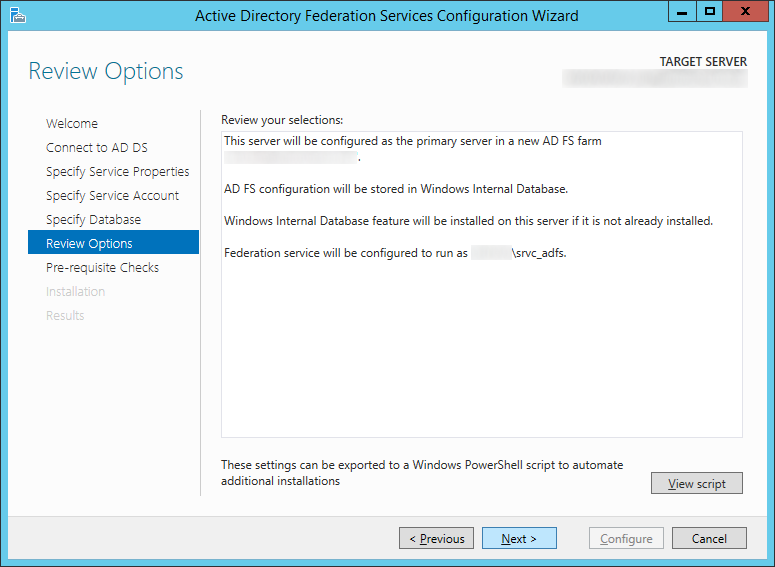
  38. Click Next > on the Review Options screen Active Directory Federation Services Configuration Wizard - Review Options
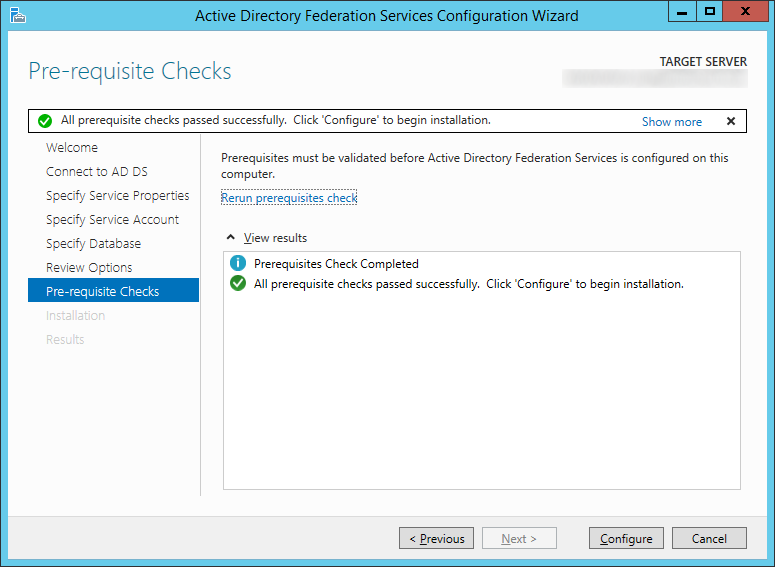
  39. Click the Configure button once all the prerequsite checks have passed successfully Active Directory Federation Services Configuration Wizard - Pre-requisite Checks
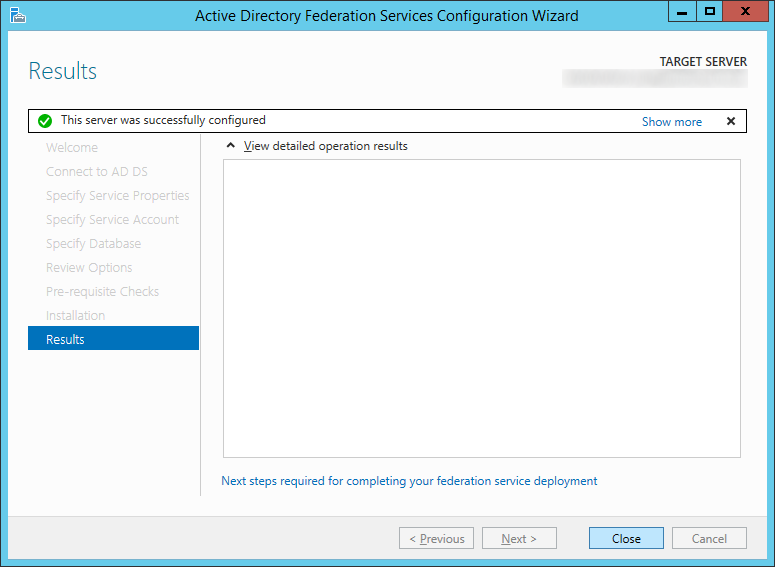
  40. Click Close once the server has successfully been configured Active Directory Federation Services Configuration Wizard - Results
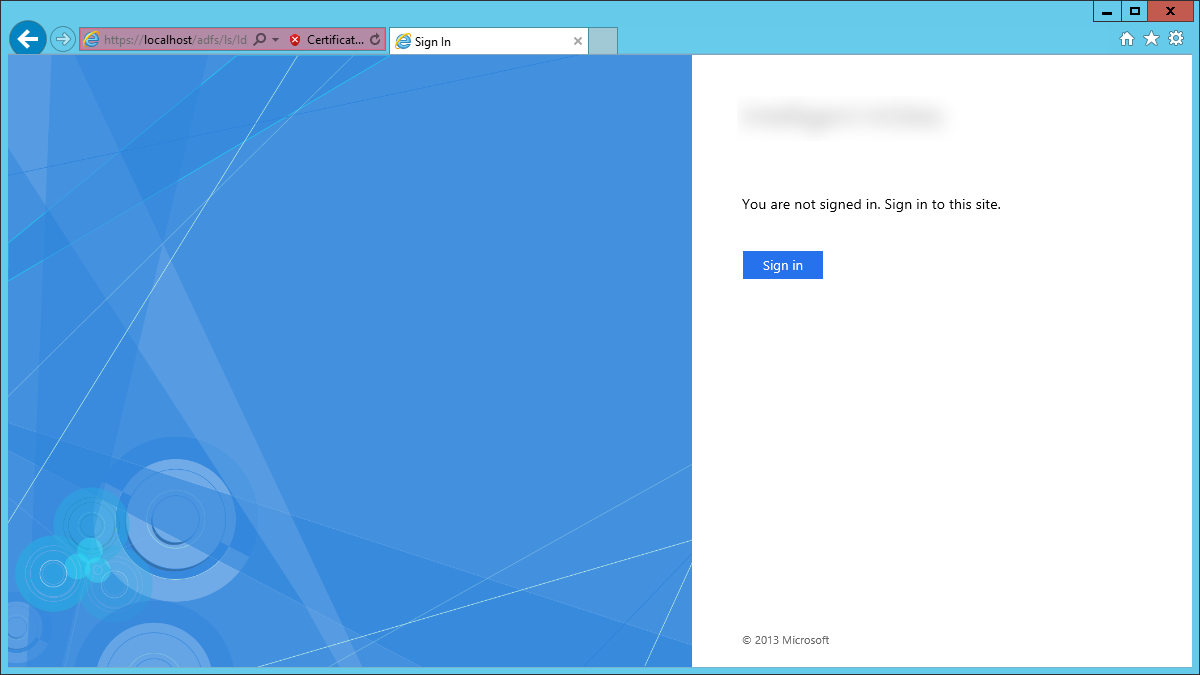
  41. Open up Internet Explorer on the new ADFS machine and navigate to https://localhost/adfs/ls/IdpInitiatedSignon.aspx to ensure the service is properly running AD FS 3 Test
    1. Note: you should receive an invalid ssl certificate error; that is OK, we will switch the DNS records over once we are ready to transition from our old farm to the new one.
  42. Next, login to your Server 2008 R2 primary ADFS server and recreate the federation trusts on the new Server 2012 R2 primary ADFS server
    1. Start -> Administrative Tools -> AD FS 2.0 Management; select Trust Relationships -> Relying Party Trusts
    2. Recreate all the rules/trusts from your original ADFS server on your new Server 2012 R2 ADFS machine
      1. Note: If you are recreating rules for Office 365, you will need to wait until you switch over our new Server 2012 R2 environment to production.  The reason is when you setup the new ADFS instance, some of the certificates will change causing a certificate mismatch/preventing your users from logging in.  You will need to make sure you follow the following steps when resetting up the Office 365 trust to ensure your users don't receive "Error 80041317": http://support.microsoft.com/kb/2647020/en-us
  43. Login to your new ADFS Proxy server
  44. Import your SSL cerficate from your old ADFS server (from step 8) onto the server's Local Machine certificate store
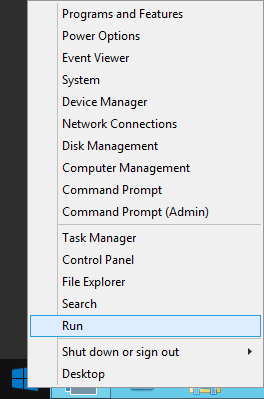
    1. Right click on Start and select Run
      Server 2012 - Start - Run
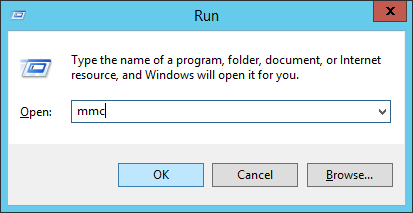
    2. Type MMC and click OK
      Server 2012 - Run - mmc
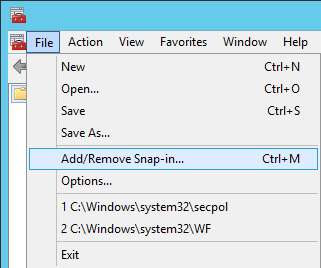
    3. Click File -> Add/Remove Snap-in...
      Server 2012 - mmc - Add Remove Snap-In
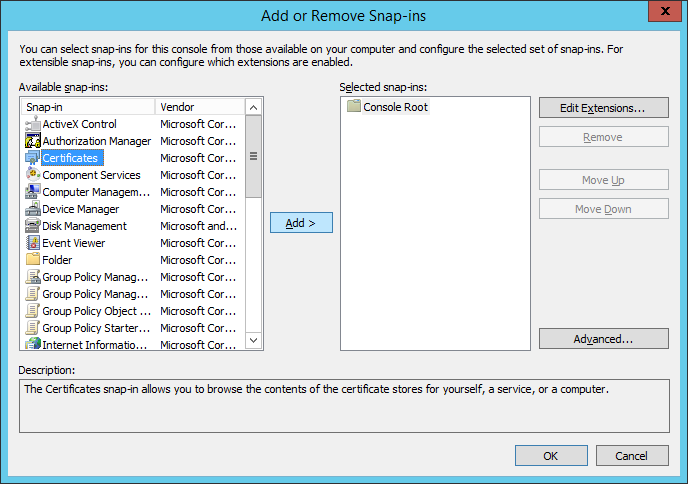
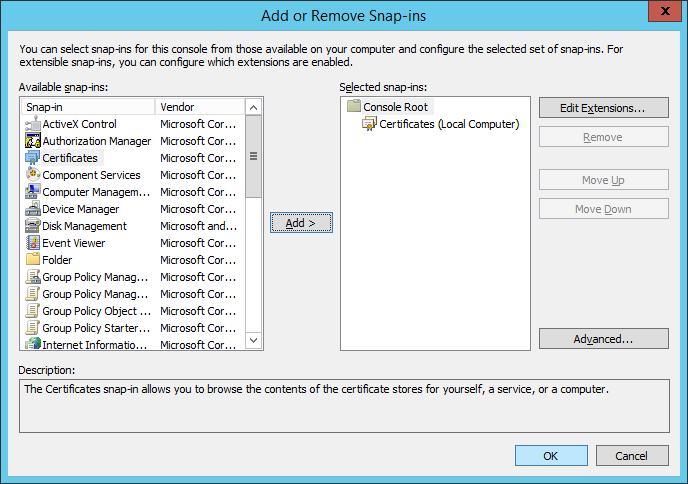
    4. Select Certificates and click Add > Add or Remote Snap-ins - Certificates
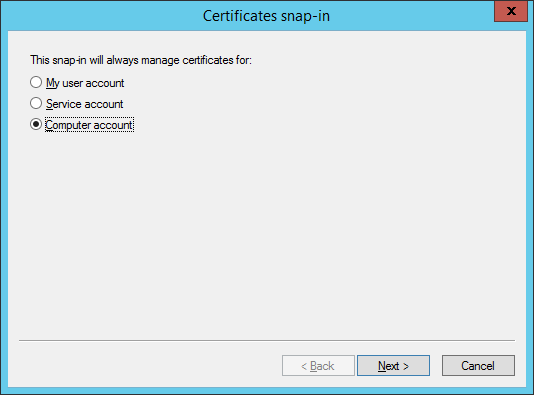
    5. Select Computer account and click Next > Certificates snap-in - Computer Account
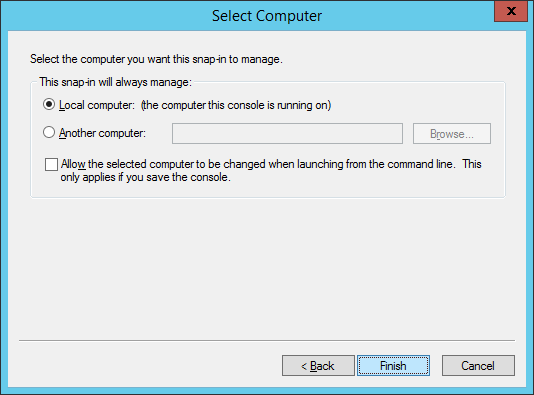
    6. Select Finish Certificates snap-in - Select Computer
    7. Click OK on the Add or Remove Snap-ins screen Add or Remove Snap-ins - Certificates - Local Computer
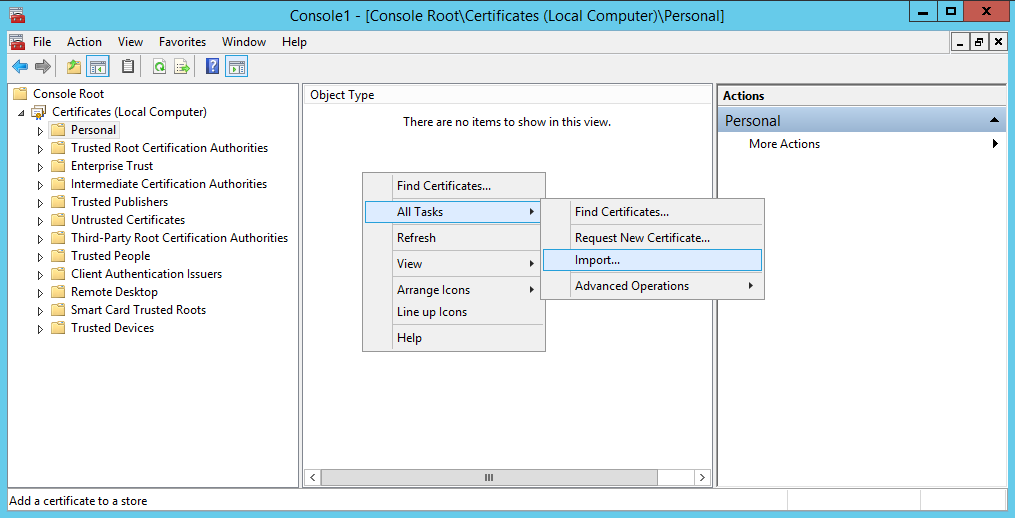
    8. Expand Certificates (Local Computer), select Personal, and right click, select All Tasks -> Import... Server 2012 - Certificates (Local Computer) - Personal - Import
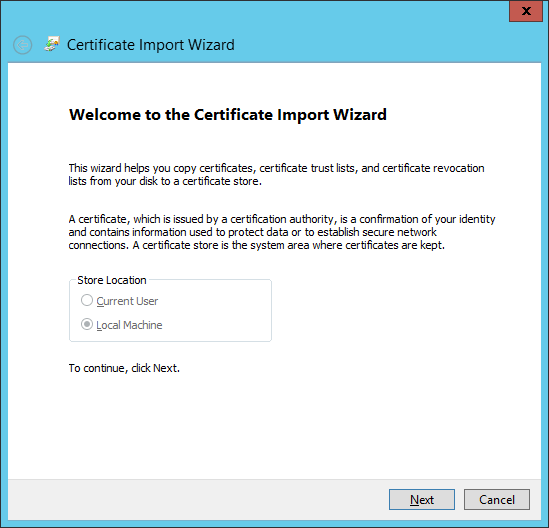
    9. Click Next on the Certificate Import Wizard Certificate Import Wizard - Welcome
    10. Click the Browse... button Certificate Import Wizard - Browse
    11. Select your certificate and click Open Select Certificate
      1. Note: You may need to click on the dropdown box in the bottom right and select All Files for your pfx file to show up.
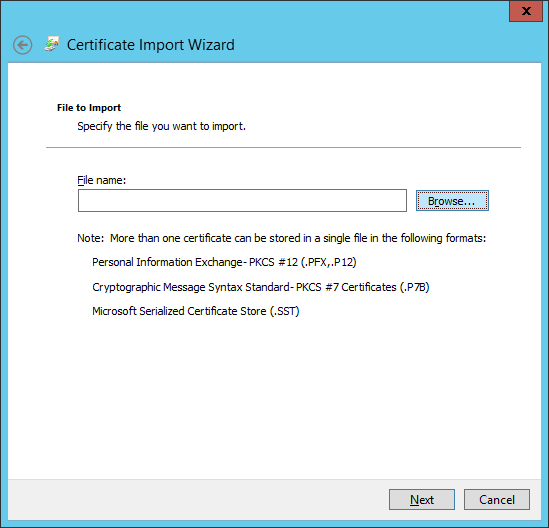
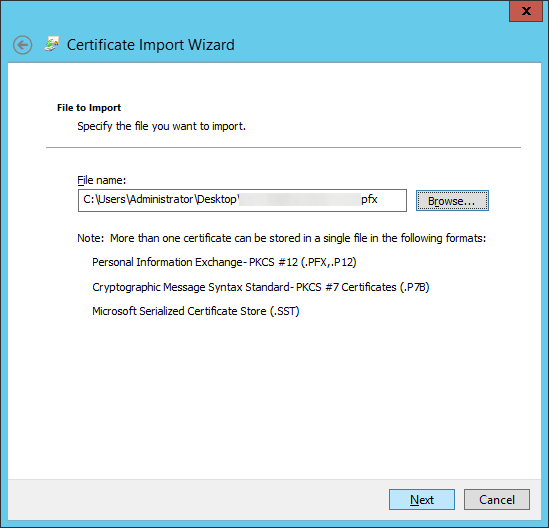
    12. Click Next on the File to Import screen Certificate Import Wizard - File to Import
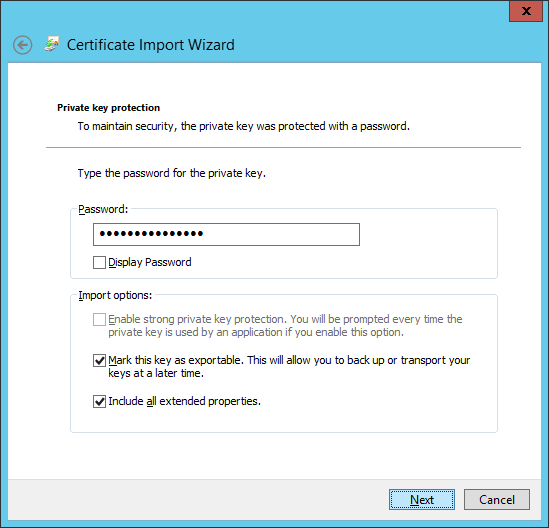
    13. Type in the password to the pfx file, check Mark this key as exportable, and click Next Certificate Import Wizard - Private key protection
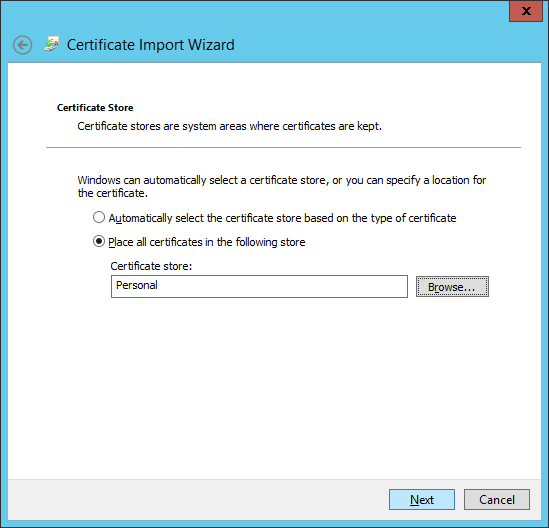
    14. Ensure Place all certificates in the following store shows Personal and click Next Certificate Import Wizard - Certificate Store
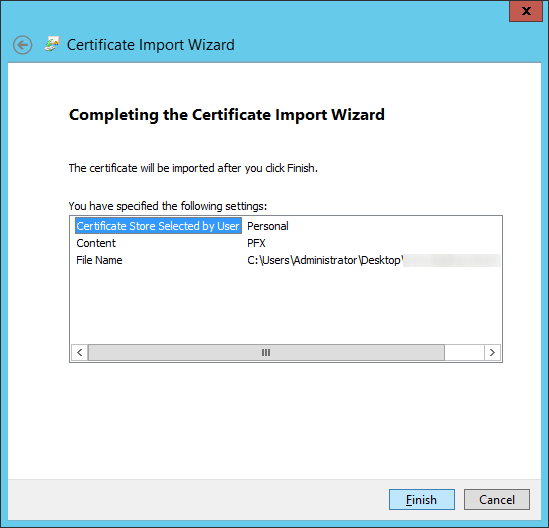
    15. Click Finish Certificate Import Wizard - Completing the Certificate Import Wizard
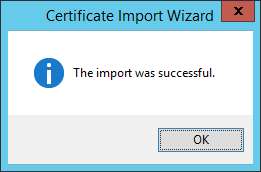
    16. Click OK on the Certificate Import Wizard successful dialog boxCertificate Import Wizard - Successful
  45. Edit the hosts file to point your DNS record to your new ADFS server
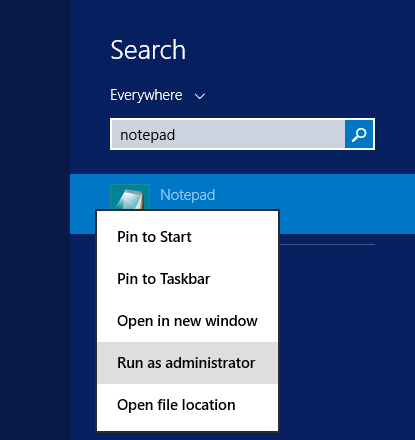
    1. Open Notepad as an Administrator Server 2012 - Notepad - Administrator
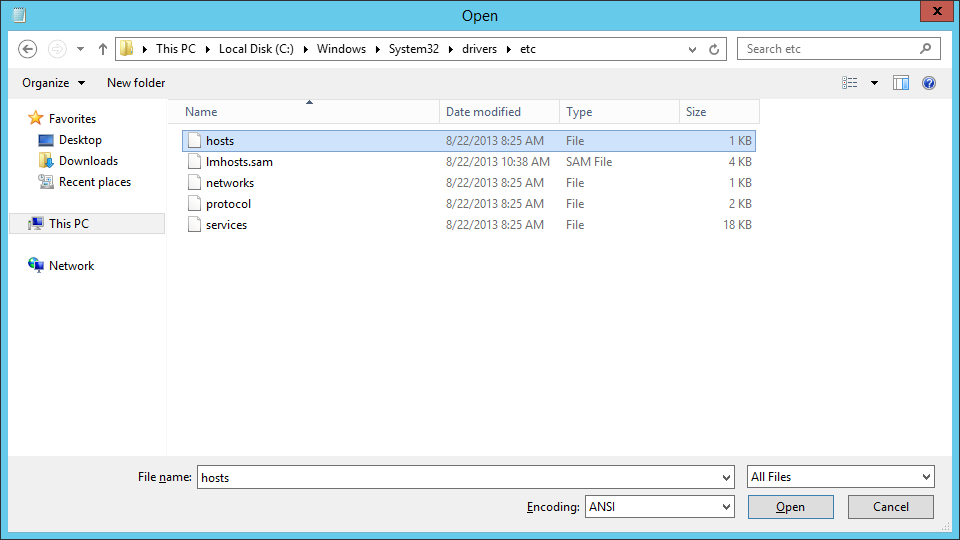
    2. Open the following file: C:\Windows\System32\drivers\etc\hosts Server 2012 - Hosts file
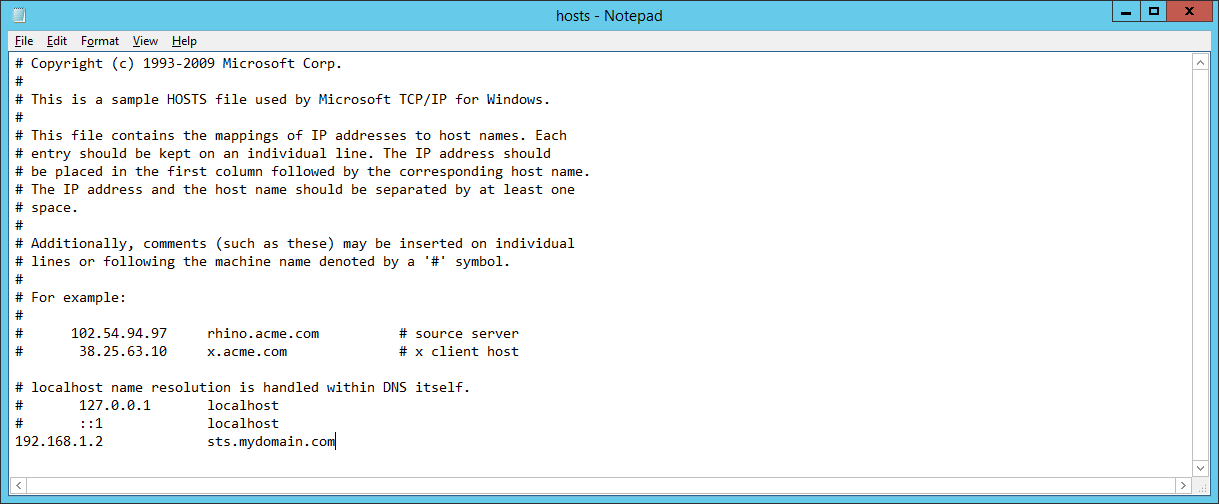
    3. Add in your DNS entry and point to your new ADFS server hosts file - adfs manual entry
    4. Save the file
      1. Note: We will come back to this later and update it to point to our load balancer once we switch over everything.  For now, this lets us test our new deployment while switching things over.
  46. Open up Server Manager
    Server 2012 R2 - Server Manager
  47. Click Manage -> Add Roles and Features
    Server 2012 - Manage - Add Roles and Features
  48. Click Next > on the Before you begin screen Add Roles and Features Wizard - Before you begin
  49. Select Role-based or feature based installation and click Next > Add Roles and Features Wizard - Select installation type
  50. Select your server and click Next > Add Roles and Features Wizard - Select destination server
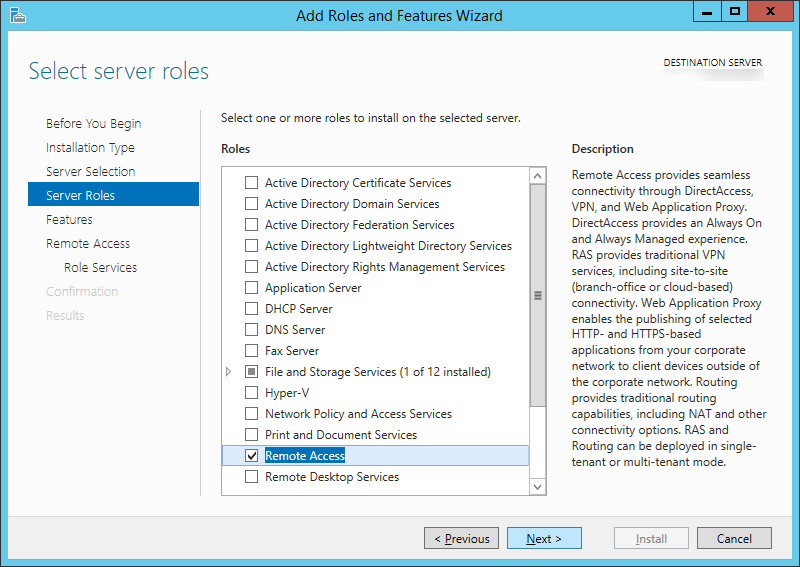
  51. Check Remote Access on the Server Roles screen Add Roles and Features Wizard - Remote Access
  52. Click Next > on the Features screen Add Roles and Features Wizard - Features - Default
  53. Click Next > on the Remote Access screen
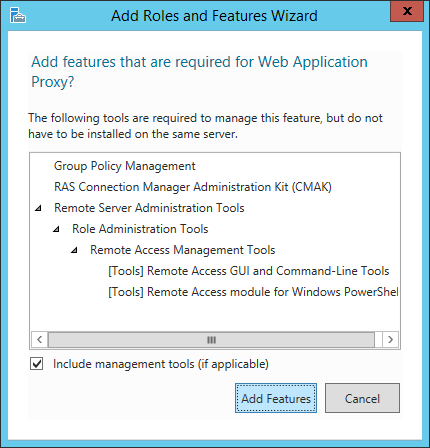
  54. Check Web Application Proxy
  55. ClickAdd Features on the Add Roles and Features Wizard dialog boxAdd Roles and Features Wizard - Web Application Proxy
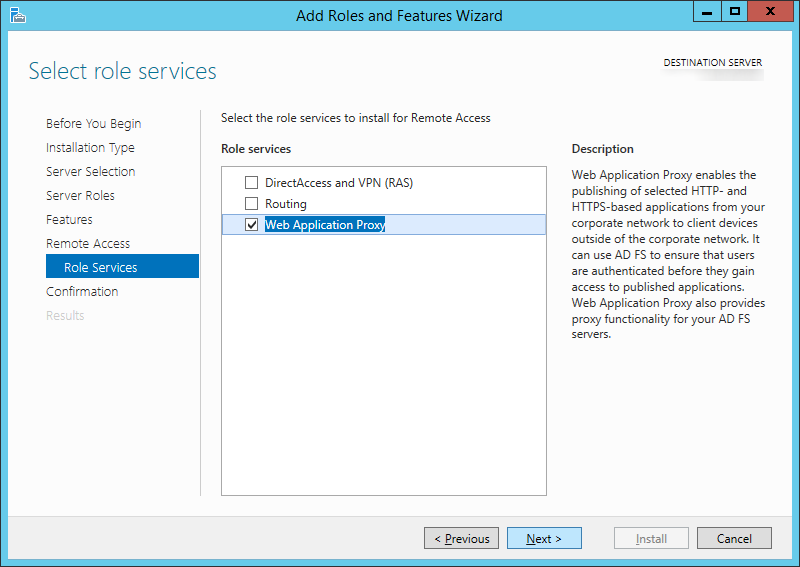
  56. Click Next > on the Roles Services screen Add Roles and Features Wizard - Role Services - Web Application Proxy
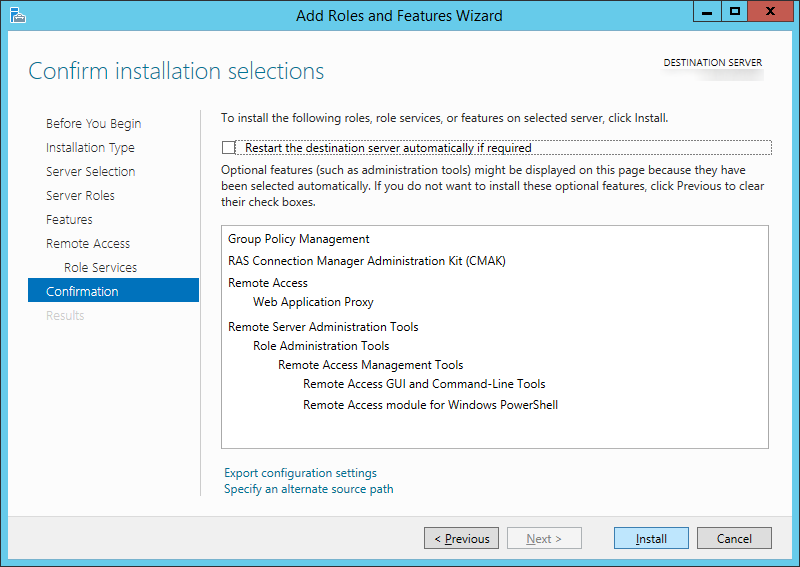
  57. Click Install on the Confirmation screen Add Roles and Features Wizard - Confirmation - Web Application Proxy
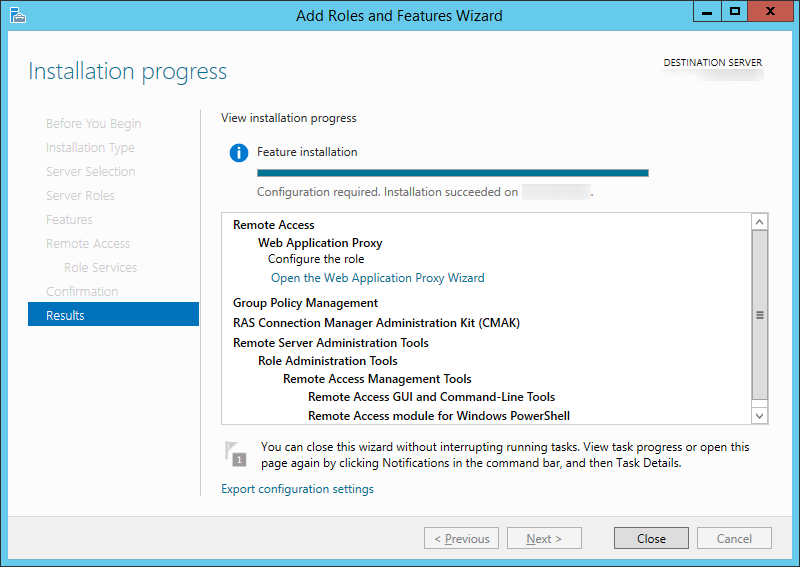
  58. Click on the Open the Web Application Proxy Wizard link once the installation succeeds Add Roles and Features Wizard - Confirmation - Web Application Proxy - Open the Web Application Proxy Wizard
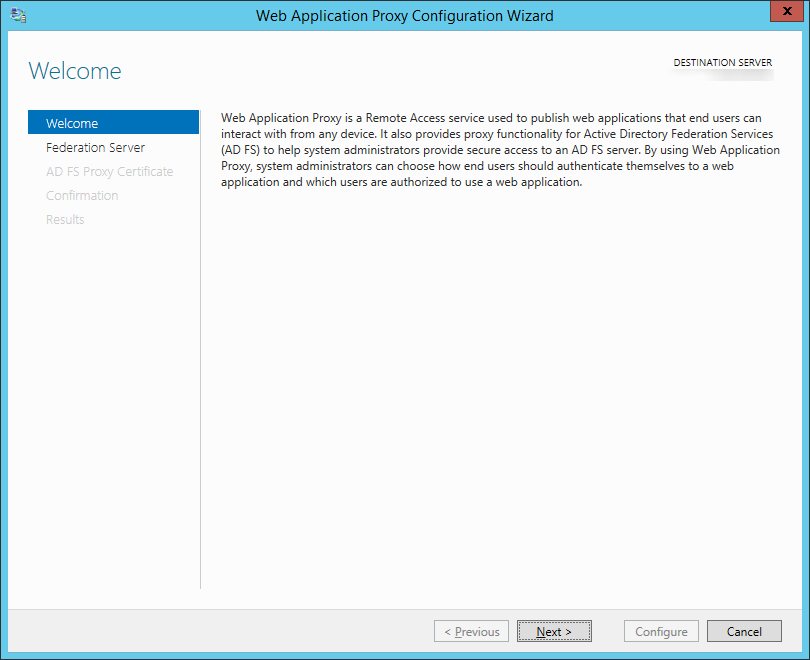
  59. Click Next > on the Welcome screen Web Application Proxy Configuration Wizard - Welcome
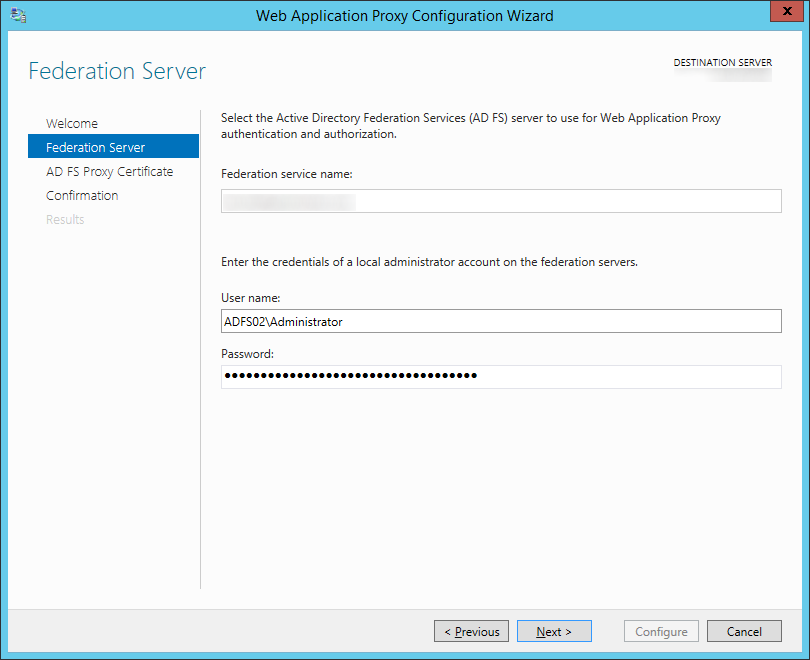
  60. Type in the FQDN to your ADFS server, the credentials of an account with local admin privileges, and then click Next >Web-Application-Proxy-Configuration-Wizard-Federation-Server
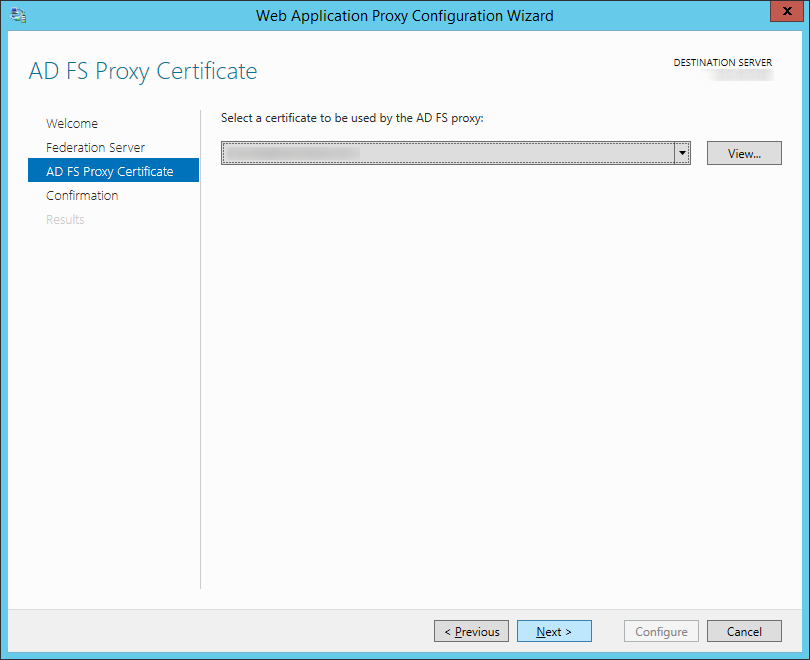
  61. Select your certificate on the AD FS Proxy Certificate screen and click Next >
    Web-Application-Proxy-Configuration-Wizard-AD-FS-Proxy-Certificate
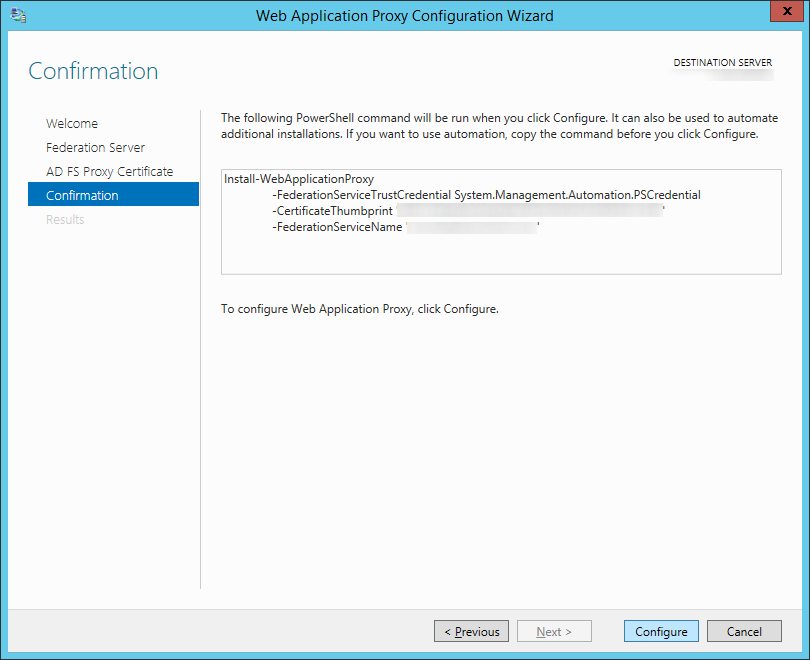
  62. Click Configure on the Confirmation screen Web Application Proxy Configuration Wizard - Confirmation
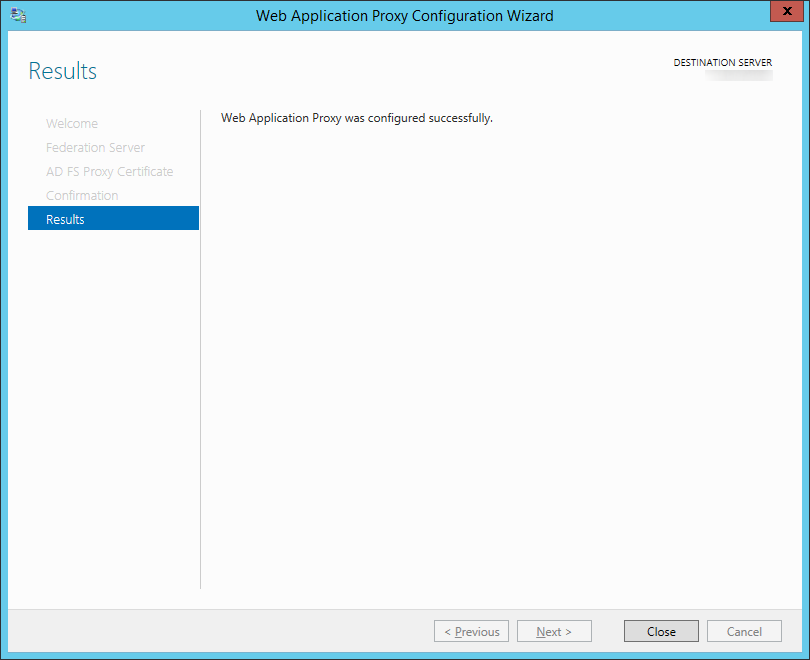
  63. Click Close once the Web Application Proxy has been successfully configured.Web-Application-Proxy-Configuration-Wizard-Results
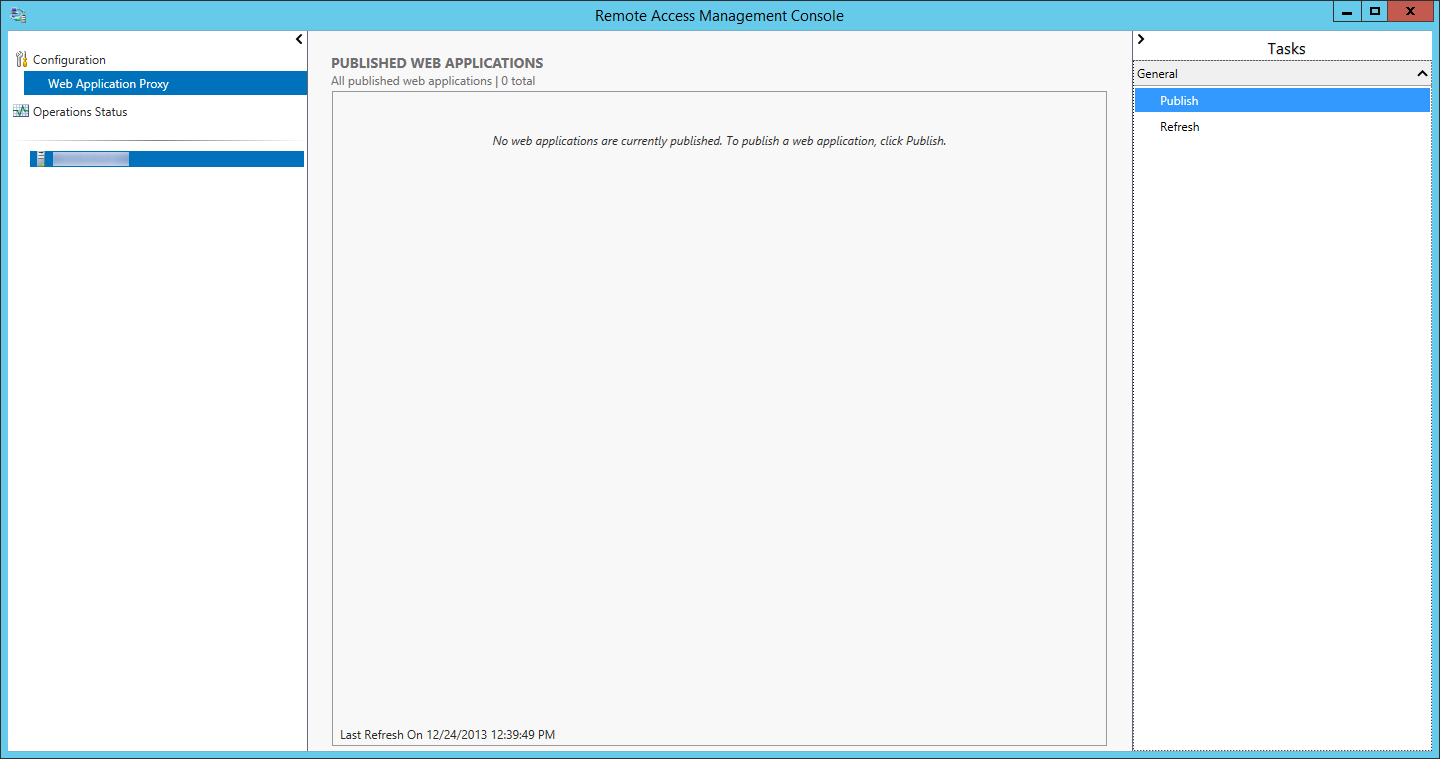
  64. After you click close a new window should open.  On the Remote Access Management Console, select Publish
    1. Note: This step only needs to be done once.  It will replicate to all other proxy servers when you set those up at a later time.
      Remote Access Management Console - Publish
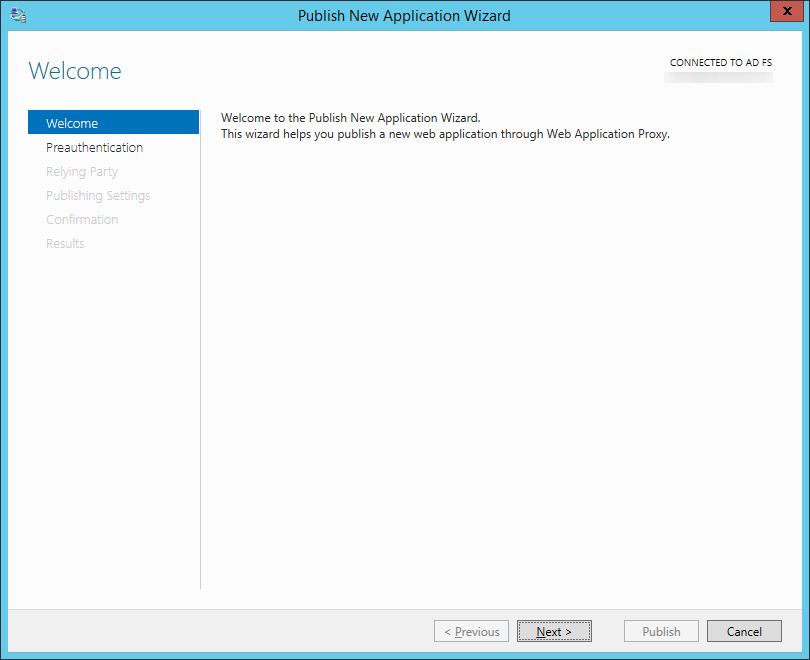
  65. Click Next > on the Welcome screen
    Publish New Application Wizard - Welcome
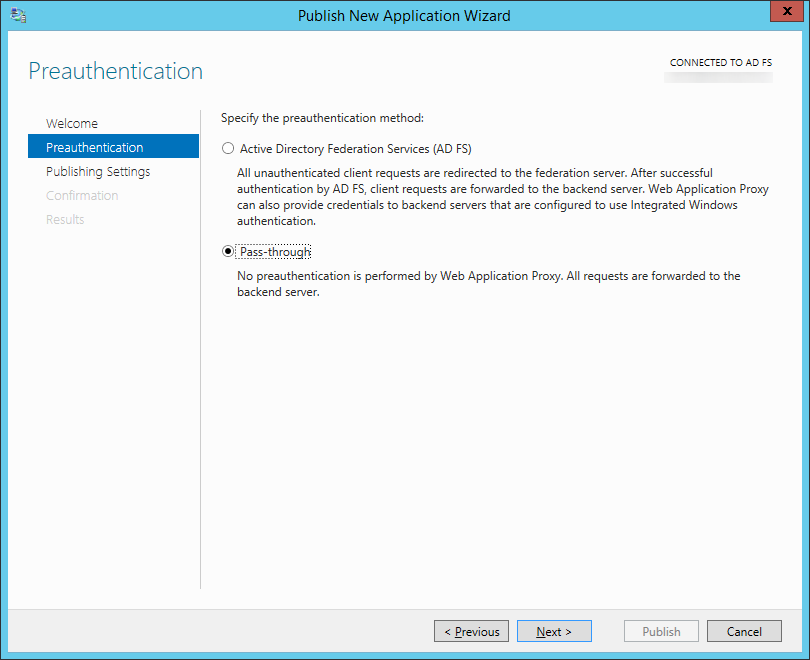
  66. Select Pass-through and click Next >
    Publish New Application Wizard - Preauthentication
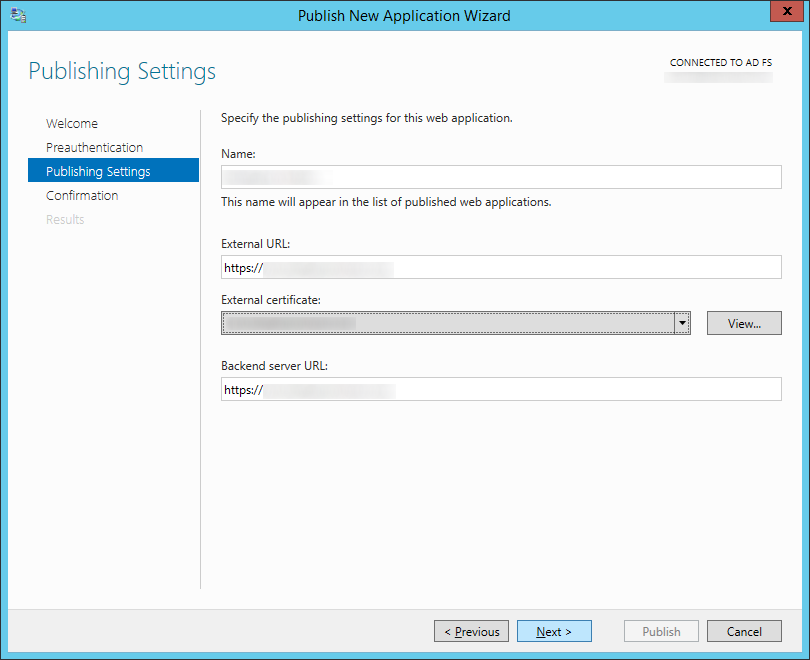
  67. Enter in a name, external URL, and internal URL for your federated server (mine were both the same since I use split-dns).  Click Next >
    Publish New Application Wizard - Publishing Settings
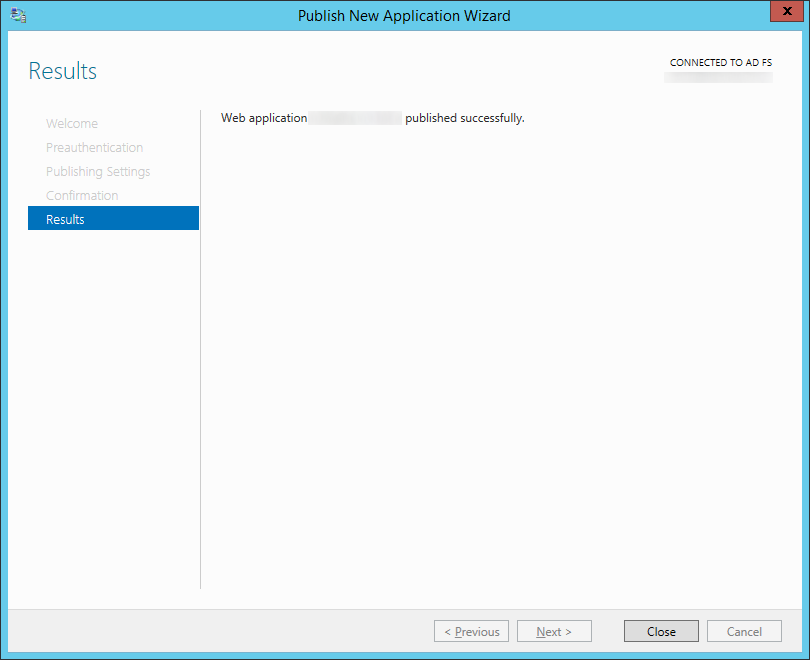
  68. Click Close
    Publish New Application Wizard - Results
  69. Add the new Server 2012 R2 ADFS machine to your load balancer and remove your Server 2008 R2 machine.
  70. Add the new Server 2012 R2 ADFS Proxy machine to your load balancer and remove your Server 2008 R2 proxy machine.
  71. Update the hosts file on your Server 2012 R2 proxy machine to point to your load balanced Server 2012 R2 ADFS environment
  72. Retire your Server 2008 R2 ADFS environment
    1. Disjoin the ADFS proxy server from the domain and recycle the machine
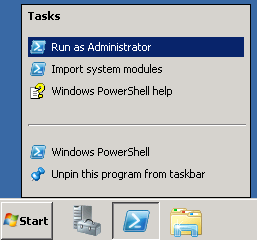
    2. Open up PowerShell as an Administrator
      Elevated Powershell
    3. Execute the following commands:
      1. Add-PsSnapin Microsoft.Adfs.Powershell
        Get-AdfsProperties
        get-adfsproperties certificatesharingcontainer
    4. Stop the service on your Server 2008 R2 ADFS machine running the old ADFS farm
    5. Execute the following command to remove the ADFS Farm info from AD (substituting in the information from the Get-AdfsProperties command):
      1. $delme = New-Object System.DirectoryServices.DirectoryEntry("LDAP://CN=484e24a8-5726-4186-8e24-825b77920798,CN=ADFS,CN=Microsoft,CN=Program Data,DC=mydomain,DC=local")
        $delme.DeleteTree()
        PowerShell DeleteTree
    6. Disjoin the ADFS machine from the domain and recycle the machine
  73. Add a new Server 2012 R2 machine and WAP machine to your new ADFS environment for redudnancy (same steps as above, except in Step 27, you will select Add a federation server to federation server farm

Notes: Here is the upgrade compatibility matrix for upgrading ADFS from a specific version to Server 2012: http://technet.microsoft.com/en-us/library/jj647765.aspx

Why did I not check Add a federation server to a federation server farm on the Welcome screen for the Active Directory Federation Services Configuration Wizard?

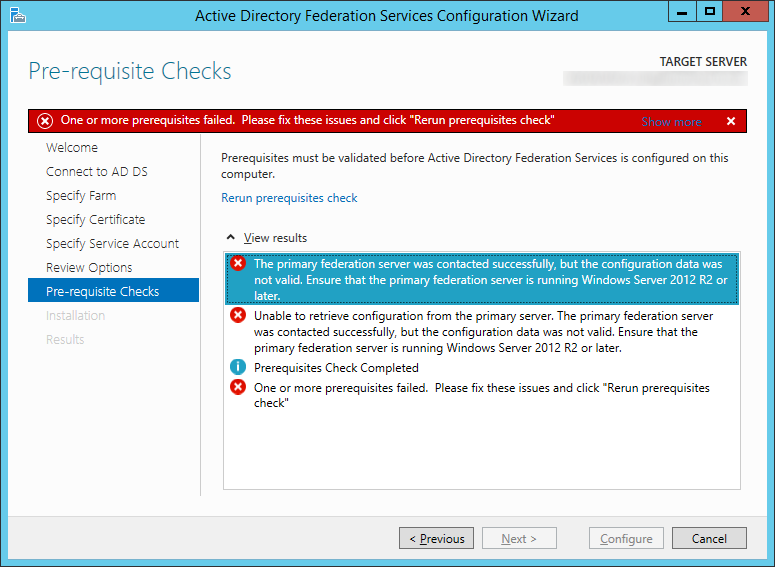
The reason behind not checking this is I believe Microsoft has a bug in their discovery tool in adding another machine to a farm running ADFS 3.0.  When adding a Server 2012 R2 machine to a farm with only Server 2008 R2 machines running ADFS 2.0, you will receive the following error:

The primary federation server was contacted successfully, but the configuration data was not valid. Ensure that the primary federation server is running Windows Server 2012 R2 or later. Unable to retrieve configuration from the primary server. The primary federation server was contacted successfully, but the configuration data was not valid. Ensure that the primary federation server is running Windows Server 2012 R2 or later. Prerequisites Check Completed One or more prerequisites failed.  Please fix these issues and click "Rerun prerequisites check" The primary federation server was contacted successfully, but the configuration data was not valid. Ensure that the primary federation server is running Windows Server 2012 R2 or later

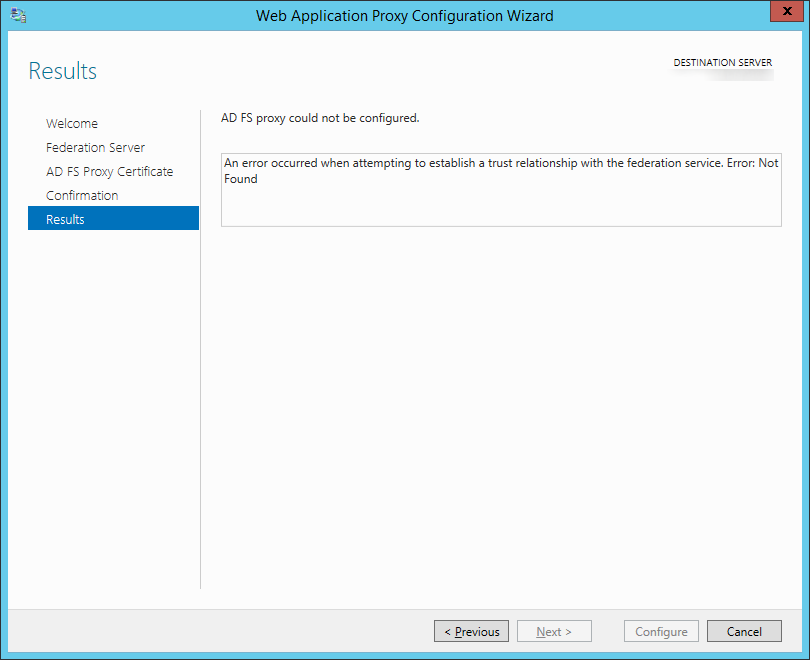
Symptom: You receive the following error while setting up the WAP (proxy) server:

An error occurred when attempting to establish a trust relationship with the federation service. Error: Not Found An error occurred when attempting to establish a trust relationship with the federation service Error Not Found

Resolution: Make sure you update the DNS records of your ADFS deployment to point to your new ADFS server.  Both the ADFS proxy and ADFS server must be running the same OS version (in this case, Server 2012 R2).

[Office 365] - Forwarding email from one mailbox to another with ADFS turned on

Synopsis: Employee leaves on personal matters for a month and their department lead requests for mail to be forwarded to their manager.  Typically, mail forwarding would be setup inside of the Exchange console, however, in this case, Exchange is managed by Office 365 (not a hybrid exchange deployment) and the users are being federated to Office 365 via ADFS.  When trying to enable mail forwarding, as outlined in the this help document by the Office 365 team http://community.office365.com/en-us/wikis/exchange/how-to-forward-email-in-office-365.aspx, I would receive an error message.

Symptom: When enabling mail forwarding for the user inside of the Office 365 Exchange portal, I received the following error message:

The action 'Set-Mailbox', 'EmailAddresses', can't be performed on the object 'Firstname Lastname' because the object is being synchronized from your on-premises organization. This action should be performed on the object in your on-premises organization.

Solution:

Personally, I think this is a bug in Office 365, but they say it is because we are on premise (if all of exchange is managed by them, how can they not enable mail forwarding?).  Any who, the work around is to manage the user's mailbox and set forwarding up as if they would.  See the steps below to achieve the same result:

  1. Login to your Office 365 admin portal.
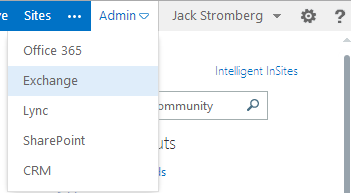
  2. Click on the Admin dropdown and select Exchange
    Exchange
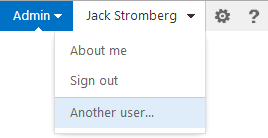
  3. Once in the Exchange portal, click on your username and select Another user...
    Exchange - Another User
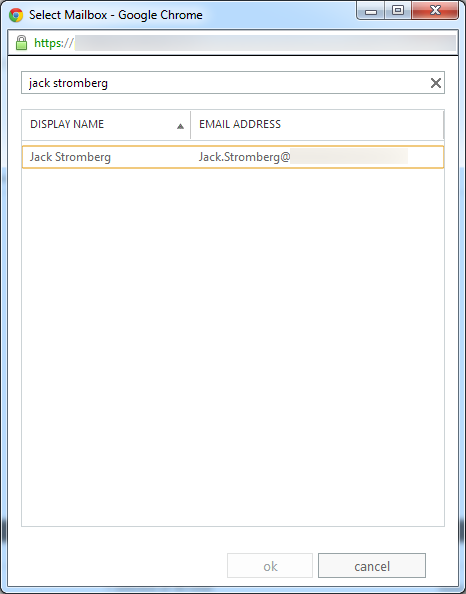
  4. Type in the mailbox you want to edit and click ok
    Select Mailbox
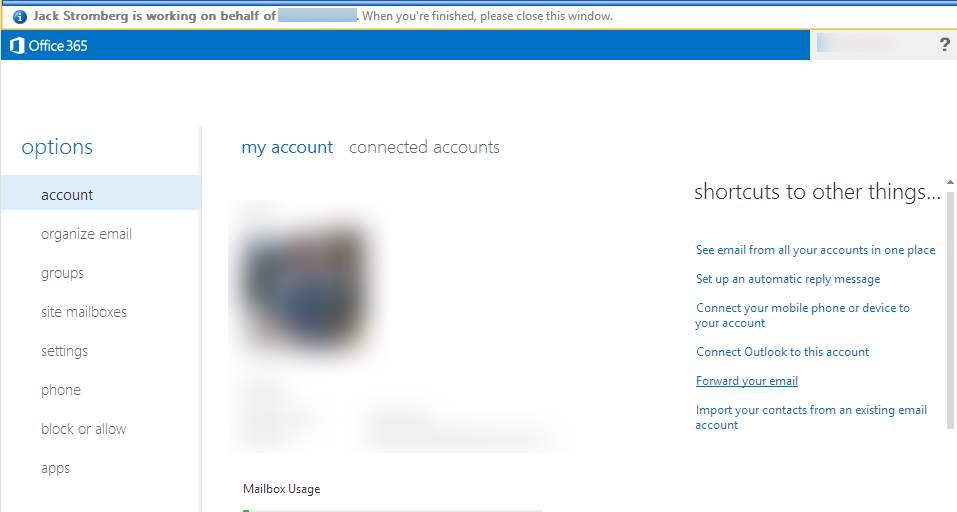
  5. On the "Managing on behalf of" screen, select Forward your email
    Exchange - Forward Your Email
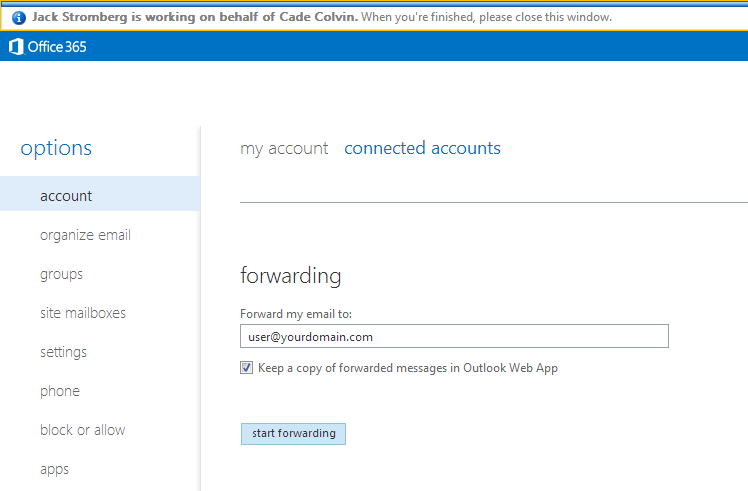
  6. Scroll down to forwarding and type in the email address of the user you want all emails to go to and click start forwarding.  You can optionally select if you want to leave a copy for the user's mailbox or have them silently forwarded.
    Exchange - Start Forwarding
  7. That's it! 🙂
Lync On-Premise with Office 365 Federation - error ID 403

When communicating to hosted companies in Office 365 from an On-Premise Lync environment, I had begun seeing the following symptoms:

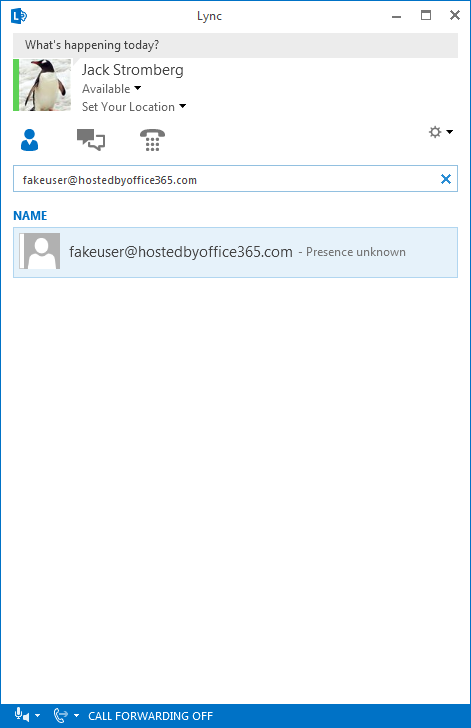
  1. Presence defaulted to Unknown for federated contacts:
    Lync Presence unknown
  2. When joining someone's meeting or sending them an IM, I would see the following:
    "When contacting your support team, reference error ID 403 (source ID 239)."
    Lync Meeting Error ID 403 (Source ID 239)
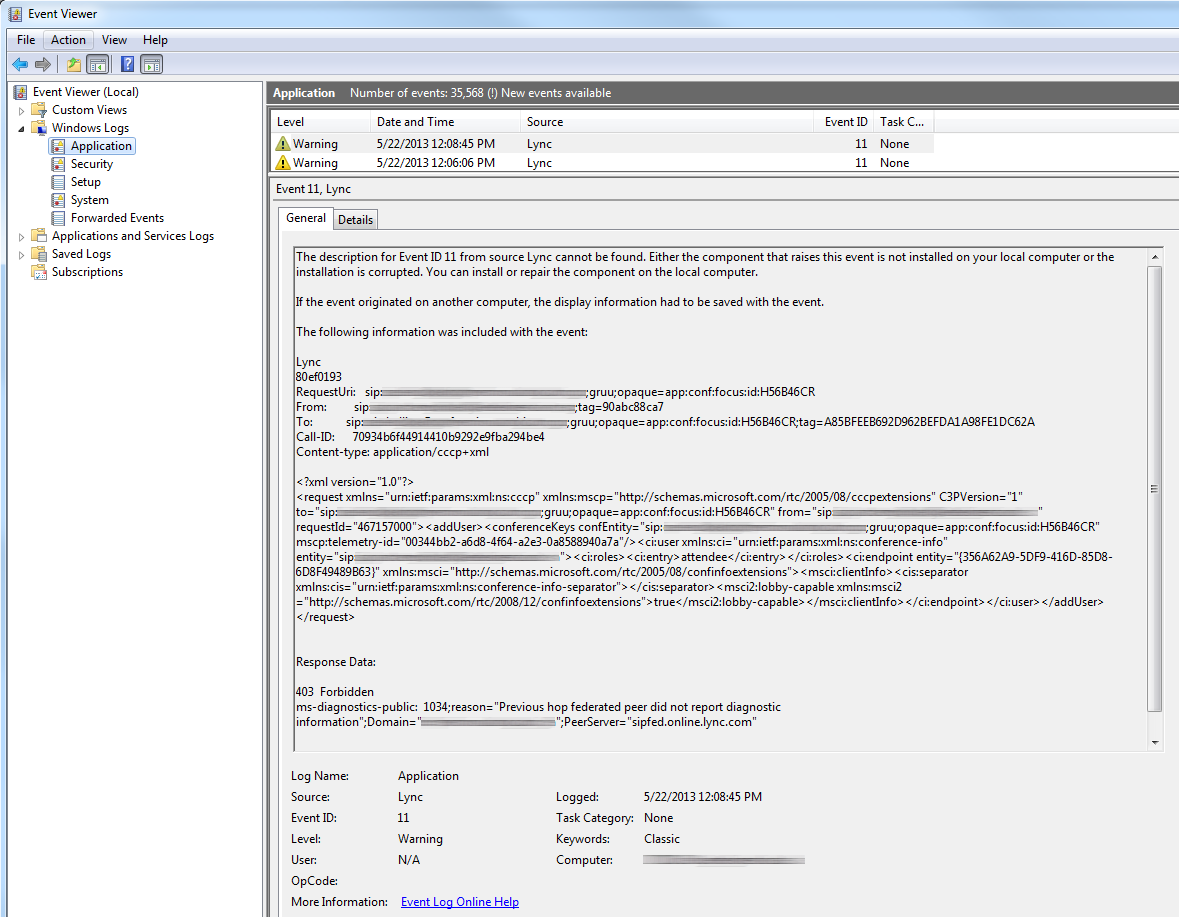
  3. Inside of event viewer, I saw:
    403 Forbidden
    ms-diagnostics-public: 1034;reason="Previous hop federated peer did not report diagnostic information";Domain="othercompanydomainon.com";PeerServer="sipfed.online.lync.com"
    Lync Office 365 Federation Error

Solution:

Interestingly enough, even though you have an On-Premise Lync environment, it appears that Office 365 will tie back to your account for some settings.  In my case, I had not enabled federation to other PIC providers on Office 365.

To resolve the issue, please follow the steps below:

  1. Login to the Office 365 Admin Portal
  2. Click on Manage Lync
    Manage Lync - Office 365
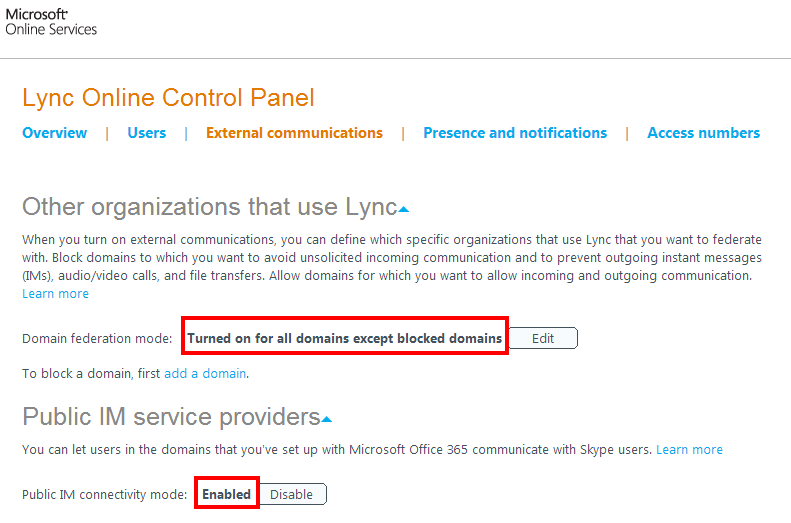
  3. Click on the External communications tab and ensure the following settings:
    1. Domain federation mode: Turned on for all domains except blocked domains (you can switch to the other mode, just keep in mind you will have to whitelist every domain you are enabling communication with)
    2. Public IM connectivity mode: Enabled
    3. Lync - Office 365 - External communications
  4. Next, head over to the Lync Online Control Panel for your on-premise Lync deployment.
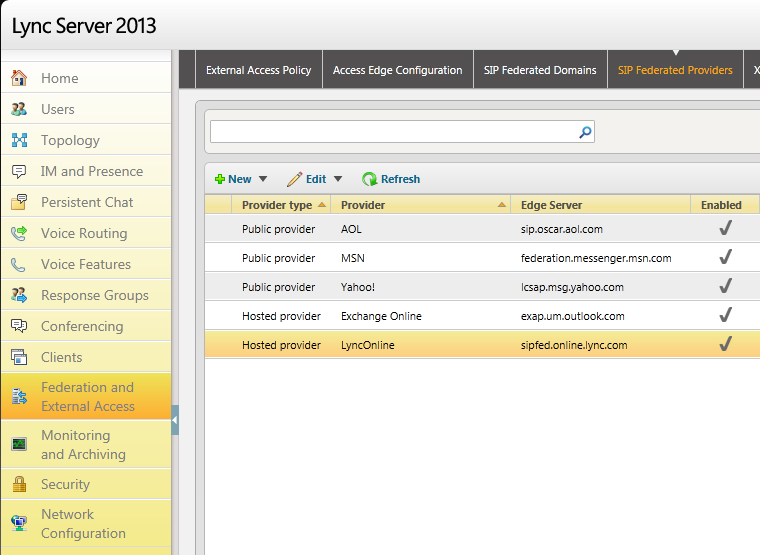
  5. Select the Federation nand External Access tab and then select SIP Federated Providers
  6. Ensure you have created a rule for the provider LyncOnline that is federated to sipfed.online.lync.com
    Lync - SIP Federated Providers

    1. To create the provider via the Lync Server 2013 Control Panel
      1. Select New... and then click Hosted Provider
        1. Enable communications with this provider: Checked
        2. Provider Name: LyncOnline
        3. Access Edge Service (FQDN): sipfed.online.lync.com
        4. Click Commit
    2. To create the provider via PowerShell, execute the following command:
      1. New-CSHostingProvider -identity LyncOnline -ProxyFqdn sipfed.online.lync.com -Enabled $True

Wait a few minutes for the changes to take effect, exit out of your Lync client on your workstation, reopen and you should now be able to communicate to your federated partner.

Enabling XMPP Federation to Google Talk on Lync 2013

Execute the following PowerShell command:

New-CsXmppAllowedPartner gmail.com -TlsNegotiation NotSupported -SaslNegotiation NotSupported -EnableKeepAlive $false -SupportDialbackNegotiation $true

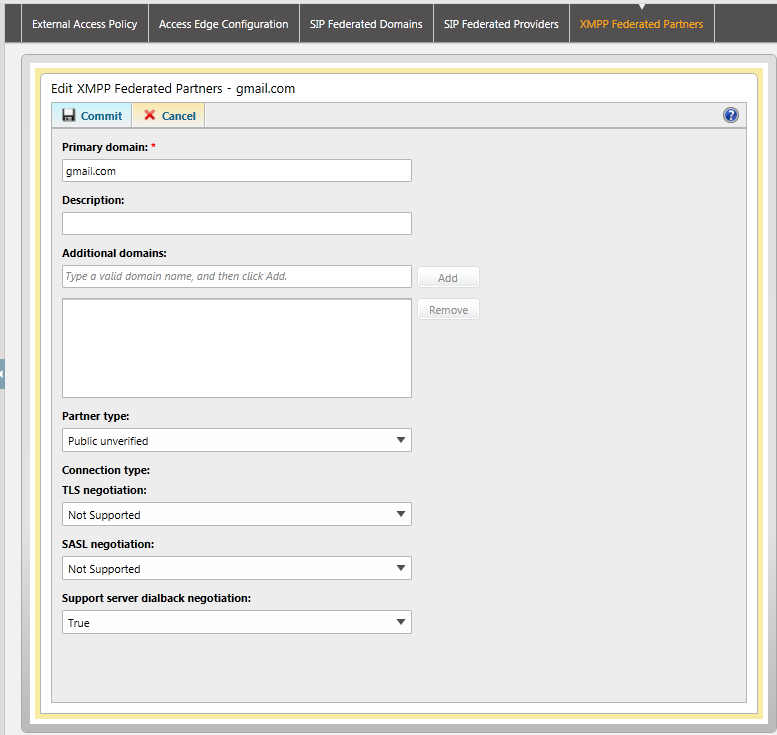
If you don't want to use PowerShell, you can setup the federated partner through CSCP with the following settings:

Gmail XMPP Federated Partners


Error:

The XMPP Translating Gateway Proxy failed to send a stanza to a remote server.

Remote domain: gmail.com
Detail: MS diagnostic code: 32019

--------------------------------------Another Event--------------------------------------

The XMPP Translating Gateway Proxy encountered an error communicating with a remote server.

Remote domain: gmail.com
Direction: Outbound
State: STREAM_WaitingForStreamFeatures
Category: Stream
Detail: NotAuthorized
Diagnostic code:32019
Exception:-

Solution:

Both events above have to do with issues hinting at split-dns.  Make sure each of your Lync DNS records are pointing to the correct servers.  Here are the records I used below (each point to the internal servers as we are configuring a split-dns environment (nothing should have changed on DNS from 2010 to 2013 other than adding the service record _xmpp-server._tcp.mydomain.com to your public and private DNS servers)):

lyncdiscover.mydomain.com (this should point to your lync proxy's address)
sip.mydomain.com (this may be different depending on how you configured it, I have seen a lot of guides use this though -- this should point to your front end servers/pool)
_xmpp-server._tcp.mydomain.com (point to the domain above: sip.mydomain.com) (port 5269, priority 0, weight 0)
_sipfederationtls._tcp.mydomain.com (point to sip.mydomain.com, port 5061, weight 0, priority 0)