Category Archives: Uncategorized

Find listing of open ports on Windows

Want to see what ports are currently listening for connections on your machine?

To quickly find a list of open ports listening for connections, execute the following netstat command (this will show the Protocol, Local Address (source port), Foreign Address, State, and Process ID):

netstat -ano |find /i "listening"

To quickly ifnd a list of ports with established connections, enter the following command  (this will show the Protocol, Local Address, Foreign Address, State, and Process ID):

netstat -an |find /i "established"


Here is a complete listing all of the netstat switches

Displays protocol statistics and current TCP/IP network connections.

NETSTAT [-a] [-b] [-e] [-f] [-n] [-o] [-p proto] [-r] [-s] [-t] [interval]

-a Displays all connections and listening ports.
-b Displays the executable involved in creating each connection or listening port. In some cases well-known executables host multiple independent components, and in these cases the sequence of components involved in creating the connection or listening port is displayed. In this case the executable name is in [] at the bottom, on top is the component it called, and so forth until TCP/IP was reached. Note that this option can be time-consuming and will fail unless you have sufficient permissions.
-e Displays Ethernet statistics. This may be combined with the -s option.
-f Displays Fully Qualified Domain Names (FQDN) for foreign addresses.
-n Displays addresses and port numbers in numerical form.
-o Displays the owning process ID associated with each connection.
-p proto Shows connections for the protocol specified by proto; proto may be any of: TCP, UDP, TCPv6, or UDPv6. If used with the -s option to display per-protocol statistics, proto may be any of: IP, IPv6, ICMP, ICMPv6, TCP, TCPv6, UDP, or UDPv6.
-r Displays the routing table.
-s Displays per-protocol statistics. By default, statistics are shown for IP, IPv6, ICMP, ICMPv6,  TCP, TCPv6, UDP, and UDPv6; the -p option may be used to specify a subset of the default.
-t Displays the current connection offload state.
interval Redisplays selected statistics, pausing interval seconds between each display. Press CTRL+C to stop redisplaying statistics. If omitted, netstat will print the current configuration information once.

Notes: Here is a great resource with more in-depth details on the command: http://www.petri.co.il/quickly_find_local_open_ports.htm
Reverse Sync from iPod (Restore backup from iPod to iTunes)

Recently, we had a drive in our main machine at home fail and of course we didn't backup anything.  As hardware on the drive itself failed, we were unable to run any recovery tools to revive anything off the drive.  Fortunately, much of what was on the machine was on a different drive, except for my iTunes library. Luckily, we had recently synchronized one of our iPod's to the machine and we were able to recover almost the entire iTunes library from the device (cheap backup device eh? :P).

So, how do I recover all of my music/media from my iPod?
Here is how using Windows 8:

  1. Close out of iTunes if you have it open
  2. Open up task manager and click on Services
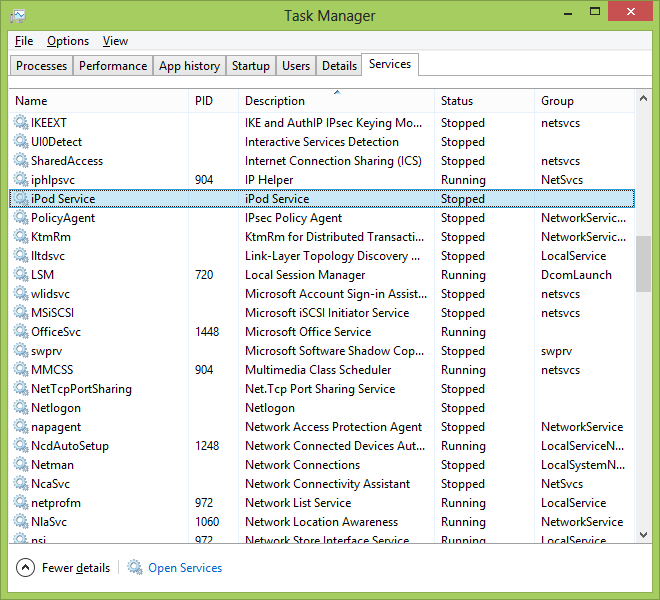
  3. Stop the following services: Apple Mobile Device, Bonjour, iPod Service
    iPod Service
  4. Make sure your machine is setup to show hidden files
    1. Click on Windows Explorer and select the View Tab
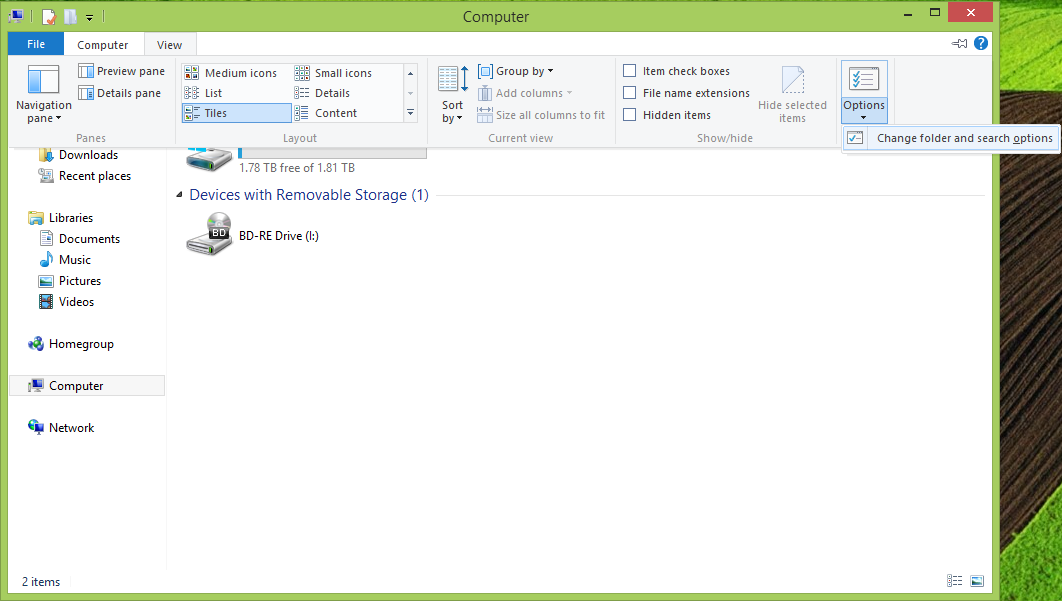
    2. Click on the Options button and select Change folder and search options
      Folder Options
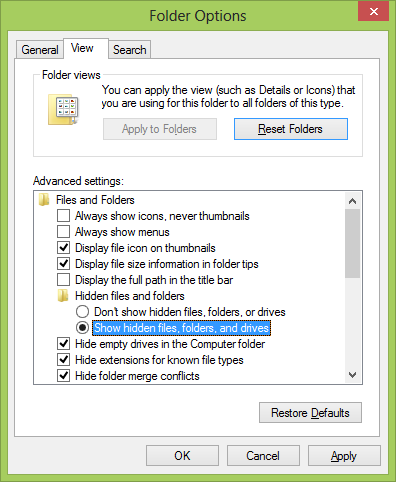
    3. Select the View Tab and check Show hidden files, folders, or drives
      Show Hidden Files
    4. Click OK
  5. Connect the iPod
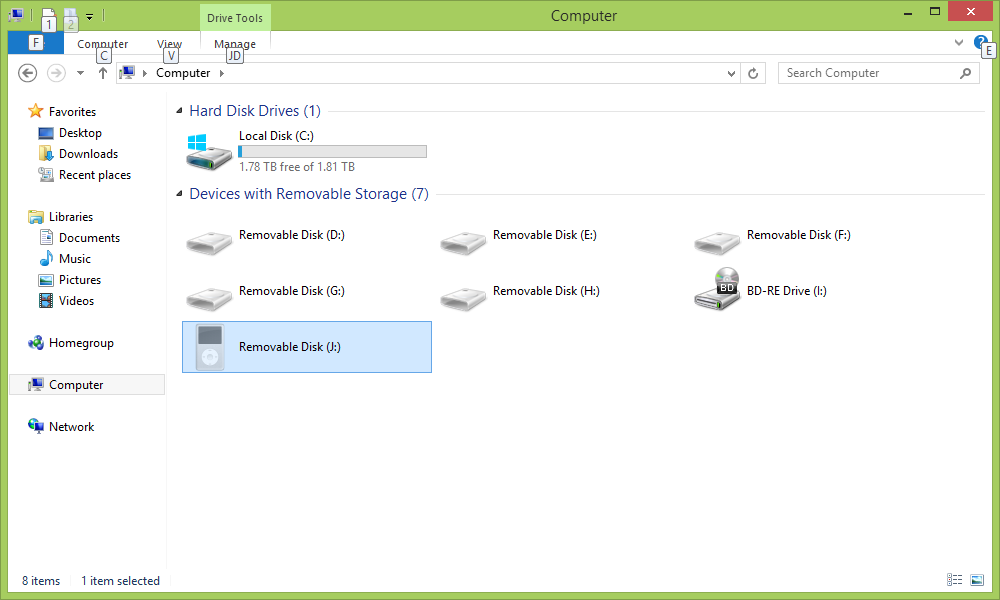
  6. Select your iPod (Removable Disk) from Windows Explorer (the ipod should be visible if you disabled the services mentioned in the previous steps)
    Select iPod
  7. Navigate to iPod_Control and select Music
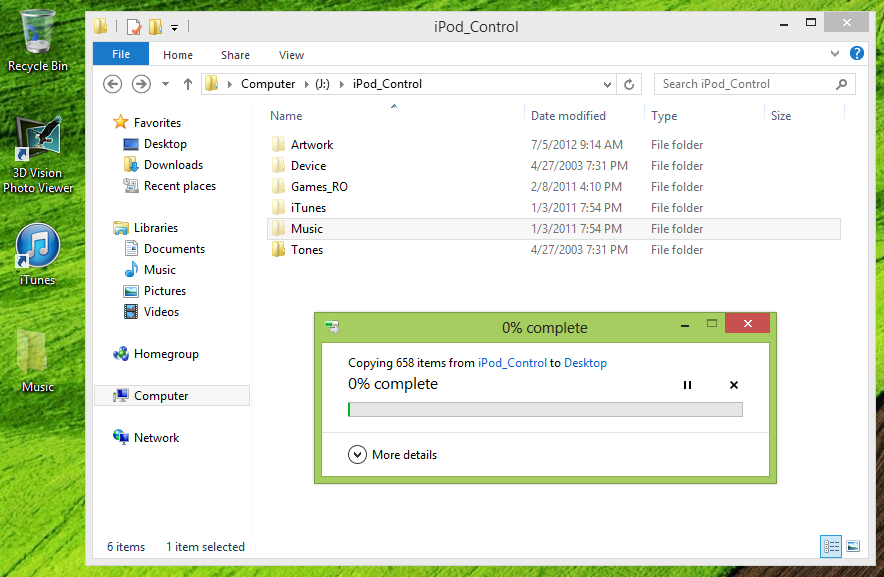
  8. Copy all of the files to your desktop
    Copy Files from iPod
  9. Open up iTunes (ignore the warning about the bonjour service not running if it pops up--that's ok)
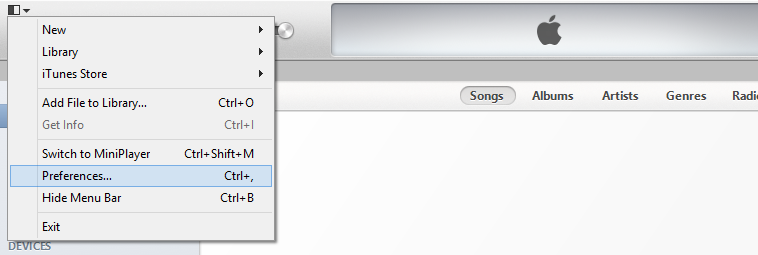
  10. Click on the little icon in the top left corner and select Preferences from the menu
    iTunes Preferences
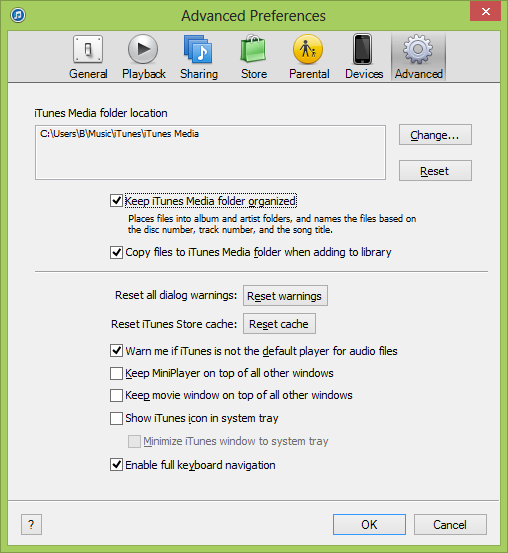
  11. Click on Advanced
  12. Check the box that says Keep iTunes Media folder organized
  13. Check the box that says Copy files to iTunes Media folder when adding to library
    Keep iTunes Media organized
  14. Click OK
  15. On your desktop, right click on the Music folder you copied from your iPod and select Properties
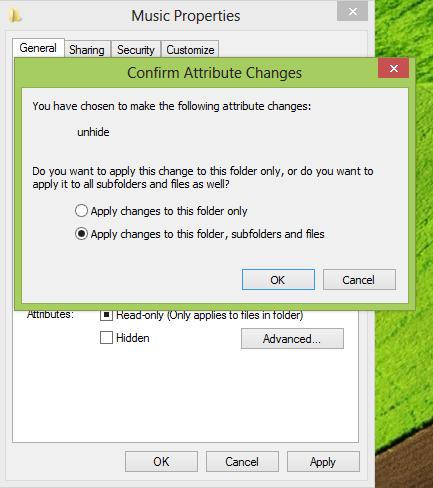
  16. Uncheck Hidden and select Apply changes to this folder, subfolders, and files when prompted.
    unhide files
  17. Click OK
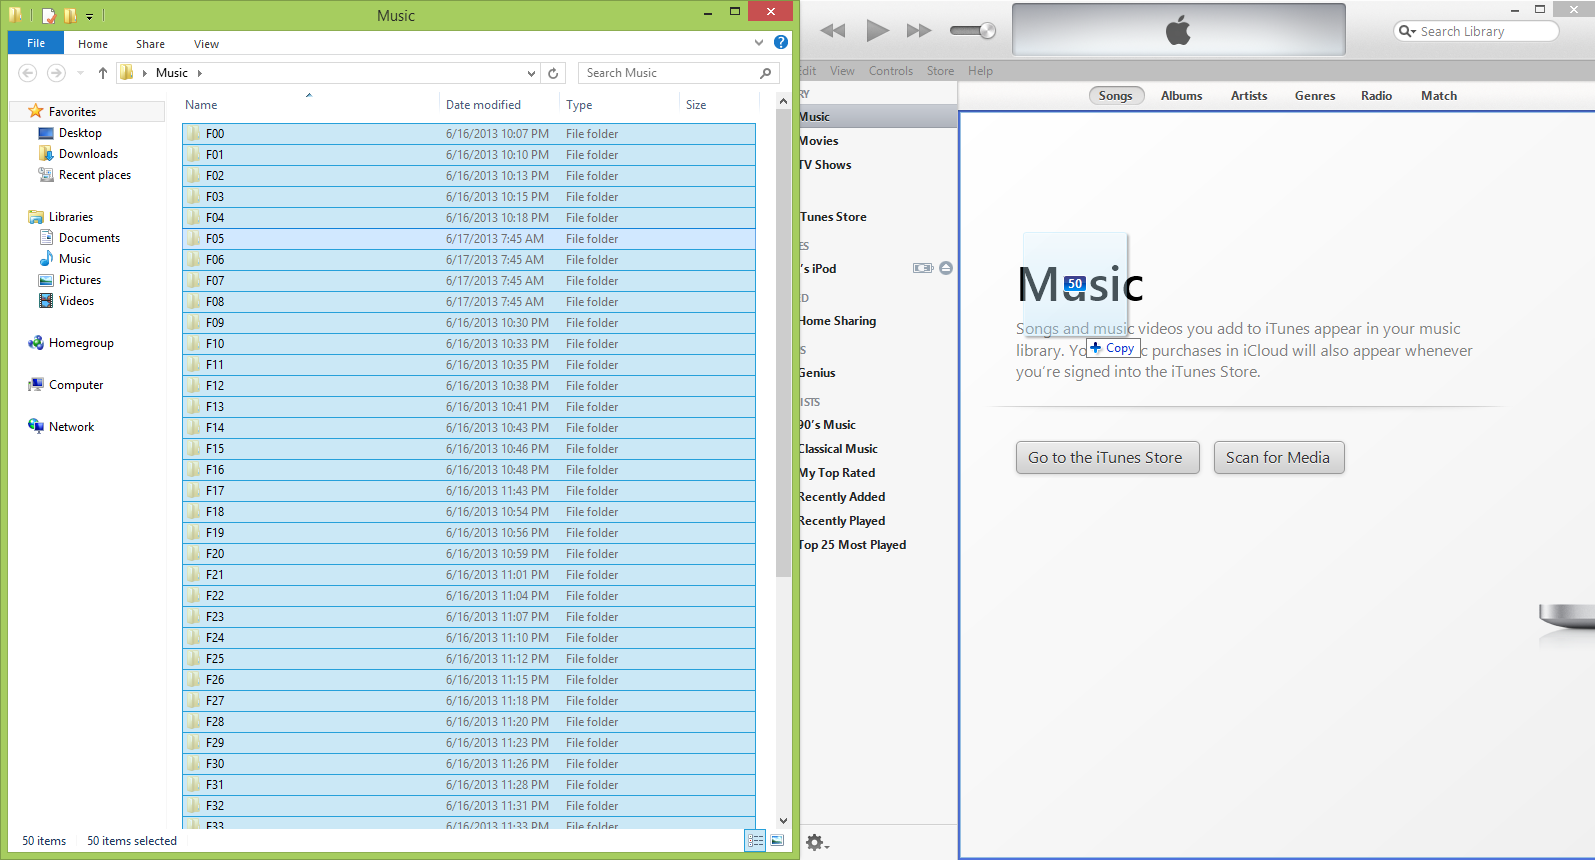
  18. Open up the Music folder on your desktop and then drag the folders over to the Music part of iTunes
    Copy Files to iTunes

At this point your tunes should automatically be populating back into iTunes.  iTunes will automatically copy the files from your desktop over to iTunes and properly place them inside your My Music folder.  Just note that doing this process requires double the amount of space on your hard drive temporarily while iTunes copies the files from your desktop, but once all files have been copied, you can safely remove the folder on your desktop and resync your iPod to iTunes.

Ford Explorer Sport 2013 - Keyless Entry Code

Recently, I purchased a Ford Explorer and for whatever reason the keyless entry code was not bundled with the owner's manual nor is it listed when you type the VIN number into Ford's website and browse the vehicle's installed accessories.

Luckily, rather than bringing the vehicle back into the dealership, there is a way to lookup the default entry code.  On the fuse box, the car has a label with a 5 digit code (sometimes followed by a single letter).

Next question is, where is the fuse box?  Interestingly, there are two on the explorer.  The first one is under the hood, on the right side inside of a "black box".  The second one is in the typical spot underneath the steering wheel on the driver side (if anyone has an explorer in Europe and it has the steering wheel on the right side of the car, you should let me know if the fuse box is on the side with the steering wheel or still on the left side by what would be the passenger :P).  Oddly enough, at a quick glance I couldn't find the fuse box as it was hidden by a piece of plastic.  Luckily, if you can grab a flashlight and stick your head underneath the steering wheel far enough, you should be able to see the sticker, otherwise you will have the pull the hex screw off and remove the plastic guard.

For whatever reason, this isn't inside the owners manual, so hopefully this helps someone else with their explorer 🙂

Importing a SSL certificate into a Java Keystore via a PKCS12 file

Here are the instructions on how to import a SSL certificate into the Java Keystore from a PKCS12 (pfx or p12) file.

  1. Create a new keystore
    1. Navigate to C:\Program Files\Java\jdk_xxxx\bin\ via command prompt
  2. Execute: keytool -genkey -alias mycertificate -keyalg RSA -keysize 2048 -keystore mykeystore
    1. Use password of: Use the same password/passphrase as the PKCS12 file
    2. What is your first and last name?  (should be the dns you're going to use) [Unknown]:  server.mydomain.com
      What is the name of your organizational unit? [Unknown]: MyCompanysITDepartment
      What is the name of your organization?  [Unknown]:  MyCompany
      What is the name of your City or Locality?  [Unknown]:  CITY
      What is the name of your State or Province?  [Unknown]:  STATE
      What is the two-letter country code for this unit?  [Unknown]:  US
      Is CN=...................................... correct?  [no]:  yes
      Enter key password for <mycertificate>
      (RETURN if same as keystore password): Hit Return/Enter
  3. Empty the keystore
    1. Execute via command prompt: keytool -delete -alias mycertificate -keystore mykeystore
    2. Ensure nothing is in the keystore by executing: keytool -v -list -keystore mykeystore
  4. Import the PKCS12 File
    1. Execute via command prompt: keytool -v -importkeystore -srckeystore whateverthefileis.p12 -srcstoretype PKCS12 -destkeystore mykeystore -deststoretype JKS
    2. Enter the PKCS12 password/passphrase for both the Source and Destination password.

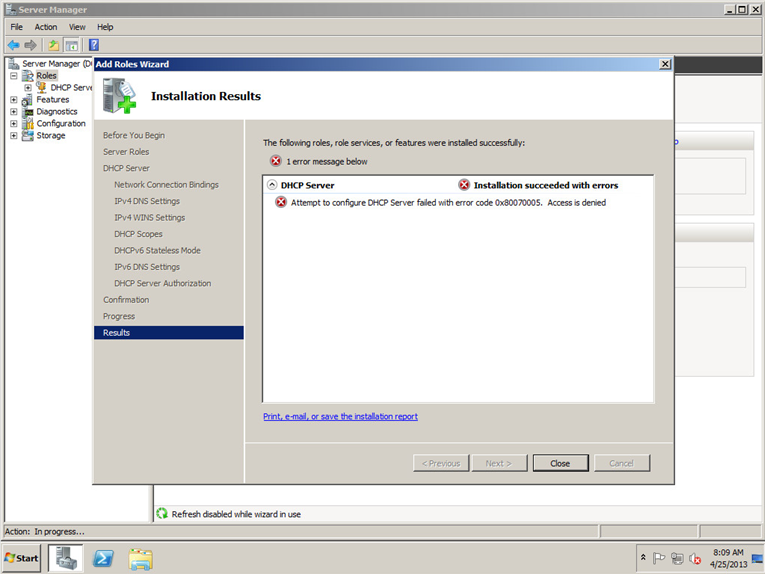
Attempt to configure DHCP server failed with error code 0x8007005. Access is denied.

Symptoms:

When trying to deploy DHCP on a member server (not a DC), you receive the following error:

Attempt to configure DHCP server failed with error code 0x8007005. Access is denied.

DHCP Error 0x8007005

When you go to Authorize the server you receive "Access Denied" as well.

Solution:

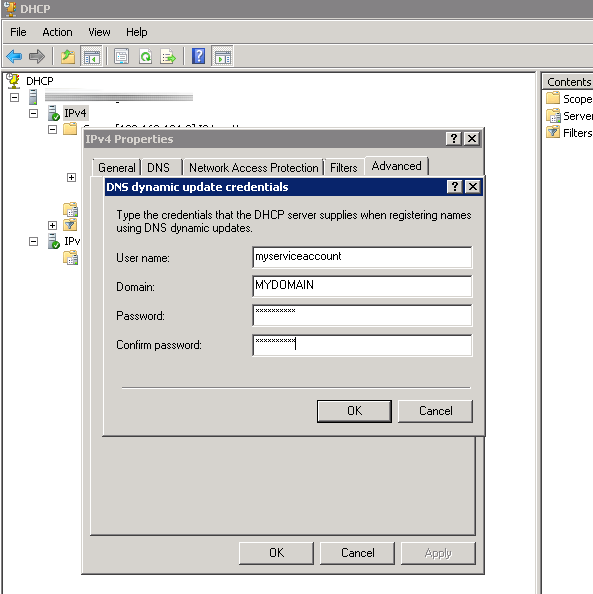
This is caused by permission issues on the user's account.  To fix this, first right click on IPv4 and then select Properties.  Click on the Advanced tab and then click on Credentials.  Inside of here, enter in the credentials you want to use as the service account to run DHCP.

DHCP Credentials

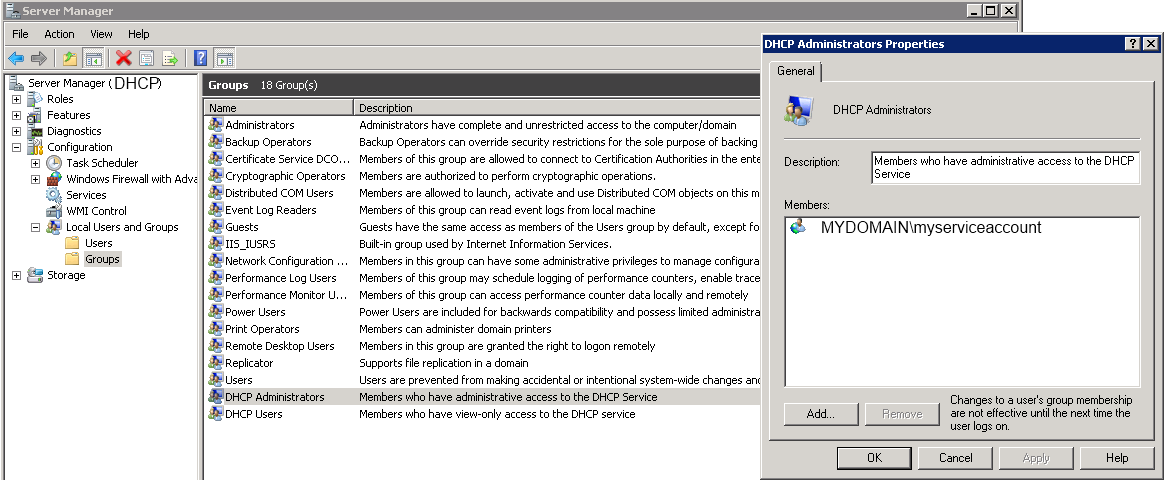
Next, open up Server Manager, expand Configuration, expand Local Users and Groups.  Click on DHCPAdministrators, and then add your service account.

DHCP Administrators group

Next, restart the DHCP Server service.  Inside of server manager, right click on the DHCP server and click Authorize.  Restart the service one last time, and each of your DHCP scopes should now be up (with green checkmarks).


Creating an installer for your application in Visual Studio 2012

In Visual Studio 2012, Microsoft removed the ability to make quick installers for your application. Now they recommend using a third party like Wix or InstallShield. This tutorial will go over using InstallSheild's free light version to make an installer for your application.

Please note, you cannot use InstallShield's product with the Express versions of Visual Studio.  If you use the express edition, you will not see the "Other Project Types" and "Setup and Deployment" folders mentioned later on.

First head over to InstallShield's website and register for the product.  It is free, but you have to register with a valid email address to receive a license key:

http://learn.flexerasoftware.com/content/IS-EVAL-InstallShield-Limited-Edition-Visual-Studio?lang=1033&ver=pro

Download and install the program.

Once installation is done, launch the program below as an Administrator:

C:\Program Files (x86)\InstallShield\2012SpringLE\System\TSConfig.exe

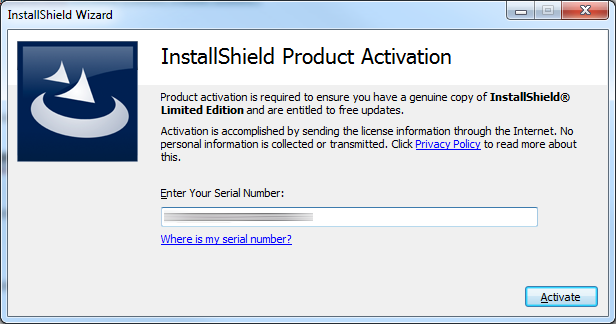
Enter your serial number from an auto-generated email they sent you when you downloaded InstallShield Limited and hit Activate.

InstallShield License

Next, open up Visual Studio 2012 (again, note we are not using express)

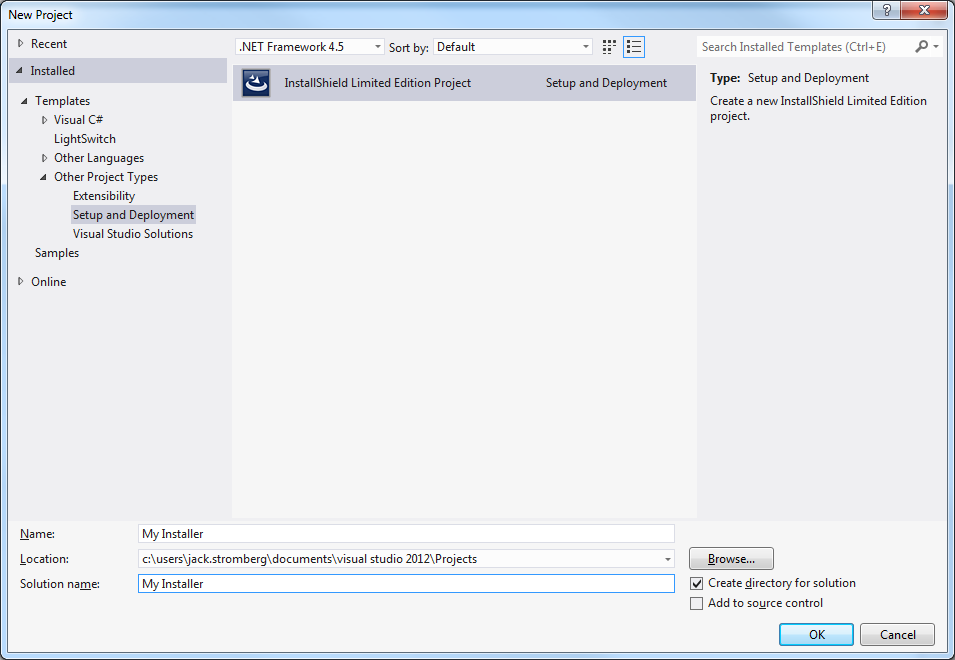
Click File->New Project.

New Project - Visual Studio

Expand Other Project Types and select Setup and Deployment.  Inside of there, you should see InstallShield Limited Edition Project (again, you won't see this in Visual Studio Express editions).  Click OK.

Other Project Types - InstallShield

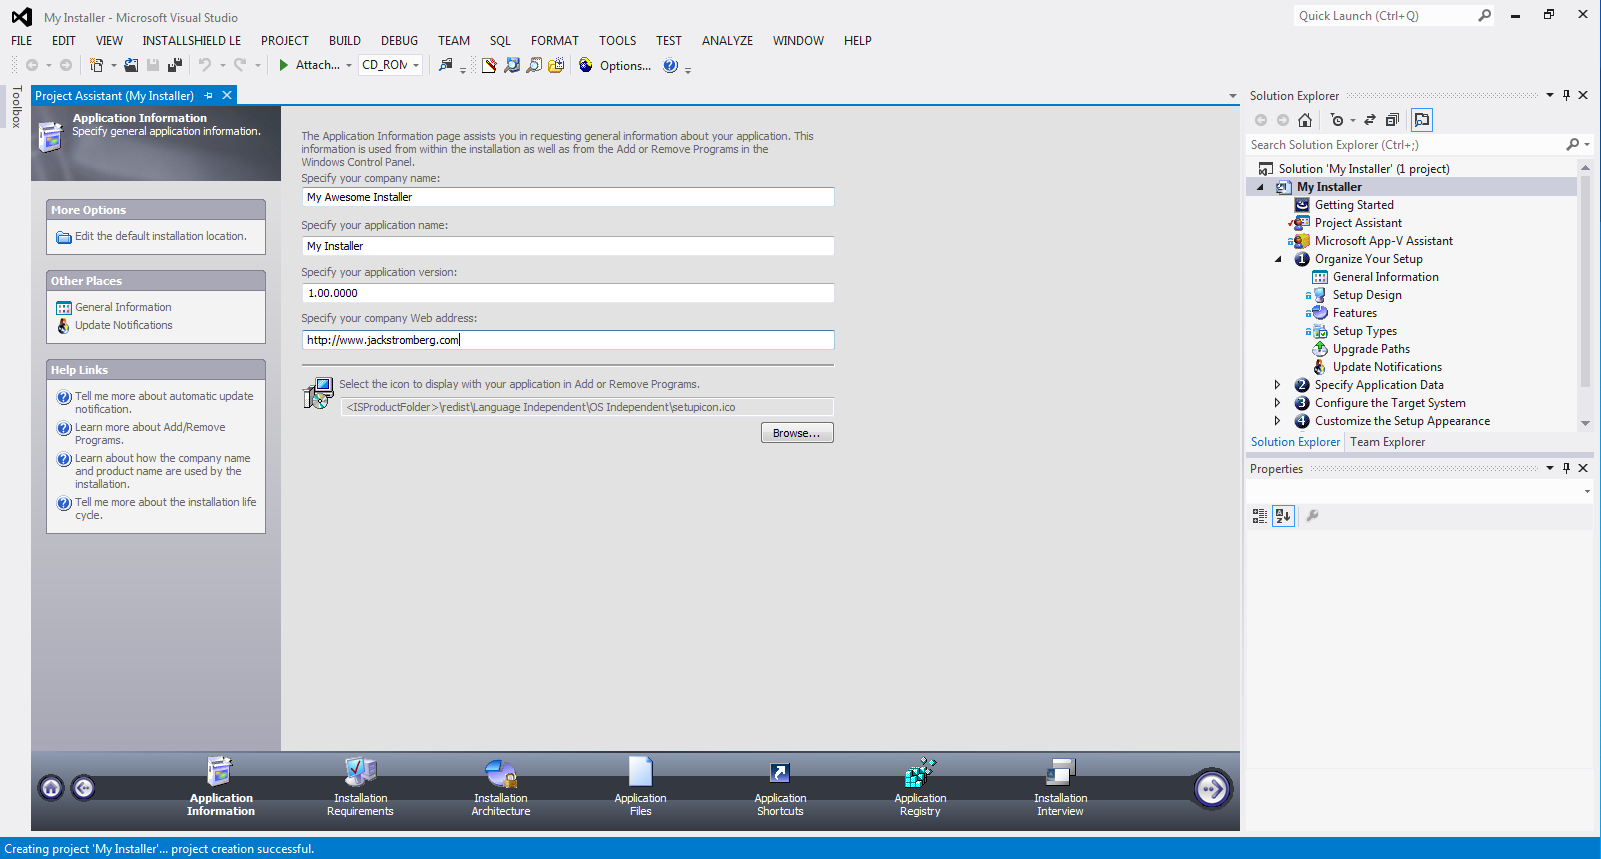
At this point, you should see a guided GUI (Project Assistant) to create your installer.  Inside of the Solution Explorer, you will see additional items you can select to configure advanced options.

Project Assistant - InstallShield

How to validate numeric-integer input in C

I had one of my buddies ask me how to validate input in C today... Turns out the task is kind of daunting. I thought I could get away with the following below:

int status, input;
status = scanf("%d", &input);
while(status!=1){
	printf("Incorrect number... please try again: ");
	status = scanf("%d", &input);
}

but the problem is you receive an infinite loop. The reason behind this is when you hit return\enter on your keyboard, a newline character is passed in as input. These extra hidden characters are what is messing with your input and spawning the infinite while loop. Luckily, I was able to parse through the extra characters one-by-one and get something working.

Hopefully this helps someone else!

#include<stdio.h>
int main(void){
	// input	user input -- hopefully a number
	// temp		used to collect garbage characters
	// status	did the user enter a number?
	int input, temp, status;

	printf("Please enter a number: ");
	status = scanf("%d", &input);
	while(status!=1){
		while((temp=getchar()) != EOF && temp != '\n');
		printf("Invalid input... please enter a number: ");
		status = scanf("%d", &input);
	}

	printf("Your number is %d\n",input);
	return 0;
}

How to move a column in a table in mySQL

Execute the following query:
ALTER TABLE mytable MODIFY COLUMN columntobemoved INT AFTER columnbefore;

mytable = the table you are modifying
columntobemoved = the column that will move in the table
columnbefore = the column that will be before the column you move. I.e. if you have columns a, b, c and you want to put columntobemoved after b (so between b and c), you would use b as the columnbefore value


Managing Adobe Reader files with iTunes - on your iPad or iPod Touch

This tutorial assumes you already have iTunes setup, you are logged into it with your Apple account, and your iPad has been synchronized to your iTunes account.  Also, this guide assumes you are using an iPad, but I believe the steps are the same for an iPod touch as well.

  1. Open up iTunes
  2. Plug-in your iPad
  3. Press the Alt key, click on the View menu, and then select Show Sidebar
  4. Getting to the Adobe Reader app on your iPad
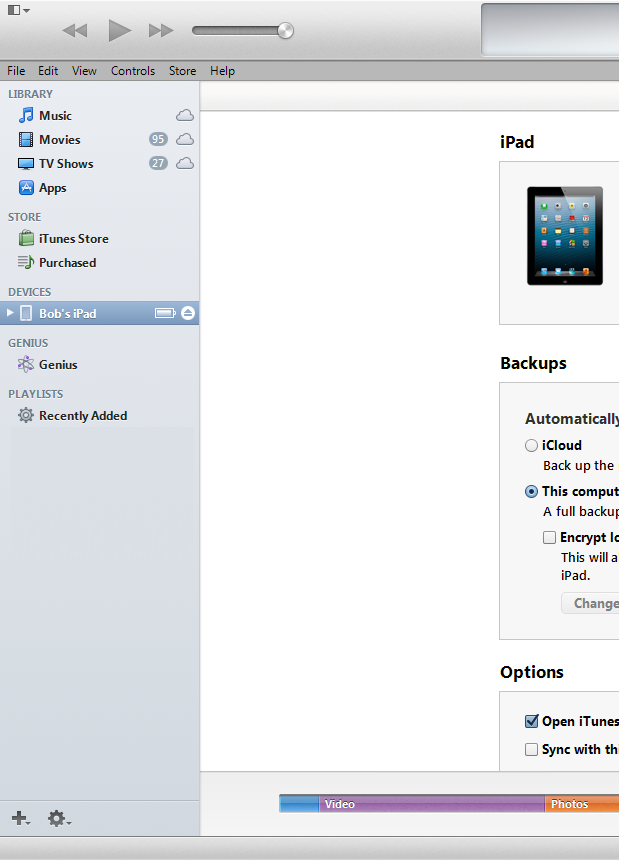
    1. Select your iPad
      1. Selecting your iPad
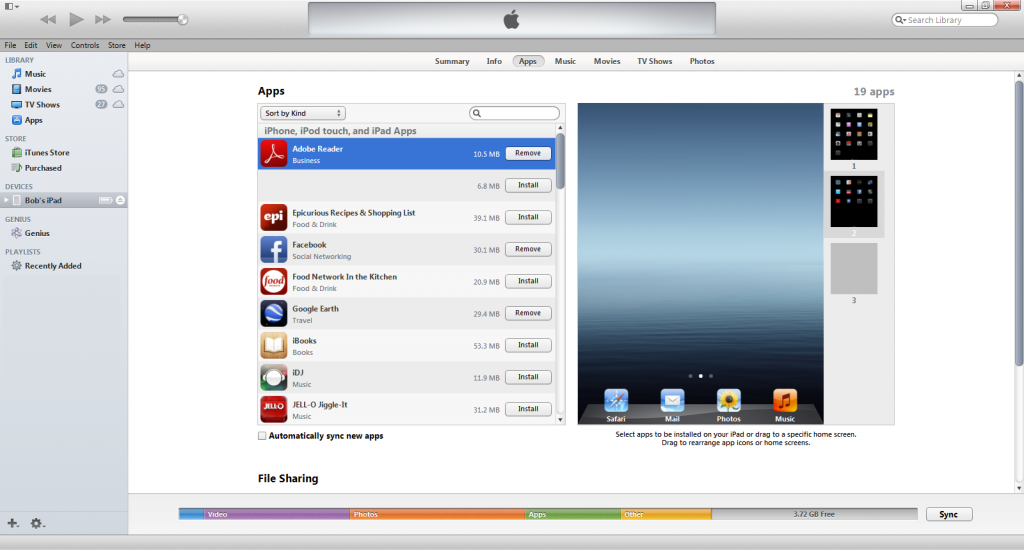
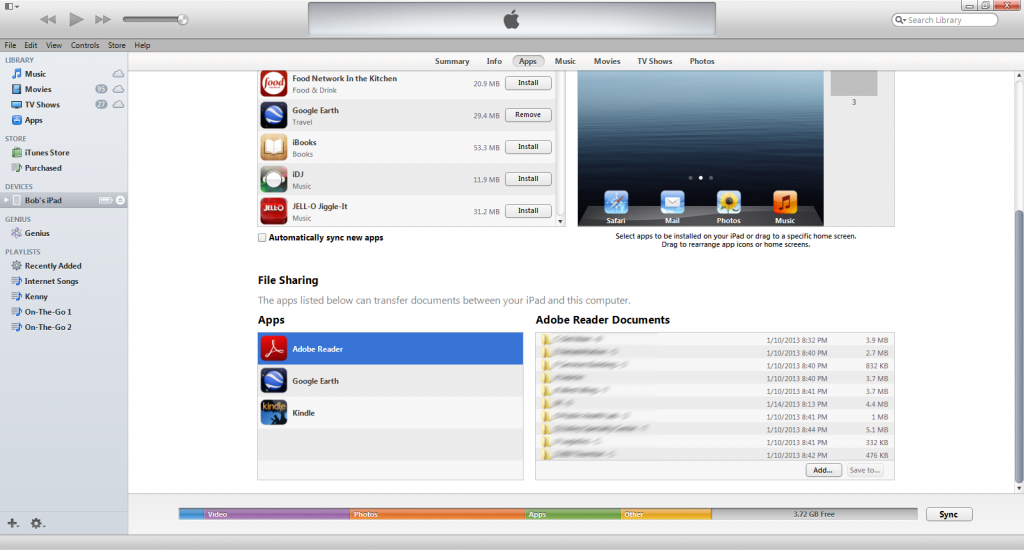
    2. Click on Apps in the top middle of the screen
      1. Selecting Apps
    3. Scroll down and click on the Adobe Reader app
      1. Adobe Reader App
  5. To add files to your iPad
    1. Click on the Add button
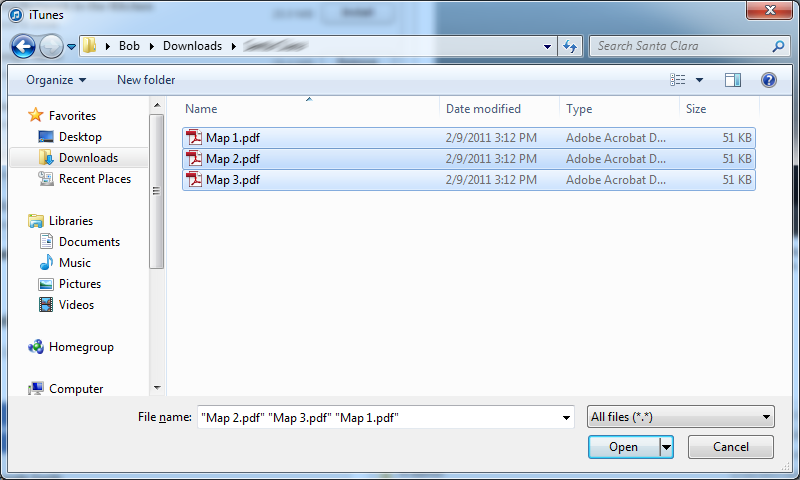
    2. Navigate to the folder you want, hold the control key, and select the files you want to send to your iPad (they must be in pdf format)
    3. Maps
    4. Click Open (note you cannot upload folders to your iPad)
  6. To backup files from your iPad to your computer
    1. Click on the folder you want and click on the Save To… button
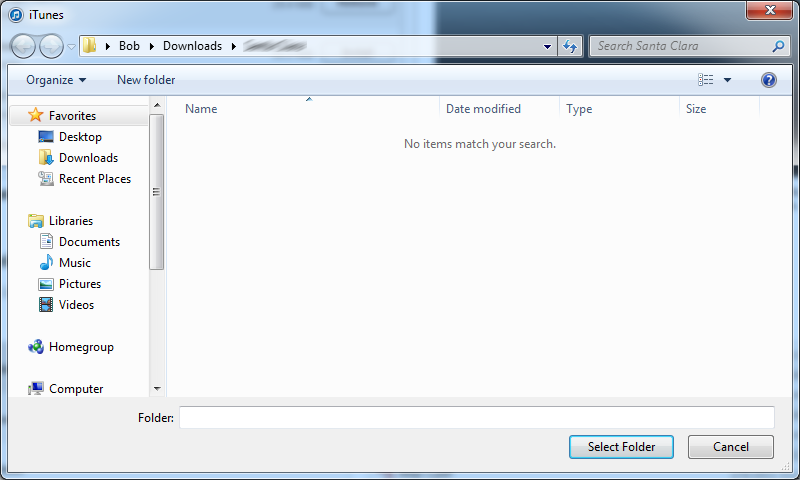
    2. Navigate to the folder you want to place the folder in (iTunes will create the folder inside of the folder you are selecting).
    3. Select Folder
    4. Click the Select Folder button (you do not need to type in anything, just click the button)
      1. At this point, if you were to navigate to your folder, you should see the folder you selected in iTunes, and then inside of that folder, the folder you selected to backup.
        1. Note: iTunes doesn't copy files from the folder you selected, it copies the folder and sub-items in it to a new folder that you selected.
  7. To create folders on your iPad, do the following:
    1. Launch the Adobe Reader application
    2. Click on Documents on the left side
    3. Click the Edit button in the top right
    4. Click on the Folder icon with a + sign on it
    5. Type in the folder name and click Save
  8. To move PDFs into a folder, launch the Adobe Reader app on your iPad (NOTE: you cannot drag the files inside of iTunes into the folders)
    1. Click on Documents on the left side
    2. Click the Edit button in the top right
    3. Find your PDFs and click on the little Circle icon next to it
        1. When you do that, it should turn red with a check mark
    4. Click on the icon with a diagonal arrow on a folder
    5. Click Move selected documents
    6. Select the folder you want to move the PDFs to

How to install Python via command line on Linux

At the time of writing this, Python 2.7.3 is the latest build of the 2.7 builds. You can simply replace the wget url with the Python 3.x build you wish to download if you want to use those releases instead.

  1. Download the tarball
    1. wget http://www.python.org/ftp/python/2.7.3/Python-2.7.3.tgz
  2. Extract the contents
    1. tar -xzf Python-2.7.3.tgz
  3. Navigate to the extracted folder
    1. cd Python-2.7.3
  4. Configure/Install Python
    1. ./configure
    2. make
    3. sudo make install