Yearly Archives: 2013

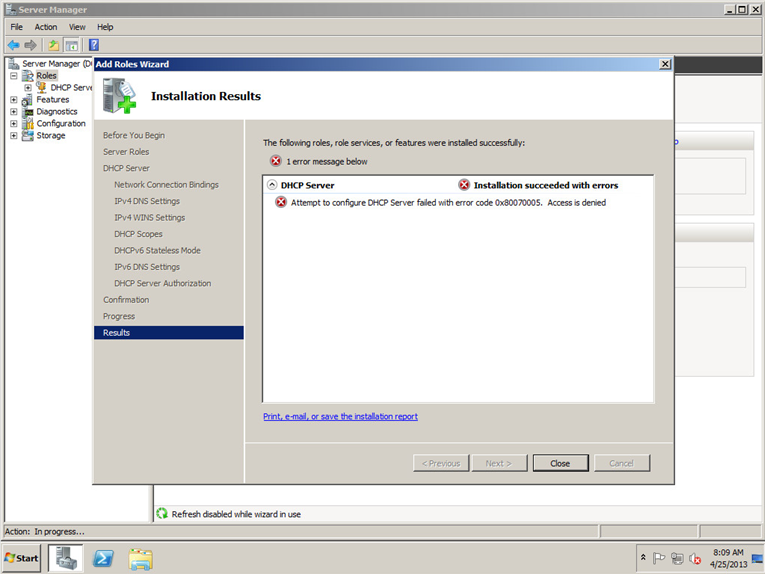
Attempt to configure DHCP server failed with error code 0x8007005. Access is denied.

Symptoms:

When trying to deploy DHCP on a member server (not a DC), you receive the following error:

Attempt to configure DHCP server failed with error code 0x8007005. Access is denied.

DHCP Error 0x8007005

When you go to Authorize the server you receive "Access Denied" as well.

Solution:

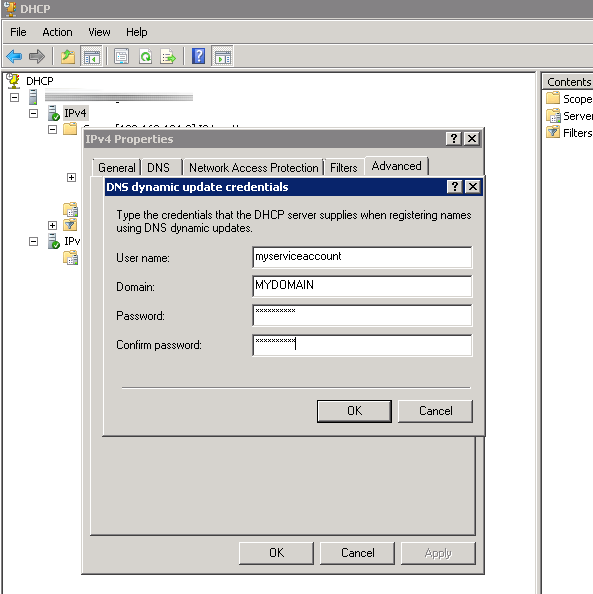
This is caused by permission issues on the user's account.  To fix this, first right click on IPv4 and then select Properties.  Click on the Advanced tab and then click on Credentials.  Inside of here, enter in the credentials you want to use as the service account to run DHCP.

DHCP Credentials

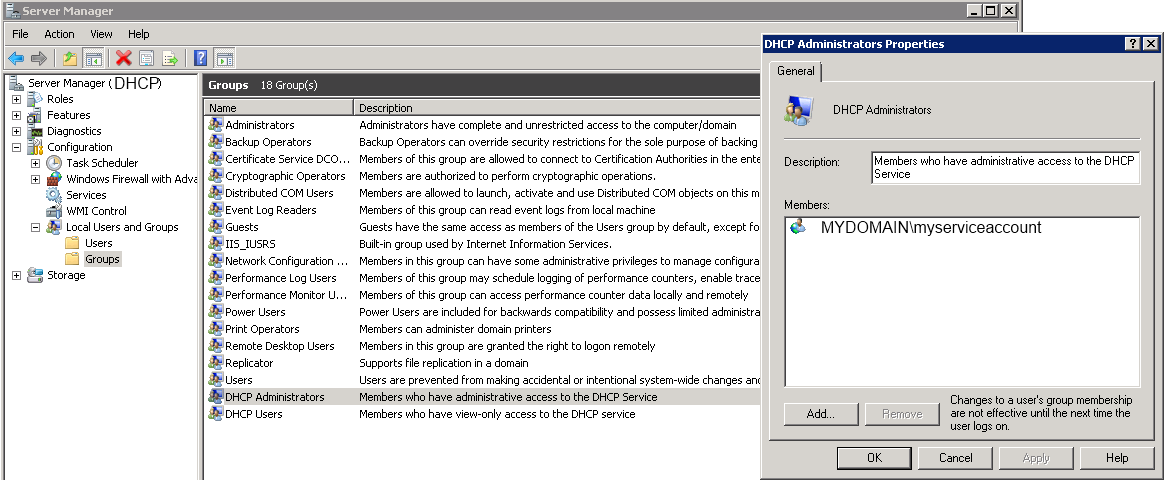
Next, open up Server Manager, expand Configuration, expand Local Users and Groups.  Click on DHCPAdministrators, and then add your service account.

DHCP Administrators group

Next, restart the DHCP Server service.  Inside of server manager, right click on the DHCP server and click Authorize.  Restart the service one last time, and each of your DHCP scopes should now be up (with green checkmarks).


Lync 2013 Logging Tool

After installing Lync 2013 RTM, I noticed that the Lync Logging Tool doesn't exist.  As you can see below, when you search for the tool under Server 2012, it is missing from the list of Apps.

Lync Logging

Solution:

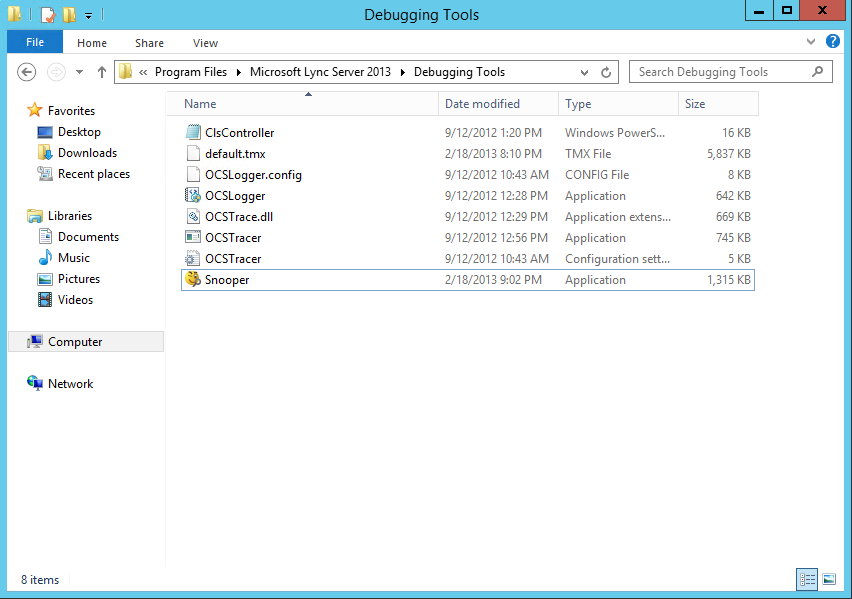
You can manually grab a copy of the Microsoft Lync Server 2013 Debugging Tools (this includes both OCSLogger.exe and Snooper.exe) from here: http://www.microsoft.com/en-us/download/details.aspx?id=35453

Once installed, you can access the tool by browsing to: C:\Program Files\Microsoft Lync Server 2013\Debugging Tools\OCSLogger.exe

Lync Debugging Tools 2013

Lync 2012 Creating CommonAreaPhone - Filter failed to return unique result

Symptom:

You receive the following error when executing the New-CsCommonAreaPhone command via PowerShell.

New-CsCommonAreaPhone : Filter failed to return unique result, "[LineURI : tel:+15555555555] [PrivateLine : tel:+15555555555] "
At line:1 char:1
+ New-CsCommonAreaPhone -LineUri "tel:+15555555555" -RegistrarPool "lync.mydomain ...
+ ~~~~~~~~~~~~~~~~~~~~~~~~~~~~~~~~~~~~~~~~~~~~~~~~~~~~~~~~~~~~~~~~~~~~~~~~~~~~~~~~
+ CategoryInfo          : NotSpecified: (:) [New-CsCommonAreaPhone], InvalidOperationException
+ FullyQualifiedErrorId : System.InvalidOperationException,Microsoft.Rtc.Management.AD.Cmdlets.NewOcsCommonAreaPhoneCmdlet

Solution:
This means that the phone number has been assigned to either another user or response group. Make sure the number is not in use by Lync.

VMware View Composer agent initialization state error (16)

Symtom:

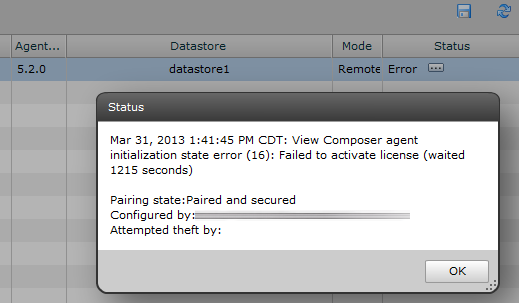
When trying to deploy a desktop using VMware View (Horizon), you receive the following error in your connection server:

Mar 31, 2013 1:41:45 PM CDT: View Composer agent initialization state error (16): Failed to activate license (waited 1215 seconds)
View Composer Agent Error 16

Solution:

This error is caused by Windows not being activated.  To solve this error, make sure you have Windows Activated or that Windows can properly reach your KMS server to activate Windows.  Once the OS is activated, simply restart the VMware Agent service or reboot the machine to have your vconnect server set the desktop to available.

Configuring Common Area Phones for Lync 2010-2013

This guide will go over configuring phones for Lync 2010/2013.  Particularly, this is going to go over configuring phones for conference rooms or any other public area that you would like a phone, but the same steps can be used to force users to login/authenticate to a phone with their number/extension and pin.  That being said, purchasing some Polycom CX3000 phones prompted me to write this guide, so if all goes well, your Polycom phones should work like a charm (Aastra phones should follow this guide as well) 😛

Making sure DHCP and DNS can dish out configurations to phones

The first thing to do is make sure you have your DHCP server setup to get your phones working (we will push settings out to the clients/phones so they can find your Lync server, pull down certificates, etc).  In order to do this, you will have to complete the following tasks on your DHCP, DNS, and Lync Front End servers.

  1. Create a DNS record to point to your NTP servers (if you haven't already)
      • Service: _ntp
      • Protocol: _udp
      • Port Number: 123
      • Host: xxx.xxx.xxx (your time server (probably your DC))
  2. Copy the DHCPUtil.exe and DHCPConfigScript.bat from the paths below to the Desktop on your DHCP Server
    1. %ProgramFiles%\Common Files\Microsoft Lync Server 2010 or 
      1. %ProgramFiles%\Common Files\Microsoft Lync Server 2013
  3. Open up a command prompt as Administrator on your DHCP server
  4. Execute the following commands on your DHCP Server
    1. DHCPUtil.exe -SipServer mylyncpoolorserver.mydomain.local –RunConfigScript
      1. If you receive the following
        1. The program can't start because MSVCR110.dll is missing from your computer. Try reinstalling the program to fix this problem.
      2. You can find MSVCR110.dll in the Lync 2013 media (D:\Setup\amd64 for example)
  5. To see if everything ran smoothly, open up the DHCP role and verify the entries were made in the IPv4 section
    1. Phone DHCP
  6. Execute the following from your Lync Server to verify the DHCP settings are correct (Note, if you run this from your DHCP server, it will always come back with a failed result).
    1. DHCPUtil.exe -EmulateClient
  7. Next, you will need to set a PIN policy for any users who will want to login.  Open the Lync Control Panel and click on Security.  Select the PIN Policy tab and double click on the Global policy.  Change the PIN Length to at least 4 you want.  Now click on Commit.

Creating the Common Area Phones Lync Policies

First, create a policy that will Enable Hotdesking.  This will log out a user that may have signed in to the phone and revert the phone back to a Common Area phone after 10 minutes of timeout.

New-CsClientPolicy -Identity CommonAreaClient -EnableHotdesking $True -HotdeskingTimeout 00:10:00

Next, we create a new voice policy to lockdown what the phone can do.  This will prevent users from  setting the phone to do call forwarding, delegation, call transfer, etc.  Alternatively, if you don't want to run the PowerShell command, you can browse use the Lync Server Control Panel web GUI to create a new Voice Policy.  Go to the Lync Control Panel, click on Voice Routing, and then the Voice Policy tab.  The command below will add the Internal policy, you can add others if you desire.

New-CsVoicePolicy -Identity CommonAreaVoice -PstnUsages @{add="Internal"} -AllowSimulRing $FALSE -AllowCallForwarding $FALSE -Name CommonAreaVoice -EnableDelegation $FALSE -EnableTeamCall $FALSE -EnableCallTransfer $FALSE -AllowPSTNReRouting $FALSE -Description "Feature-Restricted Common Area Phone Policy"

Next, we create a policy to restrict what the Common Area phone can do in conferences.  Execute the following command to create a new Conferencing Policy.  Alternatively, we could create this using the Lync Server Control Panel web GUI by clicking on Conferencing and then selecting the Conferencing Policy tab.

New-CsConferencingPolicy -Identity CommonAreaConf -AllowIPAudio $FALSE -AllowIPVideo $FALSE -EnableFileTransfer $FALSE -EnableP2PFileTransfer $FALSE -EnableDataCollaboration $FALSE

Last, we need to create a PIN policy for these guys to login.  I suppose you could use the global one for this step, but we could set this rule to be stricter for just these phones.  This will require all CommonArea phones to use a 4 digit pin to login.

New-CsPINPolicy -Identity CommonAreaPIN -Description "Common Area Phone 
Authentication PIN Policy" -MinPasswordLength 6 -AllowCommonPatterns $TRUE

Creating the Common Area Phones With Our policies

Next, create the commonarea phone:

New-CsCommonAreaPhone -LineUri "tel:+15555555555" -RegistrarPool "lync.mydomain.local" -OU "OU=CommonAreaPhones,DC=mydomain,DC=local" -Description "Batline 1" -DisplayName "Conference Room Batline" -DisplayNumber "1 (555) 555-5555"

Next, we need to set the new account we created with a PIN policy.  To do so, execute the following command (keeping in mind you need this to be at least 4 digits or longer depending on your policy you created earlier).

Set-CsClientPin –Identity “Batline 1” -Pin 123123

Lastly, we need to assign all of the polices we created earlier to this Common Area Phone account. To do so, execute the following commands:

Grant-CsClientPolicy -PolicyName CommonAreaClient -Identity "Batline 1
Grant-CsConferencingPolicy -PolicyName CommonAreaConf -Identity "Batline 1
Grant-CsPINPolicy -PolicyName CommonAreaPIN -Identity "Batline 1

Grant-CsVoicePolicy -PolicyName CommonAreaVoice -Identity "Batline 1

Last, you can execute the following powershell command on your Lync Front End server to try and emulate logging in to the phone.  This is great for debugging where the Lync Phone login would fail:

Test-CsPhoneBootstrap -PhoneOrExt 5555 -Pin 12345 -Verbose


Notes: If you have a polycom phone and you receive the following error "Certificate web service cannot be found. Please contact your support team." -- You need to configure the DHCP options as noted above in the "Making sure DHCP and DNS can dish out configurations to phones" section.

When executing the New-CsCommonAreaPhone command above, you receive the following powershell error "New-CsCommonAreaPhone : Management object not found for identity." I saw this error being an issue with your distinguishedName attribute.  Make sure you spelled your OU correctly, and that you are not using an OU that is built into AD like Users.

Good resources that explain exactly what is going on in greater detail.

http://blog.schertz.name/2010/12/configuring-lync-server-for-phone-edition-devices/

http://blog.schertz.name/2011/04/common-area-phone-configuration-in-lync/

http://www.graham-walsh.com/blog/?p=593
Enabling XMPP Federation to Google Talk on Lync 2013

Execute the following PowerShell command:

New-CsXmppAllowedPartner gmail.com -TlsNegotiation NotSupported -SaslNegotiation NotSupported -EnableKeepAlive $false -SupportDialbackNegotiation $true

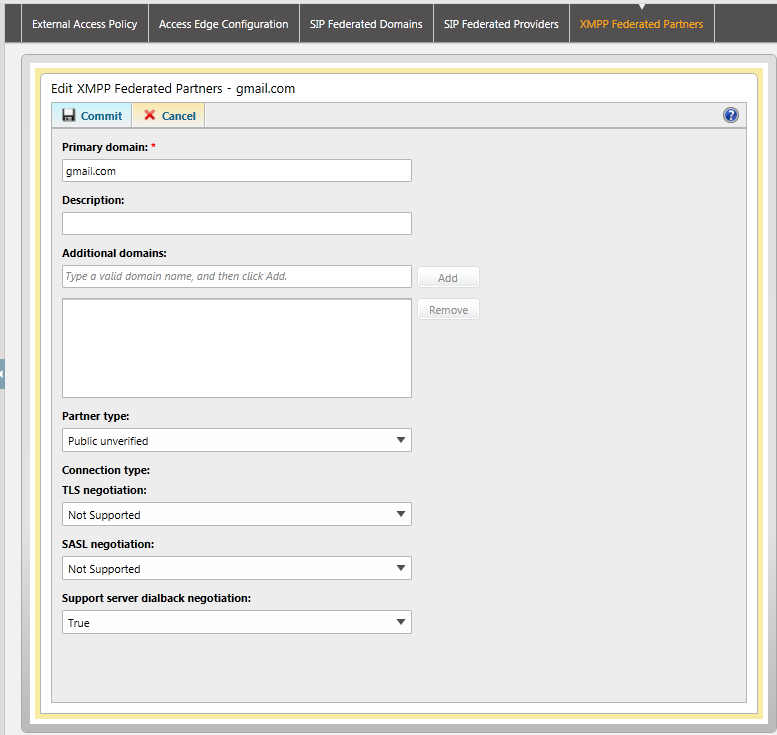
If you don't want to use PowerShell, you can setup the federated partner through CSCP with the following settings:

Gmail XMPP Federated Partners


Error:

The XMPP Translating Gateway Proxy failed to send a stanza to a remote server.

Remote domain: gmail.com
Detail: MS diagnostic code: 32019

--------------------------------------Another Event--------------------------------------

The XMPP Translating Gateway Proxy encountered an error communicating with a remote server.

Remote domain: gmail.com
Direction: Outbound
State: STREAM_WaitingForStreamFeatures
Category: Stream
Detail: NotAuthorized
Diagnostic code:32019
Exception:-

Solution:

Both events above have to do with issues hinting at split-dns.  Make sure each of your Lync DNS records are pointing to the correct servers.  Here are the records I used below (each point to the internal servers as we are configuring a split-dns environment (nothing should have changed on DNS from 2010 to 2013 other than adding the service record _xmpp-server._tcp.mydomain.com to your public and private DNS servers)):

lyncdiscover.mydomain.com (this should point to your lync proxy's address)
sip.mydomain.com (this may be different depending on how you configured it, I have seen a lot of guides use this though -- this should point to your front end servers/pool)
_xmpp-server._tcp.mydomain.com (point to the domain above: sip.mydomain.com) (port 5269, priority 0, weight 0)
_sipfederationtls._tcp.mydomain.com (point to sip.mydomain.com, port 5061, weight 0, priority 0)

Attempts to route to servers in an Exchange UM Dialplan failed - Lync 2010-2013

Symptom: When trying to check your voicemail from Lync, you notice that you call gets dropped/disconnected.  Inside of the front end server, you notice the following error log:

Attempts to route to servers in an Exchange UM Dialplan failed

No server in the dialplan [Hosted__exap.um.outlook.com__mydomain.onmicrosoft.com] accepted the call with id [c347a4ecc6e74651a2bdce6c43552e53].

Cause: Dialplan is not configured properly.

Resolution:

Check the configuration of the dialplan on Exchange UM Servers.

ExUM Error

Solution: Unfortunately, this seems to be caused by a couple of different things, so I would give all of the following below a shot.

First, make sure you have created a Unified Messaging plan in your Office 365 Exchange Control Panel:

  1. Login to https://portal.microsoftonline.com/
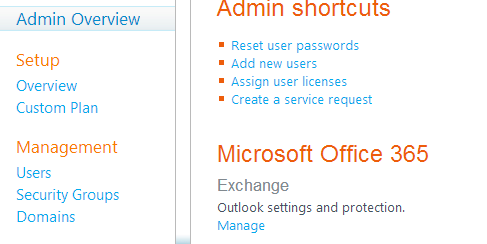
  2. Click the Manage link next to Exchange on the dashboard
    1. Exchange Manage
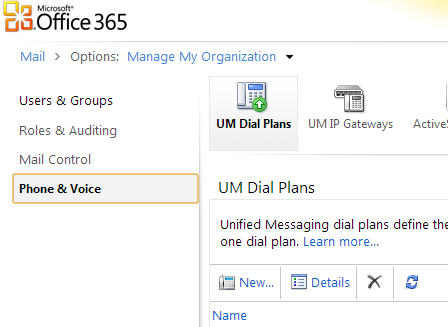
  3. Click the Phone & Voice tab
    1. Phone & Voice
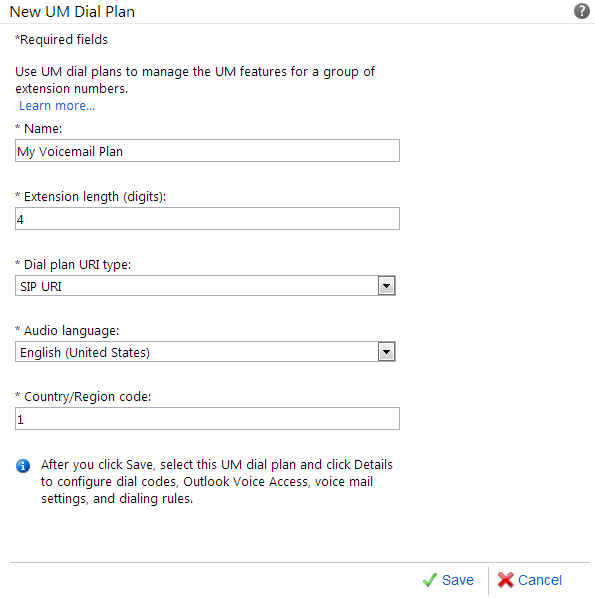
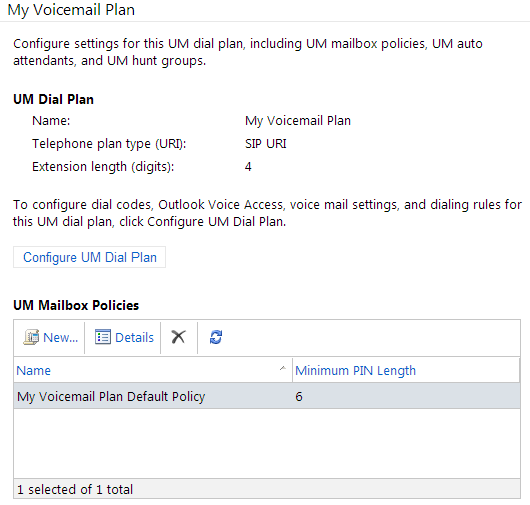
  4. Ensure you have a UM Dial Plan with the number you used in the New-CsExUmContact powershell command you ran earlier.  Your settings might differ on the screenshot below, but just make sure you have SIP URI selected.
    1. New UM Dial Plan
  5. Select your policy from the UM Dial Plans list and click the Configure UM Dial Plan button as shown below:
    1. UM Dial Plan Configuration
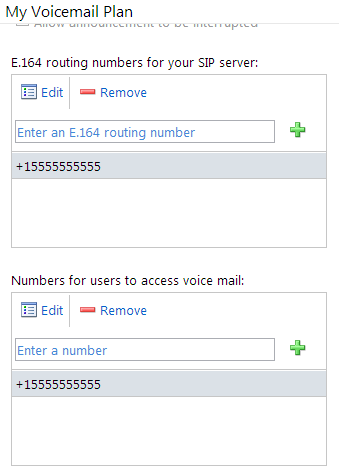
  6. Make sure you configure the number you want your users to dial to access their voicemail in the E.164 routing numbers for your SIP server and Numbers for users to access voice mail boxes.
    1. Configure Voicemail Plan


If your running Lync 2010/2013 at the same time, check out this option in topology builder to make sure you have enabled federation:

  1. Open up the Lync Server Topology Builder
  2. Download the latest topology
  3. Right click on the first site (the node under Lync Server) and then click Edit Properties...
  4. Scroll down to Site federation route assignment and make sure Apply federation route assignments to all sites is checked.
  5. Make sure Enable sip federation is checked as well and then click OK
  6. Click on Action->Topology->Publish...

If the above doesn't work, try running the following powershell commands on your front-end server.

  1. Modify the global hostedvoicemailpolicy (make sure to use your onmicrosoft domain name, not your FQDN you would use normally):
    1. Set-CsHostedVoicemailPolicy -global -Destination exap.um.outlook.com -Organization domain.onmicrosoft.com
  2. Create Lync contact for Hosted UM (make sure to set the number as the same one in the Office 365 Unified Messaging area. The last value below can be changed to put the UM contact that will be generated in AD, in any OU of your choosing; I just picked the default users one for simplicity.
    1. New-CsExUmContact -DisplayNumber +15555555555 -SipAddress sip:[email protected] -RegistrarPool FQDNTOPOOL -OU "CN=Users,DC=domain,DC=com"
  3. Associate your newly created Lync contact with your Hosted Voicemail Policy:
    1. Grant-CsHostedVoicemailPolicy -identity "sip:[email protected]" -policyname global

Lastly, if things still aren't working, make sure you have enabled federation with Office 365's exchange server for Unified Messaging by executing the following command:

  1. New-CsHostingProvider -Identity "Exchange Online" -Enabled $True -EnabledSharedAddressSpace $True -HostsOCSUsers $False -ProxyFQDN "exap.um.outlook.com" -IsLocal $False -VerificationLevel UseSourceVerification

Site to Site VPN via two Sonicwall firewalls - With DHCP over VPN

Introduction: This document shows an example of how to configure a VPN tunnel between 2 SonicWALL firewalls, one running SonicOS Enhanced at the main site (central site) and the other one running SonicOS standard at the remote site. Remote PC’s located behind the SonicWALL appliance on the remote site will obtain IP addresses automatically from a DHCP server located on the LAN zone of the Enhanced unit.

Versions Used: SonicWALL recommends using the latest firmware version on the units. On this document this feature has been tested on SonicOS Enhanced 5.6.0.11-61o and SonicOS Enhanced 4.2.1.0-20e.  SonicWALL's original document, which can be found here, shows support for this configuration on SonicOS Enhanced 3.0.0.4-21e and SonicOS Standard 3.0.0.1-28s. Please note that SonicOS Enhanced runs on TZ170, PRO2040, PRO3060, PRO 4060, Pro 5060 models, and NSA 3500. SonicOS Standard only runs on the TZ 150, TZ170, PRO2040, and PRO3060 models. Customers with current service/software support contracts can obtain updated versions of SonicWALL firmware from the MySonicWALL customer portal at https://www.mysonicwall.com. Updated firmware is also freely available to customers who have registered the SonicWALL device on MySonicWALL for the first 90 days.

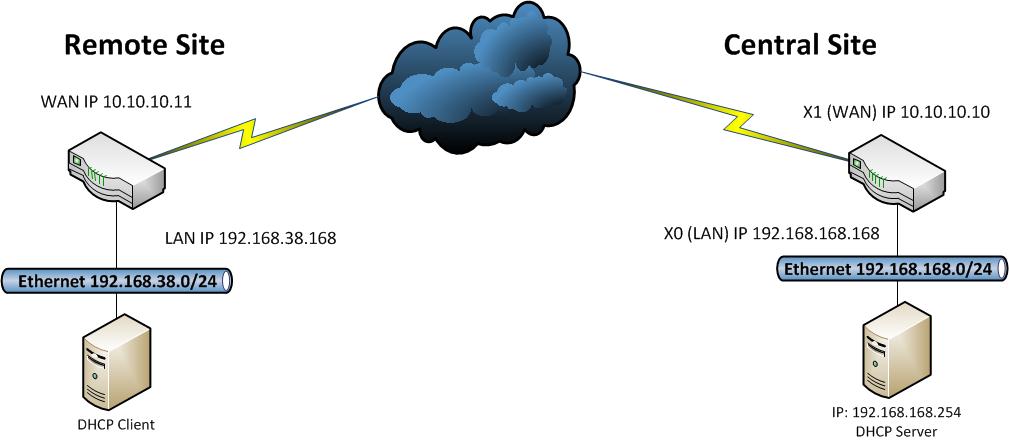
Network Topology: VPN Network Topology

Prerequisites: This guide assumes the following:

  • DHCP Server is up and running on the Central Site
  • The DHCP Server is in the LAN Zone
  • WAN Interfaces have been configured properly for internet access at both the remote and central site

Task List:

  • Configurations at the central site:
    • Set Firewall Unique Identifier
    • Add and configure a VPN policy 
    • Configure DHCP over VPN 
  • Configurations at the remote site: 
    • Set Firewall Unique Identifier
    • Add and configure a VPN policy 
    • Configure DHCP over VPN 
  • Testing
    • Verify that the VPN tunnel comes up
    • Verify that the DHCP client at the remote site obtains an IP address
    • Verify that traffic flows correctly between the sites
    • Verify that the DHCP client has access to its own network

~~~~~~~~~~~~~~~~~~~~~~~~~~~~~~~~~~~~~~~~~~~~~~~~~~~~~~~~~~~~~~~~~~~~~~~~~~~ SonicWALL Central Site Configuration

  1. Login to your SonicWALL at the Central Site
  2. Click on VPN->Settings
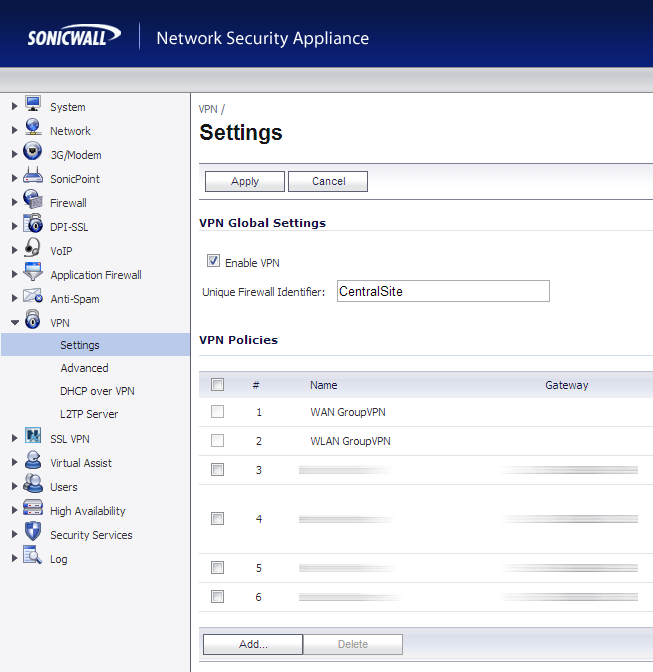
  3. In the Unique Firewall Identifier box, enter CentralSite and click Apply
    1. VPN-Settings-CentralSite
  4. On the VPN->Settings page, click the Add... button
    1. Use the configuration below:
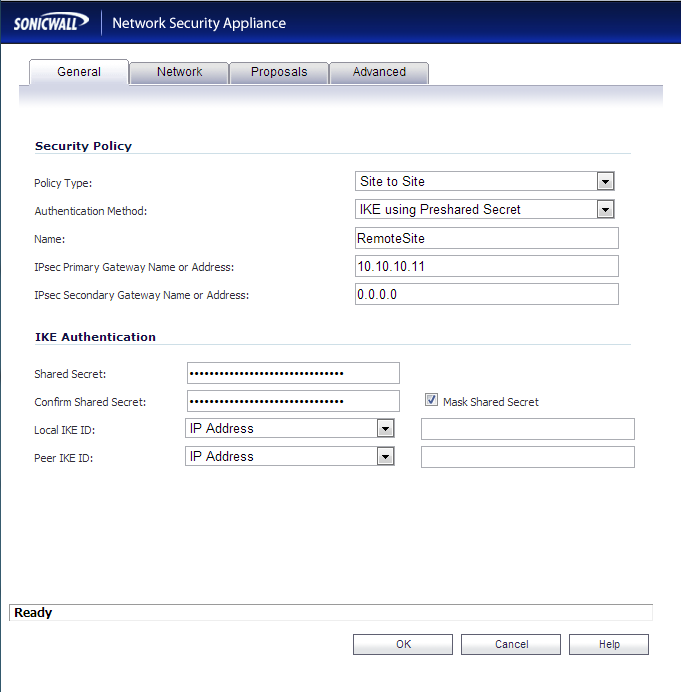
      1. General Tab
        1. Policy Type: Site to Site
        2. Authentication Method: IKE using Preshared Secret
        3. Name: RemoteSite
        4. IPsec Primary Gateway Name or Address: yourwanipaddressoftheremotesite
        5. IPsec Secondary Gateway Name or Address: Leave this blank
        6. Shared Secret: Enter a good long password here!
        7. Confirm Shared Secret: Enter the same good long password you used above!
        8. Local IKE ID and Peer IKE ID: Leave these settings their default values
        9. CentralSite-General
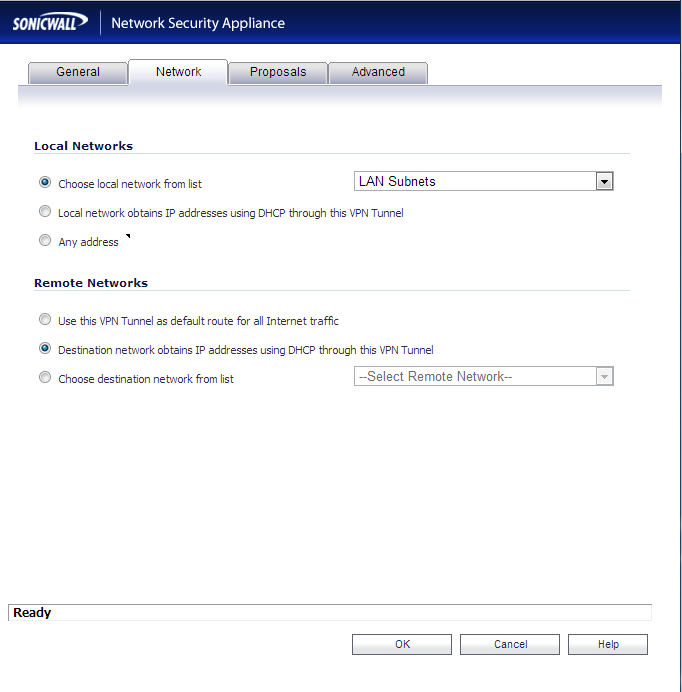
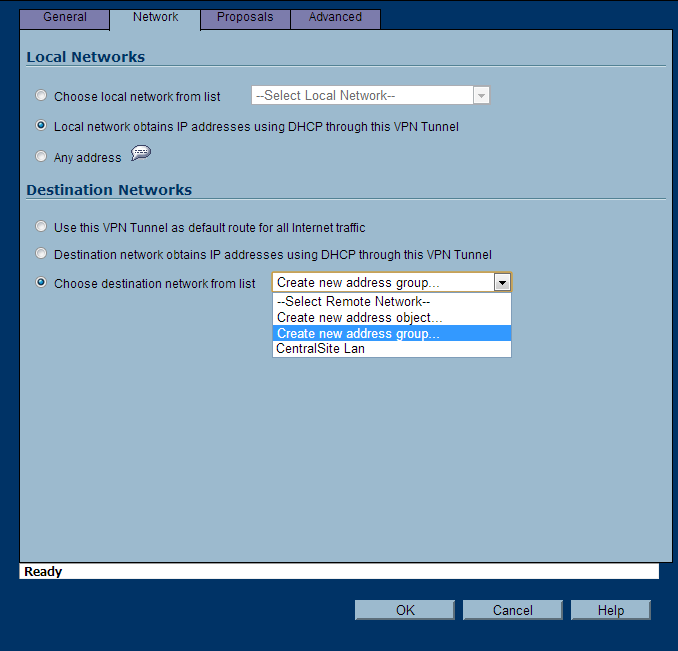
      2. Network Tab
        1. Local Networks: Select Choose local network from list and select LAN Subnets
        2. Remote Networks: Select Destination network obtains IP addresses using DHCP through this VPN tunnel
        3. CentralSite-Network
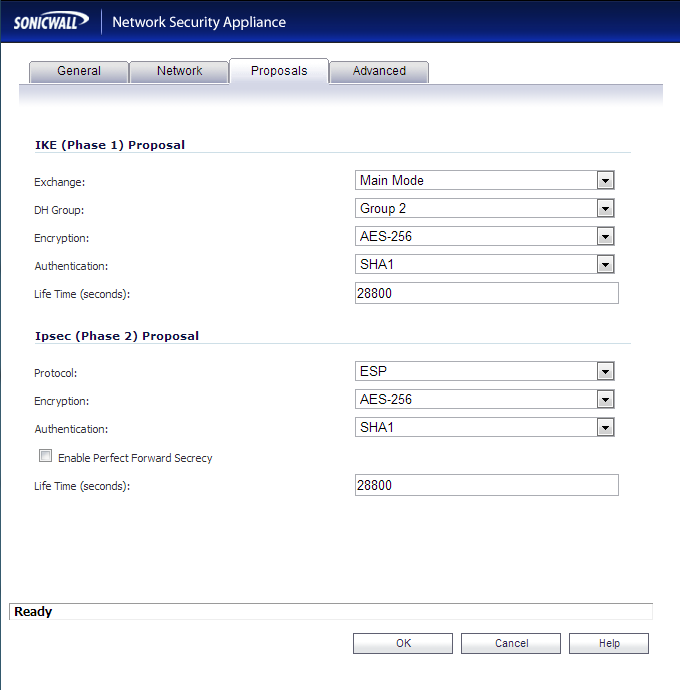
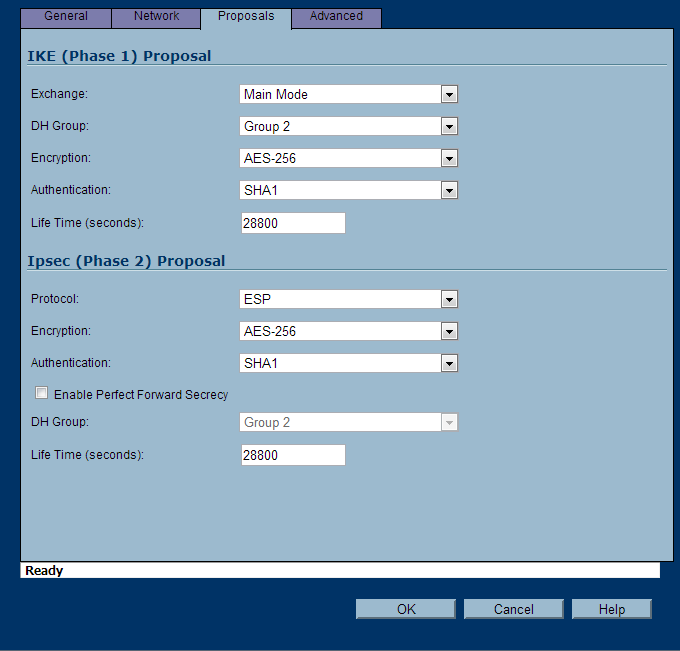
      3. Proposals Tab
        1. IKE (Phase 1) Proposal
          1. Exchange: Main Mode
          2. DH Group: Group 2
          3. Encryption: AES-256
          4. Authentication: SHA1
          5. Life Time (seconds): 28800
        2. IKE (Phase 2) Proposal
          1. Protocol: ESP
          2. Encryption: AES-256
          3. Authentication: SHA1
          4. Enable Perfect Forward Secrecy: unchecked
          5. Life Time (seconds): 28800
        3. CentralSite-Proposals
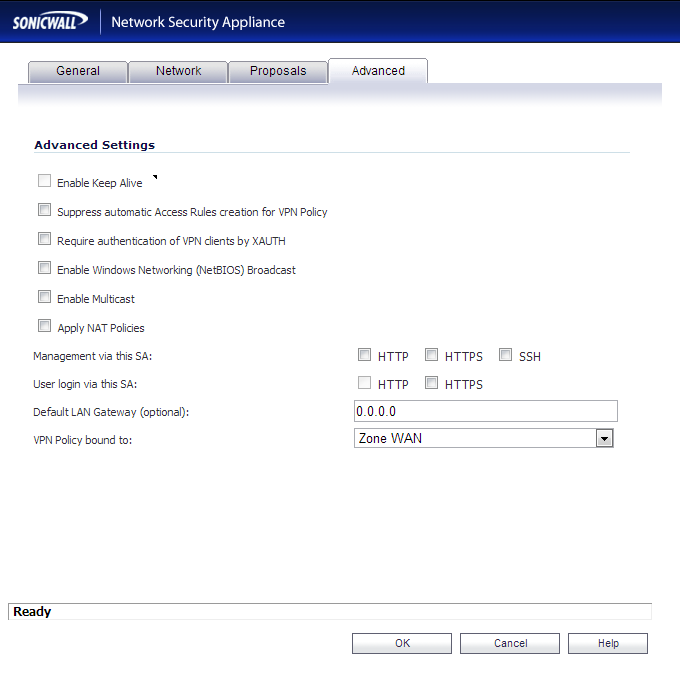
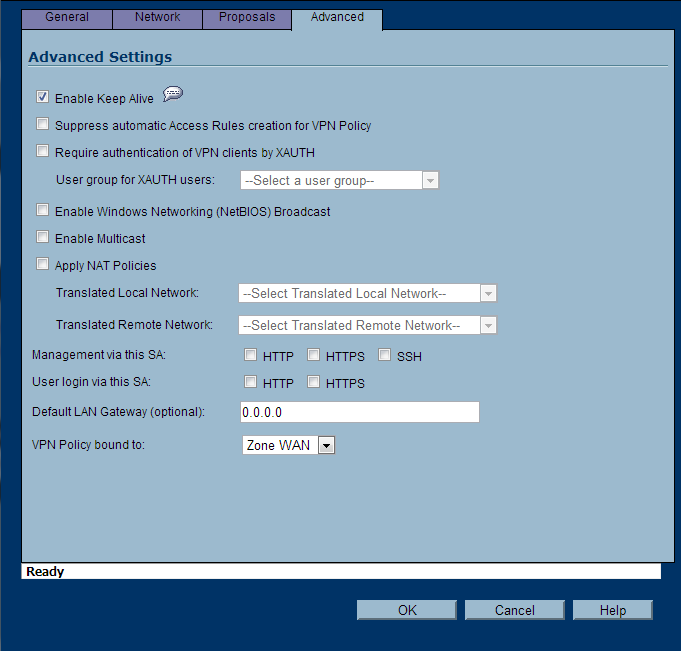
      4. Advanced Tab
        1. Enable Keep Alive: this should be unchecked and grayed out
        2. Suppress automatic Access Rules creation for VPN Policy: unchecked
        3. Require authentication of VPN clients by XAUTH: unchecked
        4. Enable Windows Networking (NetBIOS) Broadcast: unchecked
        5. Enable Multicast: unchecked
        6. Apply NAT Policies: unchecked
        7. Management via this SA: all options unchecked
        8. User login via this SA: all options unchecked
        9. Defualt LAN Gateway (optional): 0.0.0.0
        10. VPN Policy bound to: Zone WAN
        11. CentralSite-Advanced
  5. Click OK
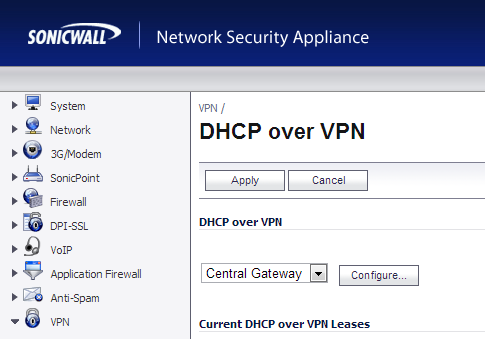
  6. Click on VPN->DHCP over VPN
    1. Select Central Gateway from the dropdown and click the Configure... button
      1. CentralSite-DHCPoverVPN
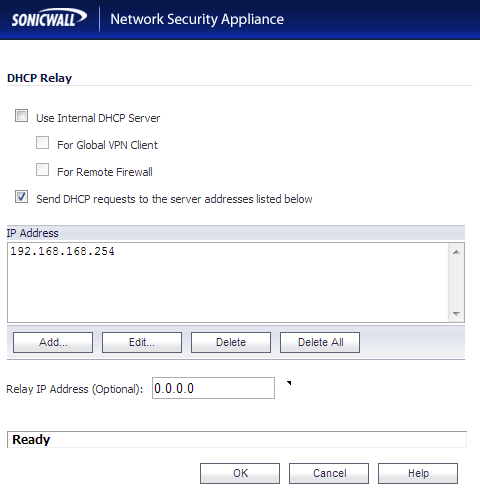
    2. Click on the Add... button and then type in the IP address of your DHCP server at the CentralSite.
      1. CentralSite-DHCPConfig
    3. Click OK

SonicWALL Remote Site Configuration

  1. Login to your SonicWALL at the remote site
  2. Click on VPN->Settings
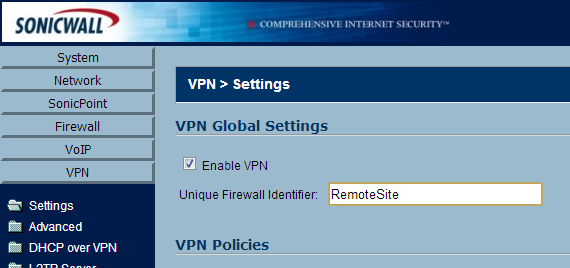
  3. In the Unique Firewall Identifier box, enter RemoteSite and click Apply
    1. RemoteSite
  4. On the VPN->Settings page, click the Add... button
    1. Use the configuration below:
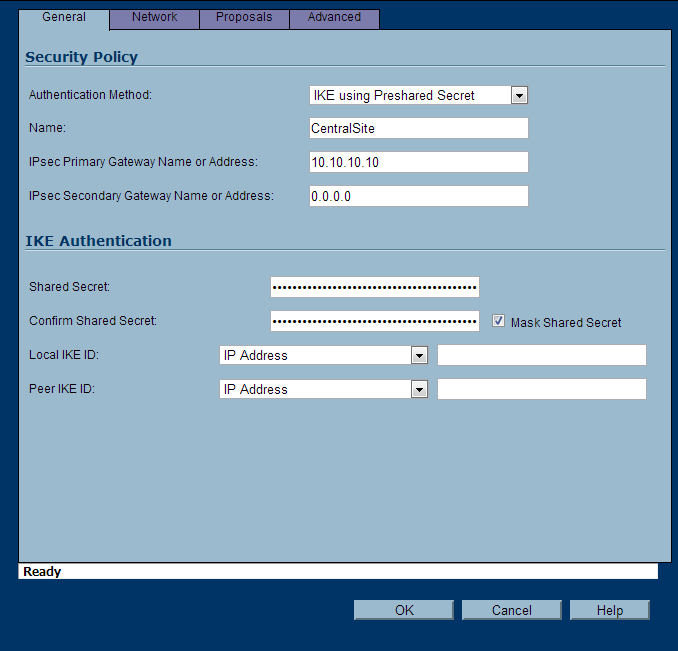
      1. General Tab
        1. Authentication Method: IKE using Preshared Secret
        2. Name: CentralSite
        3. IPsec Primary Gateway Name or Address: yourwanipaddressofthecentralsite
        4. IPsec Secondary Gateway Name or Address: Leave this blank
        5. Shared Secret: Use the same secret as the CentralSite
        6. Confirm Shared Secret: Use the same password as the CentralSite
        7. Local IKE ID and Peer IKE ID: Leave these settings their default values
        8. RemoteSite-General
      2. Network Tab
        1. Local Networks: Select Local network obtains IP addresses using DHCP through this VPN Tunnel
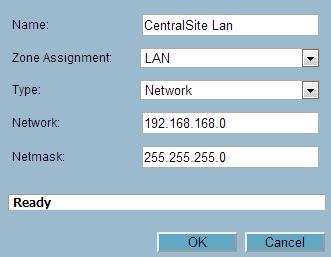
        2. Remote Networks: Select Create new address object
          1. Enter in your CentralSite's LAN information (this will be the network you pull DHCP IPs from.
            1. CentralSite-LAN Config
        3. On the Choose destination network from list, you can now select CentralSite LAN
          1. RemoteSite-Network
      3. Proposals Tab
        1. IKE (Phase 1) Proposal
          1. Exchange: Main Mode
          2. DH Group: Group 2
          3. Encryption: AES-256
          4. Authentication: SHA1
          5. Life Time (seconds): 28800
        2. IKE (Phase 2) Proposal
          1. Protocol: ESP
          2. Encryption: AES-256
          3. Authentication: SHA1
          4. Enable Perfect Forward Secrecy: unchecked
          5. Life Time (seconds): 28800
        3. RemoteSite-Proposals
      4. Advanced Tab
        1. Enable Keep Alive: check this option if it is not grayed out
        2. Suppress automatic Access Rules creation for VPN Policy: unchecked
        3. Require authentication of VPN clients by XAUTH: unchecked
        4. Enable Windows Networking (NetBIOS) Broadcast: unchecked
        5. Enable Multicast: unchecked
        6. Apply NAT Policies: unchecked
        7. Management via this SA: all options unchecked
        8. User login via this SA: all options unchecked
        9. Defualt LAN Gateway (optional): 0.0.0.0
        10. VPN Policy bound to: Zone WAN
        11. RemoteSite-Advanced
  5. Click OK

~~~~~~~~~~~~~~~~~~~~~~~~~~~~~~~~~~~~~~~~~~~~~~~~~~~~~~~~~~~~~~~~~~~~~~~~~~~ Testing/Verification

  1. Open up one of the SonicWALL devices (either Central or Remote) and head over to VPN->Settings
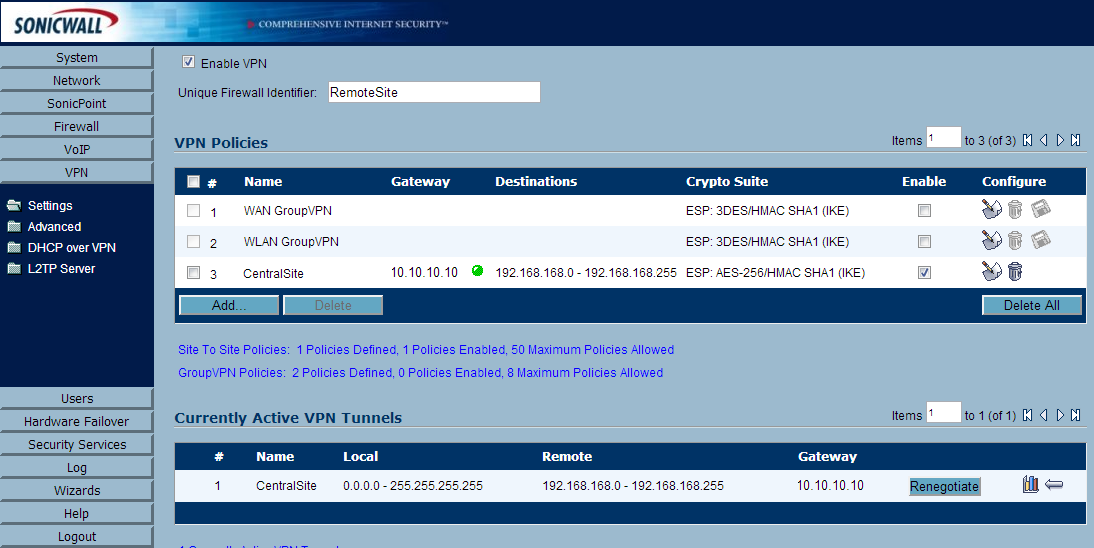
    1. You should see a green dot indicating the connection is active.  Additionally, at the bottom of the same page, you can see the "Current Active VPN Tunnels".  You should see the tunnel has been established their as well.
      1. Active Connection
    2. Active connections from the RemoteSite's SonicWALL
      1. Active VPN Tunnels
  2. Next, head over to a workstation on the RemoteSite's network.
    1. Type ipconfig /release on the workstation
    2. Type ipconfig /renew on the workstation
    3. Type ipconfig and verify the IP address is in the correct range from the Central Site.
  3. On the CentralSite's SonicWALL, go to VPN->DHCP over VPN
    1. Under Current DHCP over VPN Leases, you should see your client
  4. Try to ping a server at the CentralSite, you should receive a successful reply.

Creating an installer for your application in Visual Studio 2012

In Visual Studio 2012, Microsoft removed the ability to make quick installers for your application. Now they recommend using a third party like Wix or InstallShield. This tutorial will go over using InstallSheild's free light version to make an installer for your application.

Please note, you cannot use InstallShield's product with the Express versions of Visual Studio.  If you use the express edition, you will not see the "Other Project Types" and "Setup and Deployment" folders mentioned later on.

First head over to InstallShield's website and register for the product.  It is free, but you have to register with a valid email address to receive a license key:

http://learn.flexerasoftware.com/content/IS-EVAL-InstallShield-Limited-Edition-Visual-Studio?lang=1033&ver=pro

Download and install the program.

Once installation is done, launch the program below as an Administrator:

C:\Program Files (x86)\InstallShield\2012SpringLE\System\TSConfig.exe

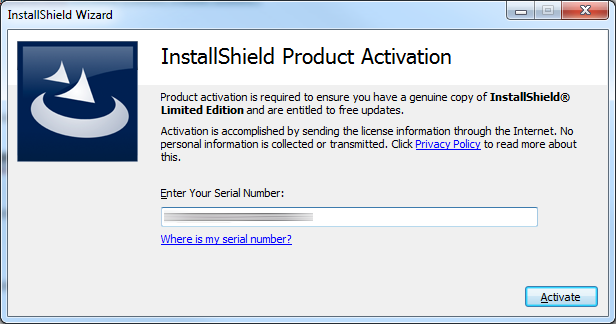
Enter your serial number from an auto-generated email they sent you when you downloaded InstallShield Limited and hit Activate.

InstallShield License

Next, open up Visual Studio 2012 (again, note we are not using express)

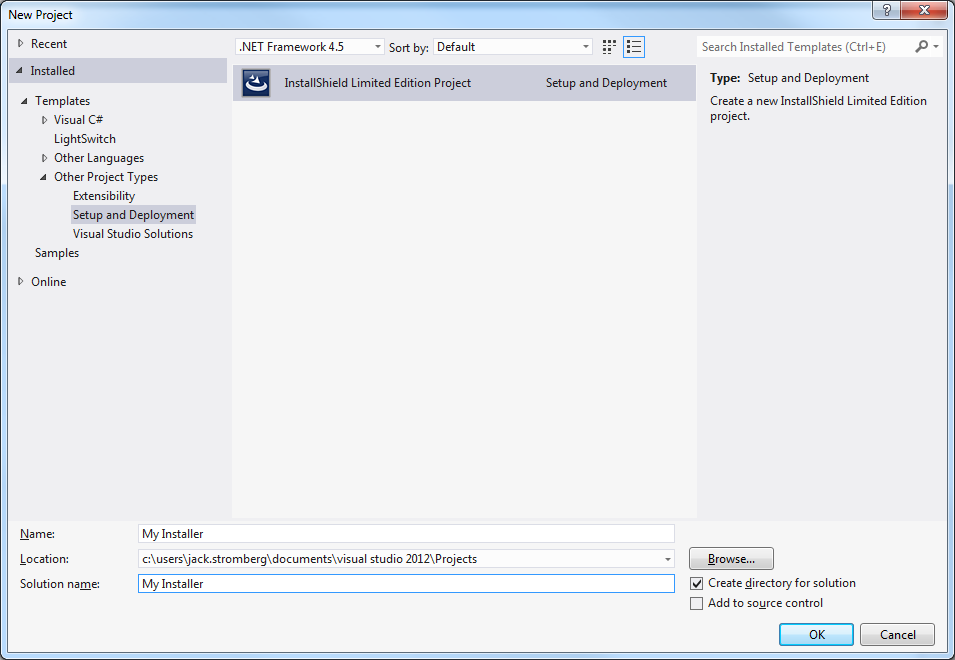
Click File->New Project.

New Project - Visual Studio

Expand Other Project Types and select Setup and Deployment.  Inside of there, you should see InstallShield Limited Edition Project (again, you won't see this in Visual Studio Express editions).  Click OK.

Other Project Types - InstallShield

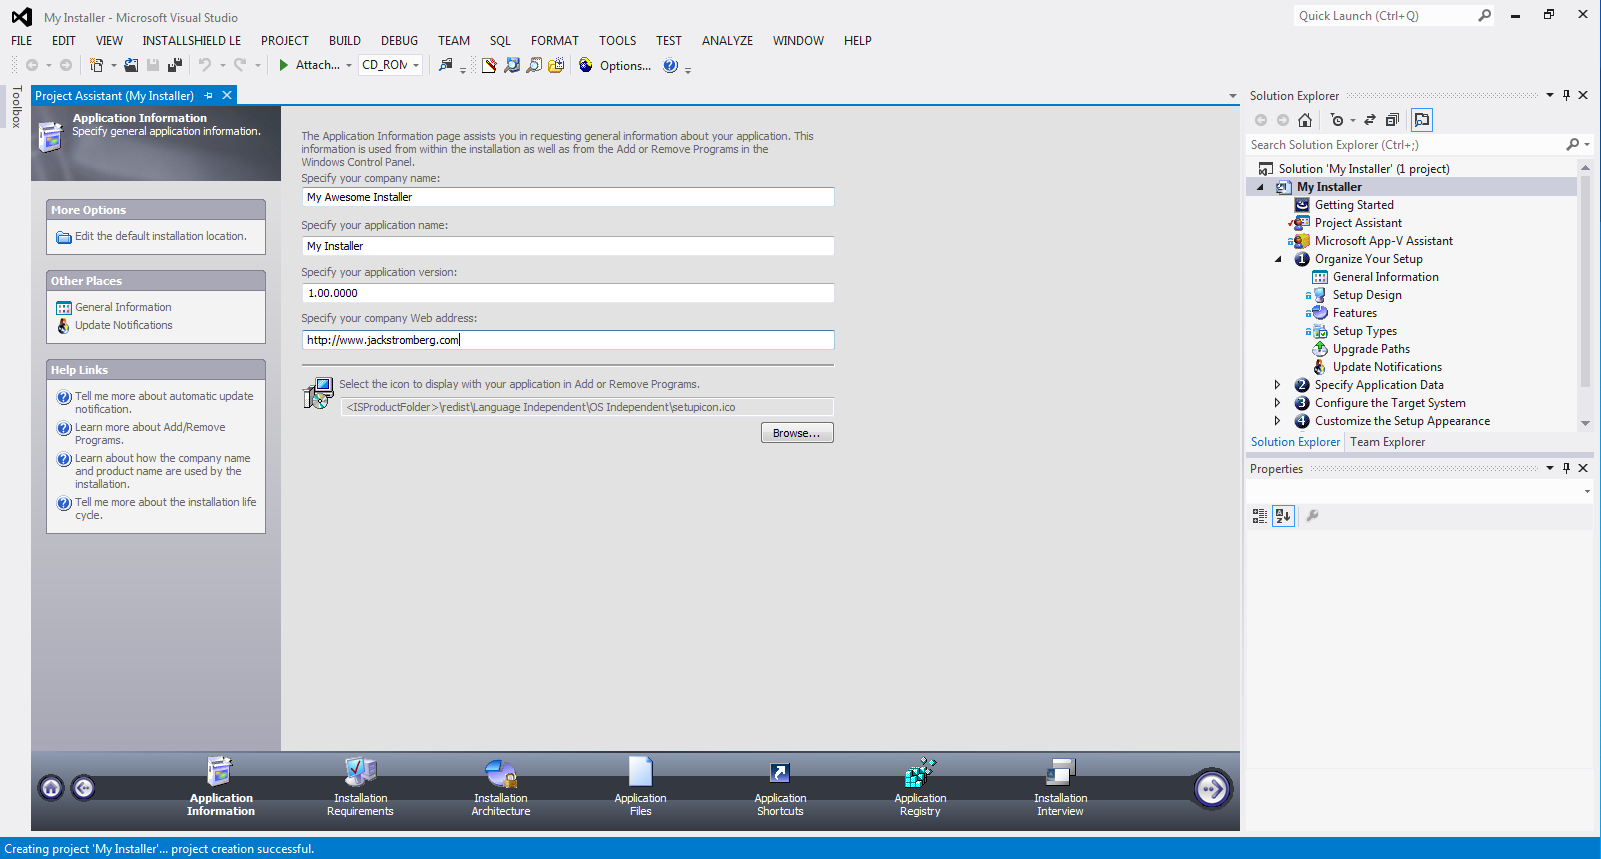
At this point, you should see a guided GUI (Project Assistant) to create your installer.  Inside of the Solution Explorer, you will see additional items you can select to configure advanced options.

Project Assistant - InstallShield

VMware vCenter Inventory Service Hang 5.1B

Today while installing VMware vCenter Inventory Service, I noticed that the installer would "hang" after I clicked the Next button on the page where you enter in the vCenter SSO service's URL (vCenter Signle Sign On Information page). First, I opened up the vminst.log file and noticed things were stopping on the following line:
VMware VirtualCenter-build-947673: 03/06/13 09:12:35 Attempting to launch ["C:\Users\ADMINI~1\AppData\Local\Temp\3\{946581B4-C0B9-4A86-9207-E64448CBA66B}\openssl.exe" x509 -noout -checkend 0 -in "C:\ProgramData\VMware\Infrastructure\Inventory Service\ssl\rui.crt" ]

Solution:
The reason I was receiving this issue was due to the way I had prestaged my SSL certificates. For whatever reason, I had missed setting up my VMware SSL directory (C:\ProgramData\VMware\SSL) and thus did not have the ca_certificates.crt and the whatever.0 hash file. Once I had placed those files inside of the C:\ProgramData\VMware\SSL directory, the installer was able to continue on.