Tag Archives: Exchange

Set out of office / autoreply for distribution list for Exchange online

One thing that is a bummer is Exchange online does not support setting an autoreply / out of office message for a distribution list. Usually if you want such functionality, you'd convert the distribution list to a shared mailbox and configure the autoreply or use a 3rd party utility, or potentially come up with some complex transform rule.

Solution

One workaround you can apply is to enable out of office / autoreply messages from recipients in the distribution list. By default, Exchange Online will suppress autoreply messages when going to a distribution list, but you can quickly configure the behavior to allow the messages per distribution list.

Steps

  1. Install Exchange Online PowerShell module
    • Open PowerShell as an administrator and execute the following command:
      Install-Module exchangeonlinemanagement
  2. Import the module for use
    • Import-Module ExchangeOnlineManagement
  3. Login to Exchange online
  4. Configure the distribution list to allow the out of office / autoreply messages to be returned to the sender / originator.
    Set-DistributionGroup -identity [email protected] -SendOofMessageToOriginatorEnabled $true

Result

Now when someone emails the distribution list, they will receive an out of office / autoreply if configured by an individual member. Note, if multiple members have the autoreply configured, the sender/originator will receive multiple replies.
Enable SSO (Single Sign On) to On-Premises Exchange OWA (Outlook Web Access) via Azure AD Application Proxy

Edit: This scenario is unofrtunately no longer supported by Microsoft.  More details can be found here: https://learn.microsoft.com/microsoft-365/enterprise/configure-exchange-server-for-hybrid-modern-authentication

Wouldn't it be awesome to be able to do the following with Outlook Web Access being published in your on-premises environment today?

  • Cheap proxy solution to prevent direct internet access to your servers
  • Mask the IPs of your on-premises infrastructure
  • Enable Azure MFA (Multi-Factor Authentication) for OWA?
  • Have a Single-Sign on experience into Outlook Web Application via federation?
  • Have the application be selectable from your "My Apps" page (myapps.microsoft.com)
  • Have the application be selectable from the "Waffle Menu" of Office 365

If you are looking for any of the above, you are in-luck and we can enable this easily through Azure AD Application Proxy.  If you organization is using Office 365 or Azure AD already and have licensing for Azure AD Premium or Basic, you are good to go.  If you have the Enterprise Mobility Suite, this will grant you to Azure AD Premium licensing which should make you good to go as well.

Configuration

  1. Prerequisite: Enable Kerberos Authentication for Outlook Web Access On-Premises
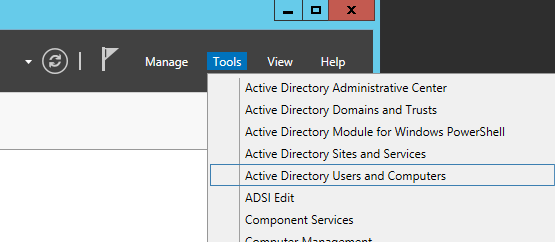
    1. Login to one of your domain controllers and open up Active Directory Users and Computers
      Server Manager - Active Directory Users and Computers
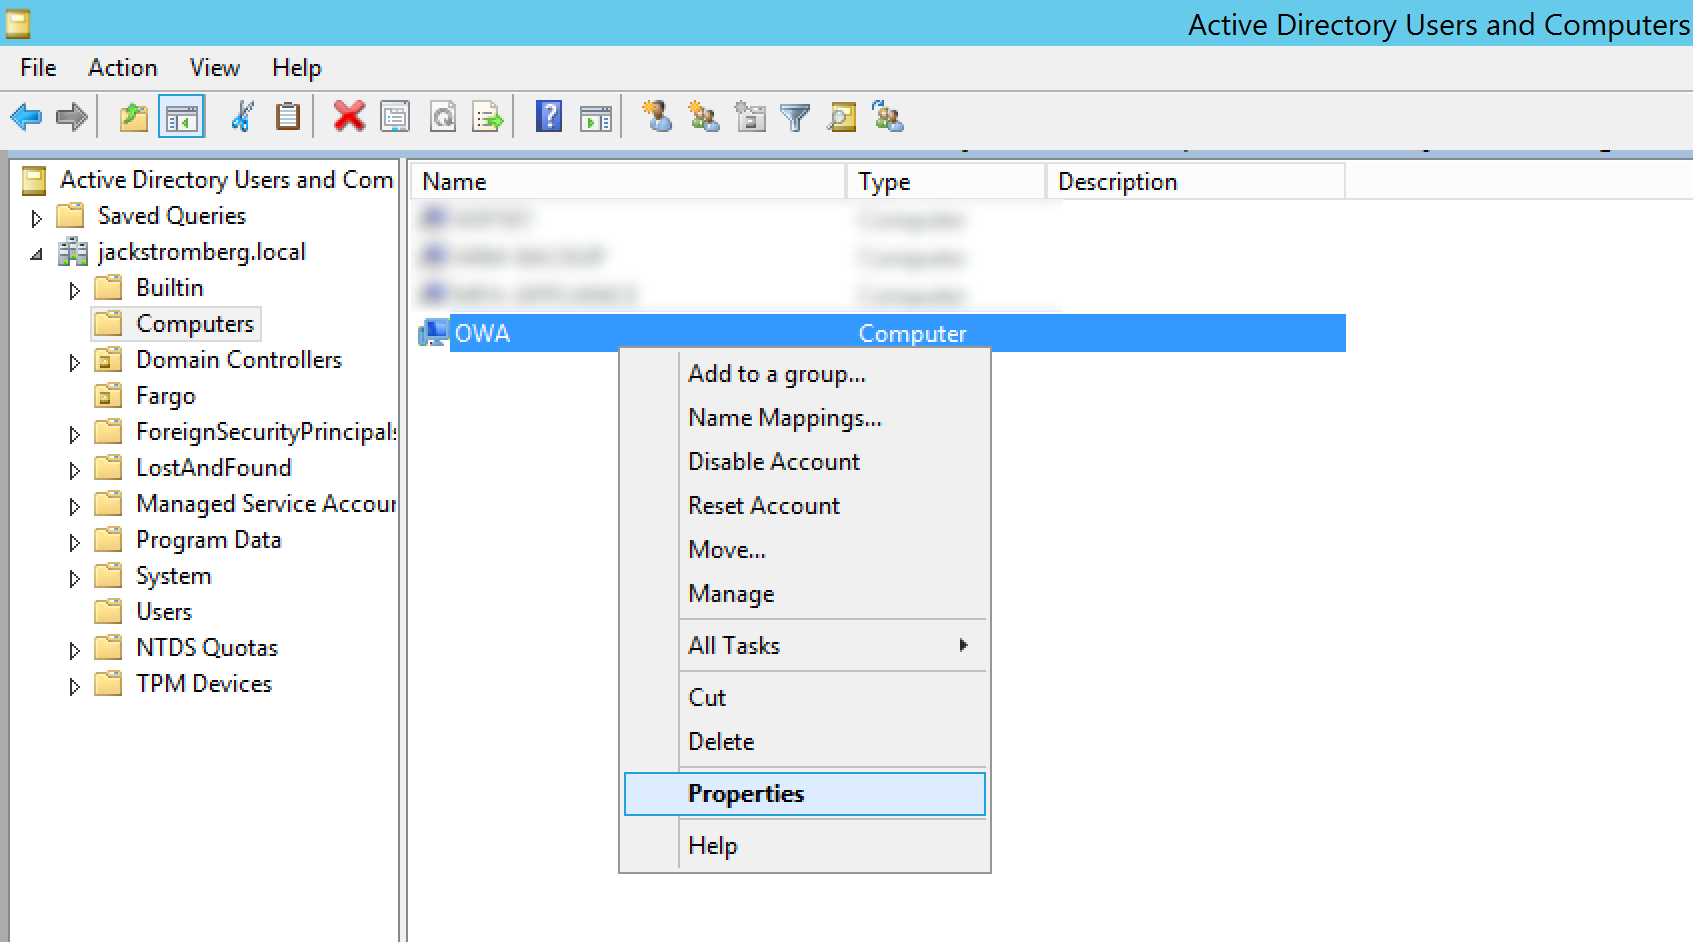
    2. Find the Computer object within your organization we will run the Azure AD Connector on later in the tutorial and right click Properties on it
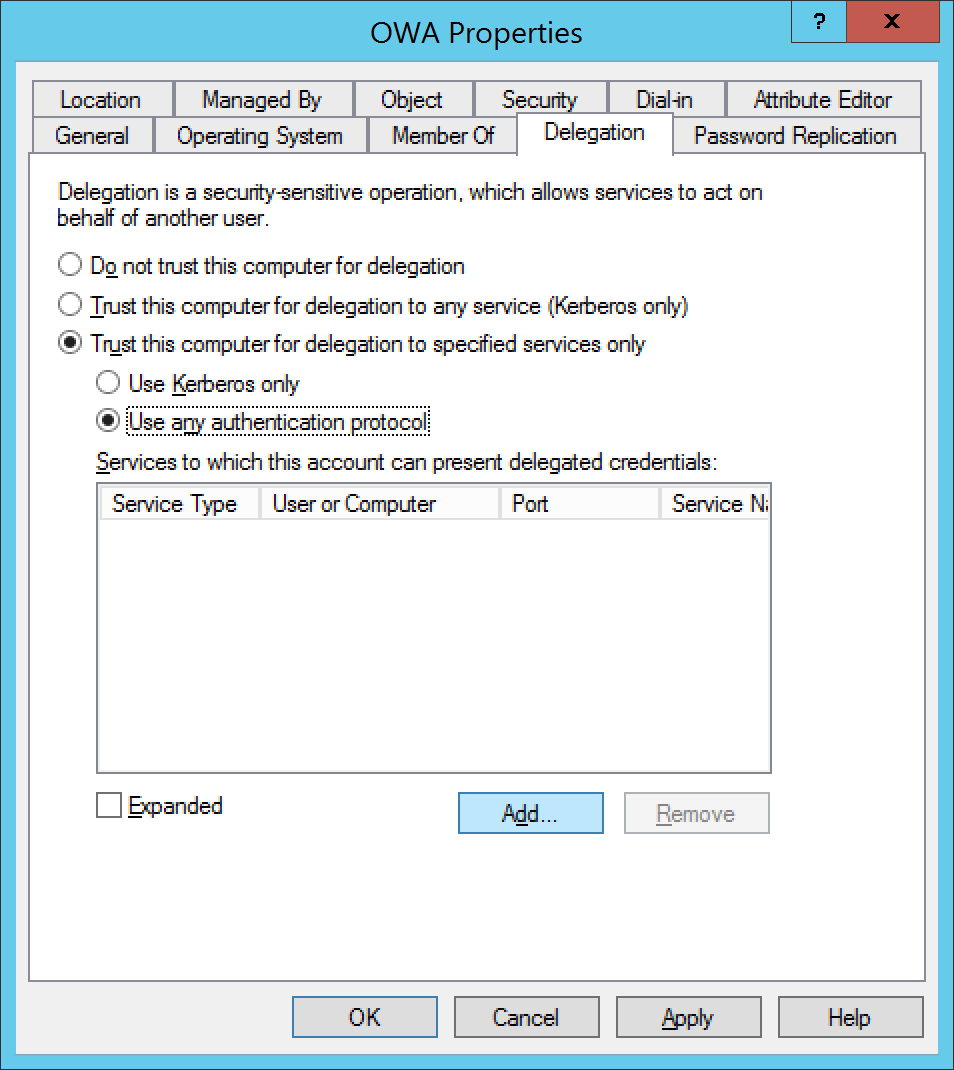
      Active Directory Users and Computers - Computers - OWA - Properties
    3. Select the Delegation tab, select Trust this computer for delegation to specified services only, check Use any authentication protocol, and click on Add...
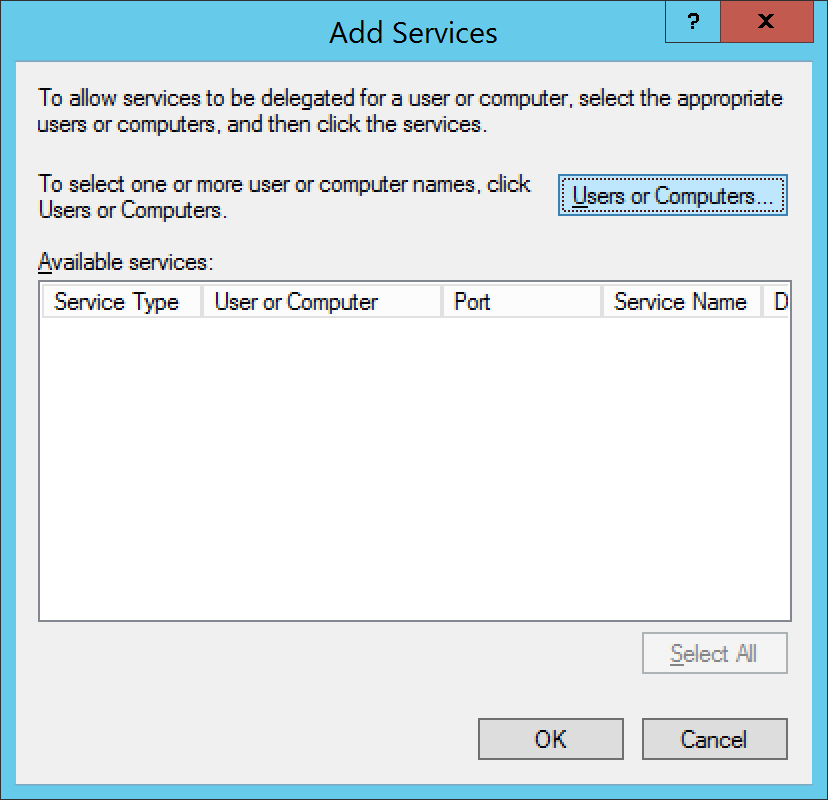
      Active Directory Users and Computers - Computers - OWA - Properties - Delegation - Add
    4. Select Users or Computers...
      Active Directory Users and Computers - Computers - OWA - Properties - Delegation - Add - users or Computers
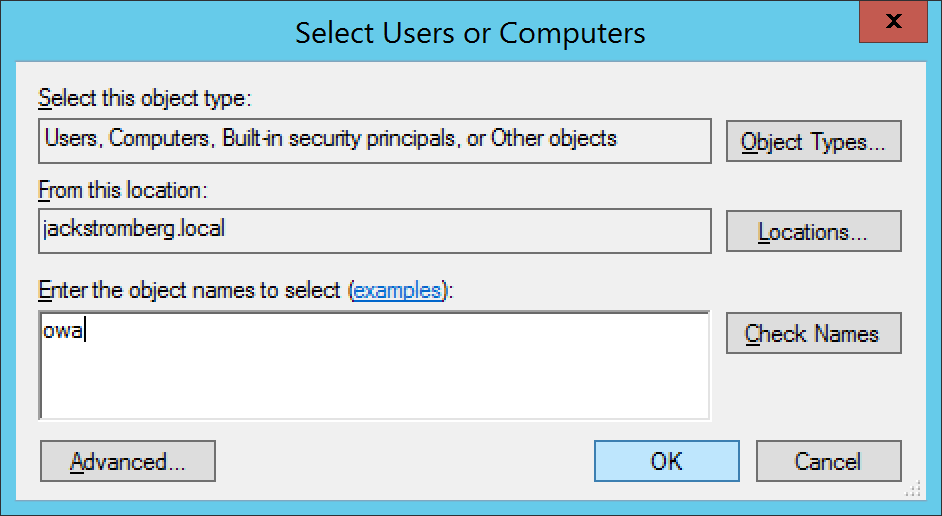
    5. Type in the machine name and click OK
      Active Directory Users and Computers - Computers - OWA - Properties - Delegation - Add - users or Computers - Select Users or Computers
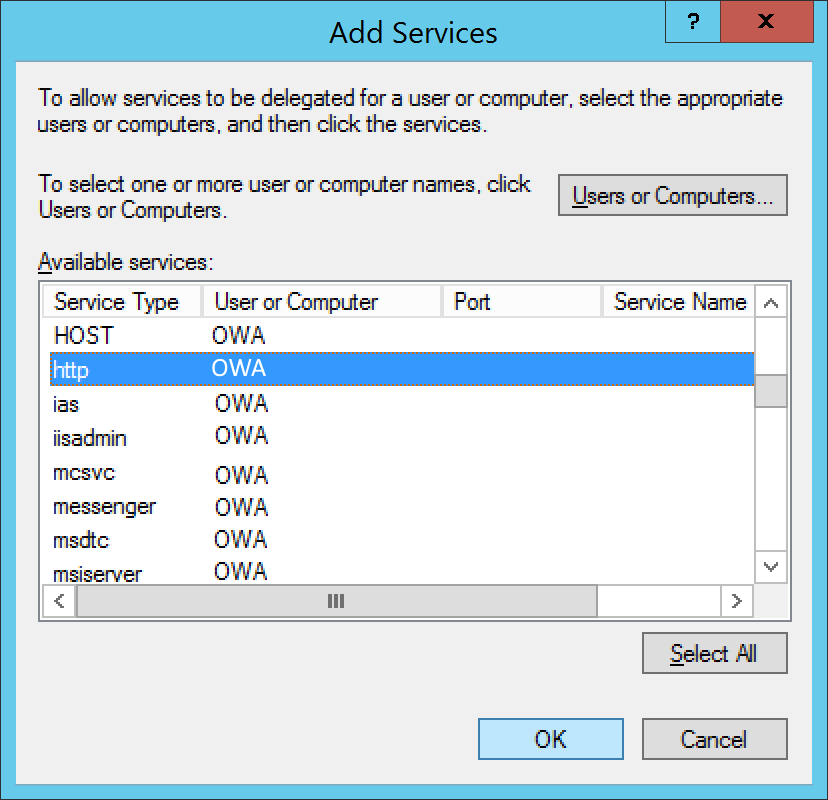
    6. Select http and click OK
      Active Directory Users and Computers - Computers - OWA - Properties - Delegation - Add - users or Computers - http
    7. Click OK on the Add Services page
  2. Pre-Requisite: Enable Exchange On-Premises to use Integrated Windows Authentication (instructions for Exchange 2010 or 2013 can be found below)
    1. Exchange 2010
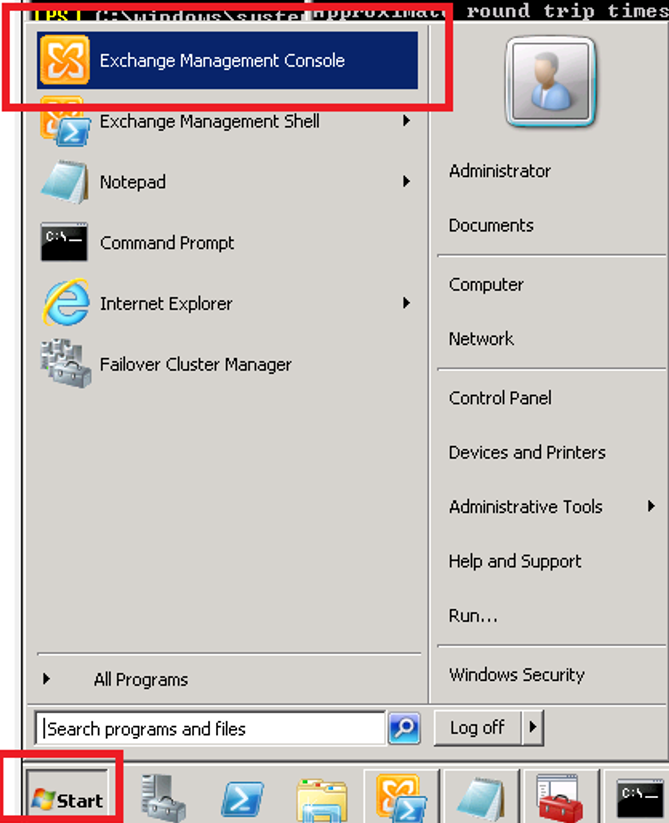
      1. Open the Exchange Management Console for your Exchange server
        Exchange Management Console (2010)
      2. Expand Server Configuration, select Client Access, under Outlook Web App, right click on your web app and select Properties
        Exchange Management Console (2010) - Outlook Web App
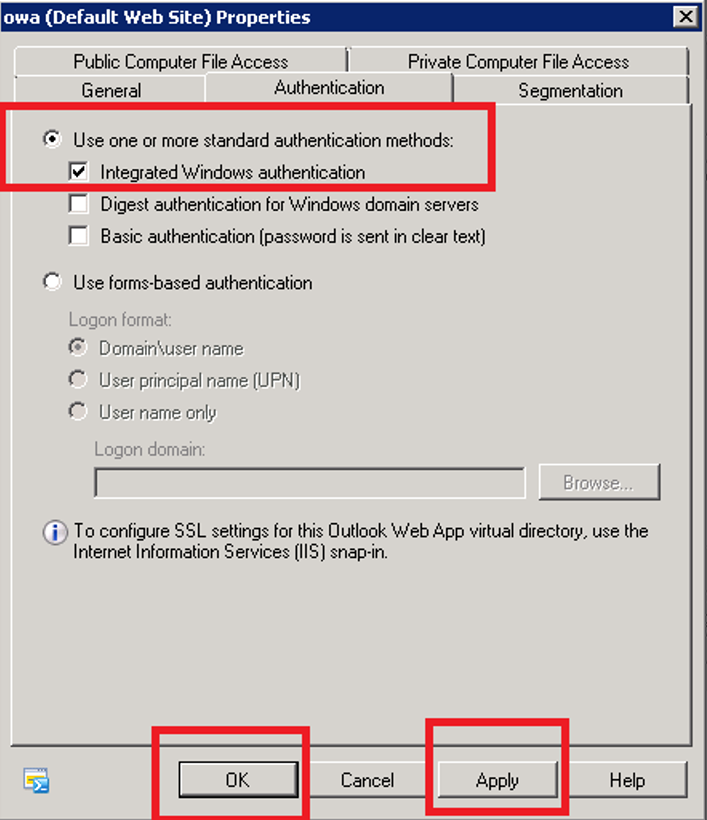
      3. Select the Authentication tab and check Use one or more standard authentication methods.  Once checked, check Integrated Windows authentication and click the Apply and OK buttons.
        Exchange Management Console (2010) - Outlook Web App Properties - Authentication - Integrated Windows Authentication
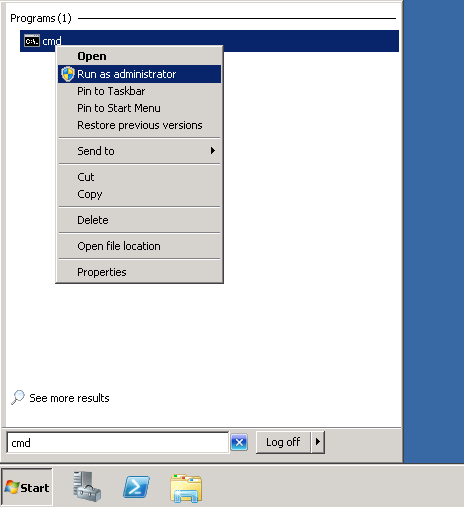
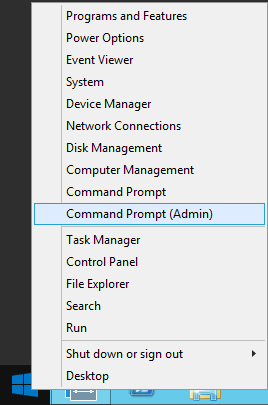
      4. Open a command prompt
        cmd as Administrator
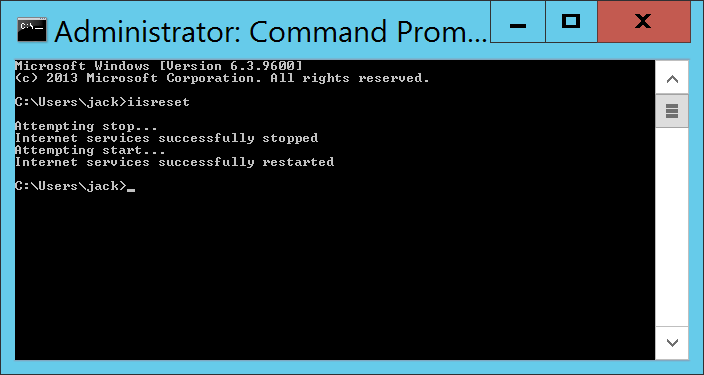
      5. Execute the iisreset command
        cmd - iisreset
    2. Exchange 2013
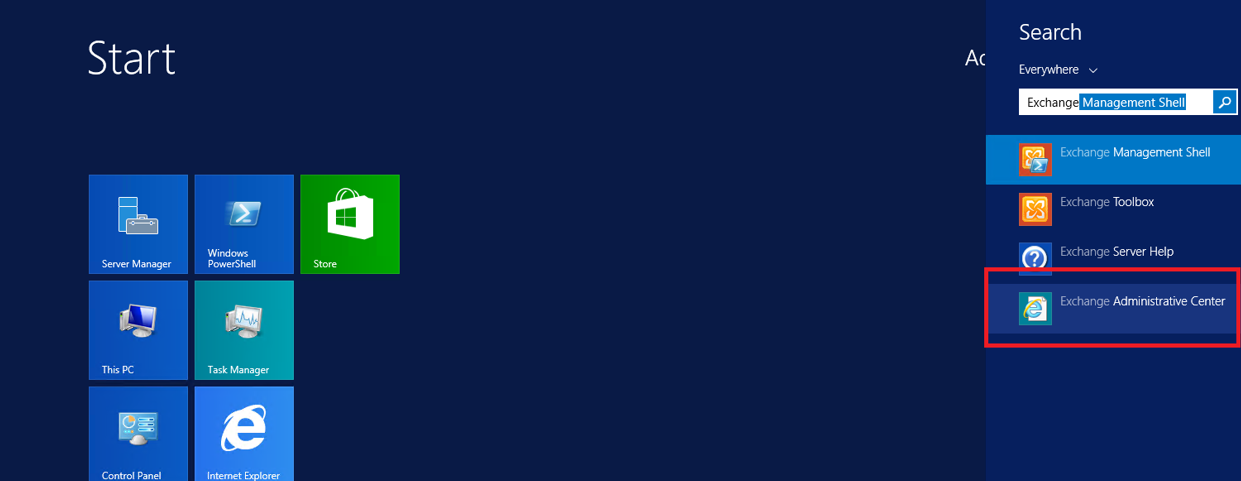
      1. Open the Exchange Administrative Center
        Exchange Administrative Center (2013)
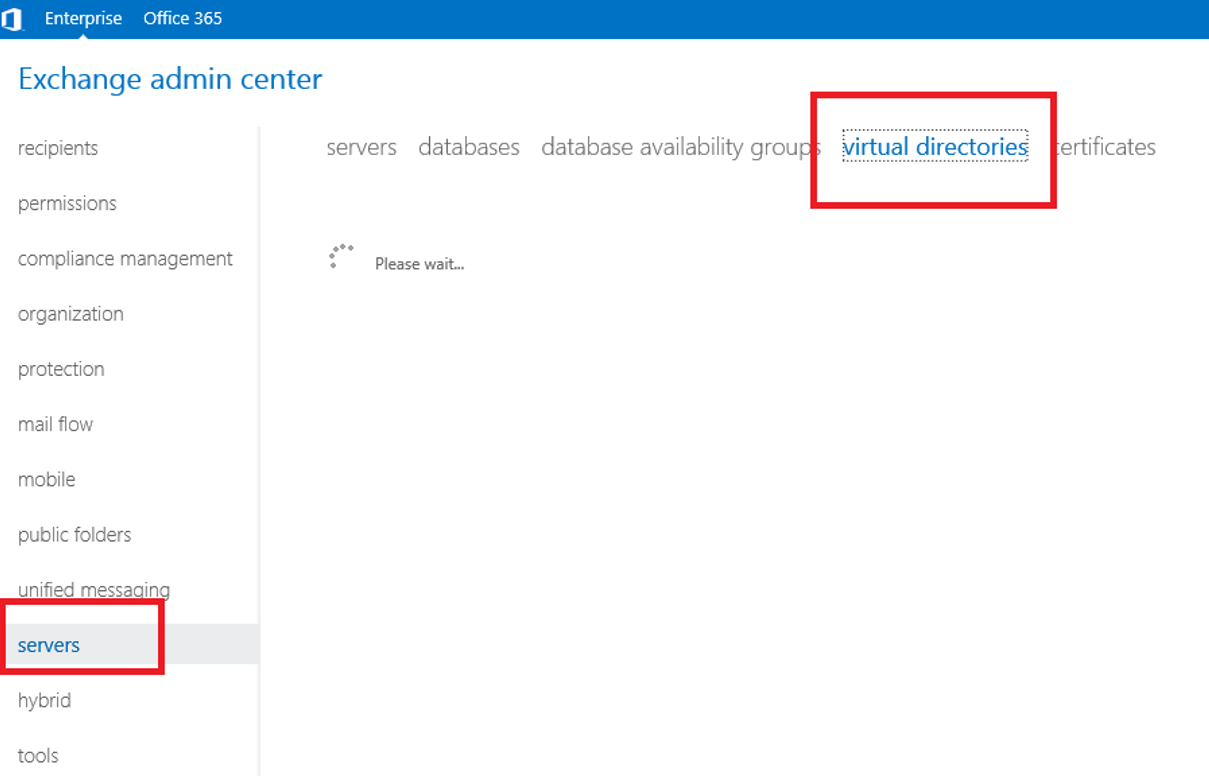
      2. Login to the admin center, click on Servers and select the Virtual Directories tab
        Exchange Administrative Center (2013) - admin center - servers -virtual directories
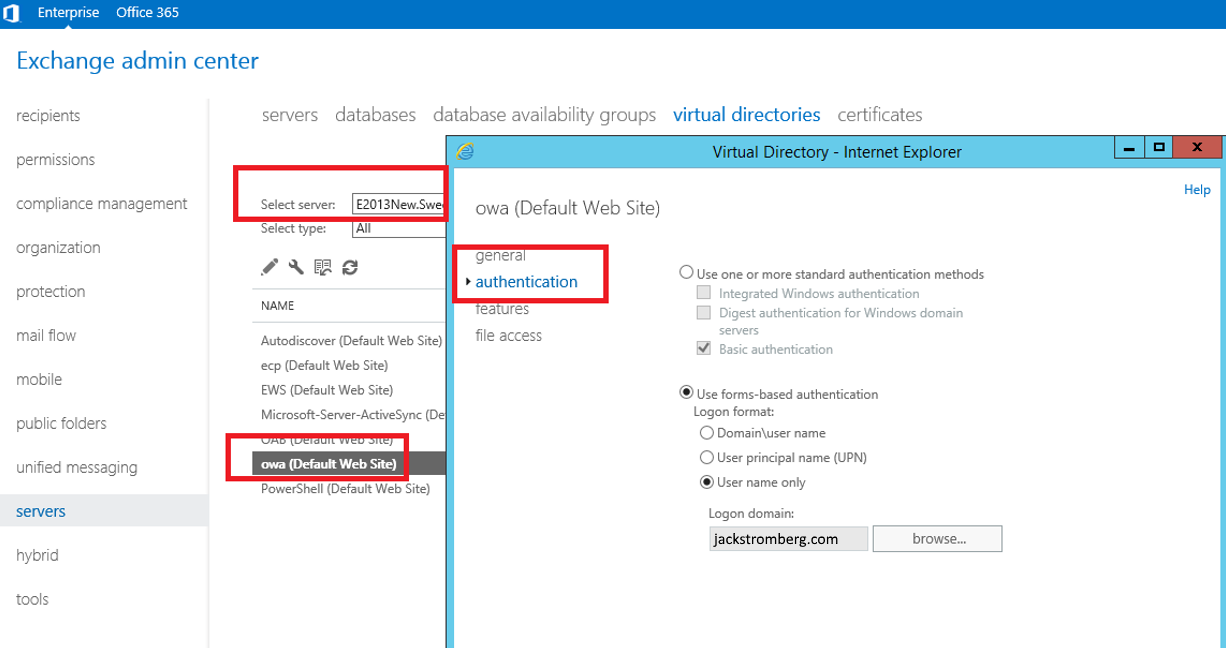
      3. Select server and then double click on the OWA Virtual Directory and select the applications tab
        Exchange Administrative Center (2013) - admin center - servers -virtual directories - owa - authentication
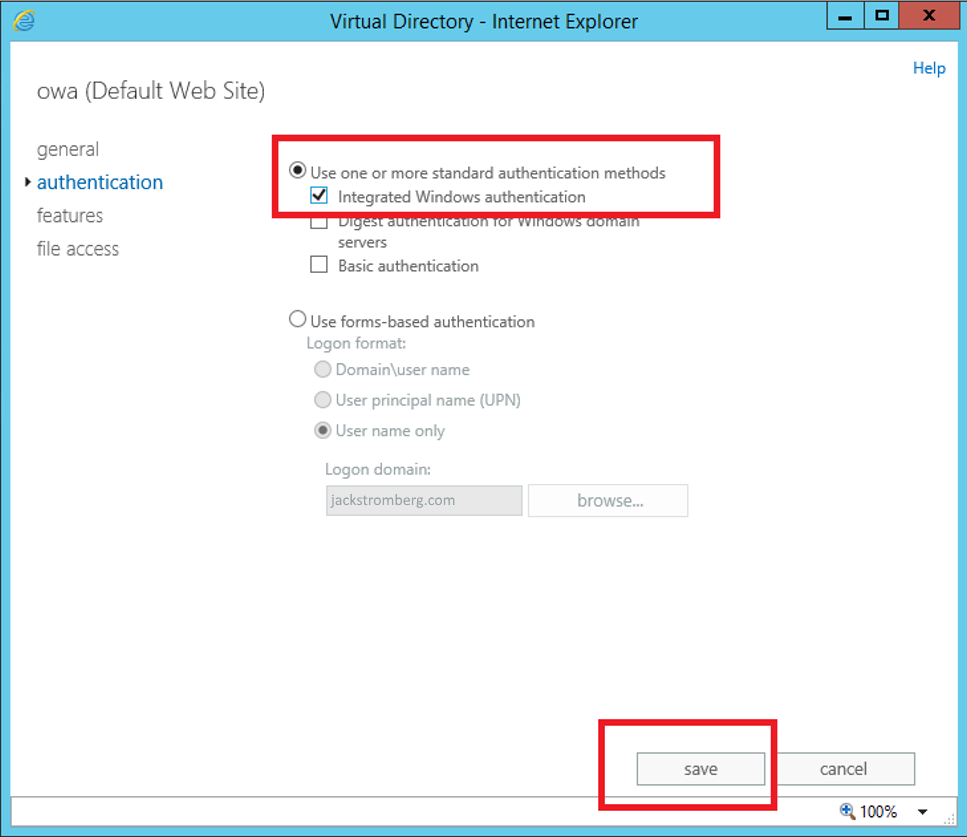
      4. On the authentication tab, select Use one or more standard authentication methods, select Integrated Windows authentication, and click save
        Exchange Administrative Center (2013) - admin center - servers -virtual directories - owa - authentication - integrated windows authentication
      5. Open a command prompt
        Elevated Command Prompt
      6. Execute the iisrest command
        cmd - iisreset
  3. Login to the Azure Portal
    1. https://portal.azure.com
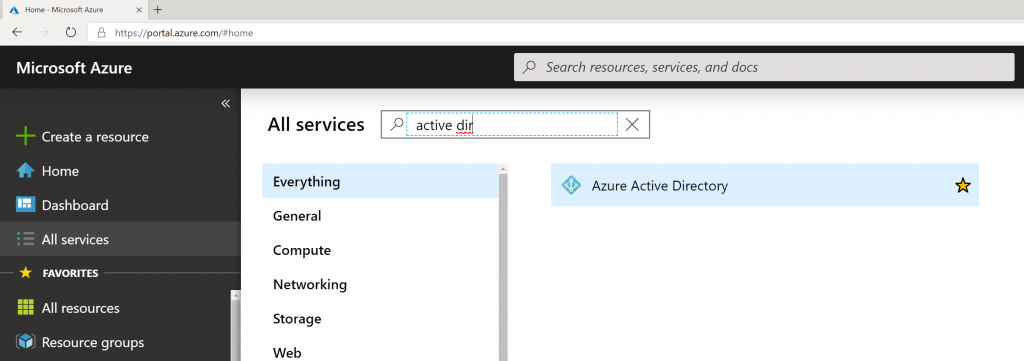
  4. Select All services -> Azure Active Directory on the left side
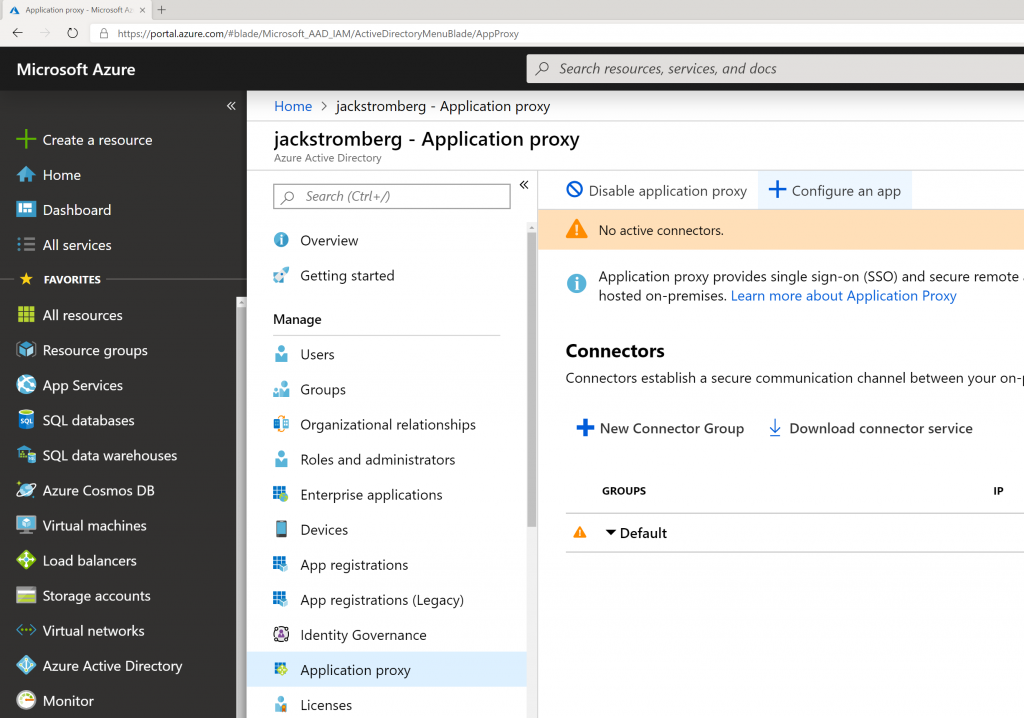
  5. Select Application proxy in the sub blade and select + Configure app

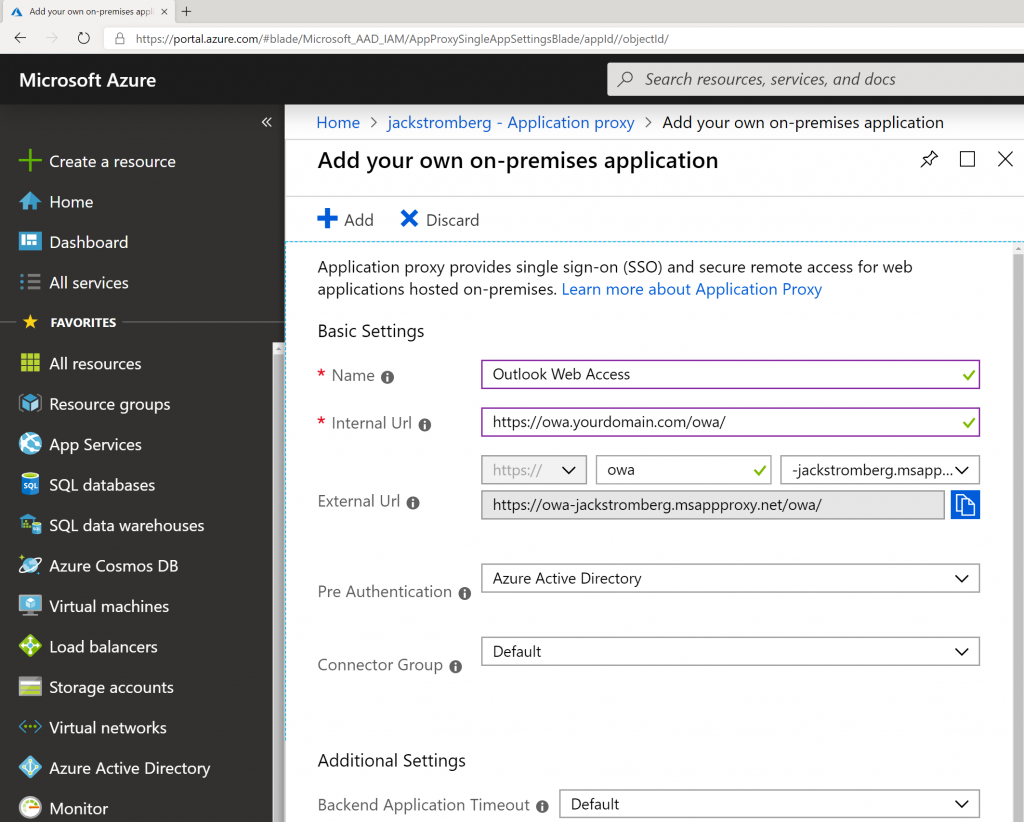
  6. Enter in the following information for the application:
    1. Name: Outlook Web Access
    2. Internal URL: https://owa.yourdomain.com/owa/ (this is the internal URL to owa)
    3. Pre-Authentication: Azure Active Directory
    4. Connector Group: Default
    5. Click + Add

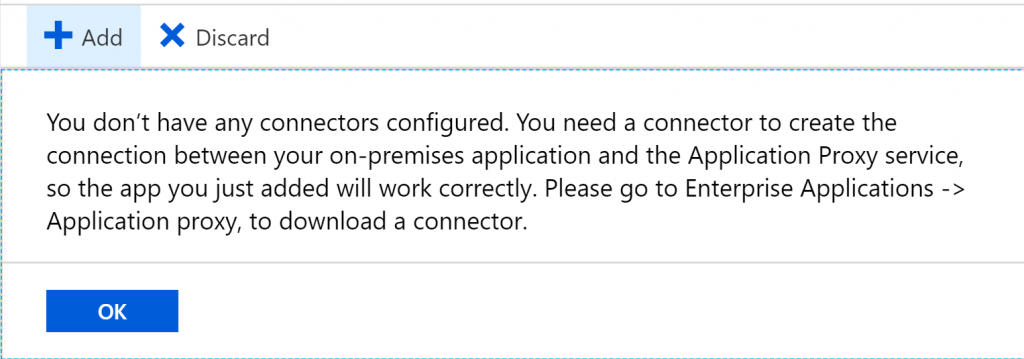
    6. Select OK if not prompted about having a connector
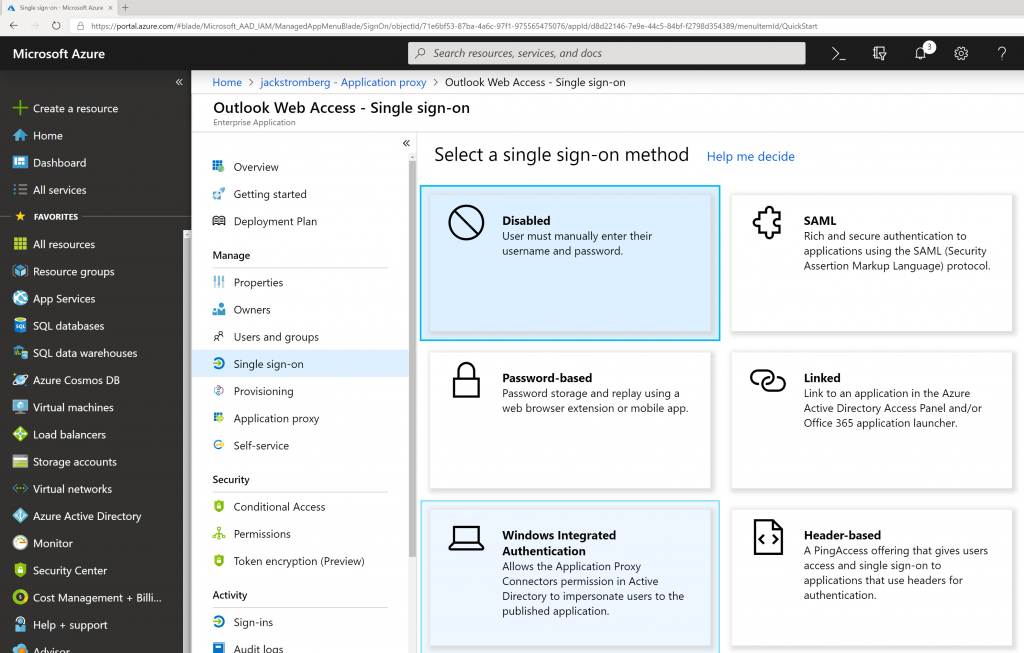
  7. Once your application is created, you should be redirected to Azure Active Directory -> Enterprise Applications -> Outlook Web Access.  On this blade, select Single sign-on and then select the Windows Integrated Authentication button

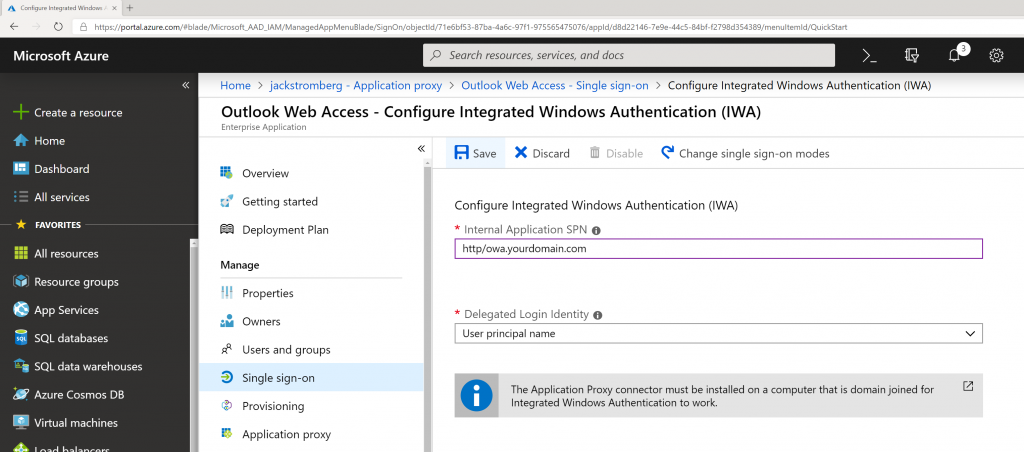
  8. Use the following configuration
    1. Internal Application SPN: http/owa.yourdomain.com
      1. This is the Service Principal Name to the Exchange Server.  The value for this was provided earlier in this tutorial.
    2. Delegated Login Identity: User Principal Name
    3. Click Save
    4. Note: If you cannot do Kerberos based authentication (Integrated Windows Authentication) in your environment, you can Discard the changes continue to use Azure AD Application proxy, however the end user will be prompted for credentials just as if they browsed directly to OWA.
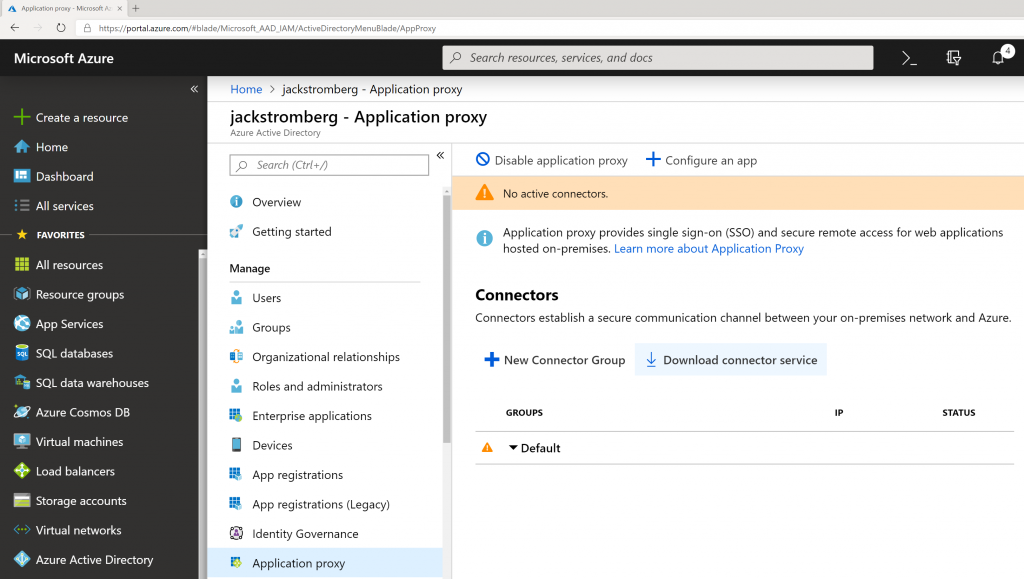
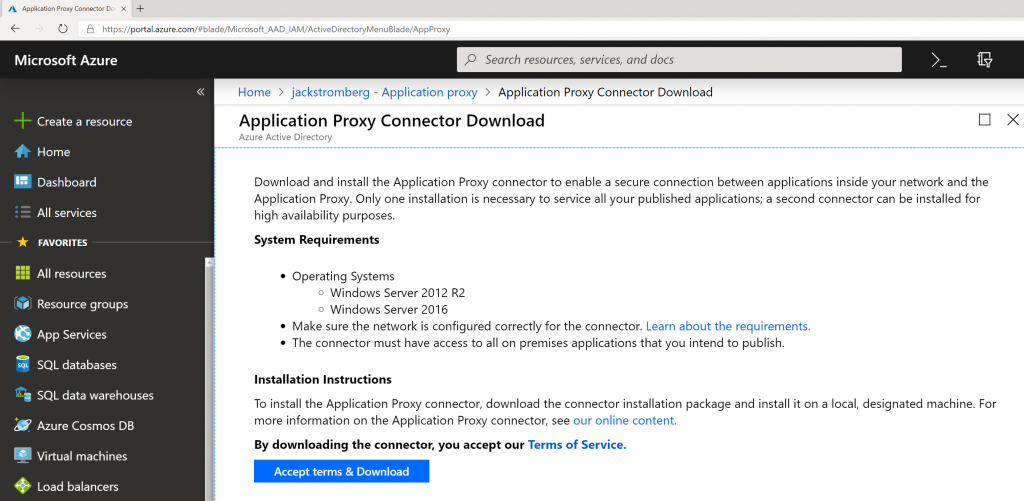
  9. Go back to All Services -> Azure Active Directory -> Application Proxy and click the Download connector service button


    1. Click the Accept terms & Download button
    2. Note: Although the download has a generic name, the download is customized specifically for your application (Outlook Web Access in this case).  If you create other applications within your Azure AD tenant, make sure you always use the Download button inside of each application so it generates the correct installer.
  10. Copy the AADApplicationProxyConnectorInstaller.exe connector to any server in your environment that can access your OWA instance internally and run the installer
    AADApplicationProxyConnectorInstaller Downloaded
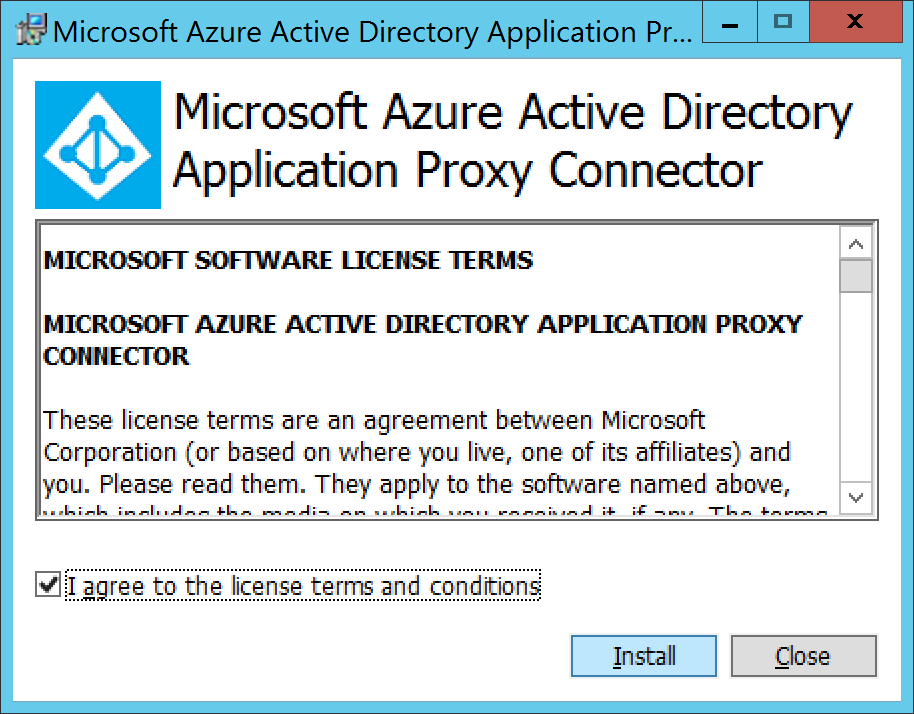
  11. Check I agree to the license terms and conditions and click Install
    Microsoft Azure Active Directory Application Proxy Connector - I agree
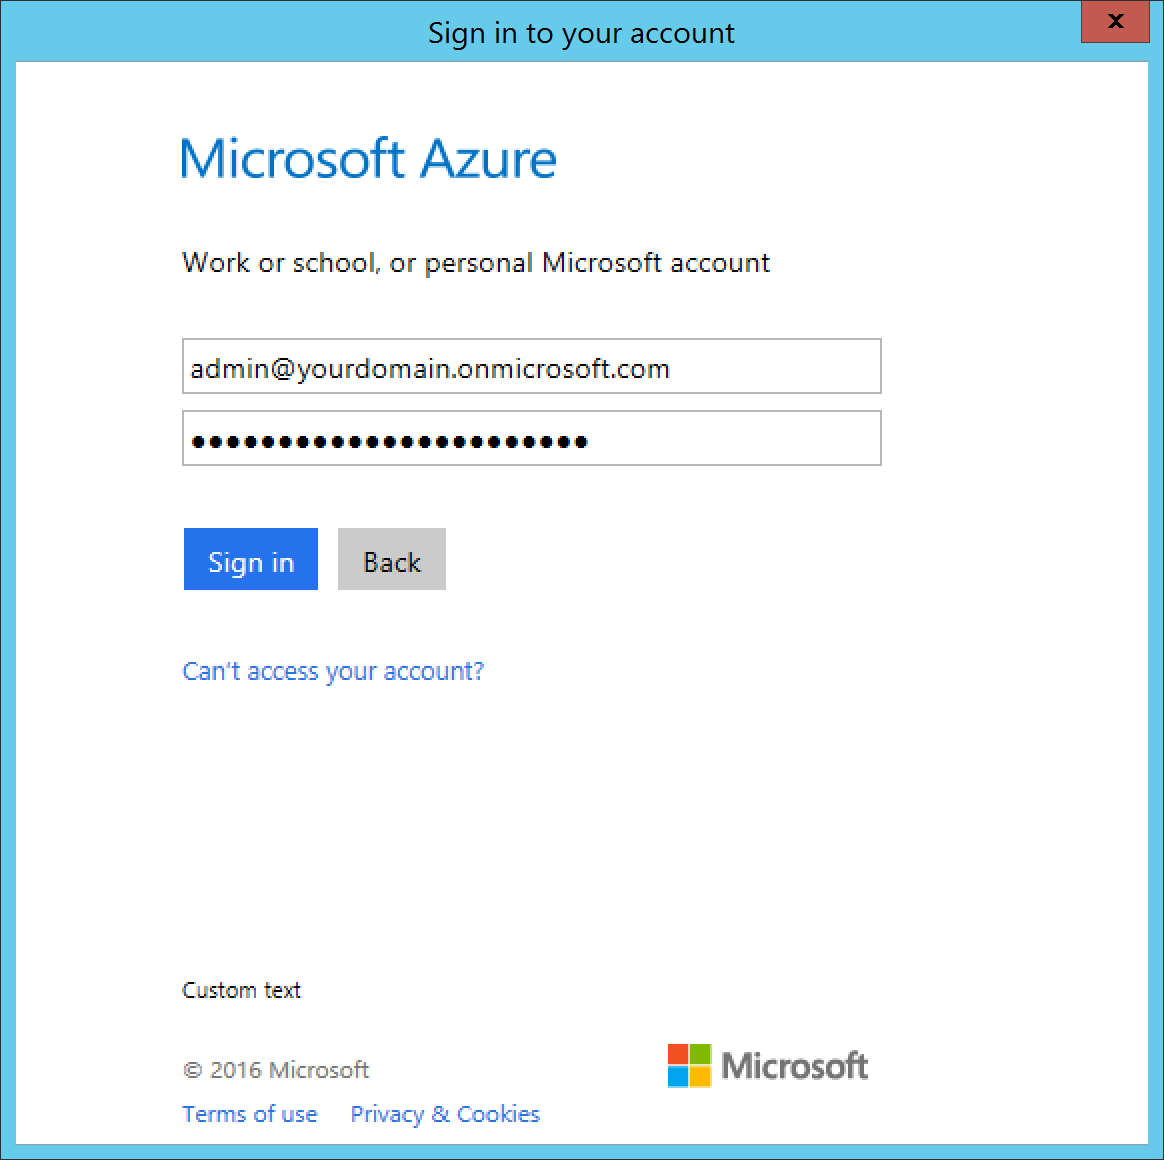
  12. Type in your Global Administrator credentials to register the agent to your Azure AD tenant and click Sign in
    Microsoft Azure Active Directory Application Proxy Connector - Credential Prompt
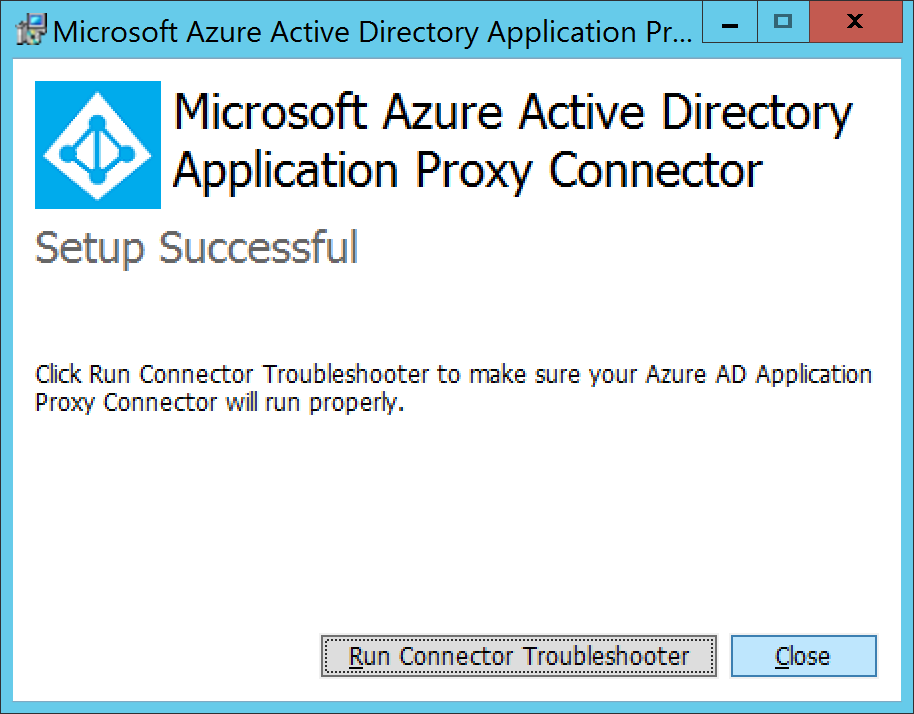
  13. Click Close if it shows Setup Success
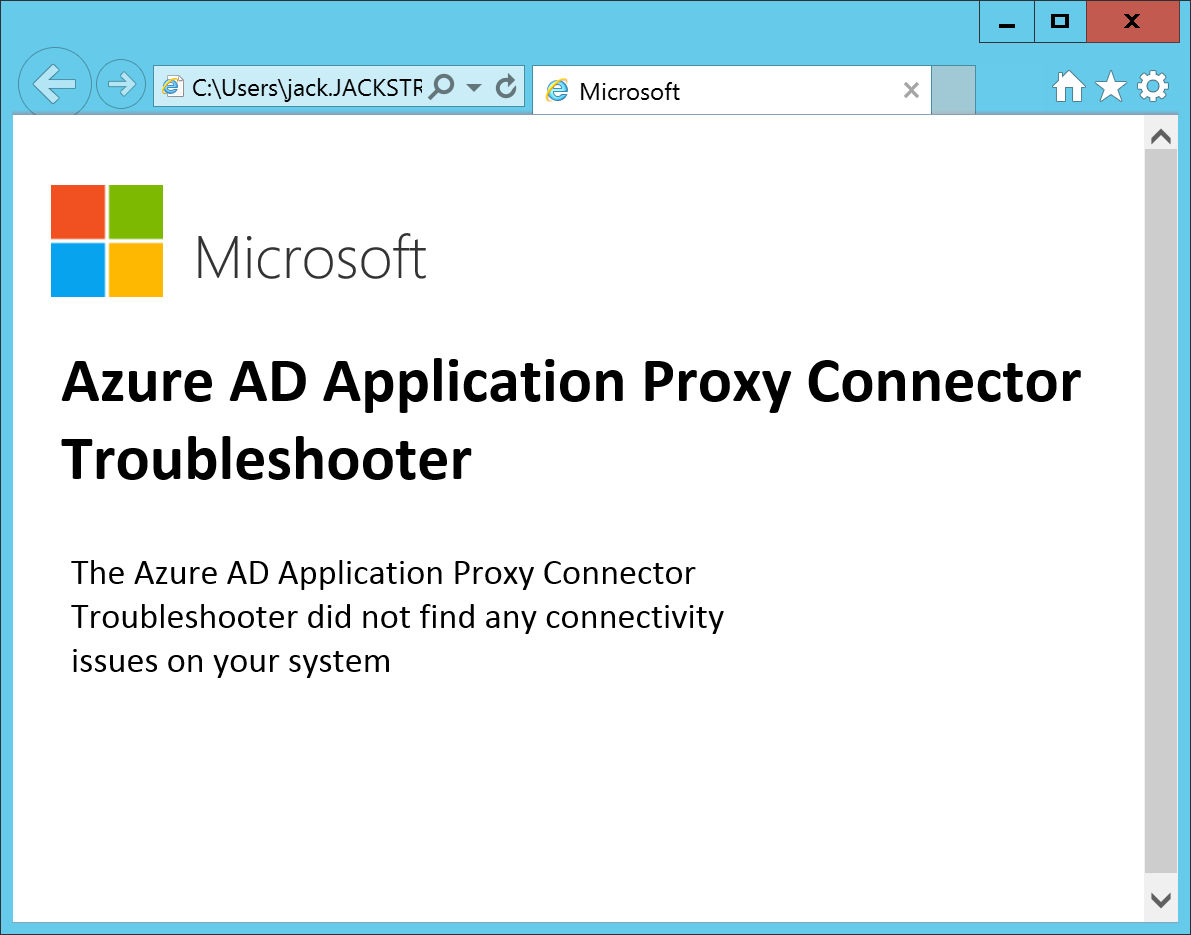
    Microsoft Azure Active Directory Application Proxy Connector - SuccessOptional: You can run the Connector Troubleshooter if you would like.  It will install a quick application that will show you the results of the test in your web browser once it has completed.
    Azure AD Application Proxy Connector Troubleshooter
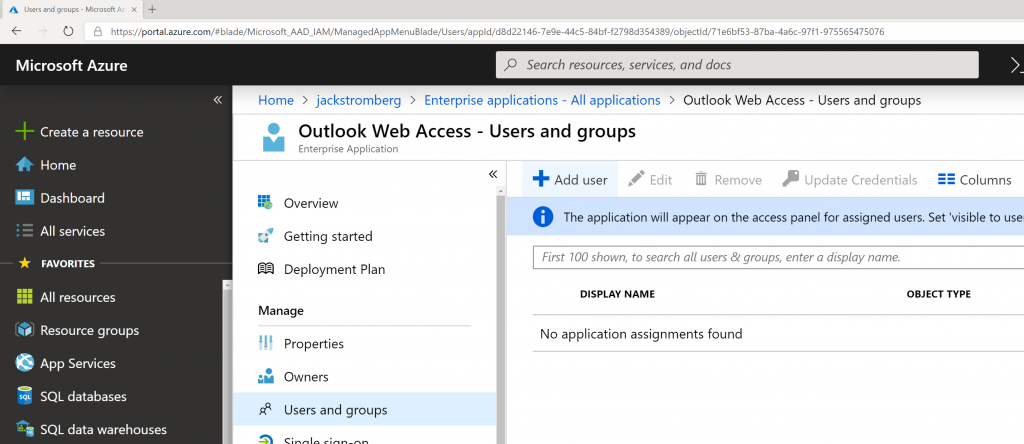
  14. Go back to the Azure Portal and navigate to Azure Active Directory -> Enterprise Applications -> Outlook Web Access.  Select Users and groups and click the +Add user button to assign the group or users that should use the application.
      

    1. Note: This group could be synchronized from on-premises to Azure AD or created in the cloud
    2. Note: Assigning a user or group to this application will automatically make the application show up in the My Apps portal
    3. Note: Users or Groups must be defined to use the application or they will receive an error upon logging in

Test

  1. Login to https://myapps.microsoft.com as one of the assigned users to the Outlook Web Access application
  2. Select the Outlook Web Access application

If all went well, you should be logged into Outlook Web Access on-premises and see your corresponding mailbox.  At this point, I would proceed with adding a vanity domain name that matches your organization as well as corresponding SSL certificate for the domain name instead of leveraging the default msapprpoxy.net domain name.  Additionally, you can always find a nice little icon for the application to make it look like OWA as well 🙂

Office 365 - Change the Alias attribute of an Exchange mailbox for a federated user

Scenario: A federated Office 365 user's Alias is incorrect.  You wish to change it, but changing the proxyAddress or Mail attribute in Active Directory does not update the Alias.

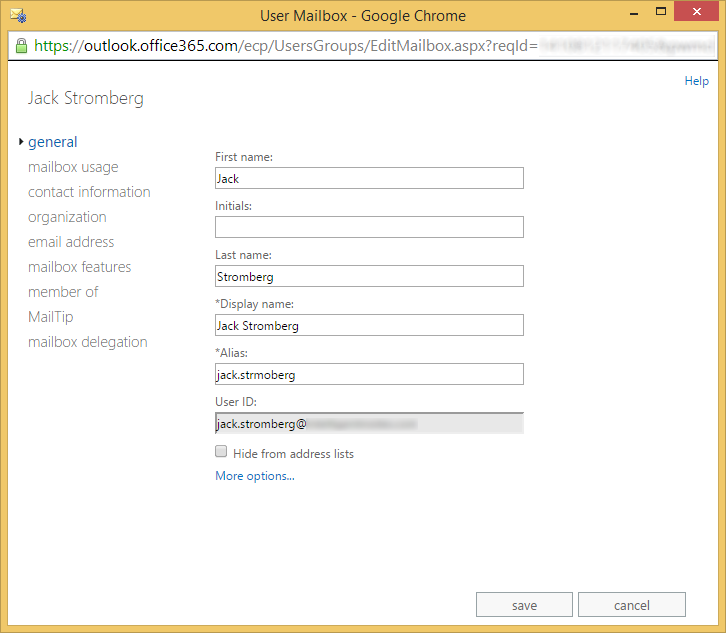
Before this tutorial, you can see the Alias has a typo in it (the m and o are out of place)

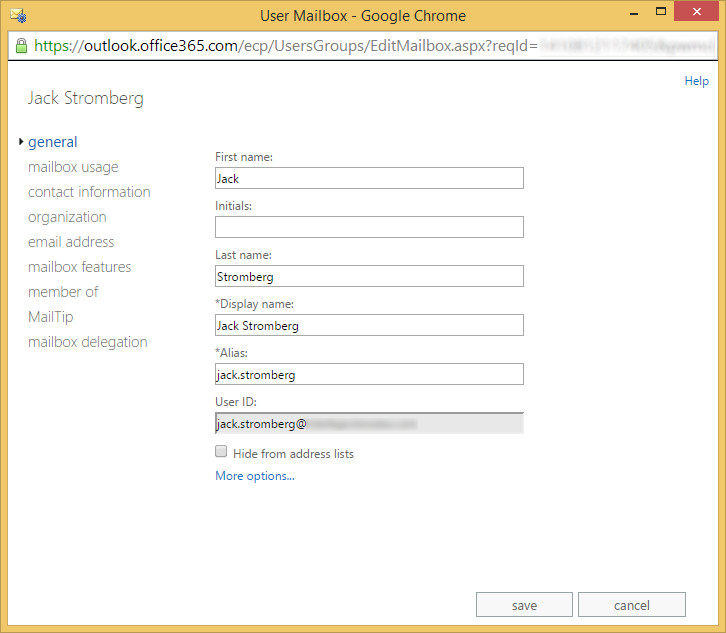
Office 365 - User Mailbox - Alias - TypoAfter completing this tutorial, we will update the Alias to look correct

Office 365 - User Mailbox - Alias - Typo Fixed

Solution: Complete the following steps below to update the Alias

  1. Login to one of your Domain Controllers and open up Active Directory Users and Computers
    Server Manager - Active Directory Users and Computers
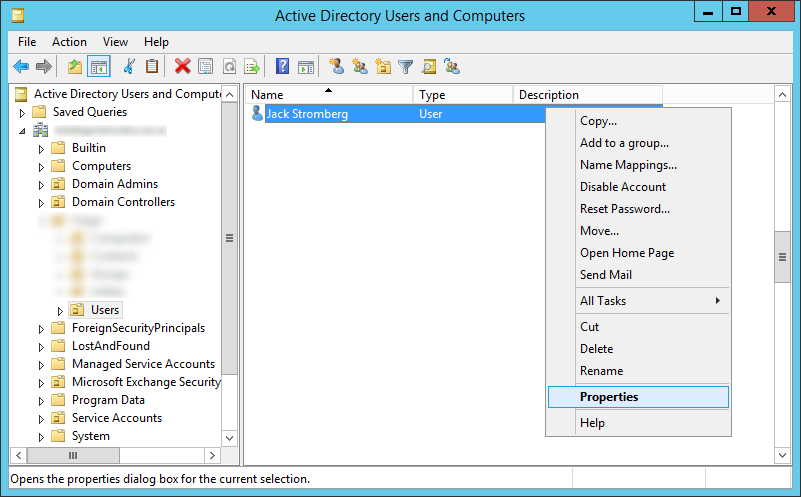
  2. Find the user that owns the mailbox, right click on them, and select Properties
    Active Directory Users and Computers - User - Properties
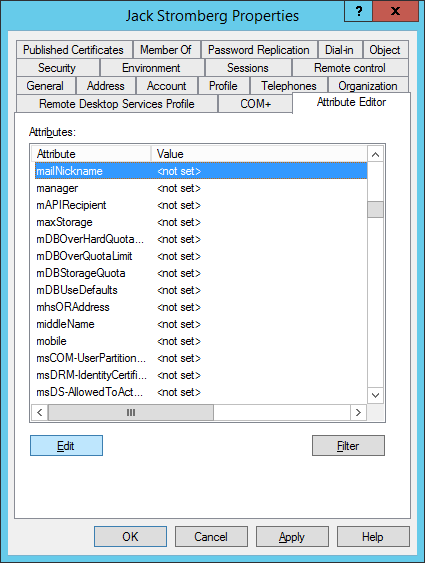
  3. Select the Attribute Editor Tab and find the mailNickname attribute
    Active Directory Users and Computers - User - Properties - Attribute Editor - mailNickname

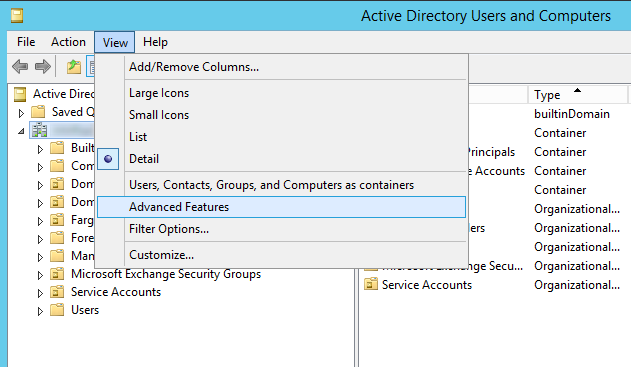
    1. Note: You will need to Enable Advanced Features on Active Directory Users and Computers to see this tab
      Active Directory Users and Computers - View - Advanced Features
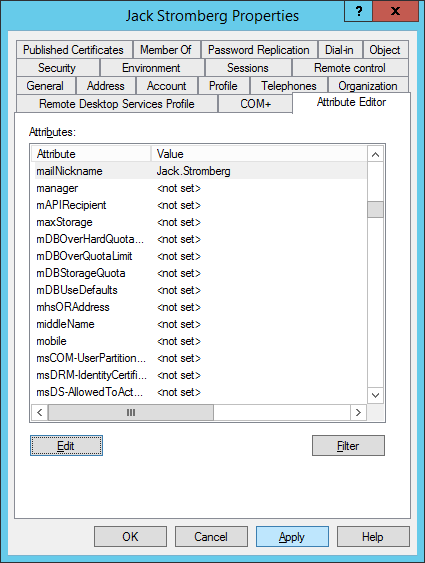
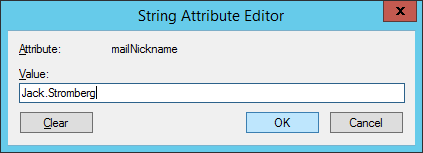
  4. Type in the desired value you wish to show up in the Alias field on the Office 365 Exchange Portal and click OK
    Active Directory Users and Computers - User - Properties - Attribute Editor - mailNickname - String Attribute Editor
  5. Click Apply on the Active Directory Users and Computers dialog
    Active Directory Users and Computers - User - Properties - Attribute Editor - mailNickname - Apply
  6. Wait for the Office 365 Directory Synchronization tool runs and updates the users online
    1. Note: Tutorial on how to do this can be found here: http://jackstromberg.com/2012/08/force-directory-synchronization-with-office-365/
  7. Ensure that the Alias field has updated in the Exchange Administrative portal
    Office 365 - User Mailbox - Alias - Typo Fixed


Office 365 - The phone number you entered has already been registered by someone else.

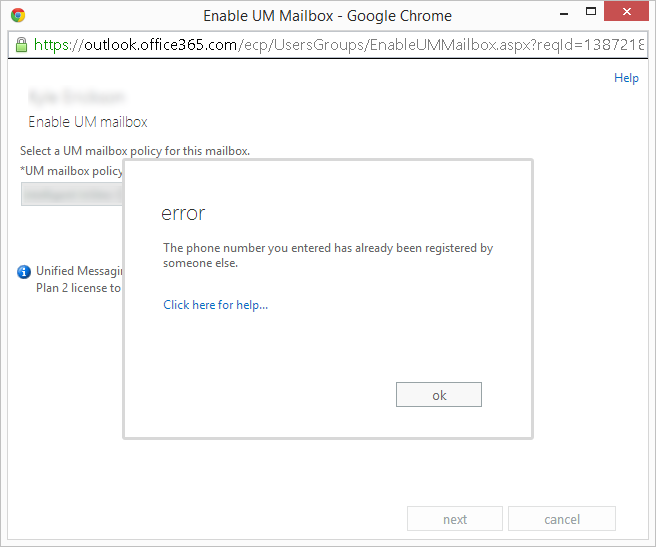
Symptom: You receive the following error when trying to enable someone for a Unified Messaging mailbox on Office 365 (Office 365 Admin Portal -> Exchange -> User Account -> Enable Unified Messaging -> Browse for UM mailbox policy).

error
The phone number you entered has already been registered by someone else.
The phone number you entered has already been registered by someone else

Resolution: This was caused by having a duplicate UM Voicemail box number.  You can run the following powershell commands to identify which user has the duplicate number assigned to them.

Set-ExecutionPolicy unrestricted
$Session = New-PSSession -ConfigurationName Microsoft.Exchange -ConnectionUri https://ps.outlook.com/powershell/ -Credential $LiveCred -Authentication Basic -AllowRedirection
Import-PSSession $session
Get-Recipient -ResultSize Unlimited | where{$_.emailaddresses -like "*EUM:*PHONENUMBER*"} | fl displayname,emailaddresses

[Office 365] - Forwarding email from one mailbox to another with ADFS turned on

Synopsis: Employee leaves on personal matters for a month and their department lead requests for mail to be forwarded to their manager.  Typically, mail forwarding would be setup inside of the Exchange console, however, in this case, Exchange is managed by Office 365 (not a hybrid exchange deployment) and the users are being federated to Office 365 via ADFS.  When trying to enable mail forwarding, as outlined in the this help document by the Office 365 team http://community.office365.com/en-us/wikis/exchange/how-to-forward-email-in-office-365.aspx, I would receive an error message.

Symptom: When enabling mail forwarding for the user inside of the Office 365 Exchange portal, I received the following error message:

The action 'Set-Mailbox', 'EmailAddresses', can't be performed on the object 'Firstname Lastname' because the object is being synchronized from your on-premises organization. This action should be performed on the object in your on-premises organization.

Solution:

Personally, I think this is a bug in Office 365, but they say it is because we are on premise (if all of exchange is managed by them, how can they not enable mail forwarding?).  Any who, the work around is to manage the user's mailbox and set forwarding up as if they would.  See the steps below to achieve the same result:

  1. Login to your Office 365 admin portal.
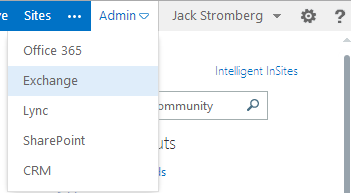
  2. Click on the Admin dropdown and select Exchange
    Exchange
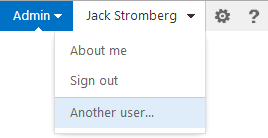
  3. Once in the Exchange portal, click on your username and select Another user...
    Exchange - Another User
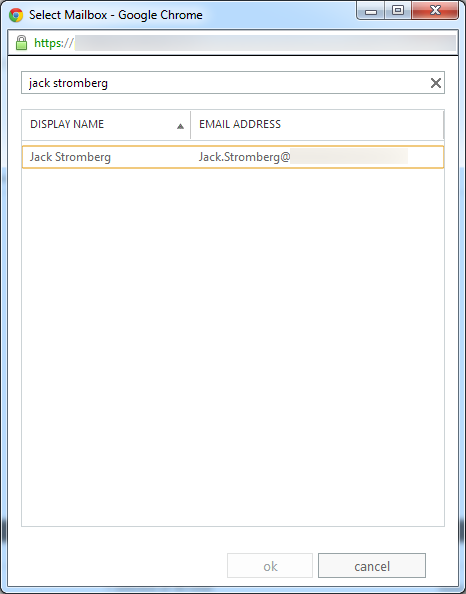
  4. Type in the mailbox you want to edit and click ok
    Select Mailbox
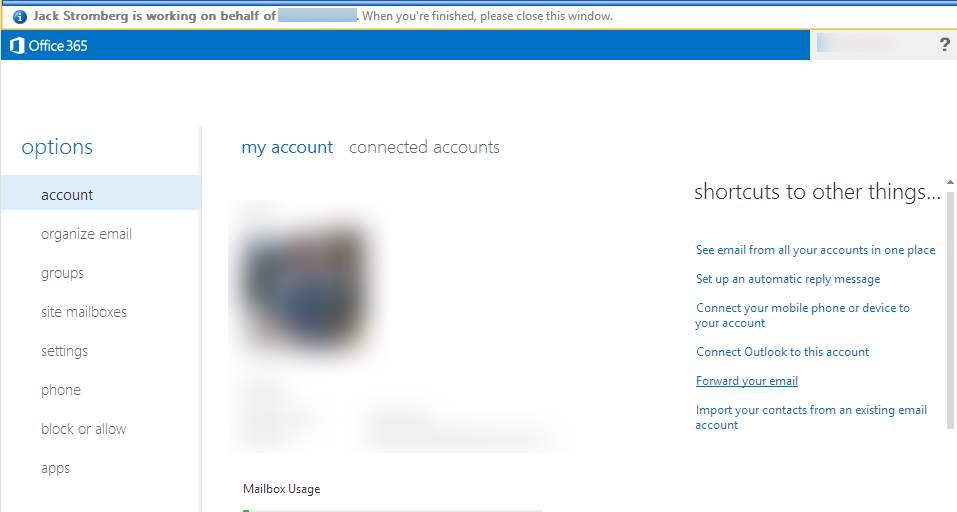
  5. On the "Managing on behalf of" screen, select Forward your email
    Exchange - Forward Your Email
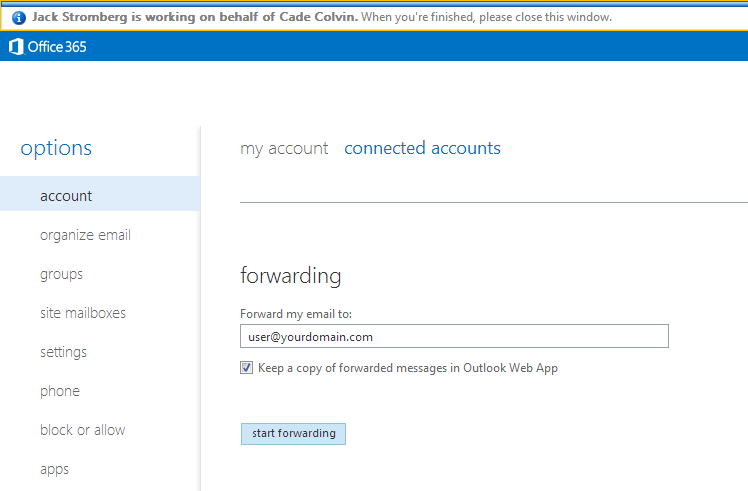
  6. Scroll down to forwarding and type in the email address of the user you want all emails to go to and click start forwarding.  You can optionally select if you want to leave a copy for the user's mailbox or have them silently forwarded.
    Exchange - Start Forwarding
  7. That's it! 🙂

Exchange 2010 Won't Sync Mobile Device Mailbox For One User

Today I stumbled across some weird stuff where one individual account wasn't able to synchronize on their iPhone/Droid. They would sign in and get an error saying the "Connection to the server was unavailable."

To fix this, simply follow the steps below! 🙂
Open Active Directory Users and Computers -> View > Advanced Features.
Find the user with the problems connecting, Right-Click -> Properties.
Click the Security tab -> Advanced and make sure that the check box for "Include inheritable permissions from this object's parent" is checked.