From a performance perspective, PHP applications running on Azure App Services tend to perform better on Linux than Windows. While Azure provides a Drupal template in their Marketplace, it deploys to a regular Windows based App Service and installs version 8.3.3 (where as of the time of writing this article; 9/10/2018, the latest Drupal version is 8.6.1)
In this case, Microsoft has published a set of templates that provide flexibility to choose the Drupal version, deploy nginx, install PHP, and allow flexibility in installing any modules. The templates are currently deployed and maintenace on GitHub, which can be found here: https://github.com/Azure/app-service-quickstart-docker-images/tree/master/drupal-nginx-fpm
So let's get started!
Download and install prerequisites:
- Download and install Git
- Download and install Docker
- Note: The above link is for Windows, here are the links to the other distributions for Docker: https://store.docker.com/search?offering=community&type=edition
- Note: On windows I recommend running the command git config core.autocrlf true to prevent issues with weird character returns. Check out this awesome blog article by Tim Clem on why this is recommended: https://adaptivepatchwork.com/2012/03/01/mind-the-end-of-your-line/
- Download and install Visual Studio Code (free lightweight code editor for Windows, Linux, and Mac)
Note: I'm using a Windows 10 machine while writing this tutorial. There will be some steps, like running Git Bash on Windows vs running Git natively on Linux. Likely, you can just run Git from a regular terminal session and you'll be fine on the Linux/Mac side.
Clone the GitHub template
- Open up Git Bash
- Create a new directory for our project
- mkdir Drupal-Azure
- cd Drupal-Azure
- Clone the GitHub templat
- git clone https://github.com/Azure/app-service-quickstart-docker-images.git --config core.autocrlf=input
- Note: Unfortunately, we cannot just clone a specific directory easily, we have to download all the files. This particular GitHub project contains several projects, so it'll be about a 50MB download as a heads up
- Note: The --config core.autocrlf=input is used to prevent windows from using crlf vs lf's for line returns. If you don't specify this, you might receive the following error if you tried running your docker container after being built:
- standard_init_linux.go:190: exec user process caused "no such file or directory"
- Navigate into the Drupal directory
- cd app-service-quickstart-docker-images/drupal-nginx-fpm/0.45
Modify the scripts to your desire
I personally prefer not to have PHPMyAdmin or MariaDB installed as I will leverage Azure MySQL PaaS services for the database. In this case, I went ahead and modified the Dockerfile document accordingly.
Build the Docker container
Execute the following command to build your container:
docker build -t jackdrupalregistry.azurecr.io/azuredrupal:test .
Note: The . at the end is needed
Note: When building docker images, the repository name must be lowercase
Create Azure Container Registries
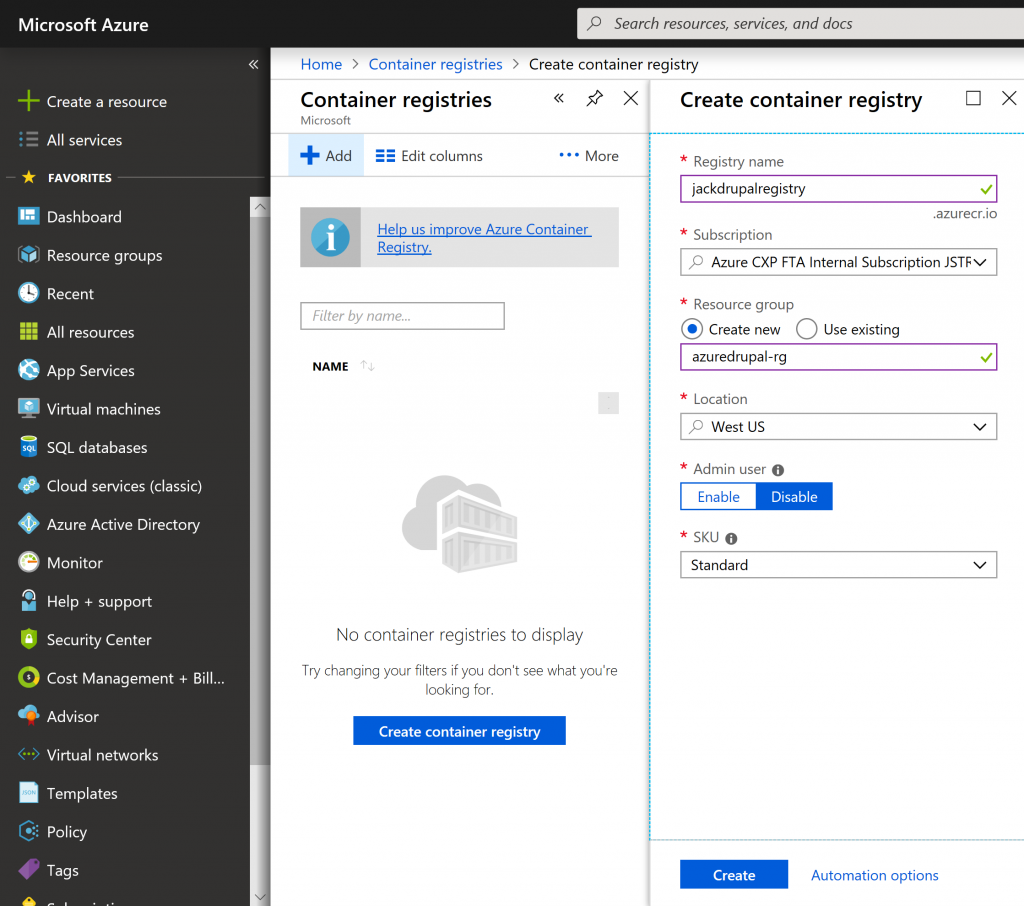
Select All Services -> Azure Container Registries. Select Add and create a new container registry
Push the Docker container to your Azure Container Registry
- Navigate to All Services -> Azure Container Registries -> Your Registry -> Access Keys
- Check Enable for Admin user
- Go back to Git Bash and execute the following commands
- Login to docker
- Execute the command:
- docker login jackdrupalregistry.azurecr.io -u yourusername -p yourpassword
- Push the image up to Azure Container Registry
- Execute the command:
- docker push jackdrupalregistry.azurecr.io/azuredrupal:test
Deploy the web app
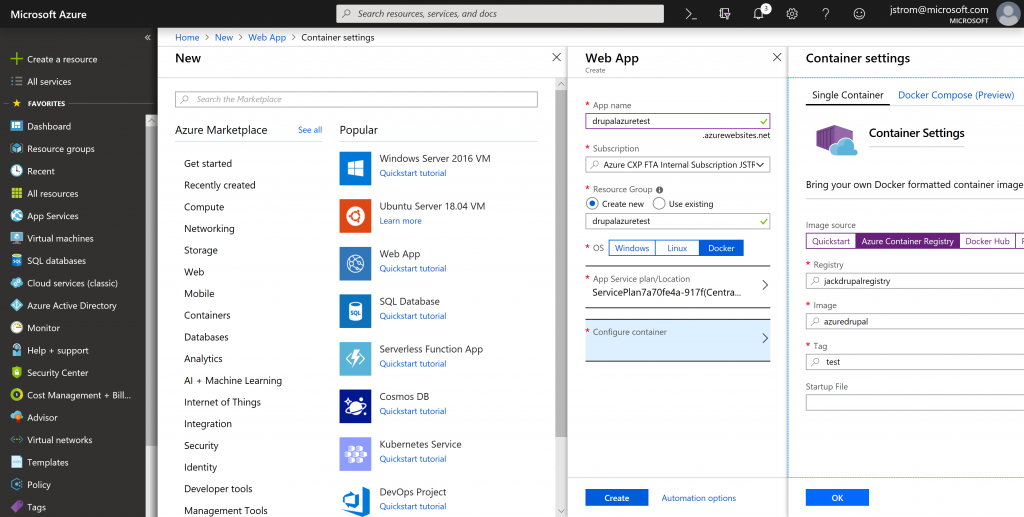
Navigate to Create a resource -> Web App. Select Docker as the OS type, select Configure container, and leverage the following settings:
- Image Source: Azure Container Registry
- Registry: jackdrupalregistry
- Image: azuredrupal
- Tag: 0.45
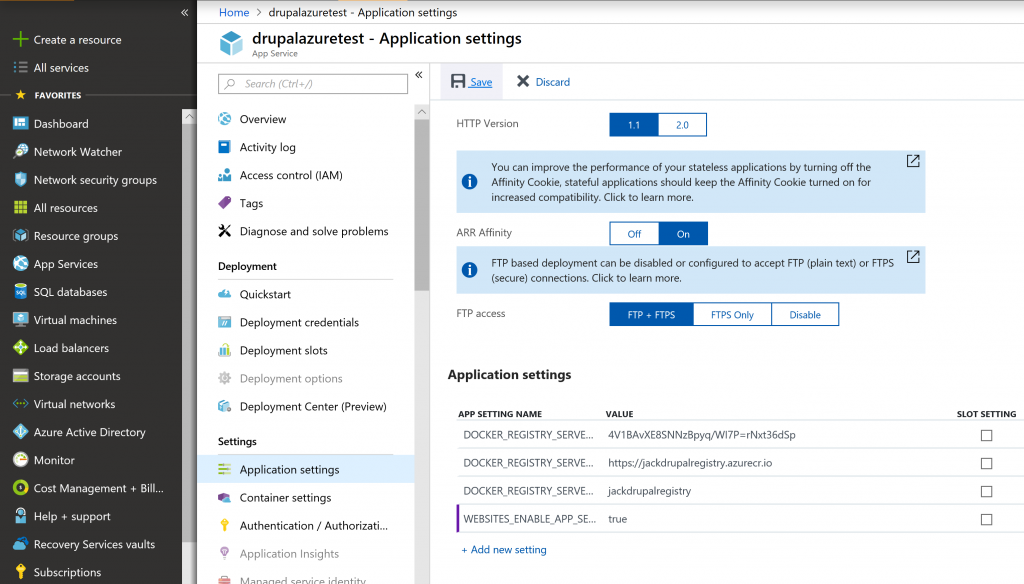
Navigate to All Services -> App Services -> Your App Service -> Application settings and set WEBSITES_ENABLE_APP_SERVICE_STORAGE to true, and click Save to help ensure data persists. Essentially, anything you write to /home will persist. Anything else will be reset when the container gets rebuilt.
Create a MySQL Database
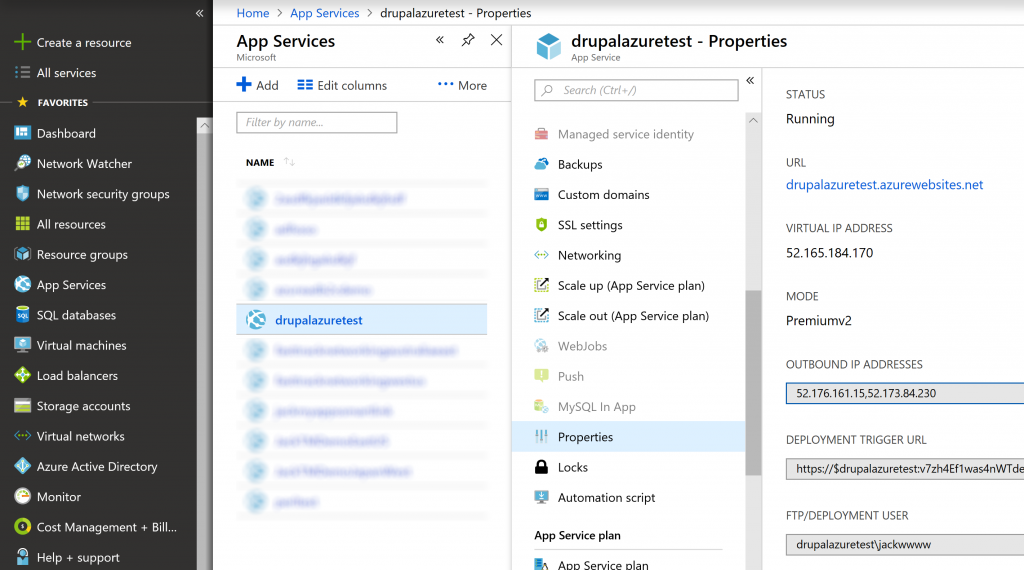
Navigate to All Services -> App Services -> Your App Service -> Properties and write down the Outbound IP Addresses; we will use these later.
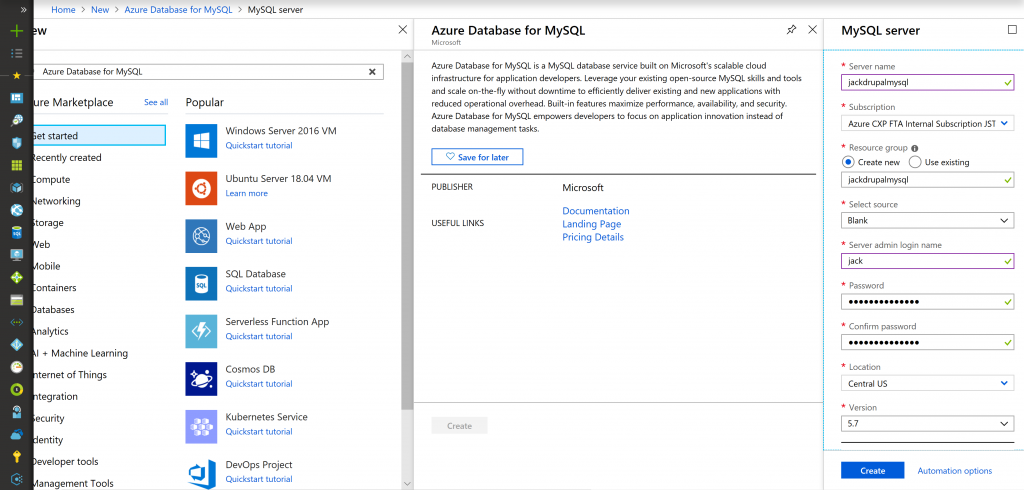
Select Create a Service -> Azure Database for MySQL -> Create -> create a blank database
Select Connection security and enter the Outbound IP Addresses from your App Service and click Save
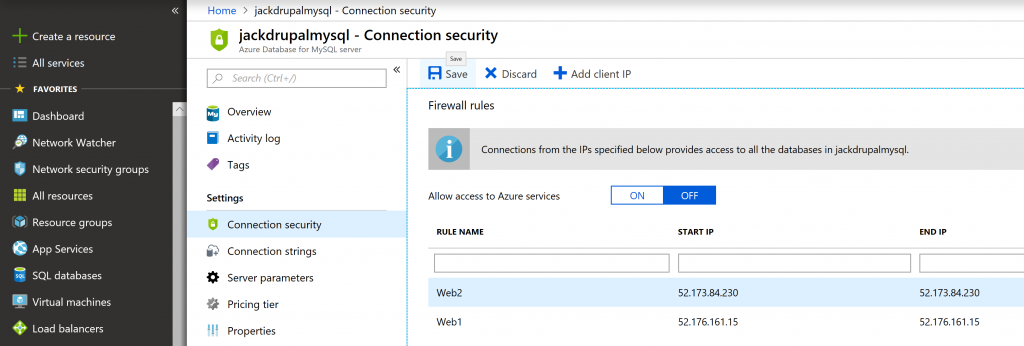
Note: I haven't found a way to get Drupal to allow SSL Connections, which would certainly be a best practice. In this case, on the same Connection security blade, go ahead and set Enforce SSL Connection to Disabled. If someone knows how to do this, please put a comment below, so I can update this guide.

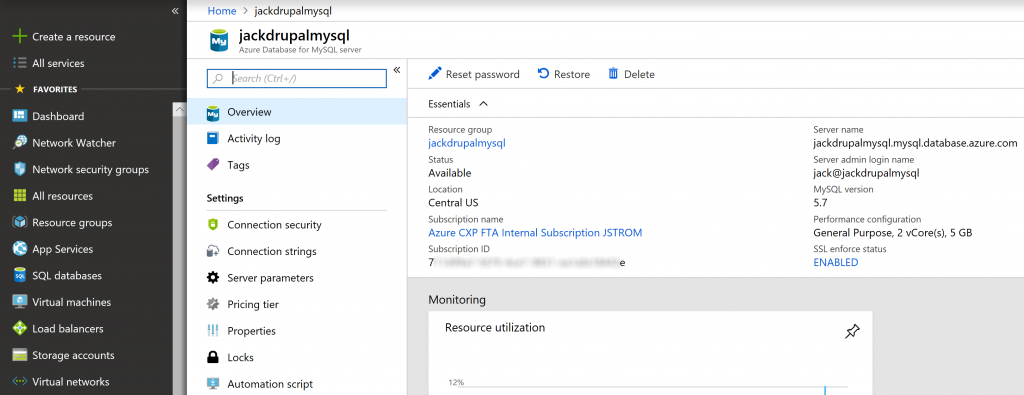
Go back to the Overview section and write down the Server admin login name and Server name; we will use these during the Drupal setup
Configure Drupal
At this point, go ahead and browse out to your App Service. You should have all the necessary details to complete the installation setup. Once completed, you should see the Welcome to Drupal Side splash page.
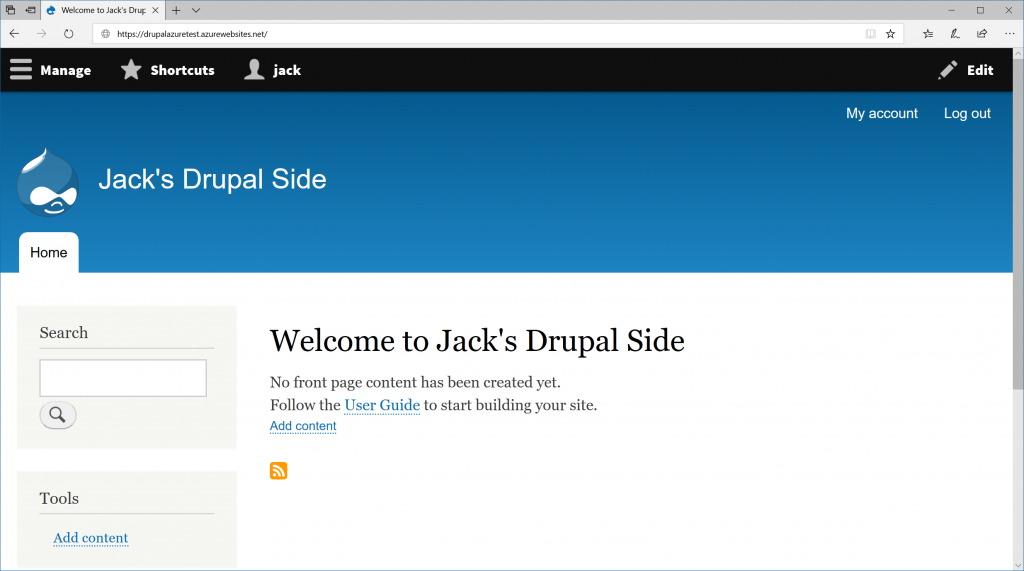
Notes:
Email:
Upon installation of Drupal you'll receive an error that Drupal cannot send email. Azure Web Apps don't allow open relay, so you will need to use a 3rd party mail service like SendGrid or Mailchimp to relay emails.
Helpful docker commands:
docker images
docker run -it azuredrupal:test
docker ps -a
docker rm containeridea
docker rmi image
Other deployment strategies:
In addition to deploying through the portal, you could easily deploy via PowerShell, Azure CLI, or ARM template. Here's an Azure CLI 2.0 example of how to deploy (note: the script below uses PowerShell variables for demonstration, please substitute those as needed):
$resourceGroupName = "Drupal-Test"
$planName = $resourceGroupName
$appName = $planName
$containerName = "appsvcorg/drupal-nginx-fpm:0.45"
$location = "West US"

az group create -l $location -n $resourceGroupName

az appservice plan create `
    -n $planName `
    -g $resourceGroupName `
    --sku S3 --is-linux

az webapp create `
    --resource-group $resourceGroupName `
    --plan $planName `
    --name $appName `
    --deployment-container-image-name $containerName

az webapp config appsettings set `
    --resource-group $resourceGroupName `
    --name $appName `
    --settings WEBSITES_ENABLE_APP_SERVICE_STORAGE="true"

az webapp config appsettings set `
    --resource-group $resourceGroupName `
    --name $appName `
    --settings WEBSITES_CONTAINER_START_TIME_LIMIT="600"

# please modify DB settings according to current condition
az webapp config appsettings set `
        --resource-group $resourceGroupName `
        --name $appName `
        --settings DATABASE_HOST="drupaldb.mysql.database.azure.com" `
            DATABASE_NAME="drupaldb" `
            DATABASE_USERNAME="user@drupaldb" `
            DATABASE_PASSWORD="abcdefghijklmnopqrstuvwxyz"
