There are a ton of old Teslas out there running Autopilot v1 (AP1), and they fall further behind in assisted-driving capability every year. AP1 felt ultra futuristic in its day, but it’s starting to become outclassed even by the lane assist shipping in everyday non-Tesla cars.
One of the biggest reasons I opted to seek an upgrade was the ability to remove the notorious “Tesla NAG”. While I get checking if the driver is paying attention is critical for safety, the way Tesla did it in AP1 was less than ideal by having to apply torque to the steering wheel, even if you are alert and watching the road ahead of you. In addition, the driving capabilities of AP1 on unmarked roads, aggressive curves, phantom braking, etc. make for a significantly less confident driving experience in AP1 and feel dated compared to newer vehicles today.
openpilot – make driving chill
Revive your car with the open source software openpilot, maintained by the company Comma AI! comma.ai — make driving chill
While Comma AI does not officially support old Tesla vehicles there are several forks for older Teslas to use openpilot and while Comma AI doesn’t provide an official wiring harness for older Tesla cars, they do provide a developer harness where you can make your own.
You can grab a harness for the vehicle from a developer in the openpilot community, who has helped try to maintain a fork of openpilot (which we’ll talk about later on). This makes installing the Comma 4 significantly easier by bringing peace of mind it’s correct and kick back support to the maintainer for their contributions to the fork for the older Tesla vehicles.
That being said, I went down the road of trying to DIY this myself for a few reasons:
1) I wanted to learn.
2) There have been many contributors to the Tesla AP1 effort and at time of writing this, there is only one individual making harnesses. If that individual decides to take on a new project, that makes new harnesses for Tesla AP1 vehicles impossible to source (supply chain risk). In the spirit of open source, IMO, the harness details should be available to keep the vehicle support available for future reference.
3) I wanted to use Comma supplied products as much as possible to have as close to what an official solution might be as possible.
4) I had many of the tools needed to make the harness and could do it for significantly less.
When starting the project, cost wasn’t originally my concern, but I was lucky and was able to pick up their official developer harness for $50 on sale and with sourcing the parts and ultimately was able to make it for under $100. The prebuilt harness was > $250 and my understanding at the time is it would have shipped from Europe, so it would have likely gone over $300 with tariffs with that assumption (although they have some stock in the USA I found out later on).
While a cheaper harness sounds great, one big note is if you go down the DIY route, don’t expect the Comma community to help. The folks that really understand this kind of stuff in the unsupported Tesla community really laid it on thick that I should give up and just buy the harness.
IMO, if you have the time and patience it was an interesting project and I learned a lot on the electrical side and comma side debugging the pin configuration.
Nonetheless, if you do this DIY, don’t expect much help. If you just want your car to work, buy the harness, it’s worth it. If you have some background in software development and electrical engineering, then here’s my learnings if you want to take a similar venture; but proceed at your own risk. I’m not responsible if you short out any components of your car.
Acquiring the parts for the harness if you DIY this
You can grab an official developer harness from Comma AI’s shop here: https://comma.ai/shop/car-harness?harness=Developer.
These are the parts from Digikey needed to make the harness:
Qty 2: MQS 8P PLUG HSG BLK – 17-1-1743282-2-ND
Qty 2: MQS HDR 8P ASSY(H-TYPE) BLK – 17-1-1743284-2-ND
Qty 20: MQS REC CONT – 17-5-963715-1CT-ND (You only need 16, but they are cheap and if you’ve never crimped these, grab a few extra for practice)
Qty 1: Breakable Protoboard: I used this to connect/solder the two MQS HDR 8P ASSY modules together: 1568-13268-ND
Qty 2: Hookup wire between 22AWG and 26AWG – I had some hookup wire on hand (3175 Adafruit Industries LLC | Cables, Wires – Single Conductors Kits | DigiKey), but you could buy per foot as well: 30-01780 Tensility International Corp | Single Conductor Cables (Hook-Up Wire) | DigiKey and 55A0111-26-9 TE Connectivity Raychem Cable Protection | Single Conductor Cables (Hook-Up Wire) | DigiKey
Qty 1: Electrical tape – Ideally, you could also use heat shrink tubing if you have some that’s 1.25″ wide.
Misc from Amazon
Qty 1: Wiring harness tape – not required, but can help with longevity of your cable.
Note: this guide assumes you have solder, soldering iron, and wire strippers on hand. I’d recommend an adjustable wire stripper as getting the lengths to the connectors can be tricky by hand, but if you are buying this just to make the cable, you may as well buy the prebuilt harness since you are likely getting close to breaking even: 12 40 200 Knipex Tools LP | Wire Strippers and Accessories | DigiKey
The pinout of the harness
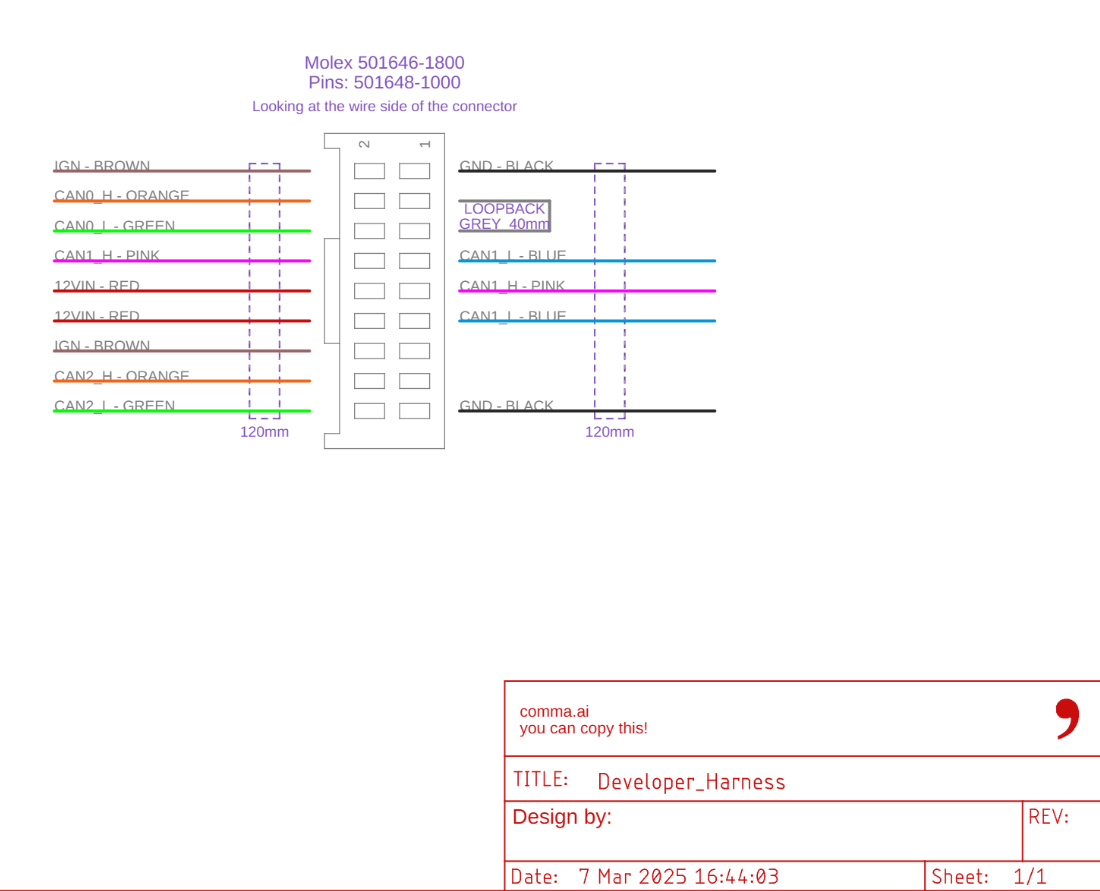
First, familiarize yourself with the Comma AI dev harness. The pinout for it can be found here: https://github.com/commaai/hardware/blob/master/harness/v3/Developer_Harness.pdf
Next, understand the Tesla harness. Tesla has a copy of the Forward Camera (NCAP) harness here:
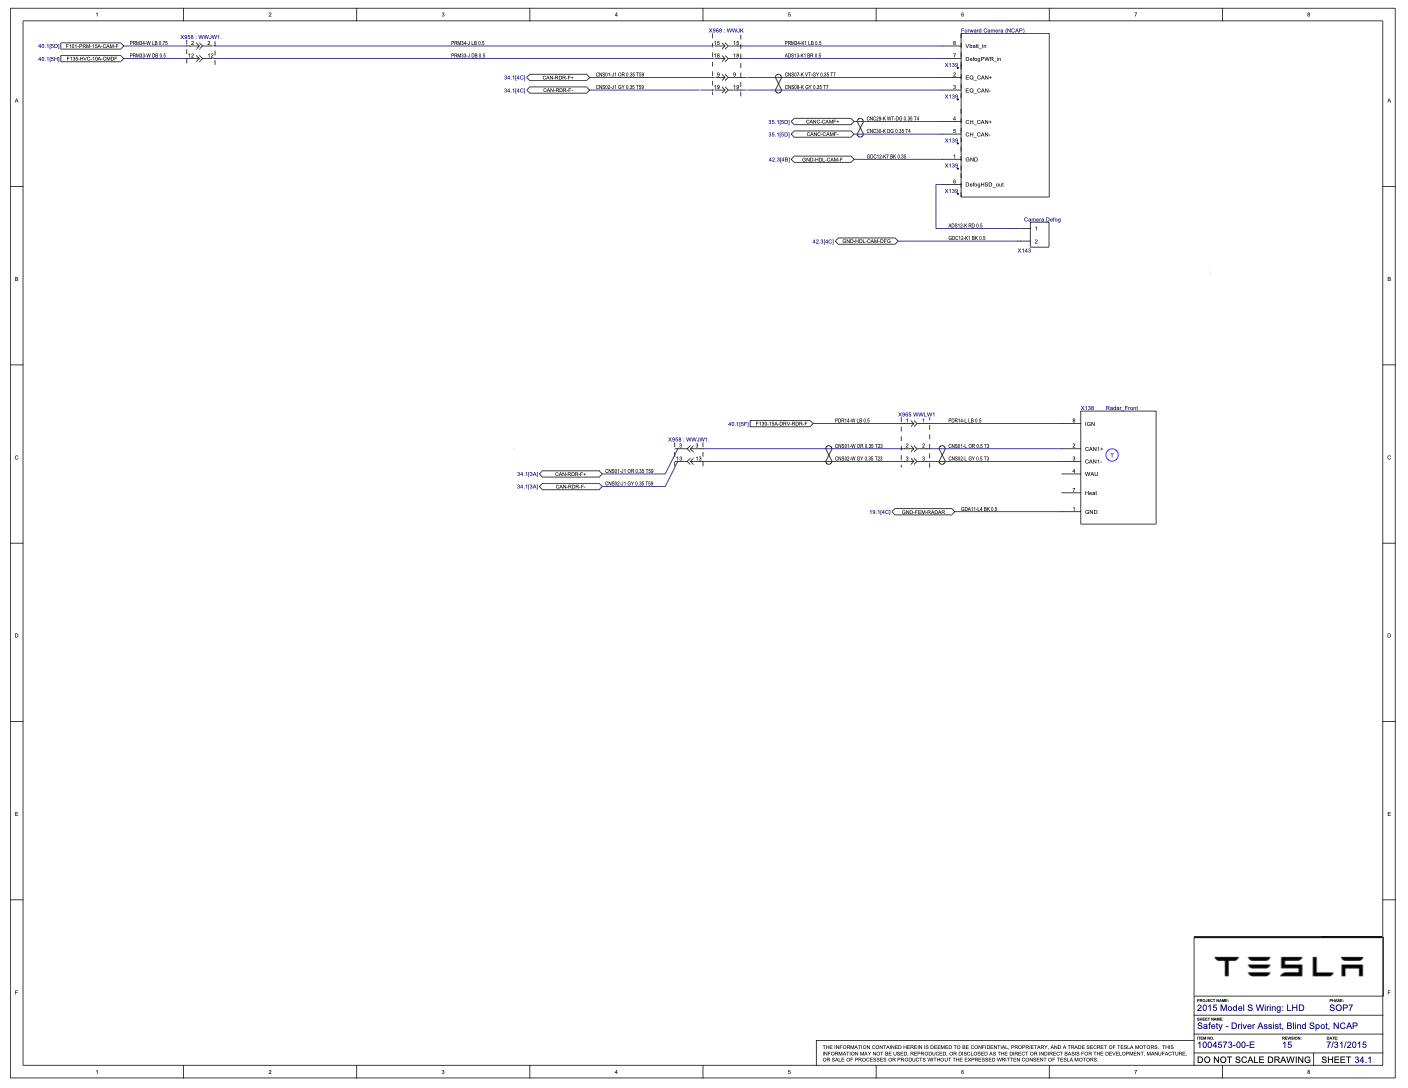
Pulling it altogether, you get this as the secret sauce to build the harness:
This branch of your harness is what receives the connector from the car (connector originally going to the Forward Camera (NCAP) port).
| Connector to car (MQS 8P PLUG HSG) [Connects to the Tesla cable] | Signal | Comma DEVELOPER harness pin |
|---|---|---|
| Pin 8 | GND | Pin 1 |
| Pin 7 | Radar CAN + | Pin 8 |
| Pin 6 | Radar CAN − | Pin 7 |
| Pin 5 | Camera CAN + | Pin 4 |
| Pin 4 | Camera CAN − | Pin 6 |
| Pin 3 | DefogHSD_OUT | Passthrough to mirror pin 6 |
| Pin 2 | DefogPWR_in | Passthrough to mirror pin 7 |
| Pin 1 | +12V | Pin 10 |
This branch of your harness is what plugs into the Forward Camera (NCAP) port.
| Connector to mirror (MQS 8P PLUG HSG) [Connects to mirror port] | Signal | Comma DEVELOPER harness pin |
|---|---|---|
| Pin 1 | GND | Pin 17 |
| Pin 2 | Radar CAN + | Pin 9 |
| Pin 3 | Radar CAN − | Pin 11 |
| Pin 4 | Camera CAN + | Pin 16 |
| Pin 5 | Camera CAN − | Pin 18 |
| Pin 6 | DefogHSD_OUT | Passthrough to car pin 3 |
| Pin 7 | DefogPWR_in | Passthrough to car pin 2 |
| Pin 8 | +12V | Pin 12 |
Pin 3 and 5 are looped on the comma developer harness connector (this is standard to the dev harness as-is)
The two IGN cables (brown cables at time of writing) that come with the dev harness you can remove as they won’t be used. You can use a tiny flat head screwdriver to gently lift the flap holding the connector to the cable up while pulling on the cable to slide them out.
For Pin 6 and 7 that passthrough to other connector, those map to the defog control of the mirror and can skip connecting to the Comma developer harness. The developer harness uses 26 AWG wire if you want to match their wire size. I used White and Dark gray cables to try and differentiate from the colors used in the Comma dev harness, but the color of shielding isn’t going to make a difference electrically lol
One note about this, be very very very careful you do not mix up the 12v pins with another position when building your harness. If you send 12v down your CAN buses, that will not be good. Use a multimeter to triple check. I was ultra surprised to find that Tesla had a red wire on their harness and it didn’t carry 12v; rather the “blue” wire is what actually carried 12v. Going simply by the color codes would have given me a bad day, so DO NOT make any assumptions.
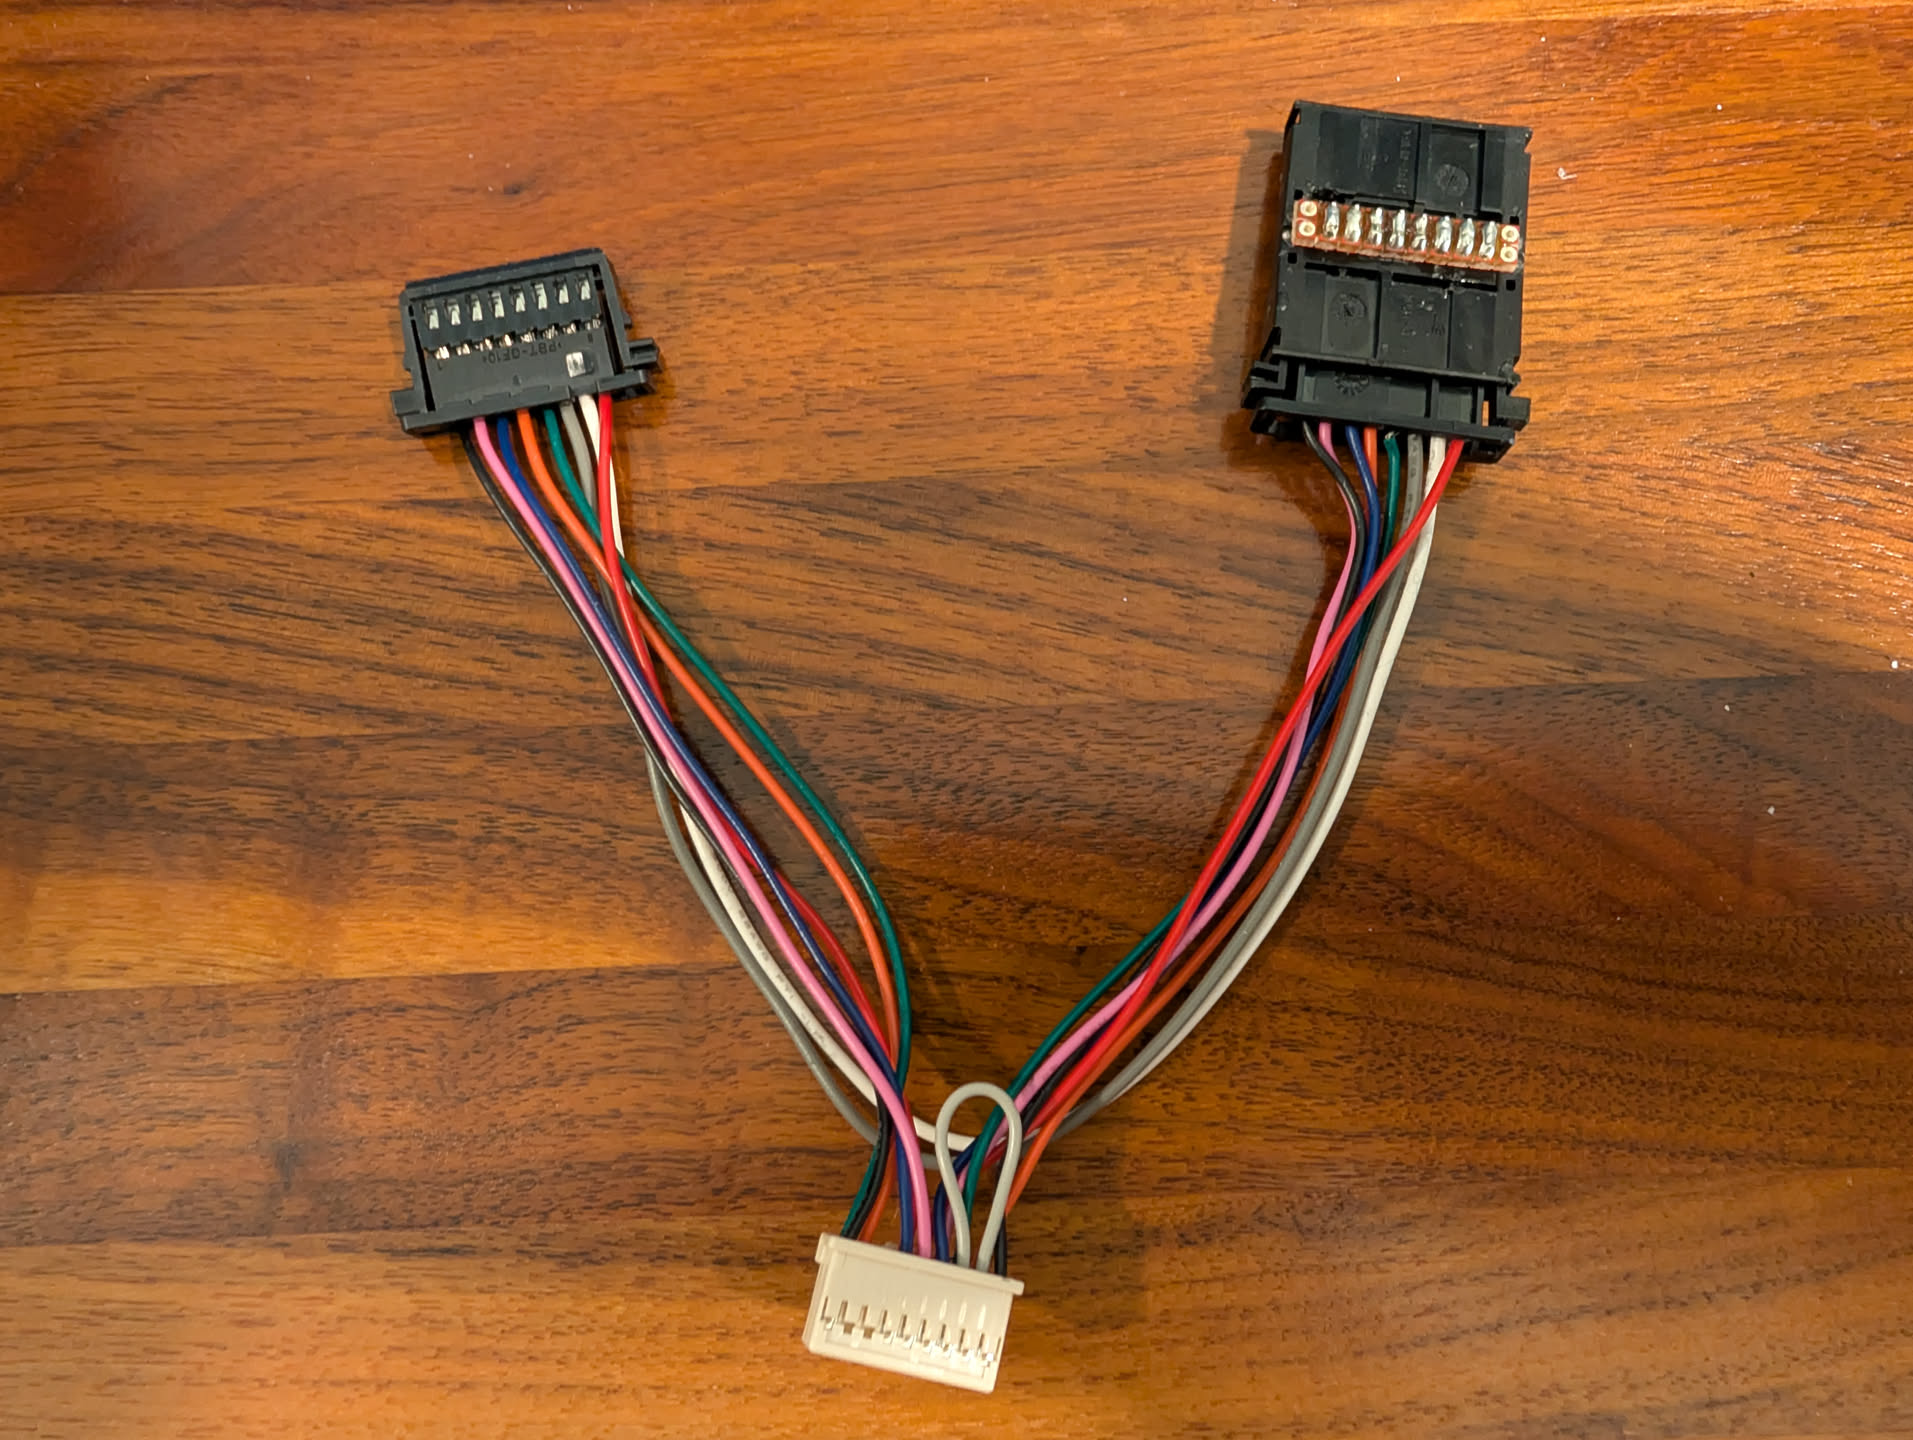
When building my harness, I terminated both the “to car” and “to camera” cables with the MQS 8P plugs. Connecting the cable from the car to the comma, I placed both MQS HDR 8P ASSY back-to-back on the protoboard and soldered the pins together. This allowed me a secure connection between the car and comma harness. Unfortunately, TE Connectivity doesn’t have the receiving connector without it being mounted to a PCB board, so double connector it was. Given vibration and force from accelerating / braking, I’d recommend locking connectors over the screw down blocks to prevent wires from coming loose.
Harness Creation
Break away 2 rows of 10 pins from your protoboard. If having a tough time snapping the protoboard apart, you can use a utility knife or exacto knife to score the area you want to snap; then use a needle nose pliers to wiggle the board back and forth until it breaks away. I used 10 pins worth, with one pin on each side unused, to give the connector a little more rigidity. Place the HDR 8P ASSY adapters back to back and solder them together.
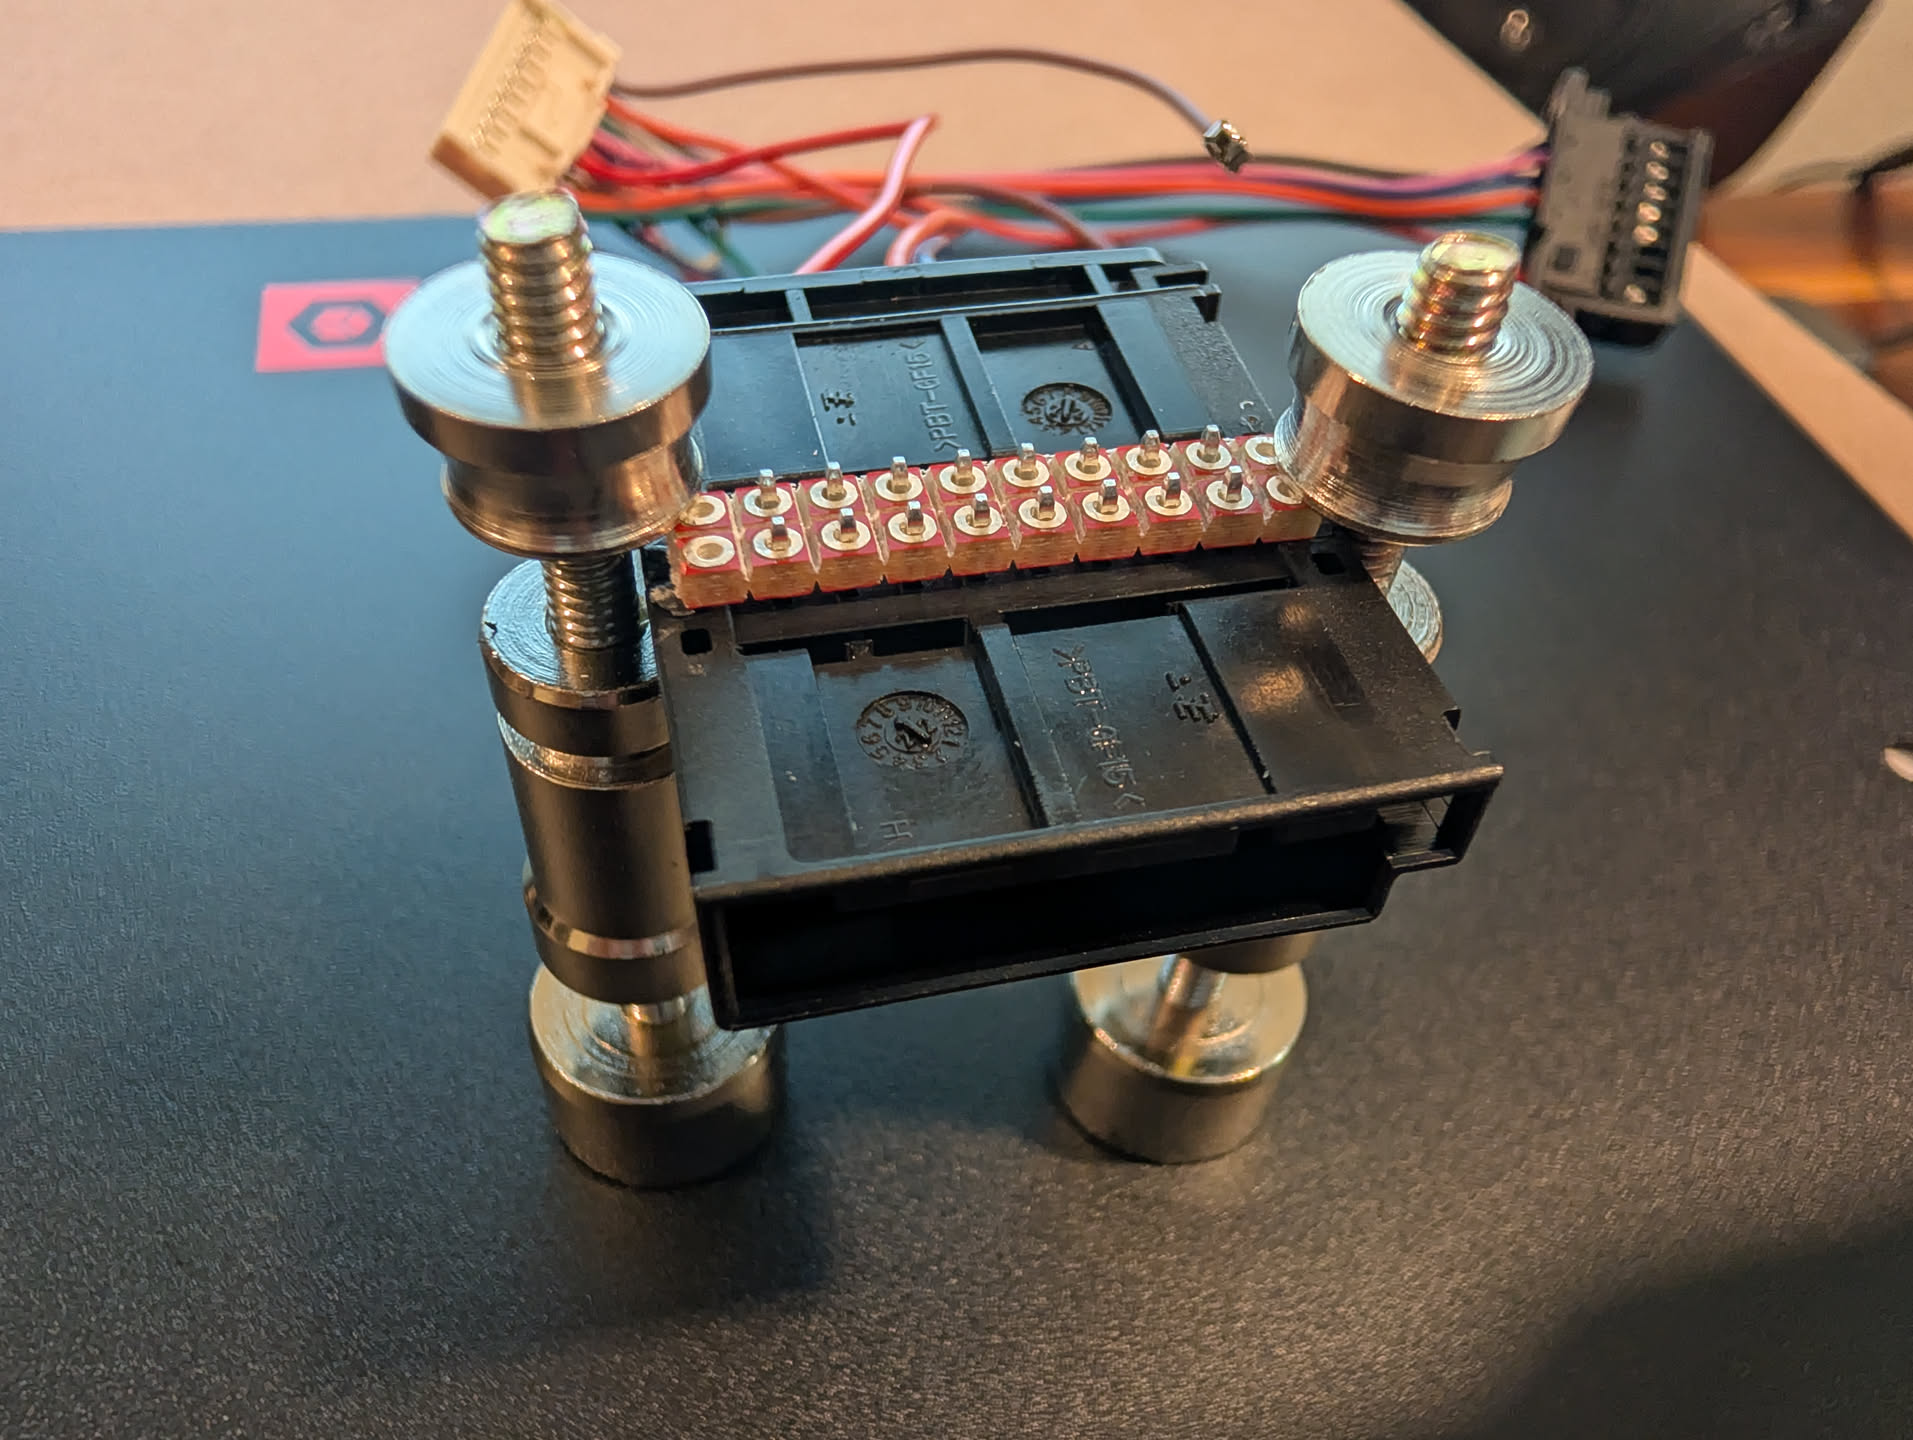
Remove the 2 IGN pins from the comma harness since they won’t be used and add the MQS rectangular pins to each of the wires needed for the harness.
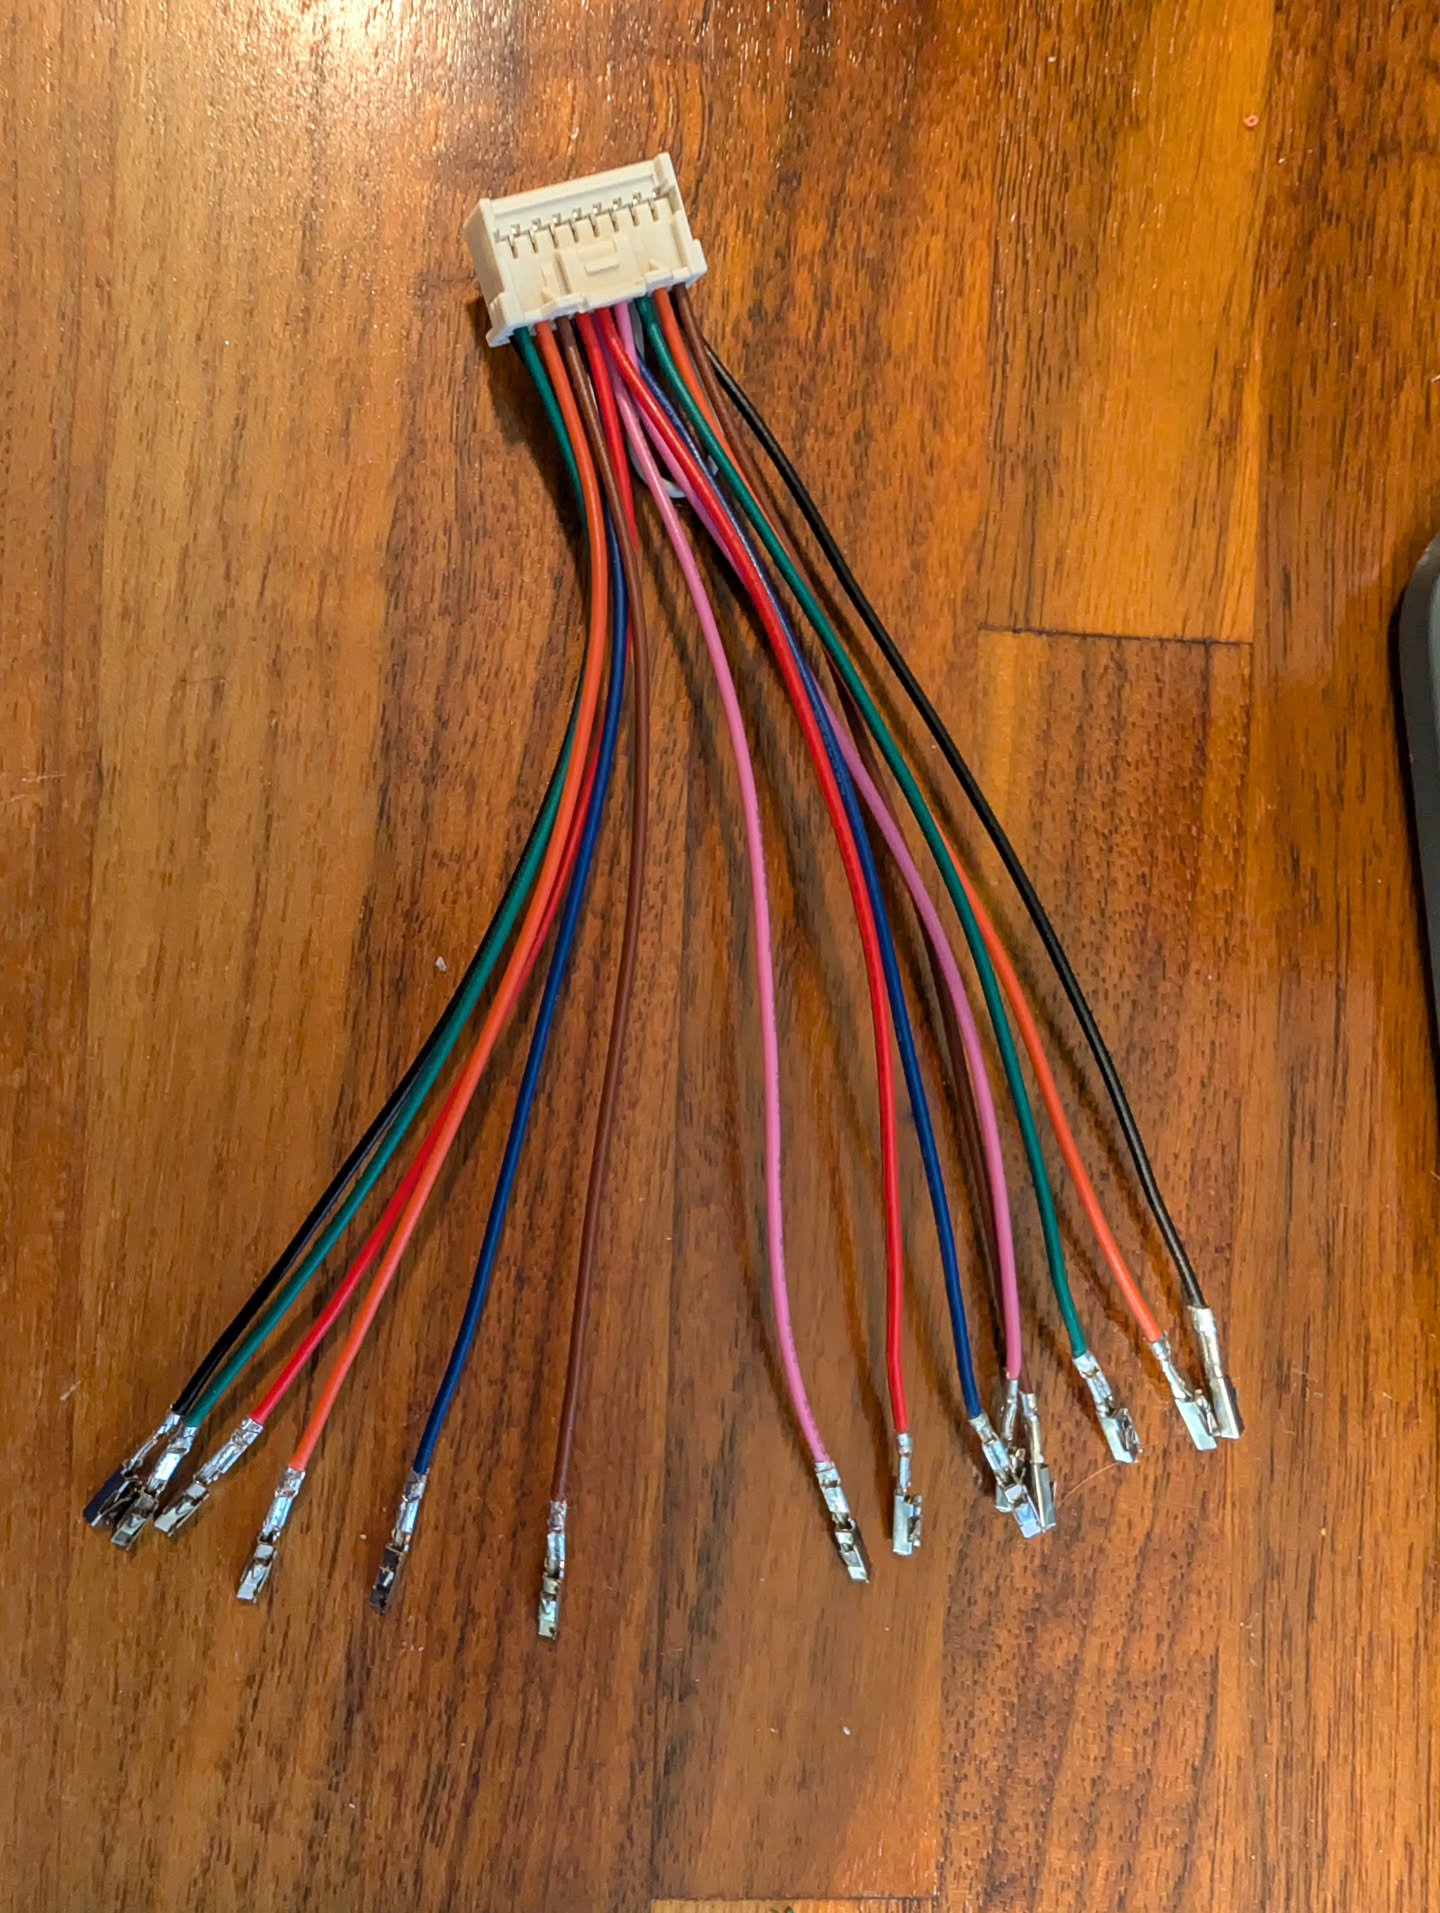
Connect the wires to each of the MQS 8P PLUG HSG adapters.
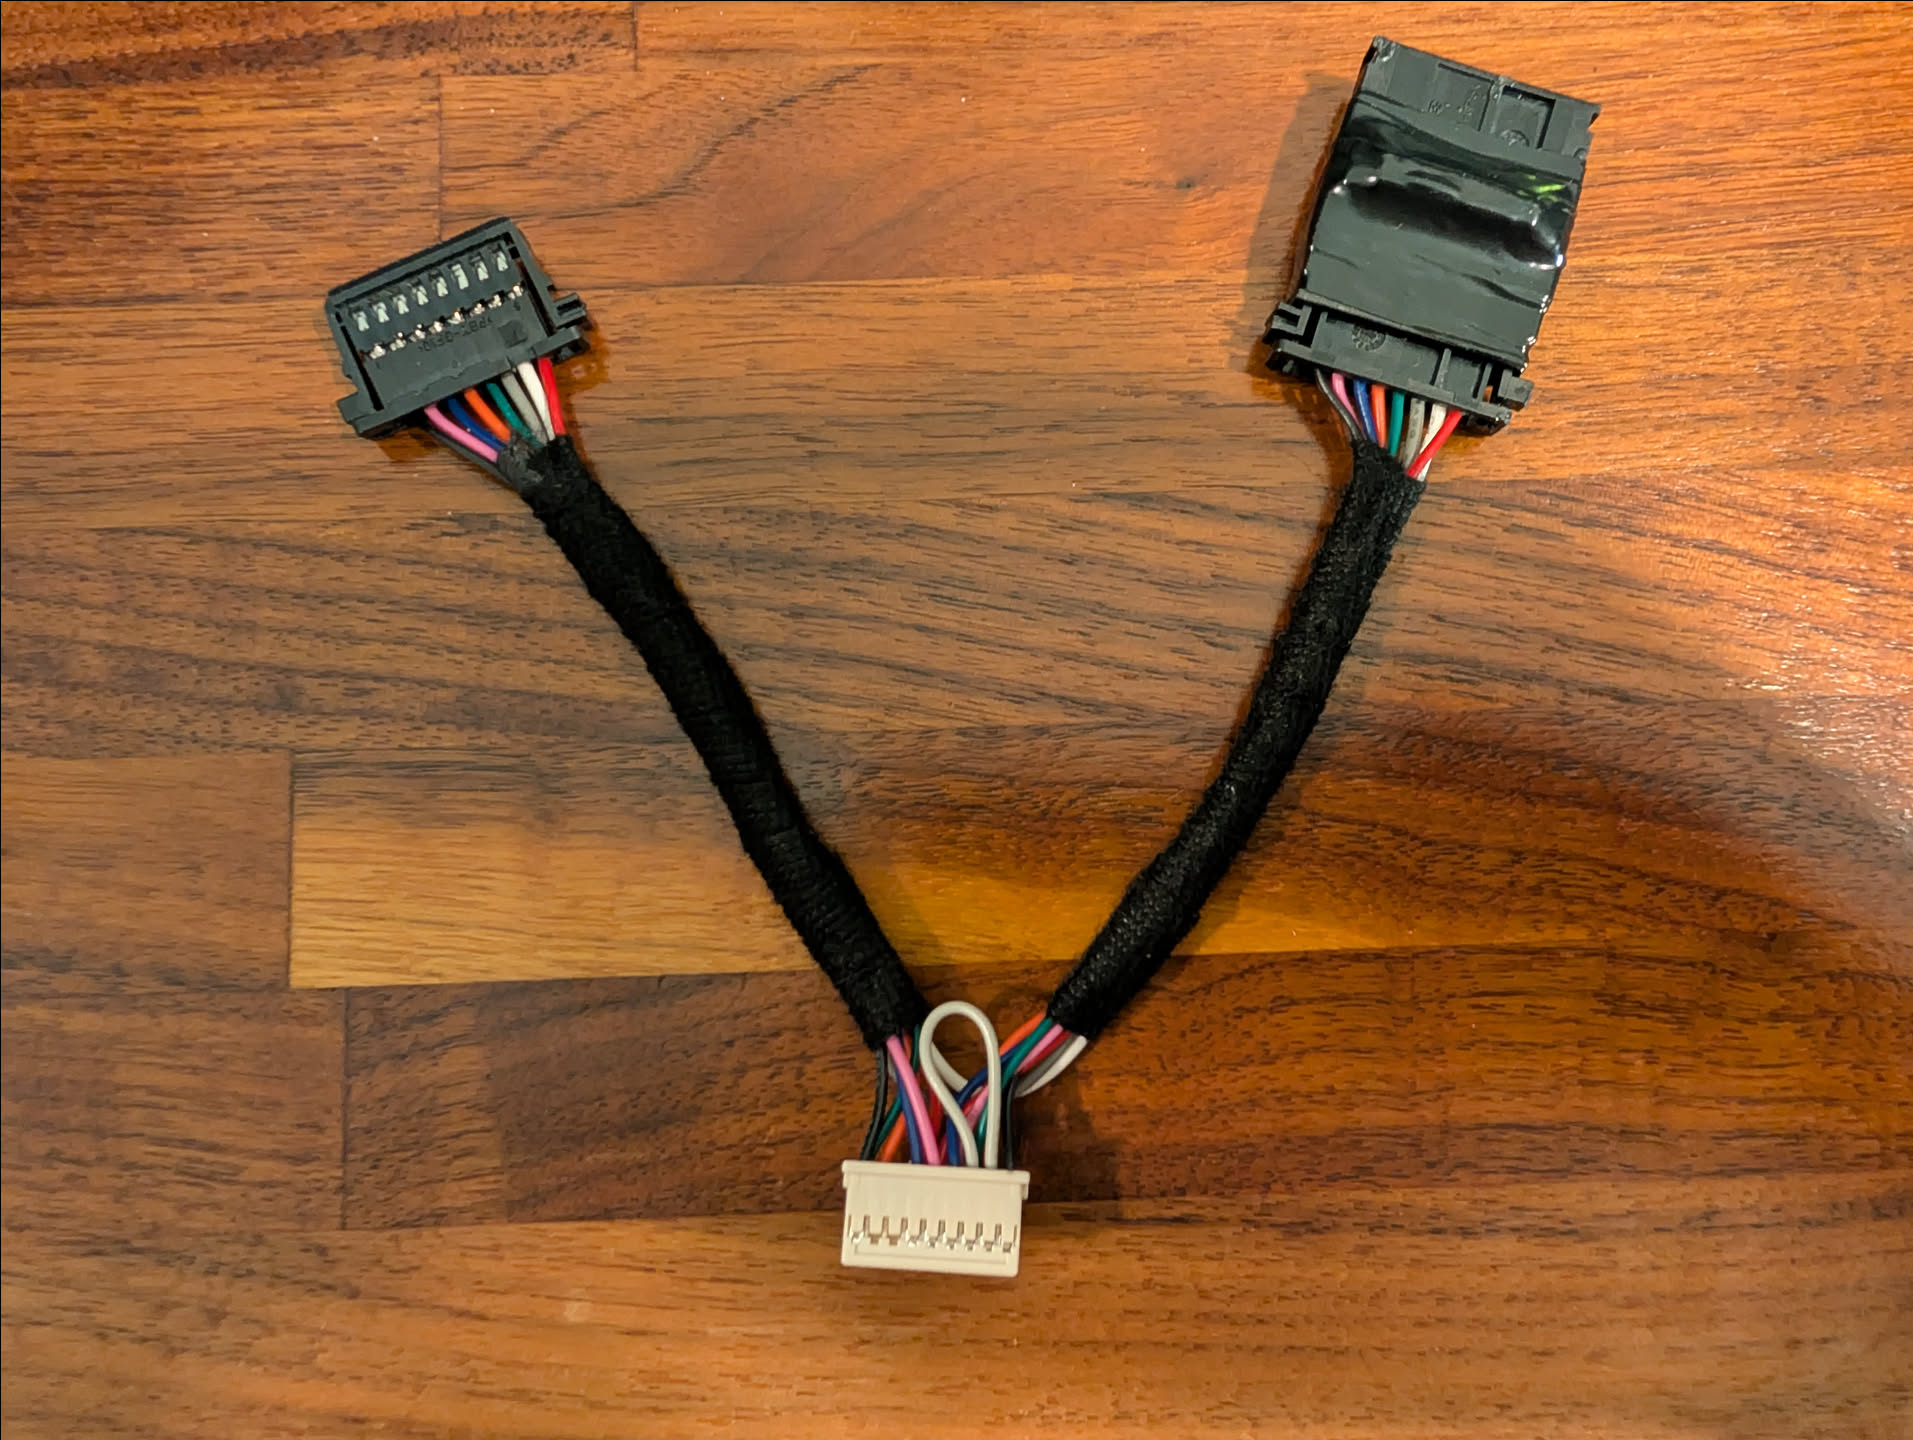
Add the fabric tape around the two branches of the harness and added electrical tape around the two HDR 8P ASSY adapters to insulate the soldered pins.
Final harness should look something like this:
Mount the Comma 4 Bracket
Before you pull apart your mirror, I would recommend mounting the Comma 4 bracket. Sit how you would normally in your seat, then hold the device up. The camera can be partially blocked by the mirror, but not fully. I saw a guide that said use 3 fingers down and you should be good. I did more like 4-5, since 3 had the entire device completely blocked by the mirror. Once your Comma 4 is mounted, remove the Comma 4 itself from the device, leaving just the mount on your windshield. One thing to make sure is to make sure the yaw (left and right balance) of the unit is as close as level as possible; you have roughly 4 degrees of skew and it’s nearly impossible to adjust once you stick the device, so have someone take a look on the outside of the windshield to gauge if it looks aligned properly.
Install the harness
To install the harness you will need to remove the front mirror assembly. Official instructions can be found on Tesla’s website here:
If you prefer a YouTube video, this video was helpful on understanding how to remove the mirror (don’t go past moving the mirror):
Mount the Comma 4 and Connect the harness
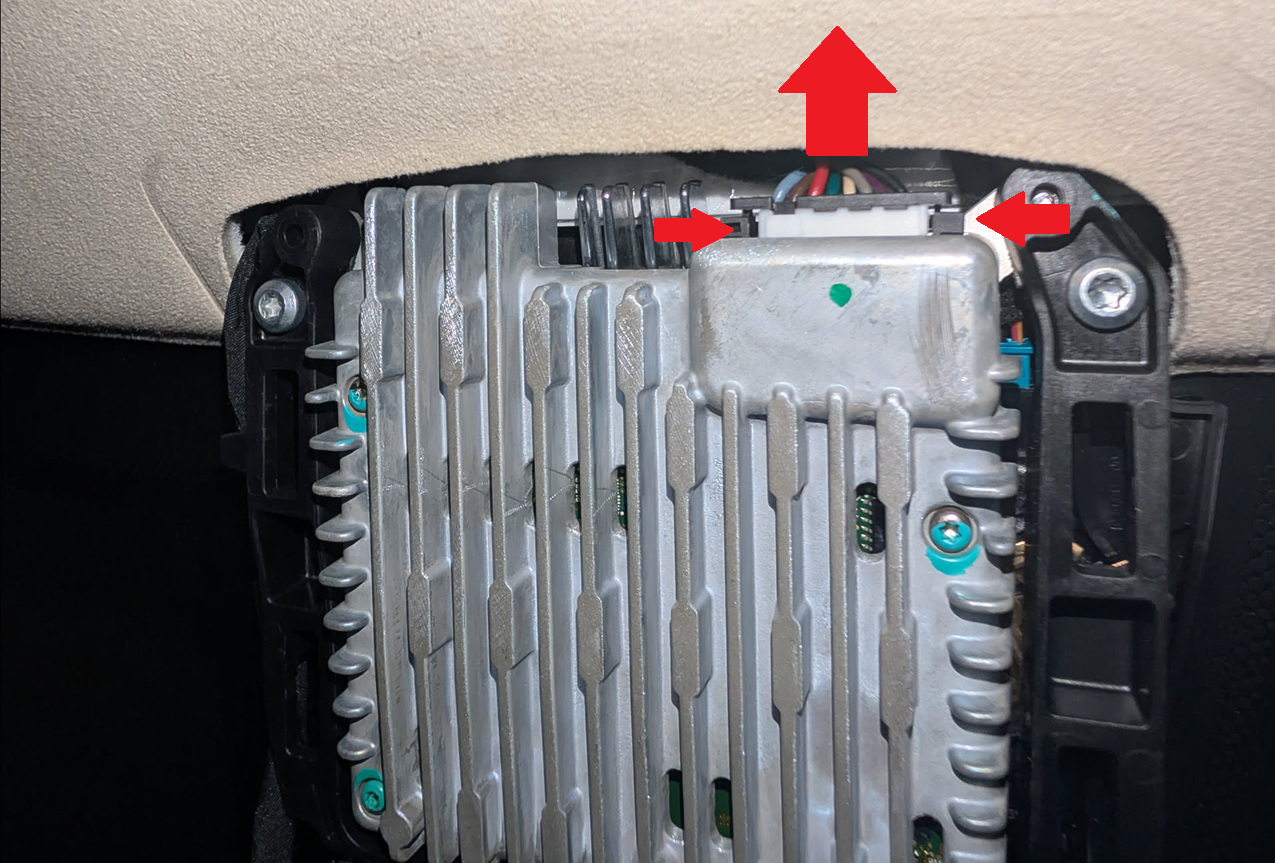
With the mirror assembly removed, unplug the connector to the mirror by pushing in both of the black sides of the connector and adding a pushing motion away to try and leverage the connector out. I found using two small flathead screwdrivers to push in the side tabs while trying to scoot the connector out worked the best. It’s tricky and can be frustrating, but you can get it!
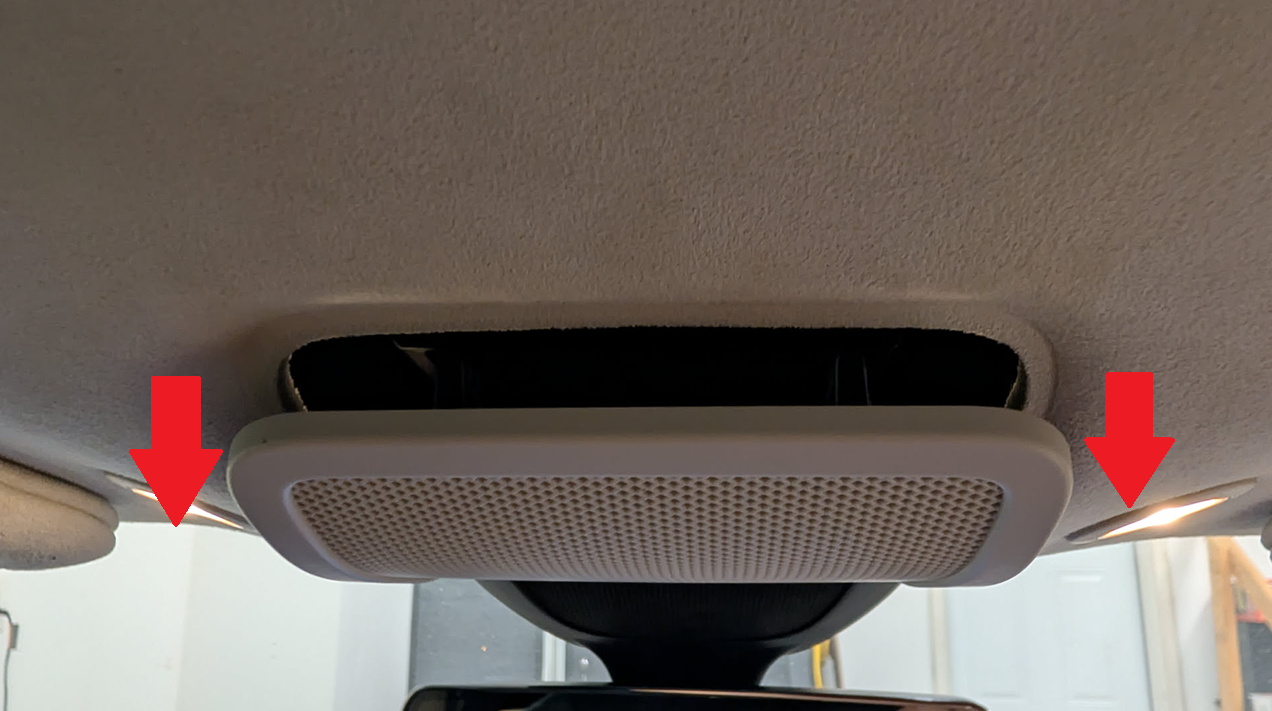
Remove the upper mirror headliner cover if you haven’t already. It’s held into place by two metal clips, pull straight down on the “back” side to detach it.
Pull the existing cable connected to the mirror assembly up through the headliner and route the one end of your harness back to the assembly and clip it into place (you should hear it click into place). Connect the other end of the harness to the cable that was previously connected to the mirror assembly. Then connect a USB-C cable to the developer harness box and route it down through the headliner.
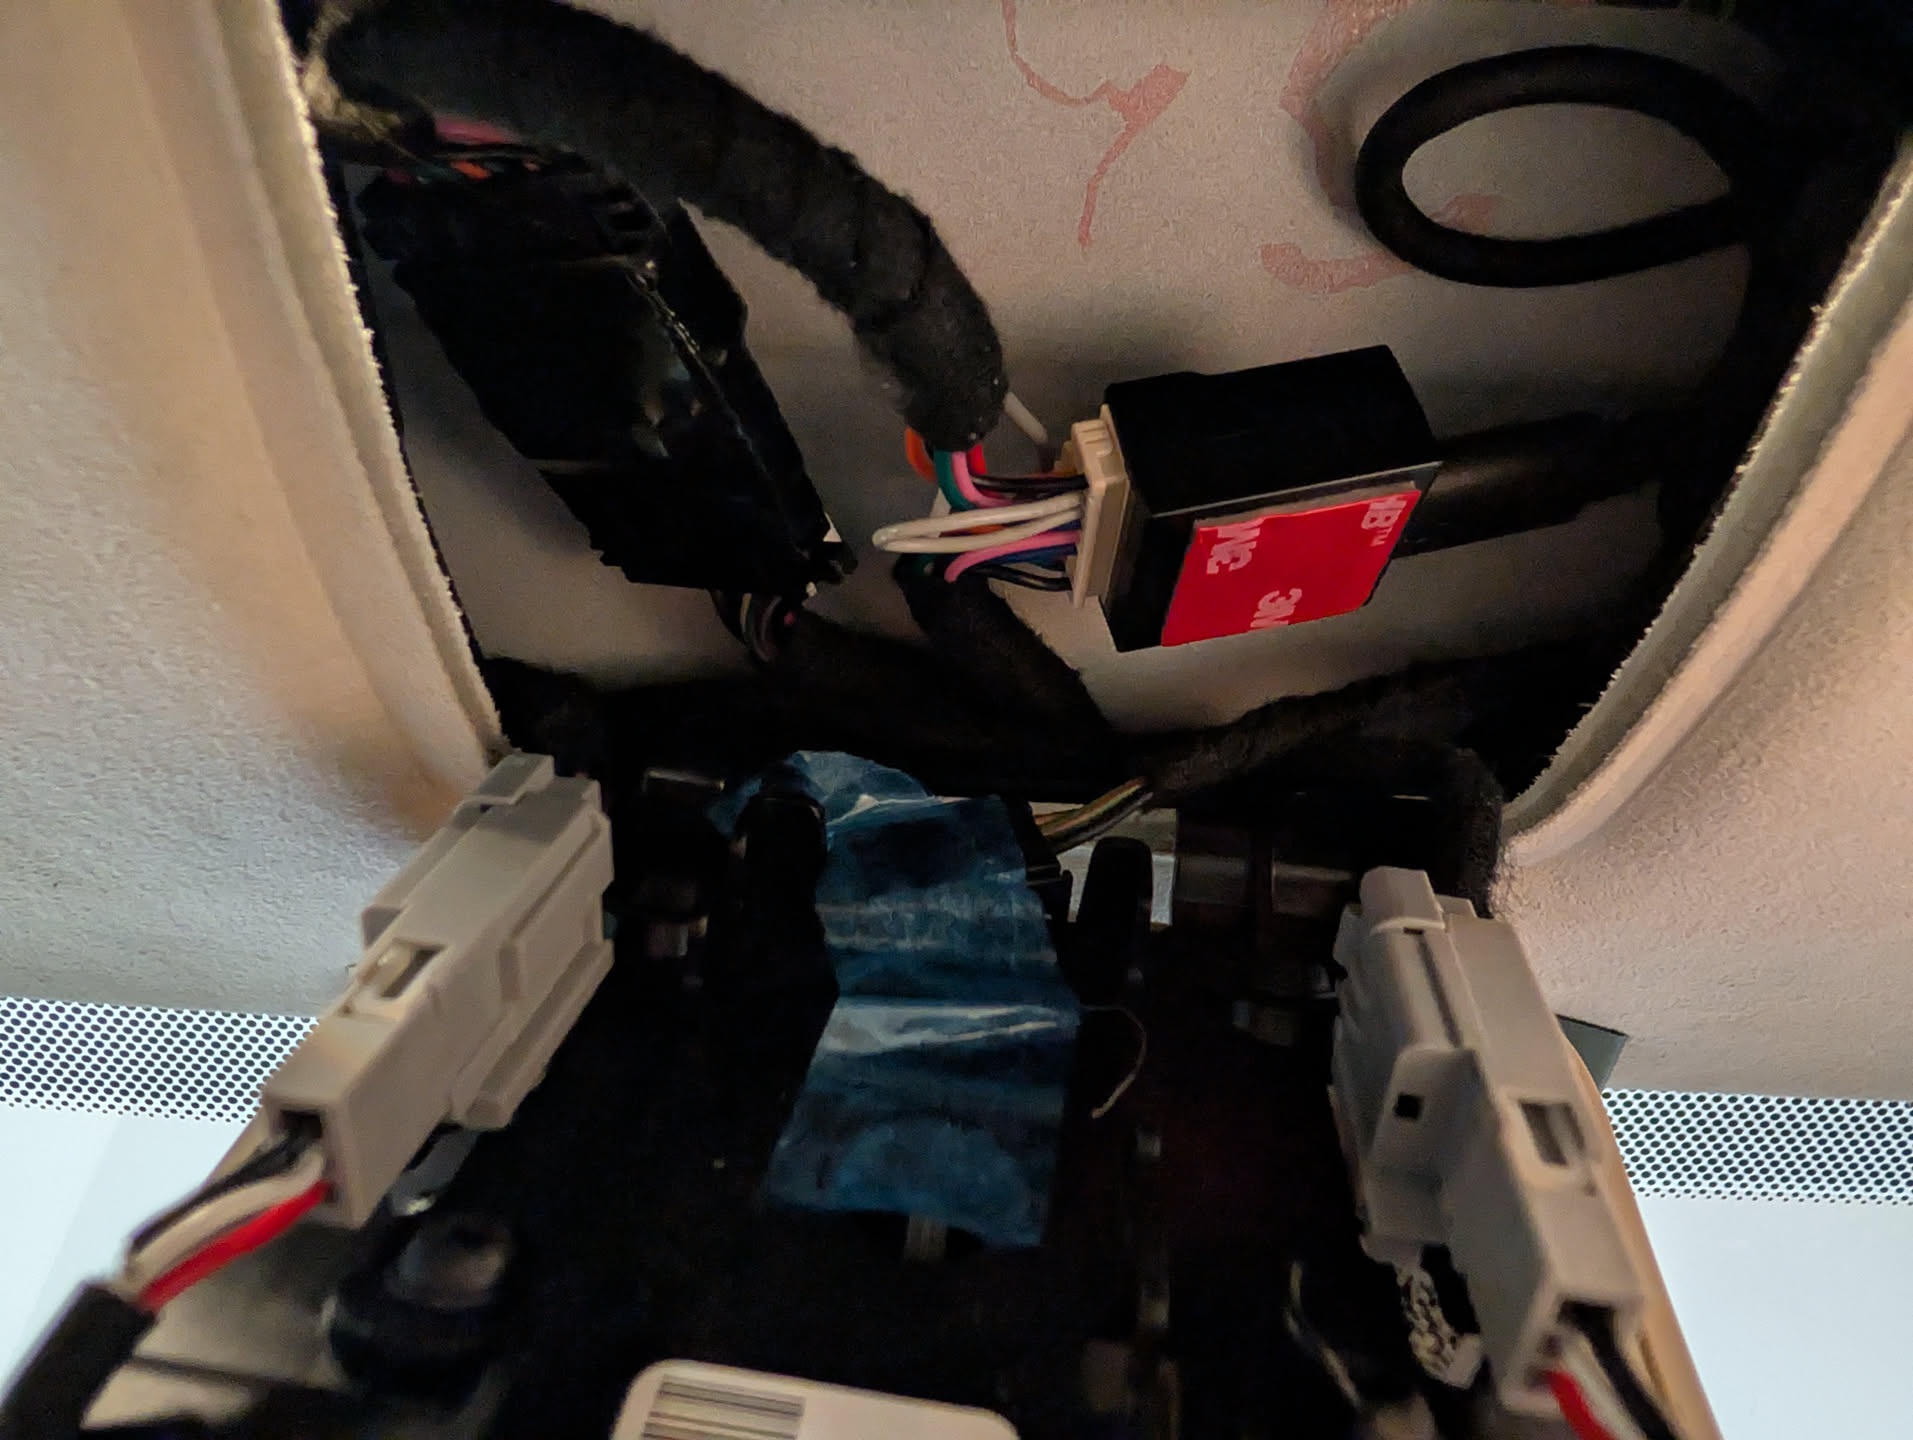
Looking up, I routed the USB-C cable from the Comma developer harness box around the mirror bracket and back into the headliner.
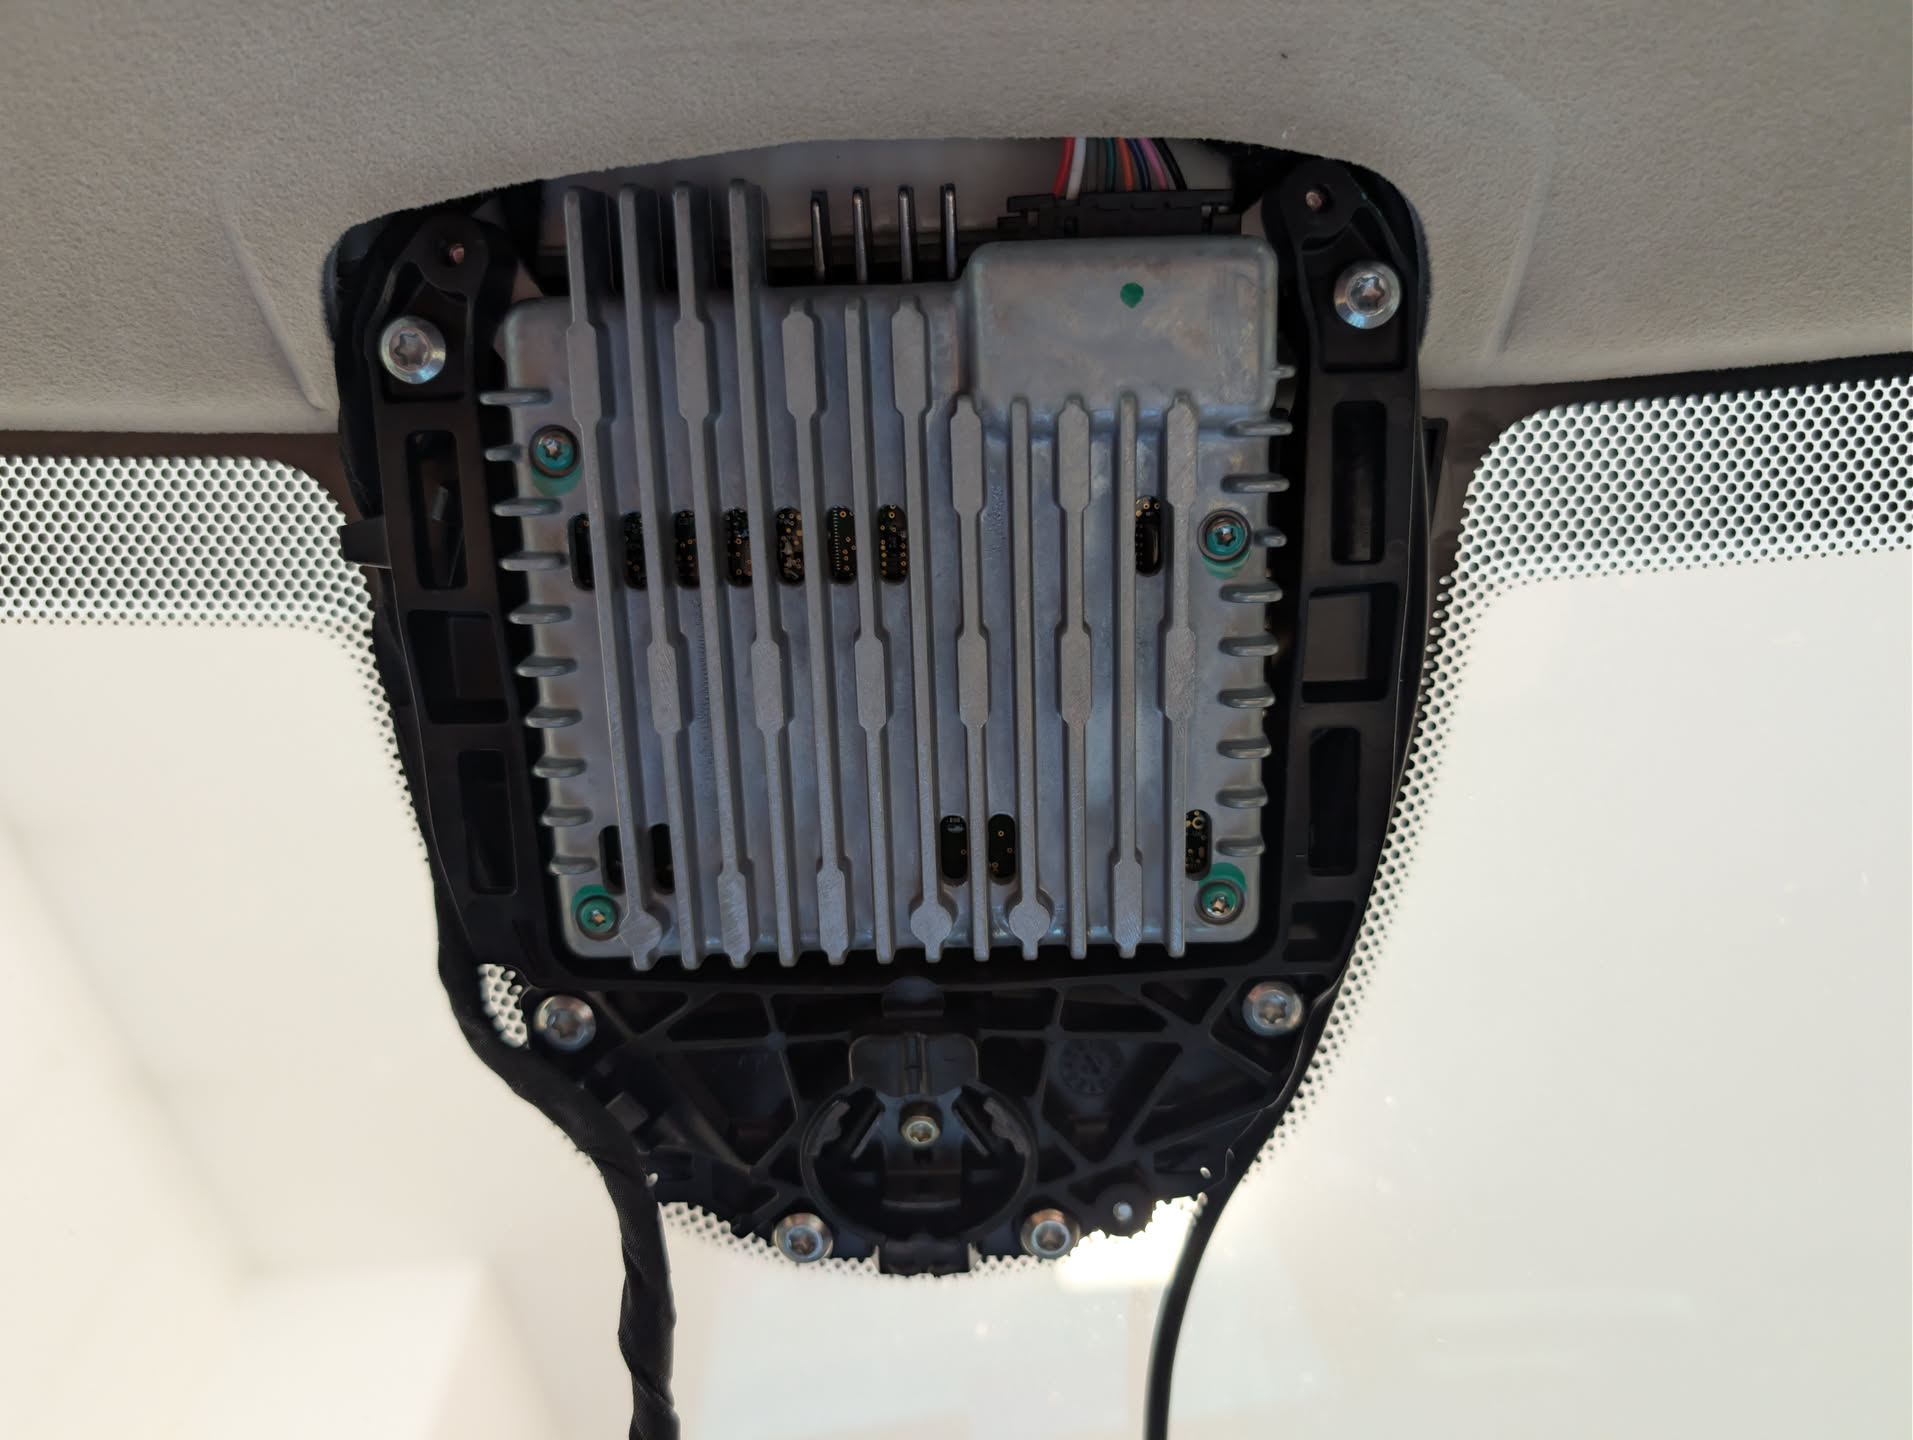
The top bracket should snap in place, even with the cable on the right side, with a tight fit.
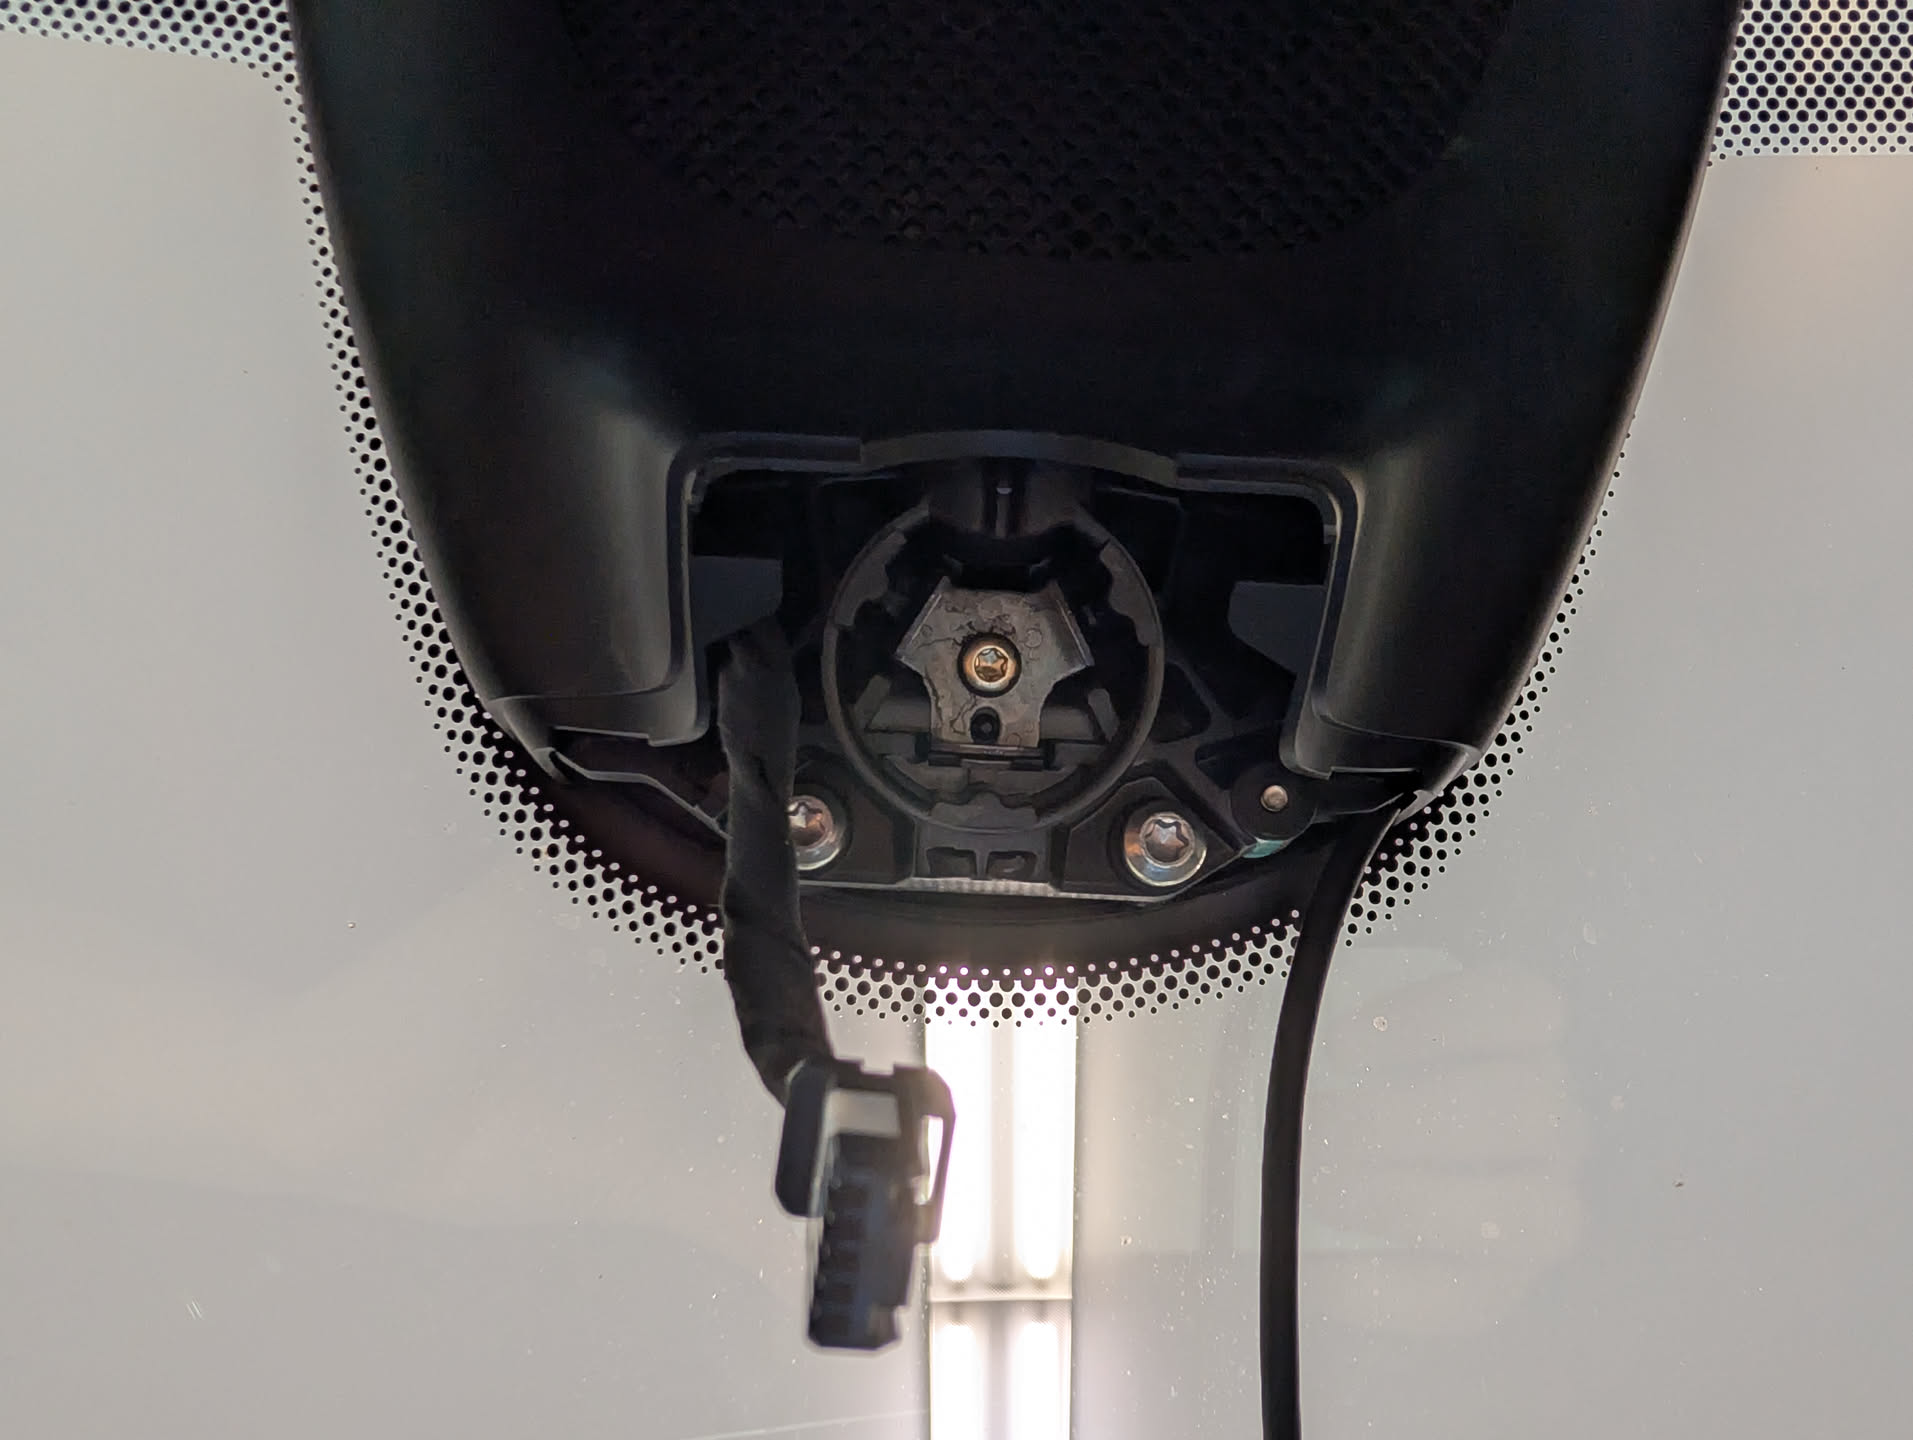
Snap the mirror into place first and then connect the wiring harness to it. Make sure the mirror is fully snapped into place; it can feel like it has, even though it hasn’t.
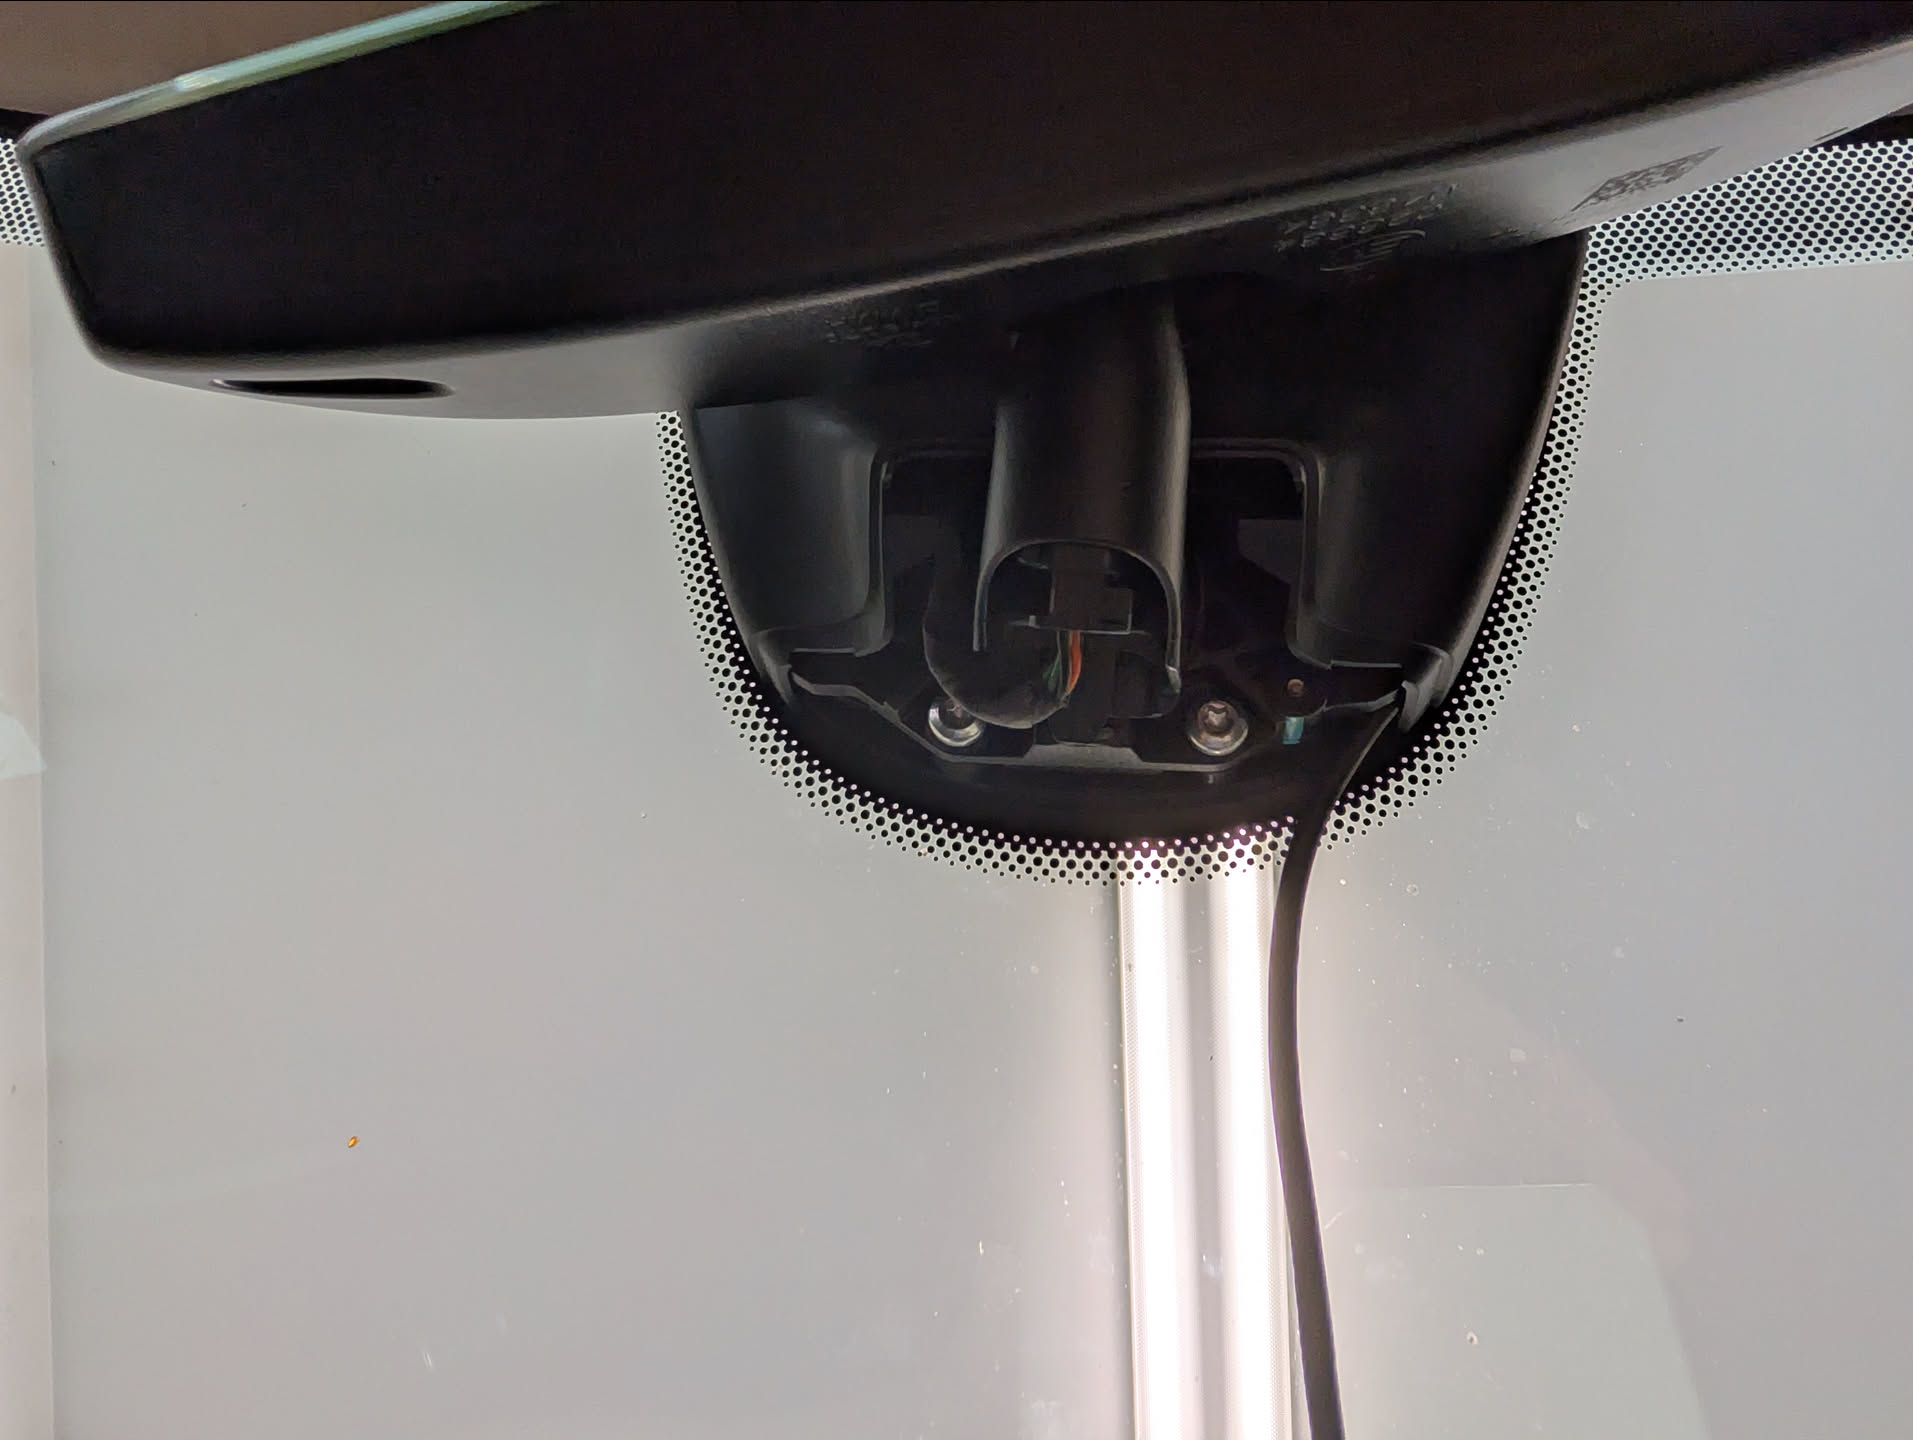
Mount your Comma 4 on the mount and connect the USB-C cable from the dev harness to the comma and it should immediately start to power up.
Install the xnor fork for the Comma 4
When the Comma 4 boots, you’ll land on a setup screen. Connect to WiFi (this is not optional as you need connectivity for the next step).
Eventually, the Comma will prompt if you want to use openpilot or Custom Software. Stock openpilot won’t do anything for you here as it doesn’t support older Tesla vehicles with AP1, so select custom software.
The fork that keeps AP1 alive is xnor, maintained by xnor-tech (Lukas Loetkolben on GitHub). Docs on how to get started can be found here: https://wiki.xnor.shop/docs/general/installing_a_fork/ On this step,
Enter this URL to install the xnor fork that has the Tesla AP1 car support: https://installer.comma.ai/xnor-tech/xnor
Unrelated, whoever at Comma was responsible for the onboard keyboard on the Comma 4 should get a gold star. The second I saw the keyboard I got anxiety that it would be miserable to type the URL in, but the keyboard honestly functions incredibly well for such a small screen. Kudos!
The install should take about 5-10 mins; it’s pretty quick.
Notes:
The `xnor` branch is the precompiled one and it covers comma four + comma 3X for Tesla Model S/3/X/Y across HW1 through HW4 — HW1 being what we care about for AP1.
There’s also `xnor-dev` at `https://installer.comma.ai/xnor-tech/xnor-dev` which builds from source on the device. It takes considerably longer to install. Unless you have a reason to be on dev, take the precompiled branch.
Setup Comma 4
At this point, I ran through the rest of setup and calibration of the Comma 4.
Ideally, you mounted the Comma 4 so you can run through the driver detection mode and pass it on first try. After driver monitoring, you’ll be prompted to run through device calibration, where you drive the car > 15 mph for a little bit of time.
Unlike me, I mounted the Comma 4 blindly after tearing the mirror apart and one thing that later got me is the yaw of the device has to be within ±3.96°. Lucky me, I was off by 0.07 degrees at −4.03° and had to remount the whole thing. At time of writing this, Comma doesn’t have a mounting mode to show you want the yaw of the device is, so you kinda have best guess whether or not it’s level on the windshield. If it’s off, you’ll see a “Unable to calibrate” messages, with no details on what went wrong.
If you unfortunately have to tear the Comma 4 mounting bracket off, I used a large wide razor blade that you use when scraping items or cleaning windows. Strongly recommend using that or some sort of plastic prying tool as trying to pull it off with your fingers is pretty much impossible
Grab the Comma Connect app
Comma Connect is the interface which allows you to pull dashcam footage, live views of the camera, and drive details. I’ve developed a mobile app to try and simplify working with the comma device on the go. You can grab a free copy of the app on the Google Play store here: Comma Connect (Unofficial) – Apps on Google Play
In closing
At this point, everything should be working. If it is, go ahead and repeat the mirror disassembly steps in reverse to reassemble it.
This is a really brief guide and slightly scattered, but thought I’d post it as I couldn’t find what the mirror pins did and was curious if the original dev harness from Comma could be used as-is (which it looks like it can be! : )
Disclaimer: At time of writing this article (and likely still not today), I am not affiliated with, sponsored by, or have any investment in comma ai or openpilot. I’m just some random person that wants to make my car feel like a car of the future again.
Disclaimer 2: You are responsible for your own car and what you do with it. Follow local, state, and federal law when it comes to your vehicle and what you do with it.