This is a quick setup guide on how to configure the open source software WeeWX for a Personal Weather Station (PWS). I highly recommend you check out the WeeWX User Guide as this information is very well documented. Here is a reflection of how I was able to get WeeWX installed on a Raspberry PI with a brand new weather station.
- Setup your Raspberry PI
- How to setup your Raspberry PI: http://jackstromberg.com/2018/03/setting-up-a-new-raspberry-pi-via-ssh/
- Note: Raspbian is a distribution based upon Debian. In this case, we will follow the Debian instructions for setting up WeeWX.
- How to setup your Raspberry PI: http://jackstromberg.com/2018/03/setting-up-a-new-raspberry-pi-via-ssh/
- (Optional) Configure the Raspberry PI to be localized to your environment
- sudo raspi-config
- Here you can arrow down to Localization Options and configure the timezone to match that of your console/weather sensor. Keeping time is critical, so if possible, try to keep the date/time between your weather station and the Raspberry PI as close as possible.
- sudo raspi-config
- Configure Apt-Get to look for the WeeWX packages
wget -qO - http://weewx.com/keys.html | sudo apt-key add -
sudo wget -qO - https://weewx.com/apt/weewx-python3.list | sudo tee /etc/apt/sources.list.d/weewx.list
Note: Use https://weewx.com/apt/weewx-python3.list for Debian 10.X (latest version of raspbian as of 2021-07-23 will use this); otherwise use https://weewx.com/apt/weewx-python2.list for Debian 9.X.
- Update your Raspberry-PI to use the latest packages
sudo apt-get update
sudo apt-get upgrade
- Before installation, ensure you have your console or device setup and connected to your Raspberry PI for WeeWX to pull the data
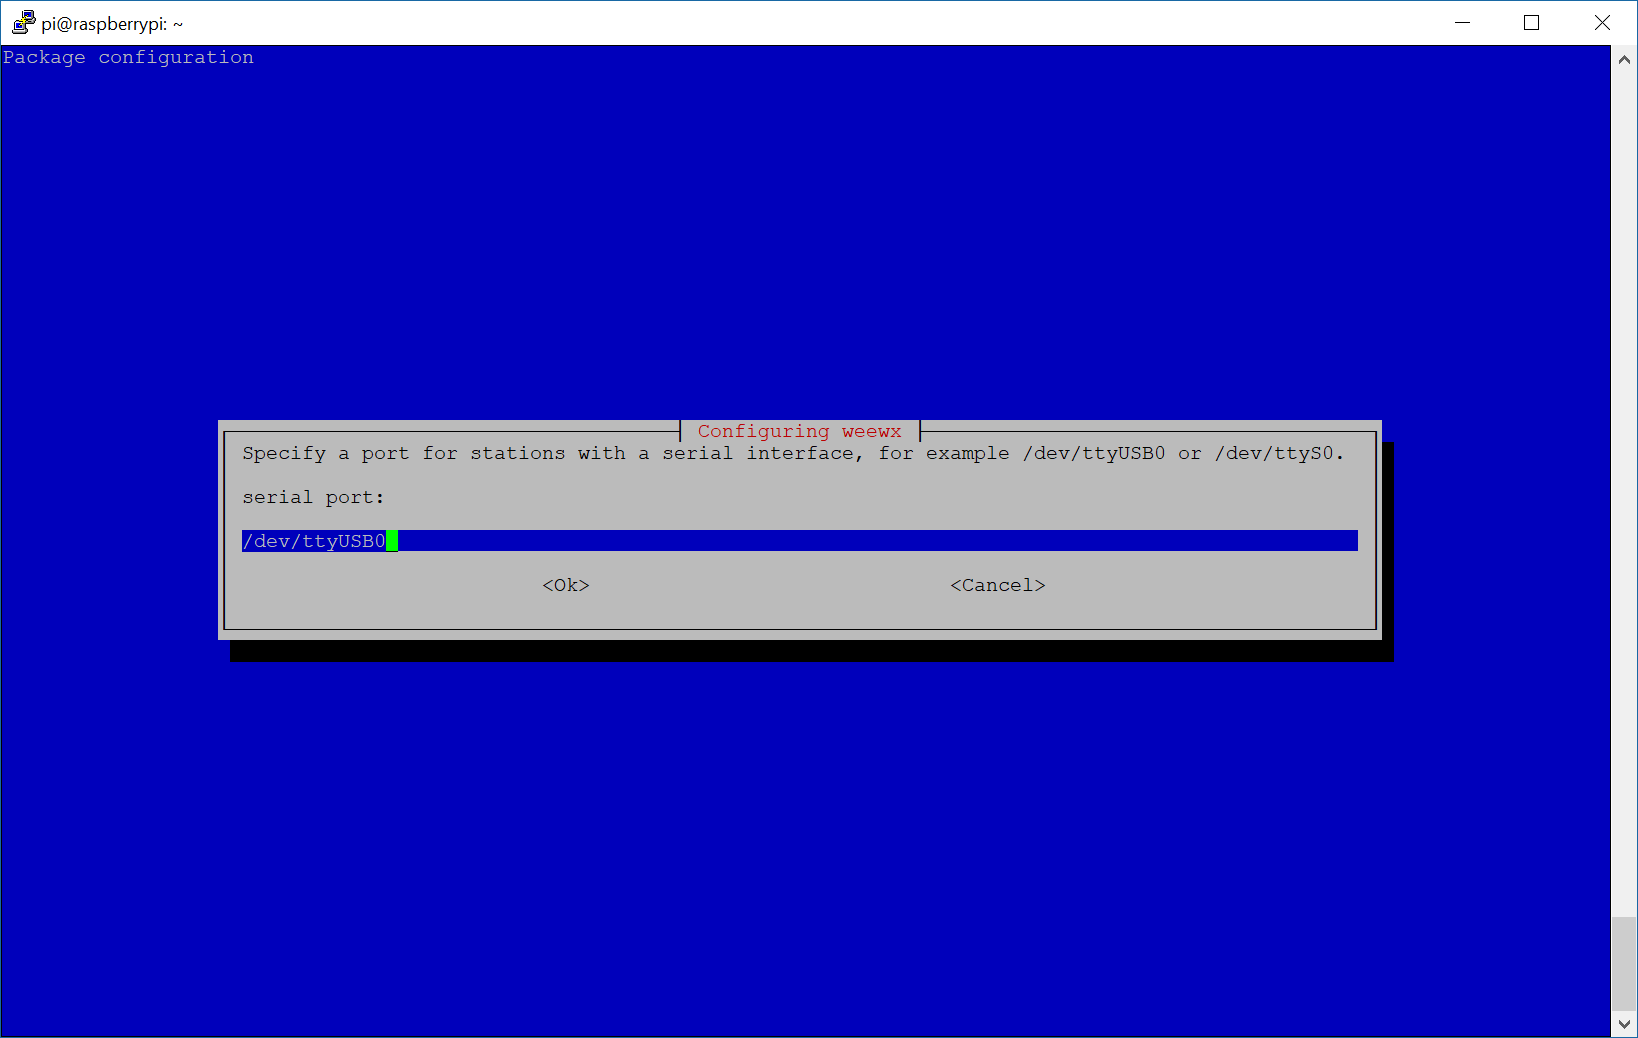
- Determine the interface the console is connected to (if using a directly attached data loggerm skip if using an IP based source)
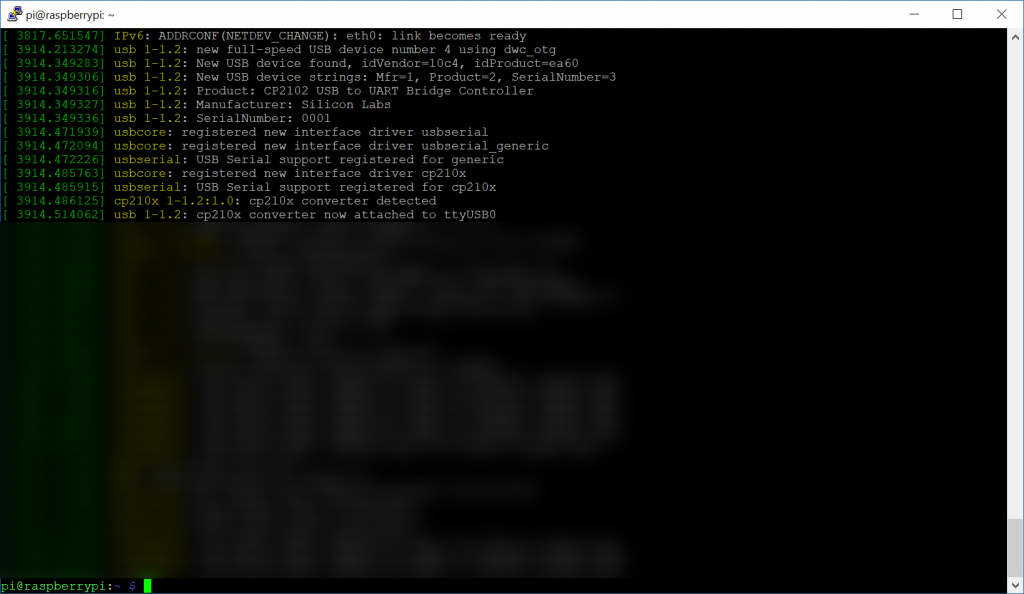
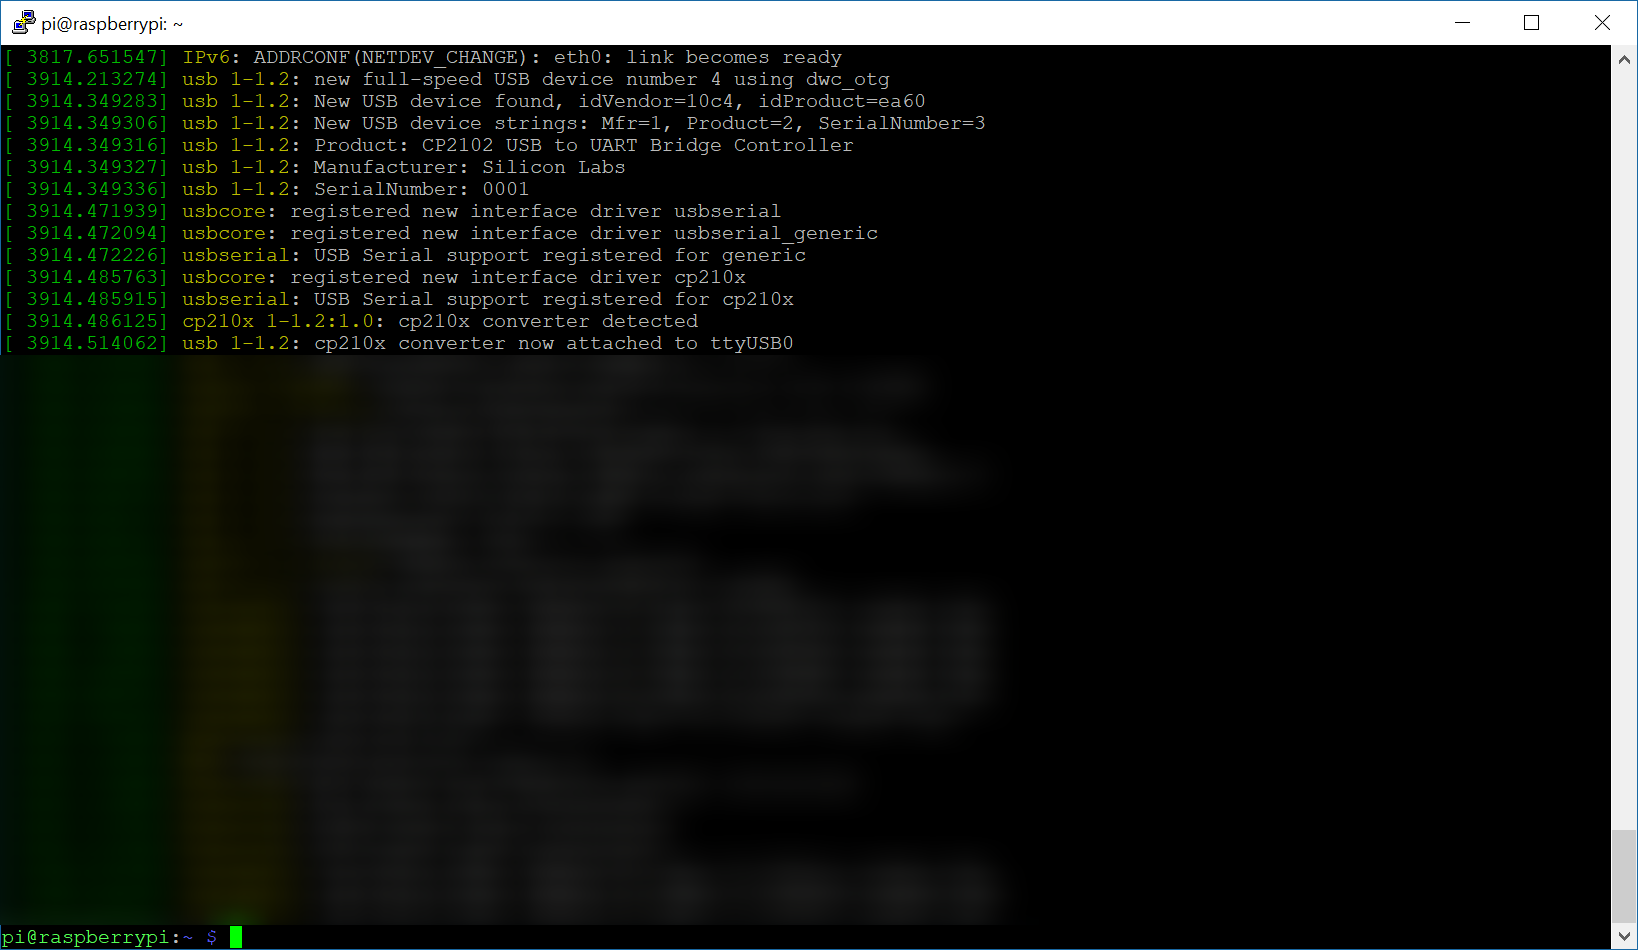
- Execute the command dmesg and look for what interface the data logger is connected to
- In my example, you can see the data logger is connected to ttyUSB0
- In my example, you can see the data logger is connected to ttyUSB0
- Execute the command dmesg and look for what interface the data logger is connected to
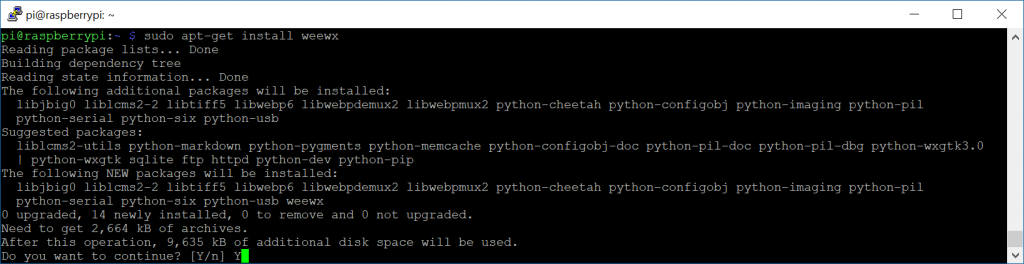
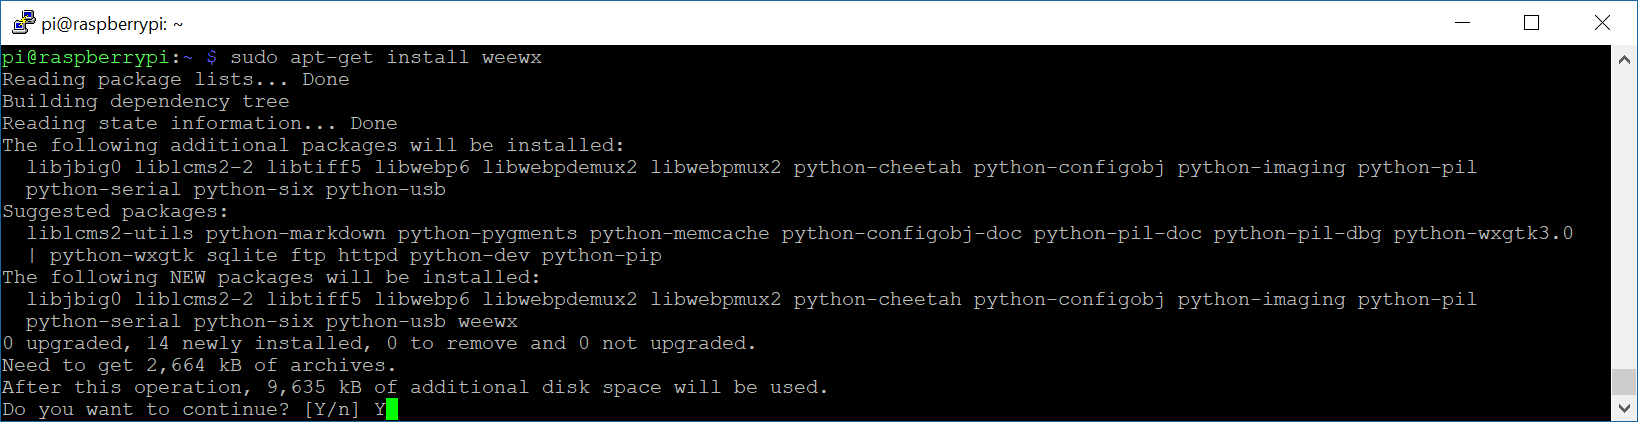
- Launch the installation wizard for weewx
- sudo apt-get install weewx
- Note: You will likely be prompted to install a few dependencies, type Y for yes to install them
- Note: You will likely be prompted to install a few dependencies, type Y for yes to install them
- sudo apt-get install weewx
- Installation
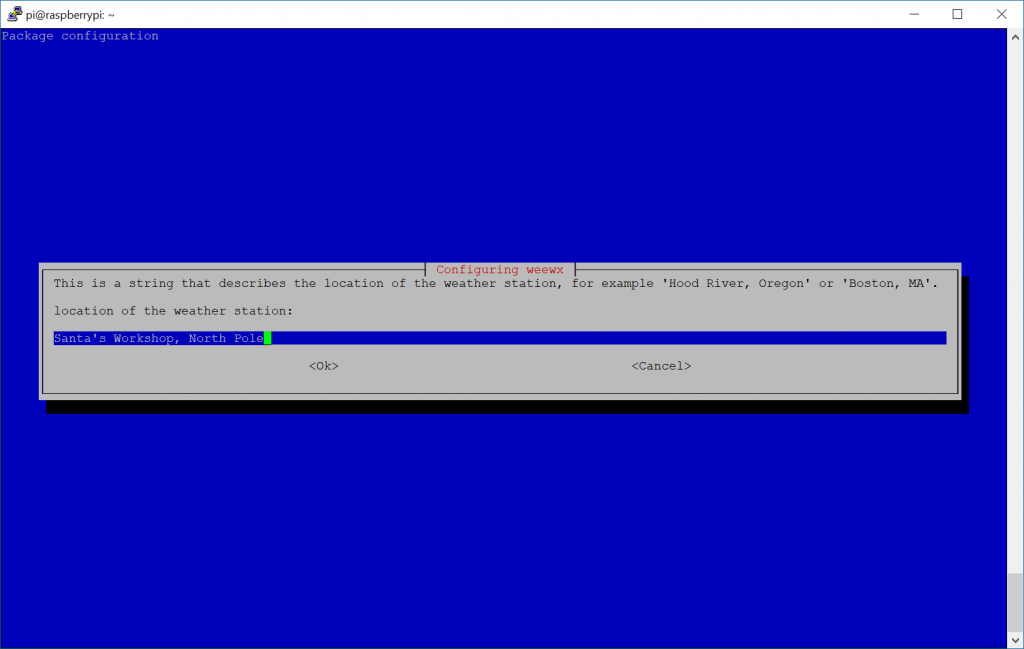
- Enter the location of your weather station: Santa's Workshop, North Pole
- Enter in the latitude, longitude of your weather station
- Note: If you don't have GPS, you can easily find this by using Bing Maps or Google Maps, navigating to your location, and right clicking.
- For Bing, it will just show you the lat/long values when you right click
- For Google, click on "What's Here" and it will list these values
- Note: You can be more specific than 3 digits behind the decimal, so if you want to use a more specific set of coordinates like 40.689167, -74.044444, that is acceptable.

- Note: If you don't have GPS, you can easily find this by using Bing Maps or Google Maps, navigating to your location, and right clicking.
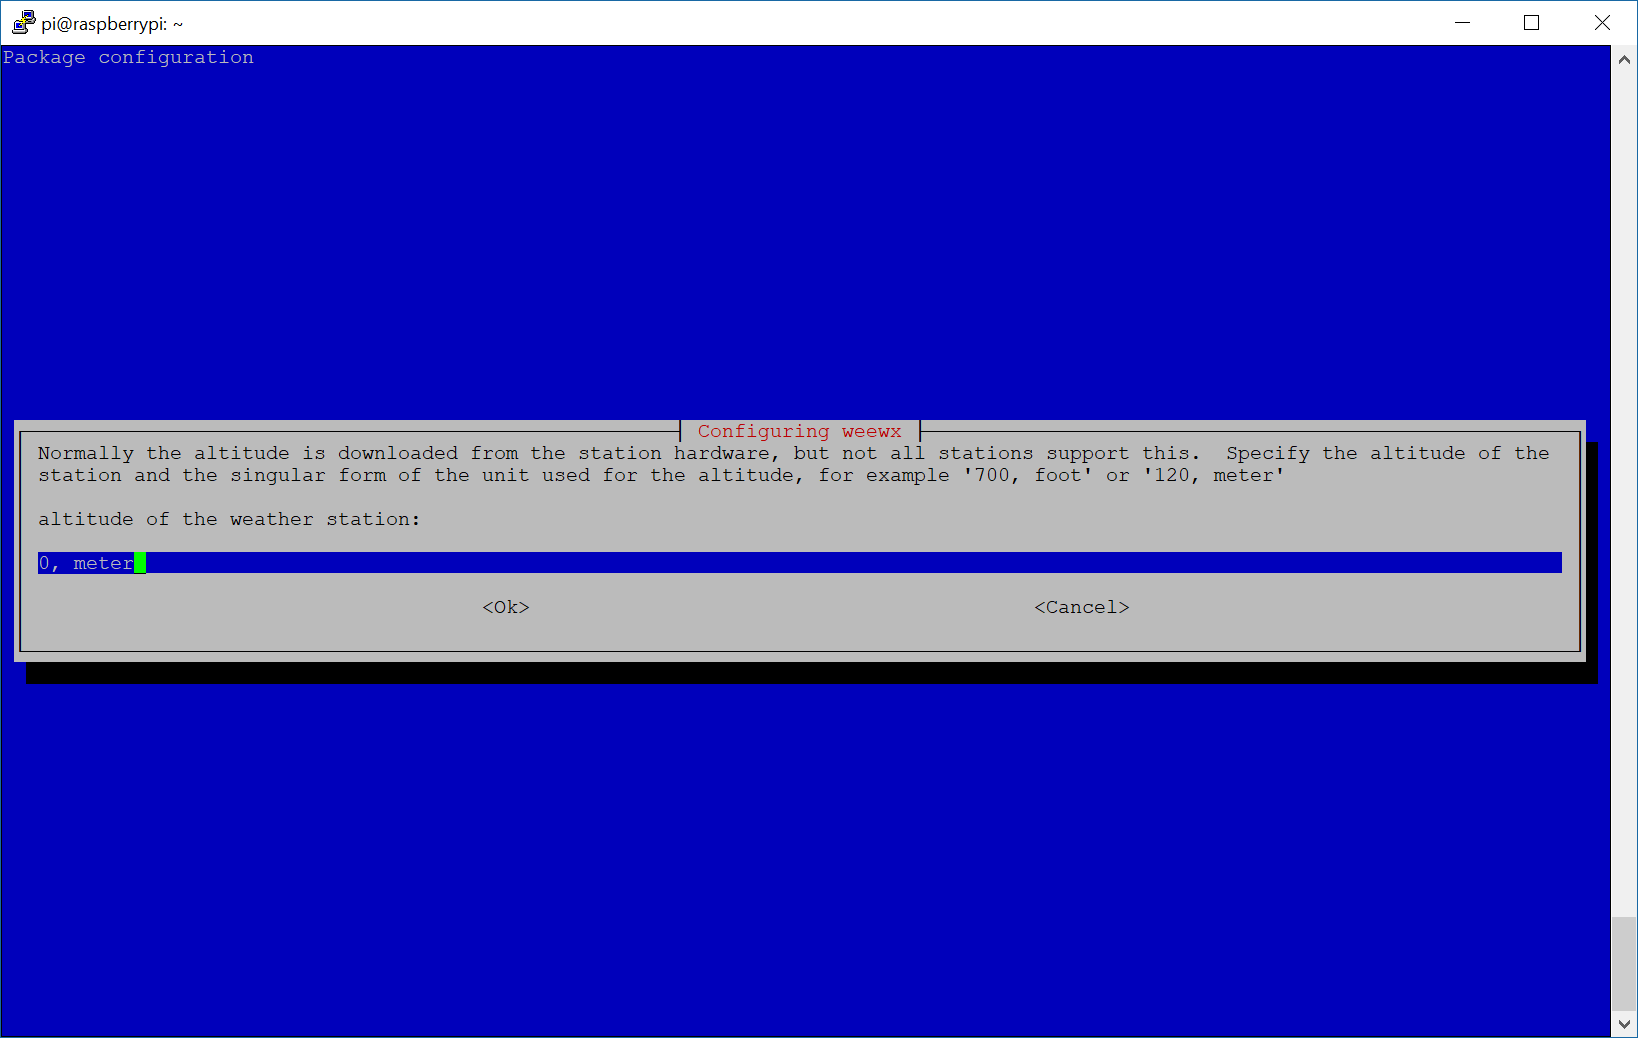
- Enter in your Altitude of where the weather station is
- You can use Google Earth to find the altitude or this tool here: https://www.freemaptools.com/elevation-finder.htm
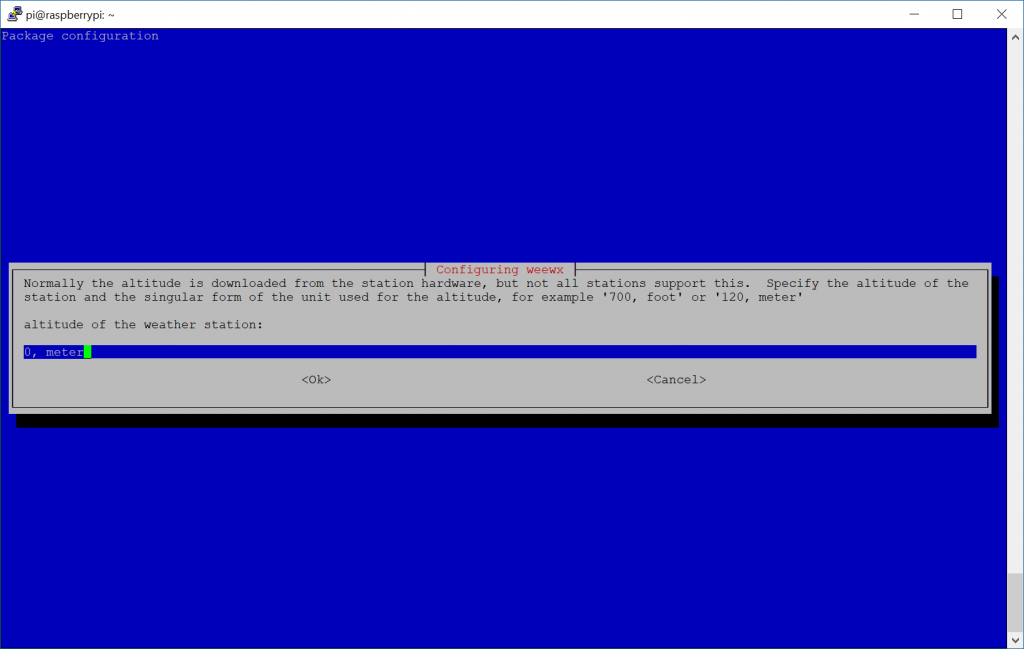
- You can use Google Earth to find the altitude or this tool here: https://www.freemaptools.com/elevation-finder.htm
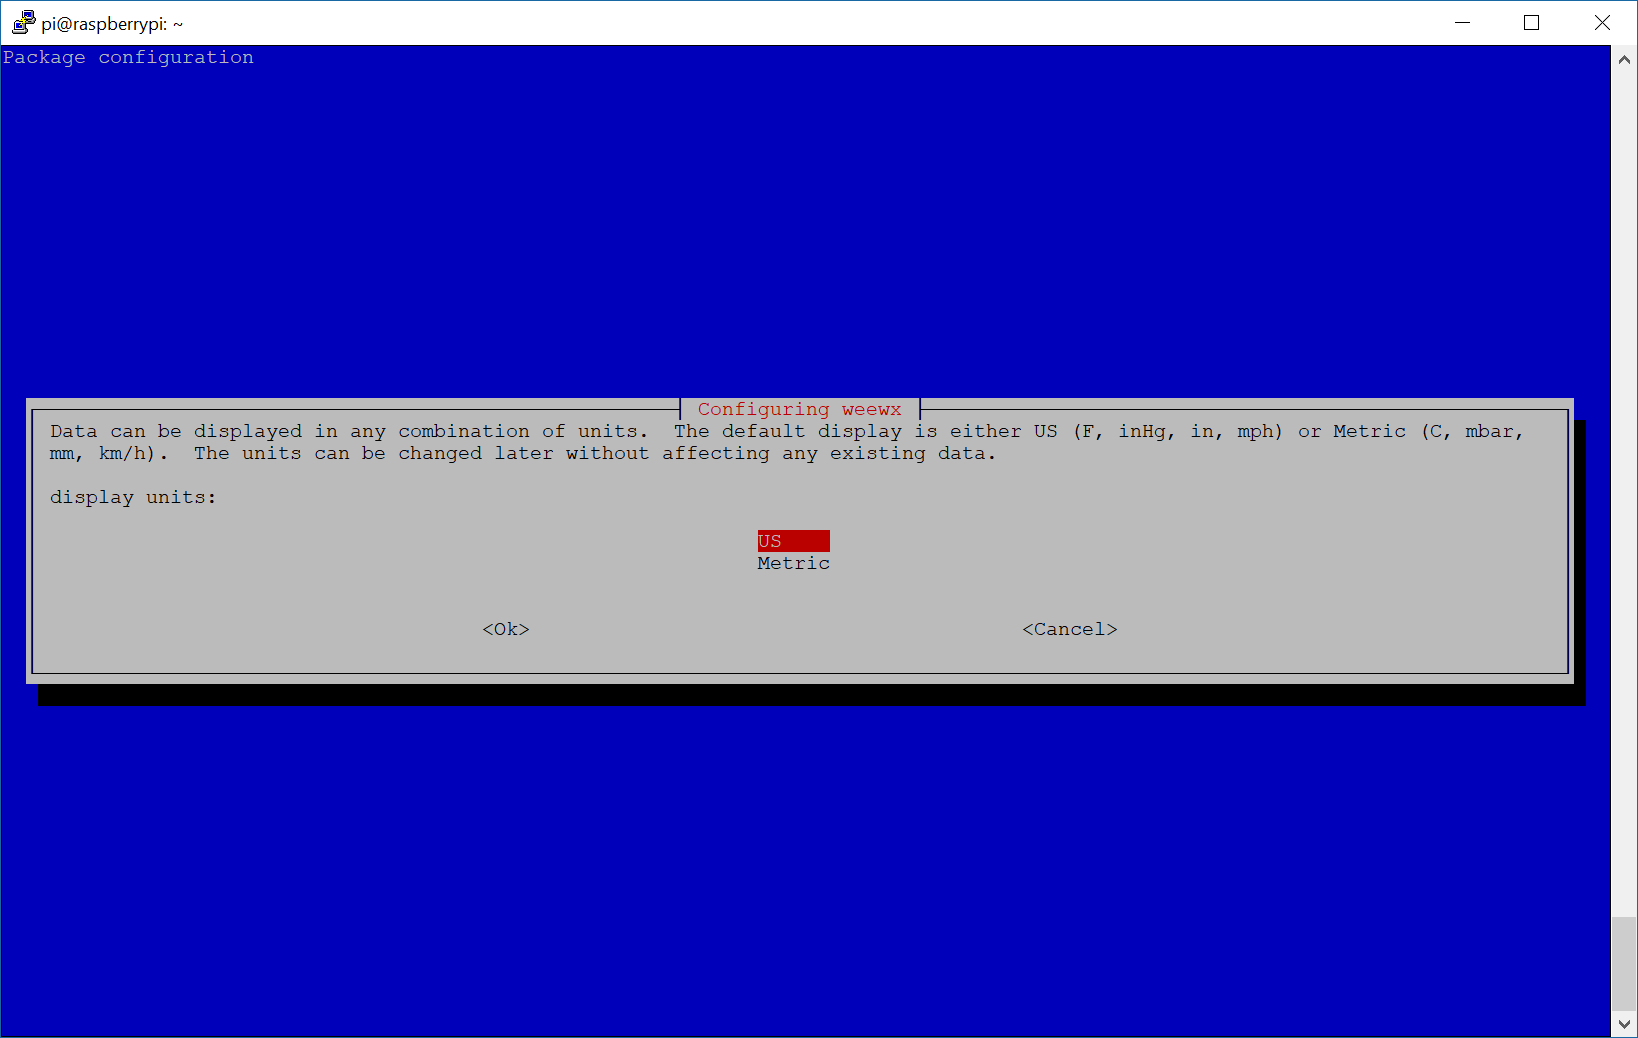
- Set your preferred unit of measurement
- US (Imperial) or Metric

- US (Imperial) or Metric
- Select your weather station type
- I.e. AcuRite, Vantage (if using Davis), etc.
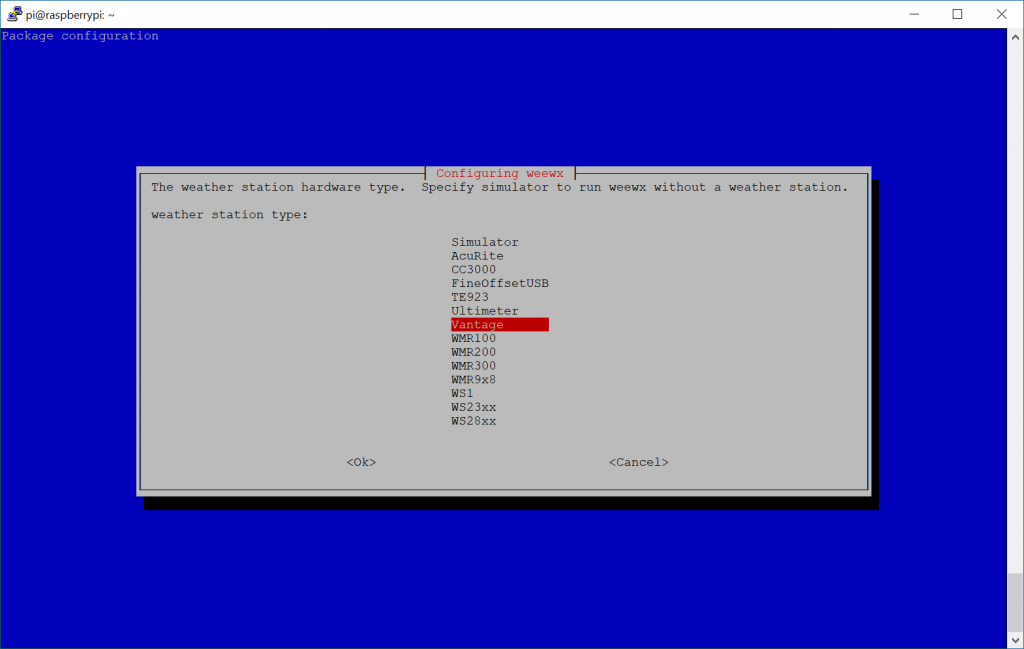
- I.e. AcuRite, Vantage (if using Davis), etc.
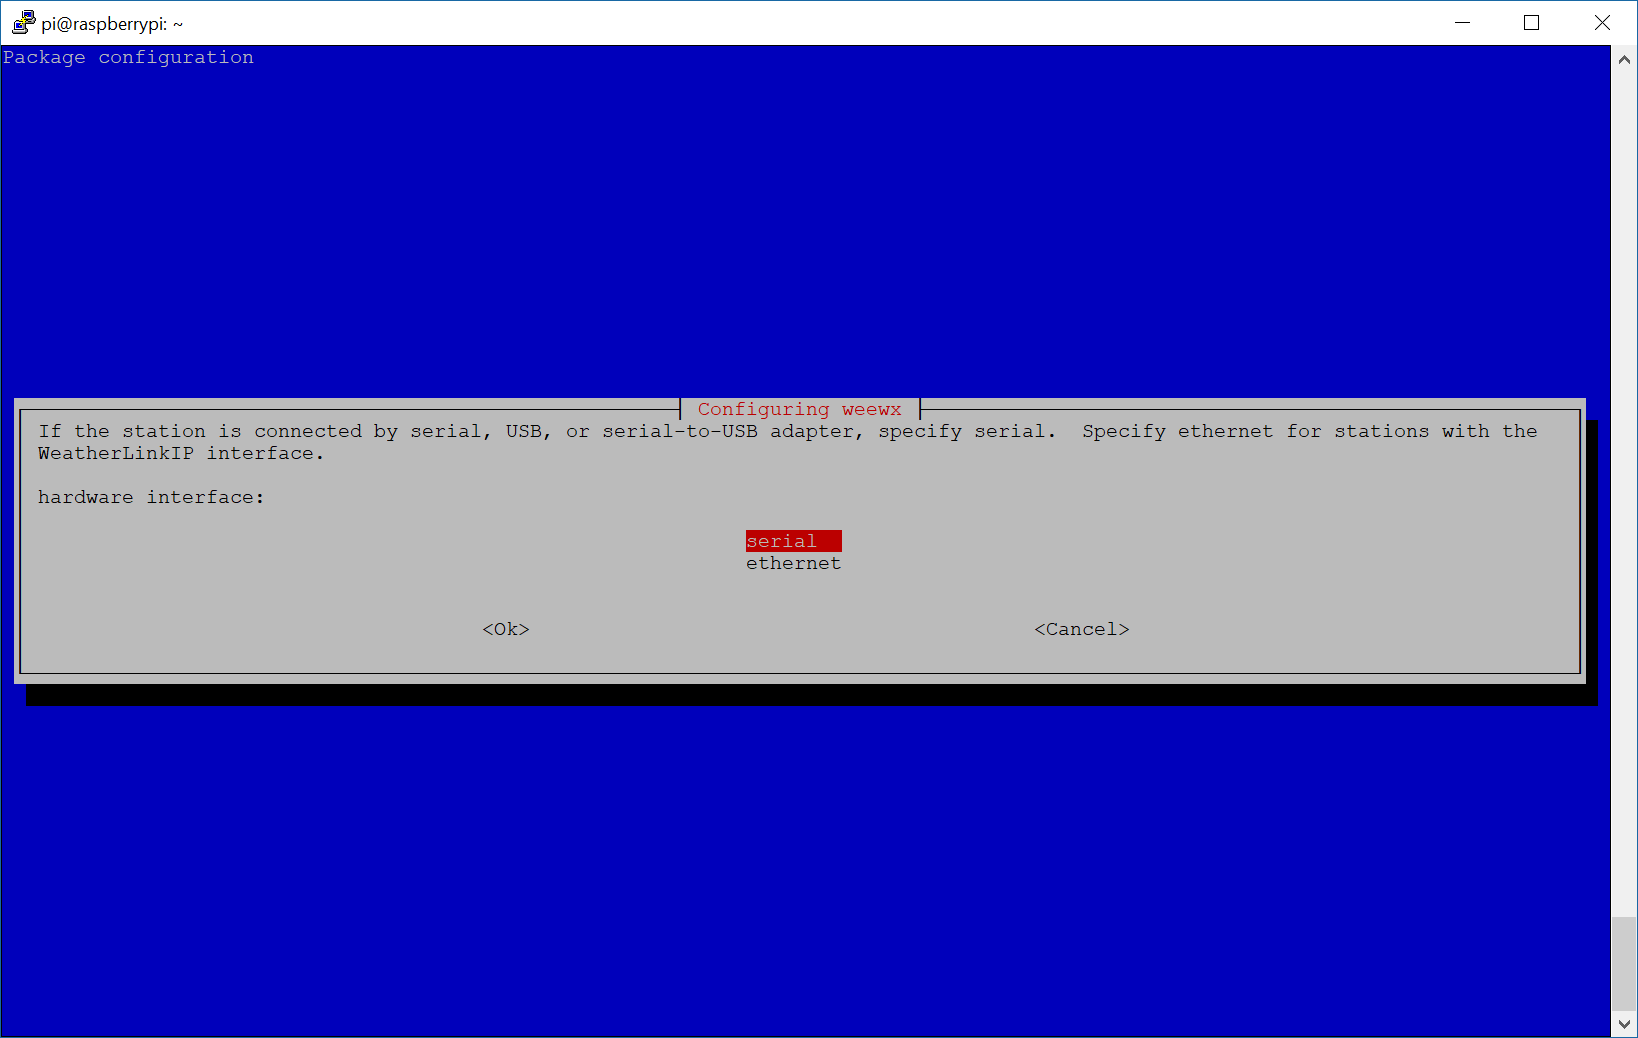
- Select the interface the device is listening on
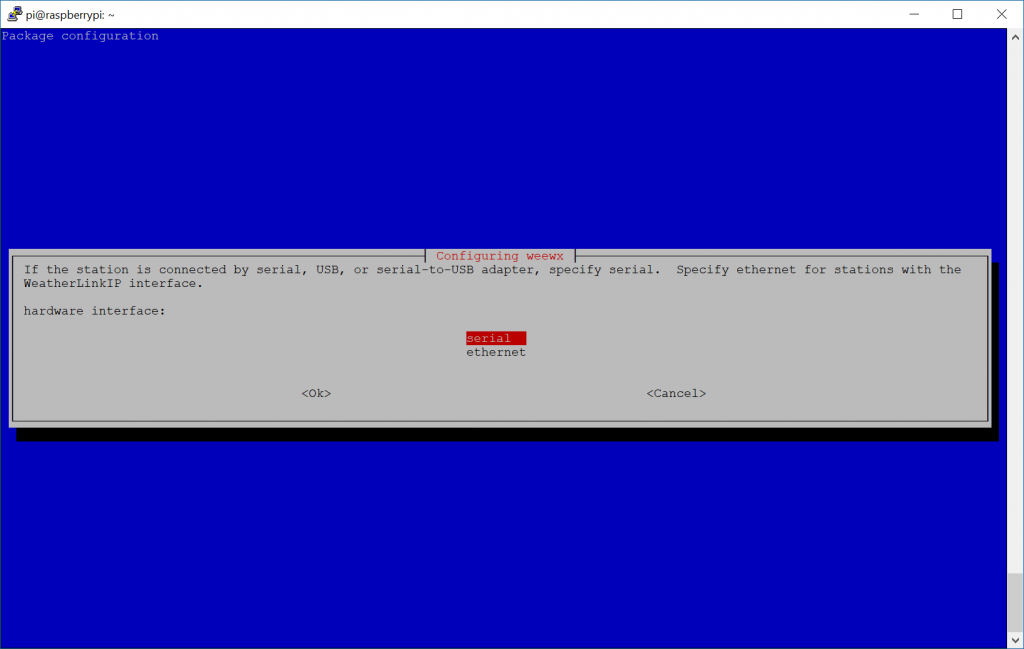
- For those using serial port, select the interface that the data logger is connected to. You should have found this in step 4 above; if using ethernet, go ahead and type in the IP, Port, etc. of the data logger.

- Enter the location of your weather station: Santa's Workshop, North Pole
- At this point WeeWX is technically installed, however many individuals will want to present the WeeWX reports via webpage. In this case, we'll install nginx, which is a lightweight webserver
- sudo apt-get install nginx
- More details on this can be found here: http://www.weewx.com/docs/usersguide.htm#integrating_with_webserver
- sudo apt-get install nginx
- Configure WeeWX to minimize disk IO
- Why do we need to do this? Since Raspberry PI's leverage SD cards, there is typically a finite number of reads/writes to the SD Card. In this case, it is recommended to either leverage an external database/fileserver for WeeWX to write its reports. Alternatively, we can also configure WeeWX to leverage ram to host the reports, which will prevent IO to the SD card (in this case, theoretically increasing the life of the drive)
- Three approaches are outlined here--in this guide I'll reflect the GitHub page in saving reports to a temporary file system using tmpfs
- Add an entry to fstab
-
echo "weewx_reports /var/weewx/reports tmpfs size=20M,noexec,nosuid,nodev 0 0" | sudo tee -a /etc/fstab
-
- Mount the new file system
- sudo mkdir -p /var/weewx/reports
- sudo mount -a
- Update weewx.config file to point to new directory
-
sudo sed -i -e 's%HTML_ROOT =.*%HTML_ROOT = /var/weewx/reports%' /etc/weewx/weewx.conf
-
- Restart WeeWX service
- sudo service weewx restart
- Create symbolic link to point webserver to the reports
- sudo ln -s /var/weewx/reports /var/www/html/weewx
- Give the web server the ability to read from the directory
- sudo chmod -R 755 /var/www/html/weewx
- Add an entry to fstab
- Three approaches are outlined here--in this guide I'll reflect the GitHub page in saving reports to a temporary file system using tmpfs
- Why do we need to do this? Since Raspberry PI's leverage SD cards, there is typically a finite number of reads/writes to the SD Card. In this case, it is recommended to either leverage an external database/fileserver for WeeWX to write its reports. Alternatively, we can also configure WeeWX to leverage ram to host the reports, which will prevent IO to the SD card (in this case, theoretically increasing the life of the drive)


At this point, go ahead and browse out to http://youripaddress/weewx/ to see your weather.
Notes:
WeeWX updates the webpage every 30 minutes (1800 seconds) out of the box. You can force a report update by executing wee_reports weewx.conf or you can modify the /etc/weewx/weewx.conf file by changing the archive_interval variable (in seconds) under the [StdArchive] section.
You can modify the Weewx configuration by editing: /etc/weewx/weewx.conf
You can validate if WeeWX is running by executing: service weewx status
You can look at diagnostics logs by following the guide here: http://www.weewx.com/docs/usersguide.htm#monitoring
Best practices guide on using WeeWX + Raspberry PI: https://github.com/weewx/weewx/wiki/Raspberry%20Pi
I seem to be having a problem with the code above.....here is what I get
.
.
pi@Weatherpi:/var/www/html $ sudo mkdir -p /var/weewx/reports
pi@Weatherpi:/var/www/html $ sudo mount -a
mount: /etc/fstab: parse error: ignore entry at line 6.
pi@Weatherpi:/var/www/html $ sudo sed -i -e ‘s%HTML_ROOT =.*%HTML_ROOT = /var/weewx/reports%’ /etc/weewx/weewx.conf
sed: -e expression #1, char 1: unknown command: `�'
pi@Weatherpi:/var/www/html $ sudo mount -a
mount: /etc/fstab: parse error: ignore entry at line 6.
pi@Weatherpi:/var/www/html $ sudo sed -i -e ‘s%HTML_ROOT =.*%HTML_ROOT = /var/weewx/reports%’ /etc/weewx/weewx.conf
sed: -e expression #1, char 1: unknown command: `�'
.
.
What am I missing?
Hello,
I think the reason why it's not working is the website converted the ASCII characters to extended ASCII. If you copy and paste the commands into notepad/terminal and manually remove the 's and "s and retype them, that should fix this problem. I've reedited the article so if you try to copy and paste the commands again, it should work properly now as well.
Please let me know how it goes,
Jack
Hi Jack
Thank for this, it's awesome!
Since I made as per #10, my nginx webserver stopped updating, only reflecting the last saved files before the change.
A bit extreme maybe but I eventually deleted /var/www/html/weewx and then created the symbolic link again and that seemed to do the trick. (perhaps there's a better way?)
under "Notes", my time was already set at 300 seconds but server only updated every 30 minutes.
That was also solved after the above "fix".
nice instructions. thanks . im using it after sd card corruptions on the raspberry pi.
Thank you for the article.
N.B. Typo - Last sentence: "Best practices guide on using WeeMX..."
Thanks Kelly! I've updated the tutorial.
I cant get the url ip/weewx to look at the new created symbolic link folder /var/www/html/weewx/reports
I think some part is missing in the manual.
http://www.weewx.com/docs/usersguide.htm 'Integrating with a web server' is for apacha2, can you tell me how to create the link for nginx
Can you help provide a little more information? Even though you are using nginx, you should be able to navigate to http://ipaddress/weewx and the page should load after installing nginx, provided you have executed the command in step 10.3 to have weewx generate reports in the default directory nginx points to.
Jack. Love your write up. The problem I am having is NGINX and Interceptor are fighting for port 80. I have tried using different ports but they are only happy on 80. If Interceptor is on 80 it works but web page is error 404 page not found. The web page comes up and will show the last updated info from the smart hub. If I do the opposite I get an error in weewx ref interceptor. Address already in use.
My set up is a acurite smart hub with 5n1. Raspberry Pi
If you are hosting multiple sites on the same raspberry pi you will need to configure virtual hosts to determine how to properly route traffic: https://www.digitalocean.com/community/tutorials/how-to-set-up-nginx-server-blocks-virtual-hosts-on-ubuntu-16-04
Great site here. I am having a problem with step 6 because I have very bad vision. I have my acurite connected tp raspberry pi with the cable that came from Acurite. The problem is I am not sure wher to go at this point of the install.
Hello Dave,
The picture shows a series of lines after executing the dmesg command. Specifically, the picture tries to call out the following text listed in the output "[ 3914.514062] usb 1-1.2: cp210x converter now attached to ttyUSB0". This output confirms which interface the device is connected to (in this case ttyUSB0). Here's a direct link to the picture which may make it easier to see: https://jackstromberg.com/wp-content/uploads/2018/06/cp210x-converter-now-attached-to-ttyUSB0-1024x594.png
Hope this helps!
Jack
Stumbled across this site tonight. Very interesting, I have a AcuRite weather station that the Ethernet bridge died on several years ago. I have not been willing to spend over a hundred dollars just for a simple bridge. I have a Pi I am not using for anything right now. Will your method work with an off the shelf RF dongle, a Pi and the Acurite station? or will I still need another Acurite RF device to read/decode the signal from the station?
Thanks!
Hello Jim,
I'm not 100% positive since I don't have any AcuRite devices, but it does look like if the RF dongle can connect via USB you could use the AcuRite interface with WeeWX: https://github.com/weewx/weewx/blob/master/bin/weewx/drivers/acurite.py
Jack
Have a look at weewx-sdr.
You will need an RTL-SDR, but that's cheeper than a console, and much more versatile.
^ This is an excellent suggestion. Thank you for sharing Colin!
Pingback: WeeWX Wetterstation mit einer Renkforce WH2300 im APRS Netzwerk - MPDX.at
I have used the instructions several times successfully. However lately, after completing the steps exactly, when attempting to bring up my Weewx page using the IP address/weewx I get a 403 forbidden error. I tried everything I could think of until I found a posting that suggested entering the following commands into a terminal program connected to your RPi that is running Weewx with ngenix.
"403 forbidden" NGINX Error
If you encounter a "403 forbidden" error from NGINX, enter these commands in Terminal (again, full credit to HowToRaspberryPi.com):
Use "sudo" at the beginning of each command if you need to, or switch to root user, as described above.
sudo echo 'Nginx work’s !' > /var/www/html/index.htmlsudo chown www-data:www-data /var/www
sudo chmod 744 /var/www
That’s it. You’re done. For good measure, reboot your Raspberry Pi (sudo reboot) and wait 10-15 minutes before trying to access the web page again. Refresh the page a couple of times to ensure you’re viewing the latest version.
Worked for me