This evening I had the pleasure of moving our switches from normal trunking to use the stacking ports. By this, I mean we are now using HDMI cables to achieve 10Gbps uplinks between switches, managing one "super switch" (all of the ports are controlled by the master switch), and also provide redundancy by moving to a ring setup via the stacking ports.
How do you stack with the Dell PowerConnect 5548's?
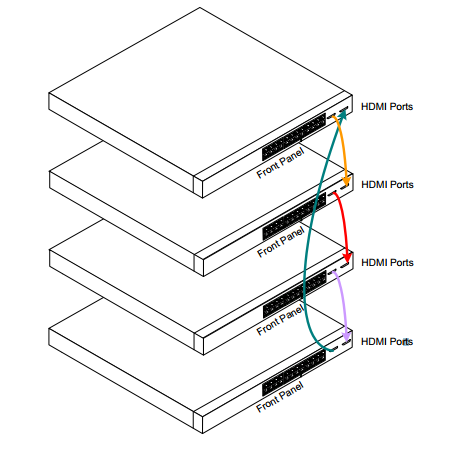
You will connect a HDMI cable from the first switch's primary port (left HDMI port) to the second switch's secondary port (right HDMI port). You will do this for all of your switches. Once you have them all connected, you can optionally connect the last switch's secondary port to the first switch's primary port. This will get you into a ring topology, which will provide some redundancy. Below you can see an image from the Dell manual using this topology.
What is the difference between a ring and stack?
From what I gather, the only difference is that in the stack you are simply daisy-chaining each of the switches together. If one fails in the middle of your stack, you are kind of SOL. By connecting the last switch to the first switch, you have a "ring" setup, which will provide redundancy in the event one switch fails.
What is the process to adding the switches?
When you add a switch to your stack, the new switch will automatically download the configuration from the "master" switch. According to the manual, the best practice is to setup your master, and have the rest of your switches unplugged. Once you have your first switch setup, connect the HDMI cable to the second switch and then power it on. When you power on the second switch, make sure you are consoled in. The switch will ask you to press enter to get into the menu. Hit enter and select the stacking options. Inside of the sub-menu, set what number the switch will be in the stack and then hit the ESC key to continue the switch booting process. You should notice that your switch's are now being stacked. Once that is done, I would recommend logging into the web gui of the primary switch and ensuring that the stack number of the switch remains persistant in the event of a power outage/any other disruption.
What HDMI cable did I use?
This was interesting as no one really recommended any cables to use for this. As long as the cable was rated for 10.2Gbps or higher, it said we were good to go. I checked with Dell to see what they sell, but apparently you can only order the stacking cables (HDMI cables) when you purchase the switch. In-turn, I ended up going with the following HDMI cables from monoprice.com: http://www.monoprice.com/products/product.asp?c_id=102&cp_id=10240&cs_id=1024004&p_id=4963&seq=1&format=2
Where can I find more info?
Here is a link to the Dell manual for the PowerConnect 5548's. While the stacking chapter is only a couple pages, it is definitely worth a read to understand what is going on as well as see a couple of recommended practices (the stacking info starts on page 9): ftp://ftp.dell.com/Manuals/all-products/esuprt_ser_stor_net/esuprt_powerconnect/powerconnect-5548p_Setup%20Guide_zh-cn.pdf
Thanks for the real life explanation. What happens if you have only 2 switches? Do you still connect the "ring" ? Basically it will become a cross connect
You can still create a "ring" if you have only two switches. I suppose in the event your HDMI cable gets cut, it would failover on the second on, but other than that, it won't provide much more redundancy.
Hope this helps!
Jack
Thanks. Do you have to access the console? My switches are currently in the rack and the console is hard to get to although I do have access via web.
I read somewhere that if I just connect the hdmi and reboot the switches, they will automatically become a stack.
Yes, you will still have access to the console. When managing your interfaces, rather than doing 1/0/1 to manage port 1, you would specify 2/0/1 to manage port 1 of the 2nd switch in the stack. When the switch turns on, you should see the display change to the number it is inside the stack.
Hope this helps,
Jack