Monthly Archives: March 2014

DirSync - Unable to establish a connection to the authentication service. Contact Technical Support.

Symptom: You receive the following errors when running the Windows Azure Active Directory Sync tool Configuration Wizard or the Microsoft Online Services Directory Synchronization Configuration Wizard.

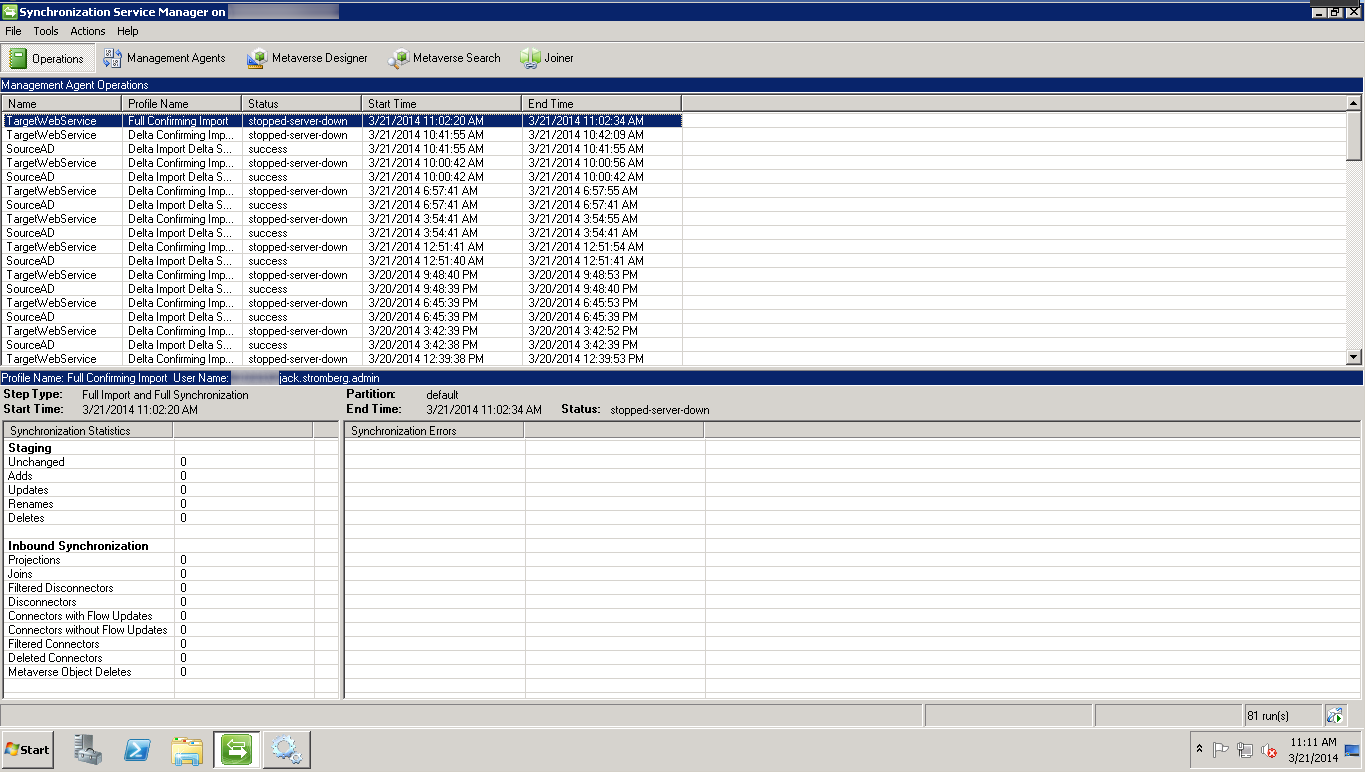
Synchronization Service Manager shows stopped-server-down status.
stopped-server-down Synchronization Service Manager

You receive the following events inside of event viewer:

Log Name: Application
Source: Directory Synchronization
Date: %Date%
Event ID: 0
Task Category: None
Level: Error
Keywords: Classic
User: N/A
Computer: %ComputerName%
Description:
Unable to establish a connection to the authentication service. Contact Technical Support. GetAuthState() failed with -2147186688 state. HResult:0. Contact Technical Support. (0x80048862)
Log Name: Application
Source: Directory Synchronization
Date: %Date%
Event ID: 102
Task Category: None
Level: Error
Keywords: Classic
User: N/A
Computer: %ComputerName%
Description:
Unable to establish a connection to the authentication service. Contact Technical Support.

Log Name: Application
Source: FIMSynchronizationService
Date: %Date%
Event ID: 6803
Task Category: Management Agent Run Profile
Level: Error
Keywords: Classic
User: N/A
Computer: %ComputerName%
Description:
The management agent "TargetWebService" failed on run profile "Delta Confirming Import" because the server encountered errors.

The Windows Azure Active Directory Sync tool Configuration Wizard presents you the following error message:
Unable to establish a connection to the authentication service. Contact Technical Support.
Unable to establish a connection to the authentication service. Contact Technical Support

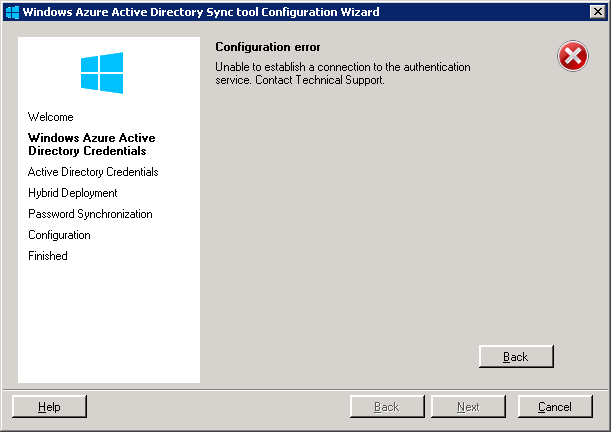
Solution: This turns out to be an issue with the provided credentials entered in the Windows Azure Active Directory Credentials step.  Please make sure you verify the following.

  1. Do not use a federated Global Administrator service account.  Federated service accounts are not allowed to be used with the synchronization tool.  You should have a non-federated Global Administrator account with an @mydomain.onmicrosoft.com UPN.
  2. Ensure your Office 365 Global Administrator service account's password has not expired.

ADFS v3 on Server 2012 R2 - Allow Chrome to automatically sign-in internally

Symptom: When upgrading from ADFS v2.0 to ADFS v3 built natively into Server 2012 R2, I noticed Chrome stopped auto-logging in people when trying to hit the ADFS server from inside the corporate network.

Solution: We need to allow NTLM authentication for the Google Chrome useragent.

  1. Login to your primary ADFS server
  2. NOTE: This step is no longer applicable on newer versions of Chrome.
    This is only applicable if running extremely old versions of Chrome (v50 or lower) -- the fix has been added in Chrome v51 and higher.

    Execute the following command to disable Extended Protection TokenCheck (See notes for what this is at the bottom of this article)

    1. Set-ADFSProperties –ExtendedProtectionTokenCheck None
      Set-ADFSProperties -ExtendedProtectionTokenCheck None
  3. Execute the following command to get the current list of supported user-agents for NTLM authentication
    1. [System.Collections.ArrayList]$UserAgents = Get-AdfsProperties | select -ExpandProperty WIASupportedUserAgents

  4. Execute the following command to inject the user agent into a temporary array of user agents already added to ADFS.
    1. $UserAgents.Add("Mozilla/5.0")
  5. Execute the following command to commit the change.
    1. Set-ADFSProperties -WIASupportedUserAgents $UserAgents
  6. Restart the Active Directory Federation Services service on each of the ADFS farm servers for the changes to take effect.  You do not need to make any changes to the proxy servers.
    Restart Active Directory Federation Services - Restart

Notes

Shout out to Jon Payne in the comments section below for the idea of putting all the values into an ArrayList and then committing the arraylist to ADFS vs adding in all the strings manually.

ExtendedProtectionTokenCheck - Copied directly from technet - Specifies the level of extended protection for authentication supported by the federation server. Extended Protection for Authentication helps protect against man-in-the-middle (MITM) attacks, in which an attacker intercepts a client's credentials and forwards them to a server. Protection against such attacks is made possible through a Channel Binding Token (CBT) which can be either required, allowed or not required by the server when establishing communications with clients.  http://technet.microsoft.com/en-us/library/ee892317.aspx

PowerShell command to find all disabled users in Active Directory

Here is a quick powershell command to find all users inside of your Active Directory domain that have been marked as disabled (this will exclude disabled computers):

Get-ADUser -Filter {Enabled -eq $false} | FT samAccountName

Additionally, you can specify which additional options you would like to show by change the filter table command we are piping the results to.  For example, this command will show the samAccountName, first name, and last name of the disabled users.

Get-ADUser -Filter {Enabled -eq $false} | FT samAccountName, GivenName, Surname

If you want no formatting whatsoever and have AD spit a bunch of information back at you, try running just the Get-ADUser part with the filter applied.

Get-ADUser -Filter {Enabled -eq $false

The following command below can be used to pull a list of disabled users and computers:

Search-ADAccount -AccountDisabled


[How-To] ThinApp Internet Explorer 9 for Windows 7 x64

Here is a comprehensive guide on how to ThinApp or virtualizate Internet Explorer 9 so you can run it in tandom with other Internet Explorer versions.

  1. Start your VM
    1. For this tutorial, I am using a blank Windows 7 64-bit instance (not with SP1) using ThinApp Setup Capture 5.0.
  2. Make sure you have the Internet Explorer 9 pre-requisites package installed.  The prerequisites can be found in this KB article: http://support.microsoft.com/kb/2399238
    Use Windows6.1-KB2454826-v2-x64.msi or  Windows6.1-KB2454826-v2-x32.msi depending on your machine (one is 32-bit the other is 64-bit)
    Internet Explorer 9 Prereqs
  3. Run the MSI
  4. Click Yes when it asks to install
    Update for Windows KB2454826
  5. Restart your machine when prompted
    Windows Updates - Installation complete - Restart Now
  6. Copy the IE9 offline installer to your machine
    http://windows.microsoft.com/en-us/internet-explorer/ie-9-worldwide-languages
    Internet Explorer 9 Installer
  7. Run the VMware->ThinApp Setup Capture program
    ThinApp Setup Capture - Start Menu
  8. Click Yes on the UAC Setup Capture dialog
    UAC - Setup Capture
  9. Click Next on the Setup Capture - Welcome screen
    Setup Capture - Welcome
  10. Click the Prescan > button
    Setup Capture - Prescan
  11. Run the installer IE9-Windows7-x64-enu.exe when you get to the Install the Application Now! screen
    Setup Capture - Install Application IE9
  12. Click Yes on the UAC screen
    UAC - Internet Explorer 9
  13. Click Install
    Install Internet Explorer 9
  14. Click Restart now when prompted
    Internet Explorer 9 Install - Restart Now
  15. Click Yes on the UAC popup to launch the Setup Capture process again
    UAC - Setup Capture
  16. Click Next on the Continue installation process window
    Setup Capture - Welcome - Continue installation process
  17. Launch the Internet Explorer 9 program
    Internet Explorer 9 - Clean Install
  18. Customize Internet Explorer how you want it on your main machine.  You can set security settings, default homepage, etc. (I like to set my homepage to about:blank since the ThinApps I have usually get deployed in virtual environments).  Close Internet Explorer when you have things the way you want.
    Internet Explorer 9 - Thinapp - Customize
  19. Click Postscan > when you have finished customing Internet Explorer 9
    Setup Capture - Install Application - Postscan
  20. Click OK on the Setup Capture screen
    Setup Capture - OK Button
  21. Uncheck the desktop.exe and inetcpl.exe Entry Points and click Next >
    (I suppose you could leave the inetcpl.exe, but I feel leaving it unchecked is a cleaner solution).
    Setup Capture - Entry Points - Internet Explorer 9
  22. Click Next >
    Setup Capture - Manage with Horizon Workspace
  23. Click Next >
    Setup Capture - Groups
  24. Click Next >
    Setup Capture - Isolation - Full write access to non-system directories
  25. Click Next >
    (you can select No if you want to)
    Setup Capture - Quality Assurance Statistics
  26. Click Next >
    Setup Capture - Native Browser Redirection
  27. Change the Inventory name to Internet Explorer 9 and click Next >
    Setup Capture - Project Settings - Internet Explorer 9
  28. Ensure Use seperate .DAT file is checked, check Generate MSI package if you want to deploy this as an installer, click Save >
    Setup Capture - Package Settings - Internet Explorer 9
  29. Click Next if you receive some capture warnings provided they look like they aren't Internet Explorer related.
    Note: Your warnings could look a little different than mine, that is ok.
    Setup Capture - Save Warnings
  30. Optional Step: Deploying a desktop icon
    1. Click Edit Package.ini
      Setup Capture - Ready to Build - Edit Package.ini
    2. Scroll down to Internet Explorer.exe and change the Shortcuts line to contain %Desktop%;%Programs% and change [Internet Explorer.exe] to [Internet Explorer 9.exe].  Save and exit notepad.
    3. Click on Open Project Folder
      Setup Capture - Ready to Build - Open Project Folder
    4. Click New Folder
      Create a new folder
    5. Click Continue on the UAC popup
    6. Enter %Common Desktop% on the new folder name
      Create a new folder - Common Desktop
    7. Drag the Internet Explorer icon from your start menu into your new %Common Desktop% folder
      Thinapp Drag Shortcut
    8. Click Continue on the UAC popup
      Destination Folder Access Denied - Common Desktop - Thinapp
    9. Rename the icon to Internet Explorer 9
      Rename Internet Explorer 9 Shortcut
    10. Click Continue on the UAC popup
      File Access Denied - Internet Explorer
    11. Right click on the icon and select Properties
      Internet Explorer 9 Shortcut - Properties
    12. Change the Start in path from %HOMEDRIVE%%HOMEPATH% to "C:\Program Files (x86)\Internet Explorer\" and click OK
      Internet Explorer 9 Shortcut Properties
  31. Click Build >
    Setup Capture - Ready to Build - Build
  32. Click Finish
    Setup Capture - Build Project - Finish
  33. Test your Internet Explorer 9 Thinapp on another machine! 🙂
    IE11 and IE9