SQL Server 2008 R2 - Reporting Services Configuration Manager - The underlying connection was closed: Could not establish trust relationship for the SSL/TLS secure channel.

Symptom: When installing the Monitoring Agent for Lync 2010, I was receiving the following information in the "log" file:

> Deploying Monitoring Server Reports... This might take a few minutes.
The Monitoring Server is using SQL instance "myserver.mydomain".
The data source is using SQL instance "(local)".
The following URL will be used for deployment: https://myserver.mydomain:443/ReportServer
SQL Server logon credentials for "mydomain\myuser" already exist. Use the existing logon credentials.
"[QoEMetrics]" role "[ReportsReadOnlyRole]" has already assigned to "mydomain\myuser".
"[LcsCDR]" role "[ReportsReadOnlyRole]" has already assigned to "mydomain\myuser".
Start to deploy reports...
The underlying connection was closed: Could not establish trust relationship for the SSL/TLS secure channel.
An error occurred when deploying Monitoring Server Reports. For details, see the log.

Turns out this was because I had accidentally forgot to add in the common name to my SSL certificate as a SAN address.  Bottom line, the issue is that your SSL certificate is bad.

Solution:

  1. Request a new SSL certificate
    1. Start->mmc
    2. Add in the Certificates snap-in
    3. Select Local Computer
    4. Expand Certificates->Personal->Certificates
    5. Right click, All Tasks->Request new Certificate...
    6. Next
    7. Next
    8. Select your policy
    9. Enter in the information you would like.  Note, if you are adding a SAN address for the short name, make sure you add both the FQDN and the short name as DNS entries in the Alternative name box.
    10. Click on the Private Key tab, expand the little arrow and check Make private key exportable
    11. Click OK
    12. Click Enroll
  2. Click Start->All Programs->Microsoft SQL Server 2008 R2->Configuration Tools->Reporting Services Configuration Manager.
  3. Click Connect
  4. Click Web Service URL
  5. Under SSL Certificate, select the appropriate certificate and click Apply
  6. At this point, you either saw a bunch of green check marks and you are good to go, or else you probably hit the dreaded "rouge SSL cert" error.  To fix that, please see this link: http://jackstromberg.com/2013/01/sql-server-2008-r2-reporting-services-configuration-manager-create-certificate-binding-failed-hresult-0x80040238/

SQL Server 2008 R2 - Reporting Services Configuration Manager - Create certificate binding failed - HRESULT: 0x80040238

Symptom: When changing an SSL certificate inside of the SQL Server 2008 R2 Reporting Services Configuration Manager, you receive the following error:

Create certificate binding.

When you click on "Tell me more about the problem and how to resovle it." you receive the following:

Microsoft.ReportingServices.WmiProvider.WMIProviderException: An SSL binding already exists for the specified IP address and port combination. The existing binding uses a different certificate from the current request. Only one certificate can be used for each IP address and port combination. To correct the problem, either use the same certificate as the existing binding, or remove the existing SSL binding and create a new binding using the certificate of the current request.

---> System.Runtime.InteropServices.COMException (0x80040238): Exception from HRESULT: 0x80040238
--- End of inner exception stack trace ---
at Microsoft.ReportingServices.WmiProvider.RSWmiAdmin.ThrowOnError(ManagementBaseObject mo)
at Microsoft.ReportingServices.WmiProvider.RSWmiAdmin.CreateSSLCertificateBinding(String application, String certificateHash, String ipAddress, Int32 port)
at ReportServicesConfigUI.WMIProvider.RSReportServerAdmin.CreateSSLCertificateBinding(UrlApplication app, String certificateHash, String ipAddress, Int32 port)

This error really sucks and the reason behind it is that Microsoft just didn't do a good job removing/unbinding SSL certificates from an interface.  Luckily, I have the solution to get you up and going...

Solution:

  1. Download the Windows Server 2003 Support Tools from Microsoft
    1. http://www.microsoft.com/en-us/download/details.aspx?id=7911
  2. Install the tools on your local machine or on the server.  You may get a warning about incompatibility if you install it on your Windows 7 machine.  I ignored this and things seem to work fine 😛  Just note if you do this, you will need to copy the following folder from your local machine to the server with SQL Server Reporting Services Configuration Manager: C:\Program Files (x86)\Support Tools
  3. Open up a command prompt with Administrator privileges on the server with SQL Server 2008 R2 Reporting Services Configuration Manager
  4. Navigate to the following directory (if you copied the folder from your local machine, browse to the appropriate directory you copied the support tools to):
    1. cd "C:\Program Files (x86)\Support Tools"
  5. Launch SQL Server 2008 R2 Reporting Services Configuration Manager
    1. Start->All Programs->Microsoft SQL Server 2008 R2->Configuration Tools->
      Reporting Services Configuration Manager
  6. Click on Web Service URL
  7. Click on the Advanced... button
  8. Remove any items listed inside of the "Multiple SSL Identities for the Report Server Web Service" box.
  9. Click OK
  10. Go back to your command prompt with the Administrator privileges and execute the following commands to unbind the old SSL certificate
    1. netsh http delete sslcert ipport=[::]:443
      1. You should see something like "SSL Certificate successfully deleted" -- If not, that is fine
    2. httpcfg delete ssl /i 0.0.0.0:443
      1. You should see something like "HttpDeleteServiceConfiguration completed with 0." -- If not, that is fine as long as the command above said it removed a certificate
  11. Go back to the Reporting Services Configuration Manager and select your SSL certificate in the  SSL Certificate dropdown.
  12. Click Apply

At this point, your certificate should have bound to the interface successfully.

Hope this helps someone!

Lync 2010 - Publishing the topology error: Missing Machine

Symptom: When you publish something to the topology in Lync 2010, you receive the following error:

The following machines from the topology you are publishing were not found in Active Directory and will result in errors during Enable-CsTopology as it tries to prepare Active Directory entries for the topology machines.  If you choose to publish this topology Enable-CsTopology will have to be re-run once the missing machines are domain-joined:

mymachine.mydomain

Solution: Exit out of the topology builder and relaunch it.  However, when you relaunch the topology builder, right click on it and Run as different user.  Type in your domain admin credentials.  You should now be able to successfully publish your topology.

UserAccountControl Attribute/Flag Values

Here is a comprehensive list of UserAccountControl attribute/flag values I have come across when working on LDAP projects.

Property Flag Value In Hexadecimal Value In Decimal Not Officially Documented
SCRIPT 0x0001 1  
ACCOUNTDISABLE 0x0002 2  
HOMEDIR_REQUIRED 0x0008 8  
LOCKOUT 0x0010 16  
PASSWD_NOTREQD 0x0020 32  
PASSWD_CANT_CHANGE 0x0040 64  
ENCRYPTED_TEXT_PWD_ALLOWED 0x0080 128  
TEMP_DUPLICATE_ACCOUNT 0x0100 256  
NORMAL_ACCOUNT 0x0200 512  
Disabled Account 0x0202 514 x
Enabled, Password Not Required 0x0220 544 x
Disabled, Password Not Required 0x0222 546 x
INTERDOMAIN_TRUST_ACCOUNT 0x0800 2048  
WORKSTATION_TRUST_ACCOUNT 0x1000 4096  
SERVER_TRUST_ACCOUNT 0x2000 8192  
DONT_EXPIRE_PASSWORD 0x10000 65536  
Enabled, Password Doesn't Expire 0x10200 66048 x
Disabled, Password Doesn't Expire 0x10202 66050 x
Disabled, Password Doesn't Expire & Not Required 0x10222 66082 x
MNS_LOGON_ACCOUNT 0x20000 131072  
SMARTCARD_REQUIRED 0x40000 262144  
Enabled, Smartcard Required 0x40200 262656 x
Disabled, Smartcard Required 0x40202 262658 x
Disabled, Smartcard Required, Password Not Required 0x40222 262690 x
Disabled, Smartcard Required, Password Doesn't Expire 0x50202 328194 x
Disabled, Smartcard Required, Password Doesn't Expire & Not Required 0x50222 328226 x
TRUSTED_FOR_DELEGATION 0x80000 524288  
Domain controller 0x82000 532480  
NOT_DELEGATED 0x100000 1048576  
USE_DES_KEY_ONLY 0x200000 2097152  
DONT_REQ_PREAUTH 0x400000 4194304  
PASSWORD_EXPIRED 0x800000 8388608  
TRUSTED_TO_AUTH_FOR_DELEGATION 0x1000000 16777216  
PARTIAL_SECRETS_ACCOUNT 0x04000000 67108864  

Property flag descriptions (Copied from KB Article)

  • SCRIPT - The logon script will be run.
  • ACCOUNTDISABLE - The user account is disabled.
  • HOMEDIR_REQUIRED - The home folder is required.
  • PASSWD_NOTREQD - No password is required.
  • PASSWD_CANT_CHANGE - The user cannot change the password. This is a permission on the user's object. For information about how to programmatically set this permission, visit the following Web site:
  • ENCRYPTED_TEXT_PASSWORD_ALLOWED - The user can send an encrypted password.
  • TEMP_DUPLICATE_ACCOUNT - This is an account for users whose primary account is in another domain. This account provides user access to this domain, but not to any domain that trusts this domain. This is sometimes referred to as a local user account.
  • NORMAL_ACCOUNT - This is a default account type that represents a typical user.
  • INTERDOMAIN_TRUST_ACCOUNT - This is a permit to trust an account for a system domain that trusts other domains.
  • WORKSTATION_TRUST_ACCOUNT - This is a computer account for a computer that is running Microsoft Windows NT 4.0 Workstation, Microsoft Windows NT 4.0 Server, Microsoft Windows 2000 Professional, or Windows 2000 Server and is a member of this domain.
  • SERVER_TRUST_ACCOUNT - This is a computer account for a domain controller that is a member of this domain.
  • DONT_EXPIRE_PASSWD - Represents the password, which should never expire on the account.
  • MNS_LOGON_ACCOUNT - This is an MNS logon account.
  • SMARTCARD_REQUIRED - When this flag is set, it forces the user to log on by using a smart card.
  • TRUSTED_FOR_DELEGATION - When this flag is set, the service account (the user or computer account) under which a service runs is trusted for Kerberos delegation. Any such service can impersonate a client requesting the service. To enable a service for Kerberos delegation, you must set this flag on the userAccountControl property of the service account.
  • NOT_DELEGATED - When this flag is set, the security context of the user is not delegated to a service even if the service account is set as trusted for Kerberos delegation.
  • USE_DES_KEY_ONLY - (Windows 2000/Windows Server 2003) Restrict this principal to use only Data Encryption Standard (DES) encryption types for keys.
  • DONT_REQUIRE_PREAUTH - (Windows 2000/Windows Server 2003) This account does not require Kerberos pre-authentication for logging on.
  • PASSWORD_EXPIRED - (Windows 2000/Windows Server 2003) The user's password has expired.
  • TRUSTED_TO_AUTH_FOR_DELEGATION - (Windows 2000/Windows Server 2003) The account is enabled for delegation. This is a security-sensitive setting. Accounts that have this option enabled should be tightly controlled. This setting lets a service that runs under the account assume a client's identity and authenticate as that user to other remote servers on the network.
  • PARTIAL_SECRETS_ACCOUNT - (Windows Server 2008/Windows Server 2008 R2) The account is a read-only domain controller (RODC). This is a security-sensitive setting. Removing this setting from an RODC compromises security on that server.

UserAccountControl values

These are the default UserAccountControl values for the certain objects:

  • Typical user : 0x200 (512)
  • Domain controller : 0x82000 (532480)
  • Workstation/server: 0x1000 (4096)

Official Microsoft KB Article: http://support.microsoft.com/kb/305144

How to install Python via command line on Linux

At the time of writing this, Python 2.7.3 is the latest build of the 2.7 builds. You can simply replace the wget url with the Python 3.x build you wish to download if you want to use those releases instead.

  1. Download the tarball
    1. wget http://www.python.org/ftp/python/2.7.3/Python-2.7.3.tgz
  2. Extract the contents
    1. tar -xzf Python-2.7.3.tgz
  3. Navigate to the extracted folder
    1. cd Python-2.7.3
  4. Configure/Install Python
    1. ./configure
    2. make
    3. sudo make install

VMware vSphere - Can't install VMware Tools

Are you running into the issue where you click VM->Guest->Install/Upgrade VMware tools? I have found that if I try creating a VM with the VMXNETv3 adapter and am using an older version of Windows, the DVD drivers aren't picked up properly and VMware tools won't install.

That being said, the only way I have found to get things working is to manually install VMware tools... yep! You VMware does offer the ability to download any version of VMware tool's ISO files.
Head on over to http://packages.vmware.com/tools/esx/index.html and download the version you would like and simply mount the tools as you would with any other disk. For whatever reason, mounting the disk manually by clicking on the "Disk with a wrench icon" and selecting an ISO connected to my local machine, seems to work and gets me back in business.

Hope this helps!

Stacking with the Dell PowerConnect 5548's

This evening I had the pleasure of moving our switches from normal trunking to use the stacking ports.  By this, I mean we are now using HDMI cables to achieve 10Gbps uplinks between switches, managing one "super switch" (all of the ports are controlled by the master switch), and also provide redundancy by moving to a ring setup via the stacking ports.

How do you stack with the Dell PowerConnect 5548's?

You will connect a HDMI cable from the first switch's primary port (left HDMI port) to the second switch's secondary port (right HDMI port).  You will do this for all of your switches.  Once you have them all connected, you can optionally connect the last switch's secondary port to the first switch's primary port.  This will get you into a ring topology, which will provide some redundancy. Below you can see an image from the Dell manual using this topology.
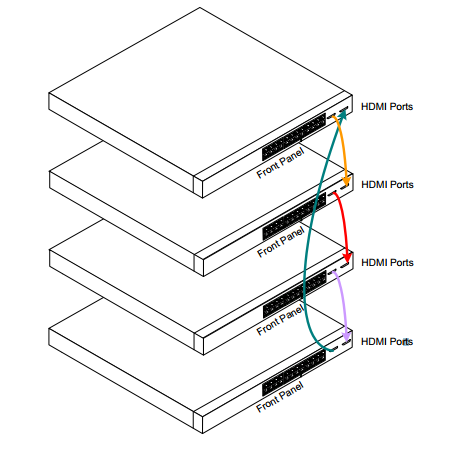
Dell Stacking

What is the difference between a ring and stack?

From what I gather, the only difference is that in the stack you are simply daisy-chaining each of the switches together.  If one fails in the middle of your stack, you are kind of SOL.  By connecting the last switch to the first switch, you have a "ring" setup, which will provide redundancy in the event one switch fails.

What is the process to adding the switches?

When you add a switch to your stack, the new switch will automatically download the configuration from the "master" switch.  According to the manual, the best practice is to setup your master, and have the rest of your switches unplugged.  Once you have your first switch setup, connect the HDMI cable to the second switch and then power it on.  When you power on the second switch, make sure you are consoled in.  The switch will ask you to press enter to get into the menu.  Hit enter and select the stacking options.  Inside of the sub-menu, set what number the switch will be in the stack and then hit the ESC key to continue the switch booting process.  You should notice that your switch's are now being stacked.  Once that is done, I would recommend logging into the web gui of the primary switch and ensuring that the stack number of the switch remains persistant in the event of a power outage/any other disruption.

What HDMI cable did I use?

This was interesting as no one really recommended any cables to use for this.  As long as the cable was rated for 10.2Gbps or higher, it said we were good to go.  I checked with Dell to see what they sell, but apparently you can only order the stacking cables (HDMI cables) when you purchase the switch.  In-turn, I ended up going with the following HDMI cables from monoprice.com: http://www.monoprice.com/products/product.asp?c_id=102&cp_id=10240&cs_id=1024004&p_id=4963&seq=1&format=2

Where can I find more info?

Here is a link to the Dell manual for the PowerConnect 5548's.  While the stacking chapter is only a couple pages, it is definitely worth a read to understand what is going on as well as see a couple of recommended practices (the stacking info starts on page 9): ftp://ftp.dell.com/Manuals/all-products/esuprt_ser_stor_net/esuprt_powerconnect/powerconnect-5548p_Setup%20Guide_zh-cn.pdf

How do I remove an iSCSI Software Adapter in VMware?

While messing with some options in my lab, I noticed that once I added an iSCSI software Adapter, every option to remove it is greyed out.

Crazy enough, the only way to remove an iSCSI adapter in VMware is to:

  1. Right click->Properties on the adapter
  2. Click on the Configure... button
  3. Uncheck Enabled under Status in the General Properties dialog box
  4. Restart the ESXi host (yep, you literally have to restart the whole box)

Upon restart, the adapter will be removed automatically.  If anyone finds another solution, please drop a comment below and let me know 🙂

Adding a host to vCenter - Datacenter.QueryConnectionInfo Error

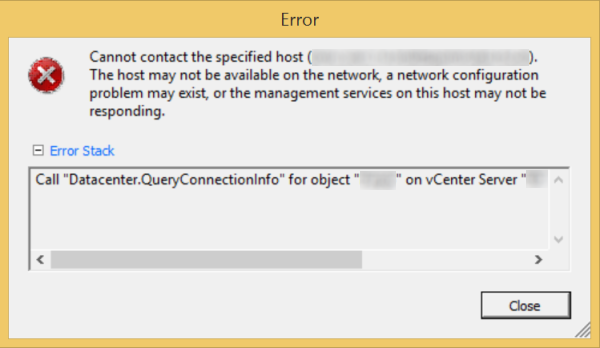
Symptom: When adding a host to your vCenter Datacenter, you receive the following error:

Permission to perform this operation was denied. You do not hold privilege "System > View" on folder""

Error Stack
Call "Datacenter.QueryConnectionInfo" for object "DATACENTERNAME" on vCenter Server "myhost.mydomain" failed.
VMware - Error Datacenter.QueryConnectionInfo

Resolution: Make sure you have not enabled Lockdown mode on the host. To change the setting, use the direct console user interface (DCUI), and press F2. Login with your credentials and arrow down to Configure Lockdown Mode and hit enter. Make sure this option is disabled (unchecked) when the prompt opens. With Lockdown Mode disabled, try adding the host to vCenter.

Additionally, make sure that you can fully resolve the DNS name to the actual ESXi host.  If the DNS entry does not exist or points to an invalid ESXi host, the warning will be prompted as well.

If you still have issues, you can try restarting the Management Agents using the troubleshooting menu. Use the DCUI, press F2, login with your credentials, and arrow down to Troubleshooting Options and press Enter. Arrow down to Restart Management Agents and hit enter. This will restart some of the ESXi services on the host and should allow it to connect to vCenter.

VMware vCenter Server 5.1 Install Error - "Create standalone instance VMwareVCMSDS" failed

When installing VMware vCenter Server 5.1, I came accross this issue after I had uninstalled an instance of vCenter running on the machine.

Symptom: When installing vCenter Server 5.1, you are presented with a dialog box saying Creation of instance VMwareVCMSDS failed: The name 'VMwareVCMSDS' is already in use as an AD LDS instance name; and are presented with options to force install or cancel.  I didn't just keep blowing through the installer as I felt it would probably bite me in the butt later.  Instead I decided to figure out what the problem was and how to make the vCenter installer happy.

As the dialog box says, you can find information inside of the jointool.log and status.txt files stored inside of your user's TEMP directory during installation (which can probably be found here: C:\Users\myusersdirectory\AppData\Local\Temp).

Here is what my log files showed:

jointool.log

[2013-01-08 10:46:53,833 com.vmware.vim.jointool] Failed to find instance config at: "C:\ProgramData\VMware\VMware VirtualCenter\instance.cfg", assuming defaults
[2013-01-08 10:46:53,833 com.vmware.vim.jointool] Storage directory not found in instance.cfg.
[2013-01-08 10:46:54,223 com.vmware.vim.jointool] Skipping DB init as we are attempting to initialize without force/recovery/upgrade.
[2013-01-08 10:46:54,223 com.vmware.vim.jointool] JoinTool started
[2013-01-08 10:46:54,223 com.vmware.vim.jointool] Storage directory for LDAP instance: C:\ProgramData\VMware\VMware VirtualCenter\\VMwareVCMSDS
[2013-01-08 10:46:54,223 com.vmware.vim.jointool] Operation Mode: initialize
[2013-01-08 10:46:54,254 com.vmware.vim.jointool] Creating directory services instance VMwareVCMSDS
[2013-01-08 10:46:54,254 com.vmware.vim.jointool] LDAP port = 389
[2013-01-08 10:46:54,254 com.vmware.vim.jointool] Base DN = dc=virtualcenter,dc=vmware,dc=int
[2013-01-08 10:46:54,254 com.vmware.vim.jointool] Storage dir = C:\ProgramData\VMware\VMware VirtualCenter\VMwareVCMSDS
[2013-01-08 10:46:56,080 com.vmware.vim.jointool] Operation "Create standalone instance VMwareVCMSDS" failed: : Action: Create Standalone Instance
Action: Creation of standalone instance
Action: Create Instance
Problem: Creation of instance VMwareVCMSDS failed: The name 'VMwareVCMSDS' is already in use as an AD LDS instance name. Type a different instance name.


[2013-01-08 10:46:56,080 com.vmware.vim.jointool] Recovering from failed Operation "Create standalone instance VMwareVCMSDS"

[2013-01-08 10:46:56,080 com.vmware.vim.jointool] Recovery successful

[2013-01-08 10:46:56,080 com.vmware.vim.jointool] Execution error.

status.txt

-----------------
Operation "Create standalone instance VMwareVCMSDS" failed:
Action: Create Standalone Instance
Action: Creation of standalone instance
Action: Create Instance
Problem: Creation of instance VMwareVCMSDS failed: The name 'VMwareVCMSDS' is already in use as an AD LDS instance name. Type a different instance name.


-----------------
Recovering from failed Operation "Create standalone instance VMwareVCMSDS"

-----------------
Recovery successful

-----------------
Execution error.

Resolution:
To fix this issue, I ended up navigating to C:\ProgramData\VMware and removing the VMware VirtualCenter folder (you could move it to a different directory to save as a backup just in case).

Now, rerun the installer and a clean copy of vCenter should install fine.

Notes: If you are prestaging your SSL certificates prior to installation, go ahead and recreate the folder structure of C:\ProgramData\VMware\VMware VirtualCenter\ssl and place your rui.crt, rui.key, and rui.pfx files in there.