Recently, I had to install System Center 2012 Configuration Manager R2. I have had no prior experience using this product up to this point, so I thought I would document my notes and findings while giving the installation a whirl.
Prerequisites
- Domain Controller
- DNS Role (could be on a seperate machine)
- DHCP Role (could be on a seperate machine)
- Server 2012 R2 instance for SCCM
- Should be joined to the domain
- 200GB HDD
- 40-50GB for OS
- 150GB for SCCM
- Windows 7 Client for Testing
- Should be joined to the domain
If you wish to use a different Operating System version for your server or client, you can find a list of supported configurations from the following technet article: http://technet.microsoft.com/en-us/library/gg682077.aspx
Here are my tutorials on deploying System Center 2012 R2 Configuration Manager Standalone
- Deploying System Center 2012 R2 Configuration Manager
- Adding a Software Update Point
- Discovery Methods and Boundaries
- Client Web Service Point and Deploying the SCCM Agent
- Deploying Endpoint Protection
Tutorial
- Manually create the System Management Container in Active Directory Domain Services
- From the following technet article: http://technet.microsoft.com/en-us/library/bb632591.aspx
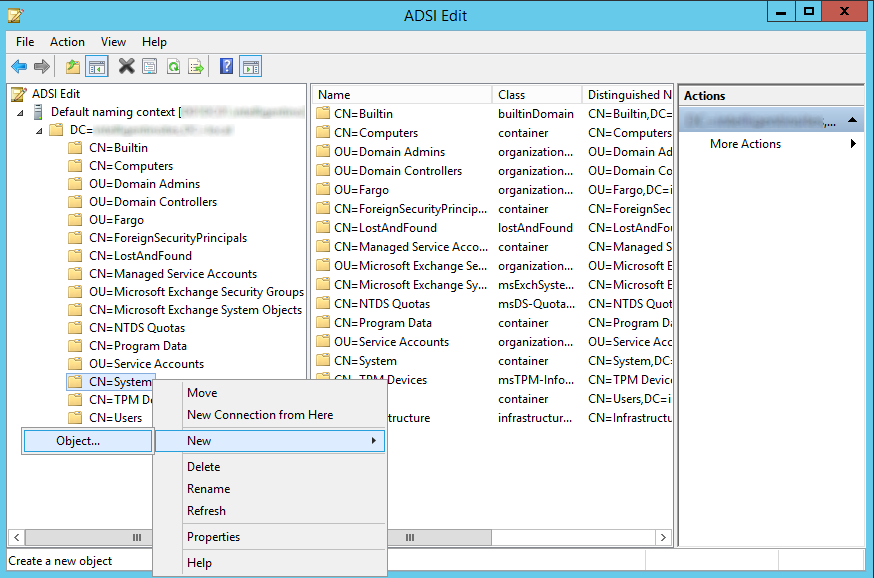
Configuration Manager does not automatically create the System Management container in Active Directory Domain Services when the schema is extended. The container must be created one time for each domain that includes a Configuration Manager primary site server or secondary site server that publishes site information to Active Directory Domain Services.- Log on to one of your domain controllers
- From Server Manager, select Tools -> ADSI Edit
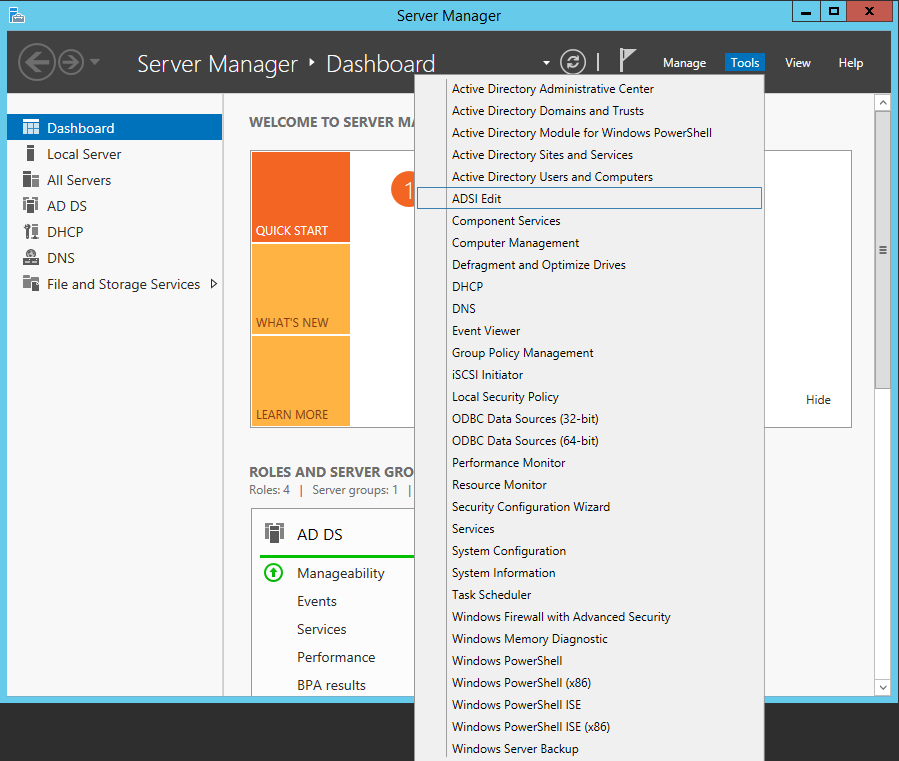
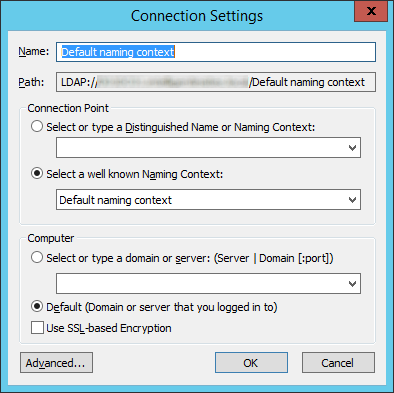
- Right click ADSI Edit and select Connect to...

- Ensure the Connection Point is set as Default naming Context and click OK
- Expand Default naming context <FQDN>, expand <distinguished name>, right-click CN=System, click New, and then click Object
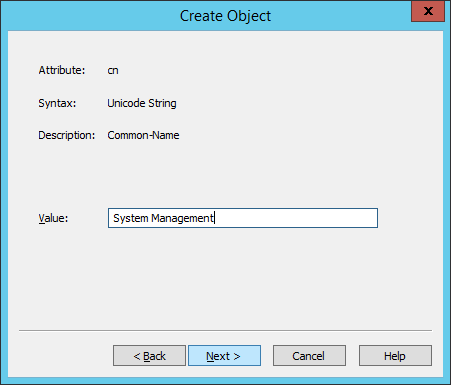
- In the Create Object dialog box, select Container, and then click Next

- In the Value box, type System Management, and then click Next
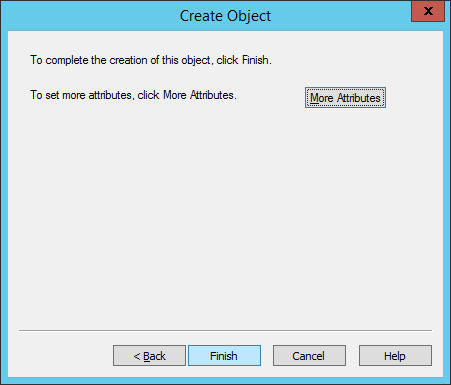
- Click Finish
- From the following technet article: http://technet.microsoft.com/en-us/library/bb632591.aspx
- Add Permission to the System Management Container
- From the following technet article: http://technet.microsoft.com/en-us/library/bb633169.aspx
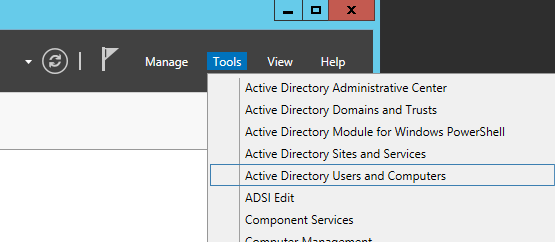
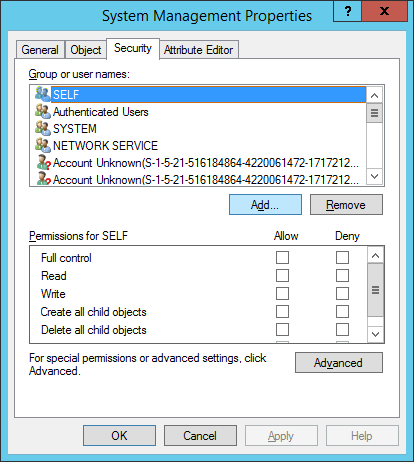
After you have created the System Management container in Active Directory Domain Services, you must grant the site server's computer account the permissions that are required to publish site information to the container.- On your domain controller navigate to Server Manager -> Tools -> Active Directory Users and Computers
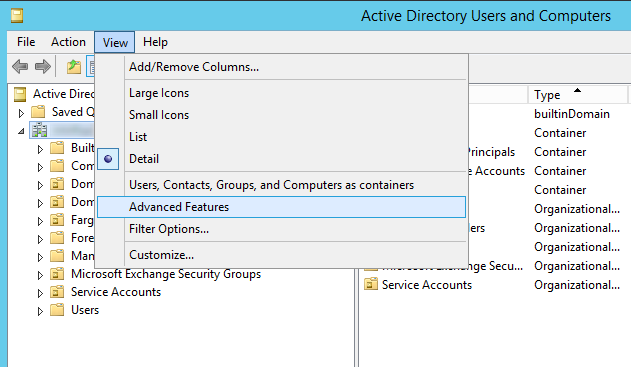
- Click View and select Advanced Features
- Expand your site, System, System Management and select Properties
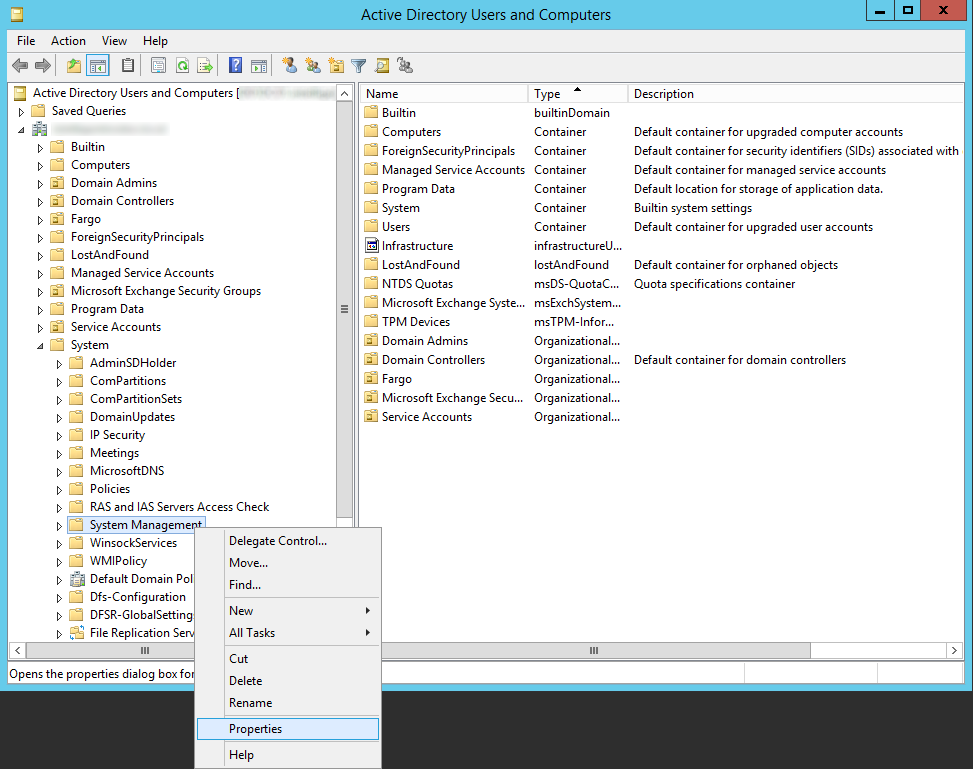
- On the System Management Properties dialog box select the Security Tab
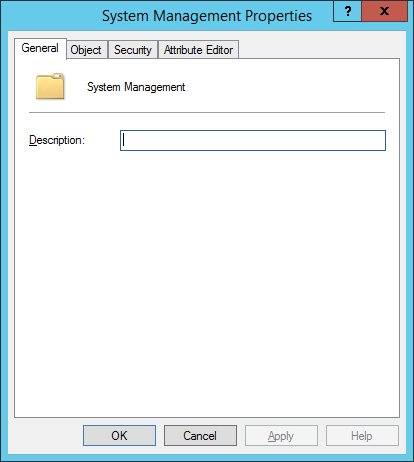
- Click Add.. on the Security Tab
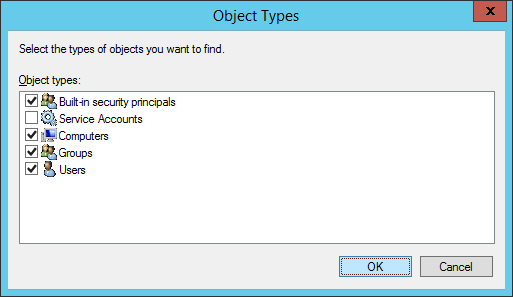
- Click the Object Types... button, check Computers, and click OK
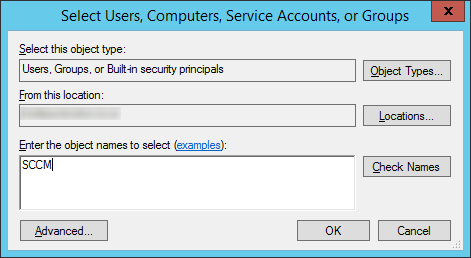
- Type in the computer's name and click OK
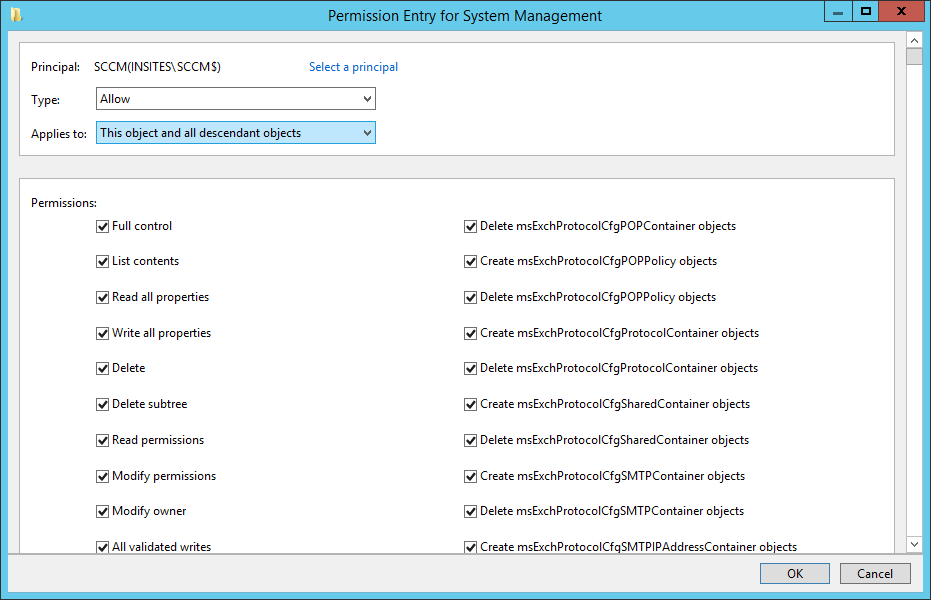
- Check Full Control on the Security Permissions for your SCCM machine
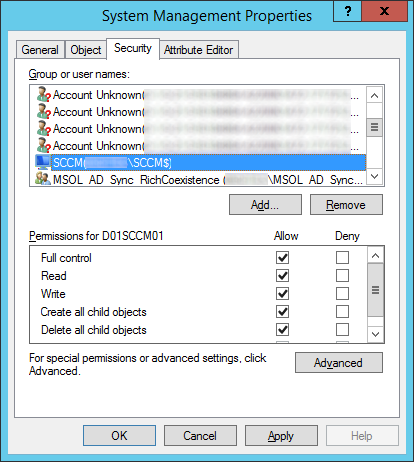
- Click the Advanced button, select the computer account, and click Edit
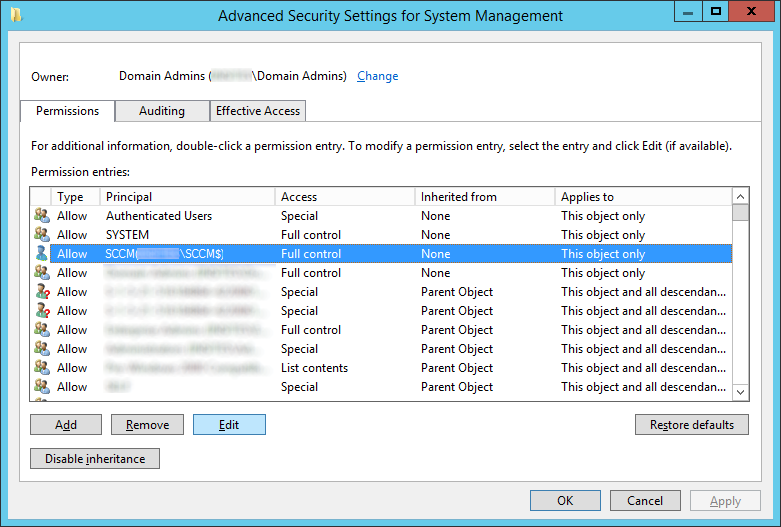
- Select This object and all descendant objects in the Applies to section and click OK
- On your domain controller navigate to Server Manager -> Tools -> Active Directory Users and Computers
- From the following technet article: http://technet.microsoft.com/en-us/library/bb633169.aspx
- Create Service Accounts for System Center in Active Directory
- SCCMDJ
- This service account is actually defined as the Task Sequence Editor Domain Joining Account. The account is used in a task sequence to join a newly imaged computer to a domain. This account is required if you add the step Join Domain or Workgroup to a task sequence, and then select Join a domain. This account can also be configured if you add the step Apply Network Settings to a task sequence, but it is not required.
- SCCMCP
- The Client Push Installation Account is used to connect to computers and install the Configuration Manager client software if you deploy clients by using client push installation. If this account is not specified, the site server account is used to try to install the client software. This account will need to be a local administrator on the machine we want to push software to.
- SCCMNA
- The Network Access Account is used by client computers when they cannot use their local computer account to access content on distribution points. For example, this applies to workgroup clients and computers from untrusted domains. This account might also be used during operating system deployment when the computer installing the operating system does not yet have a computer account on the domain.
- SCCMRA
- The Reporting Services Point Account is used by SQL Server Reporting Services to retrieve the data for Configuration Manager reports from the site database. The Windows user account and password that you specify are encrypted and stored in the SQL Server Reporting Services database.
- NOTE: There are other service accounts that can be created for SCCM other than these as well. You can see a full listing from the following technet article (additional note, descriptions for the service accounts above were copied from this same article): http://technet.microsoft.com/en-us/library/hh427337
- SCCMDJ
- Download a copy of Microsoft System Center 2012 R2 Configuration Manager and Endpoint Protection from the Volume Licensing Center or the Technet Evaluation Center
- This is called System Center 2012 R2 Config Mgr Client Mgmt License in the Volume Licensing Center
- The evaluation copy can be found here: http://technet.microsoft.com/en-us/evalcenter/dn205297.aspx
- NOTE: In this tutorial, I will be using the ISO distributed from the volume licensing center
- Extend the Active Directory schema for Configuration Manager
- Mount/extract the System Center 2012 R2 Configuration Manager media to your SCCM machine
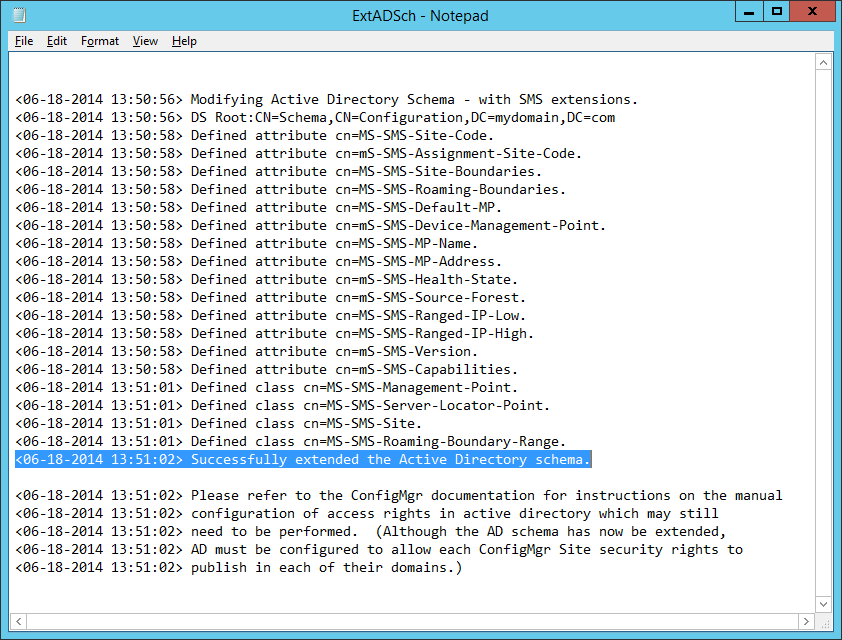
- Navigate to D:\SMSSETUP\BIN\X64 (or where ever your installation media is). Right click on a file called extadsch.exe and right click, Run as Administrator
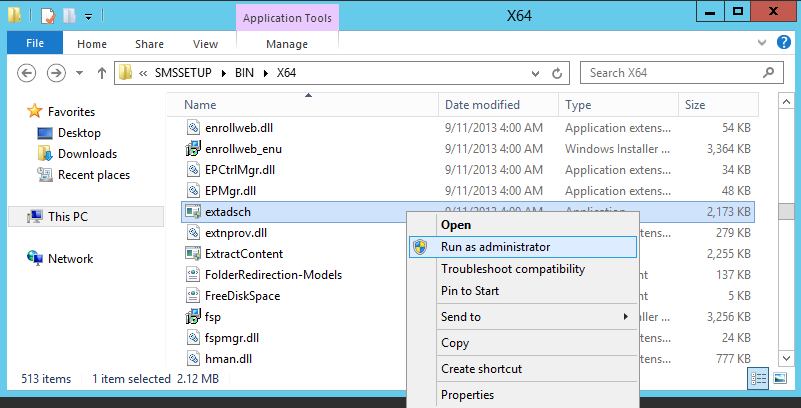
- You will notice a black command prompt popup and then dissappear. Once it has dissappeared, open the following text document: c:\ExtADSch.txt
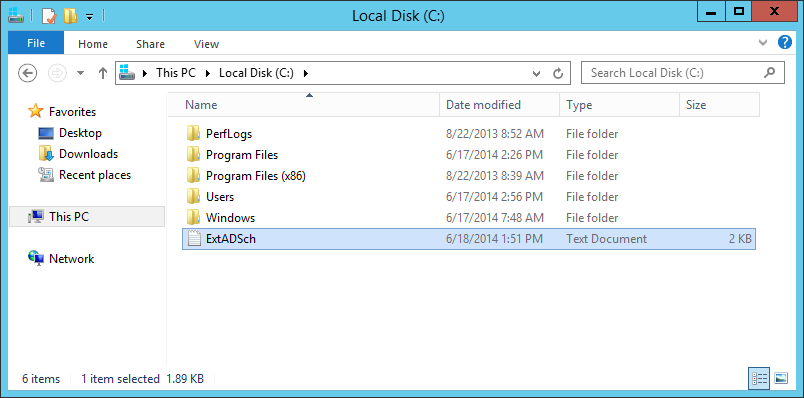
- Verify the schema has been successfully extended
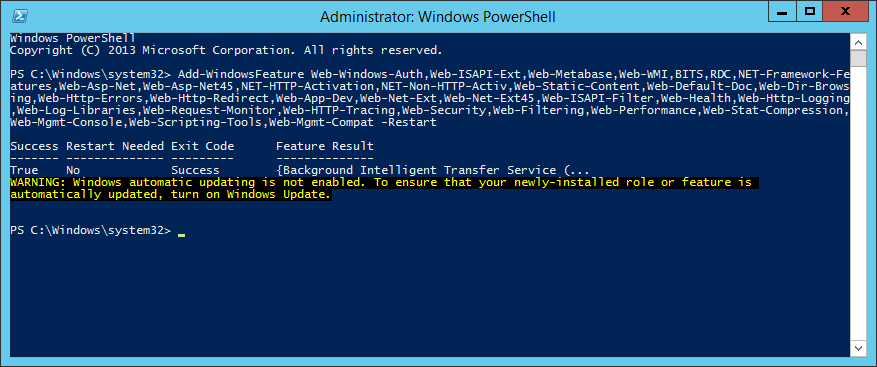
- Install Pre-requisits to System Center Configuration Manager 2012 R2
- Execute the following powershell command
- Add-WindowsFeature Web-Windows-Auth,Web-ISAPI-Ext,Web-Metabase,Web-WMI,BITS,RDC,NET-Framework-Features,Web-Asp-Net,Web-Asp-Net45,NET-HTTP-Activation,NET-Non-HTTP-Activ,Web-Static-Content,Web-Default-Doc,Web-Dir-Browsing,Web-Http-Errors,Web-Http-Redirect,Web-App-Dev,Web-Net-Ext,Web-Net-Ext45,Web-ISAPI-Filter,Web-Health,Web-Http-Logging,Web-Log-Libraries,Web-Request-Monitor,Web-HTTP-Tracing,Web-Security,Web-Filtering,Web-Performance,Web-Stat-Compression,Web-Mgmt-Console,Web-Scripting-Tools,Web-Mgmt-Compat -Restart
- Add-WindowsFeature Web-Windows-Auth,Web-ISAPI-Ext,Web-Metabase,Web-WMI,BITS,RDC,NET-Framework-Features,Web-Asp-Net,Web-Asp-Net45,NET-HTTP-Activation,NET-Non-HTTP-Activ,Web-Static-Content,Web-Default-Doc,Web-Dir-Browsing,Web-Http-Errors,Web-Http-Redirect,Web-App-Dev,Web-Net-Ext,Web-Net-Ext45,Web-ISAPI-Filter,Web-Health,Web-Http-Logging,Web-Log-Libraries,Web-Request-Monitor,Web-HTTP-Tracing,Web-Security,Web-Filtering,Web-Performance,Web-Stat-Compression,Web-Mgmt-Console,Web-Scripting-Tools,Web-Mgmt-Compat -Restart
- Execute the following command
- C:\Windows\Microsoft.NET\Framework64\v4.0.30319\aspnet_regiis.exe -r

- NOTE: Apparently there was/is? a bug in the .NET framework which causes an error later on. Although optional, I would run this just be sure the .NET framework works properly with two different versions installed. You can read more about this command here: http://msdn.microsoft.com/en-US/library/k6h9cz8h(v=vs.80).ASPX
- C:\Windows\Microsoft.NET\Framework64\v4.0.30319\aspnet_regiis.exe -r
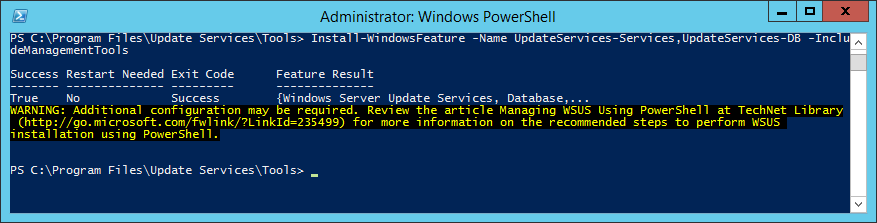
- Install Windows Server Update Services
- Execute the following commands (ensure you change the values to where you want the WSUS definitions and SQL server locations reside)
- Install-WindowsFeature -Name UpdateServices-Services,UpdateServices-DB -IncludeManagementTools
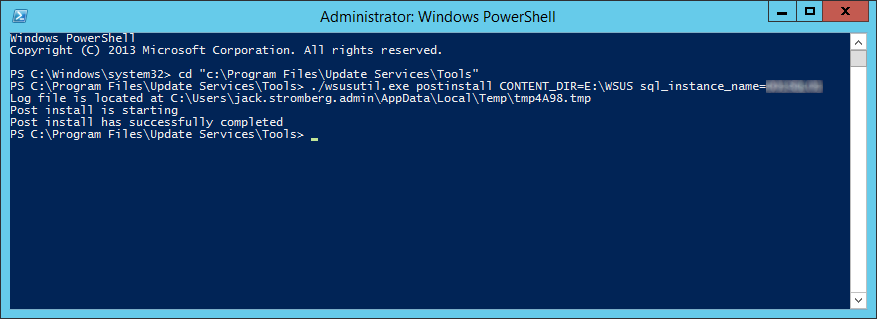
- cd "c:\Program Files\Update Services\Tools"
- ./wsusutil.exe postinstall CONTENT_DIR=E:\WSUS sql_instance_name=SQLSERVERNAME
- Install-WindowsFeature -Name UpdateServices-Services,UpdateServices-DB -IncludeManagementTools
- Execute the following commands (ensure you change the values to where you want the WSUS definitions and SQL server locations reside)
- Install User State Migration Tool (USMT)
- Download a copy of the User State Migration Tool (USMT) from Microsoft's website: http://go.microsoft.com/fwlink/?LinkId=301570
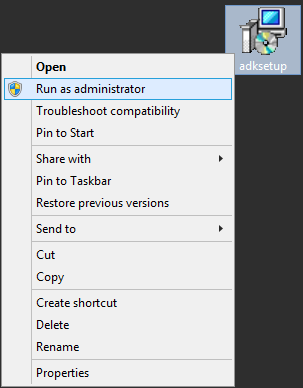
- Right click and run adksetup.exe as an administrator (Click Yes if prompted by UAC)
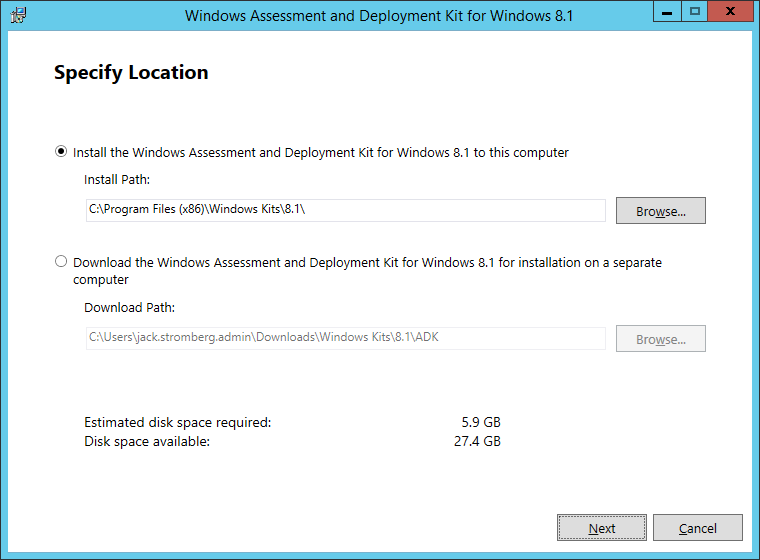
- Click Next on the Specify Location screen
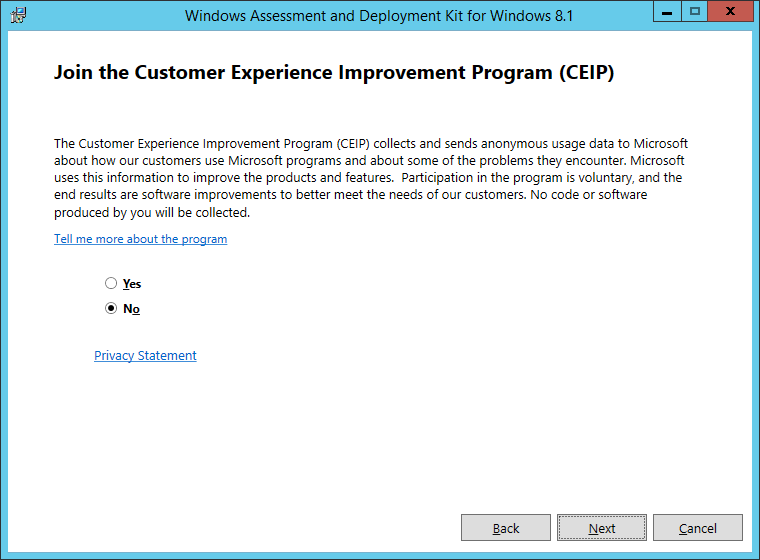
- Click Next on the Join the Customer Experience Imporovement Program (CEIP) screen
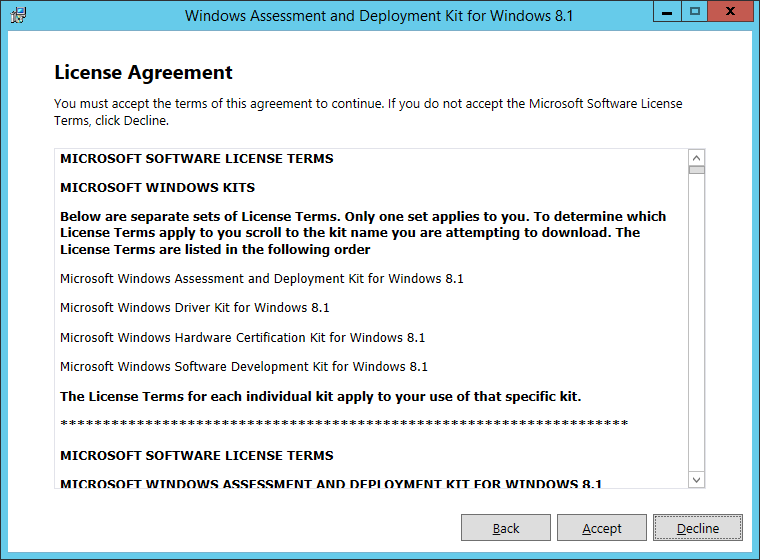
- Click Accept on the License Agreenment screen
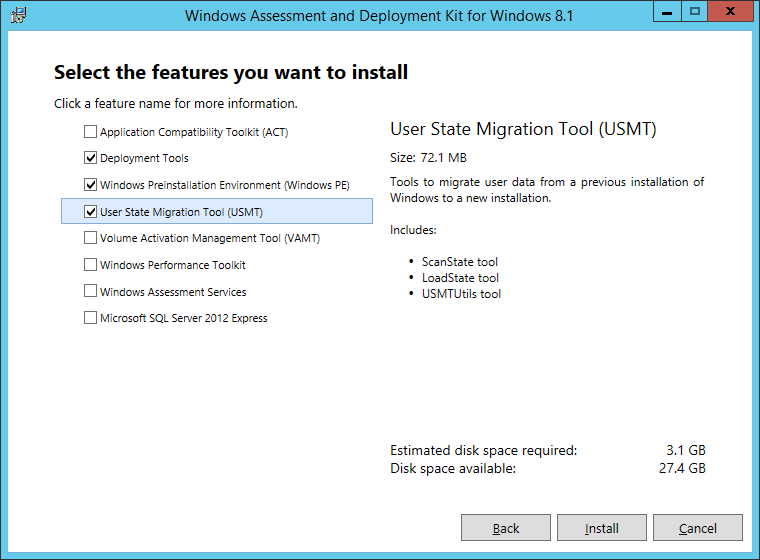
- Check Deployment Tools, Windows Preinstallation Environment (Windows PE), and User State Migration Tool (USMT), and then click Install
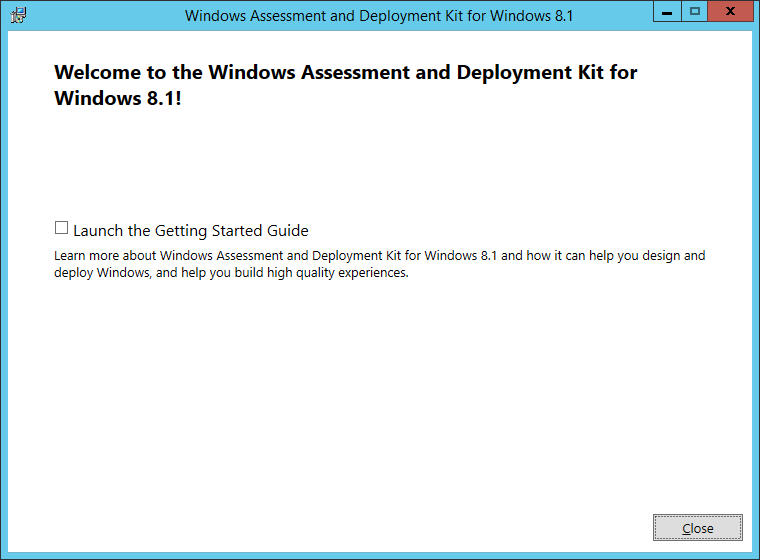
- Click Close on the Welcome to Windows Assessment and Deployment Kit for Windows 8.1
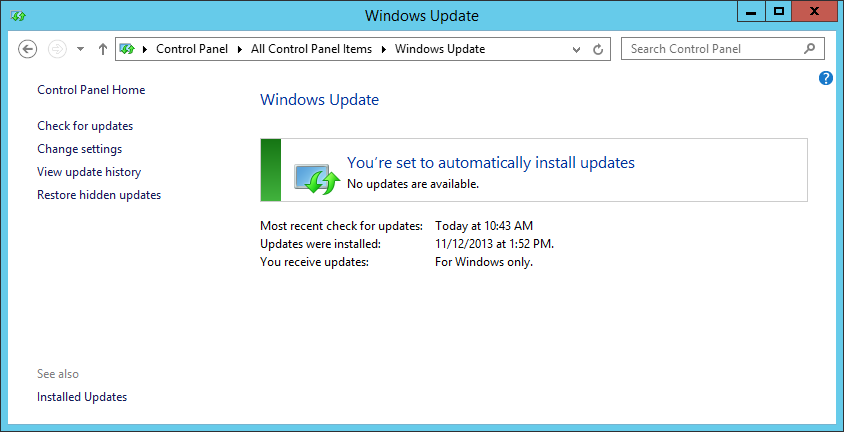
- Run Windows Updates to ensure you are fully patched
- Execute the following powershell command
- Install and Configure SQL Server
- Install SQL Server
- This step can vary on how you want to deploy SQL server. In this particular environment, a SQL cluster had already been deployed in the organization, so I will take advantage of that. However, in smaller environments, you can install the SQL Service on the same machine. You can find a compatibility matrix and which versions of SQL Server can be installed: http://technet.microsoft.com/en-us/library/gg682077.aspx#BKMK_SupConfigSQLDBconfig
- If you have a remote SQL server, make sure you add the SCCM computer account as a local administrator of the SQL server. More information on how to do that can be found in this guide: http://jackstromberg.com/2014/06/sccm-2012-r2-site-server-computer-account-administrative-rights-failed/
- Install SQL Server
- Install System Center 2012 Configuration Manager R2
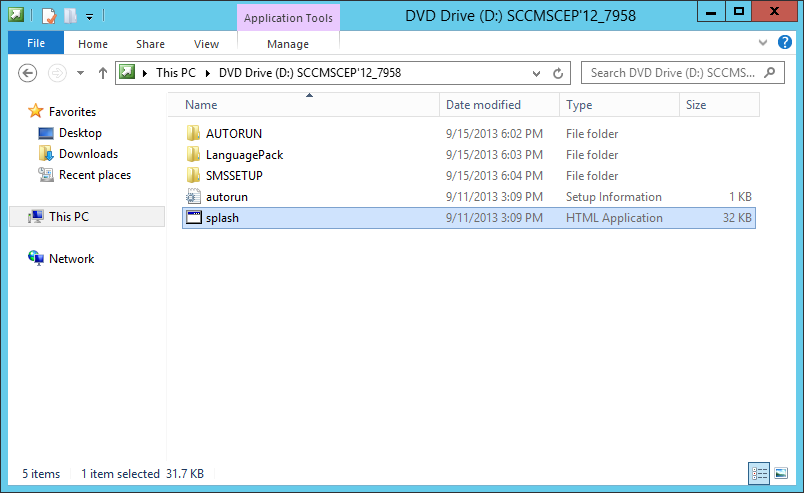
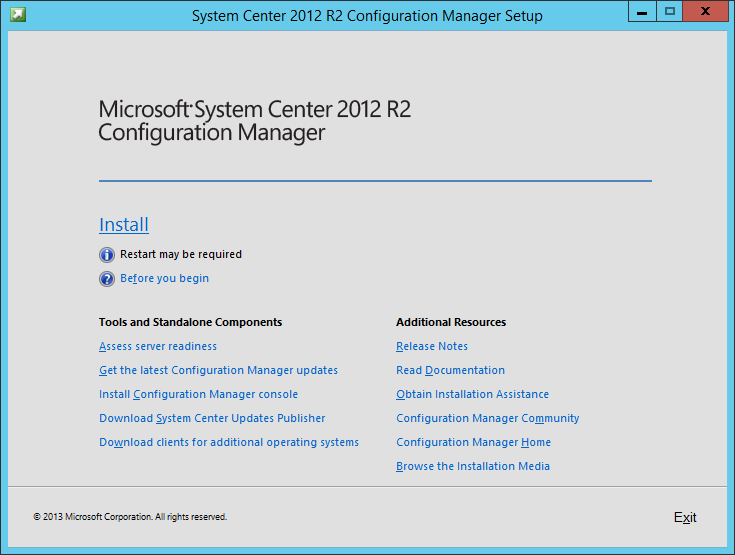
- Navigate to your installation media and double click on splash.hta to launch the installer
- NOTE: If you are doing an offline install (no internet), run the setupdl.exe installer from your installation media (example: D:\SMSSETUP\BIN\X64\setupdl.exe)
- Click on Install (Click Yes if prompted by UAC)
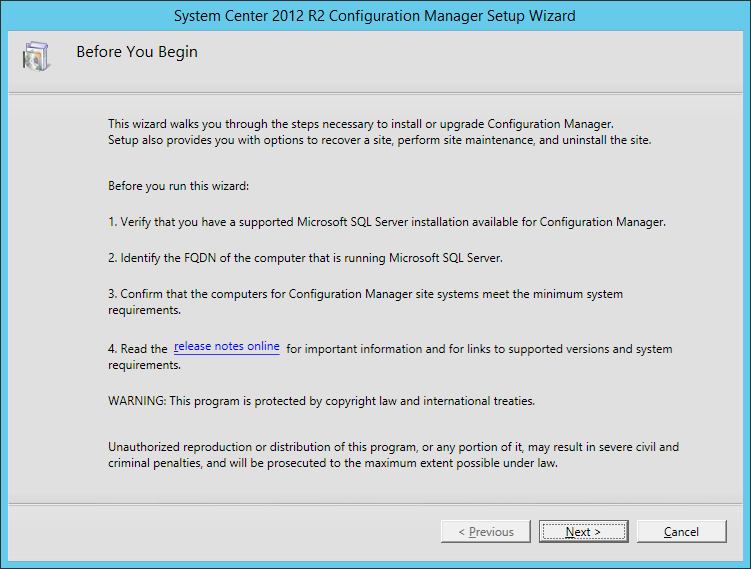
- Click Next >
- Ensure Install a Configuration Manager primary site is checked and click Next >

- Enter your license key or hit Install the evaluation edition of this product and click Next >

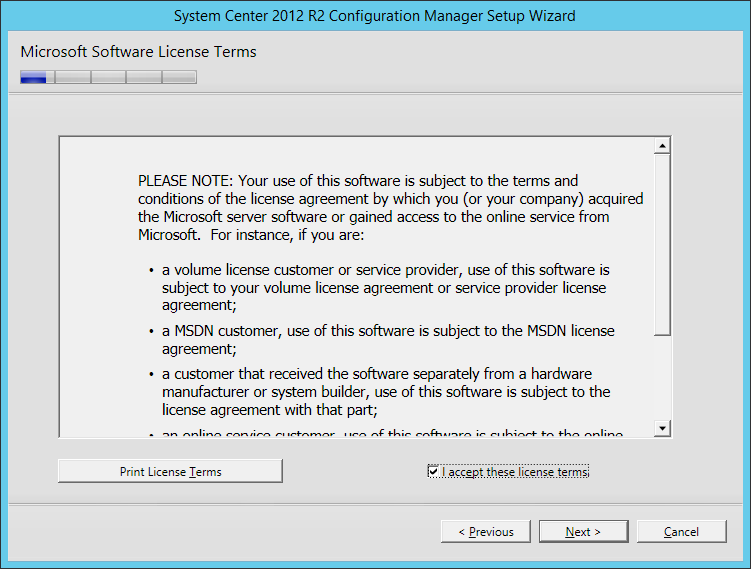
- Accept the license agreemt for the Microsoft Software License Terms
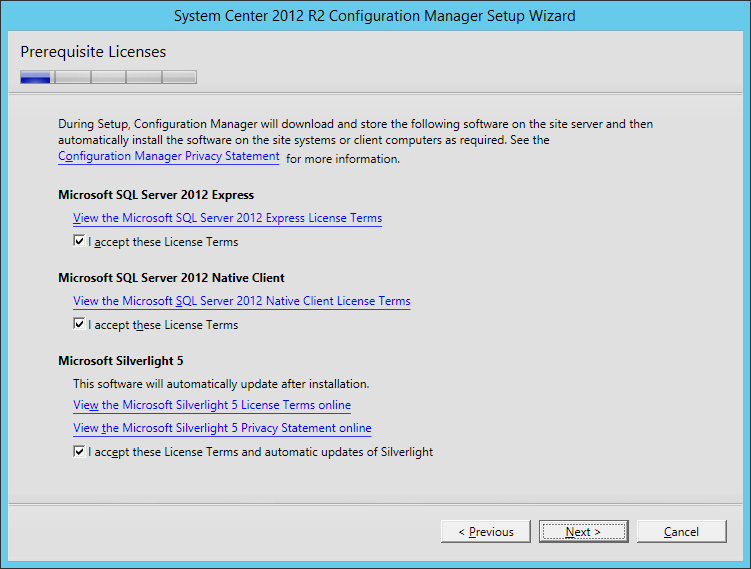
- Accept the license agreements for SQL Server 2012 Express, SQL Server 2012 Native Client, and Silverlight, then click Next >
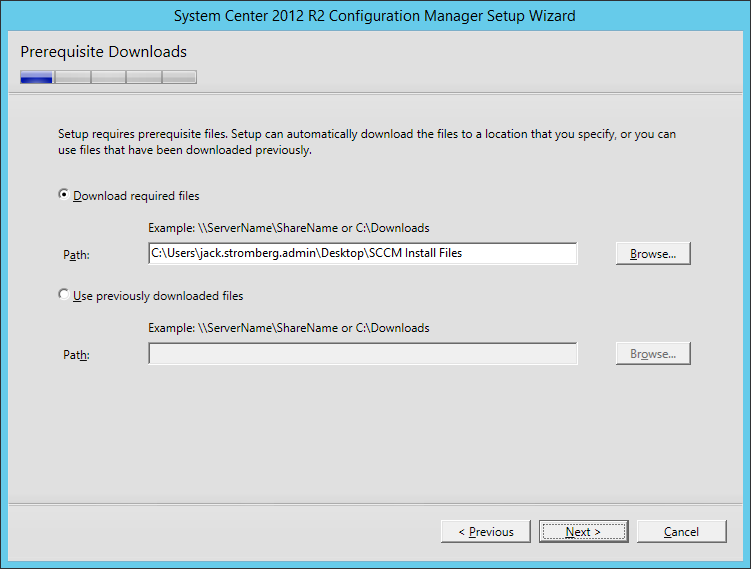
- Check Download required files and put them on your desktop
- This will grab the latest copy of SCCM. If you need to do an offline installation, you can manually run the offline installer from your installation media (in my case: D:\SMSSETUP\BIN\X64\setupdl.exe).
- This will grab the latest copy of SCCM. If you need to do an offline installation, you can manually run the offline installer from your installation media (in my case: D:\SMSSETUP\BIN\X64\setupdl.exe).
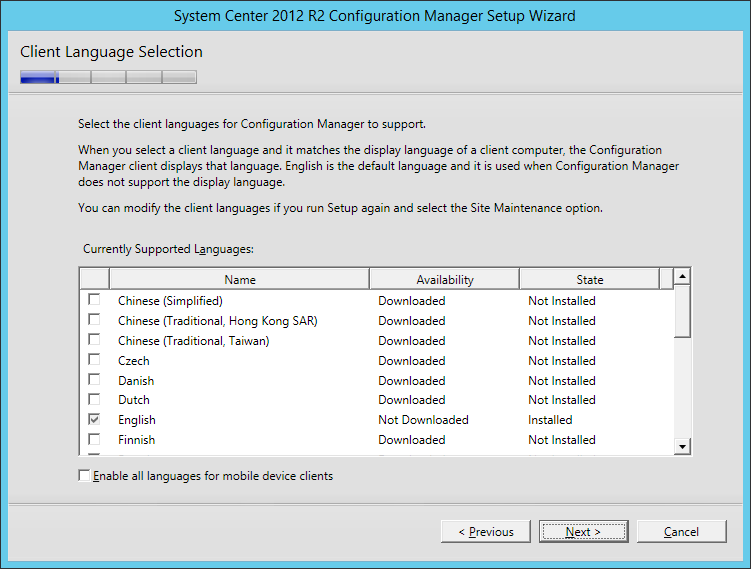
- Select your language to run System Center server in and then click Next >

- Select your languages to support on your client devices and click Next >
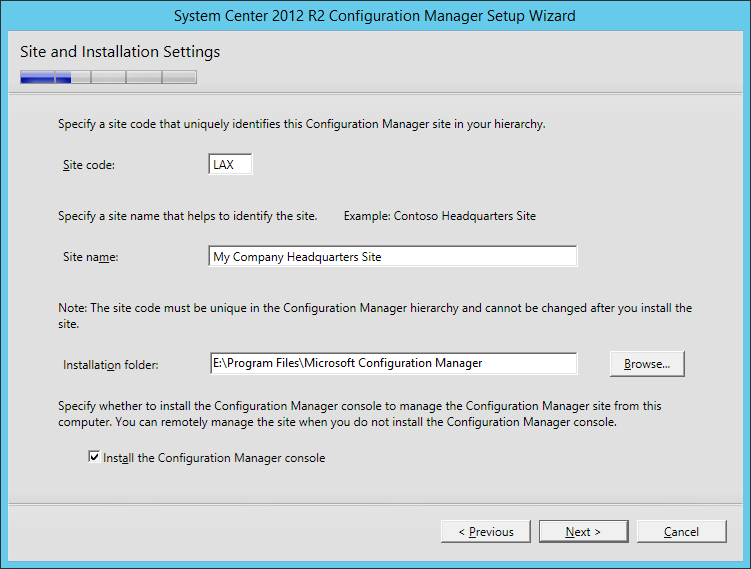
- Set a site code (I would use an airport code if you only have one office in each office location), enter your site name, and then change the installation folder to use your second partition. Once done, click Next >
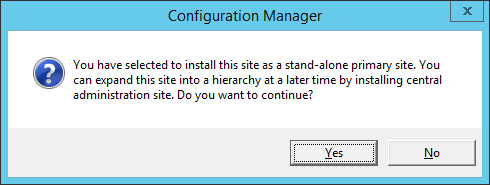
- Check Install the primary site as a stand-alone site and click Next >
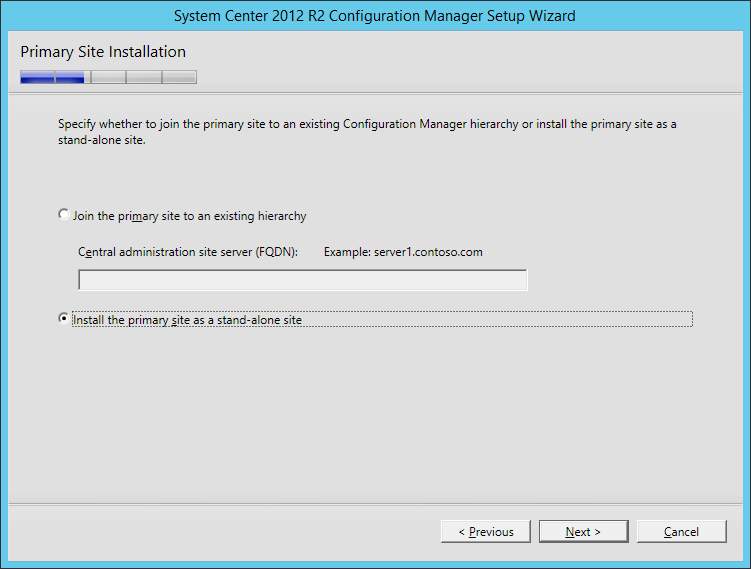
- Click Yes on the Configuration Manager dialog box that explains you can configure SCCM to be in a heirrachy to scale at a later time
- Enter in the SQL Server Name (FQDN) to your database server and click Next >
- If you installed the SQL Server service on this same machine, it should be the FQDN to your SCCM machine. If you have a SQL Server you would like to point to, enter in the FQDN of that server.
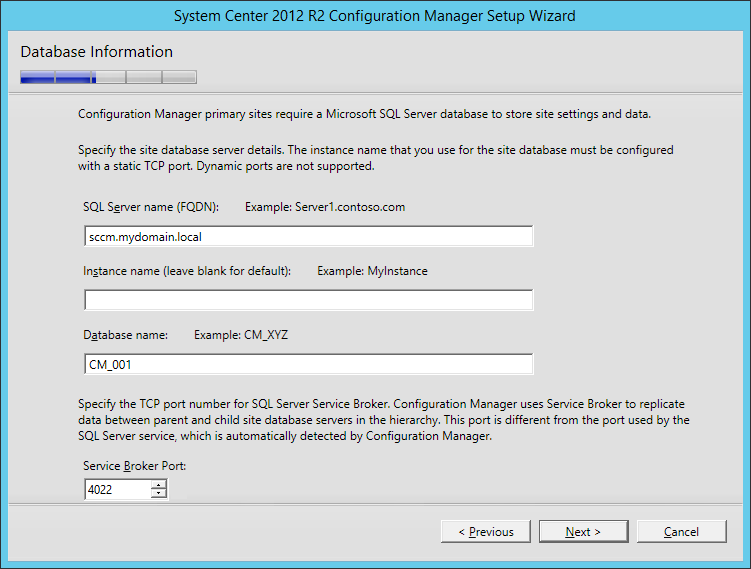
- If you installed the SQL Server service on this same machine, it should be the FQDN to your SCCM machine. If you have a SQL Server you would like to point to, enter in the FQDN of that server.
- Click Next > on the Database Information screen

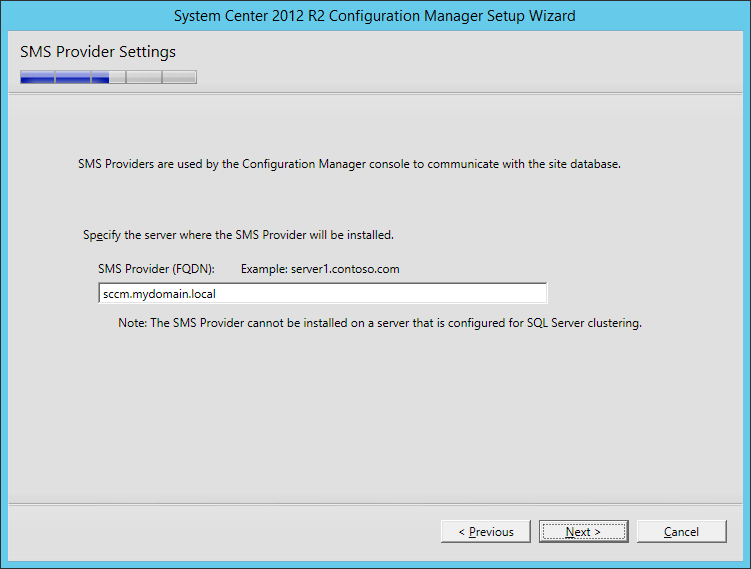
- Click Next > on the SMS Provider Settings
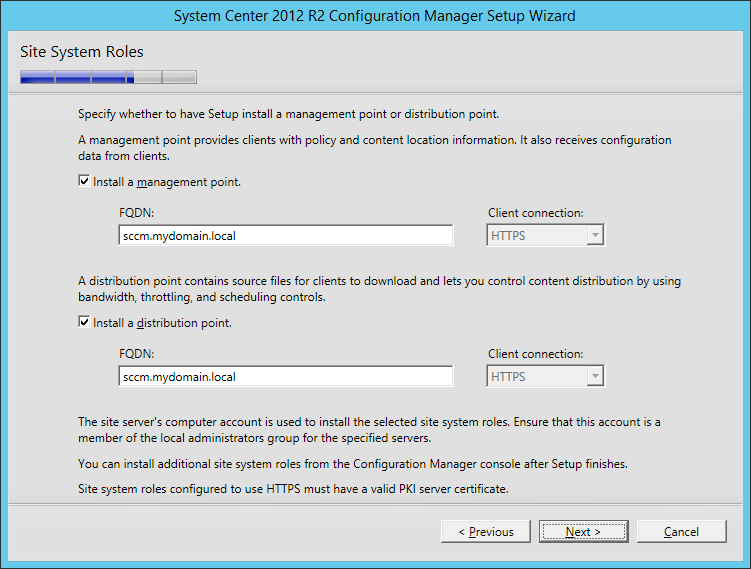
- Check Configure the communication method on each site system role and then click Next > if you do not have PKI setup. If you have a PKI implemented in your environment, you may go ahead and choose All site system roles accept only HTTPS communication from clients.
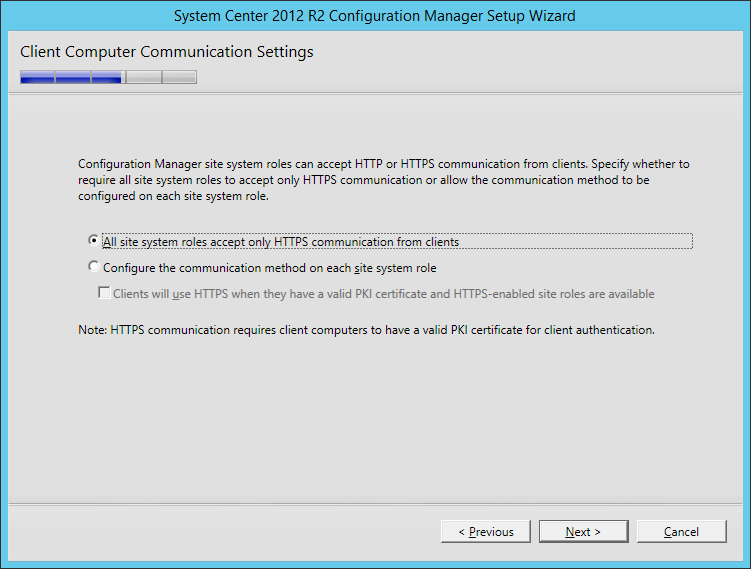
- Click Yes to continue if you selected All site system roles accept only HTTPS communication from clients
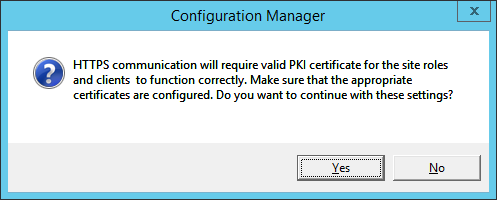
- Click Yes to continue if you selected All site system roles accept only HTTPS communication from clients
- Ensure Install a management point and Install a distribution point are checked and click Next >
- Click Next > on the Customer Experience Improvement Program

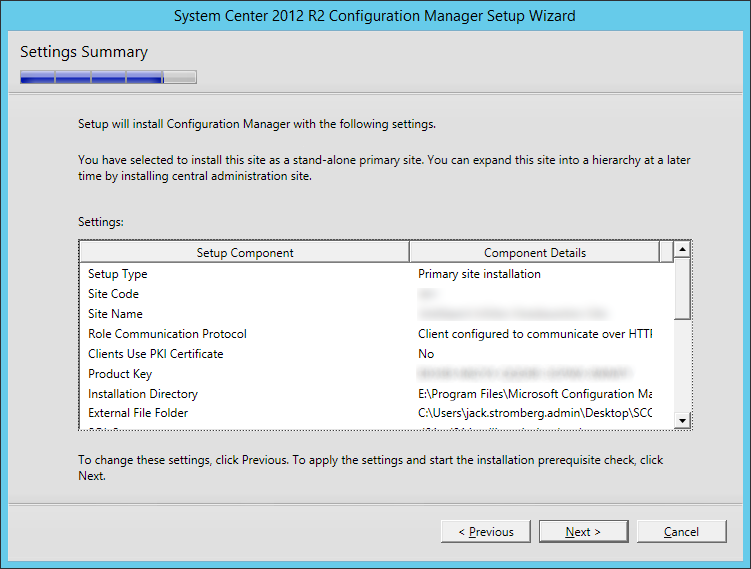
- Verify the settings you chose on the Settings Summary and then click Next >
- Click Begin Install on the Prerequisite Check once you have passed all of the potential issues. In this case, I have a few that are false possitives, so I am going to go ahead with the install.

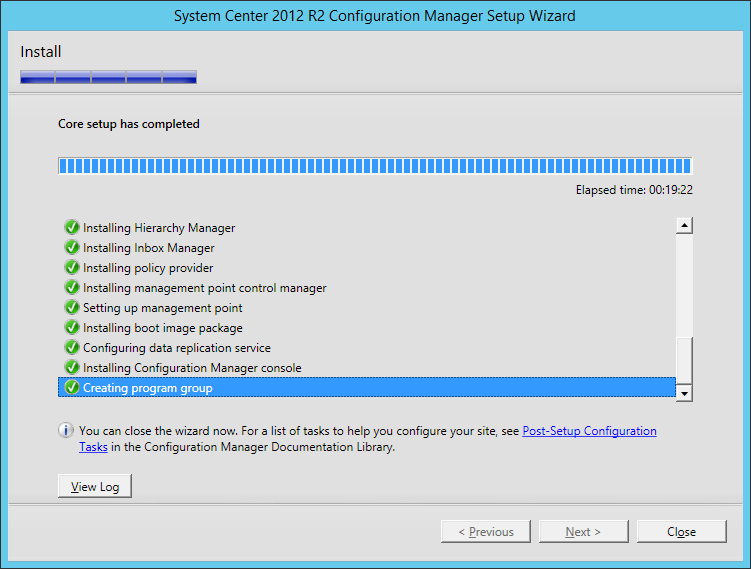
- Once done installing, hit Close
- Navigate to your installation media and double click on splash.hta to launch the installer
Try opening up the System Center 2012 R2 Configuration manager console. If it opens, congrats on your newly deployed System Center! 🙂