Category Archives: Linux

sh: /usr/bin/vmware-config-tools.pl: Permission denied VMware Tools Linux

Symptom: You see the following permissions error when trying to install VMware Tools on a Linux OS regardless if you are running as su or root:

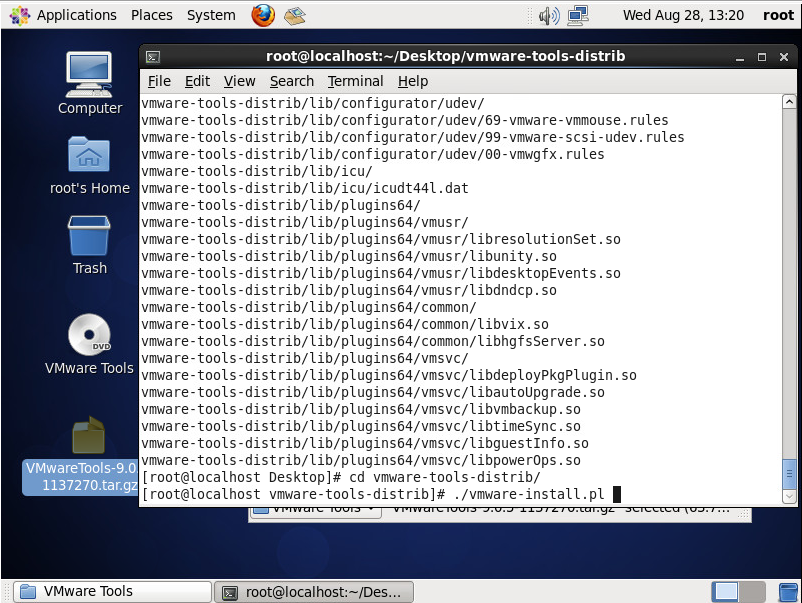
[root@localhost vmware-tools-distrib]# ./vmware-install.pl
Creating a new VMware Tools installer database using the tar4 format.

Installing VMware Tools.

In which directory do you want to install the binary files?
[/usr/bin]

What is the directory that contains the init directories (rc0.d/ to rc6.d/)?
[/etc/rc.d]

What is the directory that contains the init scripts?
[/etc/rc.d/init.d]

In which directory do you want to install the daemon files?
[/usr/sbin]

In which directory do you want to install the library files?
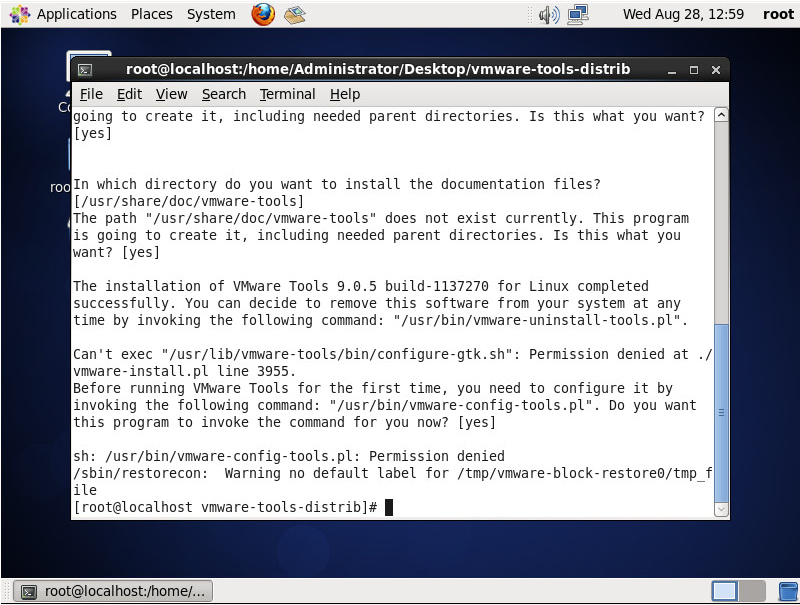
[/usr/lib/vmware-tools]

The path "/usr/lib/vmware-tools" does not exist currently. This program is
going to create it, including needed parent directories. Is this what you want?
[yes]

In which directory do you want to install the documentation files?
[/usr/share/doc/vmware-tools]
The path "/usr/share/doc/vmware-tools" does not exist currently. This program
is going to create it, including needed parent directories. Is this what you
want? [yes]

The installation of VMware Tools 9.0.5 build-1137270 for Linux completed
successfully. You can decide to remove this software from your system at any
time by invoking the following command: "/usr/bin/vmware-uninstall-tools.pl".

Can't exec "/usr/lib/vmware-tools/bin/configure-gtk.sh": Permission denied at ./vmware-install.pl line 3955.
Before running VMware Tools for the first time, you need to configure it by
invoking the following command: "/usr/bin/vmware-config-tools.pl". Do you want
this program to invoke the command for you now? [yes]

sh: /usr/bin/vmware-config-tools.pl: Permission denied
/sbin/restorecon:  Warning no default label for /tmp/vmware-block-restore0/tmp_file
[root@localhost vmware-tools-distrib]#

CentOS VMware Tools Permission Error

Solution: You need to extract the files from the tarball when installing the guest tools via the tar command rather than the build in Archive Manager installed with the OS.

  1. Mount the VMware Tools to the VM
  2. Copy the VMware Tools tarball to the desktop of the Linux OS
    Copy VMwareTools
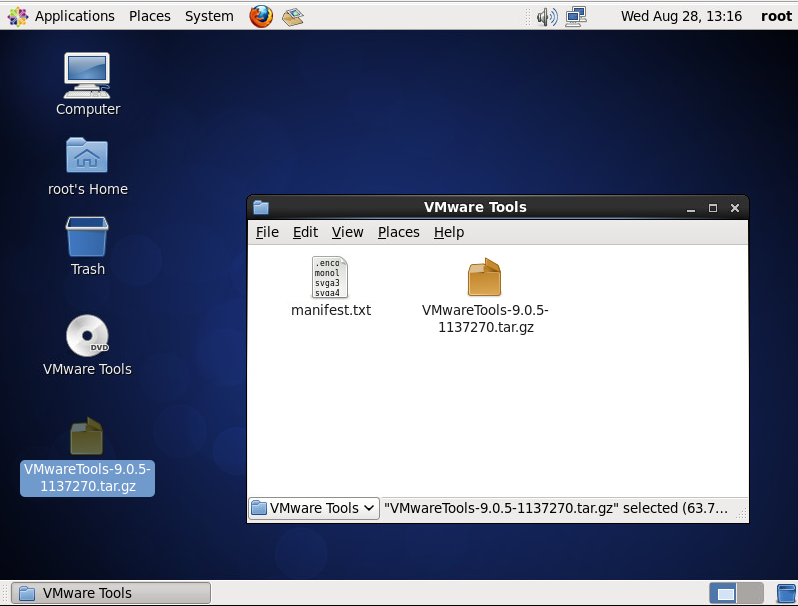
  3. Execute the following command to extract the tar's contents
    1. tar -zxvf VMwareTools-9.0.5-1137270.tar.gz
  4. Change directories to the vmware-tools-distrib that was just extracted from the tarball and execute the following commands to begin the installation
    1. cd vmware-tools-distrib
    2. ./vmware-install.pl
      vmware-install.pl

Setting up Java Runtime Environment 7 (JRE7) on Ubuntu 12.04 via Command Line

Need Java to run an application on your Linux workstation/server?  Follow the steps below via the terminal to install the latest version of Java.

  1. Head over to http://www.java.com/en/download/manual.jsp to find the latest Linux download from your client machine.
  2. Look at the link for the latest Java release for Linux.  Since we are using Ubuntu we do not need the RPM release.  In this case, I will be downloading Java 1.7.0_25-b15 for Linux x64.
    1. The download url is http://javadl.sun.com/webapps/download/AutoDL?BundleId=78697
  3. Head over to the Linux terminal on the machine you want to install Java on, and execute the following command to download the files from Java's website
    1. wget http://javadl.sun.com/webapps/download/AutoDL?BundleId=78697
  4. Extract the tarball.  Since wget cannot pull the filename like a modern webrbowser, you will have to reference the weird filename AutoDL?BundleId=78697
    1. tar -xvzf AutoDL?BundleId=78697
  5. Find out what the name of the folder is of the java files you extracted by listing the files in the current directory.  At the time of writing this, the extracted folder I had was jre1.7.0_25, so I will continue to reference that moving forward.
    1. ls
  6. Create a folder in the usr folder for Java to reside.
    1. sudo mkdir /usr/java/
  7. Move the files we extracted Java files to the java folder
    1. sudo mv jre1.7.0_25/ /usr/java/
  8. Execute the following to enable the Java Runtime Environment
    1. sudo update-alternatives --install /usr/bin/java java /usr/java/jre1.7.0_25/bin/java 1
  9. Execute the following command to set the default Java to use
    1. sudo update-alternatives --config java
  10. Execute the following command to verify that the latest version of java is installed
    1. java -version
  11. Remove the tarball we downloaded from Java's website to free up some space
    1. rm ~/AutoDL?BundleId=78697

Install Self-Signed CA Certificates on Ubuntu 12.04 via Command Line

Copy your .crt files to /usr/share/ca-certificates

Run: sudo update-ca-certificates

Hit yes to trust the certificates in the wizard (text based for CLI), and away you go! 🙂

How to enable and disable apache2 modules in Linux

a2enmod modulename - this will enable a module

a2dismod modulename - this will disable a module


Once you have made the changes, execute the service apache2 restart command and away you go!

How To Install VMWare Tools v4 on Ubuntu 12.04 LTS Server

Today I was faced the challenge of installing VMware Tools on a Ubuntu server via command line.  I stumbled accross a step-by-step tutorial on the exact steps to accomplish this task.  I am reposting for archival purposes, but all credit goes to @justinschier from http://ghosttx.com/2012/03/how-to-install-vmware-tools-v4-on-ubuntu-11-10-server/

Written: March 13, 2012
Last Updated: April 27, 2012
Tested With: Ubuntu 12.04 LTS Server, Ubuntu 11.10 Server

All the guides I found on the Internet, including VMWare’s website were outdated in some way, so I decided to write a guide of my own. I just went through these steps from start to finish on a fresh server and had no problems.

  1. Use Install VMWare Tools option in VMWare Client/Console to attach media
  2. Update the server
    sudo apt-get update
    sudo apt-get upgrade
  3. Create the mount point
    sudo mkdir -p /media/cdrom
  4. Mount the ISO
    sudo mount /dev/cdrom /media/cdrom

    You should see the message: mount: block device /dev/sr0 is write-protected, mounting read-only

  5. Change Directory
    cd /media/cdrom
  6. Copy the tar file to your /tmp directory
    sudo cp VM*.tar.gz /tmp
  7. Install Build tools if necessary
    sudo apt-get install linux-headers-server build-essential
  8. Change Directory
    cd /tmp
  9. Unmount the ISO
    sudo umount /media/cdrom
  10. Expand the tar
    sudo tar xzvf VM*.tar.gz
  11. Change Directory
    cd vmware-tools-distrib
  12. To prevent a potential error in the install script on Ubuntu 11.10, create a special directory
    Unable to create symlink “/usr/lib64/libvmcf.so” pointing to file ”/usr/lib/vmware-tools/lib64/libvmcf.so/libvmcf.so”.

    sudo mkdir /usr/lib64
  13. Run the Install Script. The -d flag automatically answers the default to all questions. To customize it, just omit the -d.
    sudo ./vmware-install.pl -d
  14. Reboot
    sudo reboot

Let me know if this worked for you!

Also, please follow me on Twitter: @justinschier

Show hard drive size in Linux via command line

If you have ever wanted to view how big your hard drive/partition sizes are in Linux, but only have access to the command line interface, here is the command to do it:
df
df -H (This will show the partition sizes in MB, GB, TB, etc.)
fdisk -l | grep Disk (This will show the physical disks and their corresponding sizes)

Setting Static IP in Linux

To setup a static IP in ubuntu, edit your networking settings file.

Here is an example of how to do it:

Open /etc/network/interfaces:

Use these configurations:


auto lo
iface lo inet loopback

auto eth0
iface eth0 inet static
address 192.168.0.10
network 192.168.0.0
netmask 255.255.255.0
broadcast 192.168.0.255
gateway 192.168.0.1

DHCP Address Configuration:


auto lo
iface lo inet loopback

auto eth0
iface eth0 inet dhcp

Then restart the service: /etc/init.d/networking restart (Make sure you are running with admin privileges when restarting 🙂 )

Generating a SSL Cert with Apache & openSSL

Registering a SSL cert is always kind of a mystery for me. You always have to use a crazy long command line command and the wizard always asks funky questions. Hopefully this tutorial will help clarify the process.

First run the following command:

openssl req -new -newkey rsa:2048 -nodes -keyout yourdomain.key -out yourdomain.csr

And what the command does is it is generating a 256bit SSL certificate. RSA:1024 would generate a 128bit certificate. When the process has finished, you will have yourdomain.key and yourdomain.csr. yourdomain.key should NOT be distributed. This is your key to decrypt your traffic. The CSR should be presented to your CA (certificate authority).

As far as the generation process goes, you will be presented with a few questions:
Country: The two-letter International Organization for Standardization (ISO) format country code for where your organization is legally registered. This would be US for the United States.
State or Province: Name of the state or province where your organization is located. Write out the name in full.
City or Locality: Name of the city where your organization is registered/located. Write out the name in full.
Organization Unit: This may be left blank. However, if you are a company, you may want to put your company nickname here. I.e. Vooba instead of Vooba LLC
Organization: Vooba LLC
Passphrase: Depending on your registrar, you can/can't use this. If you can't use it, I recommend finding a different company. Use a strong password here.
Common Name: The fully-qualified domain name (FQDN), or URL, you want to secure. If you are not using a wild-card domain (*.yourdomain.com), use www.yourdomain.com. This will allow www.yourdomain.com and yourdomain.com to be secured. If you only secure yourdomain.com, www.yourdomain.com will be invalid.

Hope this helps and clarifies the process!

Errors From Package Manager in Ubuntu 11.10

Getting the following message from Package Manager in Ubuntu 11.10?

Requires installation of untrusted packages
The action would require the installation of packages from not authenticated sources.

And when you click on the Details dropdown it shows all of the packages that need to downloaded?

Run the following commands:

cd /var/lib/apt
sudo mv lists lists.old
sudo mkdir -p lists/partial
sudo apt-get update

These commands will save a backup of the old lists and then create a new lists folder.

More information can be found here.